Navigation
This article applies to all versions of Profile Management: 2411, 2402 LTSR, 2203 LTSR, 1912 LTSR, etc.
- Change Log
- Planning:
- Create User Store (File Share)
- GPO ADMX Policy Template
- Group Policy Settings
- Mandatory Profile – Citrix Method
- Redirected Profile Folders (Folder Redirection)
- Verify Profile Management
- Troubleshooting
💡 = Recently Updated
Change Log
- 2025 Feb 8 – Updated Versions section for version 2402 LTSR CU2
- 2024 Dec 7 – App Access Control updated for 2411
- 2024 Dec 4 – Updated Versions section for version 2411
- 2024 Aug 4 – New features listed in Profile Container section
- 2024 April 18 – added link to Citrix Tech Zone Deployment Guide: Citrix Profile Management – OneDrive Container
- 2024 April 17 – Updated Versions section for version 2402 LTSR
- Added link to Enable roaming for the new Microsoft Teams at Citrix Docs
- 2023 Dec 23 – Profile Container – updated screenshots for 2311
- 2023 Dec 18 – added info from CTX585013 Microsoft Teams 2.1 supported for VDI/DaaS.
- 2023 Sept 14 – Profile Container auto-expansion
- 2024 April 30 – Updated Versions section for version 1912 LTSR CU9
- 2023 June 2 – added Enable and configure user-level policy settings at Citrix Docs
- 2023 Apr 4 – App Access Control – added GUI Rule Generate from WEM Cloud
- 2023 Apr 1 – App Access Control
- 2023 Mar 21 – added info from CTX489573 Office 365 – Account Error: Sorry, we can’t get to your account right now
Planning
Profile Management Versions
Profile Management is included with the installation of Virtual Delivery Agent. To upgrade Profile Management, simply upgrade your VDA software. Here are the currently supported versions of VDA:
- VDA Current Release 2411
- VDA Long Term Service Release (LTSR) 2402 CU2
- VDA Long Term Service Release (LTSR) 2203 Cumulative Update 5 (CU6)
- VDA Long Term Service Release (LTSR) 1912 Cumulative Update 9 (CU9)
Or you can download the individual Profile Management component and install/upgrade it separately from the VDA software. You can even install it on non-VDA machines (e.g., PCs accessed by licensed Citrix users).
For LTSR VDAs, for LTSR support compliance, only install the Profile Management version that is included with your VDA installer. Don’t upgrade to a newer Current Release version.
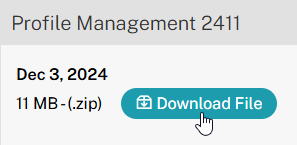
The latest release of Citrix Profile Management is version 2411, which can be downloaded from Citrix Virtual Apps and Desktops 2411. To find it, click Components that are on the product ISO but also packaged separately.

Profile Management Configuration Options
Profile Management consists of a Service (installed on the VDAs), a file share, and configuration settings.
There are four methods of delivering configuration settings to the Citrix Profile Management service:
- Microsoft group policy
- Profile Management GPO settings are provided by an ADMX file
- Citrix Policies
- Either in Citrix Studio > Policies node
- Or in a Group Policy Object Editor > Citrix Policy (assuming Citrix Group Policy Management Plug-in is installed)
- Citrix Workspace Environment Management (WEM)
- UPMPolicyDefaults.ini file
If a UPM setting is not configured in GPO, Citrix Policy, or WEM, then the default setting in the UPMPolicyDefaults.ini file takes effect. The .ini file is located in C:\Program Files\Citrix\User Profile Manager on every machine that has Profile Management service installed.
Microsoft Group Policy (ADMX file) is probably the most reliable method of delivering configuration settings to the Profile Management services. This method uses the familiar Group Policy registry framework. Just copy the Profile Management ADMX files to PolicyDefinitions and start configuring. The configuration instructions in this article use the GPO ADMX method.
The Citrix Policies configuration method requires Citrix Studio, or Citrix Group Policy Management Plug-in. On the Profile Management service side, only VDAs can read the Citrix Policies settings.
- Citrix Policies has settings for Folder Redirection. If you use Citrix Policy to configure Folder Redirection, then the Folder Redirection settings only apply to VDAs that can read Citrix Policies. To apply to Folder Redirection to more than just VDAs, configure Folder Redirection using normal Microsoft Group Policy as detailed below.
- If you’re going to use Microsoft Group Policy to configure Folder Redirection, then you might as well use Microsoft Group Policy to also configure Citrix Profile Management.
Citrix Workspace Environment Management can also deliver configuration settings to the Profile Management services. This option requires the WEM Agent to pull down the settings from the WEM Brokers and apply them to Profile Management. It can sometimes be challenging to troubleshoot why WEM is not applying the settings.
Try not to mix configuration options. If you use both WEM and GPO, which one wins?
Multiple Datacenters
For optimum performance, users connecting to Citrix in a particular datacenter should retrieve their roaming profiles from a file server in the same datacenter. If you have Citrix in multiple datacenters, then you will need file servers in each datacenter.
DFS active/active replication of roaming profiles is not supported. This limitation complicates multi-datacenter designs.
For active/active datacenters, split the users such that different users have different home datacenters. Whenever a particular user connects, that user always connects to the same datacenter, and in that datacenter is a file server containing the user’s roaming profile. StoreFront uses Active Directory group membership to determine a user’s home datacenter.
For users that connect to Citrix in multiple datacenters, there are a couple options:
- The user’s roaming profile is located in only one datacenter – If the user connects to a remote datacenter, then the roaming profile must be transmitted across the WAN. To optimize performance, disable Active Write Back, and make sure Profile Streaming is enabled.
- The user has separate profiles for each datacenter – There is no replication of profiles between datacenters. This scenario is best for deployments where different applications are hosted in different datacenters.
Disaster Recovery – For disaster recovery scenarios, the user’s roaming profile data (and home directories) must be recovered in a different datacenter. Here are some considerations:
- Use DFS One-way replication. After the disaster, edit the DFS Namespace folder target to point to the file server in the DR datacenter. You must avoid multi-master DFS replication/namespace.
- Use VMware SRM or similar to recover the entire file server in the DR datacenter.
- A datacenter failover might result in multiple file servers accessed from a single VDA, especially if you have users split across datacenters. Use DFS Namespaces as detailed below.
DFS Namespace
DFS Namespace for central user store – The Citrix Profile Management user store path is a computer-level setting, meaning there can only be one path for every user that logs into a particular VDA. If you have different users with roaming profiles on different file servers, then you must use Active Directory user attributes and DFS namespaces to locate the user’s file server. Here is an overview of the configuration:
- Create a domain-based DFS namespace with folder targets on different file servers. See Scenario 1 – Basic setup of geographically adjacent user stores and failover clusters at Citrix Docs for more information.
- Do not enable two-way DFS Replication for the roaming profile shares. But you can do One-way DFS replication. See Scenario 2 – Multiple folder targets and replication at Citrix Docs for more information.
- Edit each user in Active Directory with a location (l) attribute that matches the DFS folder name.
- Set the Profile Management user store path to
\\corp.local\CtxProfiles\#l#\#SAMAccountName#\!CTX_OSNAME!!CTX_PROFILEVER!. This pulls the user’s l attribute from Active Directory and appends that to the DFS share. The folder that matches the attribute value is linked to a file server. For example, if the user’s l attribute is set to Omaha, then the user’s profile will be located at \\corp.local\CtxProfiles\Omaha\user01\Win2016v6. The Omaha folder is linked to a file server in the Omaha datacenter.
Create User Store
This procedure could also be used to create a file share for redirected profile folders.
Create and Share the Folder
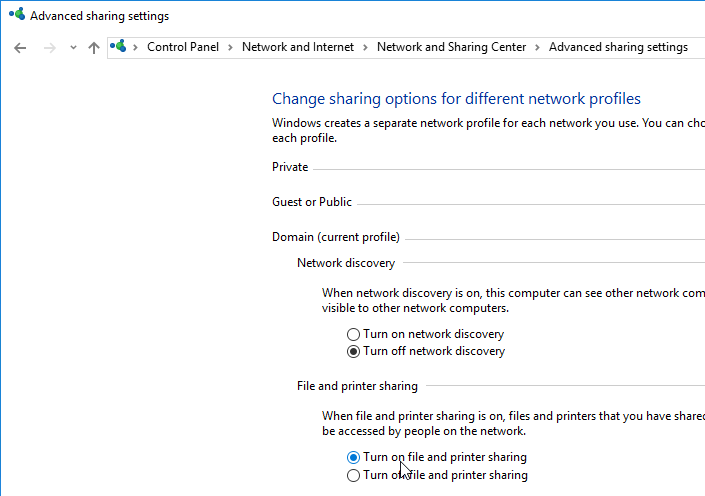
- Make sure file and printer sharing is enabled.
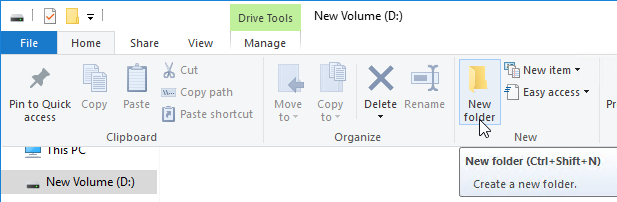
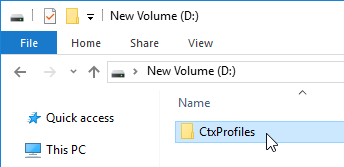
- On the file server that will host the file share, create a new folder and name it CtxProfiles or similar.
- Right-click the folder, expand Give Access to (Windows Server 2019) or expand Share with (Windows Server 2016) and select Specific people.
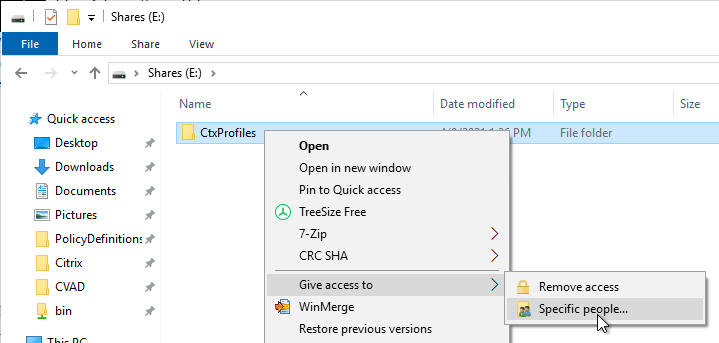
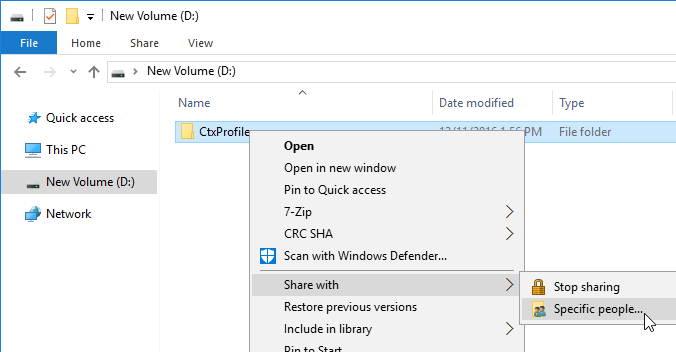
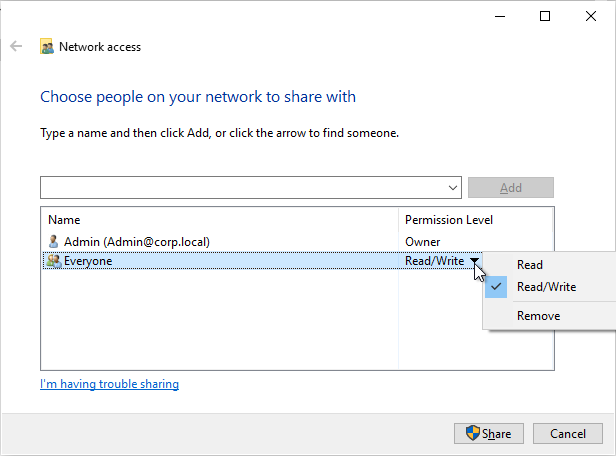
- Give Everyone (or some other group that contains all Citrix Users) Full Control (Read/Write). Click Share, and then click Done.
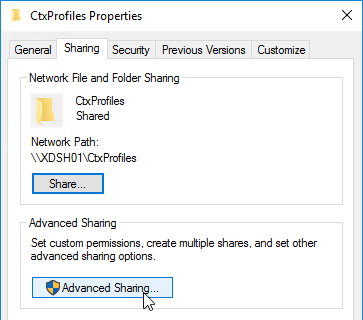
- Go to the Properties of the folder.
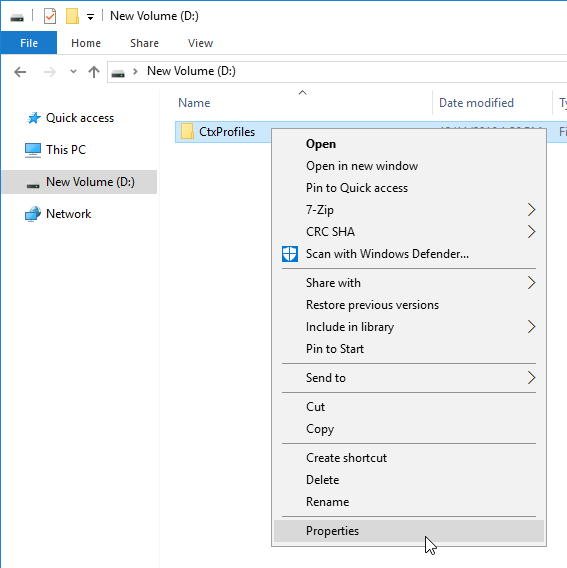
- On the Sharing tab, click Advanced Sharing.
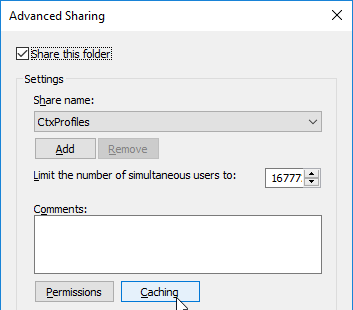
- Click Caching.
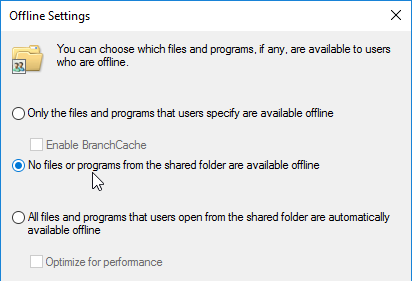
- Select No files or programs. Click OK, and then click Close.
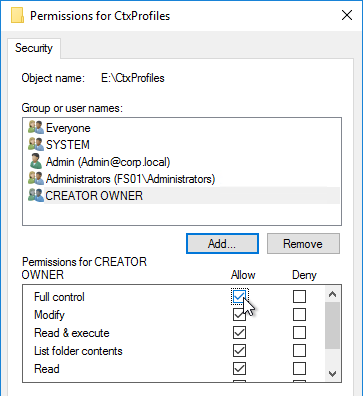
Folder NTFS Permissions
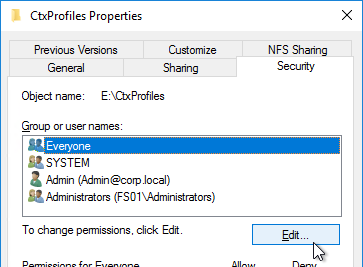
- Open the properties of the new shared folder.
- On the Security tab, click Edit.
- For the Everyone entry, remove Full Control and Modify. Make sure Write is enabled so users can create new folders.

- Add CREATOR OWNER and give it Full Control. This grants users Full Control of the folders they create. Click OK.
- Now click Advanced.

- Highlight the Everyone permission entry, and click Edit.
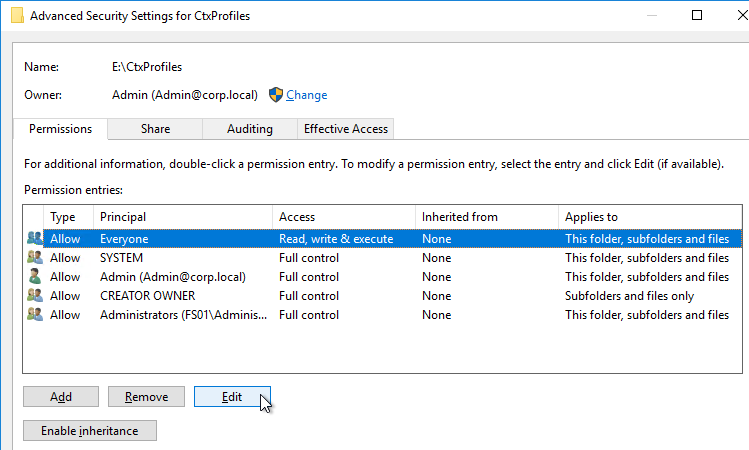
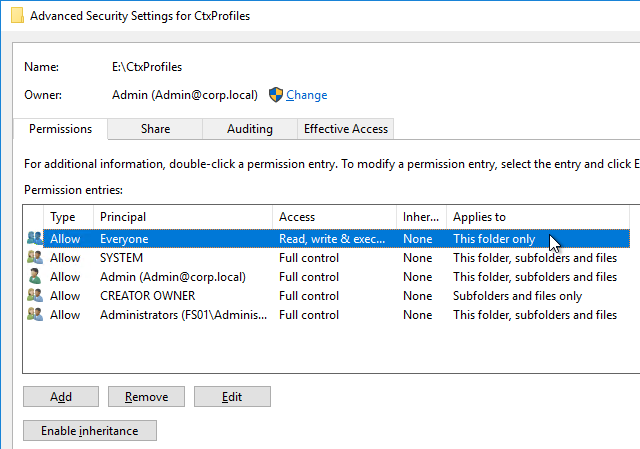
- Change the Applies to selection to This folder only. Click OK three times. This prevents the Everyone permission from flowing down to newly created profile folders.

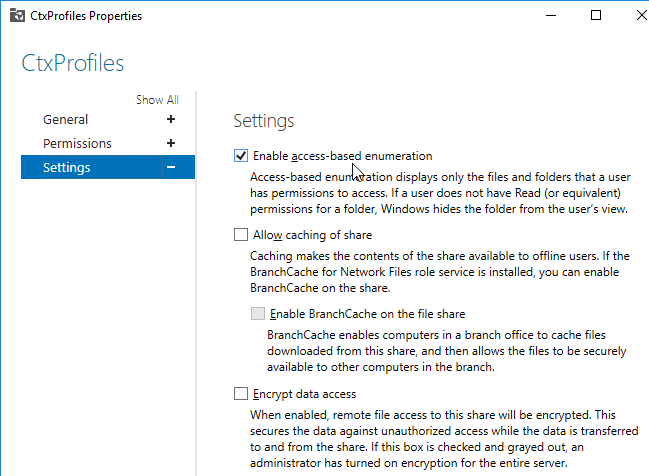
Access Based Enumeration
With this setting enabled, users can only see folders to which they have access:
- In Server Manager, on the left, click File and Storage Services.
- If you don’t see Shares then you probably need to close Server Manager and reopen it. Or perform a refresh.
- Right-click the new share and click Properties.
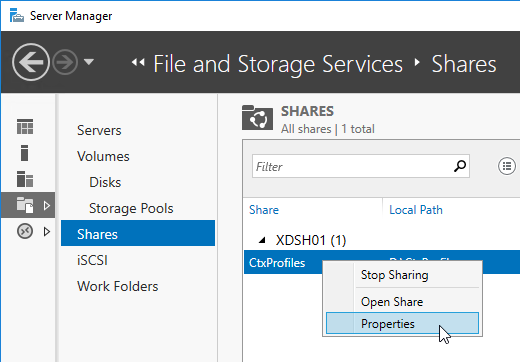
- On the Settings page, check the box next to Enable access-based enumeration.
GPO ADMX Policy Template
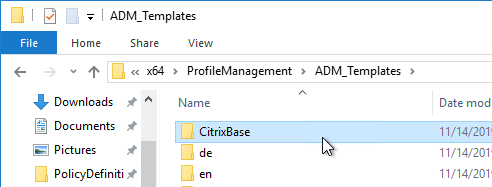
- You can find the GPO ADMX templates on the main Citrix Virtual Apps and Desktops 2411 ISO in the \x64\ProfileManagement\ADM_Templates\en folder.
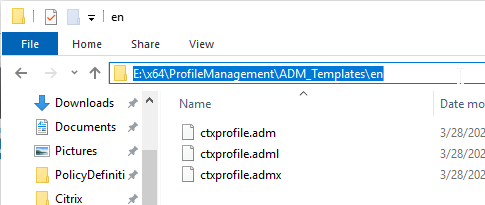
- Or they are included in the standalone Profile Management download in the \Group Policy Templates\en folder.
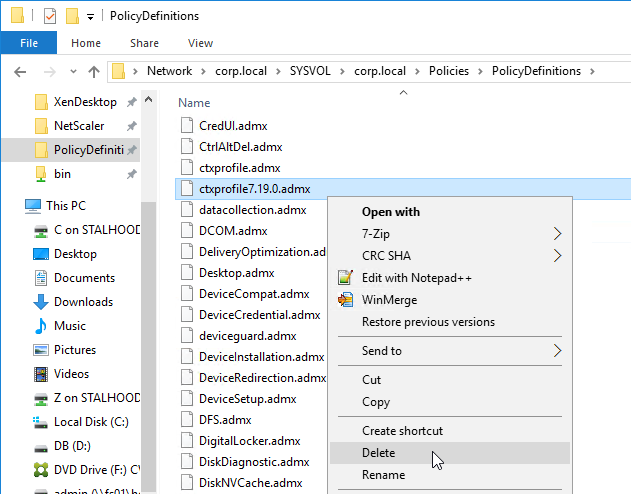
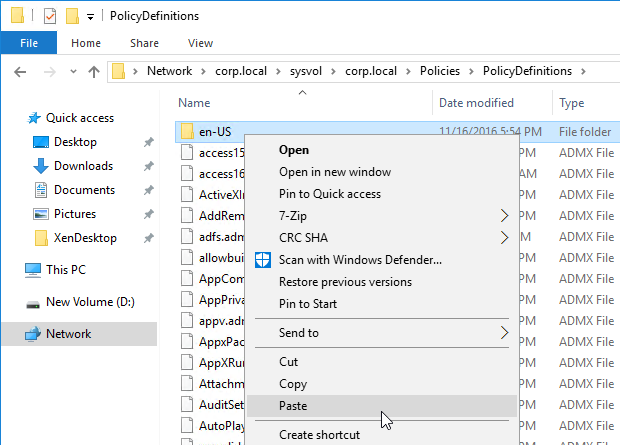
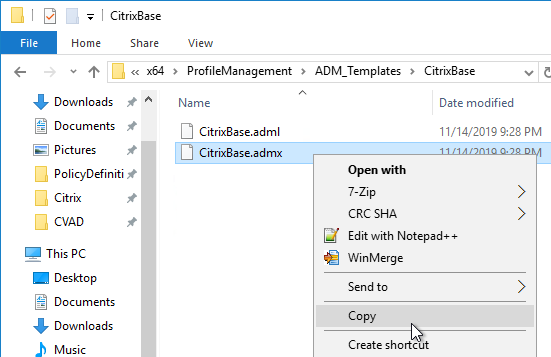
- Copy the file ctxprofile.admx to the clipboard.

- If your domain has PolicyDefinitions copied to SYSVOL, paste the file there.
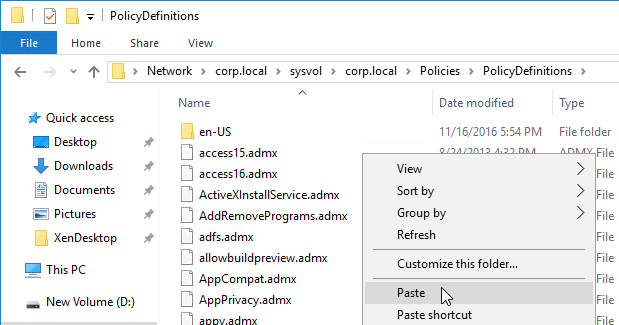
- If you don’t have SysVol PolicyDefinitions, then go to C:\Windows\PolicyDefinitions and paste the file.
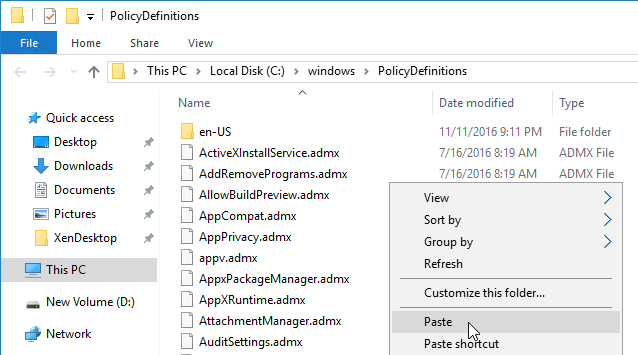
- If you don’t have SysVol PolicyDefinitions, then go to C:\Windows\PolicyDefinitions and paste the file.
- If you have an older version of the ctxprofile.admx file in either location, delete it. Note: replacing the .admx file does not affect your existing Profile Management configuration. The template only defines the available settings, not the configured settings.
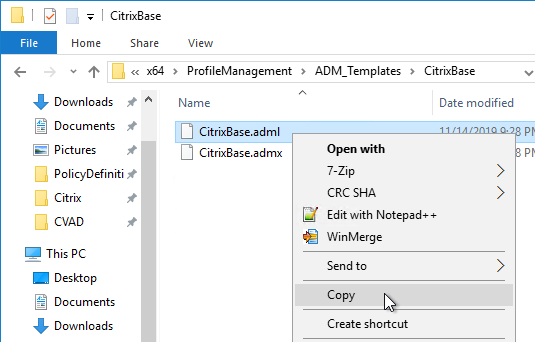
- Go back to the Citrix Profile Management Group Policy Template files.
- Copy ctxprofile.adml to the clipboard.
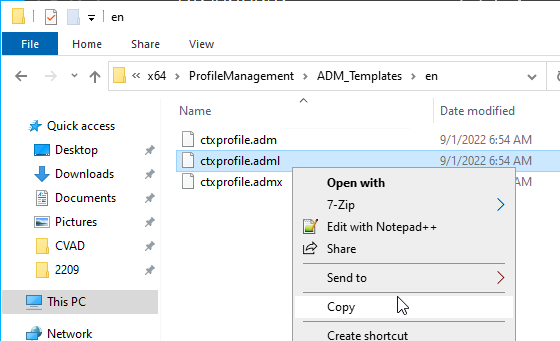
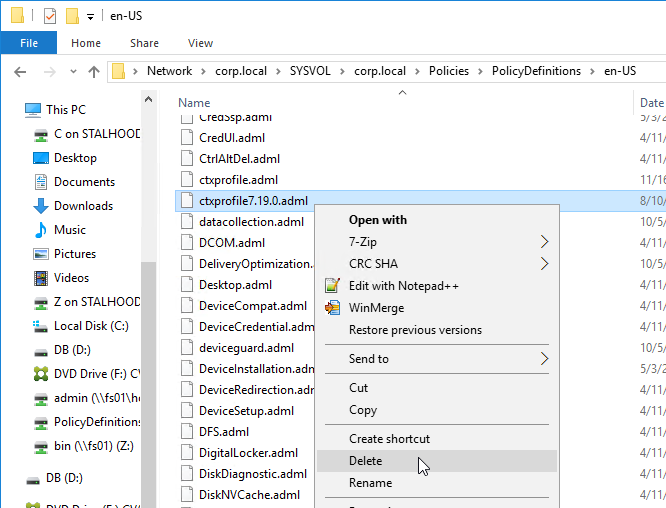
- If your domain has a PolicyDefinitions central store in SYSVOL, copy it to the en-us folder in SYSVOL. This is a subfolder of the PolicyDefinitions folder.
- If you don’t have SysVol PolicyDefinitions,, then go to C:\Windows\PolicyDefinitions\en-US and paste the file. This is a subfolder of the PolicyDefinitions folder.

- If you don’t have SysVol PolicyDefinitions,, then go to C:\Windows\PolicyDefinitions\en-US and paste the file. This is a subfolder of the PolicyDefinitions folder.
- If you have an older version of the ctxprofile.adml file in the en-US folder in either location, delete it.
CitrixBase:
- Go up a folder and then open the CitrixBase folder.
- In the CitrixBase folder, copy the file CitrixBase.admx to the clipboard.
- If your domain has PolicyDefinitions copied to SYSVOL, paste the file there.
- If you don’t have SysVol PolicyDefinitions, then go to C:\Windows\PolicyDefinitions and paste the file.
- If you don’t have SysVol PolicyDefinitions, then go to C:\Windows\PolicyDefinitions and paste the file.
- Go back to the Citrix Profile Management Group Policy Templates and copy CitrixBase.adml to the clipboard.
- If your domain has a PolicyDefinitions central store in SYSVOL, copy it to the en-us folder in SYSVOL. This is a subfolder of the PolicyDefinitions folder.
- If you don’t have SysVol PolicyDefinitions,, then go to C:\Windows\PolicyDefinitions\en-US and paste the file. This is a subfolder of the PolicyDefinitions folder.
- If you don’t have SysVol PolicyDefinitions,, then go to C:\Windows\PolicyDefinitions\en-US and paste the file. This is a subfolder of the PolicyDefinitions folder.
Group Policy Settings
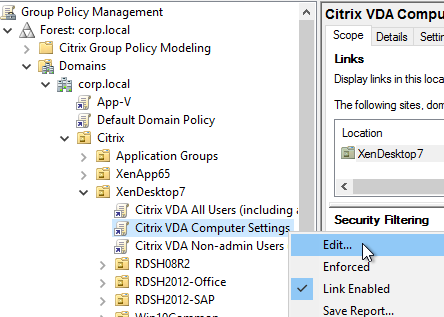
- Edit a GPO that applies to all machines (VDAs) that have the Profile Management service installed.
- Go to Computer Configuration | Policies | Administrative Templates | Citrix Components | Profile Management.
- Note: if you did not install the CitrixBase.admx file, then you can find Profile Management directly under the Administrative Templates node instead of under Citrix Components.
- Enable the setting Enable Profile management. Profile Management will not function until this setting is enabled.
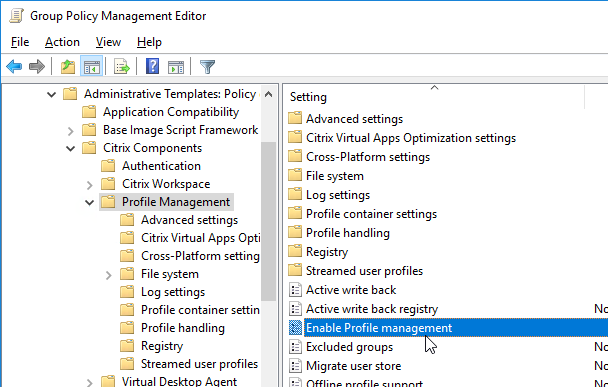
- If desired, enable the setting Process logons of local administrators.

- Enable Path to user store.
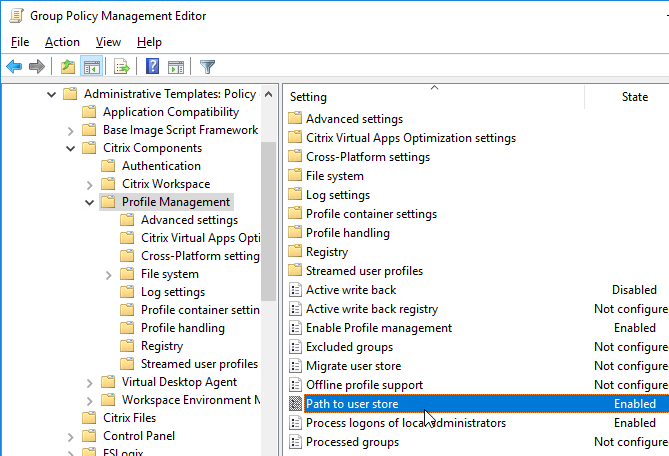
- Specify the UNC path to the folder share. An example path =
\\server\share\#SAMAccountName#\!CTX_OSNAME!!CTX_PROFILEVER!
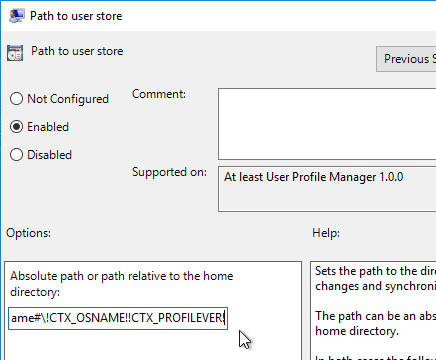
- Profile Versions– Different OS versions have different profile versions. Each profile version only works on specific OS versions. For example, you cannot use a Windows 7 profile (v2) on Windows 10 1607 (v6). The variables in the path above ensure that every unique profile version is stored in a unique folder. If users connect to multiple operating system versions, then users will have multiple profiles.
- Windows 10 Profile Versions – Windows 10 has two different profile versions. Windows 10 build 1511 and older use v5 profiles. Windows 10 build 1607 and newer use v6 profiles. v5 and v6 profile versions are incompatible so they should be separated.
- Resolved variables – With the example user store path shown above, if the user logs into Windows 2012 R2 RDSH, the profile folder will be \\server\share\user01\Win2012R2v4. If the user logs into 64-bit Windows 10 build 1607, the profile folder will be \\server\share\user01\Win10RS1v6.
- Windows 10 v6 vs Windows 2016 v6 – Both Windows 10 (1607 and newer) and Windows Server 2016 use v6 profiles. Do you want to use the same profile for both platforms? If so, remove !CTX_OSNAME! from the Path. Note: Windows 10 supports Store apps while Windows 2016 does not. If you’re allowing Store apps, then it’s probably best to use different profiles for both OS platforms.
- Windows 2012 R2 warning: in older versions of Citrix Profile Management, !CTX_PROFILEVER! recognizes Windows 2012 R2 as v2, which isn’t correct. v2 is Windows Server 2008 R2, while Windows Server 2012 R2 is v4. The profile version bug was fixed in Profile Management 5.4 and newer. If you have existing Windows 2012 R2 profiles based on the !CTX_PROFILEVER! variable set to v2, after upgrading to 5.4 or newer, then your profiles might stop working . See http://discussions.citrix.com/topic/374111-psa-upm-54-ctx-osname-server-2012-value-change/ for more details.
- Windows 10 and !CTX_OSNAME!: Profile Management sets !CTX_OSNAME! to different strings for different Windows operating system versions, especially different versions of Windows 10: (RS = Redstone, which is a Microsoft codeword)
- Windows Server 2019 sets !CTX_OSNAME! to Win2019v6.
- Windows Server 2016 sets !CTX_OSNAME! to Win2016v6.
- Windows 10 version 1903 and 1909 set !CTX_OSNAME! to Win10RS6.
- Windows 10 version 1809 sets !CTX_OSNAME! to Win10RS5.
- Windows 10 version 1803 sets !CTX_OSNAME! to Win10RS4.
- Windows 10 version 1709 sets !CTX_OSNAME! to Win10RS3.
- Windows 10 version 1703 sets !CTX_OSNAME! to Win10RS2.
- Windows 10 version 1607 sets !CTX_OSNAME! to Win10RS1.
- If you use !CTX_OSNAME! in your profile store path, then different CTX_OSNAMEs will have different profiles, which means users will lose their profile settings whenever you upgrade Windows 10.
- Profile Management 1909 and newer have a setting called Automatic migration of existing application profiles under Profile Handling that can alleviate this problem.
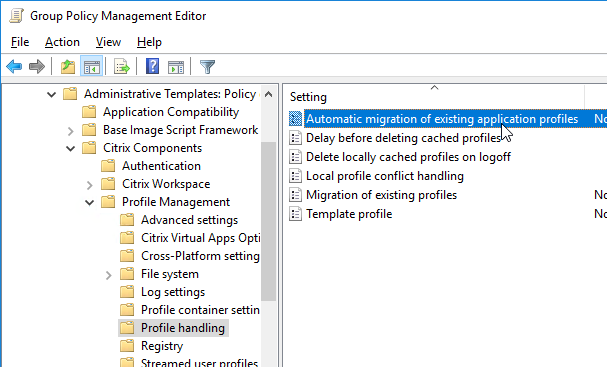
- Profile Management 1909 and newer have a setting called Automatic migration of existing application profiles under Profile Handling that can alleviate this problem.
- Multiple Domains – If you have multiple domains, in the user profile store path, change #SAMAccountName# to %username%.%userdomain% (e.g.
\\server\share\%username%.%userdomain%\!CTX_OSNAME!!CTX_PROFILEVER!). That way you can have the same account name in multiple domains and each account will have a different profile. - Hard Code Store Path – Instead of using variables, you can specify a hard coded path. However, the profile incompatibility restrictions listed above still apply. To avoid applying a single profile across multiple operating system versions, place VDAs with different OS versions in different OUs, and then use different Profile Management GPOs on those OUs to specify different Profile Management user store paths.
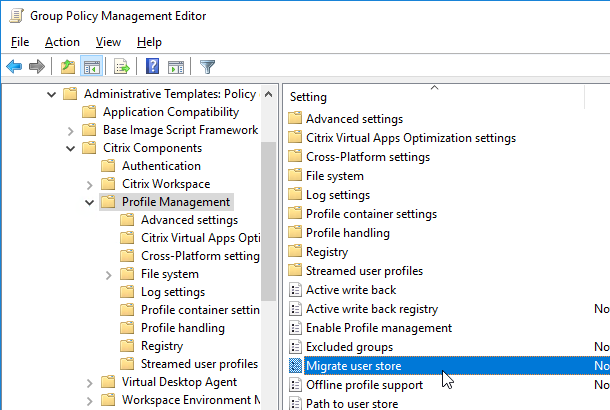
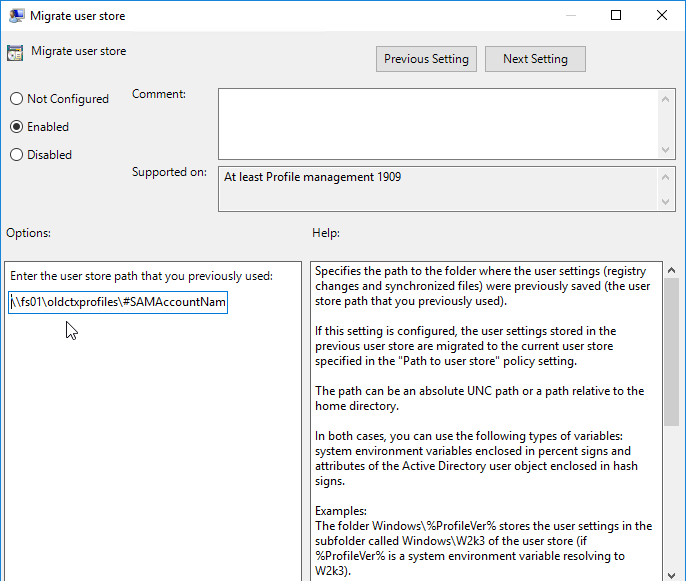
- Migrate User Store – Profile Management 1909 and newer can move profiles from an old profile path to a new profile path.
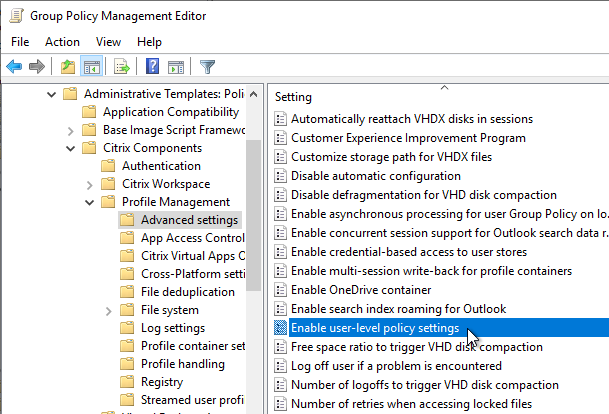
- User-level overrides – Profile Management 2305 and newer support user-level overrides. First, configure Enable user-level policy settings under Advanced Settings. Then add registry keys for user group SIDs with override settings. See Enable and configure user-level policy settings at Citrix Docs.

- Profile Versions– Different OS versions have different profile versions. Each profile version only works on specific OS versions. For example, you cannot use a Windows 7 profile (v2) on Windows 10 1607 (v6). The variables in the path above ensure that every unique profile version is stored in a unique folder. If users connect to multiple operating system versions, then users will have multiple profiles.
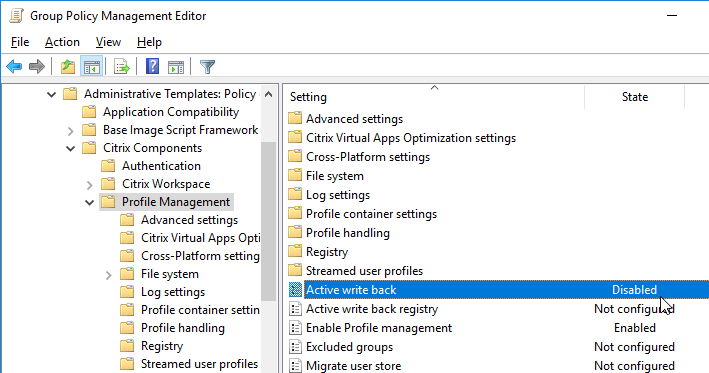
- Disable Active write back. This feature places additional load on the file server and is only needed if users login to multiple machines concurrently and need mid-session changes to be saved, or if users never log off from their sessions. Note: if you don’t disable this, then it is enabled by default.
- Profile Management 2303 and newer have an option to only perform Active write back on session lock and disconnection.
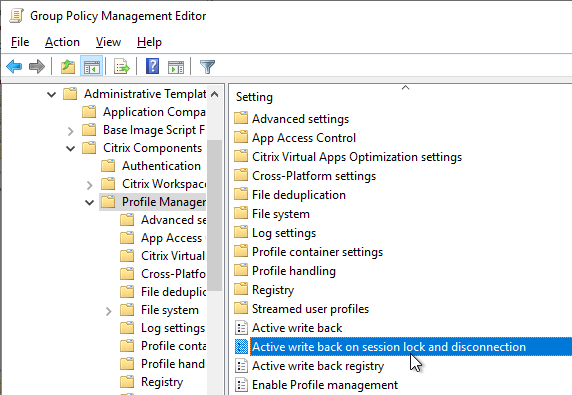
- Profile Management 2303 and newer have an option to only perform Active write back on session lock and disconnection.
- On the left, go to the Advanced settings node.
- If Microsoft Teams 2.1 or newer, and if Teams is installed per machine, then simply make sure Profile Management is version 2402 or newer. See Enable roaming for the new Microsoft Teams at Citrix Docs.
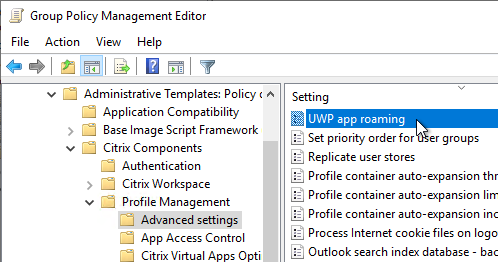
- If Teams 2.1 is installed per-user, then enable UWP app roaming, which requires Profile Management 2308 or newer. See CTX585013 Microsoft Teams 2.1 supported for VDI/DaaS.
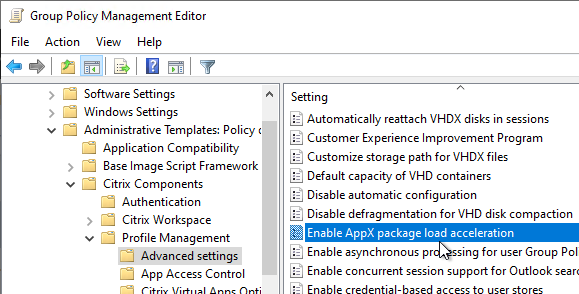
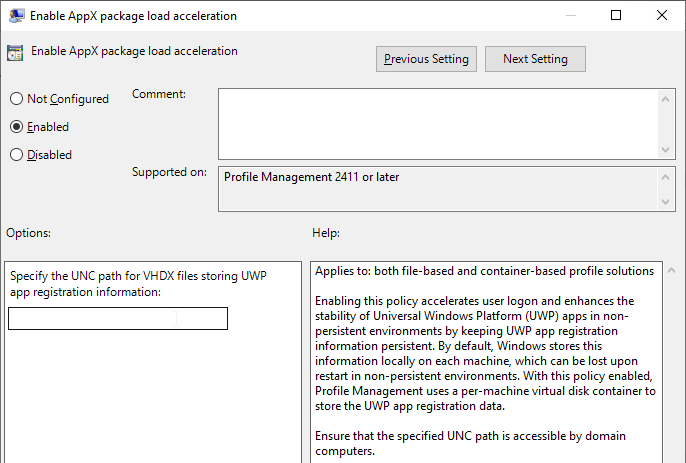
- Profile Management 2411 and newer have the setting named Enable AppX package load acceleration. It requires a file share to store the VHDX files.
- If Teams 2.1 is installed per-user, then enable UWP app roaming, which requires Profile Management 2308 or newer. See CTX585013 Microsoft Teams 2.1 supported for VDI/DaaS.
- Enable the setting Process Internet cookie files on logoff. This is probably only for Internet Explorer.
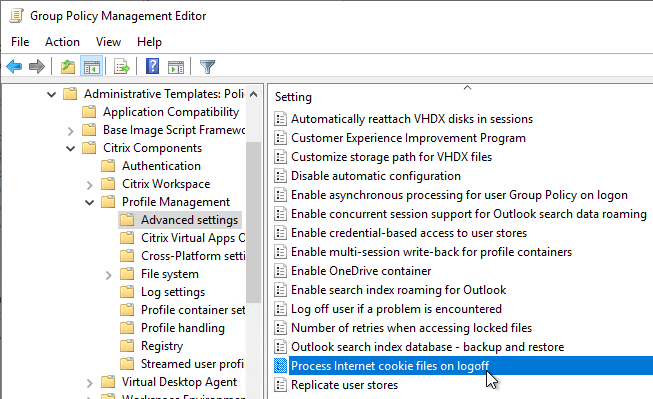
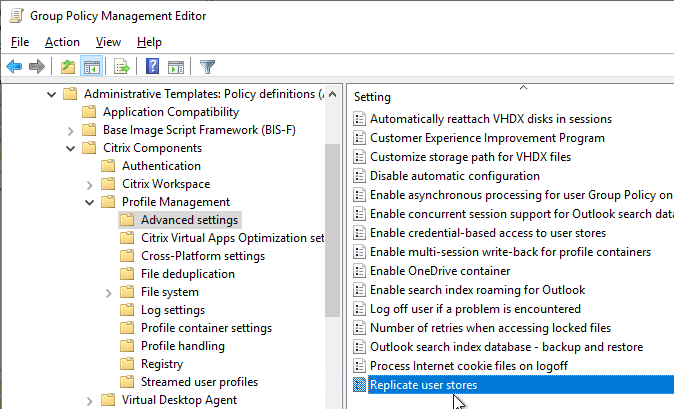
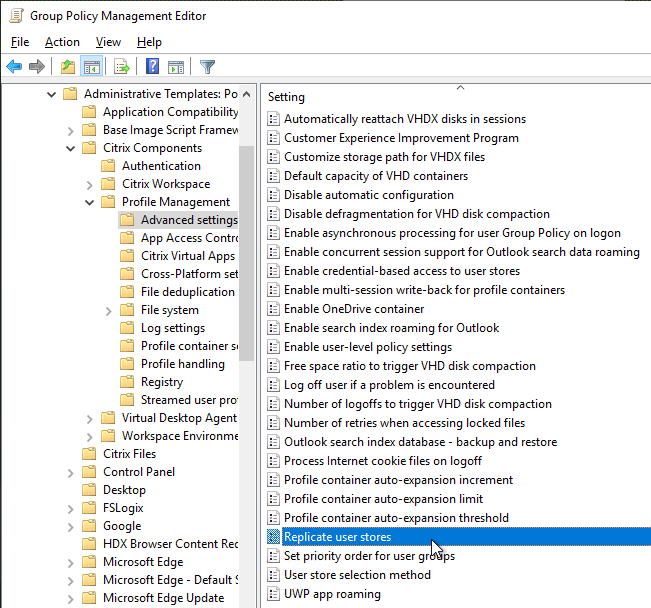
- The Replicate user stores setting replicates to multiple file shares. Note: this slows down logoffs. Profile Management 2209 and newer supports replicating profile containers, which seems to use robocopy.exe.
- In Profile Management 2407 and newer, for the container-based profile solution, the Enable in-session policy container failover among user stores policy is automatically enabled to ensure profile redundancy for the entire session.
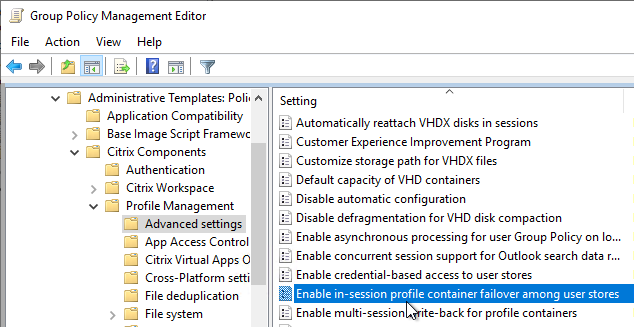
- In Profile Management 2407 and newer, for the container-based profile solution, the Enable in-session policy container failover among user stores policy is automatically enabled to ensure profile redundancy for the entire session.
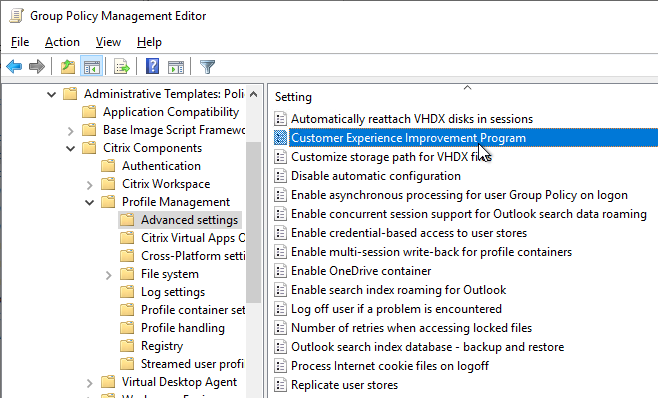
- Customer Experience Improvement Program (CEIP) is enabled by default. It can be disabled here.
- See https://www.carlstalhood.com/delivery-controller-cr-and-licensing/#ceip for additional places where CEIP is enabled.
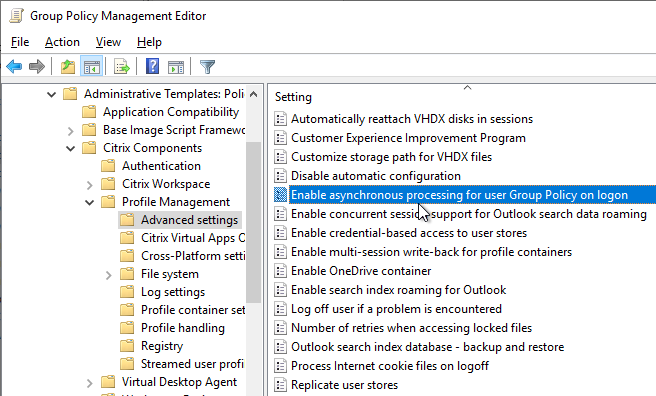
- Profile Management 2206 adds Enable asynchronous processing for user Group Policy on logon. This might speed up logons. This feature requires you to disable Always wait for the network at computer startup and logon and enable Allow asynchronous user Group Policy processing when logging on through Remote Desktop Services. More details at Citrix Docs.
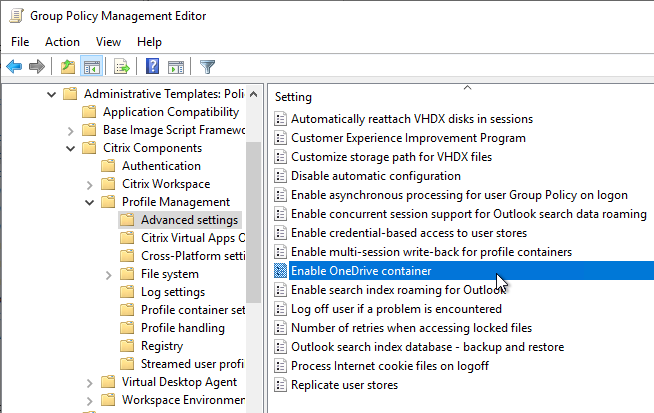
- Profile Management 2311 and newer support Enable OneDrive container. It works the same way as search index roaming as detailed next. See Citrix Tech Zone Deployment Guide: Citrix Profile Management – OneDrive Container.
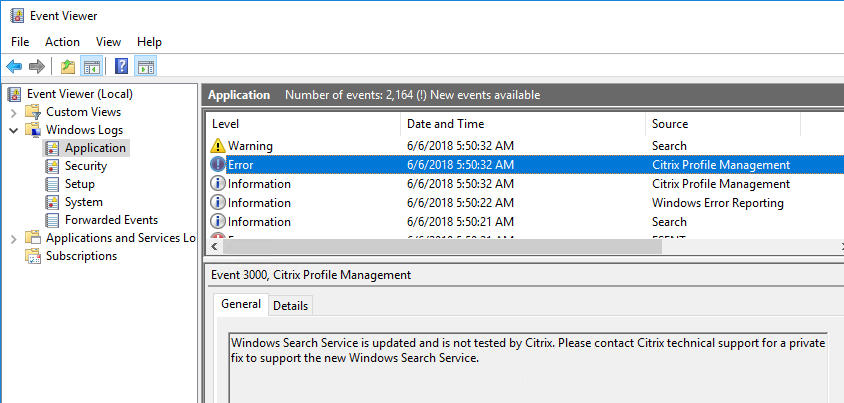
- Profile Management 7.18 and newer have Enable search index roaming for Outlook.

Notes on Outlook OST and Search roaming:
- Microsoft FSLogix is another Outlook search index roaming product that is now free. For details, see the FSLogix section in the computer group policy article.

- Profile Management 1906 and newer support 64-bit Outlook 2016 and Office 2019.
- VDA 1906 or newer are recommended for the bug fixes for this feature. You can upgrade the VDA without upgrading your Delivery Controllers.
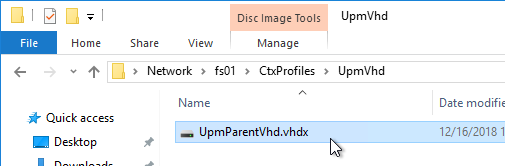
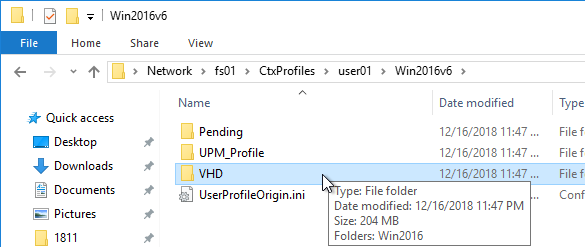
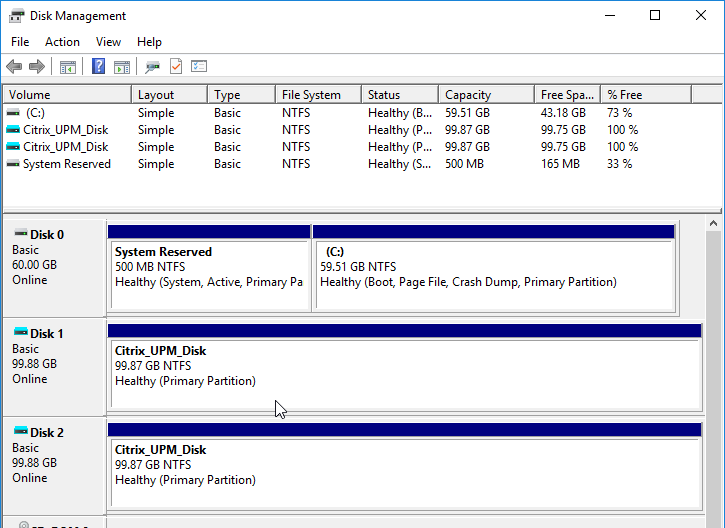
- After the first user logon, Profile Management 1811 and newer creates a template VHDX file in a folder named UpmVhd at the root of the user store. The template file is copied to new users, thus speeding up VHDX creation.
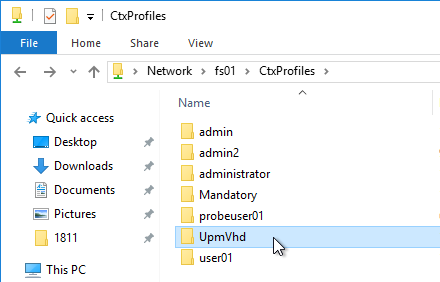
- In the user’s profile location, a new folder called VHD is created.
- You can override the VHDX path by configuring Customize storage path for VHDX files as detailed at Citrix Docs.
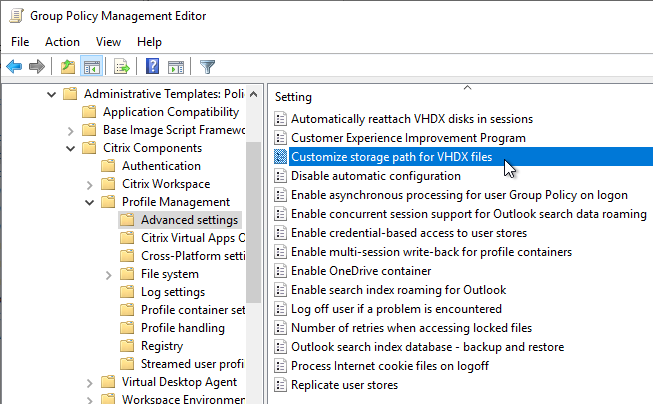
- You can override the VHDX path by configuring Customize storage path for VHDX files as detailed at Citrix Docs.
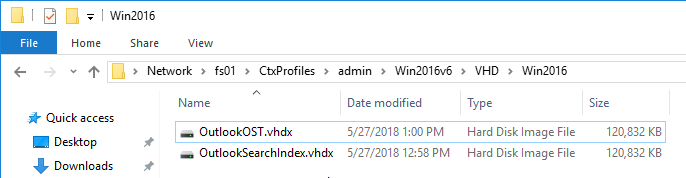
- Inside the \VHD\Win2016 folder are two new thin provisioned .vhdx files – one for OST, one for Search. The per-user .vhdx files are copied from the parent template.
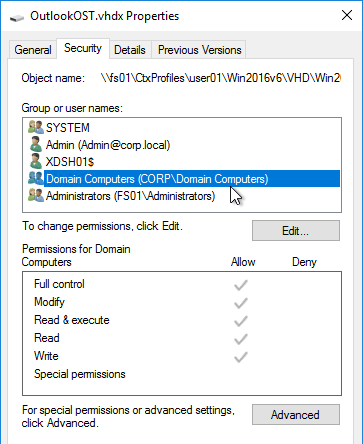
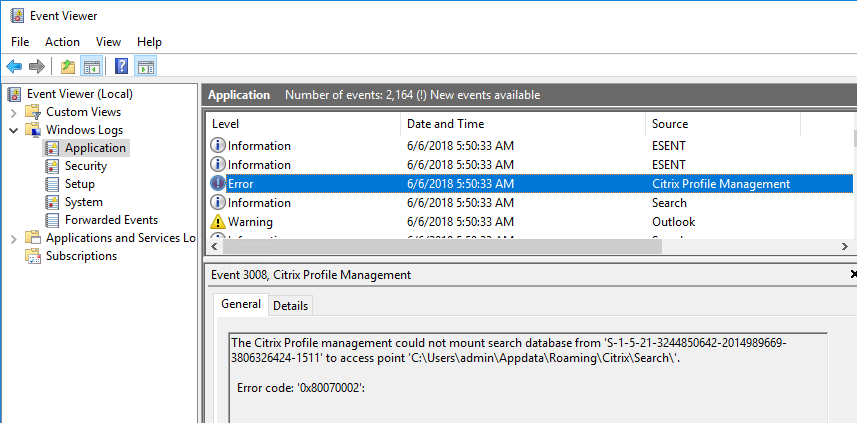
- UPM grants Domain Computers Full Control of the VHDX files. Users must have Full Control to the Profile Share, and UPM Folder to be able to grant this permission. Modify permissions are not sufficient. (Source = Robert Steeghs The Citrix Profile management could not mount virtual disk)
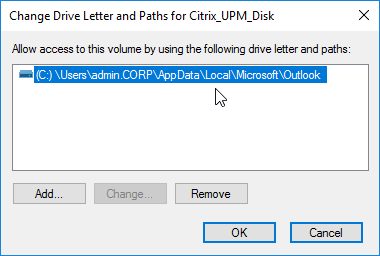
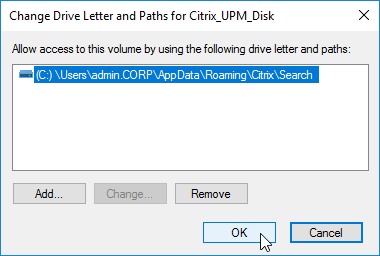
- When the user logs into a Citrix session, the two VHDXs are mounted to %localappdata%\Microsoft\Outlook and %appdata%\Citrix\Search. This means that OST files and Search Indexes are stored in the VHDX instead of in the user’s profile.
- eastwood357 at Outlook OST and Search vhdx not unmounting after log off at Citrix Discussions says that the Profile Management Path to User Store must be all lower case or else the VHDX files will not unmount at logoff.

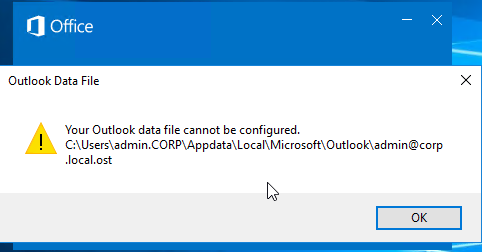
- Only enable this feature for users with new Outlook profiles. If the user already has an .ost file, then you’ll see an error about missing .ost when Outlook is launched.
- The Search roaming feature is only supported with specific versions of Windows Search service. Event Log will tell you if your Windows patches are too new.
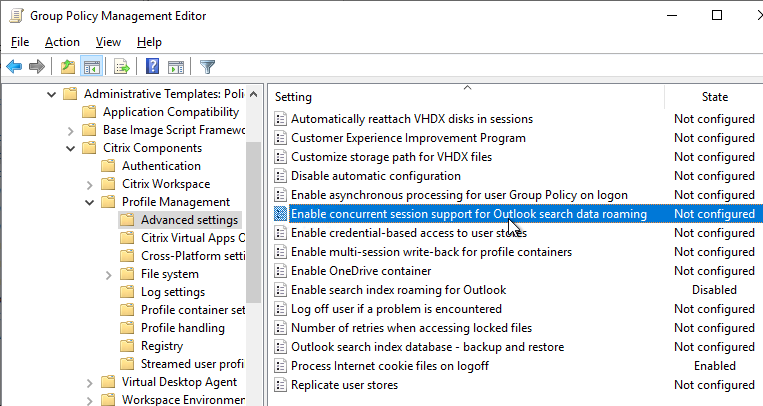
- Profile Management 2206 and newer have an option for Enable concurrent session support for Outlook search data roaming.
- In older Profile Management, VHDX files can only be mounted on one machine at a time. If you login to two VDAs, and if both try to mount the same VHDX files, then you’ll see errors in Event Viewer.
- In older Profile Management, VHDX files can only be mounted on one machine at a time. If you login to two VDAs, and if both try to mount the same VHDX files, then you’ll see errors in Event Viewer.
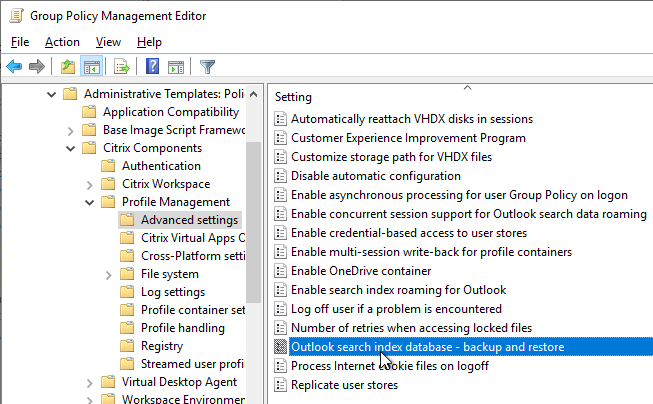
- Search Index Backup – Profile Management 1909 and newer have a GPO setting named Outlook search index database – backup and restore that can provide automatic recovery of the search index if it becomes corrupted. The backup consumes more of the available storage space of the VHDX files.
- For a detailed explanation of how the per-user Search Index works, see CTX235347 Citrix Profile Management: VHDX-based Outlook cache and Outlook search index on a user basis.
- Profile Management 2109 and newer can Automatically reattach detached VHDX disks. In Profile Management 2203 and newer, it’s available as a group policy setting under the Profile Management | Advanced Settings node.
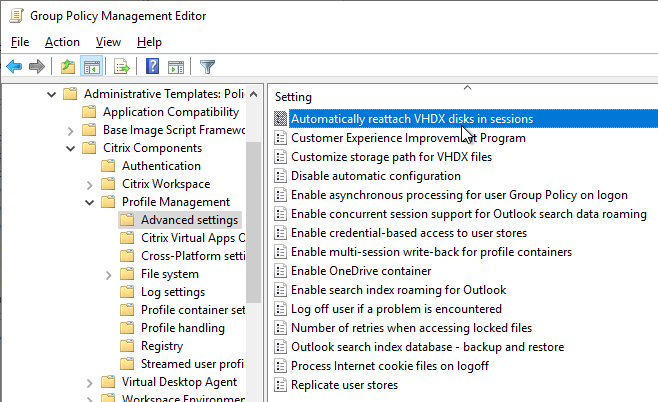
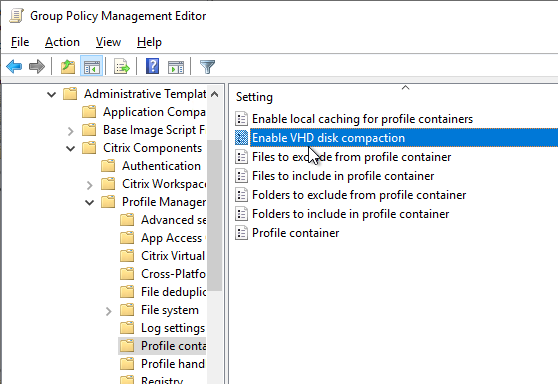
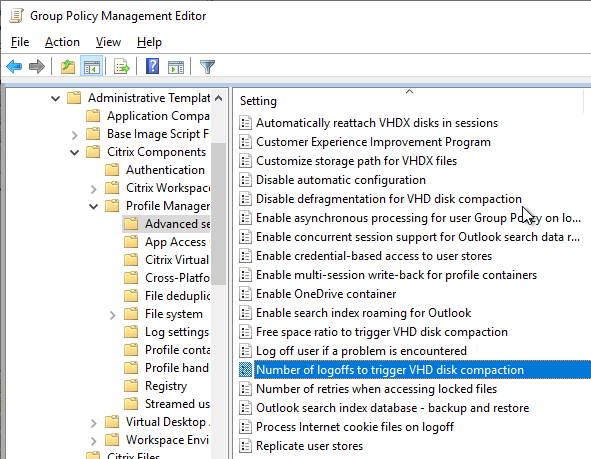
- Profile Management 2303 and newer have a Profile Container GPO setting to Enable VHD disk compaction on user logoff. See Citrix Docs.
- Additional disk compaction settings can be found under Advanced Settings.
- Additional disk compaction settings can be found under Advanced Settings.
Exclusions, Synchronization, and Mirroring
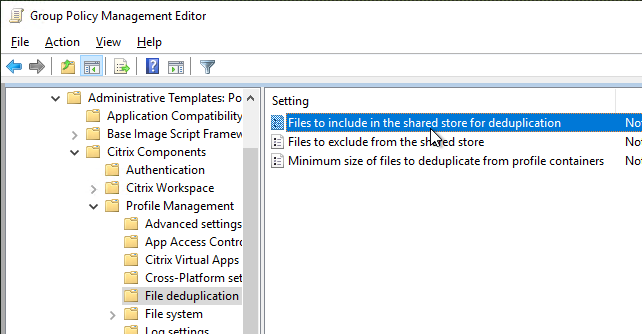
- Profile Management 2209 and newer have File Deduplication > Files to include in the shared store for deduplication. You must specify which files to delete from each user’s profile and instead store in a shared location. See Citrix Docs. Profile Management 2311 support Files deduplication of profile containers.
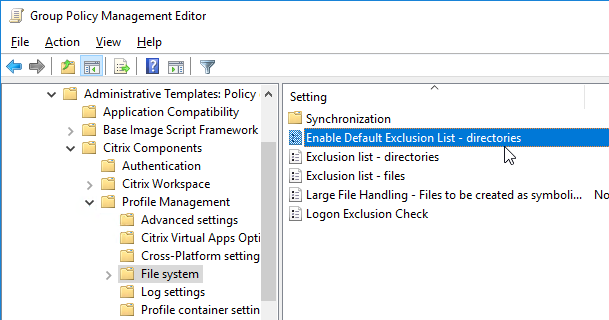
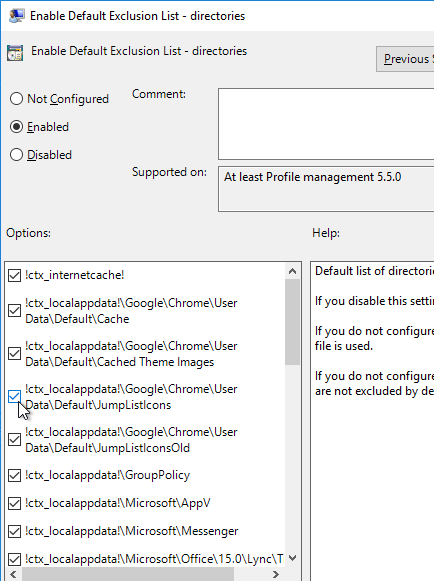
- Under the File system node in the Group Policy Editor, enable the setting Enable Default Exclusion List – directories.
- You can use checkboxes to not exclude some folders.
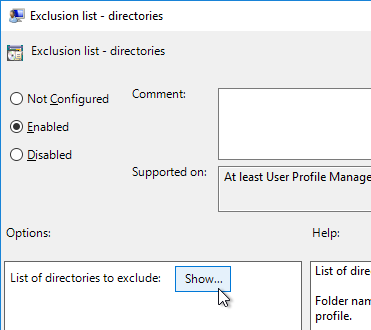
- Then edit Exclusion list – directories.
- Enable the setting, and click Show.
- For Edge Chromium, see Avanite Roaming Edge Chromium.
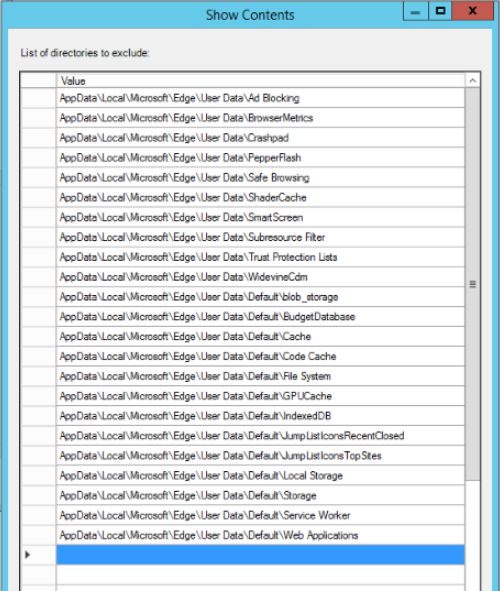
- For Chrome, use the same list as Edge but change \Microsoft\Edge to \Google\Chrome.
- Add the following to the list.
AppData\Local\Microsoft\Windows\INetCache
AppData\local\Microsoft\Windows\IEDownloadHistory
AppData\Local\Microsoft\Internet Explorer\DOMStore
AppData\Local\Google\Software Reporter Tool
AppData\Roaming\Microsoft\Teams\media-stack
AppData\Roaming\Microsoft\Teams\Logs
AppData\Roaming\Microsoft\Teams\Service Worker\CacheStorage
AppData\Roaming\Microsoft\Teams\Application Cache
AppData\Roaming\Microsoft\Teams\Cache
AppData\Roaming\Microsoft\Teams\GPUCache
AppData\Roaming\Microsoft\Teams\meeting-addin\Cache
- Note: if you see errors in Office programs (e.g. “Word could not create the work file”), then you might have to use Group Policy Preferences to recreate
%USERPROFILE%\AppData\Local\Microsoft\Windows\INetCacheat logon. Source = Olav Lillebo Errors when starting published Microsoft Office applications.
- Also see CTP Matthias Schlimm Google Chrome – Citrix UPM Configuration with Mirroring
- Note: if you see errors in Office programs (e.g. “Word could not create the work file”), then you might have to use Group Policy Preferences to recreate
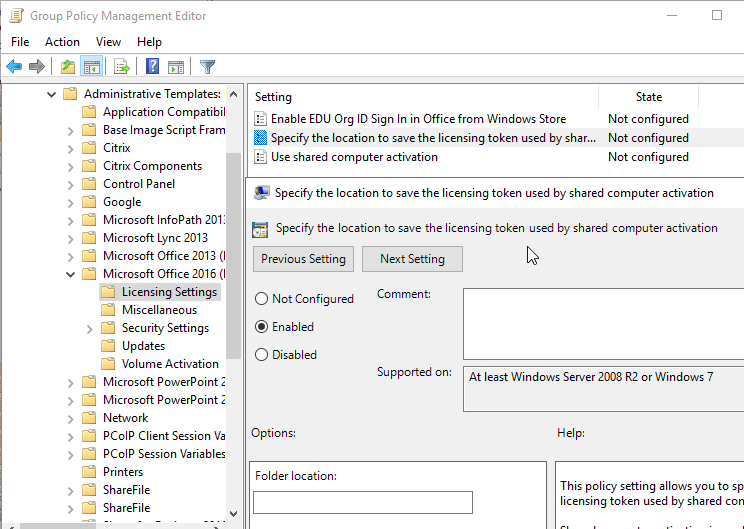
- Newer versions of Office Click-to-run let you roam the shared computer activation licensing token. See Overview of shared computer activation for Office 365 ProPlus and search for “roam”. The licensing tokens also last 30 days instead of 2-3 days. Source = Rick Smith in the comments. Ideally you should have ADFS integration so users can seamlessly re-activate Office.
- James Rankin has a much longer list of exclusions and synchronizations at Everything you wanted to know about virtualizing, optimizing and managing Windows 10…but were afraid to ask – part #6: ROAMING.
- Nick Panaccio at IE11 Enterprise Mode and UPM at Citrix Discussions has a list of exclusions for IE in Enterprise Mode.
appdata\local\microsoft\internet explorer\emieuserlist
appdata\local\microsoft\internet explorer\emiesitelist
appdata\local\microsoft\internet explorer\emiebrowsermodelist
- Then click OK twice to return to the Group Policy Editor.
- usrclass.dat*.
- Profile Management 1909 and newer automatically include usrclass.dat* in the Files to Synchronize. UPM 2103 and newer add it for Windows 10 but not for RDSH. If added to the exclusion list, then Profile Management 1909 and newer automatically removes it from the exclusion list. See Start menu roaming at Citrix Docs.

- usrclass.dat* contains file type associations. For roaming file type associations, you can export/import HKCU\SOFTWARE\Classes\Applications as described by Christoph Kolbicz at User File Type Association Roaming on Server 2016 with Citrix User Profile Manager.
- Profile Management 1909 and newer automatically include usrclass.dat* in the Files to Synchronize. UPM 2103 and newer add it for Windows 10 but not for RDSH. If added to the exclusion list, then Profile Management 1909 and newer automatically removes it from the exclusion list. See Start menu roaming at Citrix Docs.
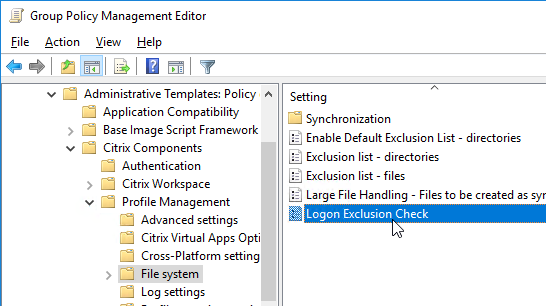
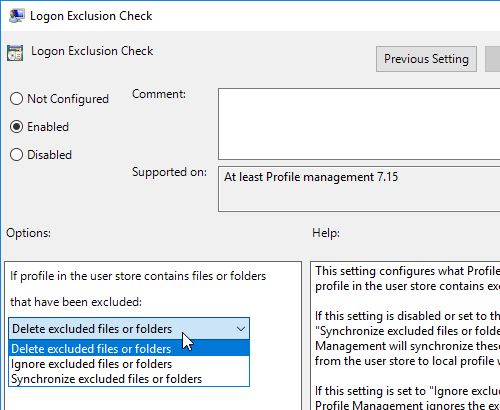
- Clean up excluded folders – If you add to the exclusions list after profiles have already been created, Profile Management 5.8 has a feature that can delete the excluded folders at next logon. See To enable logon exclusion check at Citrix Docs. In Profile Management 7.15 and newer, Logon Exclusion Check is configurable in group policy under the File System node.
- Also see Muralidhar Maram’s post at Citrix Discussions for a tool that will clean up the existing profiles.
- Also see Jeremy Sprite Clean Citrix UPM Profiles.
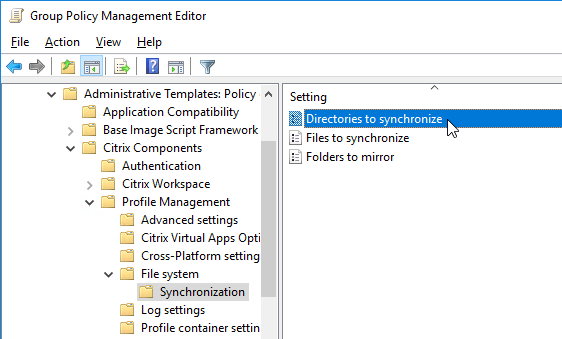
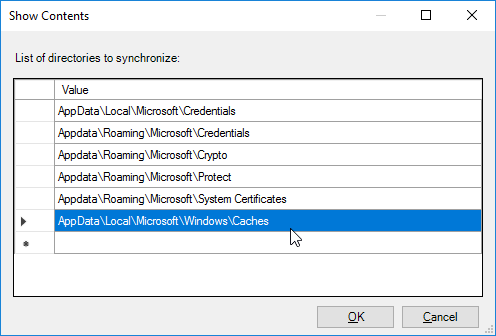
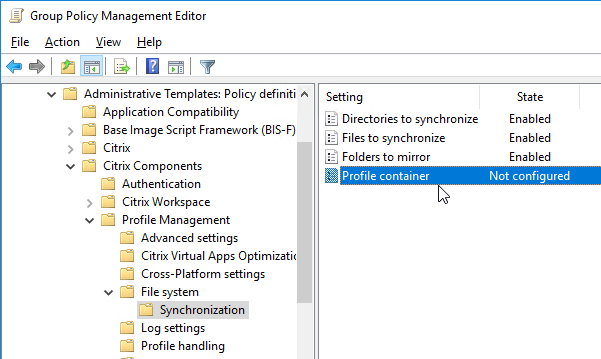
Directories to Synchronize
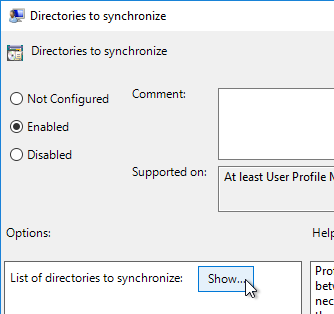
- Under the File System\Synchronization node in the Group Policy Editor you can configure which profile folders should be synchronized that have otherwise been excluded.
- Edit the setting Directories to synchronize.
- Enable the setting, and click Show.
- Profile Management 7.16 Fixed Issues says that AppData\Local\Microsoft\Windows\Caches should be synchronized. Also see CTX234144 Start Menu Shows Blank Icons on VDA 7.15 LTSR CU1/7.16/7.17 with UPM Enabled.
- CTX489573Office 365 – Account Error: Sorry, we can’t get to your account right now says that Appdata\local\microsoft\identitycache should be synchronized.
- To configure Profile Management to sync Saved Passwords in Internet Explorer, add the following directories as detailed by gtess80 at Internet Explorer 11 Saved Passwords Not Retaining Between Sessions at Citrix Discussions. However, if Microsoft Credentials Roaming is enabled, then you should instead exclude these folders from roaming as detailed at CTX124948 How to Configure Citrix Profile Manager when Microsoft Credentials Roaming is Used in the Environment.
AppData\Local\Microsoft\Windows\Caches
AppData\Local\Microsoft\Credentials
Appdata\local\Microsoft\identitycache
Appdata\Roaming\Microsoft\Credentials
Appdata\Roaming\Microsoft\Crypto
Appdata\Roaming\Microsoft\Protect
Appdata\Roaming\Microsoft\SystemCertificates
- Start Menu and File Type Associations:
- If Windows 10 1703 or newer, see James Rankin Roaming profiles and Start Tiles (TileDataLayer) in the Windows 10 1703 Creators Update for information on the new location for Tile data. Citrix Profile Management 5.8 and newer should handle this automatically.
- See David Ott’s list of UPM exclusions for Windows 10. This blog post also details how to roam the Windows 10 Start Menu and prevent file share locks.
- To roam Start Menu and/or File Type Associations in Windows 10 or Windows Server 2016, see CTX214754 Error “An app default was reset” after signout and Logon in Citrix UPM for info on why this is difficult.
- Instead of roaming usrclass.dat, you can export/import HKCU\SOFTWARE\Classes\Applications as described by Christoph Kolbicz at User File Type Association Roaming on Server 2016 with Citrix User Profile Manager.
- Daniel Feller at Sync the Windows 10 Start Menu in VDI says that configuring SettlementPeriodBeforeAutoShutdown might improve reliability of Start Menu roaming, assuming users log out of the virtual desktop instead of rebooting the virtual desktop. On a Delivery Controller, open PowerShell, and run the following:
asnp citrix.*
Set-BrokerDesktopGroup -Name "NAME_OF_DESKTOP_GROUP" -SettlementPeriodBeforeAutoShutdown 00:00:15
- With VDA 7.15 Update 1, the icons on the Start Menu of Windows 2012 R2 and Windows 2016 are sometimes blank.
- This is fixed in Profile Management 7.18 (VDA 7.18).
- To work around this issue, use Group Policy Preferences to set the following registry value at every logon: (source = Windows 2016 Start menu blank icons with 7.15 CU1 at Citrix Discussions, and CTX234144 Start Menu Shows Blank Icons on VDA 7.15 LTSR CU1/7.16/7.17 with UPM Enabled)
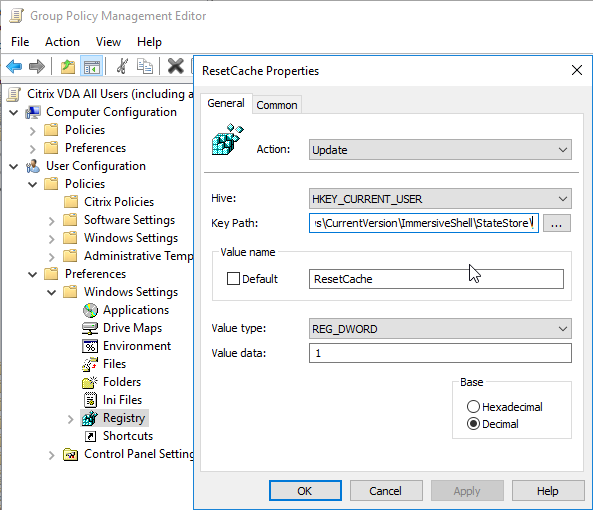
- HKCU\Software\Microsoft\Windows\CurrentVersion\ImmersiveShell\StateStore\
- ResetCache (DWORD) = 1
- HKCU\Software\Microsoft\Windows\CurrentVersion\ImmersiveShell\StateStore\
- Another option is to exclude HKEY_CURRENT_USER\SOFTWARE\Microsoft\Windows\CurrentVersion\Explorer\Advanced\StartMenuInit from roaming, or delete it at logoff. See Serge Bouwens at Citrix Discussions.
- Click OK twice.
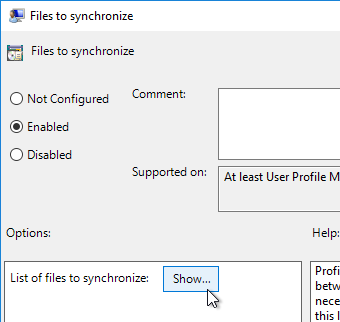
Files to Synchronize
- Edit Files to synchronize.
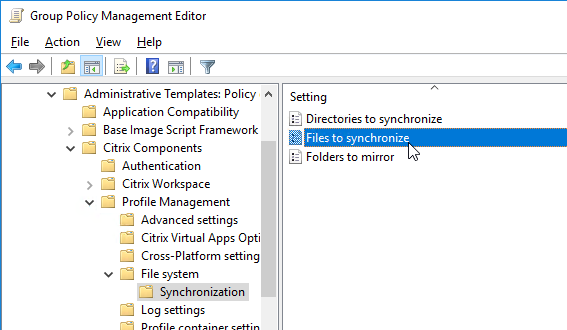
- Enable the setting, and click Show
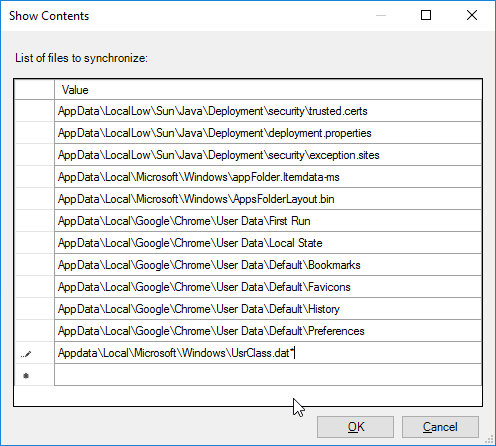
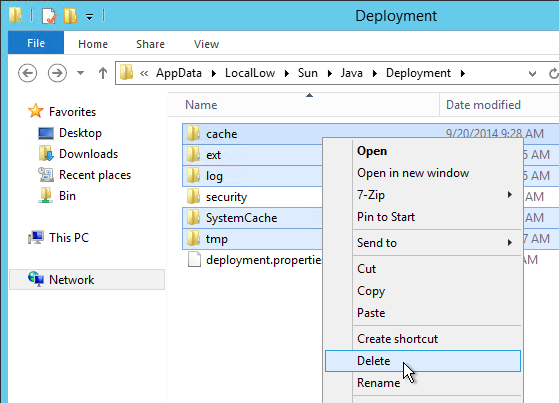
- Add the following three entries so Java settings are saved to the roaming profile:
AppData\LocalLow\Sun\Java\Deployment\security\exception.sites
AppData\LocalLow\Sun\Java\Deployment\security\trusted.certs
AppData\LocalLow\Sun\Java\Deployment\deployment.properties
- Bob Bair at Citrix Discussions recommends these additional files for Chrome:
AppData\Local\Google\Chrome\User Data\First Run
AppData\Local\Google\Chrome\User Data\Local State
AppData\Local\Google\Chrome\User Data\Default\Bookmarks
AppData\Local\Google\Chrome\User Data\Default\Favicons
AppData\Local\Google\Chrome\User Data\Default\History
AppData\Local\Google\Chrome\User Data\Default\Preferences
- Citrix’s Start Menu Roaming documentation says that Appdata\Local\Microsoft\Windows\UsrClass.dat* should be added to the list. Profile Management 1909 and newer automatically add Appdata\Local\Microsoft\Windows\UsrClass.dat* to the Files to Synchronize list.
- You can disable the automatic inclusion of these folders by enable the setting Disable automatic configuration located under Advanced Settings.
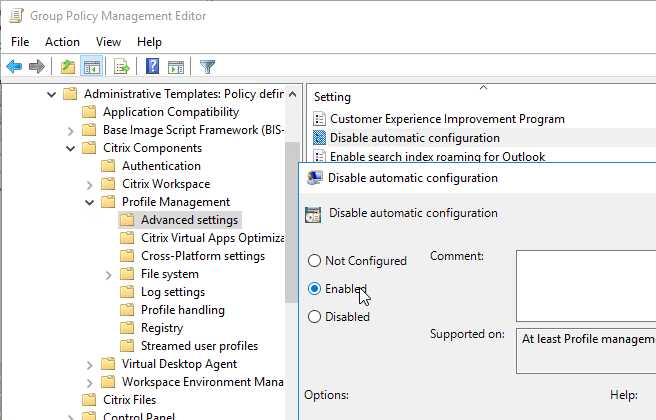
- You can disable the automatic inclusion of these folders by enable the setting Disable automatic configuration located under Advanced Settings.
- Then click OK twice to return to the Group Policy Editor.
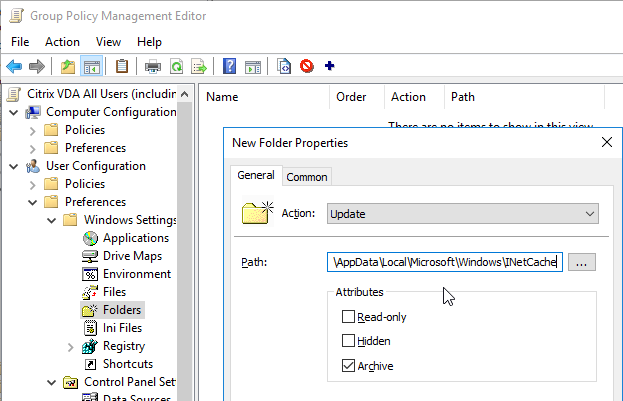
Folders to mirror
- Under File System, in the Synchronization node, enable the setting Folders to mirror.
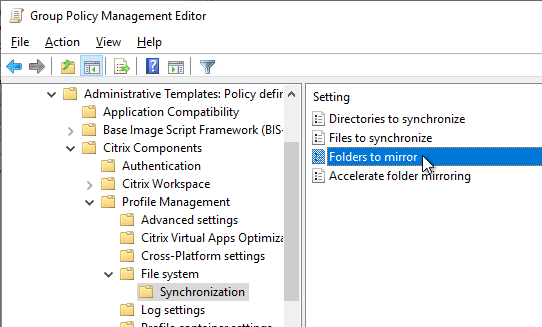
- Enable the setting, and click Show.
- Settings required for Internet Explorer 10 and later versions for browser compatibility at Citrix Docs indicate that the first three folders shown below must be mirrored in order for the Windows 10 Start Menu to function correctly.
- CTX222433 Start Menu Layout Roaming on Windows 10 indicates that TileDataLayer should be mirrored.
- CTX238419 UPM 7.15.2000: With Profile Management Enabled, Blank Icons Might Appear In The Start Menu In The Published Desktops says that AppData\Local\Microsoft\Windows\Caches should be mirrored.
- Citrix’s Start Menu Roaming documentation says that Appdata\Local\Packages should be added to the mirror list but only for Windows 10. In UPM 2103 and newer, RDSH does not need this folder mirrored. If you leave automatic configuration enabled then UPM should automatically decide if it should be mirrored or not.
- Profile Management 1909 and newer automatically add AppData\Local\Packages and AppData\Local\Microsoft\Windows\Caches to the Folders to Mirror list. In UPM 2103 and newer, Packages is added for Windows 10 but not for RDSH.
- You can disable the automatic inclusion of these folders by enable the setting Disable automatic configuration located under Advanced Settings.

- You can disable the automatic inclusion of these folders by enable the setting Disable automatic configuration located under Advanced Settings.
- To prevent Chrome Extension corruption, add AppData\Local\Google\Chrome\User Data\Default\Extensions to Folders to Mirror (source = CTX238525 Google Chrome extensions are getting corrupted when using using UPM)
- For Chrome login data, add AppData\Local\Google\Chrome\User Data\Default\Login Data and AppData\Local\Google\Chrome\User Data\Default\Last Session to Folders to Mirror (source = CTX232587 Citrix UPM + WEM – Google Chrome does not remember user login data)
- For Chrome Bookmarks, add AppData\Local\Google\Chrome\User Data\Default to Folders to Mirror (source = CTX235698 Issues to synchronize bookmarks of Google Chrome using Citrix UPM on latest LTSR version (7.15 CU2))
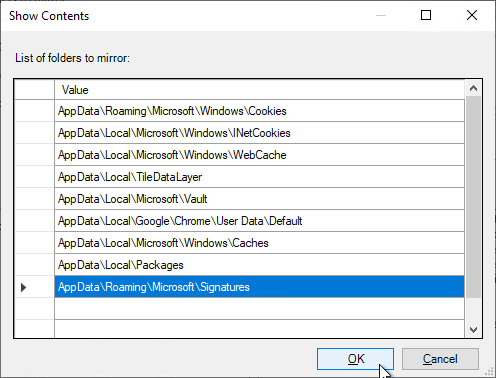
- Add the following:
AppData\Roaming\Microsoft\Windows\Cookies
AppData\Local\Microsoft\Windows\INetCookies
AppData\Local\Microsoft\Windows\WebCache
AppData\Local\TileDataLayer
AppData\Local\Microsoft\Vault
AppData\Local\Microsoft\Windows\Caches
AppData\Local\Packages
AppData\Local\Google\Chrome\User Data\Default
- These three are only needed if you didn’t include the entire Chrome User Data Default folder.
AppData\Local\Google\Chrome\User Data\Default\Extensions
AppData\Local\Google\Chrome\User Data\Default\Login Data
AppData\Local\Google\Chrome\User Data\Default\Last Session
- These three are only needed if you didn’t include the entire Chrome User Data Default folder.
- Click OK.
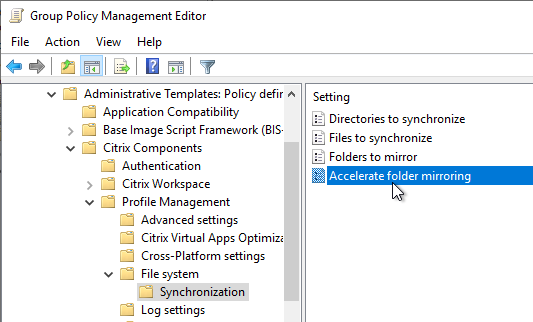
- Profile Management 2106 and newer have a setting called Accelerate folder mirroring that stores the mirrored folders in a VHDX file instead of copying back and forth at login and logoff.
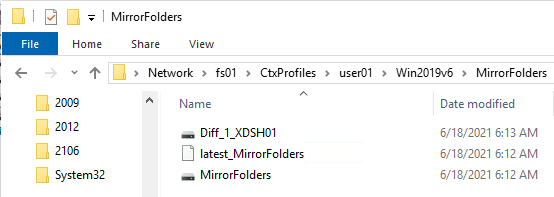
- UPM creates a folder named MirrorFolders in the user’s UPM path and creates a couple thin-provisioned VHDX files in that path.
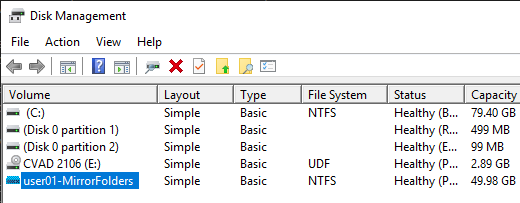
- Disk Management shows that the mounted Diff disk has a 50 GB capacity limit.
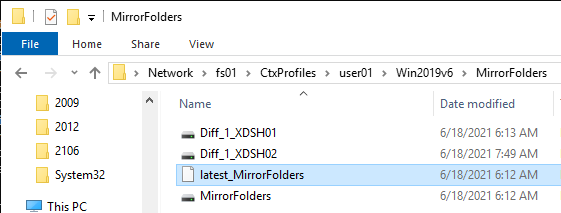
- Logging into multiple sessions concurrently results in multiple Diff disks.
- If the file server is unavailable then unpredictable behavior occurs. After the file server is back up, the session continues to misbehave and won’t recover until users log off and log back on. Plan for file server high availability that can handle always-open VHDX files. DFS won’t help you.
- Profile Management 2109 and newer can Automatically reattach detached VHDX disks.
- UPM creates a folder named MirrorFolders in the user’s UPM path and creates a couple thin-provisioned VHDX files in that path.
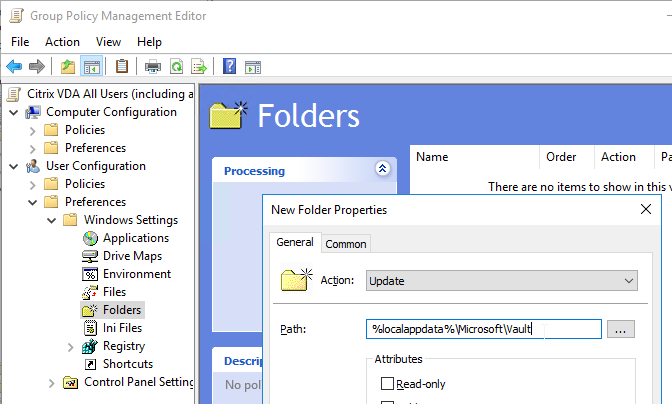
- According to CTX213190 Configure UPM to save password in Internet Explorer, you’ll also need a User Configuration > Preferences > Windows Settings > Folders item to create the %localappdata%\Microsoft\Vault folder.
Profile Container
Profile Management 2407 and newer have new Container features, including:
- In-session profile container failover among multiple user stores – Citrix Docs
- Registry exclusion and inclusion support extended to container-based profile solution – Citrix Docs
- Reset container-based profiles without the risk of losing user data – Citrix Docs
- Collects statistical data on VHD compaction actions and provides it to Workspace Environment Management (WEM) for reporting
To configure profile container:
- Profile Management 1903 and newer have a Profile container setting.
- In Profile Management 2009 and newer, the Profile container setting moved to its own node.
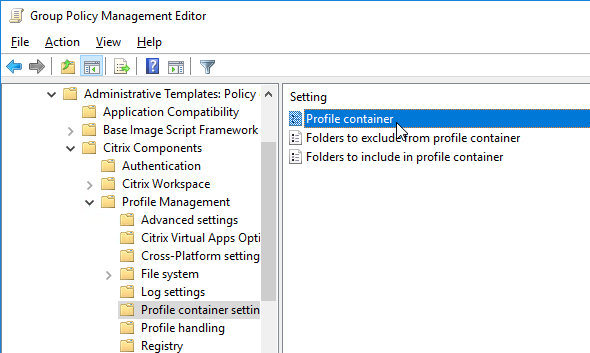
- In older versions of Profile Management, Profile Container is located under File System | Synchronization.
- In Profile Management 2009 and newer, the Profile container setting moved to its own node.
- Click the Show button to specify profile paths that should be placed in the mounted file share profile disk (VHDX file) instead of copied back and forth at logon and logoff.
- In Profile Management 2009 and newer, you can specify * to put the entire profile in the Container. Then use the other two settings to exclude folders from the Container. See Profile Container at Citrix Docs.
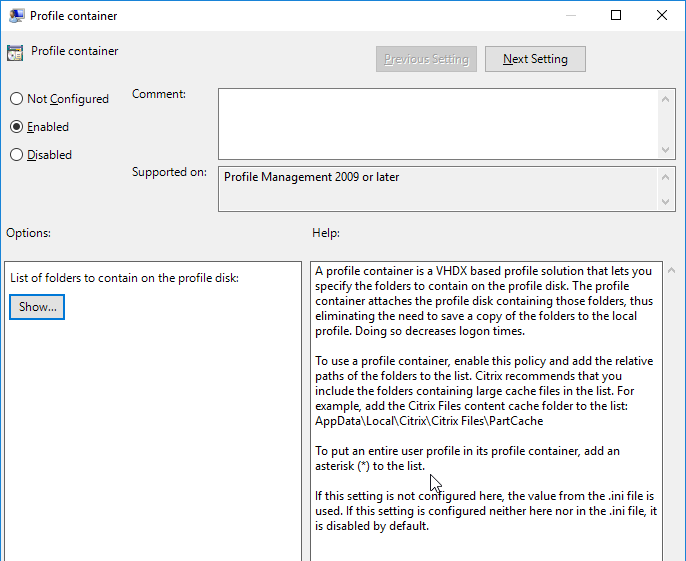
- In Profile Management older than version 2009, this setting is for large cache files (e.g. Citrix Files cache) and is not intended for the entire profile.
- In Profile Management 2009 and newer, you can specify * to put the entire profile in the Container. Then use the other two settings to exclude folders from the Container. See Profile Container at Citrix Docs.
- Profile Management 2103 and newer have a setting to Enable local caching for profile containers. Combine this with Profile Streaming for faster logons. The entire profile should be stored in the profile container.
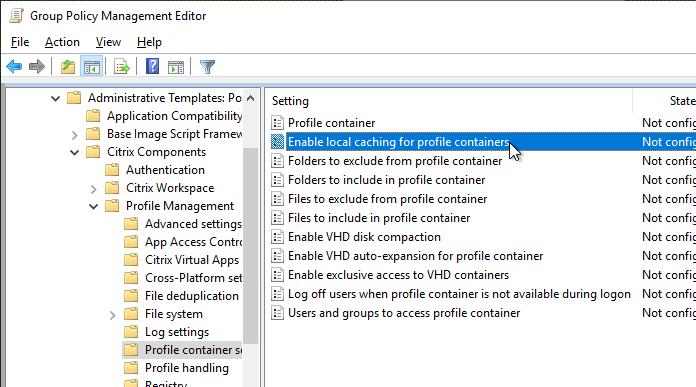
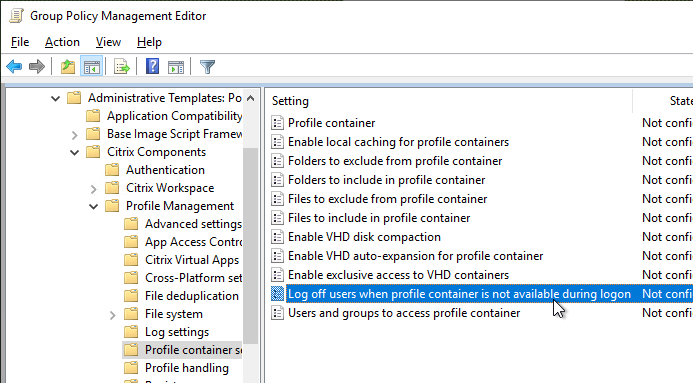
- Profile Management 2311 and newer can Log off users when profile container is not available during logon.
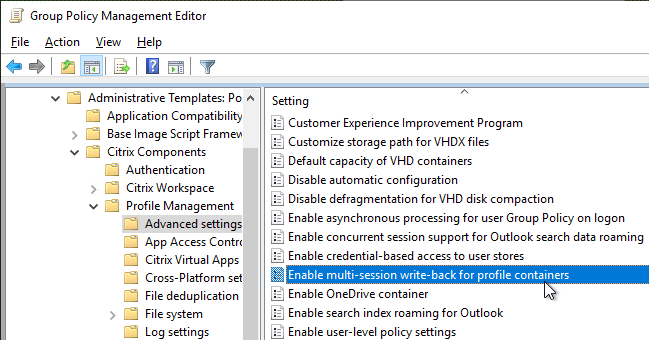
- On the left, under Advanced Settings, Profile Management 2103 and newer have a setting to Enable multi-session write-back for profile containers. This setting applies to both UPM Profile Container and Microsoft FSLogix Profile Container. If the same user launches multiple sessions on different machines, changes made in each session are synchronized and saved to the user’s profile container disk.
- Profile Management 2109 and newer can Automatically reattach detached VHDX disks.
- Citrix recommends using Profile Container for Microsoft Teams.
- See CTX247569 Citrix Profile Management: Troubleshooting Profile Containers.
- Profile Management 2209 and newer can replicate the profile container to multiple shares.
- In Profile Management 2407 and newer, for the container-based profile solution, the Enable in-session policy container failover among user stores policy is automatically enabled to ensure profile redundancy for the entire session.
- In Profile Management 2407 and newer, for the container-based profile solution, the Enable in-session policy container failover among user stores policy is automatically enabled to ensure profile redundancy for the entire session.
- Profile Management 2308 and newer can auto-expansion the container.
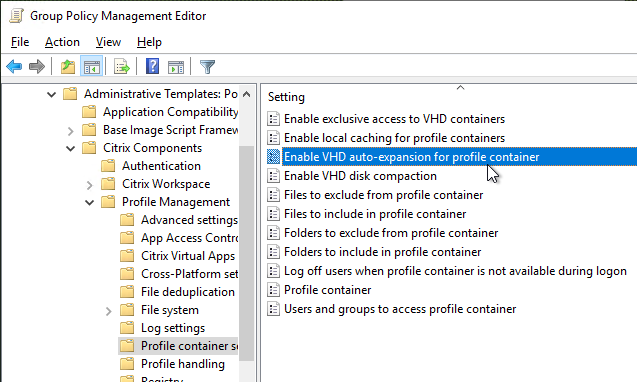
- Advanced settings node has additional auto-expansion settings.
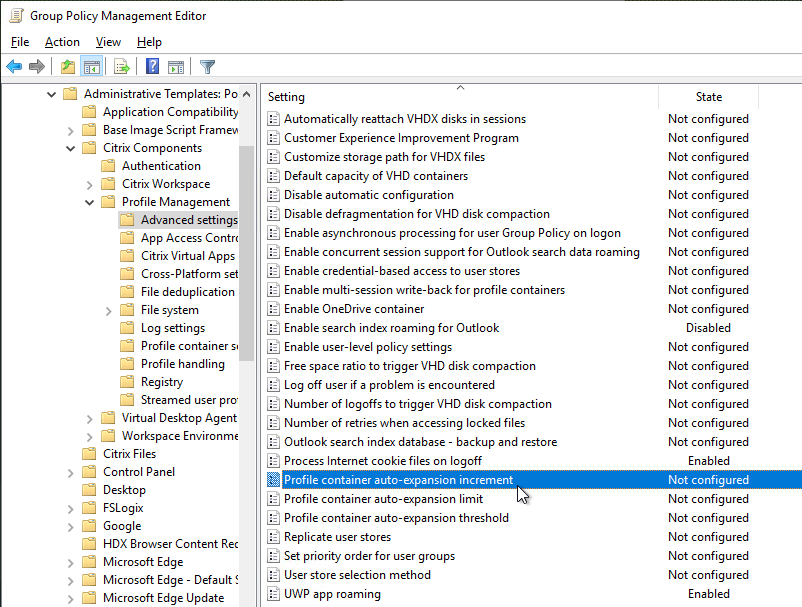
- Advanced settings node has additional auto-expansion settings.
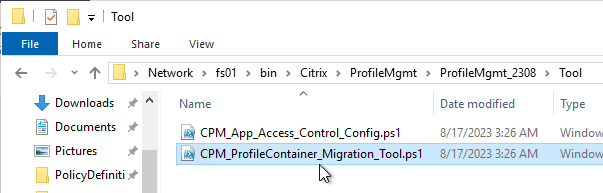
- On the CVAD 2311 and newer ISO, at \x64\ProfileManagement\Tools is a script that can migrate profiles from FSLogix to Citrix Profile Container. Prior to CVAD 2311 the Tools folder is not on the CVAD ISO but is instead included with the separately downloaded Profile Management. See Migrate user profiles at Citrix Docs.
Registry Exclusions
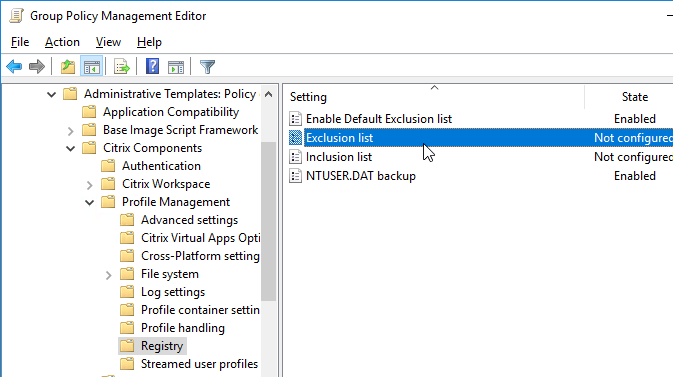
- On the left, under Profile Management, click Registry.
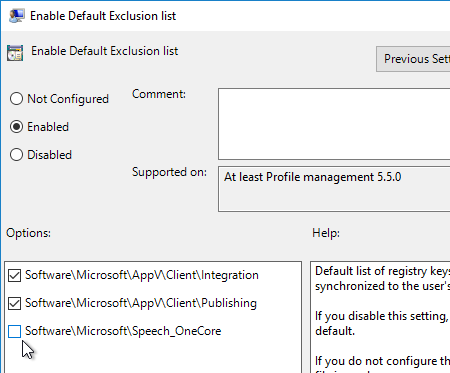
- On the right, open Enable Default Exclusion List.

- Enable the setting. You can use the checkboxes to control which registry keys you don’t want to exclude.
- According to Citrix CTX221380 Occasionally, File Type Association (FTA) Fails to Roam with Profile Management 5.7 on Windows 10 and Windows Server 2016, Software\Microsoft\Speech_OneCore should be unchecked. Click OK.
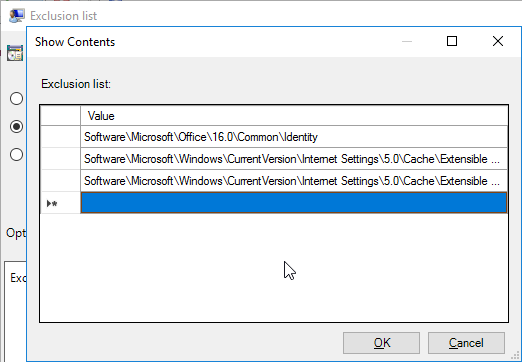
- The setting Exclusion List under Registry lets you exclude registry keys from the roaming profile.
- Nick Panaccio in the comments says that if Office with ADFS constantly prompts for login, then you should exclude the following:
Software\Microsoft\Office\16.0\Common\Identity
- Nick Panaccio at IE11 Enterprise Mode and UPM at Citrix Discussions has a list of registry exclusions for IE in Enterprise Mode.
Software\Microsoft\Windows\CurrentVersion\Internet Settings\5.0\Cache\Extensible Cache\EmieUserList
Software\Microsoft\Windows\CurrentVersion\Internet Settings\5.0\Cache\Extensible Cache\EmieSiteList
- Click OK when done.
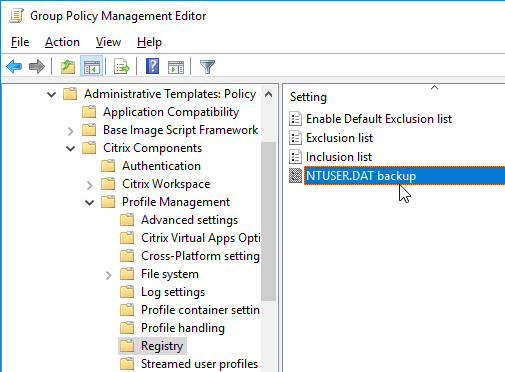
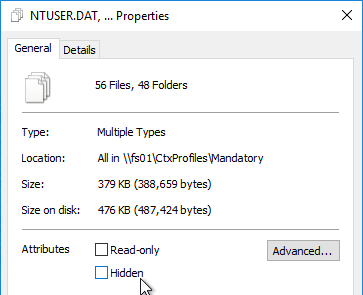
- For the NTUSER.DAT backup setting, which is disabled by default, you can enable it to provide some resiliency against profile corruption.
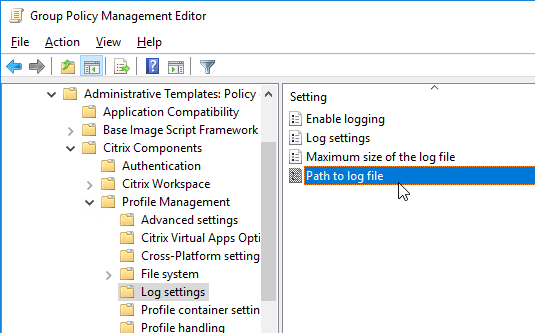
Log Settings
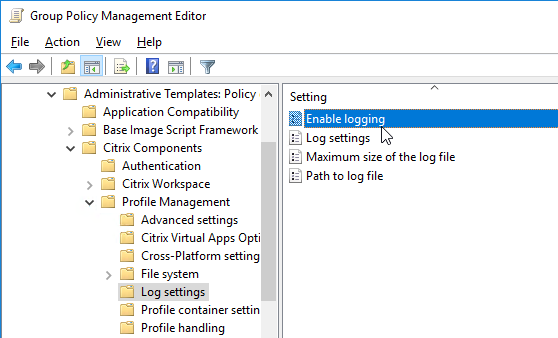
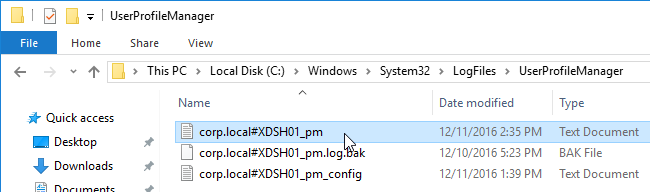
- In the Log Settings node, enable the Enable logging setting. This will make it easy to troubleshoot problems with Profile Management. The logfile is located in C:\Windows\System32\LogFiles\UserProfileManager.
- Edit the Log settings setting.
- Enable the setting and check the boxes next to Logon and Logoff. Click OK.
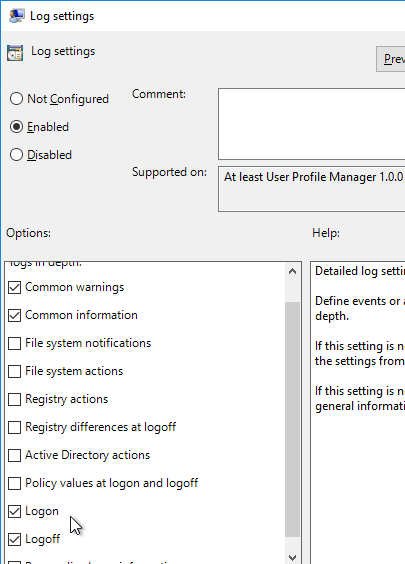
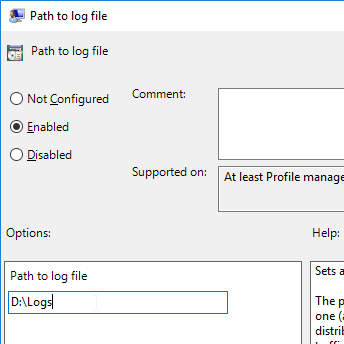
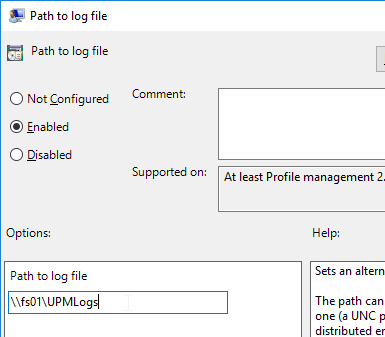
- If your VDA is a Provisioning Services Target Device and/or non-persistent, consider moving the log file to the local persistent disk (e.g. D:\Logs), or to a central share. If a central share, the VDA computer accounts (e.g. Domain Computers) will need Modify permission to the log file path. To change the log file path, edit the Path to log file setting.
- CTX123005 Citrix UPM Log Parser
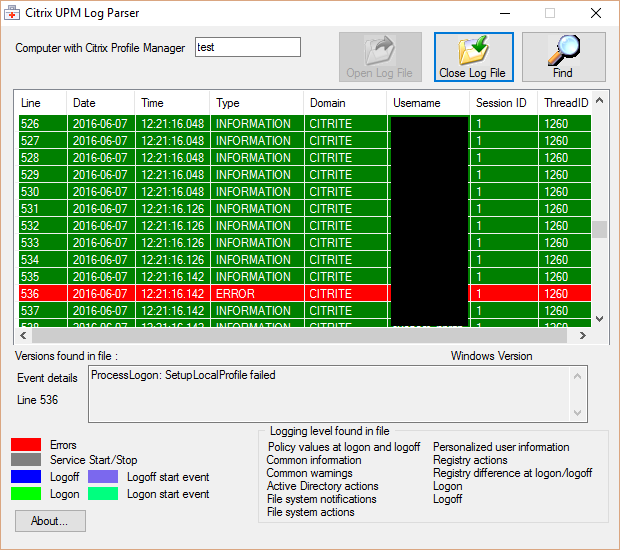
- CTX200674 How To: Review Profile Management Log Files using Microsoft Excel
Profile Streaming
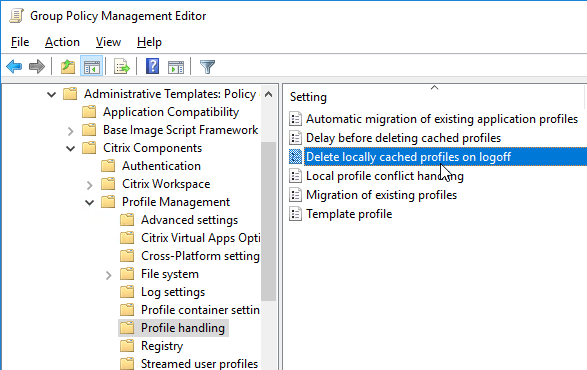
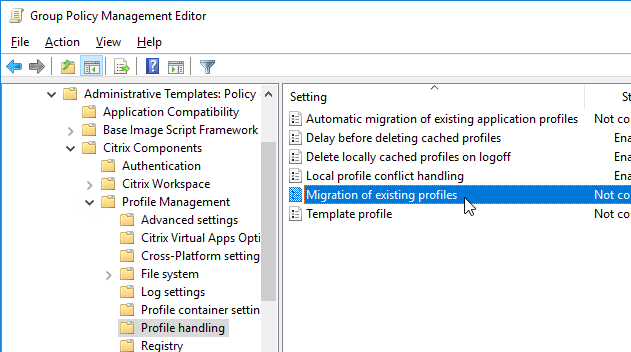
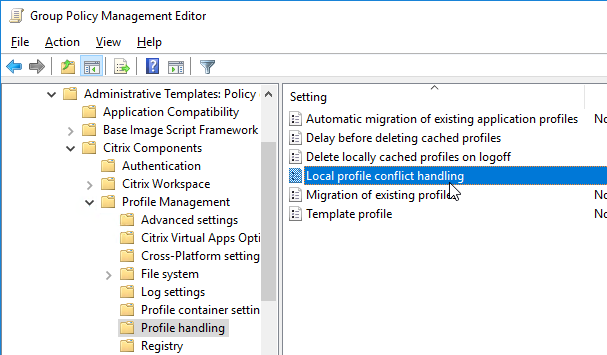
- Go to the Profile handling node under Profile Management.
- Profile Management 1909 and newer have a setting called Automatic migration of existing application profiles under Profile Handling that can migrate existing profiles when you upgrade the version of Windows 10. This setting requires the !CTX_OSNAME! variable in your profile store path.

- Enable the setting Delete locally cached profiles at logoff. Note: this might cause problems in Windows 10.
 Helge Klein has a tool to delete locally cached profiles on a session host. http://helgeklein.com/free-tools/delprof2-user-profile-deletion-tool/. This tool should only be needed if profiles are not deleting properly.
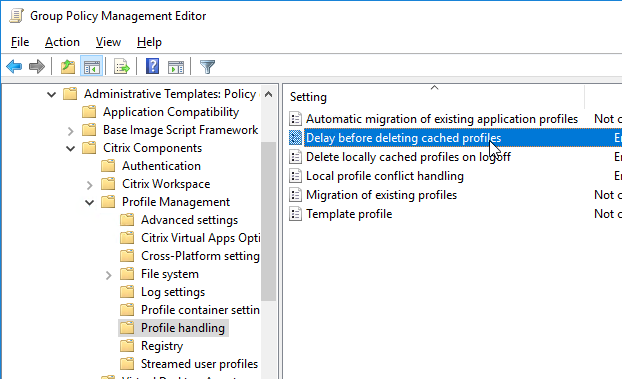
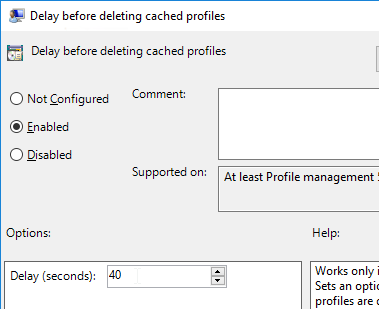
 - For Windows 10/2016 machines, CTX216097 Unable to Delete NTUSER.DAT* Files When a User Logs off recommends setting Delay before deleting cached profiles to 40 seconds.
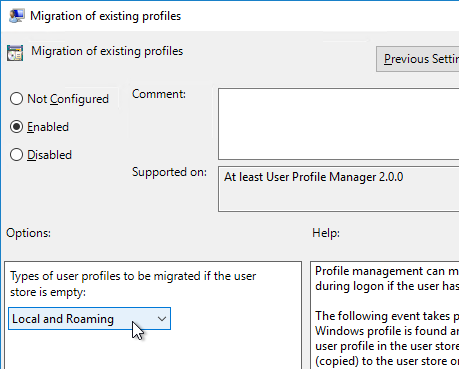
- Enable the setting Migration of existing profiles and set it to Local and Roaming. Citrix CTX221564 UPM doesn’t migrate local user profile since version 5.4.1.
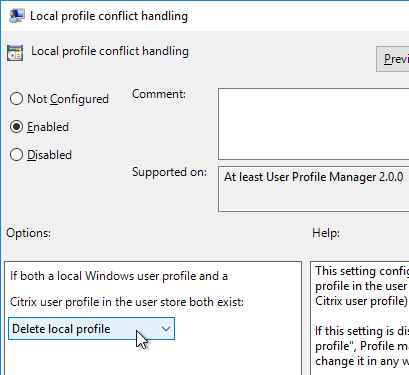
- Enable the setting Local profile conflict handling, and set it to Delete local profile. Note: this might cause problems on Windows 10.
- For fastest logons, Citrix recommends Profile streaming + Enable profile streaming for folders + Accelerate folder mirroring all enabled, or only enable Profile Container for the entire user profile. More details at CTX463658 Reduce logon time with Profile Management.
- Under Profile Management > Streamed user profiles is Profile streaming. Enable this setting to speed up logons.
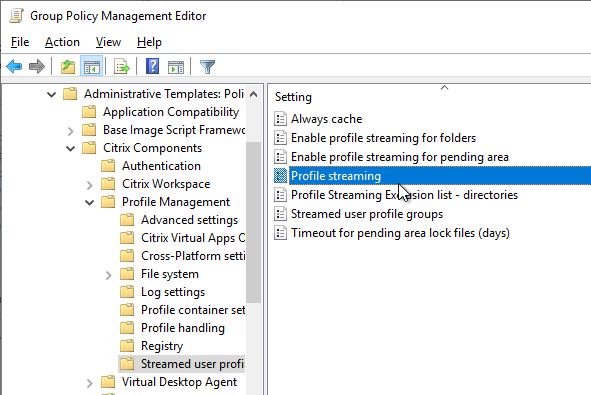
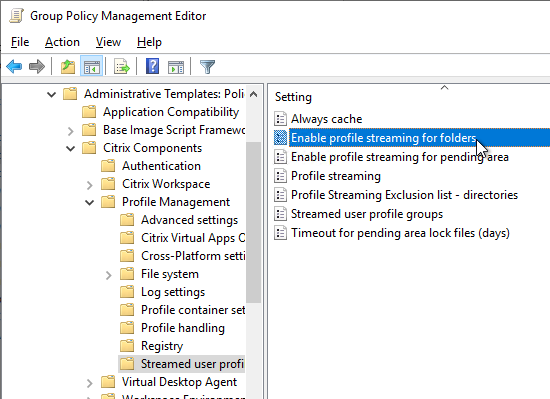
- Profile Management 2103 and newer have a setting to Enable profile streaming for folders, which should speed up logons. In Profile Management 2402 and newer, profile streaming for folders is enabled by default.
- Profile Management 2106 and newer have a setting under File System > Synchronization called Accelerate folder mirroring that stores the mirrored folders in a VHDX file instead of copying back and forth at login and logoff.
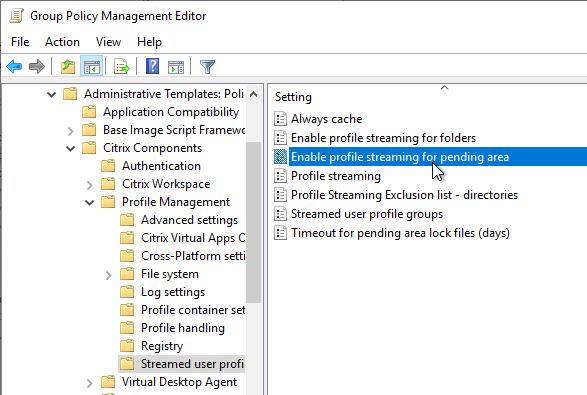
- Profile Management 2206 adds Enable profile streaming for pending area. Enable this setting if users run multiple Citrix sessions concurrently and you have Active Write Back enabled.
- Under Profile Management > Streamed user profiles is Profile streaming. Enable this setting to speed up logons.
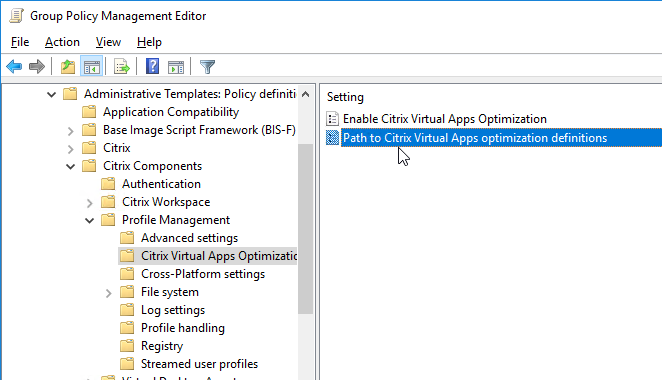
- Profile Management 7.16 and newer have XenApp Optimization (aka Citrix Virtual Apps Optimization) feature, which uses Microsoft UE-V templates to define specific settings that should be saved and restored at logoff and logon. See George Spiers XenApp Optimization (new in CPM 7.16+) for details.
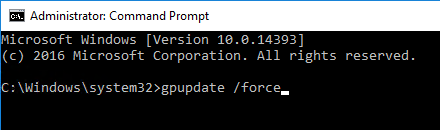
- After modifying the GPO, use Group Policy Management Console to update the VDAs.
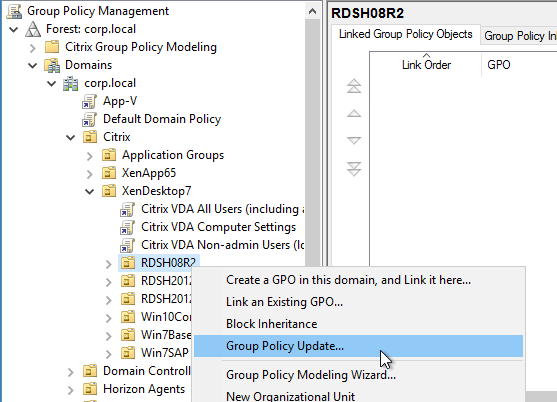
- Or run gpupdate /force on the VDAs, or wait 90 minutes.
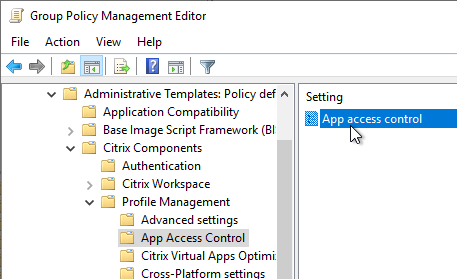
App Access Control
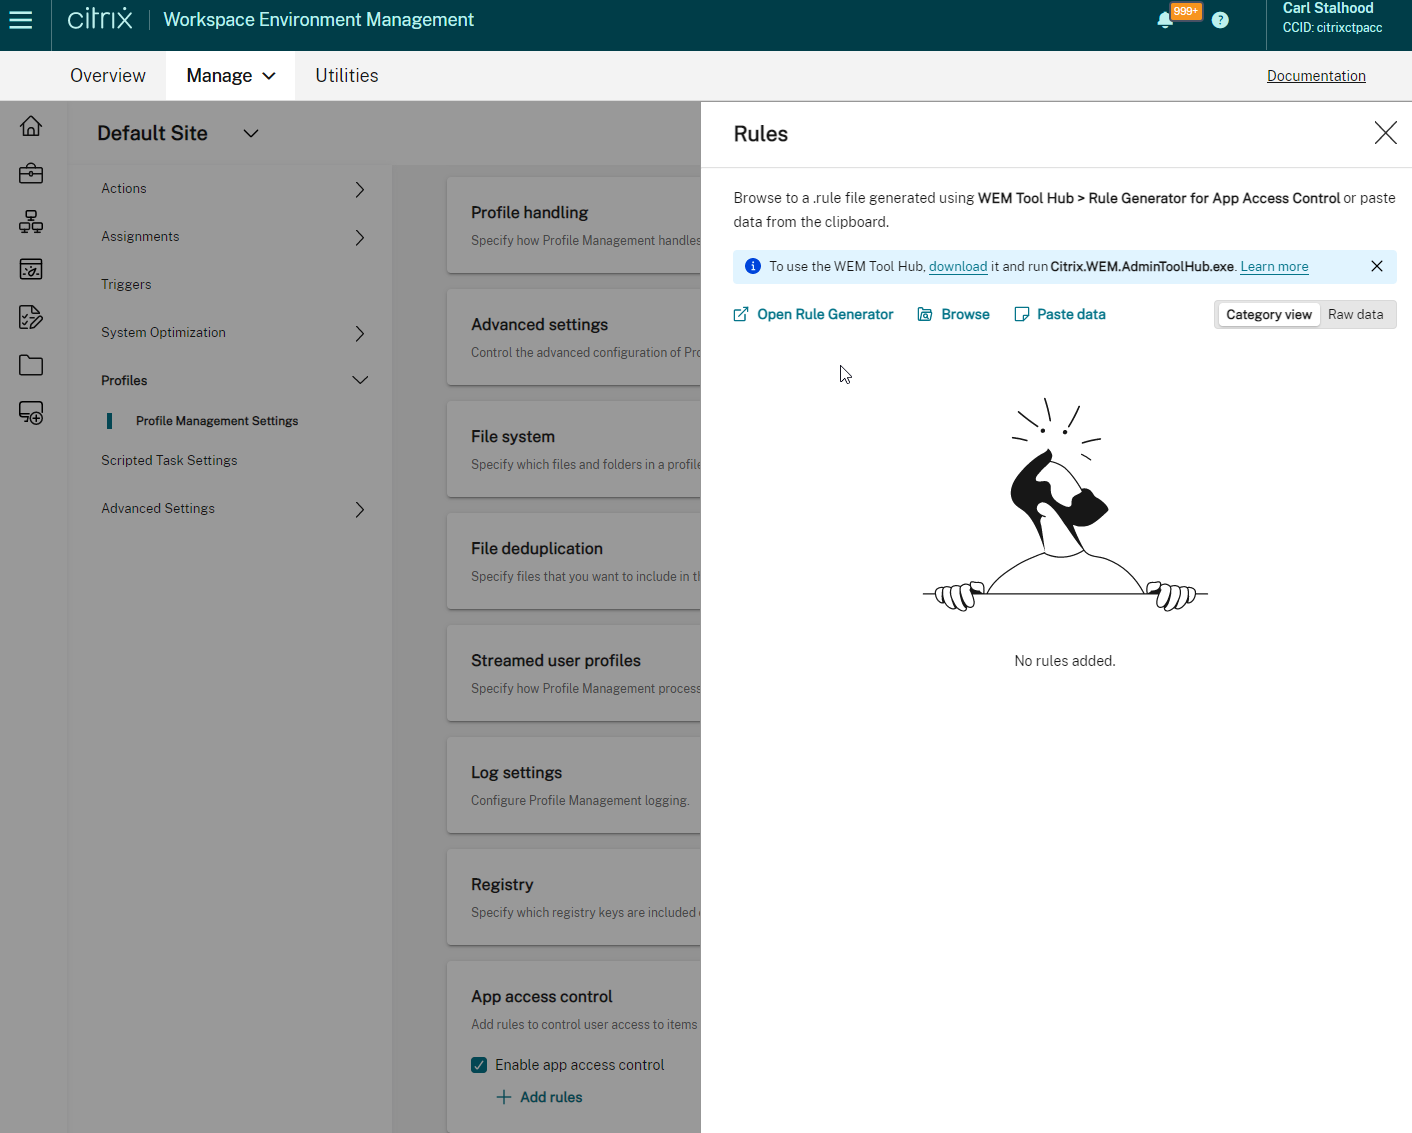
Profile Management 2303 and newer support app access control. This is similar to FSLogix App Masking.
Citrix WEM Tool Hub has a GUI-based Rule Generator.
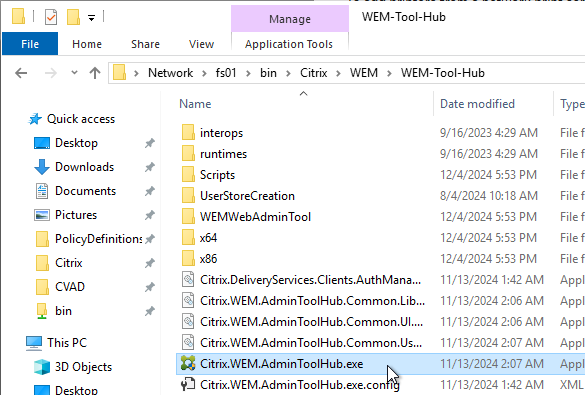
- In Workspace Environment Management Web Console, various places in the console have a link to download the WEM Tool Hub. For example, in a Configuration Set > Printers, click Add from print server.
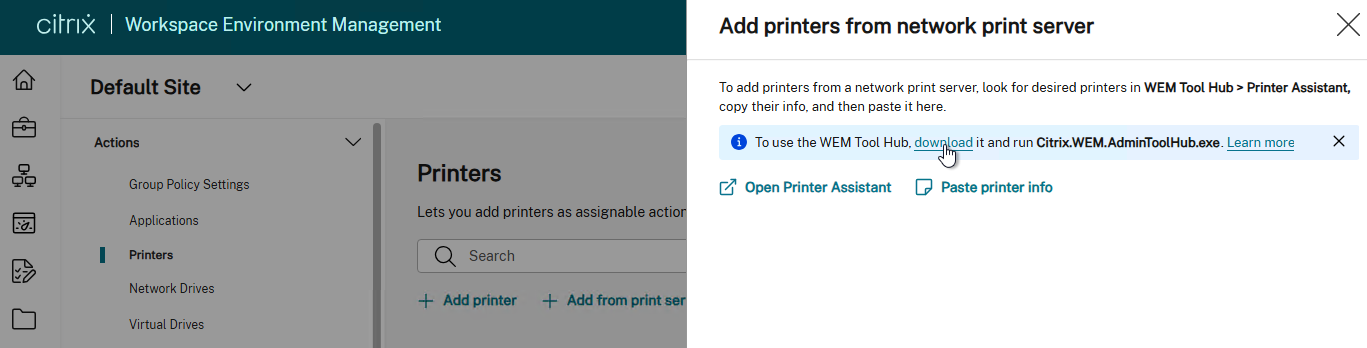
- Extract the WEM Tool Hub and run Citrix.WEM.AdminToolHub.exe.
- Click Rule Generator for App Access Control.
- Click Create app rule. WEM 2411 adds Redirect as an option. Otherwise choose Hide.

- Redirect lets you redirect Files, Folders, Registry keys or Registry values.
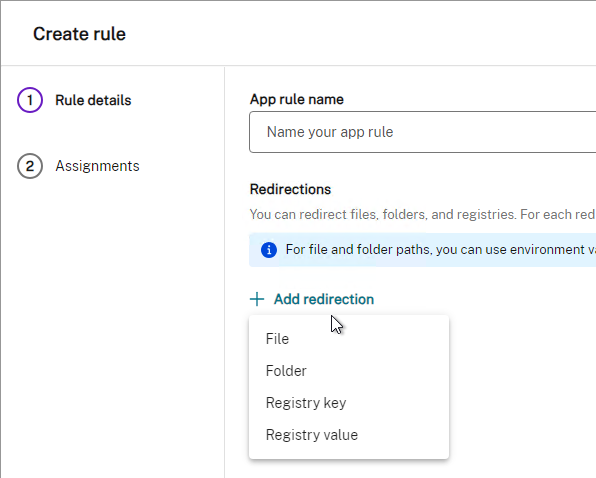
- If Hide:
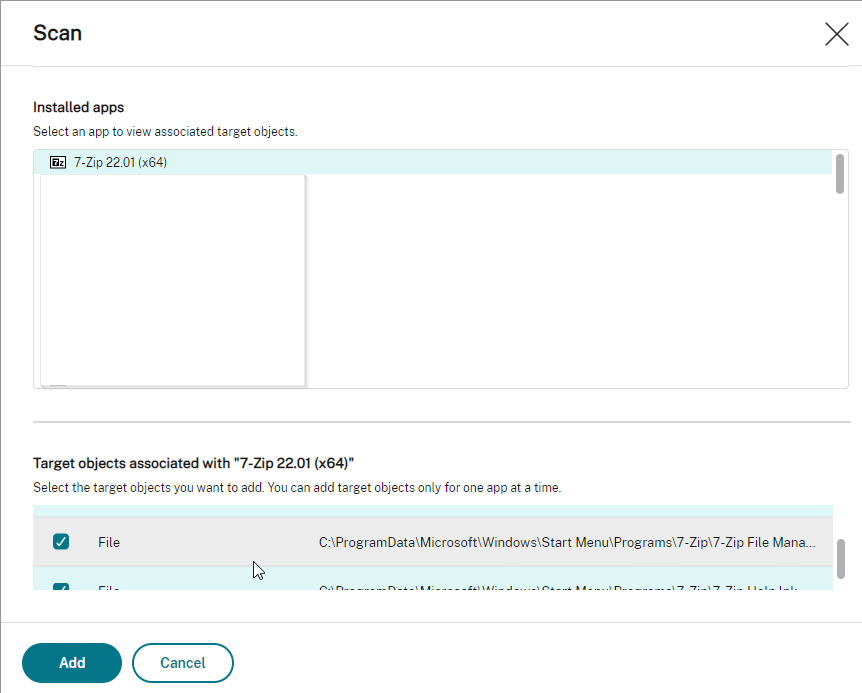
- Click Scan to select an app installed on the local machine.
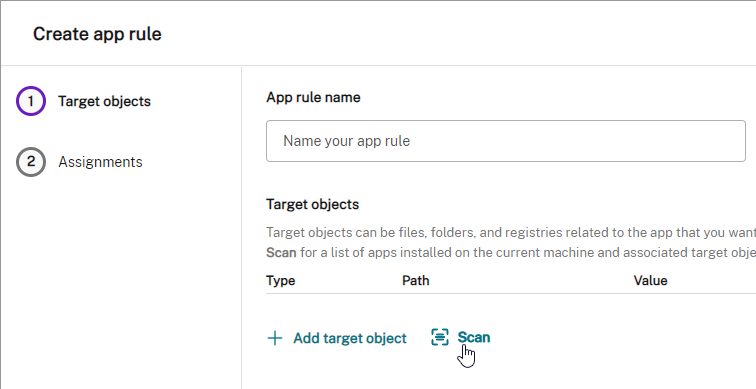
- The tool scans the selected app and automatically adds rules for the app. Click Add when done.
- Give the app a name and click Next.
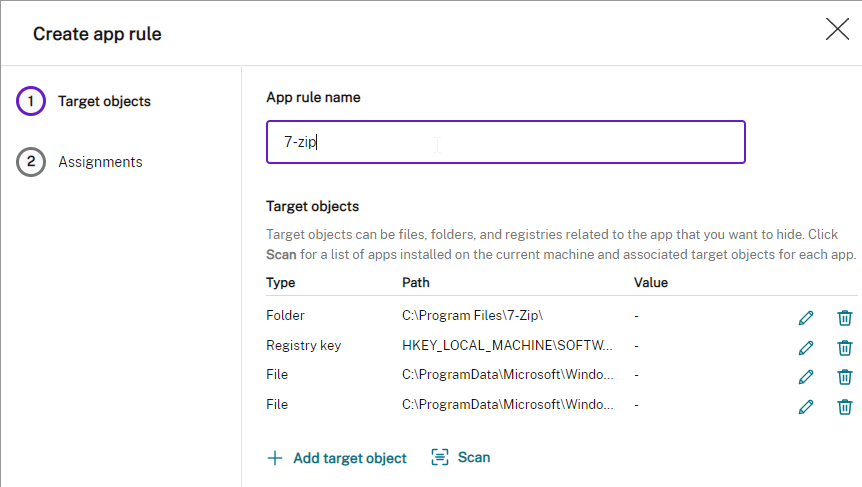
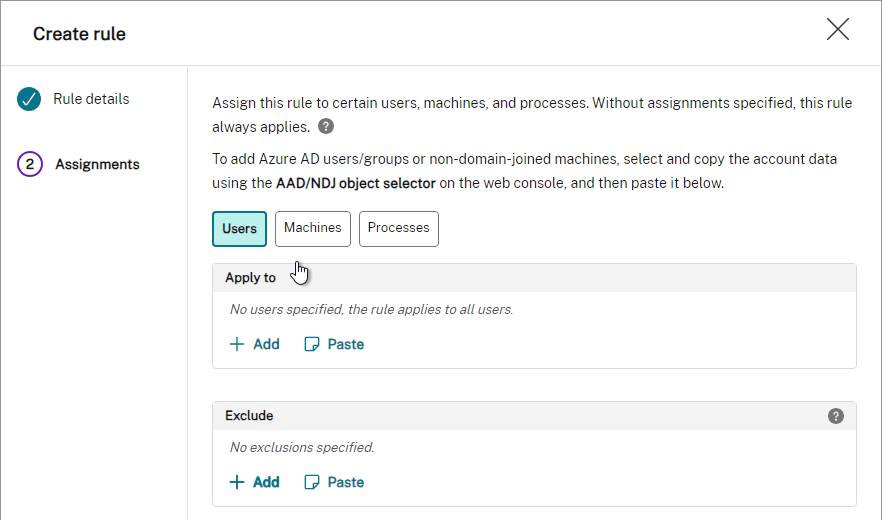
- Assign the rule to users, computers, or processes. 2411 and newer let you specify Exclusions. Click Done.
- Click Scan to select an app installed on the local machine.
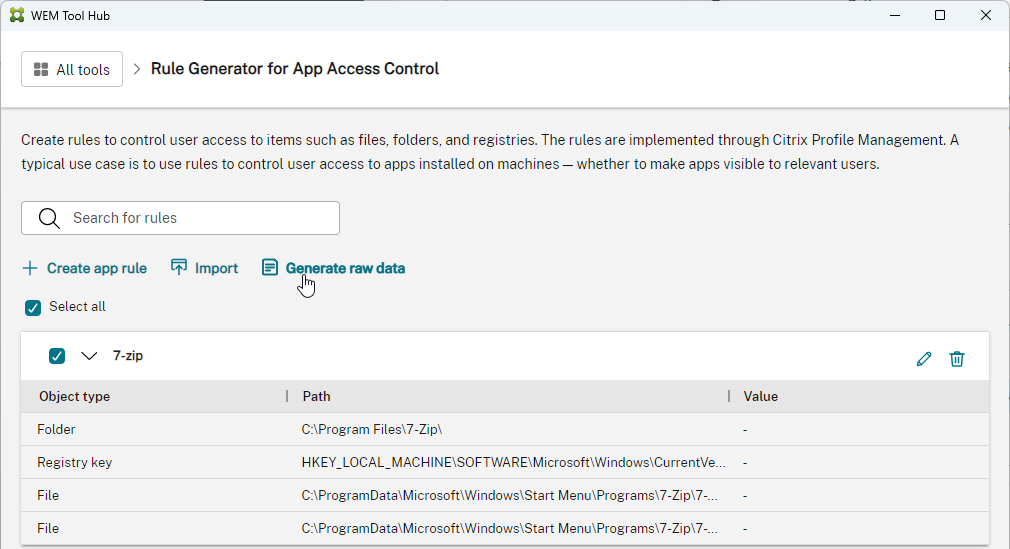
- Select the app rules and click Generate raw data.
- Click Save to file.
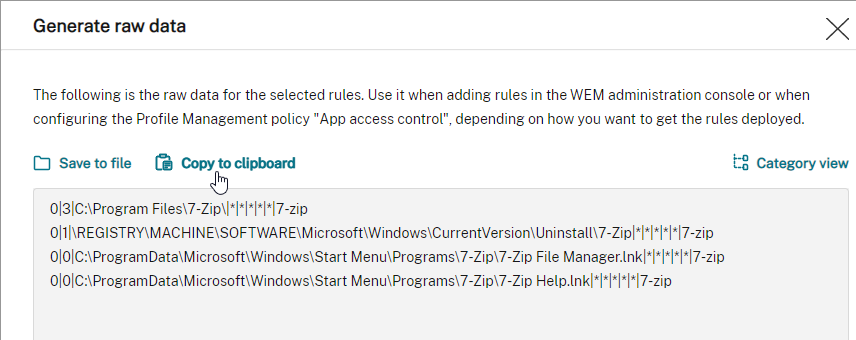
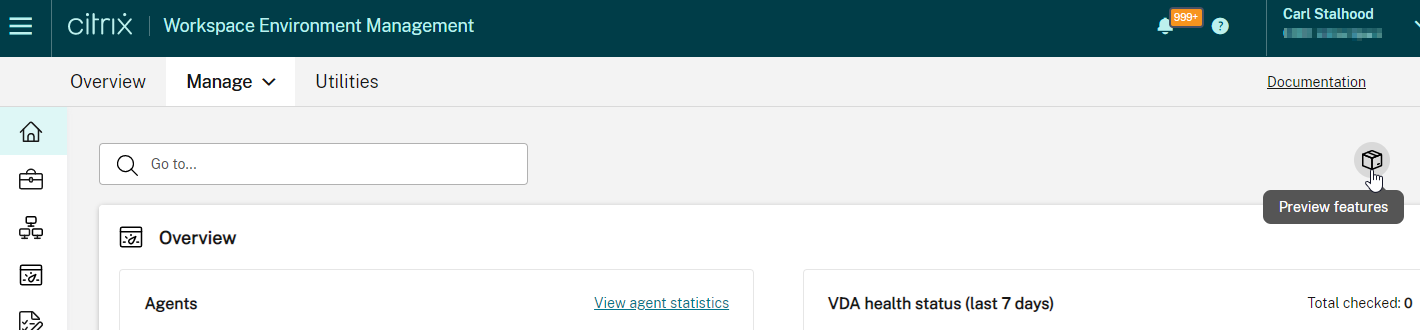
- Use WEM or Group Policy to push the string to the VDAs. App Access Control is currently a preview feature. Enable it in Citrix Cloud > Workspace Environment Management > Manage > Web Console > Home page > Preview features.

- Then edit a Configuration Set. Go to Profiles > Profile Management Settings and find App access control. Browse to the .rule file saved earlier.
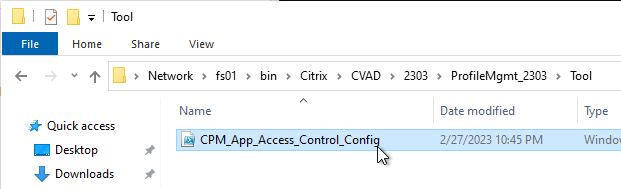
If you don’t have access to WEM Cloud, then the PowerShell Rule Generator is on the CVAD 2311 or newer ISO under \x64\ProfileManagement\Tools. Prior to CVAD 2311, the Tools folder is in the downloaded standalone Profile Management.
- The CPM_App_Access_Control_Config.ps1 PowerShell script is in the Tools folder.
- The Rule Generator script lists all locally installed apps and asks you choose one.
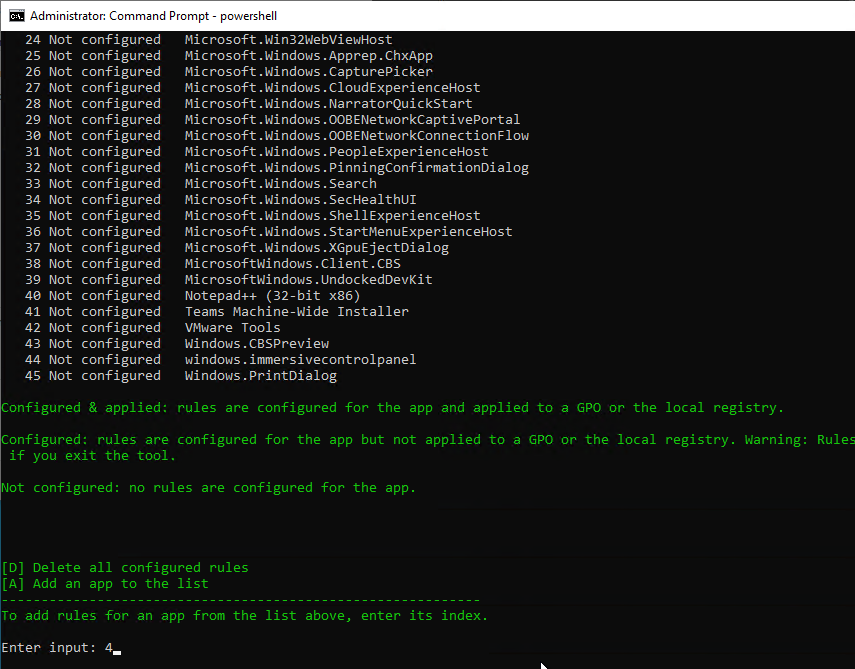
- The tool auto-generates some rules for the app and asks you to edit the rules or go to the next step to manage assignments.
- You can assign groups that can view the app. When done, press 4 to generate the rules for deployment.
- The script can push the rules to a GPO. Or you can press 3 to generate the string that you then must configure yourself in the GPO.
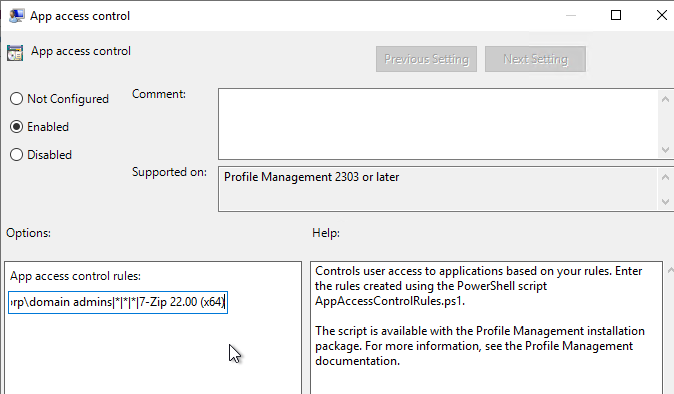
- The GPO setting is at Computer Configuration | Policies | Administrative Templates | Citrix Components | Profile Management | App Access Control. Enable the setting named App access control and paste the string that the Rule Generator provided.
Also see CTP James Rankin QuickPost – Citrix UPM App Access Control
Mandatory Profile – Citrix Method
Profile Management 5.0 and newer has a mandatory profile feature. Alternatively, use the Microsoft method. Also see CTP James Rankin How to create mandatory profiles in Windows 10 Creators Update (1703).
- Create a file share (e.g. \\fs01\profile). Give Read permission to Users and Full Control to Administrators.
- Login to the VDA machine as a template account. Do any desired customizations. Logoff.
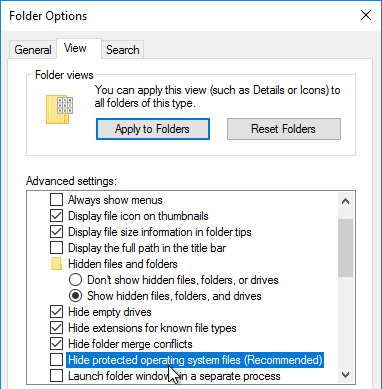
- Make sure you are viewing hidden files and system files.
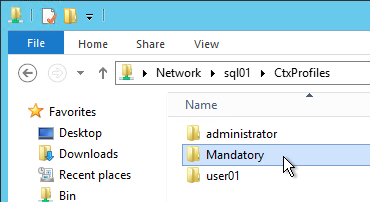
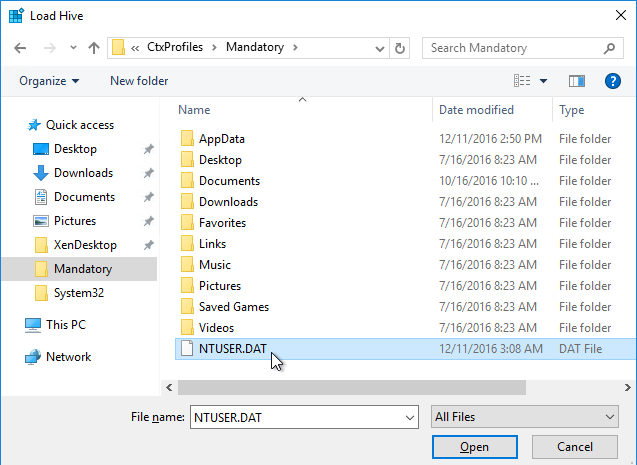
- Copy C:\Users\%username% to your fileshare. Name the folder Mandatory or something like that. Citrix Profile Management does not need .v2 or .v4 or .v6 on the end.
- You can copy C:\Users\Default instead of copying a template user. If so, remove the Hidden attribute. If you use Default as your mandatory, be aware that Active Setup will run every time a user logs in.
- You can copy C:\Users\Default instead of copying a template user. If so, remove the Hidden attribute. If you use Default as your mandatory, be aware that Active Setup will run every time a user logs in.
- Open the AppData folder and delete the Local and LocalLow folders.

- Java settings are stored in LocalLow so you might want to leave them in the mandatory profile. The only Java files you need are the deployment.properties file, the exception.sites file, and the security/trusted.certs file. Delete the Java cache, tmp and logs.
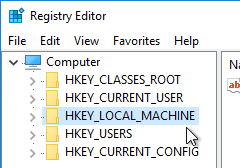
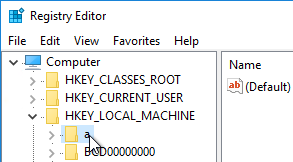
- Open regedit.exe.
- Click HKEY_LOCAL_MACHINE to highlight it.
- Open the File menu and click Load Hive.
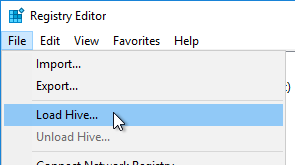
- Browse to the mandatory profile and open NTUSER.DAT. Note: Citrix Profile Management does not use NTUSER.MAN and instead the file must be NTUSER.DAT.
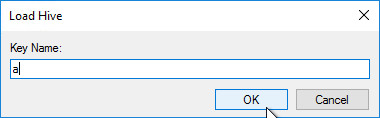
- Name it a or similar.
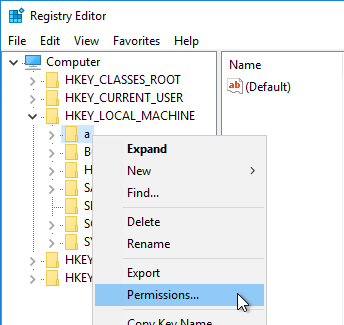
- Go to HKLM\a, right-click it, and click Permissions.
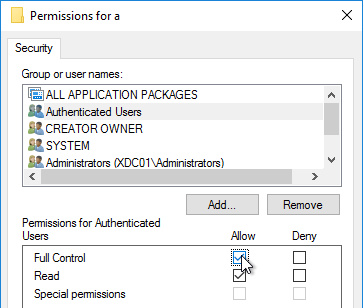
- Add Authenticated Users and give it Full Control. Click OK.
- With the hive still loaded, you can do some cleanup in the registry keys. See http://www.robinhobo.com/how-to-create-a-mandatory-profile-with-folder-redirections/ and http://appsensebigot.blogspot.ru/2014/10/create-windows-mandatory-profiles-in.html?m=1 for some suggestions.
- Citrix CTX212784 Slow User Logon When Using Mandatory Profiles – set HKCU\a\Software\Citrix\WFSHELL\SpecialFoldersIntialized (DWORD) = 1
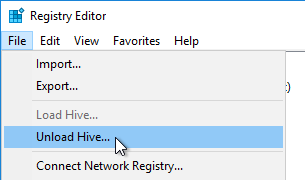
- Highlight HKLM\a.
- Open the File menu, and click Unload Hive.
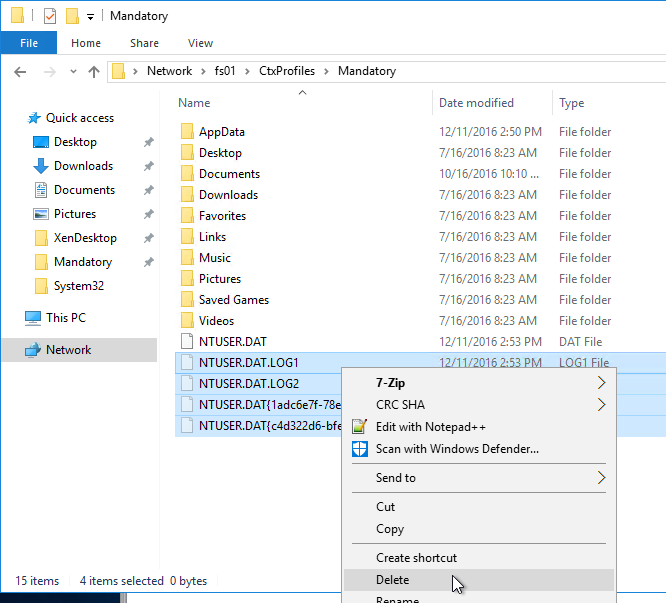
- Go back to the file share and delete the NTUSER.DAT log files.
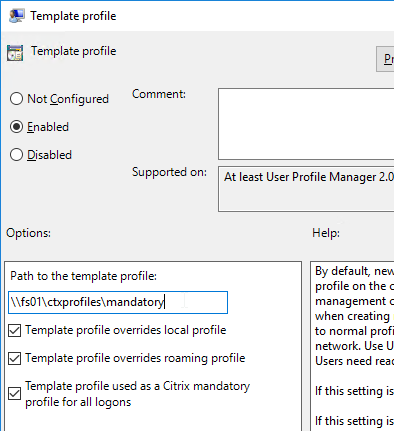
- Create/Edit a GPO that appplies to the VDAs. Make sure the Citrix Profile Management policy template is loaded.
- Go to Computer Configuration > Policies > Administrative Templates > Citrix Components > Profile Management > Profile handling. Edit the setting Template profile.
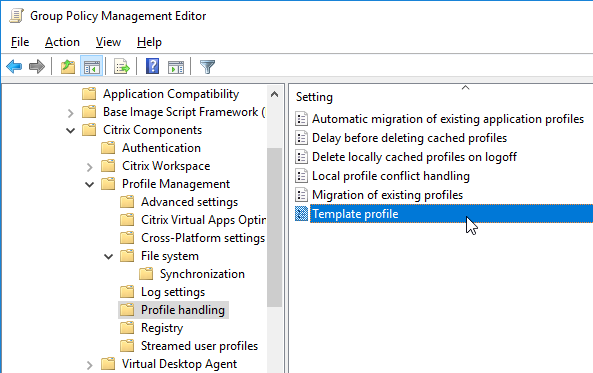
- Enable the setting and enter the path to the Mandatory profile.
- Check all three boxes. Then click OK.
Redirected Profile Folders
- Make sure loopback processing is enabled on your VDAs.
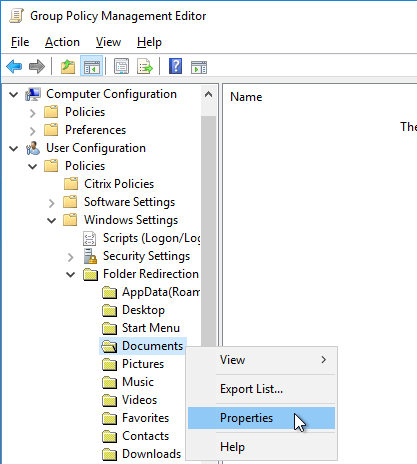
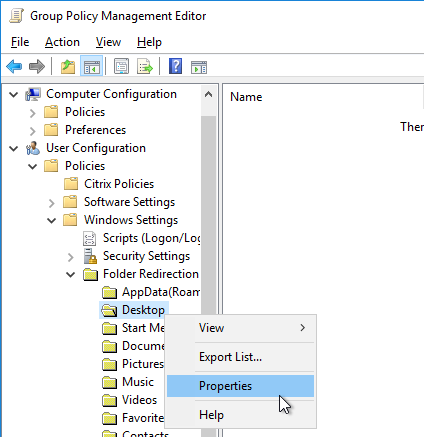
- Edit a GPO that applies to all VDA users, including Administrators.
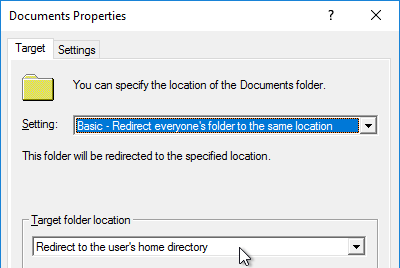
- Go to User Configuration\Policies\Windows Settings\Folder Redirection. Right-click Documents, and click Properties.
- In the Setting drop down, select Basic.
- In the Target folder location drop down, select Redirect to the user’s home directory.
- Switch to the Settings tab.
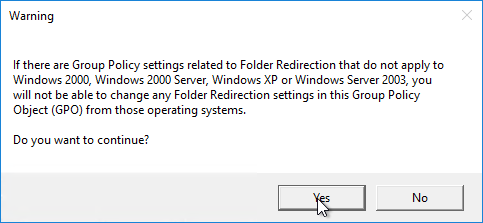
- On the Settings tab, uncheck the box next to Grant the user exclusive rights. Click OK. Note: Move the contents to the new location might cause issues in some deployments.
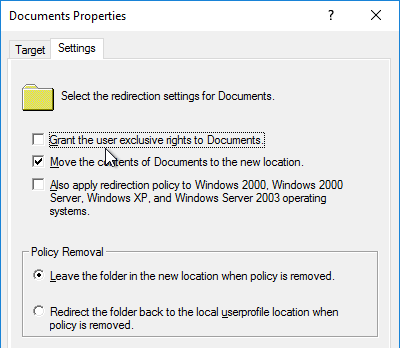
- Click Yes to acknowledge this message.
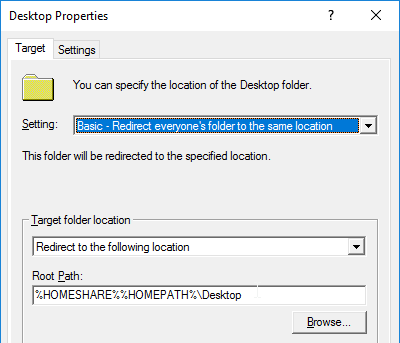
- Right-click Desktop and click Properties.
- Change the Setting drop-down to Basic.
- Change the Target folder location to Redirect to the following location.
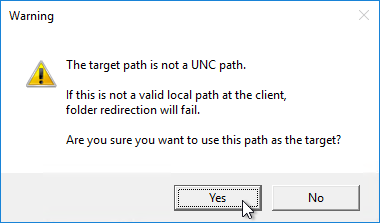
- In the Root Path box, enter %HOMESHARE%%HOMEPATH%\Desktop. It is critical that this is a UNC path and not a mapped drive. Also, since we’re using home directory variables, all users must have home directories defined in Active Directory.
- Switch to the Settings tab.
- Uncheck the box next to Grant the user exclusive rights to Desktop and click OK.
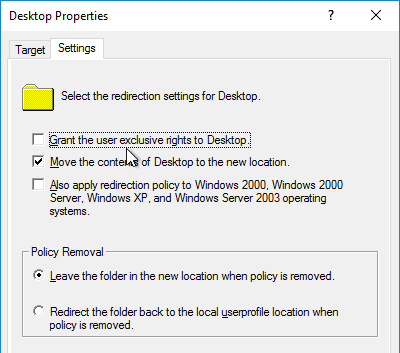
- Click Yes when prompted that the target is not a UNC path. You get this error because of the variable. It doesn’t affect operations.
- Repeat for the following folders:
- Documents = Redirect to the User’s Home Directory
- Desktop = %HOMESHARE%%HOMEPATH%\Desktop
- Favorites = %HOMESHARE%%HOMEPATH%\Windows\Favorites
- Downloads = %HOMESHARE%%HOMEPATH%\Downloads
- Redirect the following folders but set them to Follow the Documents folder.
- Pictures
- Music
- Videos
Folders not redirected will be synchronized by Citrix Profile Management.
Verify Profile Management
- Once Profile Management is configured, login to a Virtual Delivery Agent and run gpupdate /force.
- Logoff and log back in.
- Go to C:\Windows\System32\LogFiles\UserProfileManager and open the pm.log file. Look in the log for logon and logoff events.
Profile Management Troubleshooting
UPM Troubleshooter
Citrix Blog Post – UPM Troubleshooter: UPM Troubleshooter is a Windows-based standalone application that examines the live User Profile Management-enabled system in a single click, gives Profile Management Configurations, information on the Citrix products installed, facility to collect and send the logs along with system utilities dashboard to analyze the issue in an effective, simplified, quick and easier manner. See the blog post for more details.

Profile Management Configuration Check Tool
UPMConfigCheck is a PowerShell script that examines a live Profile management system and determines whether it is optimally configured. UPMConfigCheck is designed to verify that Profile management has been configured optimally for the environment in which it is being run, taking into account:
- Hypervisor Detection– The presence or absence of supported hypervisors (for example, Citrix XenServer, VMware vSphere, or Microsoft Hyper-V)
- Provisioning Detection– The presence or absence of a supported machine-provisioning solution (for example, Machine Creation Services or Provisioning Services)
- XenApp or XenDesktop– Whether it is running in a XenApp or a XenDesktop environment
- User Store – Determines that the expanded Path to User Store exists.
- WinLogon Hooking Test – Verifies that Profile management is correctly hooked into WinLogon processing. This test is for Windows Vista, Windows 7, Windows Server 2008, Windows Server 2008 R2 and requires the user running the Configuration Check Tool to have permission to access the relevant registry keys, or an error may be returned.
- Verify Personal vDisk enabled / disabled – Whether the Personal vDisk feature of XenDesktop is enabled
- Miscellaneous – Other factors that it is able to determine through registry or WMI queries, such as whether the computer running Profile management is a laptop
Profile Size
Sacha Thomet at Monitor you Profile directories has a script that displays the size of profiles in a profile share.
Log Parser
CTX123005 Citrix UPM Log Parser
View Log Files using Excel
CTX200674 How To: Review Profile Management Log Files using Microsoft Excel
Hi Carl,
I’m seeing a strange issue in a Citrix environment using UPM Profile Containers.
During logon, a temporary mount called UpmTempMount is created while the profile VHD is being attached. Windows registers this mount as a separate volume in Recycle Bin Properties alongside the system drive.
Because of this, when a user deletes a file (for example from the Desktop), the file appears twice in the Recycle Bin. When emptying the Recycle Bin, Explorer throws an error saying that one of the files cannot be found.
Disabling the Recycle Bin for that volume or deleting $Recycle.Bin does not remove it from the list. Since the mount is recreated during the profile container attach process, it keeps appearing again.
For reference, this is a test environment with no Folder Redirection configured.
Have you seen this behavior with Citrix UPM Profile Containers / temporary VHD mount points, and is there a recommended way to prevent Windows from registering that temporary mount as a $Recycle.bin volume?
Thanks!
current release of Citrix VDA / profile management is 2503
Hi Carl,
In non-persistent environment like pooled VDIs provisioned via Citrix PVS, disabling the last access time stamp has always been a recommended best practice and it’s still part of what the latest version of the Citrix Optimizer tool recommends. The setting can be defined via registry or with the fsutil tool and it applies to a whole volume (usually the C drive). When you combine PVS with FSLogix container, there’s a redirection of the user profile folders from the C drive to the VHDX disk mounted at logon time. Is it still safe to turn off the last access attribute with regards with the FSLogix profile ?
Thanks for your expertise on the matter
Kind regards
Yvan
Recently I applied OneDrive container & File on-demand policy for non-persistent VDI and work as expected. However, found that every time login to the VDI and notice that OneDrive will need to conduct “processing changes” https://support.microsoft.com/en-us/office/onedrive-stuck-on-processing-changes-b386b813-9b66-4e47-8c4c-2b45533edccd. For me this processing changes takes around 5mins to complete the sync for 50 thousand files.
May I seek your advice if there any idea to fix it as permanent within the container?
I have recently started using Citrix UPM 2402 CU1 on DaaS VDI, but App-V based apps doesn’t launch. It crashes. For example – Firefox doesn’t start and no relevant information I can find in the logs why it doesn’t launch.
Hi,
We are having an issue upgrading my Horizon Connection servers from 2406 t0 2412. Our setup consists of 2 connection servers with server1 holding the fsmo role / master.
I am receiving the error
“Unable to find schema master in local LDAP cluster”. Error occured on node %server1% while finding schema master. Please ensure that this node is reachable and there are no LDAP replication issues.”
The same error appears when I try to update on server2. Any assistance on this will be highly appreciated.
See https://docs.omnissa.com/bundle/Horizon8InstallUpgrade/page/TroubleshootingErrorsDuringUpgradeandInstallationofConnectionServers.html
Hello Carl,
since UPM 2411, a new policy called “Users and groups to access redirection target paths” has been implemented.
Since then, the logon times have drastically increased, even if that policy hasn’t been configured with any users or groups.
A test with 1000 20KB files on the Desktop leads to a logon time of 40 seconds, whereas with UPM 2407, the logon time remains fast with 12 seconds.
Running ProcMon during the logon process shows, that each file of the redirected Desktop is being touched and the ACL of the file is being set.
Do you already have any experience with that behavior? Or is there another option to completely turn of the setting of the ACL of the redirected files?
Thanks
Hello Carl ,
i have a question regarding Citrix Profile folder redirections.
Once the user redirection folder is created (with folder only) permissions .
changing it to (this folder, subfolders and files ) does it affect any functionality for the user
Not that I know of, but users usually get permission to subfolders through the CREATOR OWNER permission.
Hi Carl
Is it necessary to install the Citrix Profile management as part of the VDA when using only FSlogix for profiles? Reason i ask is that inside Citrix Cloud it is not possible to see the full interactive session breakdown as we did not install the Citrix Profile management component. Also what are your thoughts comparing FSLogix now to Citrix offerings?
I think Citrix Profile management is required for monitoring of logins and profiles.
For profile containers, I do FSLogix. For file-based profiles, I do Citrix Profile management.
I currently have the feeling that the WebView2 component will cause us increasing problems in UPM, whether file-based or container. The tmp. cache structure is similar or even the same as in Chromium browsers. Would it perhaps make sense to work with wildcards for exclusions? Where can you find useful documentation on the syntax for exclusions – I think GPO/WEM vs. HDX could also be different. Not to forget FSLogix… https://www.avanite.com/blog/roaming-edge-chromium is a good source and you can adapt the whole thing for Chrome, but I’m now seeing all the data garbage for example in PowerBI and third-party providers, such as Remote Desktop Manager. It’s not going to get any less. But as I said, if someone can provide well-founded information about syntax, whether trailing slashes, wildcards or other expressions are effective, something could be built here.
I am using UPM for folder redirection with works fine, but the folders it creates within the users profile folder – desktop for example – is not inheriting permission from the root to user folder. The desktop folder only has the individual users account in permission. As an administrator i’m unable to see the users redirected folder. I’m using citrix studio policies for folder redirection.
Adding another point, If i use windows file share i don’t see any issues, as an administrator i’m able to get into the users redirected folder and view all the files. IF i use only NAS share path then my admin account unable to access users redirected folder. In the same NAS path i have user profile folder which is working fine and i can able to see the data inside upm folder. The access issues happening only for the redirected homeshare folder when it is in NAS path. for users i don’t see any issues and it’s working perfectly from the users perspective
Hello Carl, long time fan and your articles have helped me tremendously over the years. I have ran into an issue that i’m hoping you can help provide some insight on.
Currently running 1912LTSR CU 8 providing multi session apps to several hundred users. Recently finally upgraded the Operating system of the VDA to server 2016. After this the folder redirection for roaming profiles only works now for 2 users so far. I have been fighting with this for about a month and just can’t seem to find consistency. We use a GPO for this and I have added the new VDA machines to that OU forced the policy multiple times and it just will not create the redirect for the majority of users.
Per Citrix I have even upgraded the machine catalog and even configured a new delivery group.
The only thing has changed is- VDA’s have new naming schema, and a new machine catalog was built using MCS. I was hoping you would have some insight on it. I have tried multiple times with my sign on it and it will not create this 2016 folder in our destined UNC file path- ways to test- added a link to the quick access, google chrome bookmarked a few sites and it is just not saving to that path or saving at all to be honest. I hope this all makes sense.
Are you doing native Microsoft Folder Redirection (User Config > Windows Settings > Folder Redirection, or are you doing UPM Folder Redirection? I recommend native.
Are these non-persistent? Is your master image in the same OU as the VDAs so that the master image receives the GPOs?
Is GPO Loopback Processing enabled in at least one GPO?
Carl, wow thank you for the prompt reply! This was built out by my predecessor had built this with UPM. Looking in the previous user folders for server 2012r2 there is are UPM files. And yes the Master is in the same OU as the VDA’s. I can even see the settings of the GPO have applied to the VDA’s. The strangest part is I can see two users that previously had the 2012 folder redirect in their folder have successfully created to the 2016 folder of their respected folder. It’s absolutely bizarre to me. Is it possible I just need to drop the UPM.ini files in a specific spot on the VDA’s possibly? Apologies if this sounds broken or uneducated this is my first time diving into this specific portion of a Citrix deployment.
I don’t see a UPMPolicyDefaults.ini file on my VDA, there is a UPMPolicyDefaults_all.ini file, would that be the correct file?
Yes.
Wondering if anyone has seen this before. When using OneDrive containers I am seeing multiple OneDrive.vhdx files ie: OneDrive_2.vhdx and OneDrive_2_Diff.vhdx files. Trying to clean this up with a script but would like to fix if possible.
why would i do all this , when you can simply enable it in Studio ? Where is the doc on that ? Thanks for all your dedication over the years.
The same settings are available in Citrix Policy. If you only have a single farm, then Citrix Policy in Studio is acceptable. But if you have multiple farms, then group policy can apply to multiple farms.
We newly built out the citrix VDI for RDSH app/persistent and non persistent desktop access.
For some non persistent desktop users randomly getting the error “citrix workspace app cannot connect to the server”
any suggestion to fix the issue.
Are you asking about Workspace app running inside the RDSH machine? Or are you asking about the Workspace app running on the client device?
Hi carl,
could anyone help me on this?
Hi Carl, Thanks for all the great information. I’m doing a 2402 LTSC install at 3 different locations and need active/ active User Profile data at each location. I’ve setup container replication in my labs and it seems to be working. I’ve tried to find more details about how this works, ways to track bandwidth between location, what happens if 1 location goes down, how do the user stores stay sync’d. But I’m not finding any of this data from anyone or for Citrix. It would be amazing if you could do a deep dive into these new features of CPM and how they can be a game-changer for roaming users in a large enterprise environment. On paper, these new container-based features make CPM sound like a full replacement to FS Logix. I’d greatly appreciate your comments and any wisdom you could share on container replication and the best way to do it.
Try leaving feedback at https://community.citrix.com/tech-zone/build/deployment-guides/citrix-profile-containers/
Greetings Carl,
Thanks as usual for the useful articles
For profile containers, do we need to use the !CTX_OSNAME! variable in the user store path in case of multiple OS workloads or will it automatically create a separate container for each OS profile automatically.
You can also create separate GPOs for each Delivery Group that has different OS versions and specify different paths.
you are right, Thank you so much
Would you ever recommend disabling profile management in Citrix? Currently using UPM. Users don’t save files to their profiles.
FSLogix is a typical alternative.
We use Citrix PURELY for apps, no desktops. The end user experience is logging into the Storefront and finding their app, it’s ALL ad-hoc type stuff. Since most if not all apps can be served by different VDAs, without anything done about profile management users get c:\users\ profiles on each of the servers and it causes problems when one of them is corrupted or their app launch times are slower because it’s busy creating their folder.
When we really don’t want ANY profiles to exist, what is the best strategy? The options are staggering but we’re looking for a solution that essentially doesn’t take up disk space for the hundreds of users that could one day log in and launch an app (we’ve 75 concurrent licenses which satisfies our needs).
I’ve heard of master profiles but I don’t think that works the way I thought it did, seems to be more like a VDA agnostic default profile (whereas without it, users get the default profile based on the VDA’s default profile like any other Windows device would).
I’m thinking folder redirection is my friend here but I’d rather not use up an SMB’s share of a few hundred profiles either AND it’d be awesome if the app launch were both fast and the user never left a profile when they logged out (aka auto profile deletion).
Any ideas?
Schedule a task to run https://helgeklein.com/free-tools/delprof2-user-profile-deletion-tool/ periodically.
Thank you so much! And it even supports mandatory profiles! I will leverage this in addition to searching for the ultimate way forward.
Hi Carl,
We want to implement profile streaming to increase logon times. Is there a recommended list of entries for the “Profile Steaming Exlusions list – directories” GPO for frequently used apps or Windows profile files and folders (ex. Chrome, Edge, Office, etc)?
Also, if we enable profile streaming, will the file system GPO’s be needed (ex exlclusion list, files/folders to syncronize, folders to mirror, etc)?
Cheers,
Steve
How can we disable this VHD folder creation under the profile folder. we use OST redirection to userdata folder and don’t want under profile since takes long time to login when under the profile folder.
I think you’re asking for this – https://docs.citrix.com/en-us/profile-management/current-release/configure/vhd-disk-compaction#specify-the-storage-capacity-and-path-for-vhd-containers
Hi,
Thank you for taking the time to create this documentation. I am searching for the correct settings for our environment. We are utilizing CITRIX AppLayering/XenDesktop and Citrix WEM. We are attempting to utilize profile containers from Citrix. While it initially functioned, we’ve encountered random instances where the start menu becomes corrupted and requires a logoff. Does anyone have any ideas on how to stabilize this?
Hi.
I am trying to enable Citrix Profile Mangement with FSLogix. I have updated ADMX and ADML file from Citrix_Virtual_Apps_and_Desktops_7_2311. But i dont see “Enable multi-session write back for FSLogix Profile Container” in Citrix Components, Profile Mangement, Advanced Settings. I am running 2203 LSTR CU3, do i need to update to newer version to get the “Enable multi-session write back for FSLogix Profile Container” option?
Hi Carl,
Is it possible to use Profile Container (entire profile in a VHDX file) and Outlook Search Index (OutlookOST.vhdx and OutlookSearchIndex.vhdx) simultaneously? When we activate both, the OutlookOST and OutlookSearchIndex won’t mount.
We see the discs in Disk Management. However, they are not mounted under AppData\Roaming\Citrix\Search or AppData\Local\Microsoft\Outlook.
I don’t think I’ve tried that.
I’m not sure if you ever solved this. From my testing this behavior is exhibited when you have local caching for profile containers enabled. It mounts the vhdx for the OST but doesn’t write to it. In my testing if I disable local caching I can have both profile container and OST containers active. However you lose the performance gain of caching and streaming. I’ve currently engaged Citrix support to see if this is by design or a bug.
We have Some strange issue. We have streamed servers with published app. When user logs on for very first time he gets a profile as intended, locked down colour scheme etc etc. Upon log off the profile is written to the share. On second logon of same user the profile gets read in but is partially locked down, colourscheme missing…..worked all ok for a very long time but now is causing issues… win 2019 / upm 2203 cu3. Any ideas….only strange event Id on logoff is 19341 not to be on the internet anywhere in relation with upm.
Is Windows licensing activated? I think themes are blocked on unlicensed windows.
Yes the servers are all licensed. Was also investigating the strange eventid 19134 which is logged on logoff ….???
“The description for EventID 19134 from source Citrix Profile Management cannot be found. Either the component that raised this event is not installed on your local computer or the installation is corrupted. You can install or repair the component on the local computer” ……nothing to be found.
When checking the GPO settings in the users registry hive all seems to be there
Hi Carl, new deployment of Windows Server 2022 with profile management 2308 installed is sporadically crashing.
Got Bluescreen errors like: IRQL_NOT_LESS_OR_EQUAL
or:
System_Service_Exception
No Antivirus or other software installed, ever seen this?
Hi Carl,
Is there a way to set a quota limit on Folder Redirection?
Windows Server and other non-Windows file servers have quota capabilities on file shares.
Hi Carl,
I am currently utilizing Exchange Online Plan 1 in a non-persistent VDI to access email via Outlook. Every time users log in on random VDIs, they are prompted to enter a password to activate the device. This has been an issue for the past month; previously, there were no problems.
We are using FSLogix profile solutions for profile management. It’s important to note that this issue is not occurring for Microsoft 365 E3 plan users, where we have enabled shared computer activation.
Could you please advise on how we can resolve this activation issue for Exchange Online Plan 1 users?
We had an issue with Outlook and other O365 Office applications where it would prompt for login, followed by some other errors/prompts. Also there was a yellow banner in Outlook “RESTART REQUIRED Restart Office to apply changes to your privacy settings”. This would happen every time after a fresh Citrix login, subsequently opening Outlook worked fine, but the issue reappeared after a fresh Citrix login again.
I found that including the folder AppData\Local\Microsoft\OneAuth to sync with roaming profile, resolved the issue.
Hello Mr. Stalhood,
Thanks for your excellent documentation here, it is very helpful and informative. I am running UPM 2203 LTSR CU3 on Windows 2019 Server. I tried the steps under the Mandatory Profile, using the “Citrix Method”, to create the Template Profile. When a new user tries to log in, I can see from the UPM logging the new profile is successfully created from the Template Profile, however, the new user is facing a flashing/blinking desktop. In the process monitor I can see Explorer.exe being called by WinLogon and crashing in a loop (hence the flashing desktop for the user). The error logged in the Application Event log is:
Faulting application name: explorer.exe, version: 10.0.17763.3887, time stamp: 0x5c06012d
Faulting module name: windows.immersiveshell.serviceprovider.dll, version: 10.0.17763.2989, time stamp: 0x1ea2cd20
Exception code: 0x80270233
Fault offset: 0x0000000000057bb7
Faulting process id: 0x31d0
Faulting application start time: 0x01d9e5cb11eae412
Faulting application path: C:\Windows\explorer.exe
Faulting module path: C:\Windows\System32\windows.immersiveshell.serviceprovider.dll
Report Id: 81162d74-e1d4-4ef0-8d38-671c93dc955c
Faulting package full name:
Faulting package-relative application ID:
I also created a Dump file for the Explorer.exe crash and ran it through WinDbg but it had no valuable information in it. I can share the Dump file with you if you like. Do you have any idea why Explorer.exe, or more likely windows.immersiveshell.serviceprovider.dll, is crashing? When was the last time, and with which OS, did you try the “Citrix Method” of Template Profile creation? Are you aware of any other method, other than the laborious Microsoft method, that can be used to create the template profile?
Hello again Carl.
The profile version for Windows 11 22H2 is v6 like Windows 10 22H2?
Do you know where to find a comparative list of “Profile Versions– Different OS versions have different profile versions.”?
Thanks in advance.
Yes. I don’t think it’s changed since Win10 1607. Otherwise, find out by testing. https://docs.citrix.com/en-us/profile-management/current-release/how-it-works/about-profiles.html
Hi Carl.
I have installed VDA 2303 (2303.0.0.67), but resett profile from Director does not work anymore.
So when i’m staring an app after resett, the workspace terminate when it should rename the old profile and create a new one.
Then I start the same app, and it use the old profile.
Is there a bug in this version?
Hello
I am using CVAD 2203 LTRS CU2 with FsLogix profiles and Im trying to implement them thru basic Windows GPOs.
I have very strange results: Some of the redirections work, others don’t, others are pointing at “\\Client\C$\Users\myuser”
The odd part is that this only happens on Server 2019. On my Windows 11 VDIs, it works perfectly.
Even stranger is that thru console (VMWare) and RDP the redirection DOES work correctly.. It only breaks when its a ICA connection.
Event Viewer also shows redirection applying properly. I can go, using the user, to the UNC path. When I delete the folders and the GPO reapplies, it correctly creates the folders so nothing indicates that it is a permissions issue.
Im actually pretty desperate because I have no idea what is happening or how to fix it.
Citrix has something called Special Folder Redirection that might be enabled. https://docs.citrix.com/en-us/storefront/current-release/configure-manage-stores/advanced-store-settings.html#allow-special-folder-redirection
Hi Carl,
I have a question about how Profile Management containers work. If, for example, I save a 1GB file on the desktop, I see how the RW disk increases by 1 GB. (The entire profile is being saved in the container). After the session is closed, the RW drive is consolidated with the main VHDX. I log in again and delete the file. The disk size remains intact even if I delete the 1GB file.
Note: I have configured the recycle bin in the Exclusions directive, as well as to delete the files deposited in it automatically, but the result is the same.
Thank you very much and greetings
VHDX expands but doesn’t shrink. There’s a Compaction feature that can shrink the free space from the VDHX files.
Thanks Carl,
I have seen this feature is available using FSLogix, but I am using Citrix Profile Manager containers. Can I use this feature? How?
Thanks
VDA 2303 supports it – https://docs.citrix.com/en-us/profile-management/current-release/configure/vhd-disk-compaction.html
Use this too:
https://james-rankin.com/articles/quickpost-citrix-upm-vhd-compaction-feature/
Thank you very much to both!
VDA 2023 Multiuser, Server 2019, FSLogix Profiel and ODFC
Outlook Data included in ODFC only
Any help is appreciated
I am getting complaints about sluggishness especially in the morning at logon and for a bit thereafter and have discovered the OST files are downloading to the users local appdata folder on the VDA. The sluggishness makes sense to me in this scenario for the IOPS, CPU and Network traffic during the peak logon times are very busy. I thought the OST was not to load locally, am I wrong? Do i have something configured wrong ?
If you see it going to c:\users\%username%\appdata, then that’s inside a FSLogix container. However, if you see it going to c:\users\%username%_local\appdata, then that’s on the local C: drive.
Are you monitoring the performance of your file server that hosts the FSLogix disks?
yes, i am monitoring the performance of the FSLogix disks via Resource monitor.
I see now the OST files are inside the FSLogix container, is there something specific to look for?
Make sure the file server has low disk latency. I assume your network to the file server is at least 10 Gbps.
Thanks Carl, I suspect my disk latency is not ideal and will monitor it a bit closer for a couple of days to get more detail. The VDAs are on an appliance with 7500 rpm drives.
Assuming Latency is an issue, Do you think adding additional servers/VM’s for FSLogix ODFC disks to separate the tasks will help the performance?
Additional observance: I do notice during the day after logons have caught up the highest disk response time comes from “users\Google\default\Cache\” or “google\Safe Browsing” folders.
Some IOPS requirements are shown at https://learn.microsoft.com/en-us/azure/architecture/example-scenario/wvd/windows-virtual-desktop-fslogix#performance-requirements
Dear Carl,
maybe you have an advice for me, I have installed new CVAD 2303 Servers and configured new policies (via GPO) for them. After some problems the basic config works now with two Policies CVAD_Comp and CVAD_User (UPM, path to user store [Computer Conf. / Admin. Templates]; client printer / drive prohibited [User Conf. / Citrix Policy]). Folder redirection problem: via Citrix policy or ADMX Template does not work. When I configure it via Windows Settings (like yours) it works. What could be the cause, I want to understand this. It looks like something works via AD GPO or Citrix Policy or Citrix Administration Templates?
kind regards from Vienna
Are you trying to use Citrix Profile Management to do Folder Redirection? What do you see in the pm.log file?
Hello Carl,
I use Citrix Profile Management, I have tested a lot configs. till now and at the moment UNC Path works with FQDN of Server.
I configured Policy CVAD_User: User Configuration / Policies /Administrative Templates / Citrix Components / … Documents, Downloads
But now when i set the Log Policy, it does not show Log files in configured Folder c:\install on CVAD?
Hello Carl, I am a big fan
So Everything seems to be working with UPM in my test environment. I can see the new profiles in the new user store and everything loads very quickly.
The problem is: It just freezes when I hit sign off. It will disconnect shortly after but I do not get the ‘signing off’ screen and I am scared this will confuse my users.
Also, signing out only takes me back to the storefront where they are still logged in. Am I able to rig it so it completely signs out the users.
You can set a quick timeout for the StoreFront web page.
Do you have WEM with Fast Logoff enabled?
I am not using WEM. Should I?
The problem is: We are still on OLD 2012R2 7.15 VDAs
I have managed to deploy new Delivery Controllers, upgrade the site database, upgrade the storefront……… and now I am ready to deploy these new VDAs. Once that is done I will implement MCS. We just need to get these old VDAs out of production ASAP.
I will try the quick timeout. I am not sure where to set that…… I assume in the storefront settings where it says ‘Manage Receiver for Websites’
Under ‘Workspace Control’ I have the logoff action set to terminate
My settings are as follows under ‘Session Settings’
Server Communication Attempts: 1
Communication timeout duration: 3 Minutes
Session Timeout: 1 Hour (I want people to be able to walk away and go the restroom, and not get signed out)
Sign in timeout: 5 minutes
StoreFront web page sessions and ICA sessions are completely separate. Logging off of ICA does not affect StoreFront.
Here’s an option – https://www.carlstalhood.com/storefront-cr-tweaks/#logoffseconds
Hi Carl. I was reviewing the new 2303 options to Enable VHD disk compaction under the profile container. I can’t seem to find it. I’ve tried both the CitrixBase and ctxprofile admx/adml files on both the 2303 VDA and the 2303 Profile Management GPO templates. Can you see if you see this option in your lab?
https://docs.citrix.com/en-us/profile-management/current-release/whats-new.html
Some of the options are under Advanced Settings.
PEBKAC. I had copied to wrong location on DC in lab. I see it now. Thanks