Navigation
- Change Log
- GSLB Planning
- GSLB Wizard
- GSLB Infrastructure – one time setup
- GSLB Configuration – Repeatable Steps
💡 = Recently Updated
Change Log
- 2023 Mar 30 – GSLB vServer – added GSLB Service binding Order method of doing active/passive in 13.1 and newer
- 2021 Jan 29 – RPC nodes – added link to Citrix CTX292743 Configuration Sync, Propagation and MEP Propagation Might Fail After Upgrade to 13.0 64.x\12.1 61.x
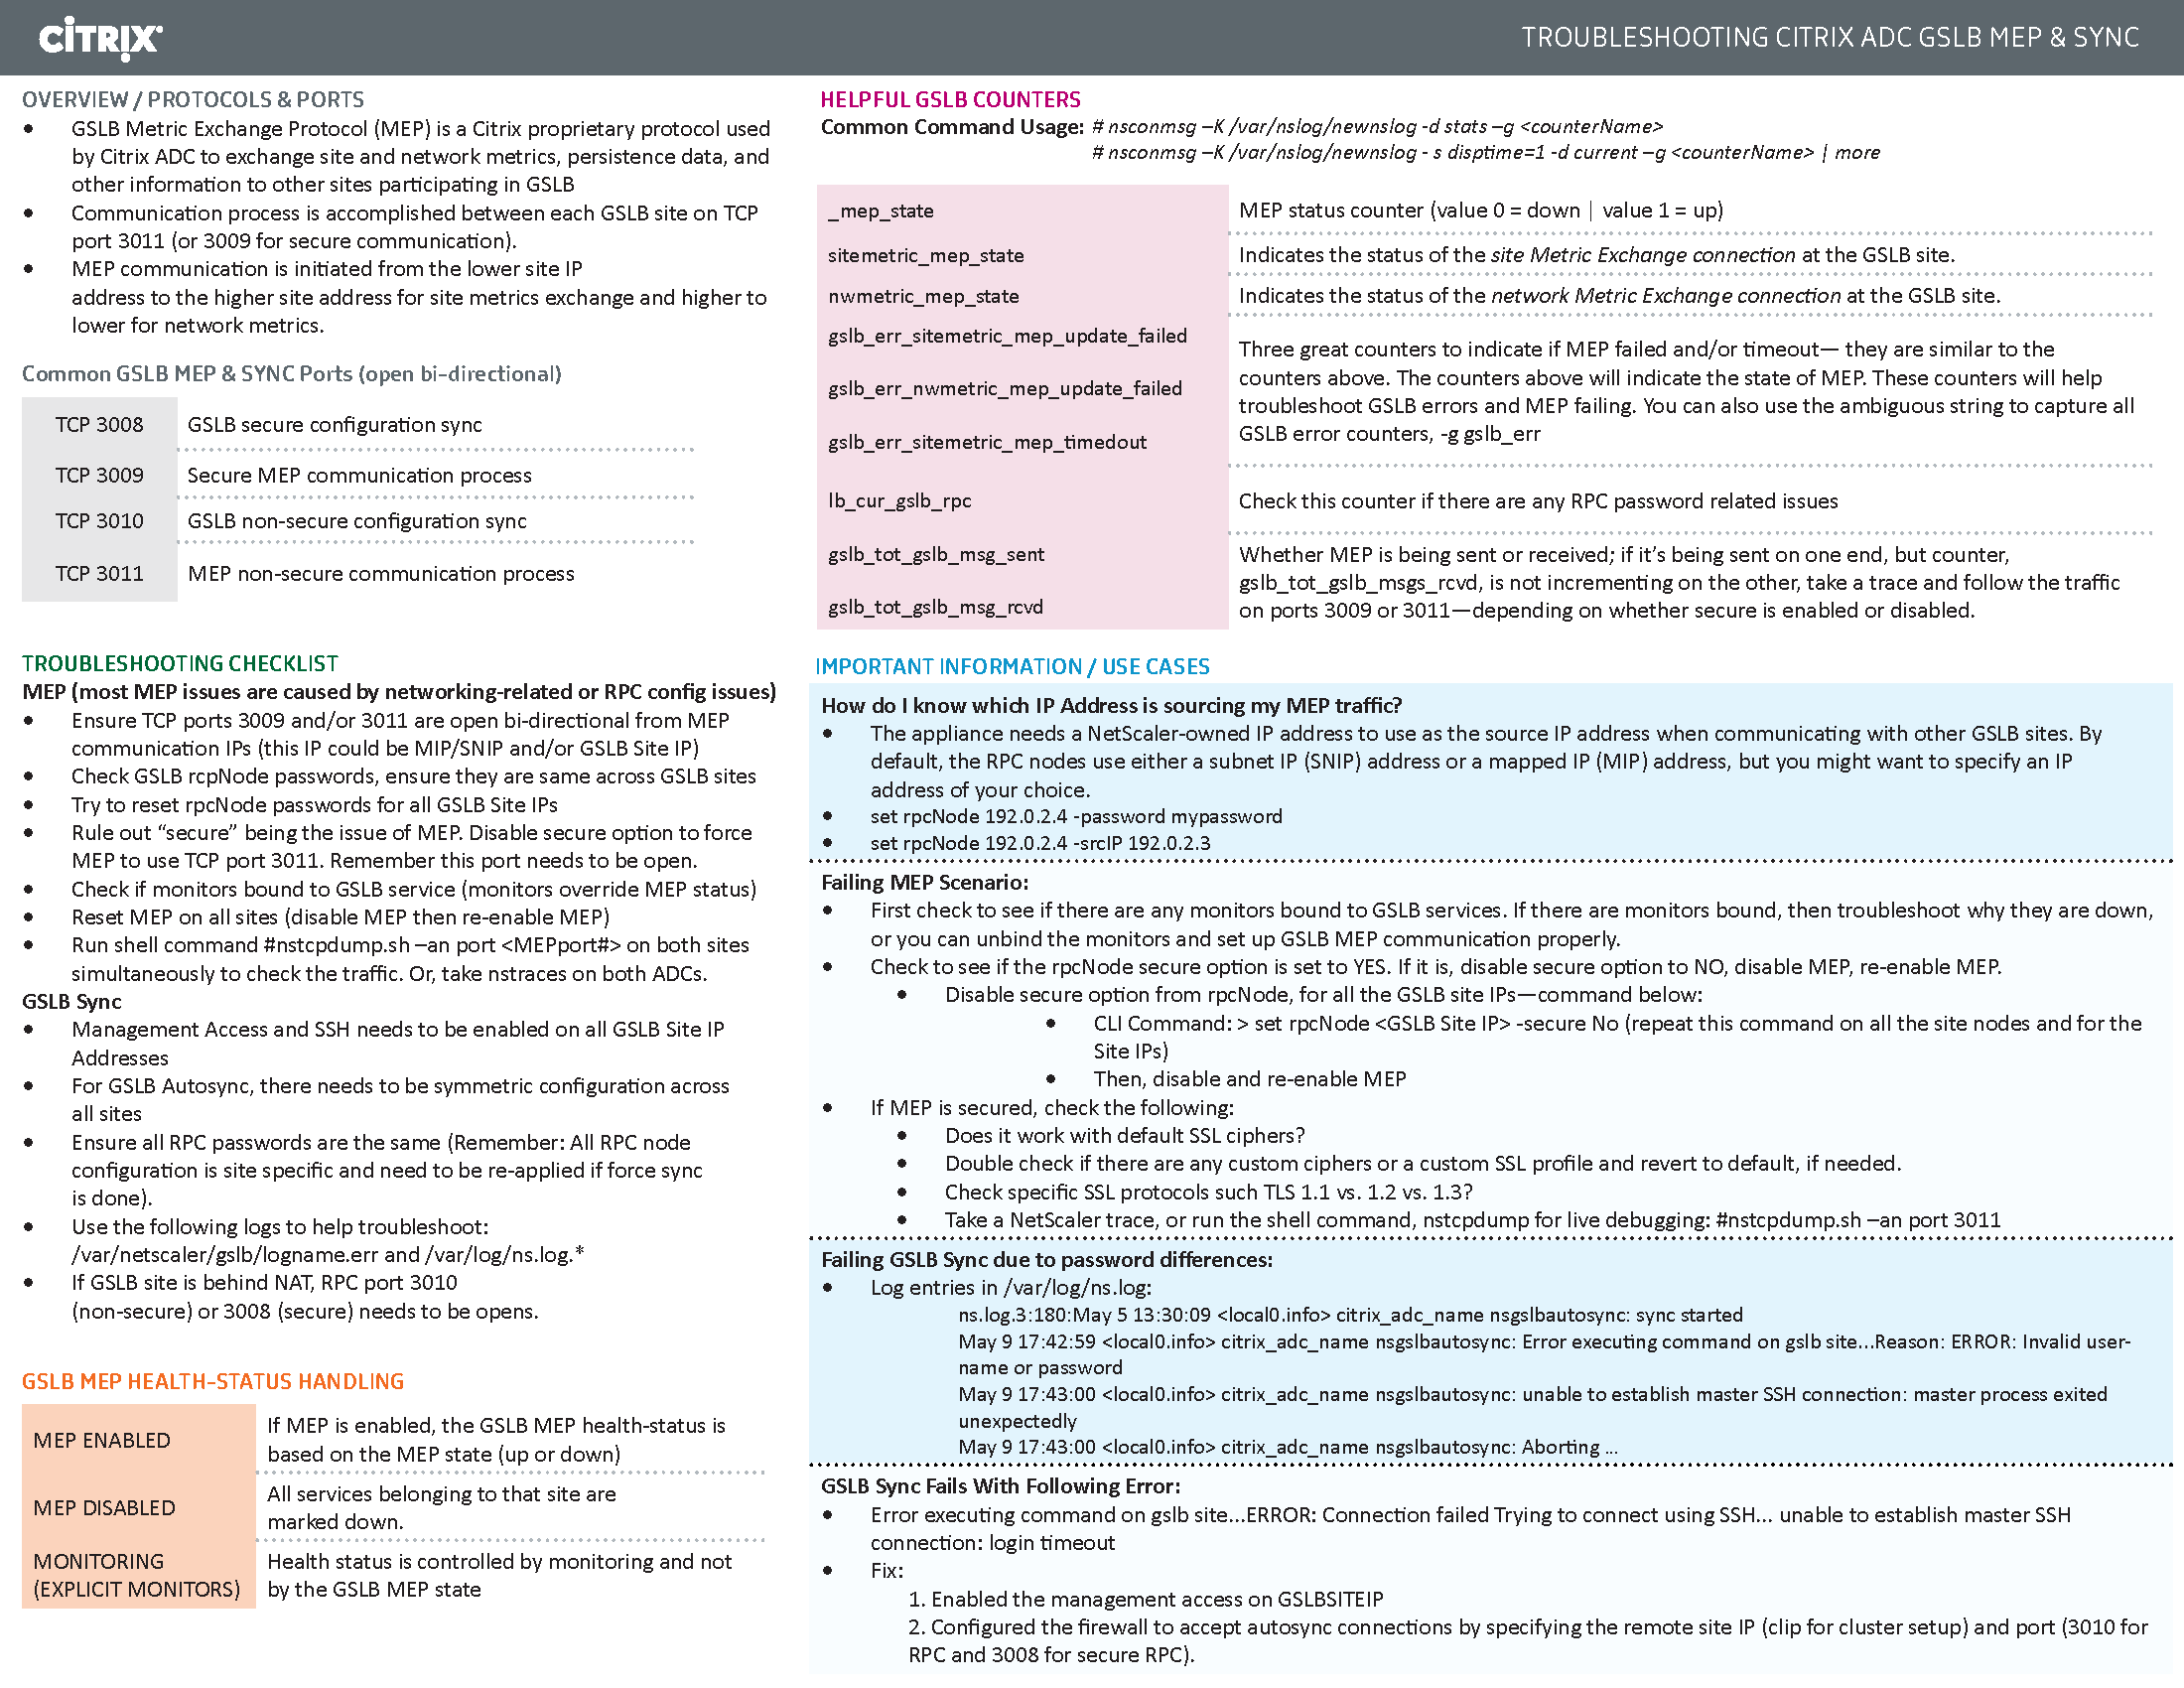
- 2020 Feb 27 – updated link to Citrix Tech Zone Troubleshooting Citrix GSLB MEP Cheat Sheet
- 2019 Mar 6 – Geo Location Database – added link to Citrix Github Citrix-ADC-GSLB-GeoIP-Conversion-Tool
- 2019 Feb 12 – Metric Exchange Protocol – added link to CTX244517 Citrix ADC Troubleshooting GSLB MEP and Sync Cheat Sheet
- 2019 Feb 4 – DNS Delegation – added link to Citrix CTX241493 Citrix Response on DNS Flag Day
- 2019 Jan 30 – ADNS – added ADNS_TCP
- 2018 Dec 18 – updated screenshots for ADC 12.1
- Geo location database – added link to Retrieve location details from user IP address using geolocation database at Citrix Docs
- 2018 July 1 – Geo Location Database – added link to CTX235799 NetScaler data formats for Location Database Import
- 2018 Mar 12 – in Use Geo Locations section, added info from CTX232884 Policies with GSLB Wildcard Location expressions not getting a hit on build 11.1-53.11 and above
GSLB Planning
GSLB is nothing more than DNS. GSLB receives a DNS query, and then GSLB sends back an IP address, which is exactly how a DNS server works. The user then connects to the returned IP, which doesn’t even need to be on a NetScaler ADC.
GSLB can do some things that DNS servers can’t do:
- Don’t give out an IP address unless it is UP (monitoring)
- If the active IP address is down, then give out the passive IP address (active/passive) instead
- Give out the IP address that is closest to the user (proximity load balancing)
- Give out different IPs for internal users vs external users (DNS View)
GSLB is only useful if you have a single DNS name that could resolve to two or more IP addresses. If there’s only one IP address, then use normal DNS instead.
Citrix Blog Post Global Server Load Balancing: Part 1 explains how DNS queries work and how GSLB fits in.
Citrix has a good DNS and GSLB Primer.
When configuring GSLB, don’t forget to ask “where is the data?”. See Citrix Blog Post XenDesktop, GSLB & DR – Everything you think you know is probably wrong!
GSLB Configuration Overview
GSLB Configuration can be split between one-time steps for GSLB infrastructure, and repeatable steps for each GSLB-enabled DNS name.
One-time GSLB Infrastructure configuration
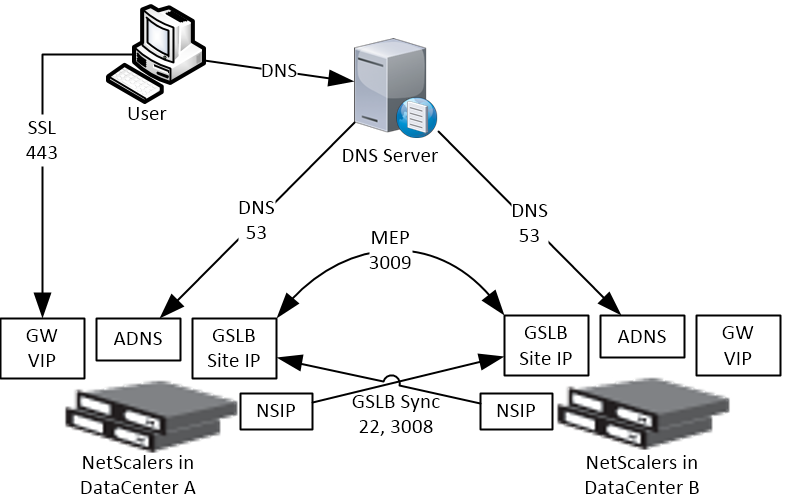
- Create ADNS listener on each ADC pair – DNS clients send DNS queries to the ADNS listeners. GSLB resolves a DNS query into an IP address, and returns the IP address in the DNS response.
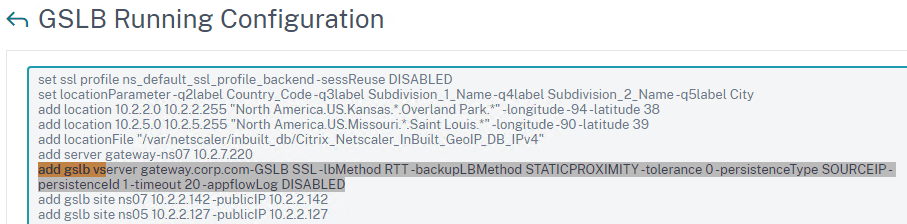
- Create GSLB Sites (aka MEP Listener) – GSLB Sites usually correspond to different datacenters. GSLB Sites are also the IP address endpoints for Citrix ADC’s proprietary Metric Exchange Protocol (MEP), which is used by GSLB to transmit proximity, persistence, and monitoring information.
- Import Static Proximity Database – Citrix ADC includes a database that can be used to determine the geographical location of an IP address. Or you can subscribe to a geolocation service, and import its database.
- Delegate DNS sub-zone to ADC ADNS – in the original DNS zone, create a new sub-zone (e.g. gslb.company.com), and delegate the sub-zone to all ADNS listeners.
Repeatable GSLB Configuration for each DNS name:
- Create one or more GSLB Services per DNS name, and per IP address response – each GSLB Service corresponds to a single IP address that can be returned in response to a DNS Query.
- Optionally, bind a Monitor to each GSLB Service. Monitors determine if the GSLB Service is up or not.
- Create a GSLB Virtual Server per DNS name
- Bind a DNS name to the GSLB Virtual Server.
- For active/active – bind multiple GSLB Services to the GSLB Virtual Server, configure a load balancing method (e.g. proximity), and configure site persistence.
- For active/passive – bind the active GSLB Service. Create another GSLB Virtual Server with passive GSLB Service and configure as Backup Virtual Server.
- Alternatively, NetScaler ADC 13.1 and newer let you bind GSLB Services in priority order. See Citrix Docs for details.
- Create CNAME records for each delegated DNS name – in the main DNS zone, create a CNAME that maps the original DNS name to the delegated sub-zone. For example, CNAME citrix.company.com to citrix.gslb.company.com.
You will create separate GSLB Services, separate GSLB Virtual Servers, and separate CNAMEs for each DNS name. If you have a bunch of DNS names that you want to GSLB-enable, then you’ll repeat these steps for each GSLB-enabled DNS name.
Each datacenter has a separate ADNS listener IP address. DNS is delegated to all GSLB ADNS Listener IPs, and any one of them can respond to the DNS query. Thus, all ADC pairs participating in GSLB should have the same Per-DNS name configuration.
One ADC appliance for both public DNS/GSLB and internal DNS/GSLB?
GSLB can be enabled both publically and internally. For public GSLB, configure it on DMZ ADC appliances, and expose the DNS listener to the Internet. For internal GSLB, configure it on separate internal ADC appliances/instances, and create an internal DNS listener.
Each ADC appliance only has one DNS table, so if you try to use the same ADC for both public DNS and internal DNS, then be aware that external users can query for internal GSLB-enabled DNS names.
- As described by Phil Bossman in the comments, you can use a Responder policy to prevent external users from reading internal DNS names.
add policy patset GSLB_INTERNAL
bind policy patset GSLB_INTERNAL internalHostname.gslb.domain.com -index 1
add responder action DNS_Empty_Response respondwith DNS.NEW_RESPONSE
add responder policy GSLB_DNS_Empty_Response "(!(CLIENT.IP.SRC.IN_SUBNET(10.0.0.0/8)||CLIENT.IP.SRC.IN_SUBNET(192.0.0.0/16)||CLIENT.IP.SRC.IN_SUBNET(172.0.0.0/12)) && DNS.REQ.QUESTION.DOMAIN.CONTAINS_ANY(\"GSLB_INTERNAL\"))" DNS_Empty_Response
bind responder global GSLB_DNS_Empty_Response 100 END -type DNS_REQ_DEFAULT
One appliance resolving a single DNS name differently for internal and public
Let’s say you have a single DNS name citrix.company.com. When somebody external resolves the name, it should resolve to a public IP. When somebody internal resolves the name, it should resolve to an internal IP.
For internal GSLB and external GSLB of the same DNS name on the same ADC appliance, you can use DNS Policies and DNS Views to return different IP addresses depending on where users are connecting from. See Citrix CTX130163 How to Configure a GSLB Setup for Internal and External Users Using the Same Host Name.
If the Internet circuit in the remote datacenter goes down, then this should affect public DNS, since you don’t want to give out a public IP that isn’t reachable. But do you also want an Internet outage to affect internal DNS? Probably not. In that case, you would need different GSLB monitoring configurations for internal DNS and external DNS. However, if you have only a single GSLB Virtual Server with DNS Views, then you can’t configure different monitoring configurations for each DNS View.
To work around this limitation, create two separate GSLB Virtual Servers with different monitoring configurations. Internal DNS uses a CNAME record to reach the GSLB Virtual Server configured for internal monitoring:
- External citrix.company.com:
- Configure ADC GSLB for citrix.company.com.
- On public DNS, delegate citrix.company.com to the ADC DMZ ADNS services.
- Internal citrix.company.com:
- Configure ADC GSLB for citrixinternal.company.com or something like that.
- On internal DNS, create CNAME for citrix.company.com to citrixinternal.company.com
- On internal DNS, delegate citrixinternal.company.com to ADC internal ADNS services.
Remote Internet Monitoring
For public DNS/GSLB, you don’t want to give out a remote public IP address if that remote public IP address is not reachable. That means the local ADC will need to somehow determine if the remote datacenter has Internet connectivity or not. Here are some methods of verifying the remote Internet connection:
- Route GSLB Metric Exchange Protocol (MEP) across the Internet. If MEP goes down, then all IP addresses associated with the remote GSLB Site are assumed to be down, and thus the local ADC will stop giving out those remote IP addresses.
- Bind explicit monitors to each GSLB Service, and ensure the monitoring is routed across the Internet.
GSLB IP Addresses
GSLB is separate from data traffic. The GSLB IP addresses are separate from the IP addresses needed for data.
Some GSLB-specific IP Addresses are needed on each ADC pair:
- ADNS Listener IP: An ADC IP that listens for DNS queries.
- The ADNS listener IP is typically an existing SNIP on the appliance.
- For external DNS, create a public IP for the ADNS Listener IP, and open UDP 53 and TCP 53, so Internet-based DNS servers can access it.
- A single ADC appliance can have multiple ADNS listeners – typically one ADNS listener for public, and another ADNS listener for internal.
- GSLB Site IP / MEP listener IP: An ADC IP that will be used for ADC-to-ADC GSLB communication. This communication is called MEP or Metric Exchange Protocol. MEP transmits the following between GSLB-enabled ADC pairs: load balancing metrics, proximity, persistence, and monitoring.
- GSLB Sites – On ADC, you create GSLB Sites. GSLB Sites are the endpoints for the MEP communication. Each ADC pair is configured with the MEP endpoints for the local appliance pair, and all remote appliance pairs.
- TCP Ports – MEP uses port TCP 3009 or TCP 3011 between the ADC pairs. TCP 3009 is encrypted.
- The ADNS IP address can be used as the MEP endpoint IP.
- MEP endpoint can be any IP – The MEP endpoint IP address can be any IP address and does not need to be a SNIP or ADNS.
- One MEP IP per appliance – there can only be one MEP endpoint IP address on each ADC pair.
- Route MEP across Internet? – If you route MEP across the Internet, and if the MEP connection is interrupted, then Internet at one of the locations is probably not working. This is an easy way to determine if remote Internet is up or not. If you don’t route MEP across the Internet, then you’ll need to configure every remote-site GSLB Service with a monitor to ensure that the remote Internet is up.
- Public IPs for MEP Enpoints – if you route MEP across the Internet, then you’ll need public IPs for each publically-accessible MEP endpoint IP address.
- Public Port for MEP: Open port TCP 3009 between the MEP Public IPs. Make sure only the MEP IPs can access this port on the other ADC . Do not allow any other device on the Internet to access this port. Port 3009 is encrypted.
- GSLB Sync Ports: To use GSLB Configuration Sync, open ports TCP 22 and TCP 3008 (secure) from the NSIP (management IP) to the remote public MEP IP. The GSLB Sync command runs a script in BSD shell and thus NSIP is always the Source IP.
- In ADC 13.0 64.x and 12.1 build 61.x onwards, Secure is enabled by default. Citrix CTX292743 Configuration Sync, Propagation and MEP Propagation Might Fail After Upgrade to 13.0 64.x\12.1 61.x
- Public IP Summary: In summary, for public GSLB, if MEP and ADNS are listening on the same IP, then you need one new public IP that is NAT’d to the DMZ IP that is used for ADNS and MEP (GSLB Site IP).
- Each datacenter has a separate public IP.
- DNS is delegated to all public ADNS IP listeners.
GSLB Wizard
NetScaler 12 and Citrix ADC 12.1 and newer have a GSLB Wizard at Traffic Management > GSLB.

However, the wizard doesn’t really save any time or steps, so it won’t be documented here.
ADNS Listener
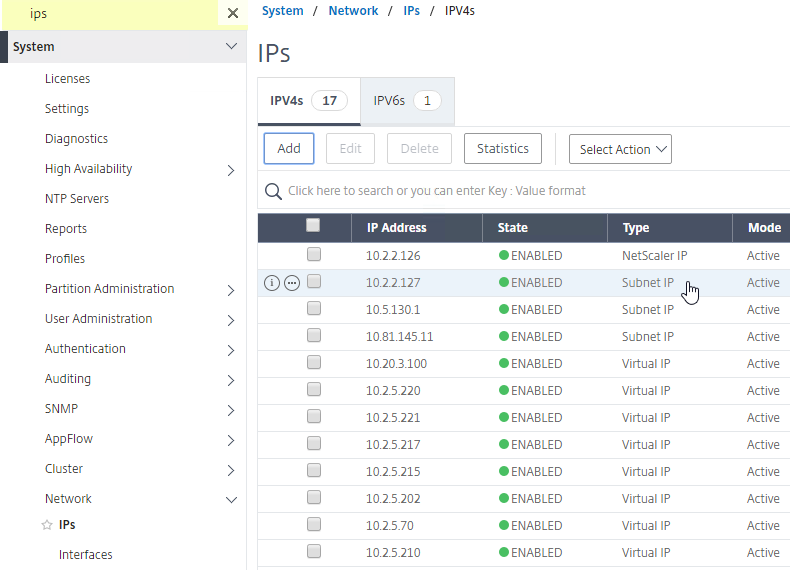
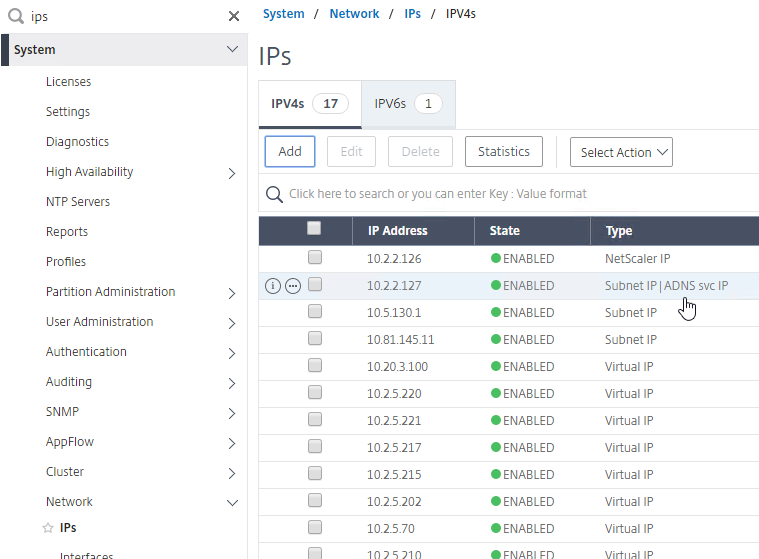
- At System > Network > IPs, identify a Citrix ADC-owned IP that you will use as the ADNS listener. This is typically a SNIP.
- Create a public IP for the ADNS Service IP and configure firewall rules. UDP 53 and TCP 53 need to be opened from the Internet to the public IP that NATs to the ADNS Listener IP address.
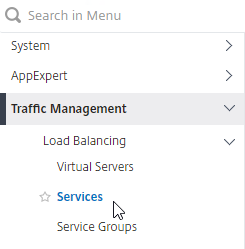
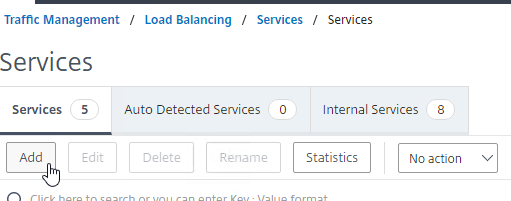
- On the left, expand Traffic Management > Load Balancing, and click Services.
- On the right, click Add.
- In the Basic Settings section, do the following:
- Name the service ADNS or similar.
- In the IP Address field, enter an appliance SNIP.
- In the Protocol drop-down, select ADNS.
- Click OK.
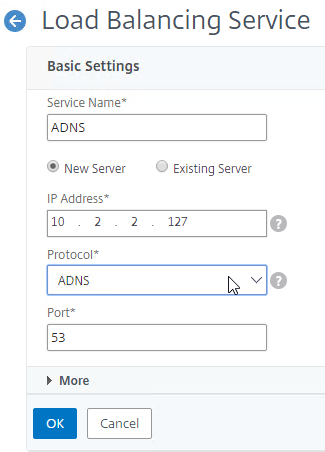
- No other configuration is needed so scroll down and click Done to close the Load Balancing Service properties.

- In the Basic Settings section, do the following:
- Highlight the ADNS service you just added and then click Add to create another Service while copying some of the settings from the previously created Service.
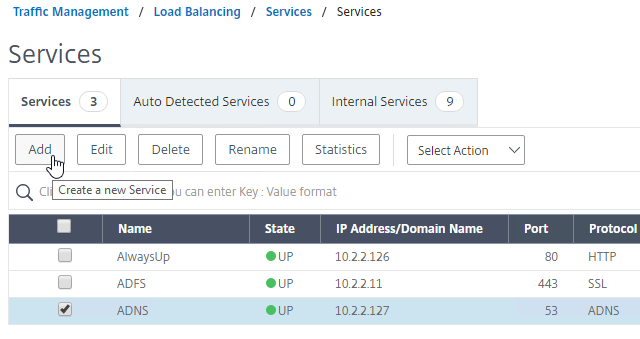
- Change the Service Name to ADNS_TCP or similar.
- Change the Protocol drop-down to ADNS_TCP.
- Click OK to close the Basic Settings section.
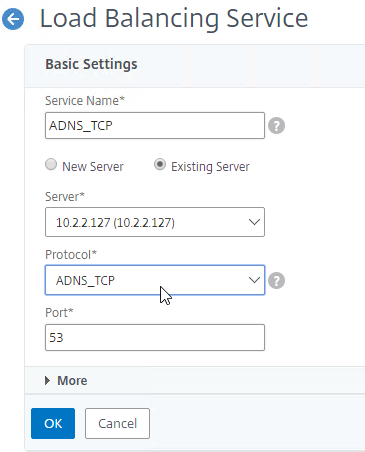
- No other configuration is needed so scroll down and click Done to close the Load Balancing Service properties.
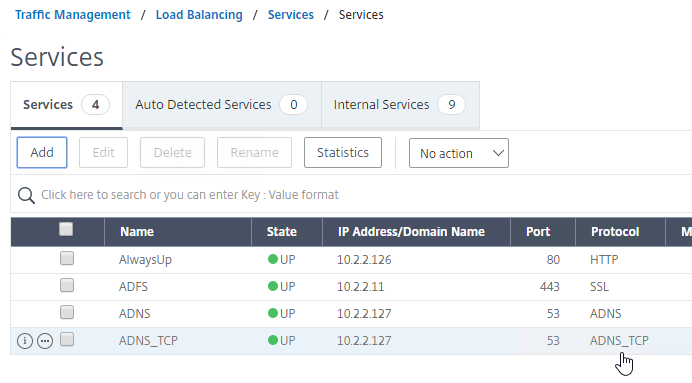
- You should have two ADNS services on the same IP address: one for ADNS, and one for ADNS_TCP.
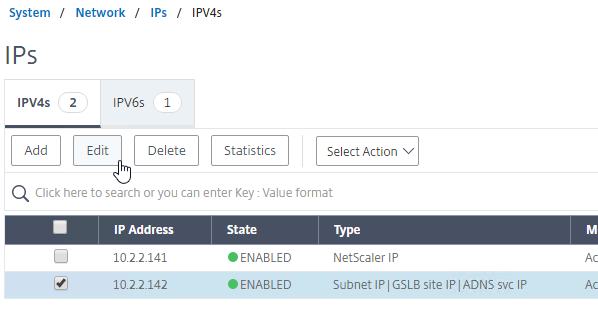
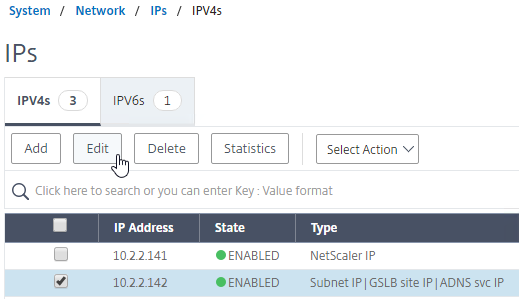
- On the left of the console in the menu, expand System, expand Network, and then click IPs.
- On the right, you’ll see the SNIP is now marked as the ADNS svc IP.
- Repeat the ADNS configuration on the other appliance pair in the other datacenter. Except the other appliance will use its own SNIP as the ADNS Service listener IP address.
- Your ADC appliances are now DNS servers.
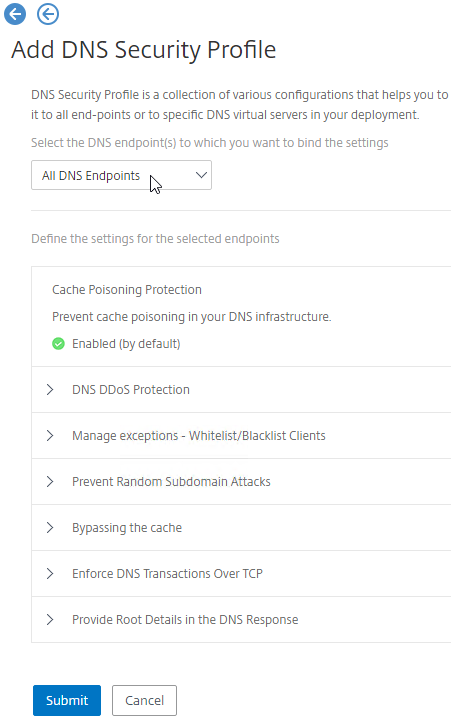
DNS Security
- Citrix ADC includes DNS Security Options, at Security > DNS Security, which can protect your ADNS service.
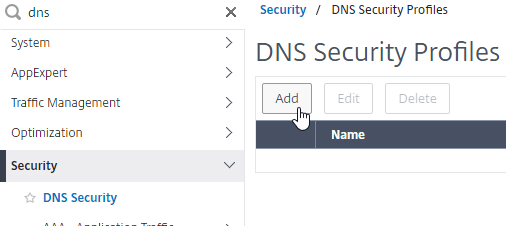
- To protect ADNS, set the Profile to All DNS Endpoints.
Metric Exchange Protocol
This section details MEP configuration between two GSLB Sites. See Citrix Docs for larger Parent-Child Topology Deployment Using the MEP Protocol.
GSLB Sites
- The local GSLB Site IP can be any IP, including the same SNIP that you used for ADNS.
- Open the firewall rules for Metric Exchange Protocol. The GSLB Site IP on this appliance pair uses TCP 3009 to communicate with the GSLB Site IP on the other appliance pair.
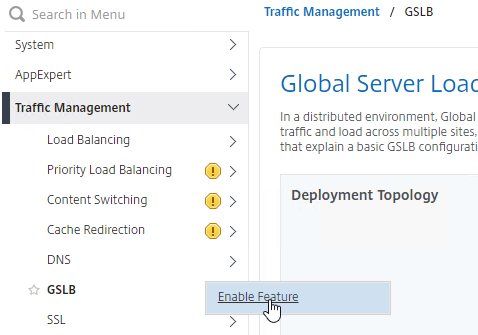
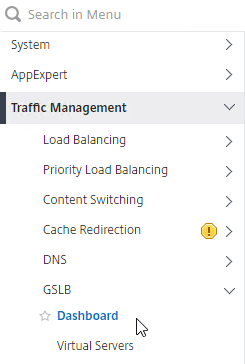
- On the left, expand Traffic Management, right-click GSLB, and enable the feature.
- Expand GSLB, and click Sites.
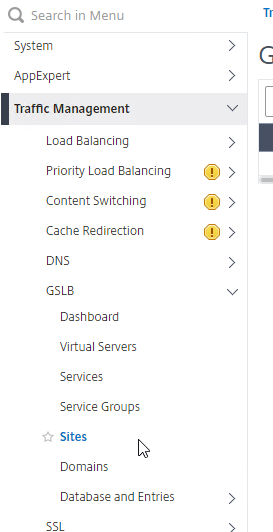
- On the right, click Add.
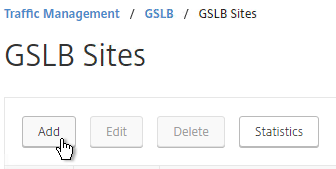
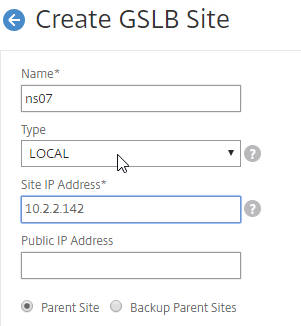
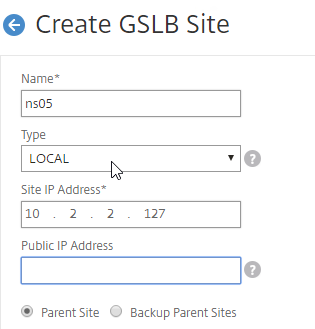
- In the Create GSLB Site page, do the following:
- We’re adding the local site first. Enter a descriptive name for the local site.
- In the Site Type drop-down, select LOCAL.
- In the Site IP Address field, enter an IP that this appliance will listen for MEP traffic. This is typically a SNIP and can the same as your ADNS IP.
- For Internet-routed GSLB MEP, in the Public IP Address field, enter the public IP that is NAT’d to the GSLB Site IP.
- For internal GSLB MEP, there is no need to enter anything in the Public IP field.
- Scroll down, and click Create, to close the Create GSLB Site page.

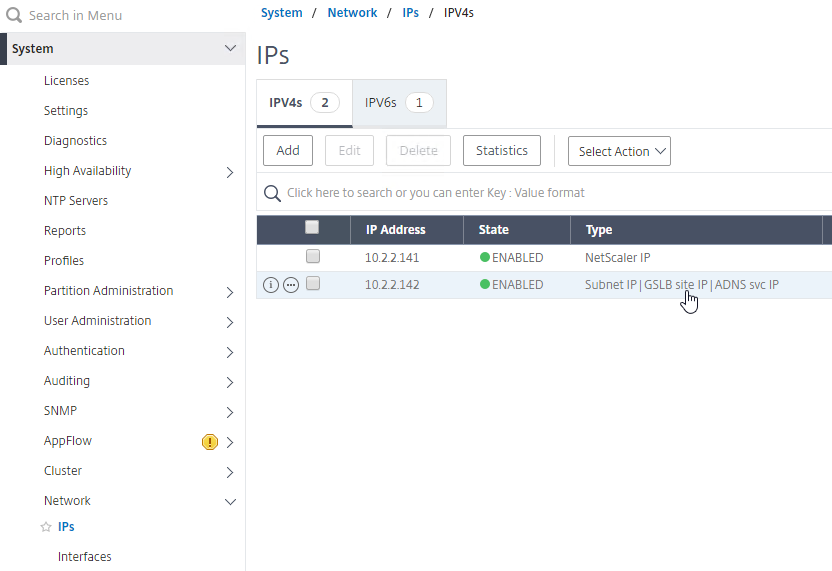
- Go back to System > Network > IPs, and notice that the IP is now marked as a GSLB site IP.
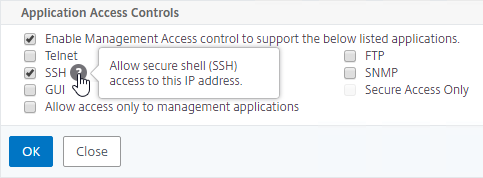
- If you want to use the GSLB Sync Config feature, then you’ll need to edit the GSLB site IP, and enable Management Access.
- Scroll down, and enable Management Access. SSH is all you need.
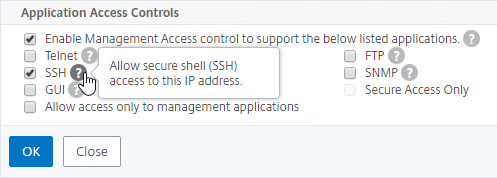
- Scroll down, and enable Management Access. SSH is all you need.
- Go to the other appliance pair, and also create the Local GSLB site using its GSLB site IP, and its public IP that is NAT’d to the GSLB site IP.
- In System > Network > IPs on the remote appliance, there should now be a GSLB site IP. If GSLB Sync is desired, enable management access on that IP and ensure SSH is enabled.
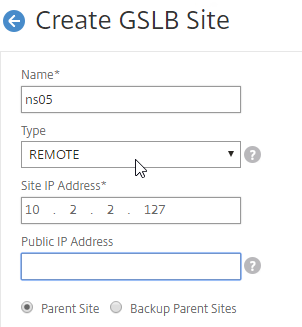
- Now on each appliance, add another GSLB Site, which will be the Remote GSLB site.
- In the Create GSLB Site page, do the following:
- Enter a descriptive name for the remote site.
- Select REMOTE as the Type.
- Enter the other appliance’s actual GSLB Site IP as configured on the appliance. This IP does not need to be reachable.
- In the Public IP Address field, enter the public IP that is NAT’d to the GSLB Site IP on the other appliance. For MEP, TCP 3009 must be open from the local GSLB Site IP, to the remote public Site IP. For GSLB sync, TCP 22, and TCP 3008, must be open from the local NSIP, to the remote public Site IP.
- Click Create.
- Repeat on the other appliance.
RPC
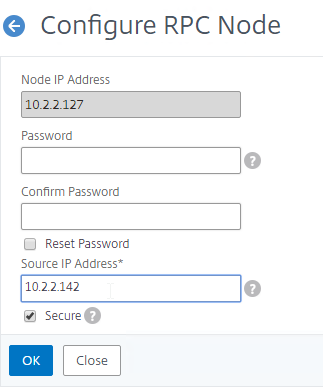
MEP defaults to unencrypted on TCP 3011. To fix that:
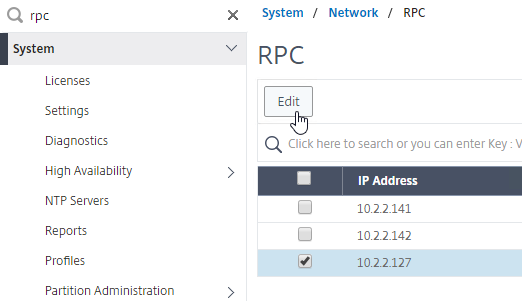
- On the left, expand System, expand Network, and click RPC.
- On the right, right-click the new RPC address (the other site’s GSLB Site IP), and click Edit.
- On the bottom, check the box next to Secure. In ADC 13.0 64.x and 12.1 build 61.x onwards, Secure is enabled by default. (source = Citrix CTX292743 Configuration Sync, Propagation and MEP Propagation Might Fail After Upgrade to 13.0 64.x\12.1 61.x)
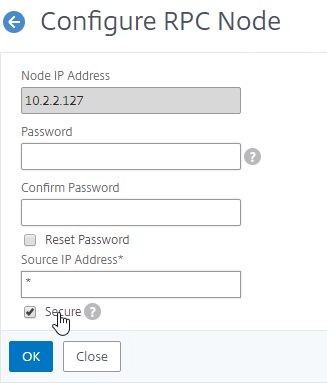
- If your local GSLB Site IP is not a SNIP, then you’ll need to change the RPC Node to use the local GSLB Site IP as the source IP. In the Source IP Address field, enter the local GSLB Site IP.
- Click OK when done.
- Do the same thing on the other appliance.
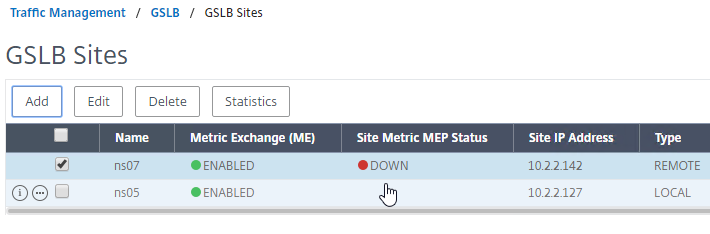
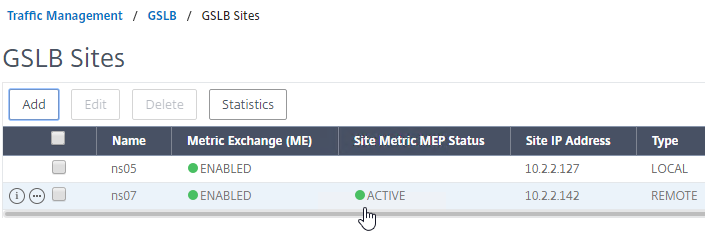
- If you go back to GSLB > Sites, you should see it as active.
See Citrix Tech Zone Troubleshooting Citrix GSLB MEP Cheat Sheet
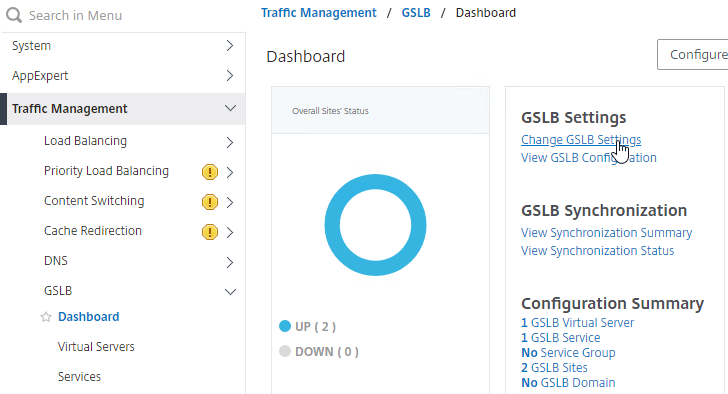
If your MEP connection between GSLB Sites flaps, it might be useful to introduce a delay before remote GSLB Services are marked as Down.
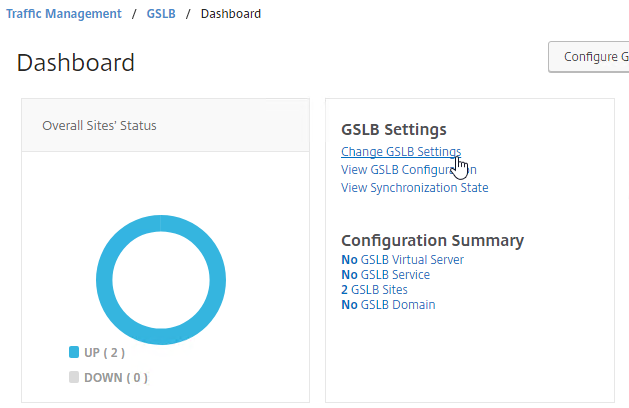
- You can do this at Traffic Management > GSLB > Dashboard.
- On the right, click Change GSLB settings.
- In the GSLB Service State Delay Time (secs) field, enter a delay before the GSLB Services are marked as down when MEP goes down.
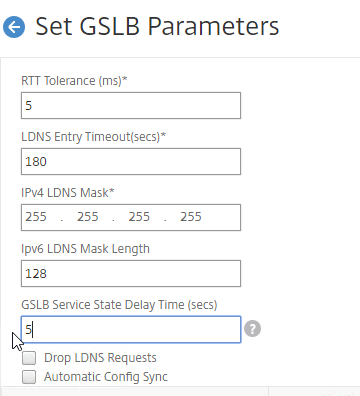
set gslb parameter -GSLBSvcStateDelayTime 15
Static Proximity Geo Location Database
If you want to use DNS Policies, or Static Proximity GSLB Load Balancing, or Responders based on user’s location, import a geo location database.
Citrix ADC has a built-in database at /var/netscaler/inbuilt_db/ that you can use. Or you can download a database. Common free databases are:
- GeoLite Legacy – http://dev.maxmind.com/geoip/legacy/geolite/
- IP2Location Lite – http://lite.ip2location.com/
For IP2Location, see the blog post Add IP2Location Database as NetScaler’s Location File for instructions on how to import.
CTX235799 NetScaler data formats for Location Database Import
Citrix Github has a Citrix-ADC-GSLB-GeoIP-Conversion-Tool that can convert Maxmind GeoIP City database to Citrix ADC (NetScaler) format.
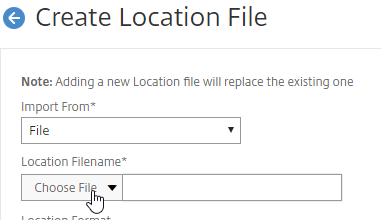
Import the Built-in Geo database:
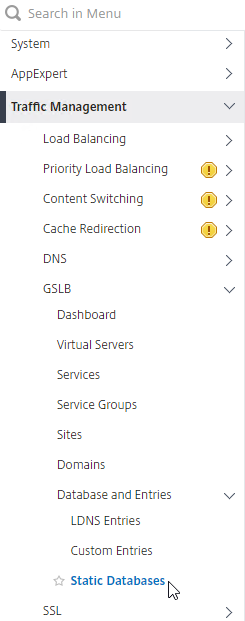
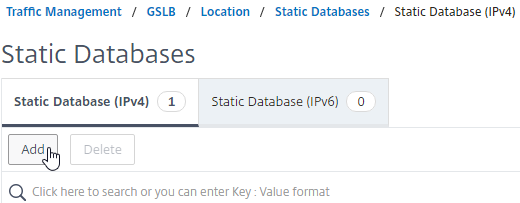
- In the Citrix ADC GUI, on the left, expand Traffic Management, expand GSLB, expand Database and Entries, and click Static Databases.
- On the right, click Add.
- Change the Import From selection to File.
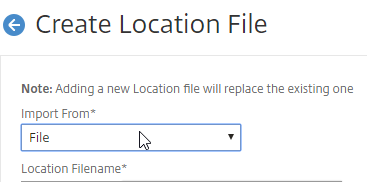
- Click Choose File.
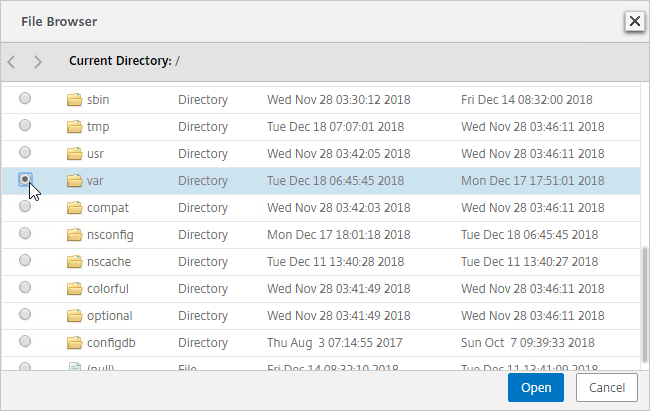
- Browse to /var/netscaler/inbuilt_db/. To browse to the directory, select var, and then click Open.
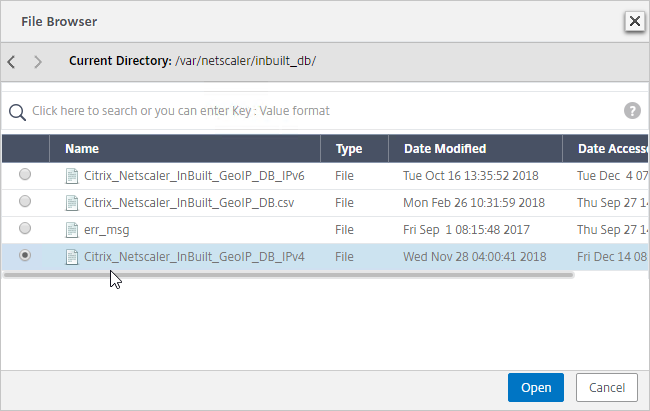
- Repeat for each directory until you reach /var/netscaler/inbuilt_db.
- In ADC 12.1, you can select the file named Citrix_Netscaler_InBuild_GeoIP_DB_IPv4. In NetScaler 12.0, select the only file shown. Then click Open.
- In the Location Format field, if using the built-in database, select netscaler, and click Create.
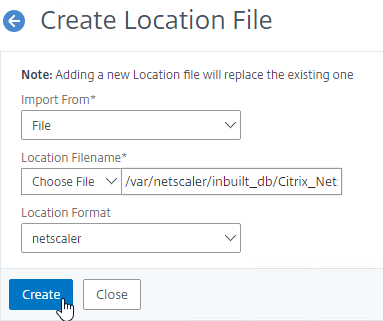
- After you later create a GSLB Service, when you open the GSLB Service, the public IP will be translated to a location based on the contents of the static proximity database.
Private IP Blocks
Geo Location databases only contain entries for Public IPs. For Private IPs, do the following:
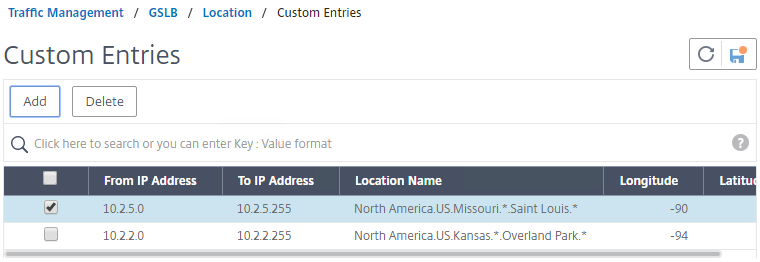
- On the left, expand Traffic Management, expand GSLB, expand Database and Entries, and click Custom Entries.
- On the right, click Add.
- Enter a range of IP addresses for a particular location.
- Enter a Location Name in Geo Location format, which is typically six location words separated by periods. You can look in the static proximity database for examples.
- Make sure you enter coordinates. Google can find you coordinates for cities.
- Click Create.
- Continue creating Custom Entries for other private IP blocks.
Use Geo Locations
You can use the Geo locations in a DNS Policy, static proximity GSLB Load Balancing, Responders, and Rewrites:
Prior to Citrix ADC 12.1 build 50, the only option in policy expressions is to match a known location.
- The main expression is CLIENT.IP.SRC.MATCHES_LOCATION(“North America.US.*.*.*.*”))
- Citrix Knowledgebase article CTX130701 – How to Block Access to a Website Using a Location Database Based on User’s Country
- In newer versions of Citrix ADC, Location expressions (e.g. CLIENT.IP.SRC.MATCHES_LOCATION(“North America.US.*.*.*.*”)) must be exact matches. You can re-enable wildcards matching by running
set locationParameter -matchWildcardtoany YESfrom the CLI. Source = CTX232884 Policies with GSLB Wildcard Location expressions not getting a hit on build 11.1-53.11 and above
- In newer versions of Citrix ADC, Location expressions (e.g. CLIENT.IP.SRC.MATCHES_LOCATION(“North America.US.*.*.*.*”)) must be exact matches. You can re-enable wildcards matching by running
- Neil Spellings blog post – Using Netscaler HTTP callouts for real-time GeoIP and anonymous proxy detection
- Citrix Docs – Overriding Static Proximity Behavior by Configuring Preferred Locations
Citrix ADC 12.1 build 50 and newer lets you extract the user’s location and use it in policy expressions.
- The main expression is CLIENT.IP.SRC.LOCATION
add audit messageaction msg1 DEBUG "\"Request Location: \"+CLIENT.IP.SRC.LOCATION"add rewrite action rewrite_act insert_http_header "User_location" CLIENT.IP.SRC.LOCATION
- For details, see Retrieve location details from user IP address using geolocation database at Citrix Docs.
GSLB Services
GSLB Services represent the IP addresses that are returned in DNS Responses. The IP addresses represented by GSLB Services do not need to be hosted on a Citrix ADC, but Citrix ADC-owned IP addresses (e.g. load balancing VIPs) have additional GSLB Site Persistence options (e.g. cookie-based persistence).
- Each potential IP address in a DNS response is a separate GSLB Service.
- GSLB Services are associated with GSLB Sites.
- GSLB Service configuration is identical for active/active and active/passive. GSLB Virtual Server configuration defines active/active or active/passive, not GSLB Services.
GSLB should be configured identically on all Citrix ADC pairs that are responding to DNS queries. Since you have no control over which Citrix ADC will receive the DNS query, you must ensure that both Citrix ADC pairs are giving out the same DNS responses.
To create a GSLB Service:
- On the left, expand Traffic Management > GSLB, and click Services.
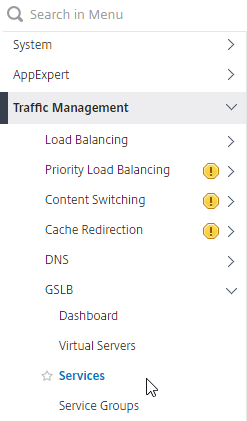
- On the right, click Add.
- The service name should be similar to the DNS name that you are trying to GSLB. Include the site name in the service name.
- Select one of the GSLB Sites. The IP address you’re configuring in this GSLB Service should be geographically located in the selected GSLB Site.

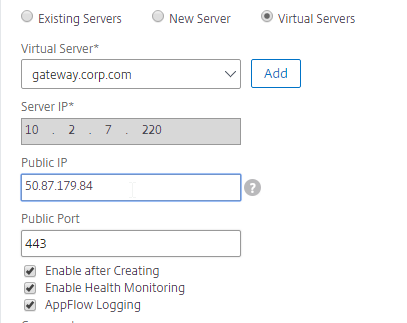
- On the bottom part, if the IP address is owned by this Citrix ADC, then select Virtual Servers, and select a Virtual Server that is already defined on this appliance. It should automatically fill in the other fields. This option is only available when creating a GSLB Service in the Local GSLB Site.
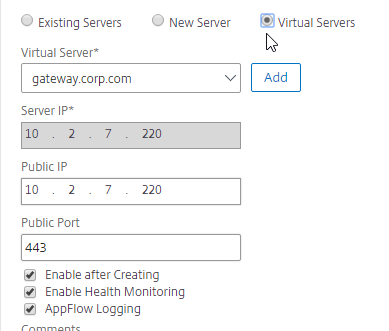
- If the IP address is not owned by this Citrix ADC, then change the selection to New Server, and enter the remote IP address in the Server IP field.
- The Server IP field is the IP address that Citrix ADC will monitor for reachability.
- If the remote IP is owned by a different Citrix ADC that is reachable by MEP, then enter the actual VIP configured on that remote Citrix ADC. The Server IP does not need to match what is returned to the DNS Query.
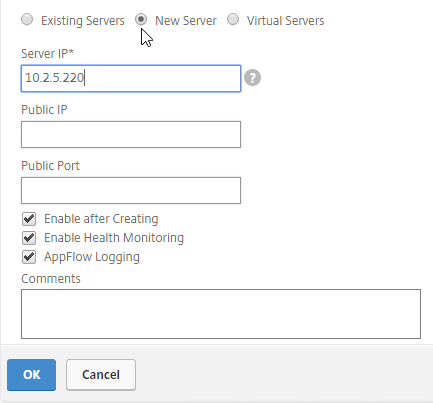
- In the Public IP field, enter the IP address that will be returned to the DNS Query. If you leave Public IP blank, then Citrix ADC will copy the Server IP to the Public IP field. For Public GSLB, the Public IP field is usually a Public IP address. For internal GSLB, the Public IP field is usually an internal IP, and probably matches the Server IP.
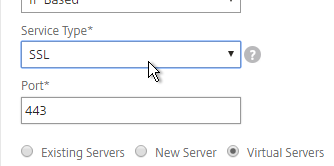
- Scroll up, and make sure the Service Type is SSL. It’s annoying that Citrix ADC doesn’t set this drop-down correctly.
- Scroll down, and click OK, to close the Basic Settings section.

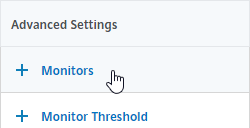
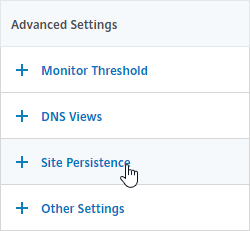
- GSLB Service Monitoring – on the right, in the Advanced Settings column, you can click Monitors to bind a monitor to this GSLB Service. Review the following notes before you bind a monitor.
- Local Citrix ADC VIP – If the GSLB Service IP is a VIP on the local appliance, then GSLB will simply use the state of the local traffic Virtual Server (Load Balancing, Content Switching, or Gateway). There’s no need to bind a monitor to the GSLB Service.
- Remote Citrix ADC VIP – If the GSLB Service IP is a VIP on a remote appliance, then GSLB will use MEP to ask the other appliance for the state of the remote traffic Virtual Server. In both cases. There’s no need to bind a monitor to the GSLB Service.
- GSLB Monitor overrides other Monitoring methods – If you bind a monitor to the GSLB Service, then MEP and local Virtual Server state are ignored (overridden).
- Here are some reasons for binding a monitor to the GSLB Service:
- IP is not on a Citrix ADC– If the GSLB Service IP is not hosted on a Citrix ADC, then only a monitor can determine if the Service IP is up or not.
- Monitor remote Internet – For Public DNS, if MEP is not routed through the Internet, then you need some method of determining if the remote Internet circuit is up or not. In that case, you’ll need to bind monitors directly to the GSLB Service. The route of the Monitor should go across the Internet. Or you can ping the Internet router in the remote datacenter to make sure it’s reachable.
- Traffic Domains – If the GSLB Service IP is in a non-default Traffic Domain, then you will need to attach a monitor, since GSLB cannot determine the state of Virtual Servers in non-default Traffic Domains.
- TCP monitor – for TCP services (not UDP), a simple TCP monitor is probably all you need. The TCP monitor tries to connect to the GSLB Service Public IP address using the SNIP of the local appliance. Make sure firewall on both sides allows this connection.
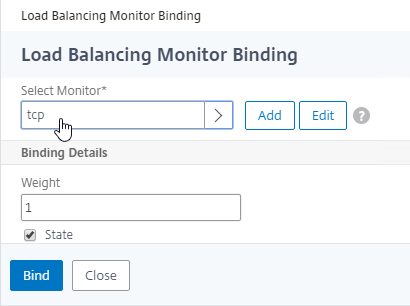
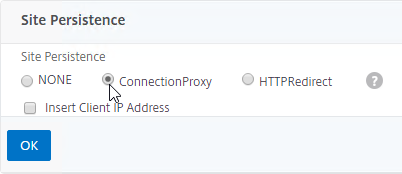
- Active/Active Site Persistence – If you intend to do GSLB active/active, and if you need site persistence, then on the right you can add Site Persistence and enable Connection Proxy or HTTP Redirect. See Citrix Blog Post Troubleshooting GSLB Persistence with Fiddler for more details. This only works with GSLB Service IPs that match Virtual Server VIPs on Citrix ADC appliances reachable through MEP.
- Scroll down, and click Done, to finish creating the GSLB Service.

- Create additional GSLB Services for each IP address that will be returned to a DNS query. There should be at least two for each DNS name.
- When creating a GSLB Service, select the correct Site, and make sure Service Type = SSL.
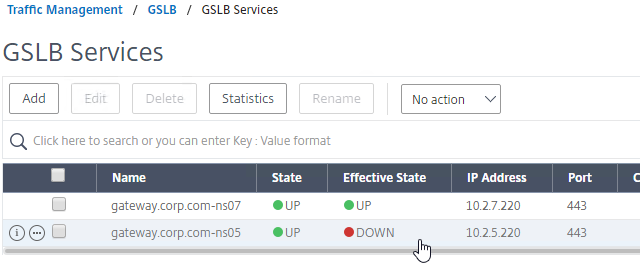
- The State will probably be down until the other ADC is configured.
Manually Synchronize GSLB Configuration
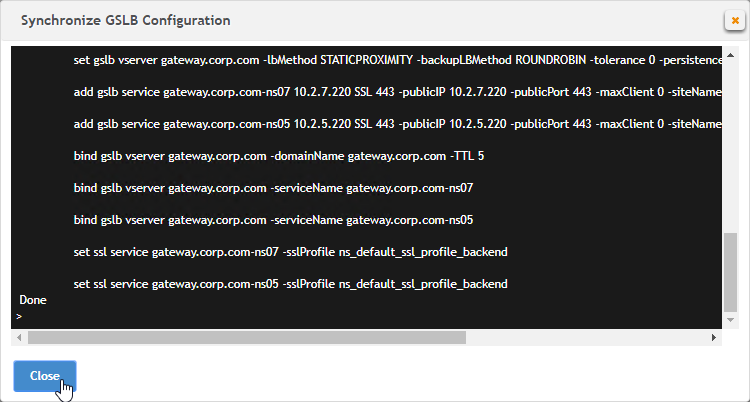
Copy the GSLB Service Configuration to the remote Citrix ADC pair. You can either repeat the GUI steps listed above. Or you can do the following:
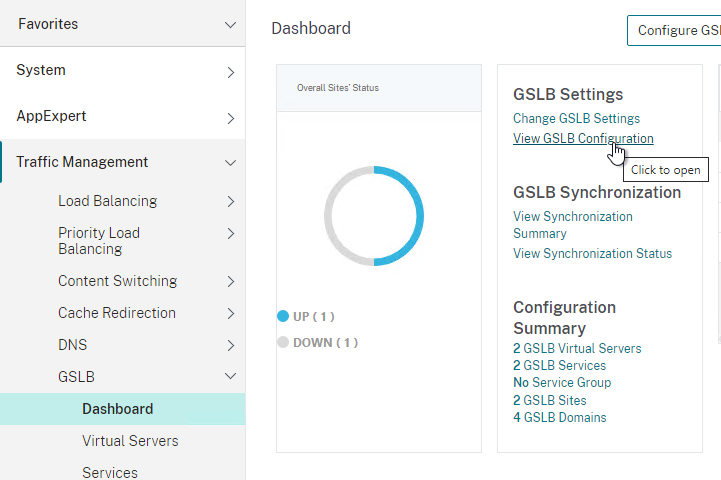
- On the left, expand Traffic Management, expand GSLB, and click Dashboard.
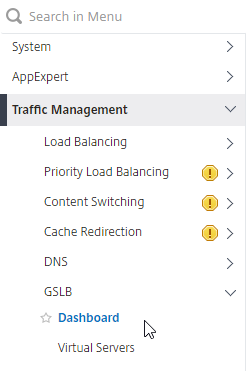
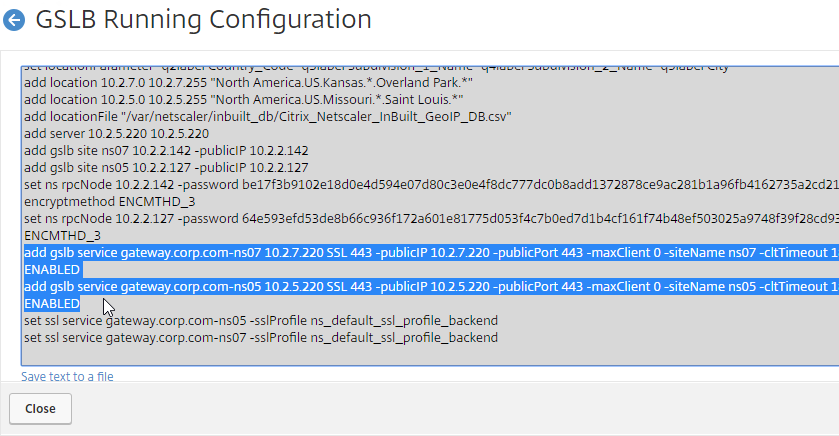
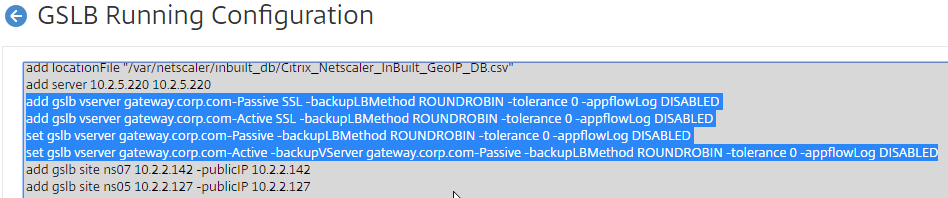
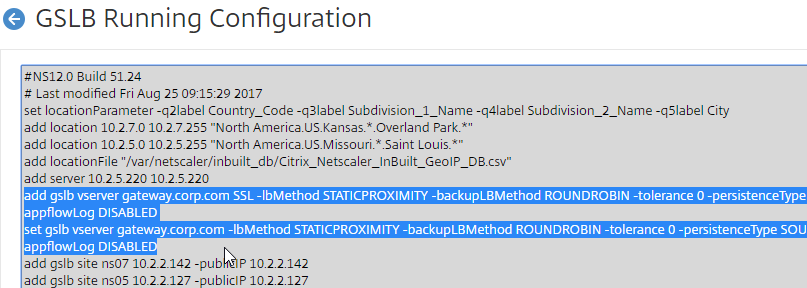
- On the right, click View GSLB Configuration.
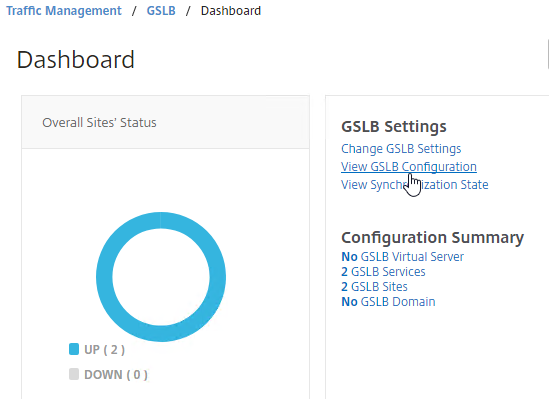
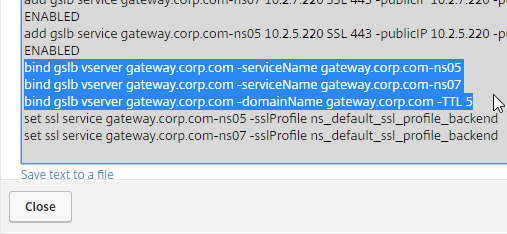
- This shows you all of the CLI commands for GSLB. Look for add gslb service commands. You can copy them, and run them (SSH) on other Citrix ADC pairs that are participating in GSLB.
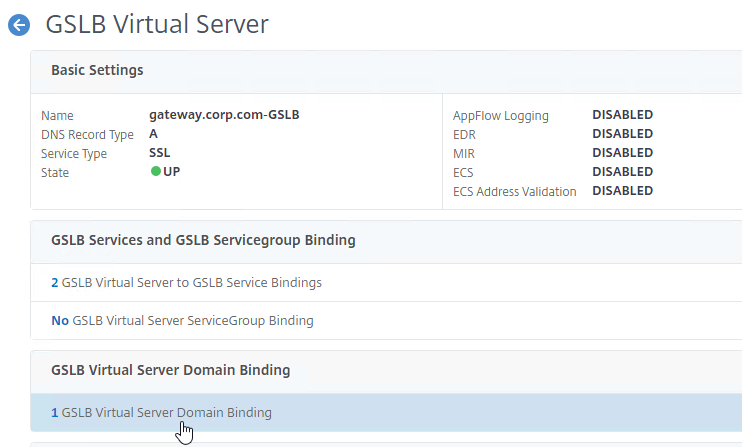
GSLB Virtual Server
GSLB Virtual Server is the entity that links a DNS name with GSLB Services.
For Active/Passive GSLB in NetScaler ADC 13.1 or newer, GSLB Services can be bound in priority order. GSLB will give out the IP address of the lowest order GSLB Service. If that GSLB Service is down, then GSLB will give out the IP address of the next order GSLB Service.
- Create a GSLB Virtual Server.
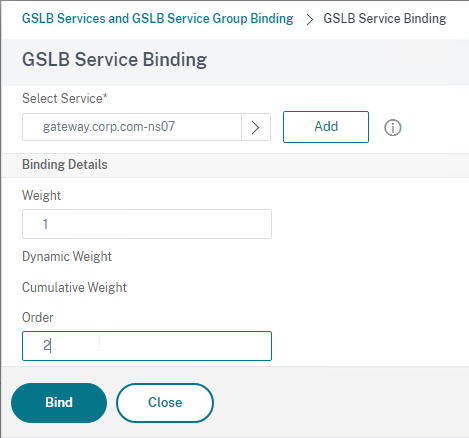
- Bind the active GSLB Service but set the Order to 1.
- Bind the passive GSLB Service but set the Order to 2.
- Bind a DNS name to the GSLB Virtual Server.
- Repeat the GSLB Virtual Server configuration on other Citrix ADC pairs participating in GSLB.
- Delegate the DNS name to Citrix ADC ADNS.
For Active/Passive GSLB, the Active GSLB Virtual Server will give out a single IP address if that IP address up. If the GSLB Service is down, then it will fail over to a Backup GSLB Virtual Server that gives out a different IP address.
- Create a GSLB Virtual Server for the Passive IP address.
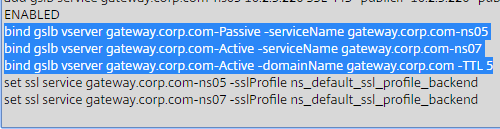
- Bind the Passive GSLB Service to the Passive GSLB Virtual Server.
- Create another GSLB Virtual Server for the Active IP address.
- Bind the Active GSLB Service to the Active GSLB Virtual Server.
- Configure Backup Virtual Server pointing to the Passive GSLB Virtual Server.
- Bind a DNS name to the Active GSLB Virtual Server.
- Repeat the GSLB Virtual Server configuration on other Citrix ADC pairs participating in GSLB.
- Delegate the DNS name to Citrix ADC ADNS.
For Active/Active GSLB, a single GSLB Virtual Server gives out multiple IP addresses based on load balancing method and site persistence.
- Create one GSLB Virtual Server.
- Bind two or more GSLB Services to the Virtual Server.
- Configure the GSLB Virtual Server Load Balancing Method – e.g., Proximity
- Configure Site Persistence:
- Source IP persistence is configured on the GSLB Virtual Server.
- Cookie Persistence is configured on the GSLB Services.
- Bind a DNS name to the GSLB Virtual Server.
- Repeat the GSLB Virtual Server configuration on other Citrix ADC pairs participating in GSLB.
- Delegate the DNS name to Citrix ADC ADNS.
Configure Active/Passive GSLB in NetScaler ADC 13.1 and newer
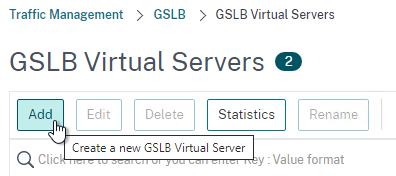
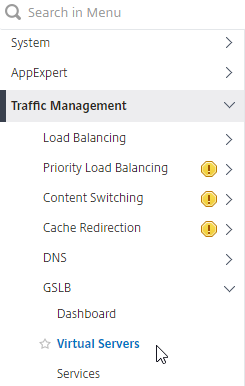
- On the left, expand Traffic Management, expand GSLB, and click Virtual Servers.

- On the right, click Add.
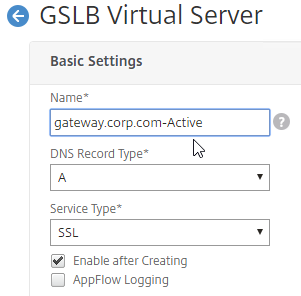
- In the Basic Settings section, do the following:
- Give the GSLB Virtual Server a descriptive name.
- Set the Service Type to SSL to match the GSLB Sevices you intend to bind.
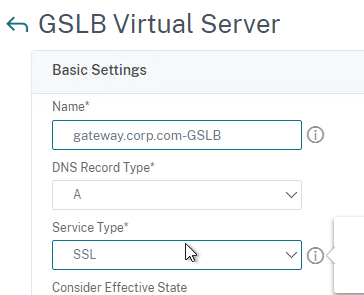
add gslb vserver <gslb_vserver_name> SSL
- Click OK to close the Basic Settings section.

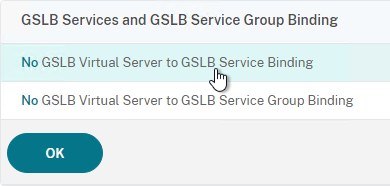
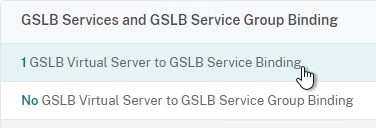
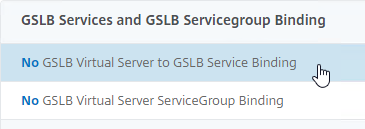
- On the left, click where it says No GSLB Virtual Server to GSLB Service Binding.
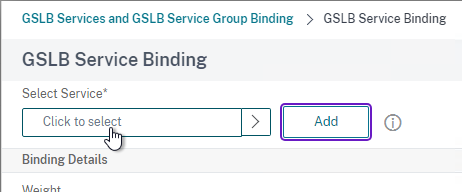
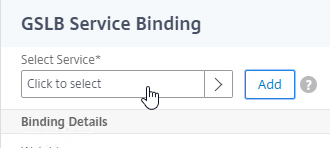
- Click where it says Click to select.

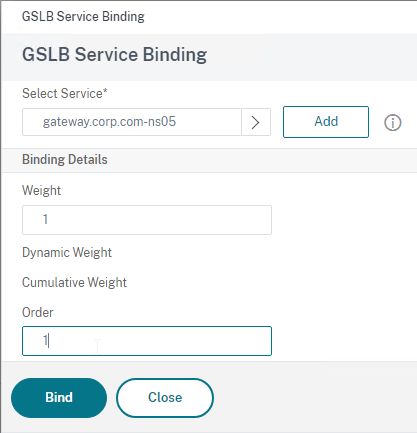
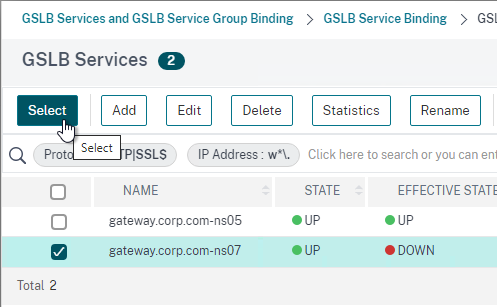
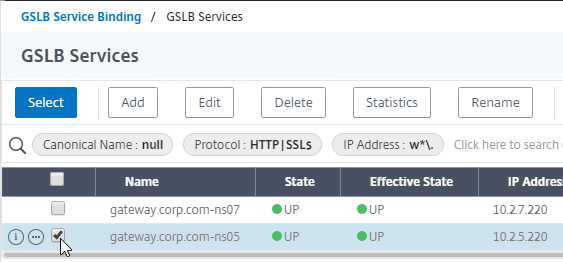
- Check the box next to the active GSLB Service and click Select.
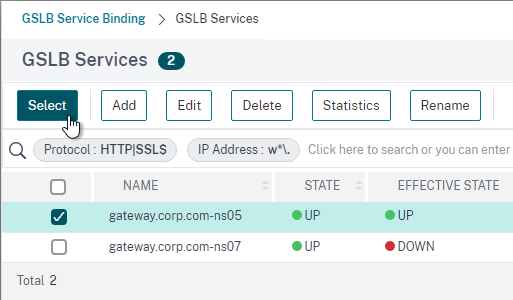
- In the Order box, enter 1. Click Bind.
- Click where it says Click to select.
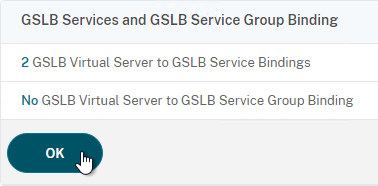
- To add another GSLB Service Binding, on the left, click where it says 1 GSLB Virtual Server to GSLB Service Binding.
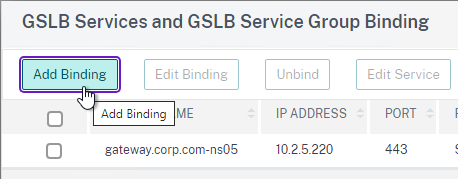
- Click Add Binding.
- Click where it says Click to select.
- Check the box next to a passive GSLB Service and then click Select at the top of the page.
- In the Order box, enter 2 so that this GSLB Service is only used if all Order 1 GSLB Services are down. Click Bind.
- Click Add Binding.
- Click OK to close the GSLB Services and GSLB Service Group Binding section.
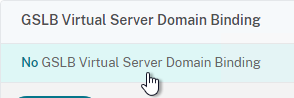
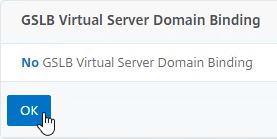
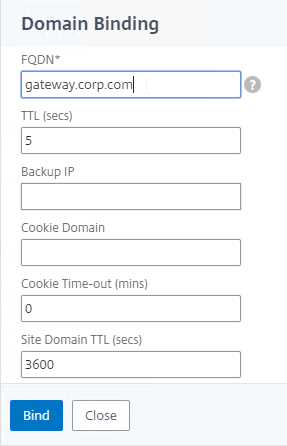
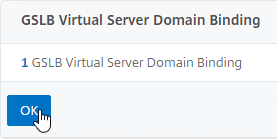
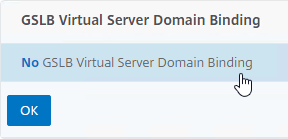
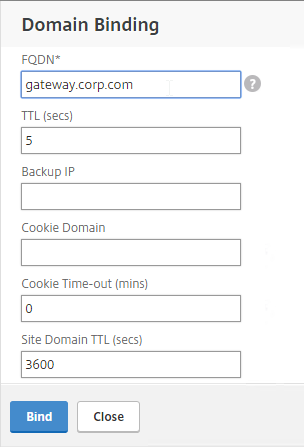
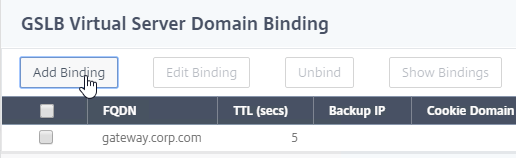
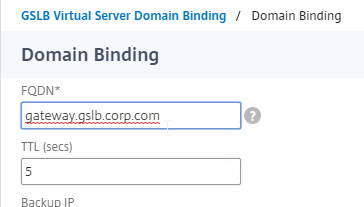
- On the left, click where it says No GSLB Virtual Server Domain Binding.
- Enter the FQDN that this GSLB Virtual Server will resolve.
- Click Bind.
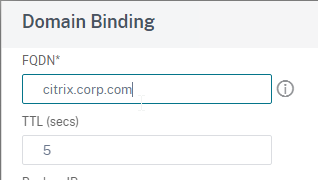
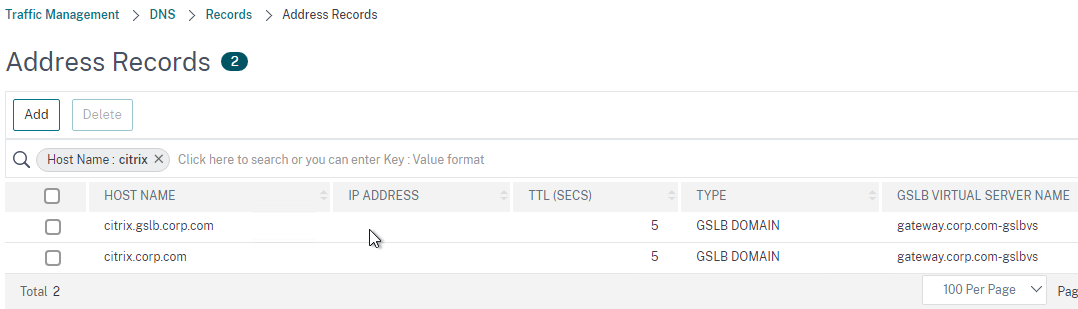
- If you are doing CNAME (e.g., citrix.corp.com CNAME to citrix.gslb.corp.com, then add domain bindings for both the main FQDN and the CNAME FQDN. Click Close when done.
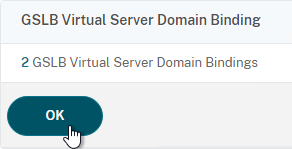
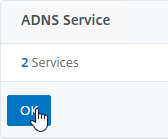
- Click OK to close the GSLB Virtual Server Domain Binding section.
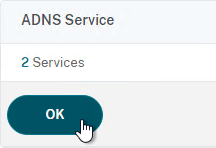
- Click OK to close the ADNS Service section.
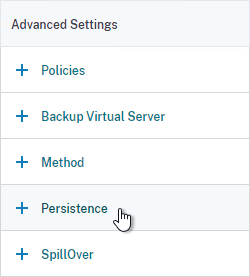
- With GSLB Services assigned to different Order numbers, it is not necessary to configure Backup Virtual Server.
- If you bound multiple GSLB Services to a single Order number, then you might want to adjust Method and Persistence.
- Click Done to finish creating the GSLB Virtual Server.

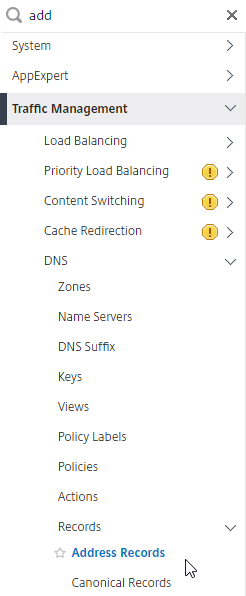
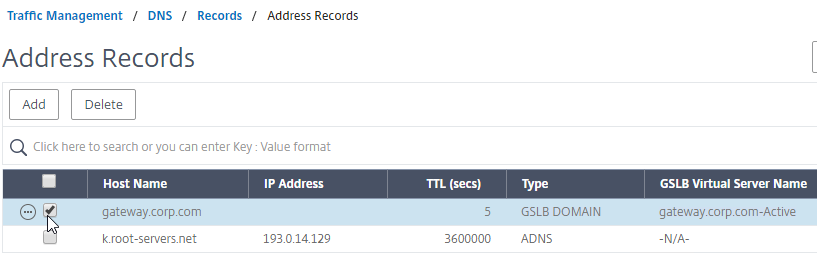
- On the left, if you expand Traffic Management > DNS, expand Records, and click Address Records…
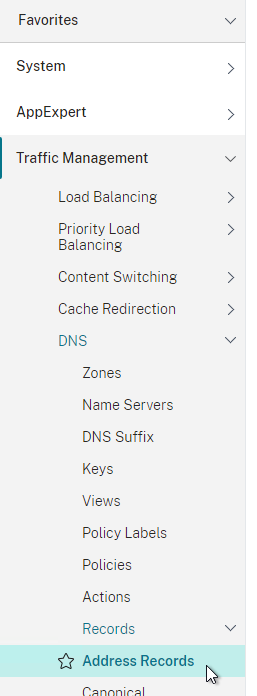
- You’ll see a new DNS record for the GSLB domain you just configured. Notice it is marked as GSLB DOMAIN, and has a default TTL of 5 seconds. You can also see which GSLB Virtual Server it is bound to.
- Configure an identical GSLB Virtual Server on the other NetScaler ADC appliance pair. Both NetScaler ADC pairs must be configured identically. You can use Traffic Management > GSLB > Dashboard > View GSLB Configuration to copy the add/set/bind gslb vserver commands from this appliance to other NetScaler ADC appliances.

Configure Active/Passive GSLB in NetScaler ADC 13.0 and older
Passive Virtual Server
- On the left, expand Traffic Management, expand GSLB, and click Virtual Servers.

- On the right, click Add.

- In the Basic Settings section, do the following:
- Give the Passive GSLB Virtual Server a descriptive name.
- Set the Service Type to SSL to match the GSLB Services that you will bind to this Virtual Server.
- Click OK to close the Basic Settings section.

- On the left, click where it says No GSLB Virtual Server to GSLB Service Binding.

- Click where it says Click to select.

- Check the box next to an existing Passive GSLB Service, and then click the blue Select button at the top of the screen.
- Click Bind.
- Click where it says Click to select.
- Click OK to close the GSLB Virtual Server GSLB Service Binding section.
- Click OK to close the GSLB Virtual Server Domain Binding section. The DNS name is bound to the Active Virtual Server, not the Passive Virtual Sever.
- Click OK to close the ADNS Service section.
- Click Done to finish creating the Passive GSLB Virtual Server.

Active Virtual Server
- On the left, expand Traffic Management, expand GSLB, and click Virtual Servers.
- On the right, click Add.

- In the Basic Settings section, do the following:
- Give the Active GSLB Virtual Server a descriptive name.
- Set the Service Type to SSL to match the GSLB Services that you will bind to this Virtual Server.
- Click OK to close the Basic Settings section.

- On the left, click where it says No GSLB Virtual Server to GSLB Service Binding.
- Click where it says Click to select.
- Check the box next to an existing Active GSLB Service, and click Select.
- Click Bind.

- Click where it says Click to select.
- Click OK to close the GSLB Virtual Server GSLB Service Binding section.

- On the left, click where it says No GSLB Virtual Server Domain Binding.

- In the Domain Binding page, do the following:
- Enter the FQDN that GSLB will resolve.
- Click Bind.
- Click OK to close the GSLB Virtual Server Domain Binding section.
- Click OK to close the ADNS Service section.

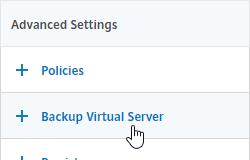
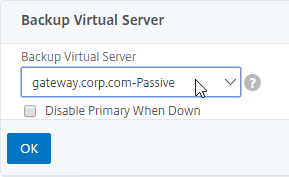
- On the right, in the Advanced Settings section, click Backup Virtual Server to add it to the left.
- On the left, in the Backup Virtual Server section, select the Passive GSLB Virtual Server, and click OK.
- Click Done when done creating the Active GSLB Virtual Server.

- On the left, if you expand Traffic Management > DNS, expand Records, and click Address Records…
- On the right, you’ll see a new DNS record for the GSLB domain you just configured. Notice the Type is GSLB DOMAIN, and has a default TTL of 5 seconds. You can also see which GSLB Virtual Server it is bound to.
- Configure identical GSLB Virtual Servers on the other Citrix ADC appliance pair. Both Citrix ADC pairs must be configured identically. You can use Traffic Management > GSLB > Dashboard > View GSLB Configuration to copy the add/set/bind gslb vserver commands from this appliance to other Citrix ADC appliances.
Configure Active/Active GSLB
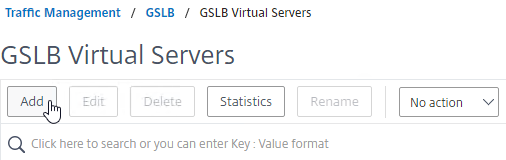
- On the left, expand Traffic Management, expand GSLB, and click Virtual Servers.
- On the right, click Add.
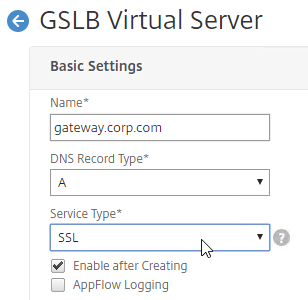
- In the Basic Settings section, do the following:
- Give the GSLB Virtual Server a descriptive name.
- Set the Service Type to SSL to match the GSLB Sevices you intend to bind.
- You can optionally check the box for Send all “active” service IPs in response (MIR). By default, GSLB only gives out one IP address per DNS query. This checkbox always returns all IPs, but the IPs are ordered based on the GSLB Load Balancing Method and/or GSLB Persistence.
- A new DNS feature called ECS will contain the actual DNS client IP. This dramatically improves the accuracy of determining a user’s location. Without this setting, GSLB can only see the IP address of the user’s configured DNS server instead of the real client IP. Check the box next to Respond with ECS option to enable ECS for site persistence.
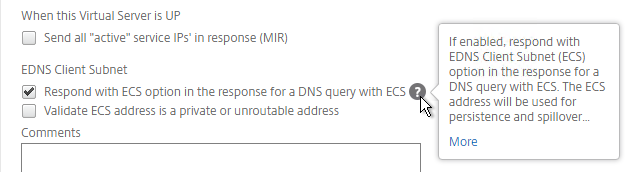
set gslb vserver <gslb_vserver> -ECS ENABLED
- Click OK to close the Basic Settings section.

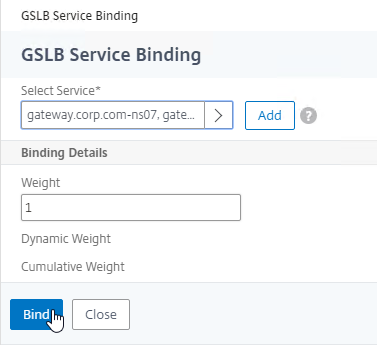
- On the left, click where it says No GSLB Virtual Server to GSLB Service Binding.

- Click where it says Click to select.
- Check the boxes next to multiple existing GSLB Services, and click Select.

- Click Bind.
- Click where it says Click to select.
- Click OK to close the GSLB Virtual Server GSLB Service Binding section.

- On the left, click where it says No GSLB Virtual Server Domain Binding.
- Enter the FQDN that this GSLB Virtual Server will resolve.
- Click Bind.
- Click OK to close the GSLB Virtual Server Domain Binding section.

- Click OK to close the ADNS Service section.

- On the left, in the Method section, click the pencil icon.

- For poximity load balancing, change the Choose Method drop-down to RTT with STATICPROXIMITY as backup.
- RTT = Round Trip Time. Each ADC appliance sends a ping to the user’s DNS server. Whichever ADC appliance gets the fastest response determines the site of the GSLB Service. RTT requires that ADC be able to ping anything on the Internet so adjust firewall rules accordingly.
- STATICPROXIMITY requires that the Geo Location database has already been installed on the appliance.
- Click OK to close the Method section.
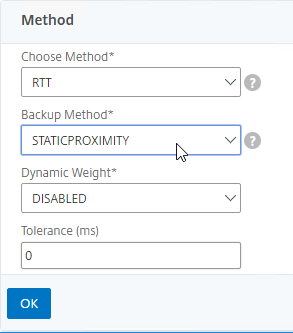
- For poximity load balancing, change the Choose Method drop-down to RTT with STATICPROXIMITY as backup.
- On the right, in the Advanced Settings column, click Persistence to add it to the left.
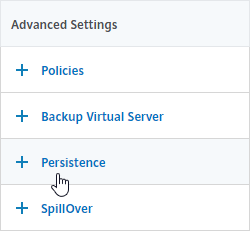
- On the left, at the bottom of the page in the Persistence section, change the Persistence drop-down to Source IP.
- Enter a Persistence Id.
- The Persistence ID signifies the persistence table that each ADC pair shares across the MEP connection.
- Each active/active GSLB Virtual Server should have a different Persistence ID (different persistence table).
- When you configure the same GSLB Virtual Server on each Citrix ADC pair, specify the same Persistence ID so every Citrix ADC has the same persistence information for this particular GSLB Virtual Server.
- In the Time-out field, enter the Persistence Time-out. This is typically the same or longer than the webpage timeout.
- Click OK to close the Persistence section.
- Click Done to finish creating the GSLB Virtual Server.

- On the left, if you expand Traffic Management > DNS, expand Records, and click Address Records…
- You’ll see a new DNS record for the GSLB domain you just configured. Notice it is marked as GSLB DOMAIN, and has a default TTL of 5 seconds. You can also see which GSLB Virtual Server it is bound to.
- Configure an identical GSLB Virtual Server on the other Citrix ADC appliance pair. Both Citrix ADC pairs must be configured identically. You can use Traffic Management > GSLB > Dashboard > View GSLB Configuration to copy the add/set/bind gslb vserver commands from this appliance to other Citrix ADC appliances.
GSLB Configuration Synchronization Script
Manual GSLB Synchronization
- The synchronization script requires SSH to be enabled on your GSLB Site IPs.
- Ports TCP 3008, TCP 3010, and TCP 22 must be opened from the local NSIP to the remote GSLB Site IP. The source IP is NSIP, not SNIP.
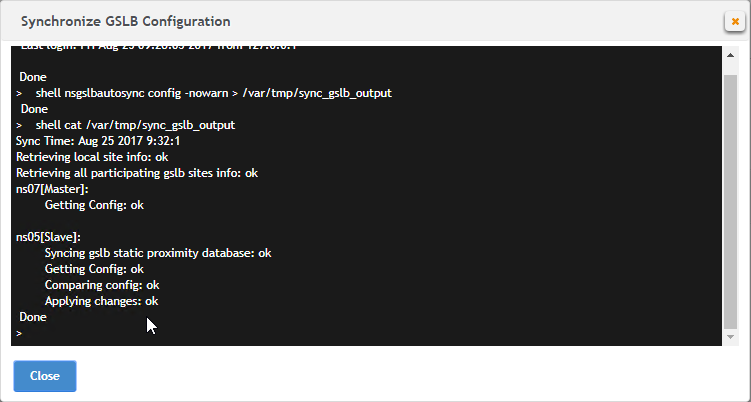
- To manually run the script that syncs GSLB configuration from one GSLB Site to another, on the left, expand Traffic Management, expand GSLB, and click Dashboard.
- On the right, click the button labelled Auto Synchronization GSLB.

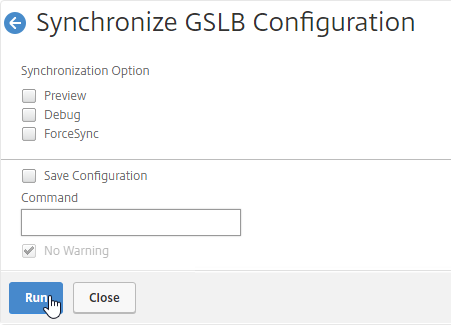
- Use the check boxes on the top, if desired. It’s usually a good idea to Preview the changes before applying them.
- Then click Run to begin synchronization.
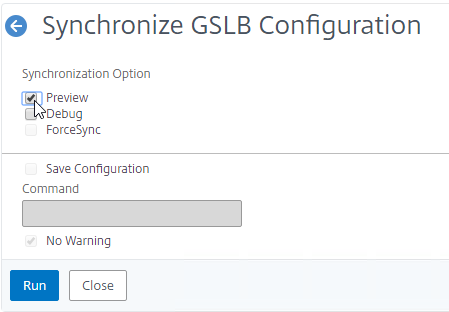
- Click Close.
- You can Run it again without previewing it. It seems to take several seconds to complete.
Automatic GSLB Synchronization
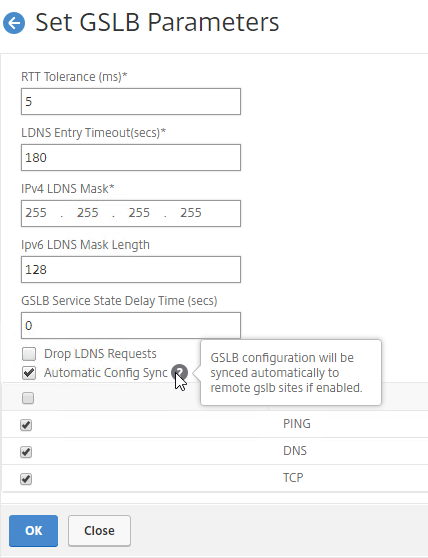
- There is an automatic GSLB Configuration Sync feature, which automatically syncs the GSLB config every 15 seconds. To enable it on the master appliance, go to Traffic Management > GSLB > Dashboard. On the right, click Change GSLB settings.
- Check the box next to Automatic Config Sync. Only enable this on the one appliance where you are configuring GSLB, and want that GSLB config synced to other appliance.
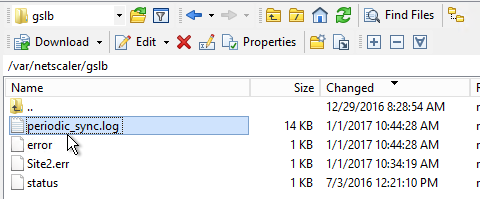
- The automatic sync log can be found at /var/netscaler/gslb/periodic_sync.log.
Some notes regarding GSLB Sync:
- When syncing GSLB Services, it tries to create Load Balancing Server objects on the remote appliance. If the GSLB Service IP matches an existing Load Balancing Server object, then the GSLB sync will fail. Check the Sync logs for details. You’ll have to delete the conflicting Load Balancing Server object before GSLB Sync works correctly.
- GSLB Sync runs as a script on the BSD shell and thus always uses the NSIP as the source IP.
- GSLB Sync connects to the remote GSLB Site IP on TCP 3008 (if RPC is Secure) and TCP 22.
Test GSLB
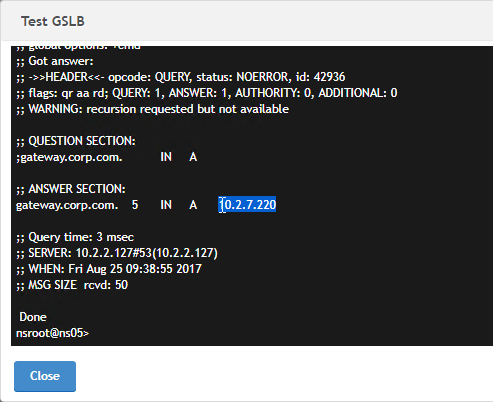
- You can test GSLB DNS name resolution from the GUI by going to Traffic Management > GSLB > Dashboard, and on the right, click the button labelled Test GSLB.
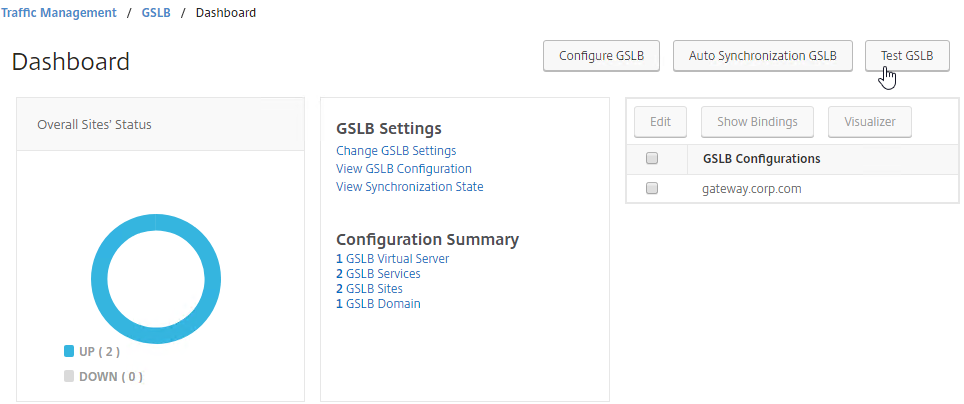
- Select a GSLB Domain Name.
- Select an ADNS Service IP to test it from, and click Test.
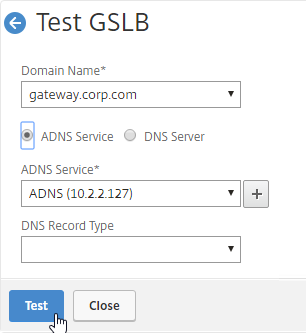
- The test performs a dig against the ADNS IP. Verify that the response contains the IP address you expected.
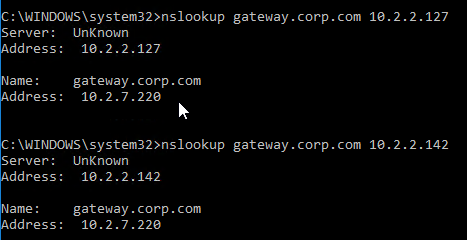
- Another method of testing GSLB is to simply point nslookup to the ADNS services and submit a DNS query for one of the DNS names bound to a GSLB vServer. Run the query multiple times to make sure you’re getting the response you expect.
- The syntax is “nslookup <DNS_name> <ADNS_IP>”. The second argument specifies the DNS server that you send the DNS Query to.
- The Citrix ADC ADNS services at both GSLB sites should be giving the same response.
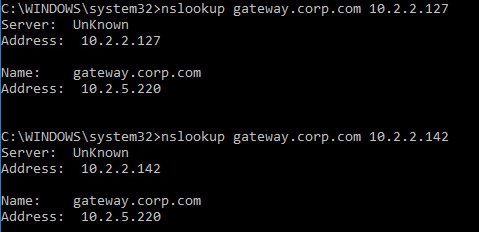
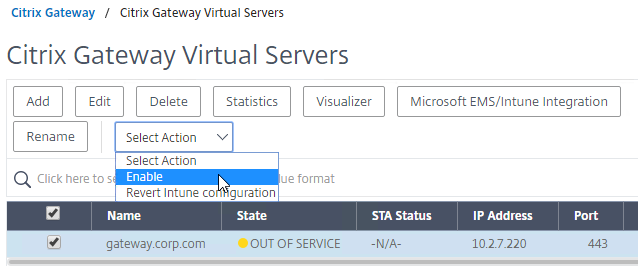
- To simulate a failure, if the GSLB Service IP is a Citrix ADC Load Balancing, Content Switching, or Citrix Gateway IP, you can disable the Virtual Server.
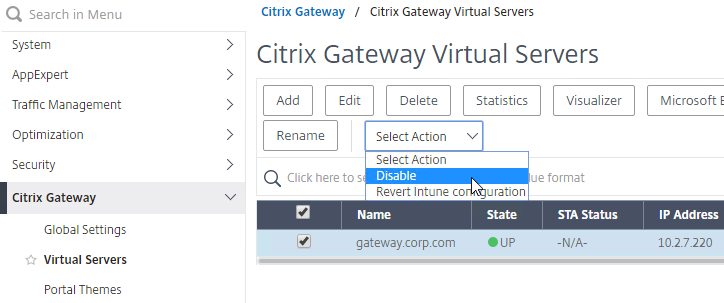
- Then the responses should change. Verify on both ADNS services.
- Re-enable the Virtual Server, and the responses should return to normal.
DNS Delegation
If you are enabling GSLB for the domain gateway.corp.com, you’ll need to create a delegation at the server that is hosting the corp.com DNS zone. For public GSLB, you need to edit the public DNS zone for corp.com.
DNS Delegation instructions will vary depending on what product is hosting the public DNS zone. This section details Microsoft DNS, but it should be similar in BIND or web-based DNS products.
There are two ways to delegate GSLB-enabled DNS names to Citrix ADC ADNS:
- Delegate the individual record – For example, delegate gateway.corp.com.
- Delegate an entire subzone – For example, delegate the subzone gslb.corp.com. Then create a CNAME record in the parent DNS zone for gateway.corp.com that is aliased to gateway.gslb.corp.com. For additional delegations, simply create more CNAME records.
- The incoming DNS query to the ADNS listener is for gateway.gslb.corp.com and not gateway.corp.com. You’ll need to bind gateway.gslb.corp.com to your GSLB Virtual Server. You can bind multiple FQDNs to a single GSLB Virtual Server.
A delegation consists of the following DNS records:
- A records (host records) that resolve to each Citrix ADC ADNS IP address. If you have two ADC pairs participating in GSLB, then you’ll need one A record for each ADC pair.
- The A record names are typically something like ns1.corp.com and ns2.corp.com, just like you would name any other DNS server.
- You only create the A records once. The A records for ADNS services can be used by multiple delegations.
- These A records for ADNS are sometimes called glue records.
- NS records for each delegation. The NS records point to the A records that resolve to the ADC ADNS IP addresses. If you have two ADC ADNS IP addresses, then you need two NS records for each delegation.
- When delegating individual records, you create separate NS records for each delegation. If you have two ADNS listeners, then you need two NS records for each delegation.
- When delegating a subzone, you only need NS records for the subzone. To GSLB-enable a DNS name, you create a CNAME that aliases to a record under the subzone.
Delegate an individual DNS record
- Run DNS Manager.
- First, create Host Records pointing to the ADNS services running on the Citrix ADC pairs in each data center. These host records for ADNS are used for all GSLB delegations no matter how many GSLB delegations you need to create. These are sometimes called glue records.
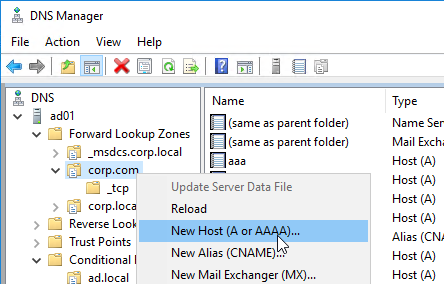
- The first Host record is gslb1, (or similar) and should point to the ADNS service (Public IP) on one of the Citrix ADC appliances.
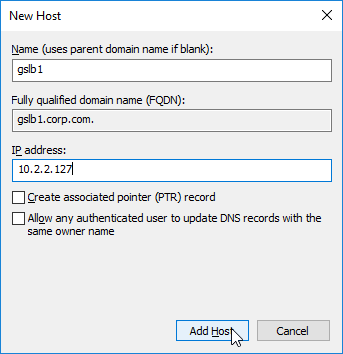
- The second Host record is gslb2, and should point to the ADNS Service (public IP) on the other Citrix ADC appliance.
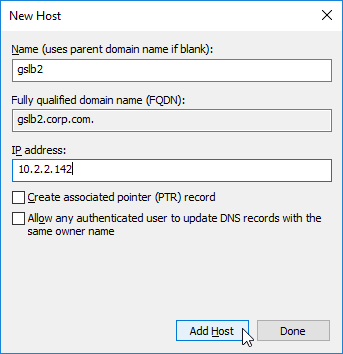
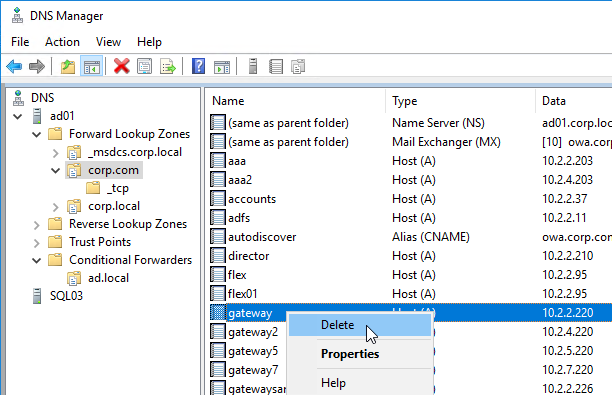
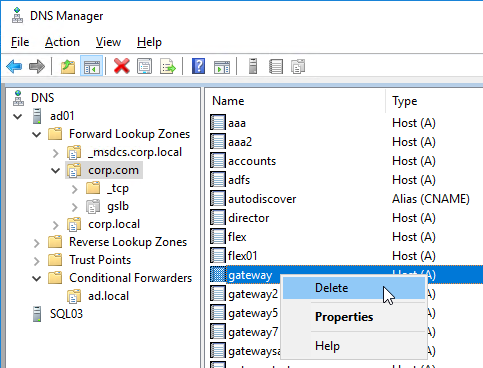
- If you currently have a host record for the service that you are delegating to GSLB (e.g. gateway.corp.com), delete it.
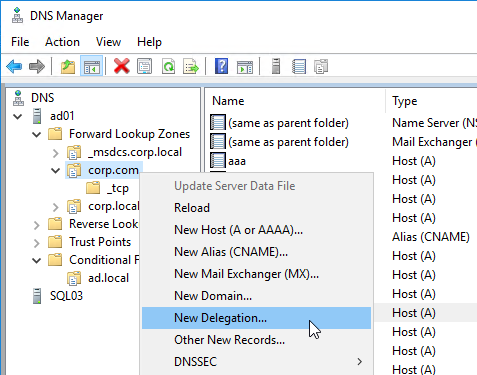
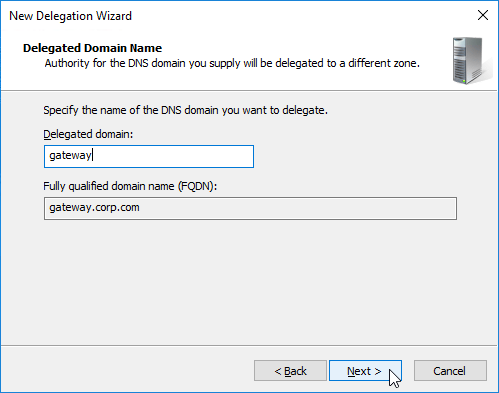
- Right-click the parent DNS zone, and click New Delegation.
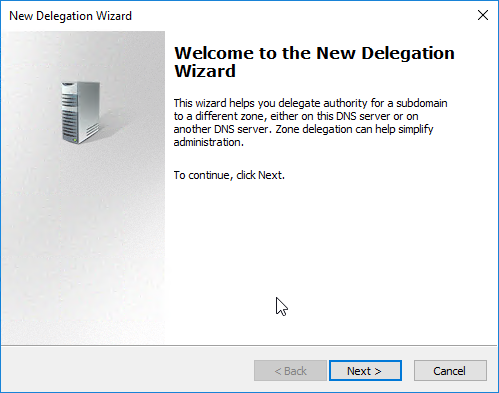
- In the Welcome to the New Delegation Wizard page, click Next.
- In the Delegated Domain Name page, enter the left part of the DNS record that you are delegating (e.g. gateway for gateway.corp.com). Click Next.
- In the Name Servers page, click Add.
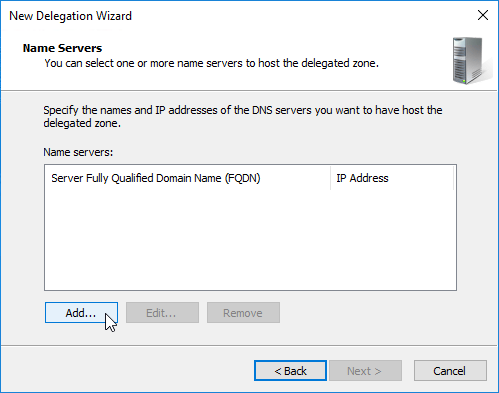
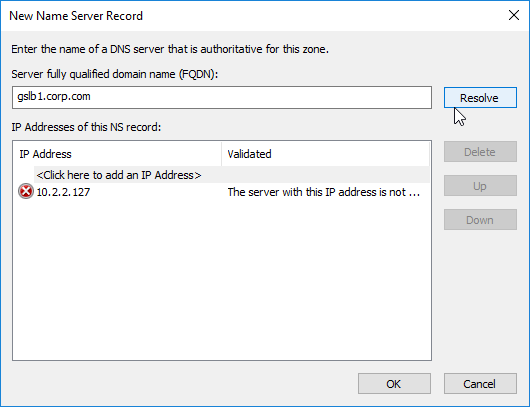
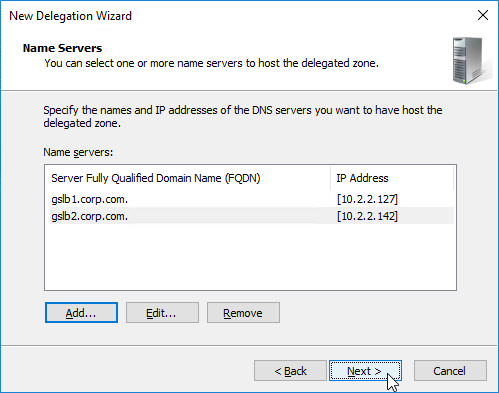
- This is where you specify gslb1.corp.com and gslb2.corp.com as delegated name servers. Enter gslb1.corp.com, and click Resolve. Then click OK. If you see a message about the server not being authoritative for the zone, ignore the message. Note: you only add one name server at a time.
- Then click Add to add the other GSLB ADNS server.
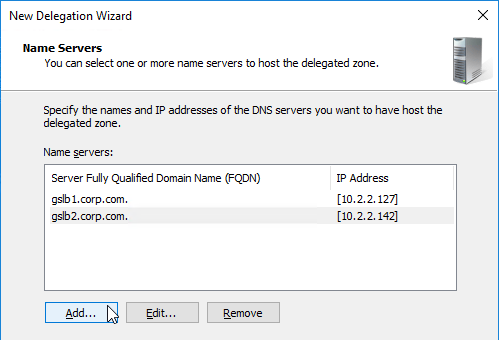
- Once both ADNS servers are added to the list, click Next.
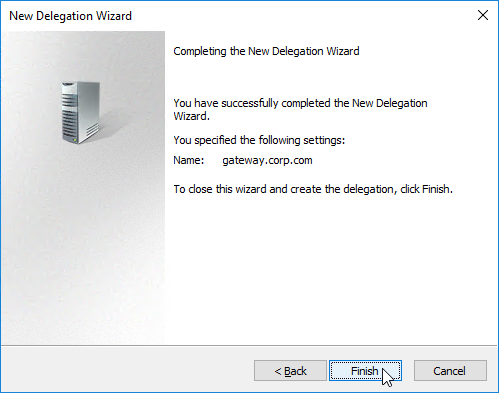
- In the Completing the New Delegation Wizard page, click Finish.
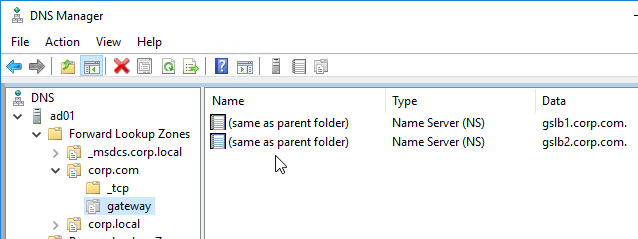
- The delegation is shown in the DNS Manager console.
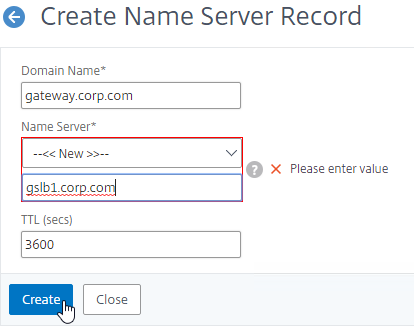
- For proper delegation, the Name Server records should also be added to Citrix ADC. (source = Citrix CTX241493 Citrix Response on DNS Flag Day)
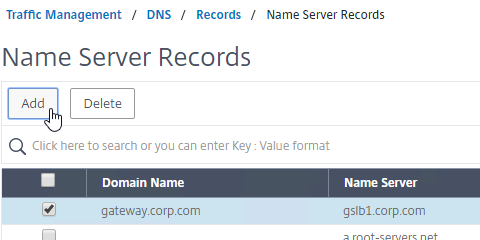
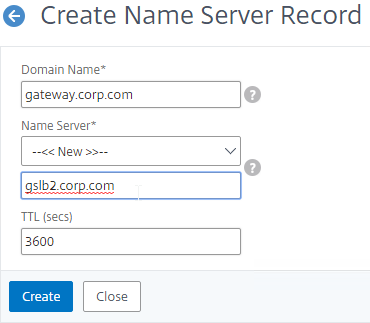
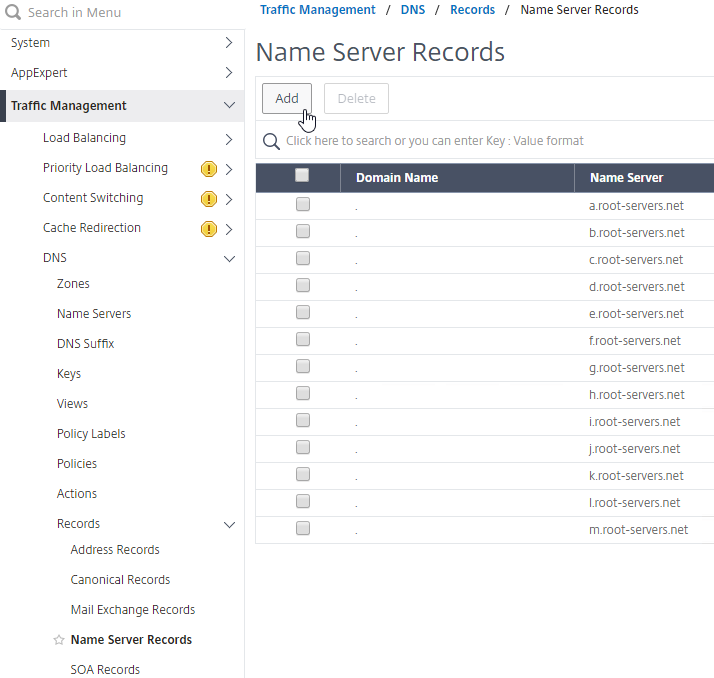
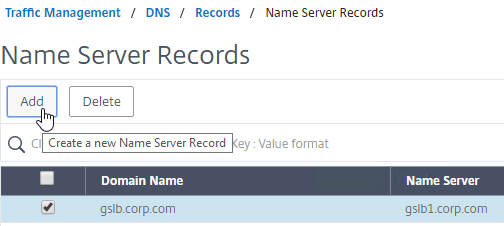
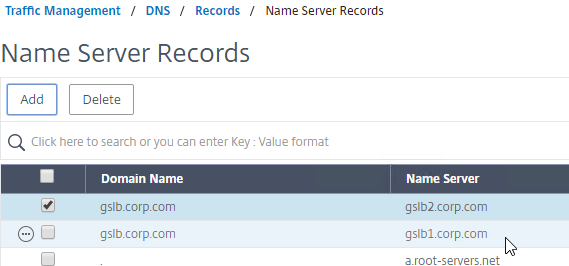
- On the GSLB Citrix ADC appliances, expand Traffic Management, expand DNS, expand Records, and click Name Server Records.
- On the right, click Add.

- In the Domain Name field, enter the name of the delegated DNS name (e.g. gateway.corp.com).
- In the Name Server field, leave it set to –<< New >>–, and enter one of the FQDNs for your GSLB ADNS services. This is one of the glue records you created earlier.
- Click Create.
- Add another Name Server Record for the same domain name. But this time, enter the second GSLB ADNS FQDN. Repeat this process until all GSLB ADNS FQDNs are specified.
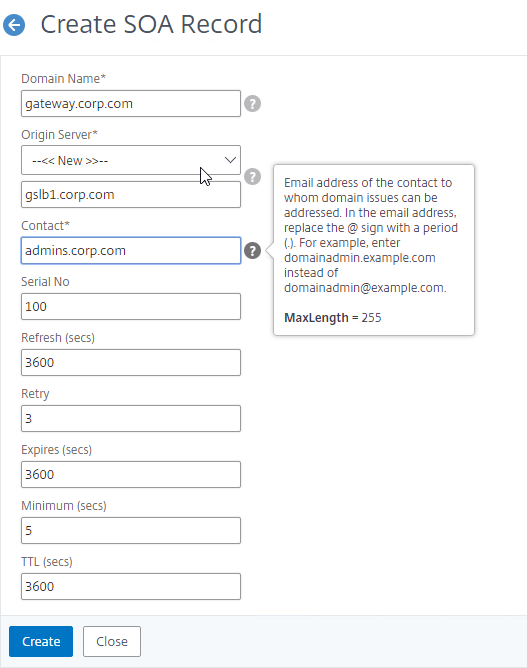
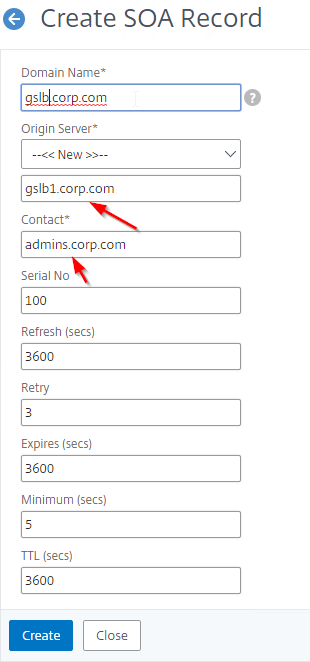
- Also add an SOA record for the delegation. If you are delegating individual records, then you will need an SOA for each record. If you are delegating a subzone, you only need an SOA record for the subzone.
- On the left, in the menu, go to Traffic Management > DNS > Records > SOA Records.
- On the right, click Add.
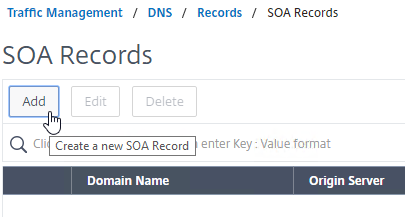
- In the Domain Name field, enter the FQDN that you delegated to NetScaler. This can be an individual record, or a sub-zone.
- In the Origin Server field, leave it set to –<< New >> — and then enter the FQDN that resolves to one of your ADNS listeners. It doesn’t matter which one you enter.
- In the Contact field, enter an email address that is publicly viewable. Replace the @ symbol with a period.
- Click Create.
- Repeat this on the other ADCs that are participating in GSLB for this delegated DNS name.
- On the left, in the menu, go to Traffic Management > DNS > Records > SOA Records.
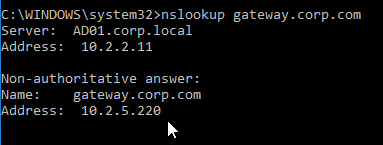
- If you run nslookup against your Microsoft DNS server, it will respond with Non-authoritative answer. That’s because it got the response from Citrix ADC, and not from the original DNS server that you send the request to.
Delegate a Sub-zone
- Run DNS Manager.
- First, create Host Records pointing to the ADNS services running on the Citrix ADC pairs in each data center. These are sometimes called glue records.
- The first Host record is gslb1 (or similar), and should point to the ADNS service (Public IP) on one of the Citrix ADC appliances.
- The second Host record is gslb2, and should point to the ADNS Service (public IP) on the other Citrix ADC appliance.
- The first Host record is gslb1 (or similar), and should point to the ADNS service (Public IP) on one of the Citrix ADC appliances.
- Right-click the parent DNS zone, and click New Delegation.
- In the Welcome to the New Delegation Wizard page, click Next.
- In the Delegated Domain Name page, enter the left part of the DNS sub-zone that you are delegating (e.g. gslb for gslb.corp.com). Click Next.
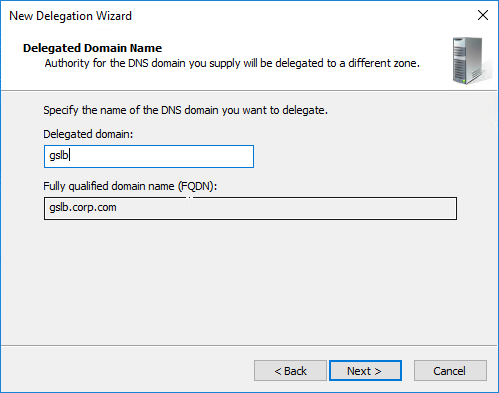
- In the Name Servers page, click Add.
- This is where you specify gslb1.corp.com and gslb2.corp.com. Enter gslb1.corp.com, and click Resolve. Then click OK. If you see a message about the server not being authoritative for the zone, ignore the message. Note: you only add one name server at a time.
- Then click Add to add the other GSLB ADNS server.
- Once both ADNS servers are added to the list, click Next.
- In the Completing the New Delegation Wizard page, click Finish.

- The sub-zone delegation is shown in the DNS Manager console.
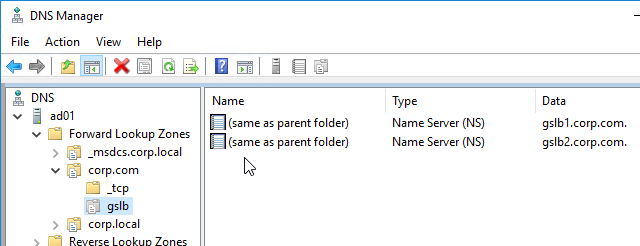
- For proper delegation, the Name Server records should also be added to Citrix ADC. (source = Citrix CTX241493 Citrix Response on DNS Flag Day)
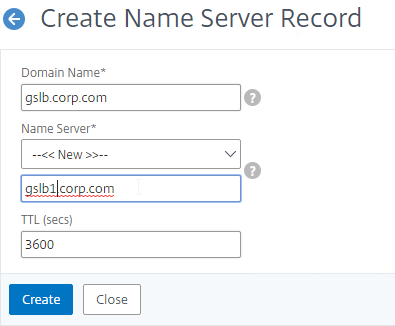
- On the GSLB Citrix ADC appliances, expand Traffic Management, expand DNS, expand Records, and click Name Server Records.
- On the right, click Add.
- In the Domain Name field, enter the name of the delegated sub-domain (e.g. gslb.corp.com).
- In the Name Server field, leave it set to –<< New >>–, and enter one of the FQDNs for your GSLB ADNS services. This is one of the glue records you created earlier.
- Click Create.
- Add another Name Server Record for the same domain name. But this time, enter the second GSLB ADNS FQDN.
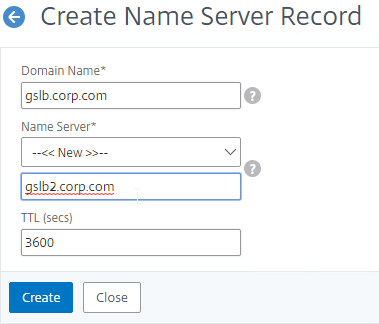
- Repeat this process until all GSLB ADNS FQDNs are specified.
- Also add an SOA record for the delegation. If you are delegating individual records, then you will need an SOA for each record. If you are delegating a subzone, you only need an SOA record for the subzone.
- On the left, in the menu, go to Traffic Management > DNS > Records > SOA Records.
- On the right, click Add.
- In the Domain Name field, enter the FQDN that you delegated to NetScaler. This can be an individual record, or a sub-zone.
- In the Origin Server field, leave it set to –<< New >> — and then enter the FQDN that resolves to one of your ADNS listeners. It doesn’t matter which one you enter.
- In the Contact field, enter an email address that is publicly viewable. Replace the @ symbol with a period.
- Click Create.
- Repeat this on the other ADCs that are participating in GSLB for this delegated DNS name.
- On the left, in the menu, go to Traffic Management > DNS > Records > SOA Records.
Each GSLB-enabled DNS name must be CNAME’d to GSLB:
- In Citrix ADC, go to Traffic Management > GSLB > Virtual Servers, and edit your GSLB Virtual Server.
- On the left, click in the GSLB Virtual Server Domain Binding section.
- Click Add Binding.
- Add a domain binding for the CNAME’d DNS name. For example, if the original DNS name is gateway.corp.com, then enter gateway.gslb.corp.com. gslb.corp.com matches the sub-zone that you delegated to Citrix ADC. Click OK.
- Repeat the Domain Binding on the other Citrix ADC appliances.
- In DNS Manager, if you currently have a host record for the service that you are delegating to GSLB (gateway.corp.com), delete it.
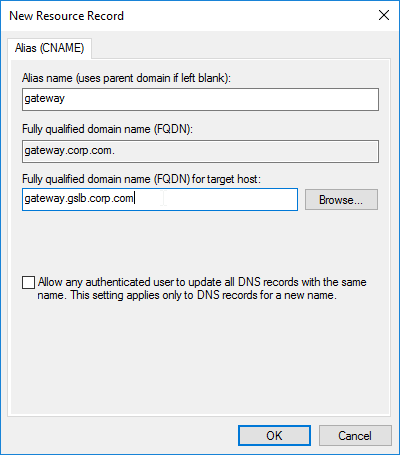
- Right-click the DNS zone, and click New Alias (CNAME).
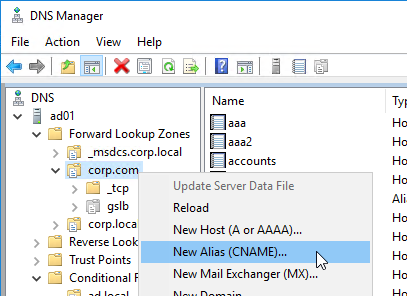
- In the Alias name field, enter the left part of the original DNS name. For gateway.corp.com, enter gateway.
- In the Fully qualified domain name (FQDN) for target host field, enter the CNAME’d DNS name that is delegated to Citrix ADC. For example, if you delegated gslb.corp.com to Citrix ADC, then enter gateway.gslb.corp.com. The GSLB Virtual Server must be configured to match this longer DNS name.
- Click OK.
- If you run nslookup for the delegated DNS name, it will first CNAME to the longer name, and then respond with the IP address returned by Citrix ADC GSLB.

- You can repeat these steps to delegate (CNAME) additional DNS names to Citrix ADC GSLB.
Hi Carl,
Trust you are doing well.
This link seems to be expired : https://www.citrix.com/blogs/2015/08/25/global-server-load-balancing-part-1-2/
which is mentioned under following section :
Citrix Blog Post Global Server Load Balancing: Part 1 explains how DNS queries work and how GSLB fits in.
Hi Carl,
I configured GSLB for active\passive failover, I also used DNS views so that a single ADC will return different addresses for external and internal users. DNS resolution works as expected, but when I disable the V server, only the external record is failing over, the internal record never fails over to the passive node.
On each ADC, production and DR, I configured two views, one for production and one for DR, the production view\policy is bound to the production service and DR view\policy is bound to the DR.
Any idea why it wouldn’t fail over the internal record? again, the external record is failing over as expected.
Thanks for your time!
Hi Carl,
I am building a GSLB site for an app that uses both TCP and UDP for the local LB vserver Service Type. One app that has 4 ports (2 TCP, 2 UDP).
Citrix is telling me that I must use two GSLB vservers, one for the TCP services and one for the UDP services. They also state I need two FQDNs (one for TCP, one for UDP) as well. My team wants one FQDN to deal with, not two.
My question to you is, can I use one FQDN by using the ANY Service Type instead? I’m not sure that will work but I imagine that if the local vservers are ANY and the GSLB vserver is also ANY, it might work. Citrix has no examples or documents explaining if/how this would/might work. Would you happen to know of any?
Thank you
-Steve
The GSLB vServer Protocol is mostly for monitoring and persistence. If you’re doing active/active, what persistence method are you configuring?
We have a need to return a different A record response if the request comes from a specific subnet to our GSLB virtual server. We are trying to use a DNS view/policy/action bound to the GSLB service. No matter what we try in our policy, we only get the IP of the GSLB service, never the one bound to the DNS view. Our policy expression is: CLIENT.IP.SRC.IN_SUBNET(192.168.1.0/24) || DNS.REQ.OPT.ECS.IP.IN_SUBNET(192.168.1.0/24)
The policy action is tied to our DNS view name and the view is bound to our GSLB service. All are created on both pairs of ADCs.
Thanks in advance for any insight you can provide.
Is the DNS Policy bound globally?
No. The document we had found did not mention needing to bind it globally.
Dear Carl !
I’m contacting You regarding the GSLB “priority order” feature. I have the following setup:
– Have one GSLB virtual server, a sum of four services assigned to it.
– Two of them are in order #1, another two of them are in order #2.
– According to our experience, by default BOTH services in order #1 should go DOWN in order to switch over to order #2.
Is it possible to change this behavior to switch over to order #2 as soon as ANY of the services assigned to order #1 goes DOWN?
(So in case at least one service in order #1 goes down, it should switch to order #2.)
Many thanks in advance!
You can bind multiple monitors to a GSLB service and then set the monitor threshold
https://docs.netscaler.com/en-us/citrix-adc/current-release/global-server-load-balancing/monitoring.html#to-set-the-monitoring-threshold-for-a-gslb-service-by-using-the-configuration-utility
https://docs.netscaler.com/en-us/citrix-adc/current-release/load-balancing/load-balancing-advanced-settings/set-monitor-threshold.html
Dear Carl !
Many thanks for the quick feedback. Maybe I misunderstood something, but binding multiple monitors to a service and manipulating the weight threshold values can impact the logic of the state for the given service only.
I would like to manipulate the logic when GSLB switches over from priority order group #1 to order group #2. Currently, both services bound to the GSLB virtual server should go to DOWN state in order to activate over group #2.
I have also tried changing the “Order Threshold” value on a GSLB virtual server, but with no luck.
The quick help for this “Order Threshold” option says: “This option is used to to specify the threshold of minimum number of services to be UP in an order, for it to be considered in Lb decision. Default = 0, Max = 100”
According to this, this is for setting up a threshold between priority order groups, but I cannot make it work. Do You have any experience with this “Order Threshold” option?
Thank You very much for the support!
Bind both monitors to both services and set the monitor threshold on both services. If one monitor goes down, then both services will go down.
This statement doesn’t seem to be true – “The IP addresses represented by GSLB Services do not need to be hosted on a Citrix ADC,” confirmed with Citrix support and through testing of my own.
What exactly is not working? I expect monitoring to not work unless you bind a monitor.
I am working on a similar issue. I have a service that is not hosted on the Netscaler, but I want the Netscaler to help with failover between the hosted service. I have a monitor bound on the GSLB service and the state is up and effective state is down. You mentioned this was a quirk in a previous version, https://support.citrix.com/s/article/CTX214755-effective-state-shows-down-on-netscaler-gslb-service?language=en_US . The issue I am having is that the DNS service is not responding with an authoritative response. Is this due to the effective state? Or am I missing something else?
Hi Carl,
We set up ADC Netscaler as Authoritative nameserver.
Our webserver via port 443 is accessible via internet if the service provider ISP provided public IP DNS such google 8.8.8.8, 1.1.1.1, 202.56.7.x,etc.
But if the Service provider ISP provided DNS server as private IP 192.168.1.1, 10.1.1.2, etc which is not public our webserver is not accessible.
I don’t know if there would configuration adjustments on the ADC side or not. Also if we try to modify the DNS of ISP provider to 8.8.8.8 or any public IP DNS replacing the private IP it works.
Hoping for your response or comments on this. Thank you.
Regards,
Rene
Hi Carl,
Thank you on this one. Just have a question, for example I setup gslb using internal AD-DNS domain example.com, all of our private IP virtual servers is natted to the public IP via firewall same with SNIP IP, do we only need an A-record for external DNS example.com for SNIP ADNS public IP and all of the record controls would be handle by internal DNS example.com zone?
Thank you again, Carl, and hoping for your response. Thank you.
If you want GSLB, then in external DNS you create A records for each ADNS service public IP. Then you create NS records for a subdomain to delegate to the ADNS service A records. Then you create CNAME records for each GSLB Domain and alias them to the subdomain so they are delegated to the NetScalers.
Thank you carl on the response. 🙂
Also another question, customer has an existing F5 zone runner configuration, we want it to migrate to Citrix ADC, what is the equivalent configuration that we could do in the ADC Netscaler? I try to do some testing by entering zone, nameserver, nameserver records,SOA and A-records in ADC. there are times that the public fqdn nslookup response is okay but sometimes not(not consistent).
Customer created a nameserver record only pointing to the public IP of SNIP private IP address.
sample external nameserver:
example.com external zone.
customer create external nameserver pointed to public IP SNIP.
gslb1.example.com
Sorry, this is really my struggle right now, as per F5 team they only need a zone file from the external DNS providers for them to act as external DNS and I just want to replicate the configuration to ADC netscaler.
Thank you carl and hoping again for your response. 🙂
Have a great day! 🙂
Regards.
NetScalers have DNS hosting capability but only for the GSLB feature. NetScalers are not fully featured DNS servers, so I wouldn’t recommend hosting a full DNS zone on a NetScaler. A better option is to move the zone to an internal DNS server and then use NetScaler to load balance or reverse proxy that DNS server.
Hi Carl,
Good day!
Thank you for you response. Yes, we are actually implementing Citrix ADC GSLB using public DNS zone. I don’t know if the below Citrix documentation link is the one you are referring to be used as DNS hosting bind or capable of using public IP’s of SNIP to be in bind configuration.
Also, when you say reverse proxy DNS as recommendation does that mean the client would still enter the DNS IP details to there own device?
Our aim for now is to replicate or migrate F5 zone runner configuration which uses public dns zone without entering the DNS IP details to the client device to be load balance. Thank you very much, Carl, and hoping again for your response. 🙂
https://support.citrix.com/article/CTX124727/how-to-configure-dns-delegation-using-bind-in-netscaler
Regards,
GJ
F5s have a full implementation of BIND but NetScalers do not.
For DNS Proxy, you configure load balancing of DNS servers and then configure DNS Clients or DNS Delegation to point to the load balancing VIP.
Hi Carl,
Thank you.
We will try to move the external DNS zone to internal DNS zone as you recommended, on this we can now create domain delegation for Netscaler ADC servers internally.
Is it possible that given we have created a delegation to internal DNS to ADC servers is ADC still capable to nslookup the full fdqn of virtual servers via public internet without configuring the ADNS public IP SNIP as default DNS in clients pc?
Sorry for the many questions and hoping again for your response.. 🙂
Thank you, Carl. 🙂
Regards.
If you are doing DNS Proxy, then set the clients to use the DNS Load Balancing VIP.
ADNS (SNIP) is for GSLB delegation from the parent zone to the GSLB sub-zone. Usually only DNS servers need to know about NetScaler ADNS.
Hi Carl,
Thank you again, we try to setup a DNS proxy in ADC netscaler.
We noticed that the external nslookup response is okay to other internet network connection but others cannot.
For example, on my broadband internet when I try to nslookup of gslb fqdn it is not working, but when I switch to my mobile data connection via hotspot the nslookup is working very well, same thing with my other colleagues, some is working and some is not base on there connection.
Seems DNS proxy as you recommended have worked but this is only issue we are facing right now.. 🙂
Hope you can help us share ideas on how to resolve this.. 🙂
Thank you again Carl.
Regards.
Aaaaah this is what changed on this page:
“2023 Mar 30 – GSLB vServer – added GSLB Service binding Order method of doing active/passive in 13.1 and newer”
Because I’ve built the GSLB active/passive “Backup Virtual Server” variant a few months ago and ran into some failover issues recently where the GSLB answer of the passive/failover vserver was not stable. Then opened a ticket/case with Citrix and I wanted to show them what I did based on this page, but the “Backup Virtual Server” passive config was gone and I thought I’d gone crazy haha!
Now I did a reconfiguration with the service order numbers and that works like a charm!
So, not really a question just something “funny” and to let you know that you are a great source of information and inspiration. Thanks for all the hard work Carl!
Kind regards,
Dennis
The Netherlands
Hello Mr. Stalhood,
I need to configure gslb to return one or more IP addresses of healthy smtp gateway server. Is this possible? How?
thanks
Carmelo Jimenez
If you edit the GSLB Virtual Server, in the Basic Settings section is an option called MIR, which means Multi-IP Response. Bind multiple GSLB Services to the GSLB vServer and it will return all of their IPs.
thank you Carl.
A follow up: So in the context of my original question, the GSLB services would point directly to smtp server IP…say 3 of them hosted on separate sites and do health checks directly to smtp gateway service running on these servers. Is this the way to achieve it ?
thanks again. Truly appreciate your expertise.
Cheers, Carmelo
Yes. GSLB Sites usually means the VIPs are hosted on separate NetScaler pairs. If you’re not using VIPs, then the GSLB sites usually don’t matter.
Hey Carl,
Is there a way to configure the VS handed off by GSLB to present like the original domain? Like a user going to site1.company.com, with GSLB directing them to site1.gslb.company.com, but they see just site1.company.com? My main driver for this is certificates and avoiding errors without having to purchase SAN certs for each service. Because in past setups I have had to setup a SAN cert with the base site URL and the GSLB URLs.
I thought there might be a way to do this with rewrite policies but I wasn’t sure.
That’s typically how it works. The user enters a FQDN, which is then CNAME’d to a GSLB-FQDN. After getting the IP address, the client connects to the IP and sends the original FQDN that the user entered. This is DNS CNAME, not redirect.
Thanks Carl! I did more research based on what you said and it makes more sense now. The nuance of CNAME vs 301/302 redirect is that it is handled in the network stack and the browser never sees it right? Thanks again.
Hi Carl,
Im hoping for some advice. we currently use the same URL both internally and externally so the storefront url is the same as the gateway url (secure.mydomain.com). followed your guidance and setup GSLB successfully and it has been working fine for a month (im guessing due to DNS cache). Today thou we had an issue with the ADC gateway login page for XenDesktop keep looping. we realized that the ADC couldn’t resolve the URL to the storefront server address as it was using the ADC DNS records that get created when you configure GSLB for resolution, so using the external IP address instead of the storefront IP.
is there a way to get the SNIP addressof the ADC to ignore the internal ADC DNS records and use the name servers configured on the ADC instead so the XenDesktop wizard can successfully resolve the URL to the internal address of the storefront?
Many thanks in advance
Session Policy lets you select a DNS Load Balancing vServer but I don’t know if that’s used for ICA proxy.
Another option is to create a local StoreFront Load Balancing VIP that has a Backup vServer for StoreFront in the other datacenter. Then use that VIP in your Session Profile.
Carl,
We are looking to stop hosting DNS publicly from our windows servers and migrate our public DNS.
I can’t seem to test and get back the results I’m looking for via a dedicated cloud hoster, for example dnsmadeeasy.com
they do offer NS record creation, and I’ve used a test domain to mirror our production and at least figure out what should be happening before it gets to the netscaler.
They don’t seem to have the same “delegated DNS” as it looks in windows dns, but I can certainly create sub DNS records.
So we are doing method 1, 2 NS records, both called “cloud.domain.com” and they both point to A records, which are the netscaler devices.
Is there different tiers of records i should be looking out for, or do the standard services work as long as i can create NS sub records?
You fist add A records for your ADNS services. Then do this – https://support.dnsmadeeasy.com/support/solutions/articles/47001001289-how-to-create-and-delegate-a-subdomain-to-a-3rd-party-dns-provider
Hi Carl. How exactly does one route MEP over the internet? Do I just need to point it at the public IP address of the remote appliance? Seems there is a lot of reference to this setup, but no defined method to set it up. Thanks
Yes, enter public IPs when creating GSLB Sites.
Carl,
I am curious, you use a SNIP IP when configuring a SITE IP and ADNS Listener. We have always used an IP address on a SNIP Network as opposed to using the SNIP IP address. What is the difference between the 2 setups, and does it cause any issues using just an IP address vs the SNIP IP?
Fewer IPs? What source IP does MEP use? Does it use the GSLB Site IP? Or does it use SNIP? nstcpdump.sh port 3009 can show you source IP.
Upon Checking, i do see that it is sourced from the SNIP and not the defined SITE IP. I guess what would the point be of assigning a site IP if its always going to source from the SNIP? Thanks for the help Carl!
Hello Carl,
Thanks for this document. I have one doubt here, I have one GSLB setup + DNS sub-domain Delegation, however the Round Robin method setup on VS GSLB not working accurate..
If I try nslookup direclty to ADNS services, works perfectly BUT when the AD resolve the DNS query with sub-domain Delegation.. the Round Robin not works very well, the hits to GSLB VS happened 4x 6x times before changes between DC.
My guess is the problem are related with DNS Delegation hosted on My AD (Windows Server).
Do you have any advise ?
Is Persistence configured?
Hi Carl,
In this example, let’s say I have an IIS server that responds by the name https://www.corp.com and the delegation would look like this, as you exemplified:
www CNAME http://www.gslb.corp.com
Now imagine that the IIS server also responds to requests without the “www” and I need to delegate only the “corp.com” record to the GSLB without affecting the rest of the records for that domain.
What would this delegation look like? I believe I can’t make a CNAME like “www” because it would be very strange and incorrect.
corp.com CNAME corp.com.gslb.corp.com
Does your DNS hoster support apex records? Officially DNS standards don’t allow it. Here’s a thread on the issue – https://serverfault.com/questions/613829/why-cant-a-cname-record-be-used-at-the-apex-aka-root-of-a-domain
I’m currently on a project where DNS Server is a Windows Server and I believe it doesn’t support apex!
My searches could find support for Apex only on AWS Route 53, Azure Traffic Management, etc.
Hi Carl,
For
“Also add an SOA record for the delegation. If you are delegating individual records, then you will need an SOA for each record. If you are delegating a subzone, you only need an SOA record for the subzone.”
This mean for the SOA record, if we’re not delegating a zone, we need two records in there? like gslb1.corp.org and gslb2.corp.org?
Hello Carl,
I have two vpxs, one at each data center, trying to configure gslb.
We have infoblox appliances at each Dc for dns. Would the Gslb services on each vpx be the infoblox ip at each Dc?
I’m configuring the Gslb services but I’m not sure what ip addresses would be configured. It sounds like I’d need a service with the Dc1 infoblox ip, and another service for the Dc2 infoblox ip?
Also, I’m guessing a dns monitor would be appropriate to probe the infoblox ips?
Thanks,
Your goal is to provide a DNS service that resolves a FQDN to one or more IP addresses. The IP addresses are usually VIPs. For a GSLB configuration, GSLB Services are the IP addresses that the FQDN resolves to.
Thanks Carl for the quick reply!
Sorry, I’m totally confused.
My thinking on how Gslb works is that we would have a subdomain called something like gslb.mydomain.com, and the 2 adcs would be authoritative for that subdomain.
If a client asked for host1.gslb.mydomain.com they would get forwarded to the adcs, and then, based on mep metrics, the Adc would return either the ip address for the Dc1 infoblox appliance or the Dc2 infoblox appliance. I know that’s wrong though because infoblox would not be authoritative for gslb.mydomain.com
That’s my incorrect thinking 🙂
Or are you saying that I would need a service for every host on the network that I want to utilize Gslb for dns resolution?
I’m missing something very basic here I believe.
Yes. The whole point of GSLB is for FQDNs that resolve to multiple IP addresses. If you have FQDNs that resolve to a single IP then you don’t need GSLB for those FQDNs.
GSLB Services are how ADC monitors the availability of the IP addresses before it gives them out to DNS clients. GSLB Services are also used for load balancing methods, persistence, etc.
Thanks you so much Carl! That cleared up my thinking. You sir, are a kind individual. Thanks for always helping!
Hi Carl,
Does GSLB supports active/passive between MPX and VPX?
I have MPX at primary site and DR using VPX. Can we enable gslb between two site to use ICA proxy?
Yes, it is supported to mix ADC models and versions when configuring Metric Exchange Protocol.
Hello, great article.
When i try to put in the NS or SOA record netscaler complains “Alias name cannot have any record”
I use Service and Virtual Server Type CNAME.
When i do an nslookup against DNS Server that has the delegation to the netscaler, i don’t get the right adress but just the correct CNAME. It does not resolv till the end, i assume because of the missing SOA or NS entry. The bad thing is, my browser does not resolv too. I get a right answer, when i use dig against the Domain Controller.
NS entries have been implemented on Domain controller for the Netscalers.
DNS Zone:
abc.xyz.com
Delegation from
ghi.abc.xyz.com to NS ns1.efg.xyz.com and ns2.efg.xyz.com
VServer Reply should CNAME to
ghi.uvw.xyz.com or ghi.uvw2.xyz.com (located on Domain Controller)
(It is working with the DNS Record Type A instead of CNAME).
Again great article, i am working since 2009 with netscaler, finally i got the chance to build some GSLB stuff with your help. 🙂
Parent DNS has delegation of subdomain to ADCs.
Parent DNS has a CNAME from original FQDN to new FQDN that is in the subdomain.
ADC receives the DNS query and usually returns an A record. Are you saying that you want ADC to return a CNAME that then has to be queried on a different DNS server?
Hi Carl,
I need your advice to configure GSLB for noth HTTP and SSL protocol of same server group. In my situation, Citrix appliances only be used for Global Load Balancing pointing to F5 LTM load balancer. I understand we have to create 2 GSLB services for HTTP and SSL in each site. When creating each gslb service, selecting new server ip address being F5’s VIP. If so, we must add a monitor binding to a gslb service (HTTP for HTTP GSLB service and HTTPS for SSL GSLB Service). But the problem is we can’t add same domain name to 2 GSLB Virtual Server (for both HTTP and SSL).
I also follow https://support.citrix.com/article/CTX130152. It indicated that adding 2 monitor binding as http and https to each GSLB Service (HTTP GSLB Service and SSL GSLB Service) and only creating HTTP GSLB Virtual Server but do not create SSL GSLB Virtual Server. But if I add 2 monitor bindings to each GSLB Service, the state always DOWN, thus 4 GSLB Services for both sites will down state.
Please advise. Thank you so much. Hope to receive your response soon.
Nguyen
sorry for my typos.
I mean I need your advice to configure GSLB for both HTTP and SSL protocol of same server group
When you create a monitor, you can specify the port number in the monitor. For the “Secure” monitor, enter 443 for the port. Enter “80” for the monitor that doesn’t have Secure checked. Is that what you’re asking?
Hi Carl,
In this case, I have 2 GSLB Virtual Servers (HTTP and SSL) using same domain name. So I can only create one GSLB Virtual Server with one domain name (if adding domain name to GSLB Virtual Sever for HTTP Traffic, I can’t add domain name to GSLB Virtual Server for SSL Traffic and vice versa). So I’m not sure how GSLB work in this case.
Besides I searched an article in Citrix Knowledge Center https://support.citrix.com/article/CTX130152 and tried to follow the instructions. In this article, it mentioned that need to bind both http and https monitors to each GSLB Service. For example, there are 2 GSLB Services at siteA: gslbsvca-http, gslbsvca-ssl and 2 GSLB Services at siteB: gslbsvcb-http and gslbsvcb-ssl. So must bind both http and https monitors to theses GSLB Services like this:
bind lb monitor https gslbsvca-http
bind lb monitor http gslbsvca-http
bind lb monitor http gslbsvca-ssl
bind lb monitor https gslbsvca-ssl
bind lb monitor https gslbsvcb-http
bind lb monitor http gslbsvcb-http
bind lb monitor http gslbsvcb-ssl
bind lb monitor https gslbsvcb-ssl
But when I add 2 monitors to a gslb service, the status will be DOWN. That means all gslb services will get DOWN. So GSLB function will not work.
I’m very confusing how to configure GSLB for this case. Please advise.
Create separate monitors for HTTP vs HTTPS (HTTP with Secure box checked). The HTTP monitor needs port 80 configured while the HTTPS monitor needs port 443 configured. Bind both monitors to the GSLB Service.
Even I use pre-defined http and https monitors or create custom monitors for http and https (http with secure box checked), and binding both to gslb service, the gslb service will be DOWN. If I only add one monitor type same with gslb service protocol, it will be UP but it’s different with the article link above.
If not follow the article, I will need to create 2 GSLB Virtual Servers: one for HTTP and one for HTTPS. But adding same domain name to these 2 GSLB virtual servers is impossible.
The default monitors don’t have the port number configured. You need to add the port number to the monitor configuration.
Hi Carl,
I just want to configure GSLB for both HTTP and SSL for a same backend server group. But GSLB only allows to add one domain name to a GSLB Virtual Server while there are 2 GSLB Virtual Servers in this case: one for HTTP and one for SSL. Please advise.
So add port number at advanced parameter of the monitor? I’m very confusing here:
I have 2 gslb services at one site: gslb-svc-http (running on http port 80) and gslb-svc-ssl (running on https port 443). As the article, need to add both http and https monitors to each gslb service. So gslb-svc-http will go down with https monitor because it’s only listen on http port 80. Similarly, gslb-svc-ssl will go down with http monitor because it’s only listen on https port 443. Can you help to explain more details? Or if you have other way to configure gslb in my case, please advise. I just want to configure GSLB for both HTTP and SSL for a same backend server group but can’t add same domain name to one GSLB Virtual Server. If adding domain name to gslb virtual server for http traffic, I can’t add to gslb virtual server for ssl traffic and vice versa.
If the GSLB Service IP is only listening on one port number then you only need one monitor. But if the GSLB Servie is listening on both 80 (http) and https (443), then bind a monitor for each port number.
Or are you saying that you have two different GSLB Service IPs that are listening on different port numbers? If so, then bind the correct monitor to the correct GLSB Service IP and then bind all of the GSLB Services to your GSLB Virtual Server.
Hi Carl,
I’m very confusing here.
At one site, I have 2 gslb services: gslb-svc-http (listen on http port 80) and gslb-svc-ssl.(listen on https port 443). So if binding 2 http and https monitors to each gslb service, the gslb service will go down. Because gslb-svc-http can’t be UP with https monitor and gslb-svc-ssl can’t be UP with http monitor. Can you help to explain more detail? Or advise how to configure gslb in my case. I just want to configure gslb for http and ssl traffic of a set of same servers but only one GSLB virtual server (or http or ssl) has domain name.
Hello Carl, I have a question, if I have one server in each DC (2 DC), but this servers have many services and I have it active active gslb, I see when a service is down, keeps sending traffic to service down, I think because the anothers services into same servers are UP, in this case is better have one url for each service? o I’m wrong or am I missing configuration?
Are you saying that have multiple port numbers on one service? DNS requests can’t see the port number that users are connecting to. One option is to configure a Backup vServer for the port number so ADC proxies the connection to the vServer that is up. Or you can configure a Redirect URL that only applies when the service is down.
I have multiple service in the one server, this multiple service in a one url. In this case the better is have one url for one service?
DNS cannot see the original URL Paths so DNS can only make decisions based on Hostnames. Same workarounds apply. Either proxy the connection to the ADC that’s still up, or redirect the user to the other ADC by redirecting a different hostname.
Hello everyone,
I am in the same situation, I think I am going to configure a url for each service
how did you do?
Hi Carl, regarding connection Proxy, I want to make sure I understand. In order for this to work in a GSLB active/active environment, the NSGW VIP has to be configured on the GSLB NetScaler’s? In our Active/Active Environment Citrix designed it to have a set of GSLB NetScaler’s and then a set off 2 HA pair NetScaler that have the NSGW VIPs configured (no MEP is configured on the NSGW VIP NetScaler’s). If it is not possible, then this would explain why we are having issues with Connection Proxy.
I’m guessing you simply need to add MEP to the Gateway ADCs.
Thank you for the quick reply. So we can just configure MEP for the gslb sites on the netscalers that have the nsgw vips even though those gslb sites are configured on another set of netscalers?
Yep. You can even do parent/child MEP.
Hi Carl,
Is it possible to setup GSBL Active-Passive with three Netscalers among single url?
Yes. Do you mean active-passive-passive? Create a GSLB service for each NetScaler. Create a GSLB vServer for each NetScaler. Bind the domain to the active GSLB vServer. Edit the active vServer and configure the first backup vServer. Edit the first backup vServer and select the second backup vServer. Repeat these steps on all three NetScalers.
Do you need to do anything other than import the location database and set STATICPROXIMITY to get it to work, do you need to rewrite headers with the IP address/location at all?
What are you trying to accomplish? If just GSLB Static Proximity load balancing, then the database is all you need.
Also, I take it setting the Location Format to “geoip-city” for instance on the default DB would make the built in file unreadable and the service to revert to the backup method, RTT in our case?
Hi Carl, I just wanted to clarify GSLB remote site set up. NS appliances in three geos are sitting behind firewalls in DMZ, all with NAT-ed public IPs. Internal comms working between them using only internal non-routable IPs. For remote site setup, do the public IPs of the remote sites need to be accessible from the local site internal IP? Thanks 🙂
It depends on how you want to route MEP. If you route MEP internally, then you’ll need to attach monitors to each GSLB Service to so the local ADC can determine if the remote ADC has Internet access or not.
Thanks Carl, yes MEP is routed internally and REMOTE sites are showing as DOWN on all NetScalers as internet accesss can’t be determined. Does the http-ecv monitor need to be bound to all GSLB services (local and remote) on each NetScaler appliances or just the local site on each?
For TCP services, I usually bind a TCP monitor. It should go out to the GSLB Service’s Public IP.
Is that on the 443 port of the public IP of the remote site (I am working with Alan 🙂 )
It should use whatever port is configured on the GSLB Service. You can also specify the port number in the monitor itself.
Thanks for your help Carl!
Carl thanks for all the assistance. This has truly helped and the Network Solutions configuration makes more sense now.
I enjoy your assistance so I’m going to ask another question… 🙂
Now that I am getting GSLB setup on the external side, I’m using the same NetScaler that handles internal requests. In case I need to go this far (I’m thinking I may) how can I keep External and Internal DNS name resolution separate?
There’s only one DNS table per appliance.
Same FQDN for internal and external? In that case in internal DNS I configure a CNAME to a completely different GSLB-enabled DNS Name and add that to ADC GSLB. That way I can have a GSLB config for the external FQDN that is separate from the GSLB config for the internal (CNAME’d) FQDN.
“You might have to contact Network Solutions. I think they are a DNS provider that doesn’t let you create NS records.”
Network Solutions does permit the creation of Nameserver Records for Subdomains.
What did you name the A records for the ADNS services. They should not be portal.mydomain.com. Make up something new for each ADNS service, just like you would name a new DNS server.
Then create a NS record for portal.mydomain.com and point it to the A record for your new DNS server (ADNS service). Do it twice for both ADNS services.
Thanks for being so patient with me Carl. This is where I’m getting a bit lost in Network Solutions.
Here is what I have,
Two ADNS Services for – portal.mydomain.com:
1. 192.168.168.10
2. 192.168.168.11
My Original Domain A Records were as follows:
Portal.mydomain.com – 192.168.168.150
Portal.mydomain.com – 192.168.168.151
How would I setup the records to make GSLB work for these two sites? When I add the portal NS record in Network Solutions I get “The domain extension you entered is not supported.”
I apologize for all the questions, but I’m trying to understand this part and it was easier internal on the network where I could configure delegation. I also tried to find configurations that showed exactly how all components were configured but there is no example I could find for external DNS.
I truly appreciate your assistance.
You might have to contact Network Solutions. I think they are a DNS provider that doesn’t let you create NS records.
Hoping you have seen this before. I have a GSLB configuration that has been working internally for some time with no issues. We have two NS appliances in two separate data centers connected via private network. Now we wanted to add the same functionality externally, for the GSLB part. This was going well until one of the NS UG Content Switching Vservers stopped working for Unified Gateway only. The CS Vserver has two 443 Sites (Portal and AS2), and one 80 (AS2 only). When accessed internally or externally “Portal” does not work, but AS2 works fine, and so does port 80. The secondary GSLB NS works perfectly fine with the exact same config.
I’m not sure what else to check for the CS Vserver or what could be causing this as the NS shows the state as up, and all services are green. Have you seen this before?
See https://support.citrix.com/article/CTX205568
Since Gateway is always up, you can bind monitors to your GSLB Services to monitor other servers.
Hi Carl,
Thanks for the response. However, that’s just it, all services are monitored and in an Up state. GSLB is working. What is not working is the Content Switching Virtual Server to access the Unified Gateway portal. This vServer has two SSL Sites, the Unified Gateway and standalone app server (AS2).
When accessing the app server AS2 via 443 it works. When accessing the Unified Gateway over 443 it does not work, but we receive errors such as “PR_CONNECT_RESET_ERROR” or “SSL_ERROR_NO_CYPHER_OVERLAP”.
We have a secondary NS at another site that is part of active-active GSLB, identical config as the two units synchronize. Access to the Unified Gateway via NS1 works, access via NS2 suddenly stopped working only for Unified Gateway everythiig else is working.
This is where I’m at a loss. Not understanding why the vServer works for AS2 and not for UG. I tried restarted the NS but that had no impact.
I found my answer, earlier this afternoon. I started checking the config again realizing the errors pointed towards SSL. Upon checking the Unified Gateway I noticed the cert was incorrect. Instead of pointing at “portal” it pointed at “AS2” changing the cert fixed the problem.
My original issue before the CS vServer, was and is GSLB. I have GSLB working internally with no problems and can access the sites via external IPs. However, after switching the external A records to point to the NS ADNS, the site no longer loads.
I’m assuming I need to delegate records, but we use Network Solutions for our external DNS. Here is what I have configured:
ADNS is exposed to the internet.
My GSLB Services have public IPs and are accessible.
The GSLB vServer has the FQDN associated.
And I replaced my current A Record with two A Records that point to each NS ADNS.
Am I missing anything else?
Thanks for all your assistance.
To delegate to ADNS, you create NS records, not A records.
You should have new A records for the ADNS services.
Then replace the existing A records for the GSLB domain with NS records for the same GSLB domain that point to the A records that you created for the ADNS services.