Navigation
- Change Log
- nFactor Overview
- nFactor High-level configuration summary
- AAA Virtual Server
- Login Schema
- Authentication Policies
- Authentication Policy Label
- nFactor for Citrix Gateway
- Sample Configurations:
💡 = Recently Updated
Change Log
- 2023 July 3 – Sample Configurations – added link to CTX561487 How to configure EPA domain check combined with Smartaccess feature
- 2023 Mar 10 – AAA vServer – encrypt nFactor login fields.
- 2020 Oct 13 – Overview – added some info regarding ADC Standard Edition.
- 2020 Mar 5 – added link to Mark DePalma Running RSA SecurID/Azure MFA side-by-side using an AD group on NetScaler Gateway
- 2020 Feb 27 – updated link to Citrix ADC nFactor Basics Cheat Sheet
- 2019 Nov 16 – Overview – added link to CTX264698 Citrix ADC nFactor Basics Cheat Sheet
- 2019 Aug 8 – Login Schema XML File – added link to nFactor Extensibility at Citrix Docs
- 2019 Jul 1 – Sample Configurations – ADC 13 has a CAPTCHA authentication action instead of WEBAUTH
- nFactor Flow Visualizer
- Updated screenshots for ADC 13
nFactor Overview
nFactor lets you configure an unlimited number of authentication factors. You are no longer limited to just two factors.
nFactor seems to be Citrix’s preferred authentication architecture. All authentication mechanisms are moving from Citrix Gateway to nFactor.
Citrix Tech Zone Citrix ADC nFactor Basics Cheat Sheet.

Each authentication factor performs the following tasks:
- Collect credentials or data from the user. These credentials can be anything supported by Citrix ADC, including:
- SAML assertion
- Client Certificate
- Forms-based authentication (traditional web-based logon page) for LDAP, RADIUS, TACACS, etc. – aka Login Schema
- Multiple passwords can be collected with one form.
- Or prompt the user multiple times (multiple forms) throughout the authentication chain.
- The logon page can contain a domain drop-down.
- Native OTP passcode
- Citrix ADC Self-Service Password Reset with email verification
- Native OTP Push authentication
- OAuth OpenID Connect
- Kerberos ticket
- StoreFrontAuth – authentication is delegated to Citrix StoreFront
- Endpoint Analysis Scan – either pre-authentication, or post-authentication.
- EULA
- Google reCAPTCHA
- Swivel
- Use a drop-down to select an authentication method
- Cookie – e.g. NSC_TASS cookie containing URL path entered after the Gateway/AAA’s FQDN
- Client IP address
- No credentials/data – ADC policy expression uses criteria it already has (e.g. collected from a prior factor)
- Evaluate the collected credentials. The results can be:
- No authentication – policy expression is evaluated only to determine next factor
- Authentication success
- Authentication failure
- Group extraction
- Attribute extraction from SAML, Certificate, JWT, etc.
- Based on the evaluation results, do one of the following:
- Allow access to Gateway or Web site
- Select next factor
- Deny access
- If there’s a Next Factor, repeat these steps, until there are no more Next Factors to evaluate.
Factors can also be configured only a decision point meaning that the factor does not perform any authentication and instead uses Citrix ADC Policy expressions to select the Next Factor. For example:
- If client IP is internal, next factor is LDAP only.
- If client IP is external, next factor is LDAP and then another factor for RADIUS.
Here are some nFactor use cases, but the combinations are almost limitless:
- Choose Authentication method based on Active Directory group: Logon screen asks for user name only. Extract user’s groups from Active Directory. Based on user’s Active Directory groups, either ask user for client certificate, or ask user for LDAP password. If LDAP, the username doesn’t need to be entered again.
- Ask for Certificate first:
- If client certificate is valid, perform LDAP only.
- If no client certificate, perform LDAP + RADIUS
- Two-factor with passwords checked in specific order: Display logon screen with two password fields. Check the first password. If the first password succeeds, then check the second password. This lets you check RADIUS before LDAP.
- Run Endpoint Analysis first:
- If EPA passes, perform LDAP only.
- If EPA fails, perform LDAP + RADIUS
- See Sample Configurations later for many more combinations.
All new authentication methods added to Citrix ADC require nFactor configuration and are not supported on native Citrix Gateway. These new authentication methods include:
- StoreFrontAuth – authentication is delegated to Citrix StoreFront
- Native OTP (one-time password) – e.g. Google Authenticator
- Self-Service Password Reset (SSPR)
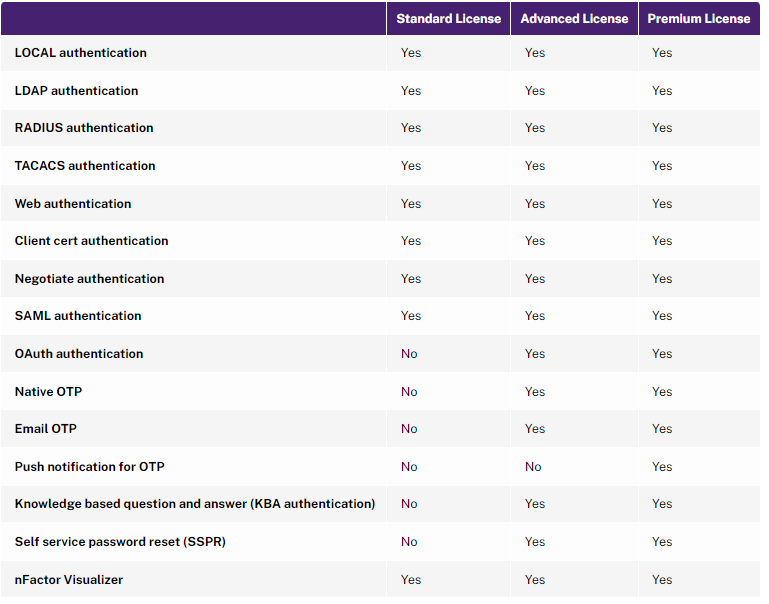
nFactor is a AAA feature, which means you need Citrix NetScaler ADC Advanced Edition or Citrix NetScaler ADC Premium Edition.
- ADC 13.0 build 67 and newer support nFactor in NetScaler ADC Standard Edition licensing.
- To configure nFactor in NetScaler Standard Edition, go to Citrix Gateway > Virtual Servers and edit a Virtual Server. On the right, add the Authentication Profile section. Click Add to create an Authentication Profile. Then click Add to create an Authentication Virtual Server.
- Not all Authentication Policy types are supported in Standard Edition. See Citrix Docs for the list.
Citrix ADC supports two types of authentication policies – Classic, and Advanced (aka Default). You can bind Classic Authentication Policies directly to Citrix Gateway Virtual Servers, but today you cannot bind Advanced Authentication Policies to Citrix Gateway. The only way to use Advanced Authentication Policies with Citrix Gateway is to configure nFactor on a AAA Virtual Server and then link the AAA Virtual Server to the Gateway Virtual Server.
Workspace app 1809 and newer with Citrix Gateway 12.1 build 49 and newer support nFactor authentication. Older Receivers and older NetScalers don’t support nFactor, so you’ll instead have to use a web browser.

nFactor High-level Configuration
Here’s a high level summary of nFactor configuration objects. Detailed instructions are provided later in this article.
Each factor is a Policy Label that combines Advanced Authentication Policies and Login Schema.
- Login Schema is a XML file that nFactor uses to create a custom HTML form where users enter credentials.
- Login Schemas are optional depending on the authentication method you are configuring.
- If an Advanced authentication policy expression evaluates to true, then an authentication action is performed.
- Citrix ADC has many different types of authentication actions.
- nFactor authentication policy expressions use Advanced Syntax (Default Syntax) instead of the older Classic Syntax expression traditionally used in Citrix Gateway authentication policies. An example Advanced syntax expression is true. An example classic syntax expression is ns_true.
- When binding an Advanced authentication policy to a Policy Label or AAA vServer, you can optionally select a Next Factor, which is another Policy Label.
- If the authentication action is successful, then nFactor processes the configured Next Factor.
- If Next Factor is not configured, then nFactor is complete and authentication is successful.
- If the authentication action fails, then the next lower priority (higher priority number) authentication policy in the same factor is evaluated. If there are no more authentication policies in the same factor, then the entire nFactor authentication flow failed.
AAA vServer – nFactor configuration is always bound to a AAA vServer, even if you want to use nFactor with Citrix Gateway.
- An Authentication Profile links the AAA vServer with Citrix Gateway.
nFactor Configuration methods – Citrix ADC 13 has two methods of configuring nFactor:
- ADC 13 adds nFactor Flow Visualizer, which makes it easy to link the Factors (Policy Labels) together.
- After creating a Flow, you bind the Flow to a AAA Virtual Server.
- Manually – Create Policy Labels, Login Schemas, Authentication Policies/Actions, and manually bind them together and to a AAA Virtual Server. This is the only method available in ADC 12.1 and older.
- For the first factor, you bind Authentication Policies/Actions and Login Schemas directly to a AAA Virtual Server without using a Policy Label.
- All other factors are Policy Labels linked using the Next Factor bind points.
The Visualizer is a better option for understanding the nFactor flow, but neither method is flexible:
- If you want to rename factors, then you have to delete the factor and remake it.
- You can’t change a factor’s Login Schema without deleting and remaking the factor.
- Visualizer does not let you delete factors. Instead, you can either delete the Policy Label outside of the flow configuration, or you can delete the entire flow and start over.
- With Manual method, it is difficult to rearrange factors, especially since the first factor is not a Policy Label like the other factors. Visualizer lets you graphically change how the factors are linked together.
- The Manual method is typically configured from bottom up which makes it difficult to understand the entire nFactor flow.
Also see:
- Citrix CTX222713 Concepts, Entities and Terms used for nFactor Authentication through NetScaler.
- Jacob Rutski NetScaler nFactor Authentication
This article will detail how to use the Manual method to configure nFactor from top to bottom:
- Create AAA vServer
- Create First Factor:
- Create Login Schema Profile
- Create Login Schema Policy – only for first factor – if policy expression is true, then display Login Schema
- Create Authentication Actions – LDAP, RADIUS, etc.
- Create Advanced Authentication Policies – if policy expression is true, then perform authentication action
- Edit AAA vServer, bind Login Schema, and bind Authentication Policies
- Create Next Factor:
- Create Login Schema Profile
- Create Authentication Actions – LDAP, RADIUS, etc.
- Create Advanced Authentication Policies – if policy expression is true, then perform authentication action
- Create Authentication Policy Label, select Login Schema, and bind Advanced Authentication Policies
- Edit AAA vServer, edit Authentication Policy binding, and configure Next Factor to this Policy Label
- Create Next Factor:
- Create Login Schema Profile
- Create Authentication Actions – LDAP, RADIUS, etc.
- Create Advanced Authentication Policies – if policy expression is true, then perform authentication action
- Create Authentication Policy Label, select Login Schema, and bind Advanced Authentication Policies
- Edit other Policy Label, edit Authentication Policy binding, and configure Next Factor to this Policy Label
- Continue creating Factors and linking them until the flow configuration is complete.
- Create Citrix Gateway Traffic Policy for Single Sign-on to StoreFront.
- Edit existing Citrix Gateway, create Authentication Profile, and bind Traffic Policy
Once you are familiar with nFactor, due to the way the objects are linked together, it’s probably easier to configure nFactor from the bottom up:
- Create Authentication Actions for all factors – LDAP, RADIUS, etc.
- Create Advanced Authentication Policies for all factors
- Create Login Schema Profiles for all factors
- Create Authentication Policy Labels for all factors except the first factor.
- Start with leaf (bottom) factors so you can configure Next Factor when binding authentication policies in higher branch factors. For example, if your flow is Collect Username –> Perform LDAP –> Perform RADIUS, then create the RADIUS Policy Label first so you can link to it when creating the LDAP Policy Label.
- Create Login Schema Policy for first factor
- Create AAA vServer – bind Login Schema, bind Authentication Policies, and select Next Factor Policy Label
- Create Citrix Gateway Traffic Policy for Single Sign-on to StoreFront.
- Create Authentication Profile
- Edit existing Citrix Gateway, create Authentication Profile, and bind Traffic Policy
It can be difficult to visualize a manually-created nFactor configuration, so my ADC Virtual Server Configuration Extractor script now includes a nFactor visualizer. Here’s an example for a Native OTP configuration.
AAA Virtual Server
Create AAA Virtual Server
This section applies to NetScaler ADC Advanced Edition and Premium Edition. For NetScaler ADC Standard Edition, go to Citrix Gateway > Virtual Servers, edit a Gateway, add the Authentication Profile section, create an Authentication Profile, and then create a Authentication Virtual Server from there.
nFactor is configured on a AAA Virtual Server. Then you later link the AAA Virtual Server to the Citrix Gateway Virtual Server.
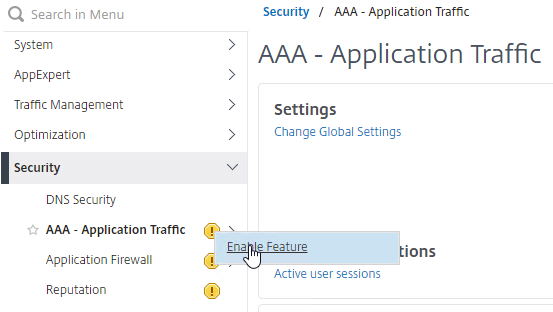
- If the AAA feature is not already enabled, on the left menu, expand Security, right-click AAA – Application Traffic, and click Enable Feature.
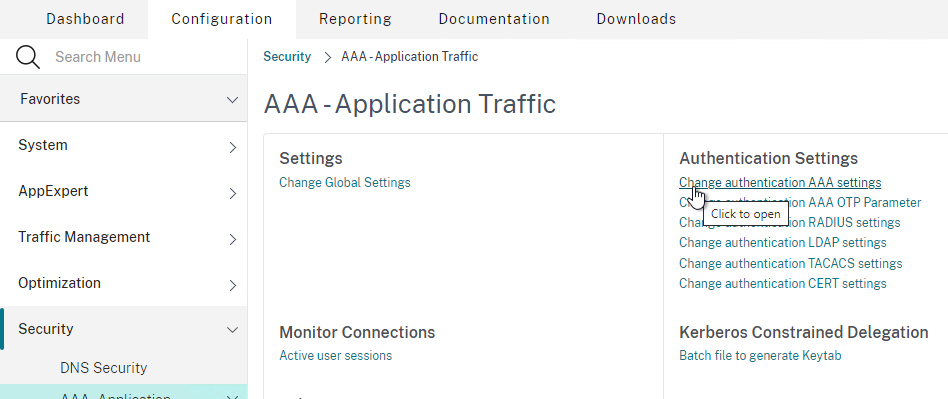
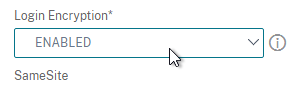
- Go to Security > AAA – Application Traffic. On the right, click Change authentication AAA settings.
- Find Login Encryption and enable it. Click OK.
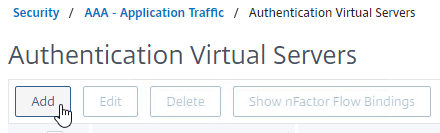
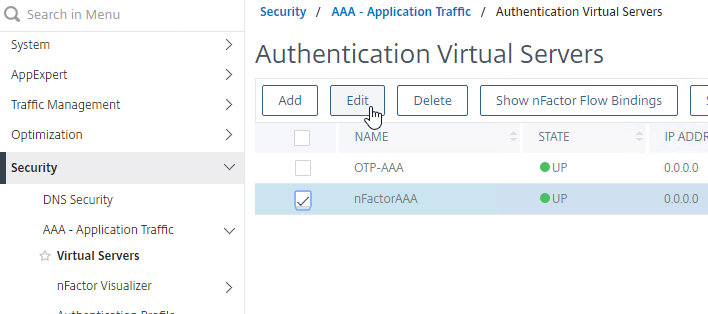
- Go to Security > AAA > Virtual Servers.
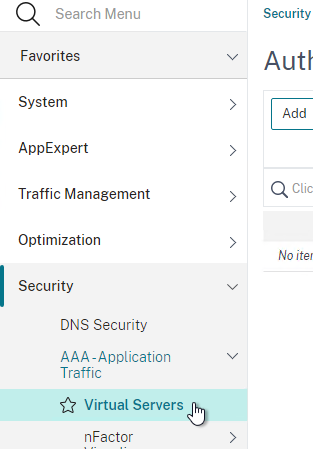
- On the right, click Add.
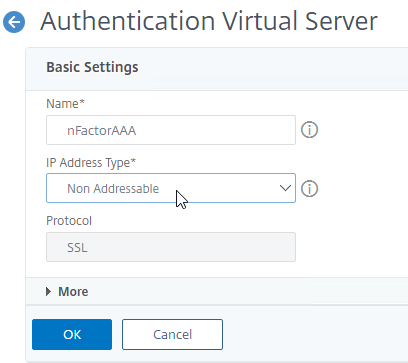
- Give the Virtual Server a name.
- If this AAA Virtual Server is only for Citrix Gateway, then you can change the IP address Type to Non Addressable.
- It’s also possible to content switch to AAA (Citrix CTX201949 One Public IP for AAA-TM Deployments on NetScaler).
- Click OK.
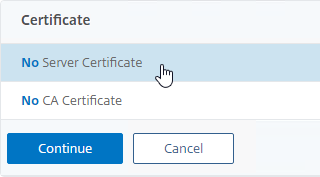
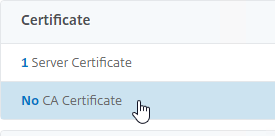
- For a non-addressable AAA vServer, configuring the certificate is optional, but the AAA vServer will be DOWN (red) without a certificate. The AAA vServer still works even if its status is DOWN. Binding a certificate will change the AAA vServer’s status from DOWN to UP (green).
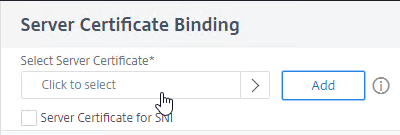
- In the Certificates section, click where it says No Server Certificate.
- In the Server Certificate Binding page, click where it says Click to select.
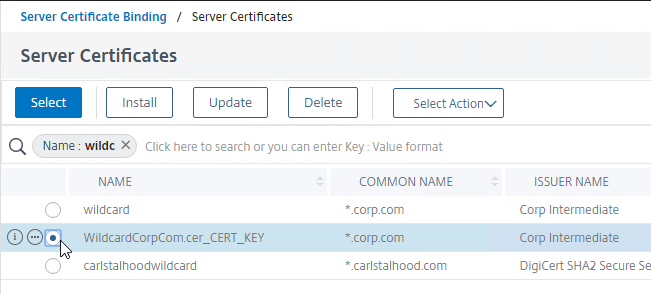
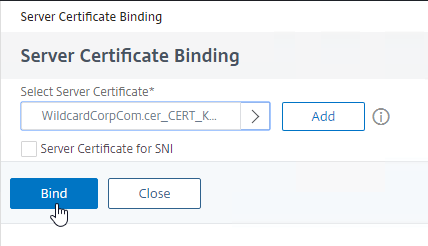
- Click the radio button next to a certificate for the AAA Virtual Server, and click Select. Since this AAA Virtual Server is not directly addressable, the chosen certificate doesn’t matter.
- Click Bind.
- In the Certificates section, click where it says No Server Certificate.
- Click Continue to close the Certificate section.
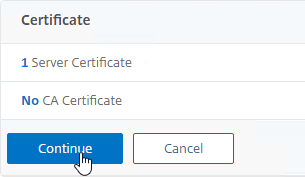
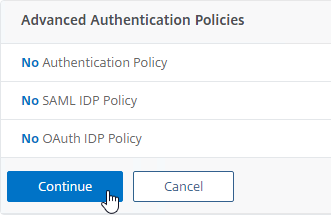
- You probably haven’ts created any Advanced Authentication Policies yet, so just click Continue. Note that this is where you bind the authentication policies for the first factor.
Bind Portal Theme to AAA Virtual Server
If this AAA Virtual Server is used not just for Citrix Gateway but also directly addressable for traffic management (Load Balancing, Content Switching), then you might want to change the AAA Portal theme.
- Go to Citrix Gateway > Portal Themes, and add a theme. You create the theme under Citrix Gateway, and then later bind it to the AAA Virtual Server.
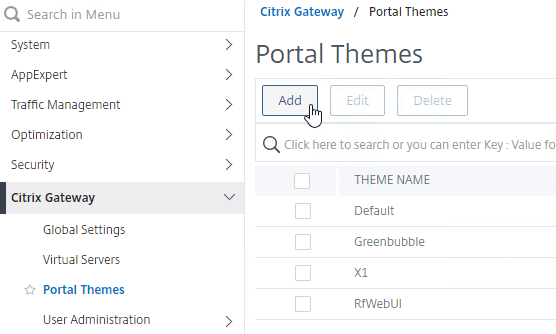
- Create a theme based on the RfWebUI Template Theme.
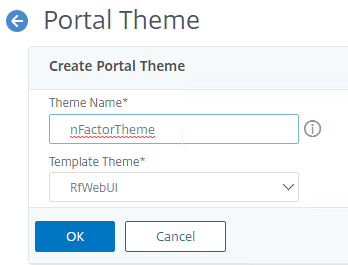
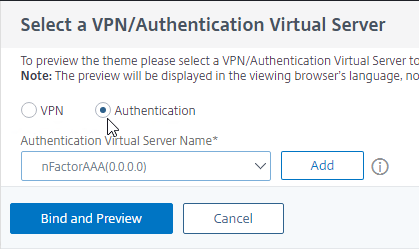
- After adjusting the theme as desired, at the top of the portal theme editing page, click the link labelled Click to Bind and View Configured Theme.
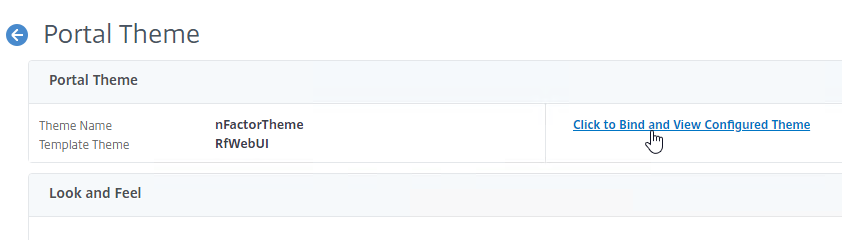
- Change the selection to Authentication.
- Use the Authentication Virtual Server Name drop-down to select the AAA Virtual Server, and click Bind and Preview. You can close the preview window.
Client Certificate Authentication
If one of your authentication Factors is client certificate, then you must perform some SSL configuration on the AAA Virtual Server:
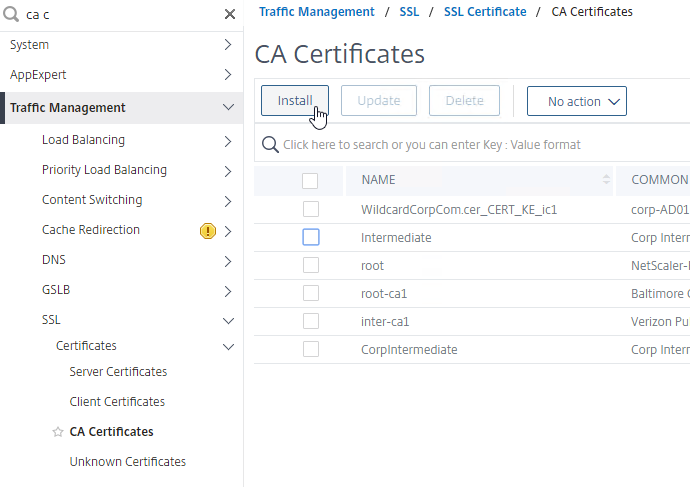
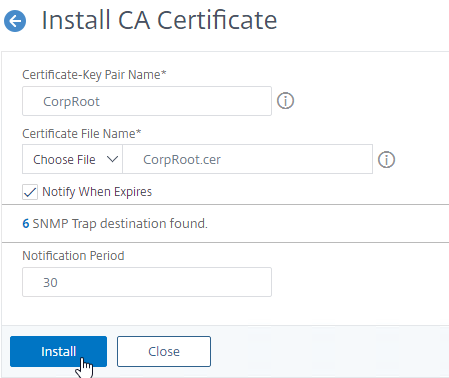
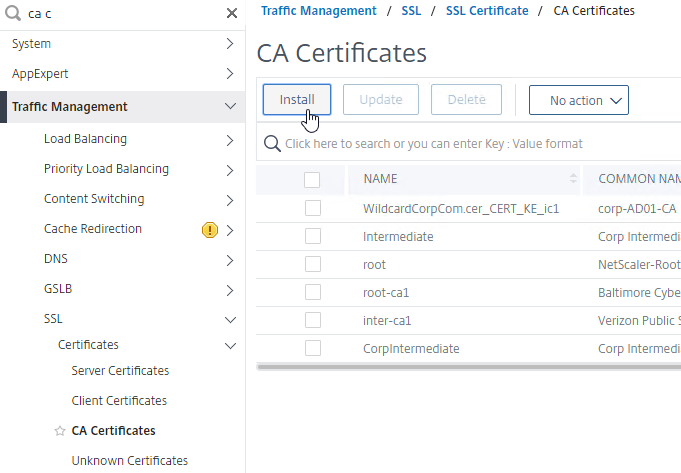
- Go to Traffic Management > SSL > Certificates > CA Certificates, and install the root certificate for the issuer of the client certificates. Root certificates do not have a key file.

- Go to Traffic Management >SSL > Change advanced SSL settings.
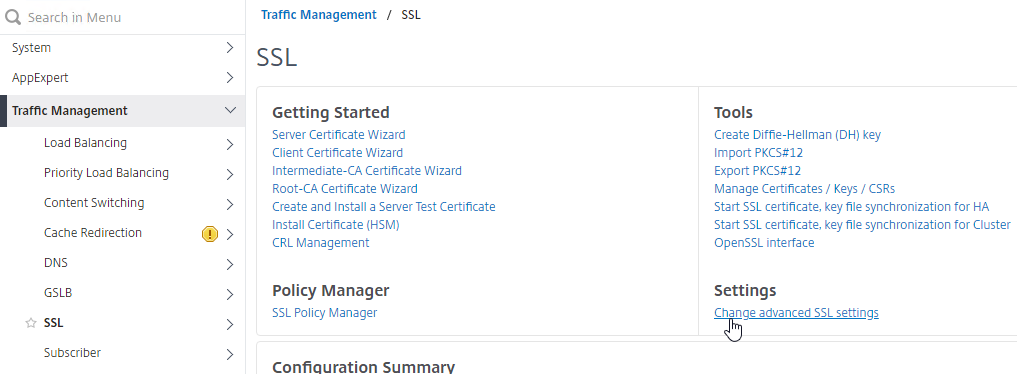
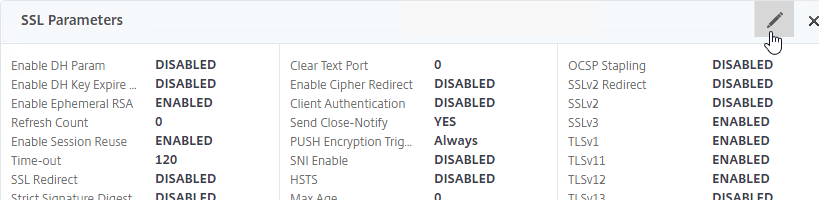
- Scroll down. If you see Default Profile: ENABLED, then you must use an SSL Profile to enable Client Certificate Authentication. Otherwise, you can enable Client Certificate Authentication directly on the AAA Virtual Server in the SSL Parameters section.
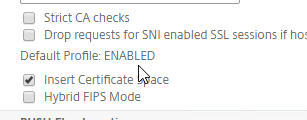
- Scroll down. If you see Default Profile: ENABLED, then you must use an SSL Profile to enable Client Certificate Authentication. Otherwise, you can enable Client Certificate Authentication directly on the AAA Virtual Server in the SSL Parameters section.
- If Default SSL Profiles are enabled, then create a new SSL Profile with Client Authentication enabled:
- On the left menu, expand System, and click Profiles.
- On the top right, switch to the tab named SSL Profile.
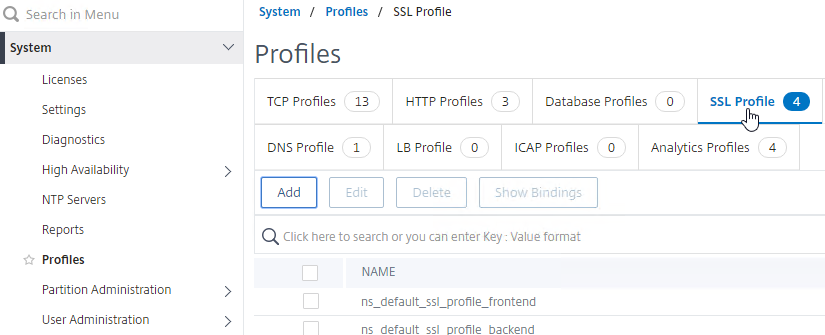
- Right-click the ns_default_ssl_profile_frontend profile, and click Add. This copies settings from the default profile.
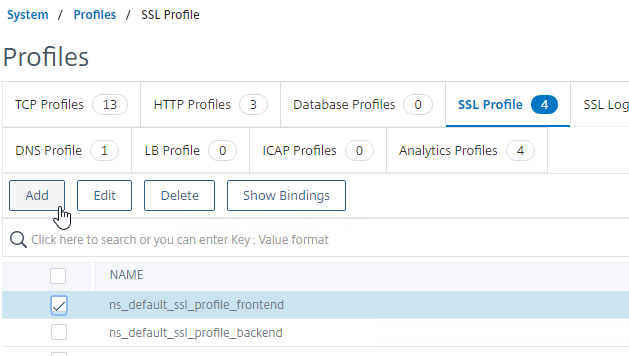
- Give the Profile a name based on this goal: enable Client Certificates.
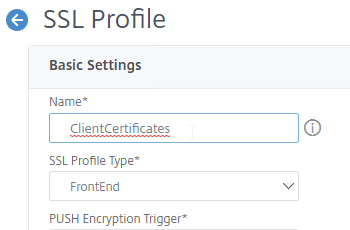
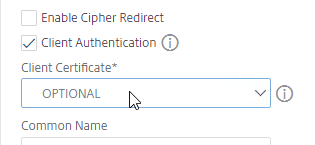
- Scroll down and find the Client Authentication checkbox. Check the box.
- Change the Client Certificate drop-down to OPTIONAL.
- Scroll down and click OK to close the Basic Settings section.
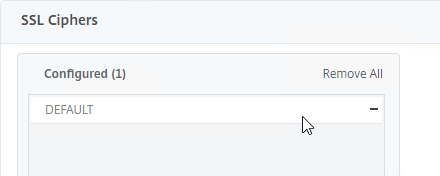
- Copying the default SSL Profile does not copy the SSL Ciphers so you’ll have to redo them.
- Click Done when done creating the SSL Profile.
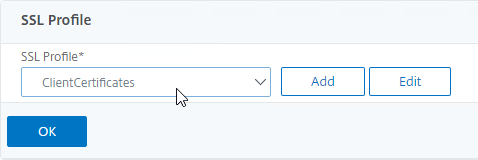
- Go to Security > AAA – Application Traffic > Virtual Servers, and edit a AAA vServer.
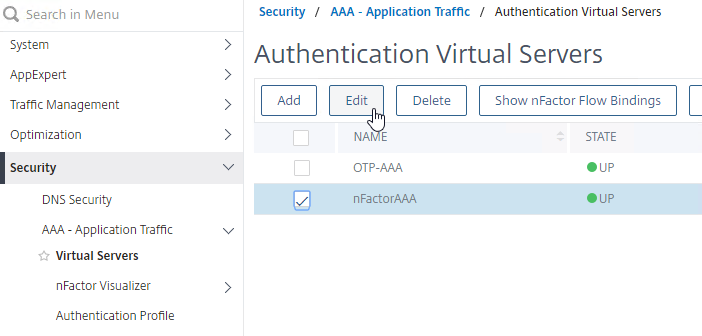
- Scroll down to the SSL Profile section and click the pencil.

- Change the SSL Profile drop-down to the profile that has Client Certificates enabled. Click OK.
- Scroll down this article until you reach the instructions to bind the CA certificate.
- Go to Security > AAA > Virtual Servers, and edit an existing AAA Virtual Server you’re using for nFactor.

- If default SSL Profiles are not enabled:
- On the left, scroll down to the SSL Parameters section, and click the pencil icon.
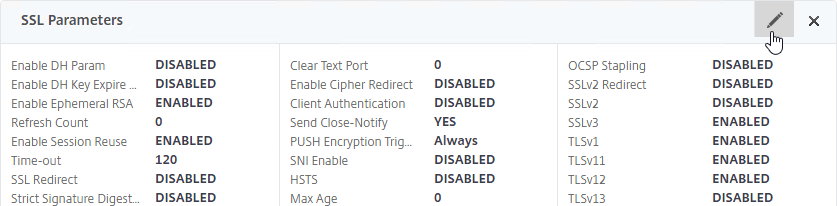
- Check the box next to Client Authentication.
- Make sure Client Certificate drop-down is set to Optional.
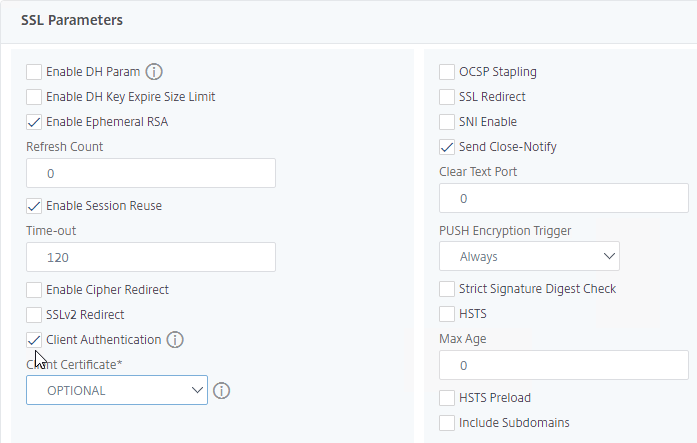
- Click OK to close the SSL Parameters section.
- On the left, scroll down to the SSL Parameters section, and click the pencil icon.
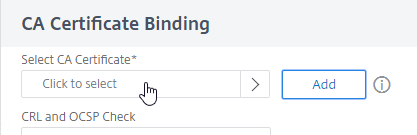
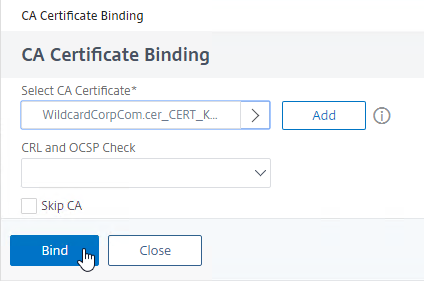
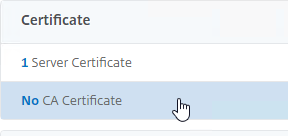
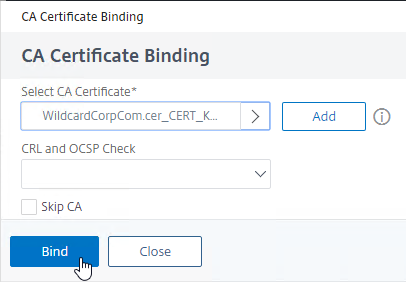
- On the left, scroll up to the Certificates section, and click where it says No CA Certificate. Do this whether you are using SSL Profiles or not.
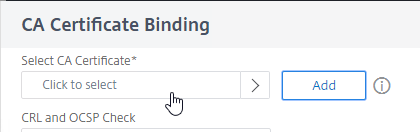
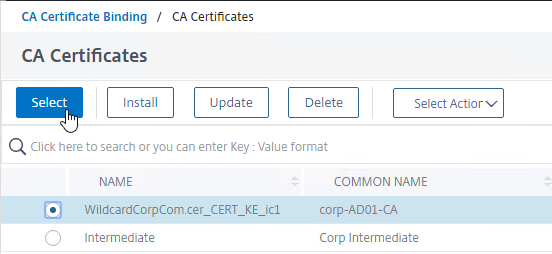
- In the CA Certificate Binding page, click Click to select.
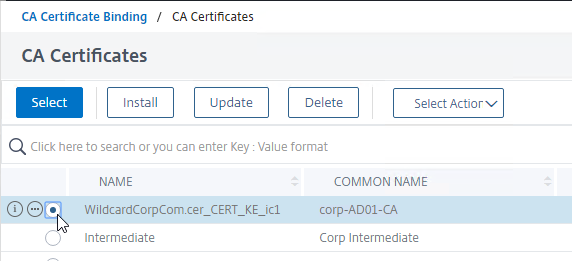
- Click the radio button next to the root certificate for the issuer of the client certificates, and then click the blue Select button on the top of the page.
- Click Bind.
- In the CA Certificate Binding page, click Click to select.
Login Schema
Login Schema XML File
Login Schema is an XML file providing the structure of forms-based authentication logon pages.
nFactor implies multiple authentication Factors that are chained together. Each Factor can have different Login Schema pages/files. In some authentication flows, users could be presented with multiple logon screens.
Or you can have one Login Schema gather information that can be passed on to multiple Factors, so that the later Factors don’t need to display another Login Schema. This is particularly useful for traditional two-password logon screens (LDAP + RADIUS), since each password is evaluated in a separate Factor:
- The first password is evaluated in the first factor (e.g. LDAP). If successful, then evaluate the Next Factor.
- The second factor (e.g. RADIUS) evaluates the second password. However, the second password has already been entered, so there’s no need to ask the user for it again. To prevent the second factor from showing another Login Schema to the user, select noschema (LSCHEMA_INT) in the Authentication Policy Label.
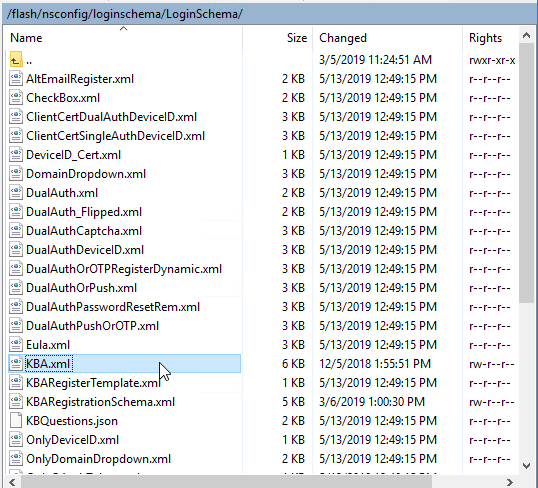
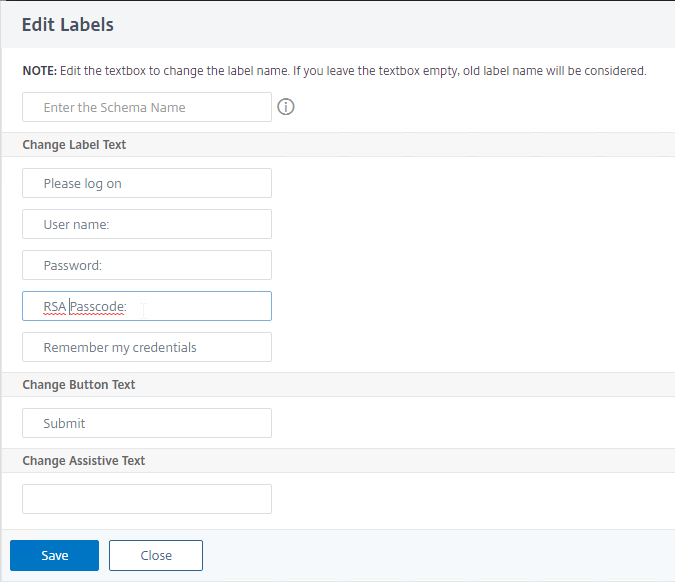
Several Login Schema .xml files are included with Citrix ADC under /nsconfig/loginschema/LoginSchema.
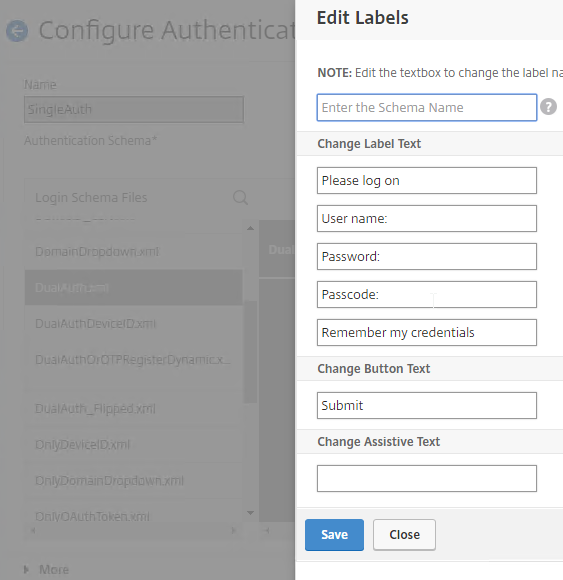
In the Citrix ADC management GUI, when creating or editing a Login Schema entity, you can Edit the labels. Citrix ADC copies the modified Login Schema to a new .xml file based on the Schema Name entered in this widow, or based on the original file name.
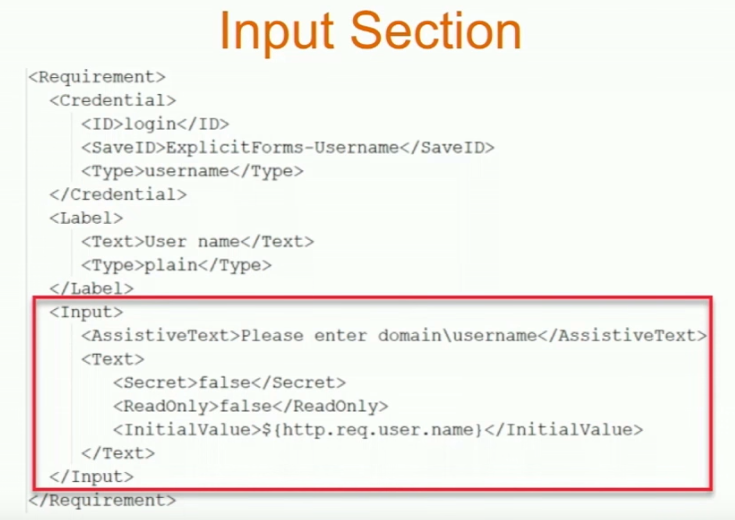
Or you can use WinSCP to connect to the appliance, duplicate one of the existing .xml files, and edit it as desired. For example, you can configure fields (InitialValue tag) to pre-fill information from previous Factors, as shown below:

The structure of the Login Schema file is documented at Citrix Common Authentication Forms Language Citrix Developer Documentation.
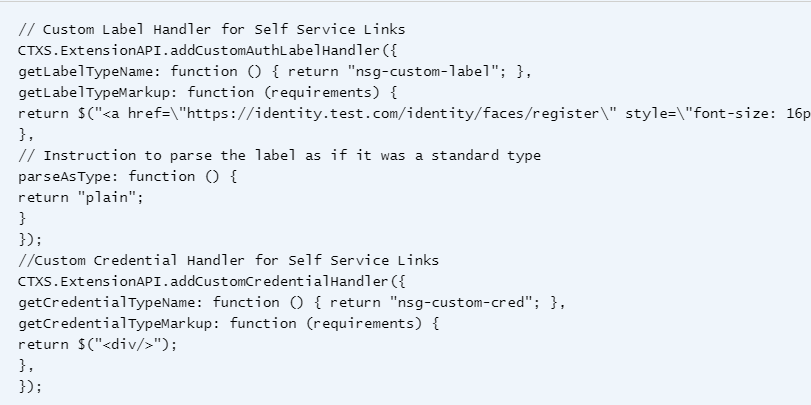
nFactor Extensibility at Citrix Docs explains how to use JavaScript to add custom login labels, add custom login credentials, customizing UI displays and so on.
CTP Sam Jacobs at SYN229 – nFactor and Login Schemas explains how to customize the .xml file.
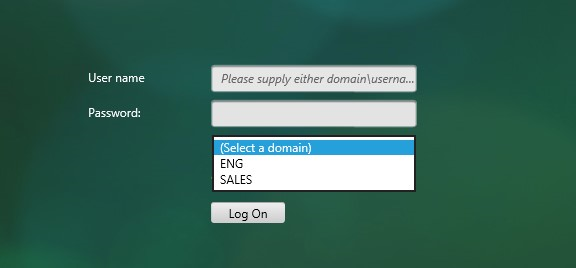
The login schema can contain a domain drop-down. See CTX201760 nFactor – Domain Drop-Down in First Factor then Different Policy Evaluations Based on Groups for a sample configuration.
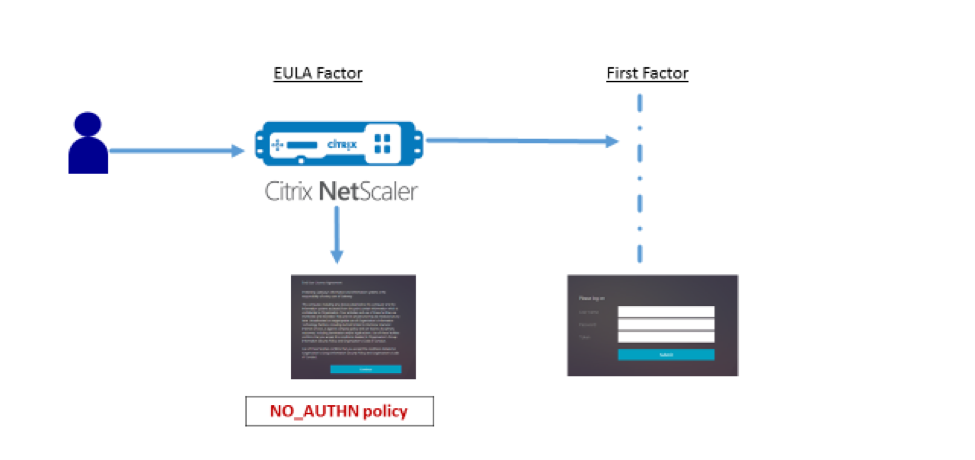
Login Schema and Authentication Factor can be a EULA. See Configure EULA as an authentication factor in NetScaler nFactor system at Citrix Docs.

Citrix CTX219545 Custom Login Labels in NetScaler nFactor Authentication: add a Requirement element with a Label sub-element to the Login Schema .xml file. Then use JavaScript to populate the label with any desired HTML. Another example is Morten Kallesoee nFactor – adding custom links.
Several more samples can be found later.
Login Schema Profile
Login Schemas define a user interface (web page form) that is shown to the user. Login Schema Profiles are bound directly to Policy Labels (aka Factors). After the user fills out the form and submits it, nFactor uses the submitted form fields to evaluate the authentication policies bound to the same Policy Label.
To create a Login Schema Profile:
- Create or Edit a Login Schema .XML file based on your nFactor design.
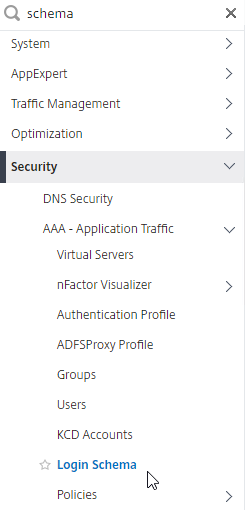
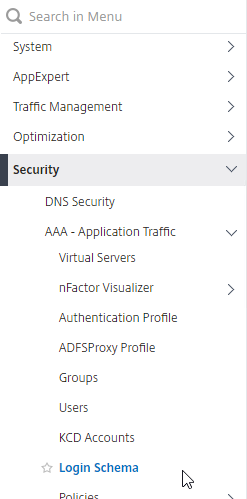
- Go to Security > AAA > Login Schema.
- On the right, switch to the tab named Profiles and click Add.
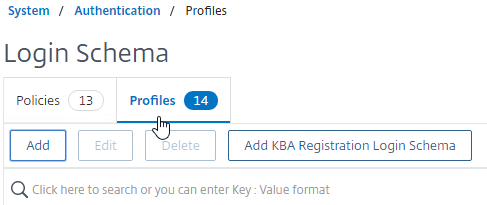
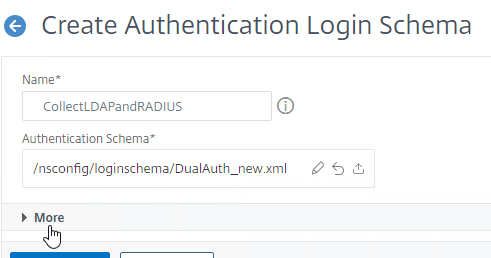
- Name the Login Schema.
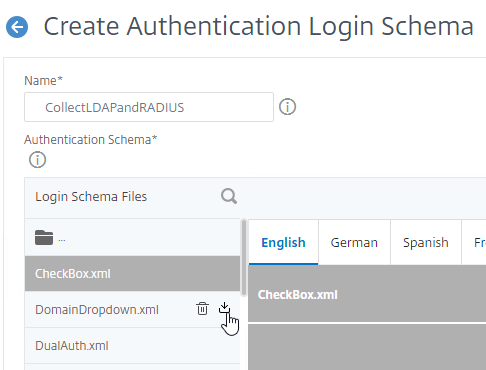
- In the Authentication Schema field, click the pencil icon.
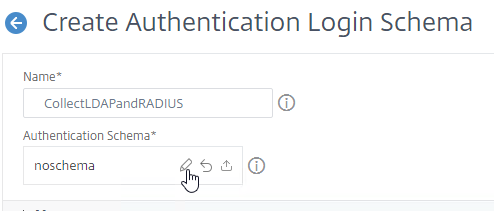
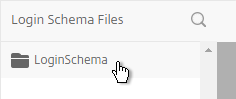
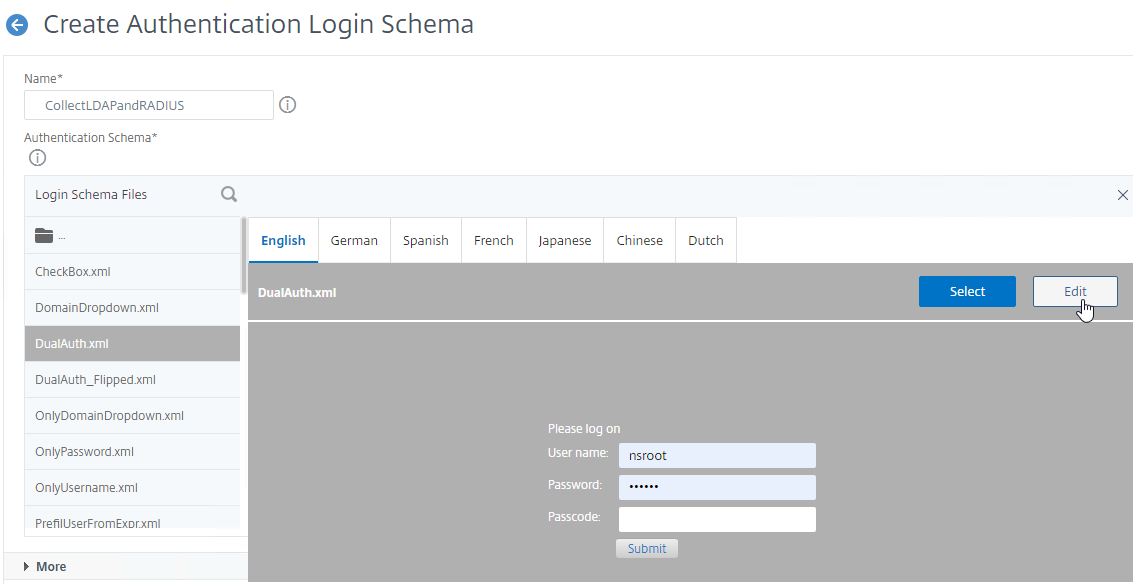
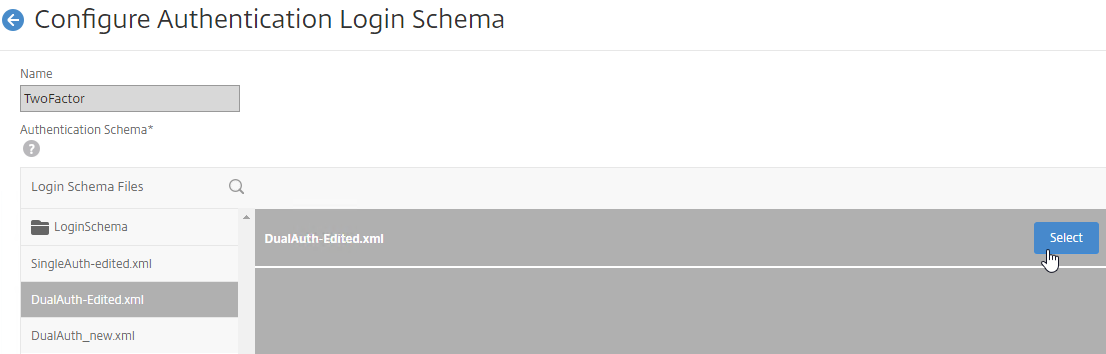
- The window expands to show Login Schema Files. Click the LoginSchema folder to see the files in it.
- Select one of the files. You can see a preview on the right.
- The labels can be changed by clicking the Edit button on the top right.
- When you Save the changes, a new file is created under
/nsconfig/LoginSchema.
- The top of the screen shows the new file name. You’ll have to go up a folder and select the new file instead of the folder you’re looking at.

- Next to each file is an icon to download the file so you can modify the XML and then upload a new copy.
- Once you’ve found the file you want and clicked it to preview it, then on the top right, click the blue Select button. You might be tempted to click the blue Create button on the bottom of the screen but don’t do that until you have clicked the blue Select button.
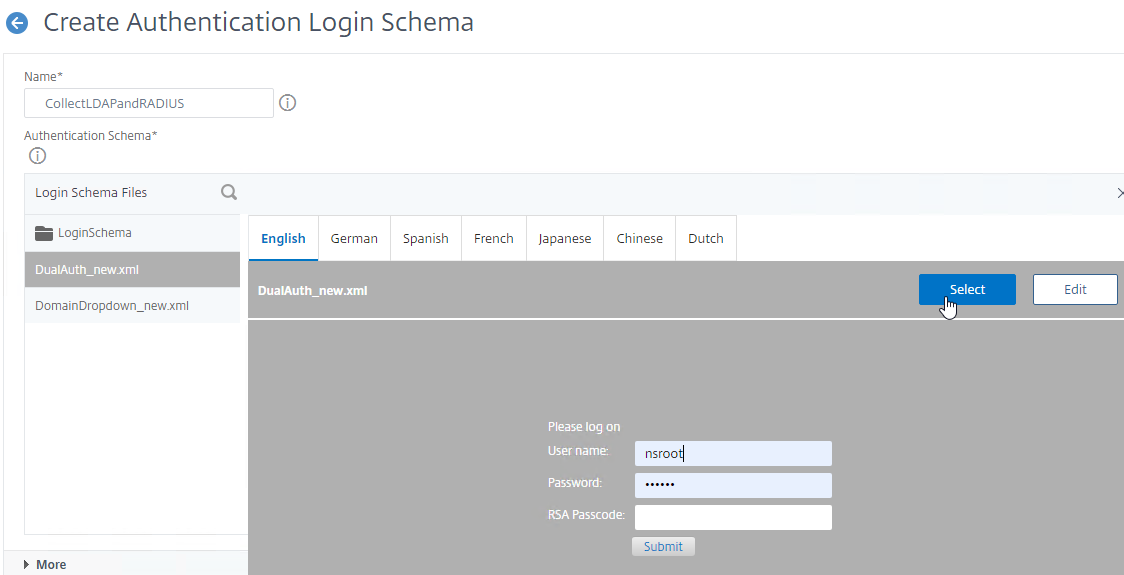
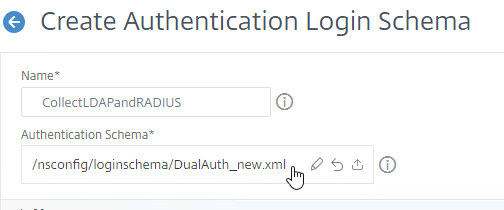
- After you click the blue Select button, the window collapses. Look in the Authentication Schema field to make sure you selected the correct file.
- Click More.
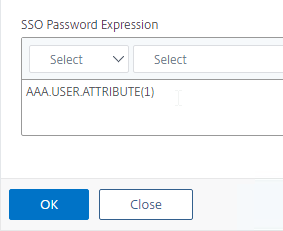
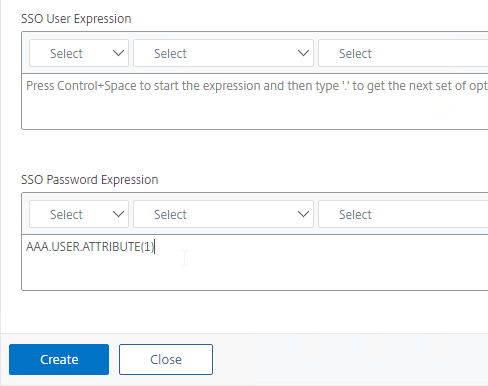
- You typically need to save the entered credentials so you can use them later in a Single Sign-on flow to a back-end server (e.g. Citrix StoreFront). Near the bottom of the Login Schema Profile, enter a unique value between 1 and 16 for the Password Credential Index .
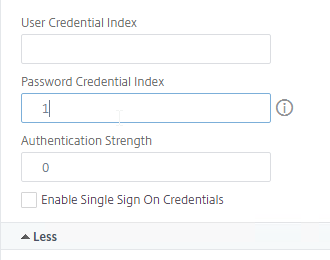
- Later you reference the index value in a Traffic Policy/Profile by using the expression AAA.USER.ATTRIBUTE(#).
- Each Login Schema can store different credentials in different indexes.
- Later you reference the index value in a Traffic Policy/Profile by using the expression AAA.USER.ATTRIBUTE(#).
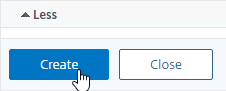
- Click Create to create the Login Schema profile.
If you later edit the Login Schema .xml file using WinSCP or similar, then the changes to the file might not be reflected until you edit the Login Schema Profile, and click the blue Select button for the .xml file again.
Login Schema Policy
For most factors, you can bind a Login Schema Profile directly to a Policy Label. However, the first factor is bound directly to the AAA vServer and does not use a Policy Label. To bind a Login Schema directly to a AAA vServer, you must first create a Login Schema Policy. You don’t need Login Schema Policies for any factor other than the first one.
To create a first factor Login Schema Policy:
- In the left menu, go to Security > AAA > Login Schema.
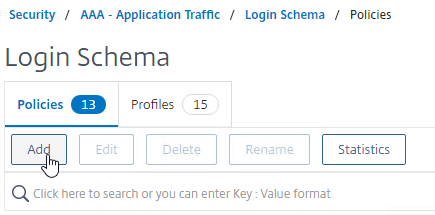
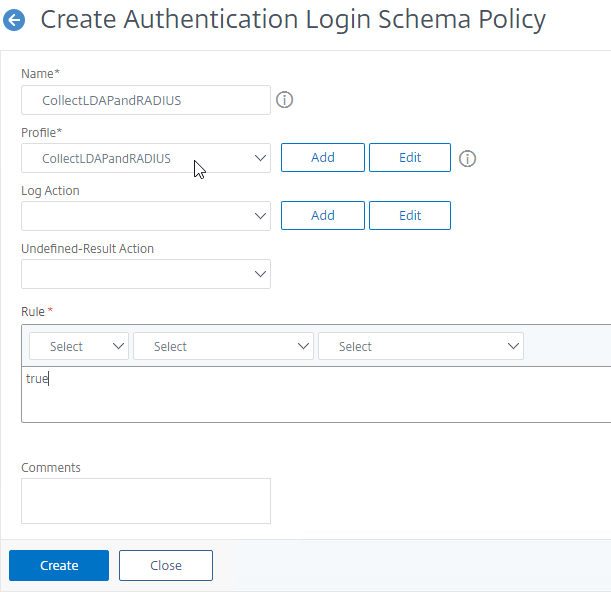
- On the right, switch to the tab named Policies, and click Add.
- Use the Profile drop-down to select the Login Schema Profile you already created.
- Enter a Default Syntax expression (e.g. true) in the Rule box.
- For the first factor, you can use policy expressions to control whether a Login Schema is shown to the user or not. For example, you might bind two Login Schemas to the AAA vServer but have a policy expression that only shows a Login Schema if the client IP is in the internal network instead of from the Internet.
- Policy expressions only apply to the first factor; subsequent factors (Policy Labels) always show their Login Schema.
- Click the blue Create button when done.
Bind first factor Login Schema to AAA vServer:
- On the left, go to Security > AAA > Virtual Servers, and edit an existing AAA Virtual Server.
- On the right, in the Advanced Settings column, click Login Schemas.
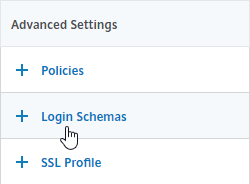
- On the bottom left, in the Login Schemas section, click where it says No Login Schema.
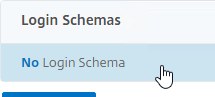
- In the Policy Binding window, click where it says Click to select.
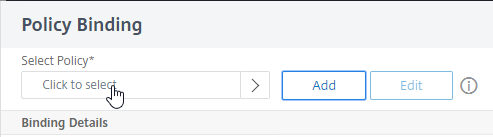
- Click the radio button next to the Login Schema policy, and then click the blue Select button on the top of the window. Only Login Schema Policies appear in this list. Login Schema Profiles (without a policy) do not appear.
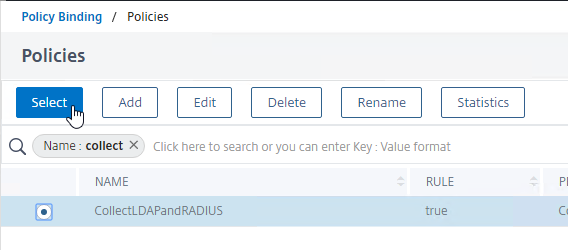
- Click Bind.

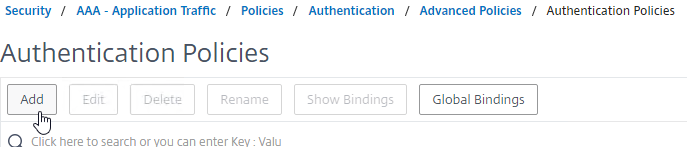
Authentication Policies
Authentication policies are a combination of policy expression, and policy action. If the expression is true, then perform the authentication action.
- The Action is an authentication server (LDAP, RADIUS, etc.), or no authentication (i.e. do nothing, typically for selecting a Next Factor).
- For nFactor, the policy expression must be in the newer default syntax, not the older classic syntax.
You typically create at least one Authentication Policy for each Factor. When you bind multiple Authentication Policies to one Factor, Citrix ADC checks each authentication policy in priority order until one of them succeeds.
Note: Citrix Gateway 12.0 and newer have deprecated Basic Authentication Policies (Classic Syntax). The only way to bind an Advanced Authentication Policy (Default Syntax) to Gateway is through nFactor and AAA.
Create Authentication Actions
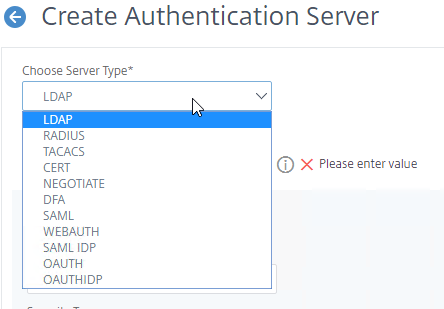
Authentication Policies need configured Authentication Servers (e.g. LDAP, RADIUS, CERT, SAML, etc.). You can create Authentication Actions (Servers) prior to creating the Authentication Policy.
- In the left menu, go to Authentication > Dashboard. On the right, click Add.
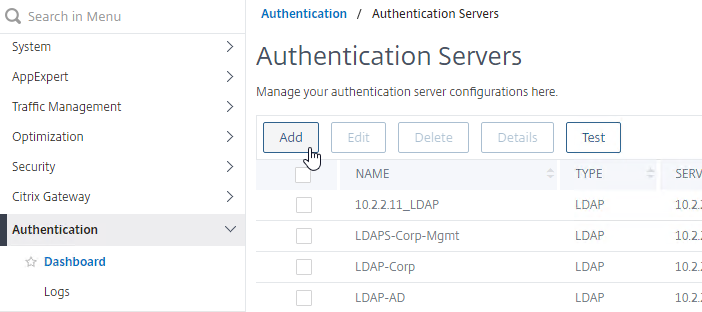
- Select a Server Type. The instructions for creating these Authentication Servers are not detailed here. Some of them are detailed at the Authentication – Citrix ADC 13 procedures.
- Select a Server Type. The instructions for creating these Authentication Servers are not detailed here. Some of them are detailed at the Authentication – Citrix ADC 13 procedures.
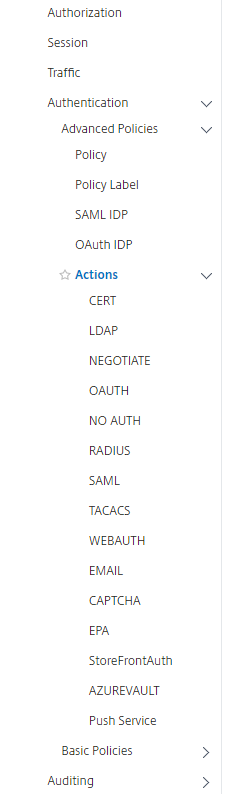
- Or in the left menu, you can find all of the Action types under Security > AAA – Application Traffic > Policies > Authentication > Advanced Policies > Actions.
- Or when creating an Authentication Policy, there’s a Add button that lets you create Authentication Actions/Servers.
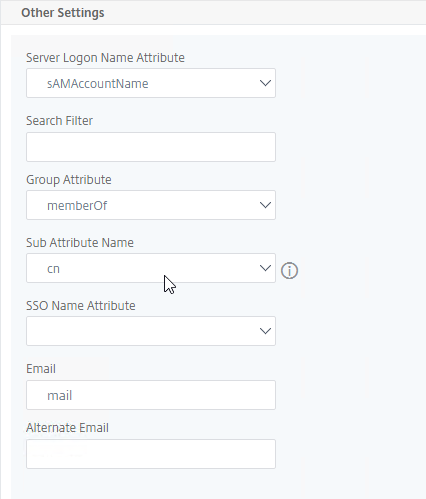
LDAP Group Extraction
Sometimes you need to extract a user’s groups from Active Directory without authenticating. These extracted groups can then be used to select the next authentication Factor.
To configure an LDAP Action/Server for only group extraction:
- When creating or editing an LDAP Server/Action for only group extraction, make sure Authentication is unchecked.
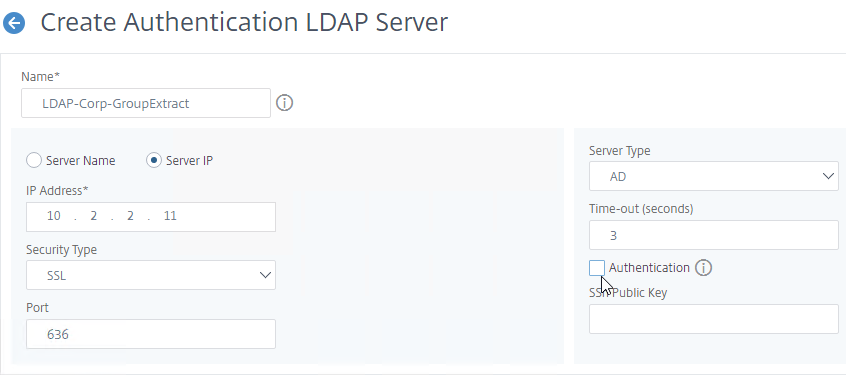
- On the left, in the Other Settings section, make sure Group Attribute and Sub Attribute Name are filled in.
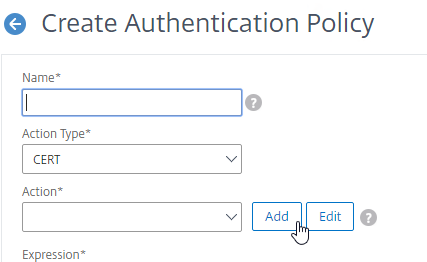
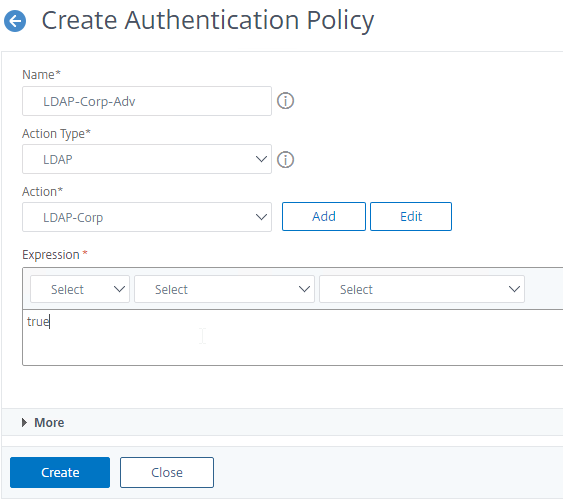
Create Authentication Policies
Once you’ve created your Authentication Actions, you can now create an Advanced Authentication Policy that links an expression to the Action:
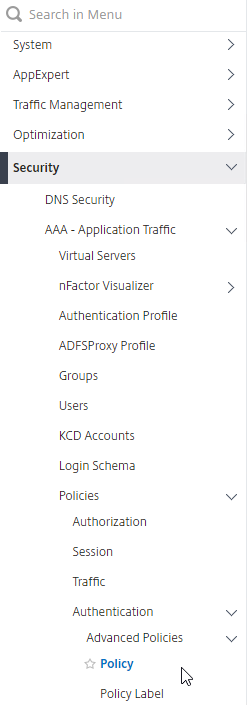
- Go to Security > AAA > Policies > Authentication > Advanced Policies > Policy.
- On the right, click Add.
- Name your Authentication Policy.
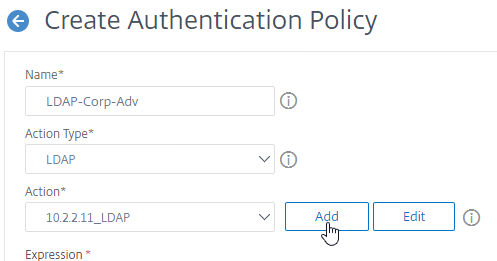
- Use the Action Type drop-down to select the Action Type (e.g. LDAP). Typically each Factor is a different type of Authentication Action.
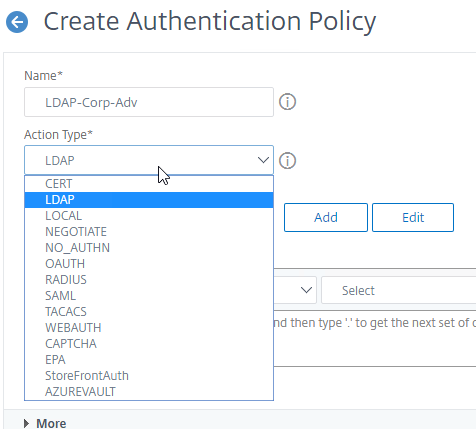
- If you don’t want to perform authentication, then select NO_AUTHN as the Action Type. This is useful if you only want to use this Authentication Policy expression to choose a Next Factor.
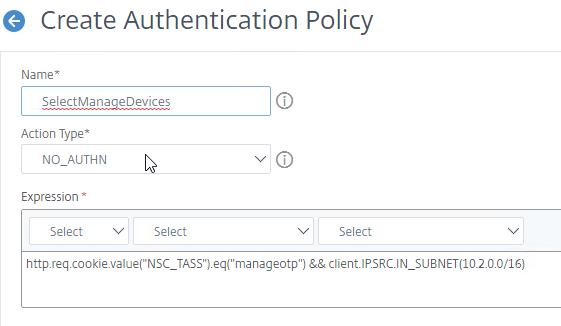
- If you don’t want to perform authentication, then select NO_AUTHN as the Action Type. This is useful if you only want to use this Authentication Policy expression to choose a Next Factor.
- If you don’t currently have any Actions configured, or if you want to create a new one, click the Add button next to the Action drop-down. The Actions/Servers are created in the normal fashion (not detailed here).
- In the Expression box, enter an expression using the Default Syntax. ns_true won’t work because that’s Classic syntax. There’s an Expression Editor link on the right. Or hit Ctrl+Space to see your options. true is a valid Default expression.
- Click Create when done.
- Continue creating one or more Authentication Policies for each of your Factors.
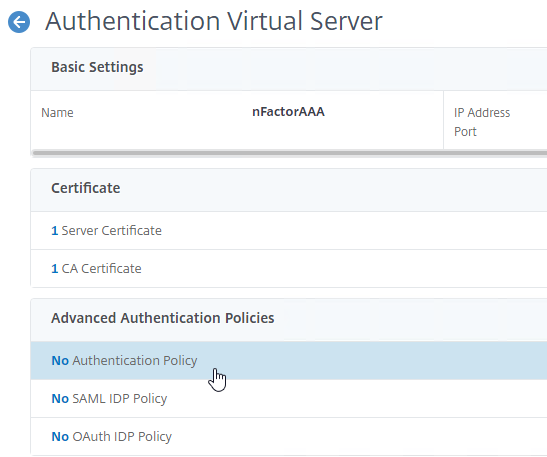
Bind First Factor to AAA
For all factors except the first factor, the Authentication Policies are bound to Authentication Policy Labels as detailed in the next section.
However, since the first factor doesn’t use a Policy Label, you instead bind the first factor’s Authentication Policies directly to the AAA vServer.
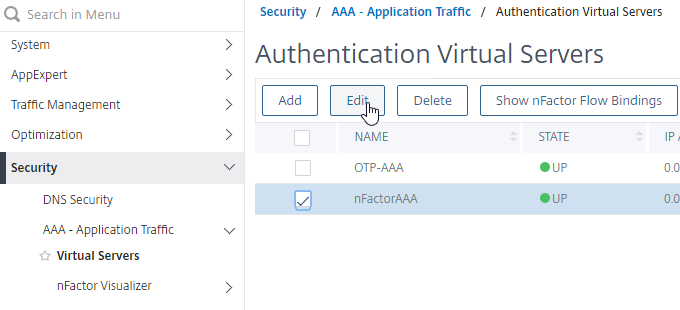
- Go to Security > AAA > Virtual Servers.
- Edit an existing AAA Virtual Server.

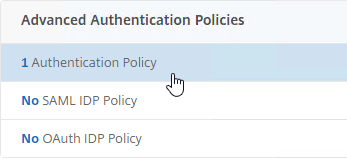
- On the left, in the Advanced Authentication Policies section, click where it says No Authentication Policy.
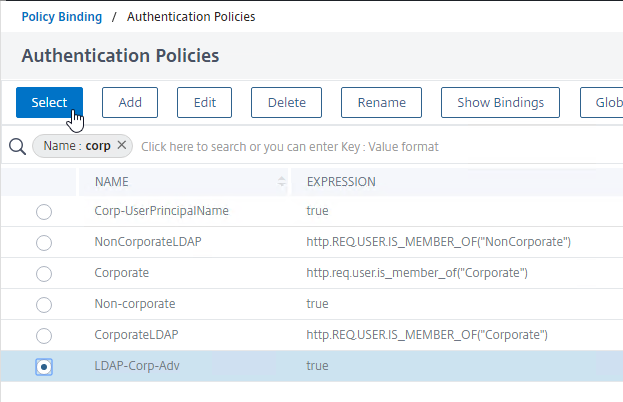
- In the Policy Binding page, click where it says Click to select.
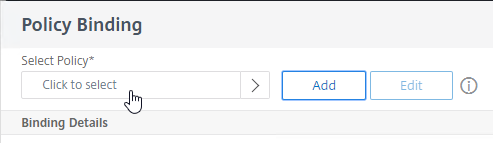
- Click the radio button next to the first factor’s Advanced Authentication Policy, and then click the blue Select button at the top of the page. Only Advanced Authentication Policies appear in this list. Classic Authentication Policies do not appear.
- In the Binding Details section, if this Advanced Authentication Policy fails, then the Goto Expression determines what happens next. If it is set to NEXT, then the next Advanced Authentication Policy bound to this AAA Virtual Server is evaluated. If it is set to END, or if there are no more Advanced Authentication Policies bound to this AAA Virtual Server, then authentication is finished and marked as failed.
- The Select Next Factor field can optionally point to an Authentication Policy Label as detailed in the next section. The Next Factor is only evaluated if this Advanced Authentication Policy succeeds. You can bind a Policy Label later since you probably don’t have any yet.
- Click Bind.
- You can optionally bind more Authentication Policies and they will be evaluated in priority order. If one of the Authentication Policies succeeds, then nFactor moves to the Next Factor and the remaining Authentication Policies in this factor are ignored.
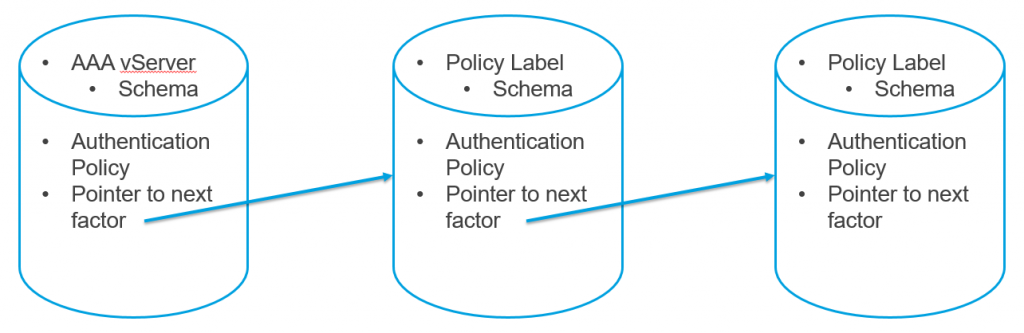
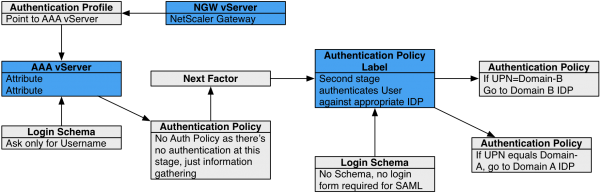
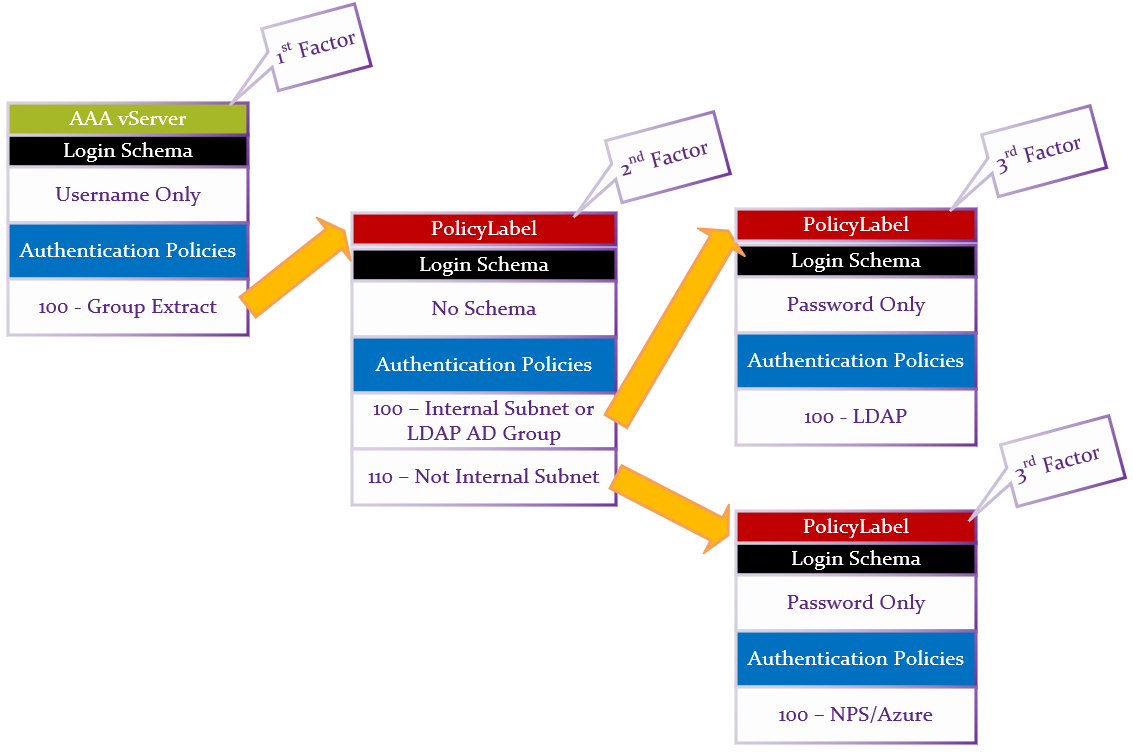
Authentication Policy Label
For all factors except for the first factor, you create a Policy Label for each factor, and then bind the Policy Labels to the various Next Factor authentication policy bind points in the nFactor flow.
Authentication Policy Labels contain two objects:
- Login Schema
- Advanced Authentication Policies
The Authentication Policies can have a Next Factor link to a different Policy Label. Factors are chained together through the Next Factor links.
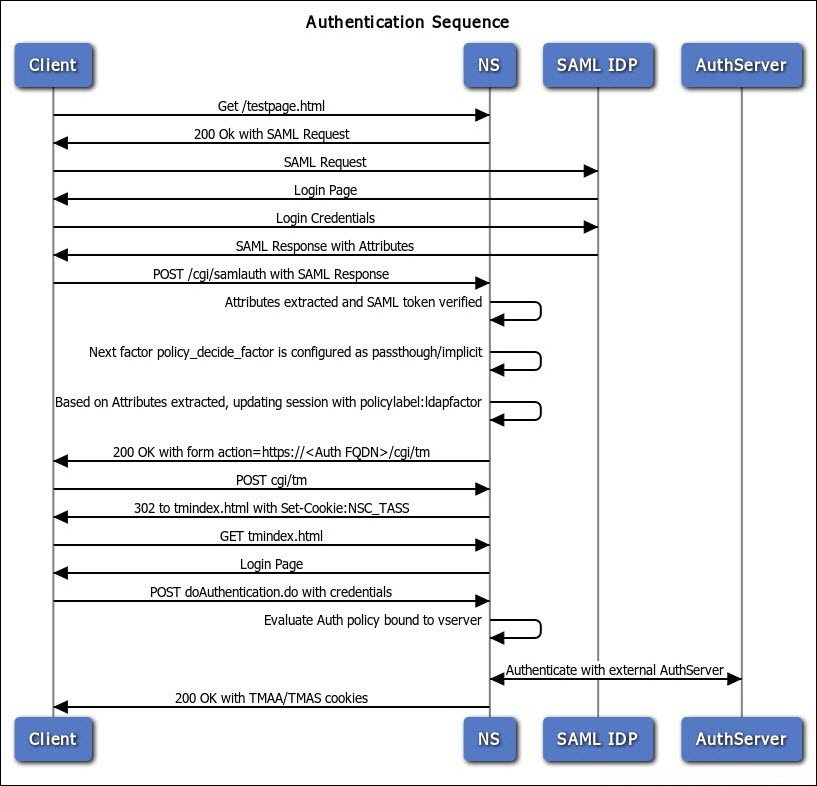
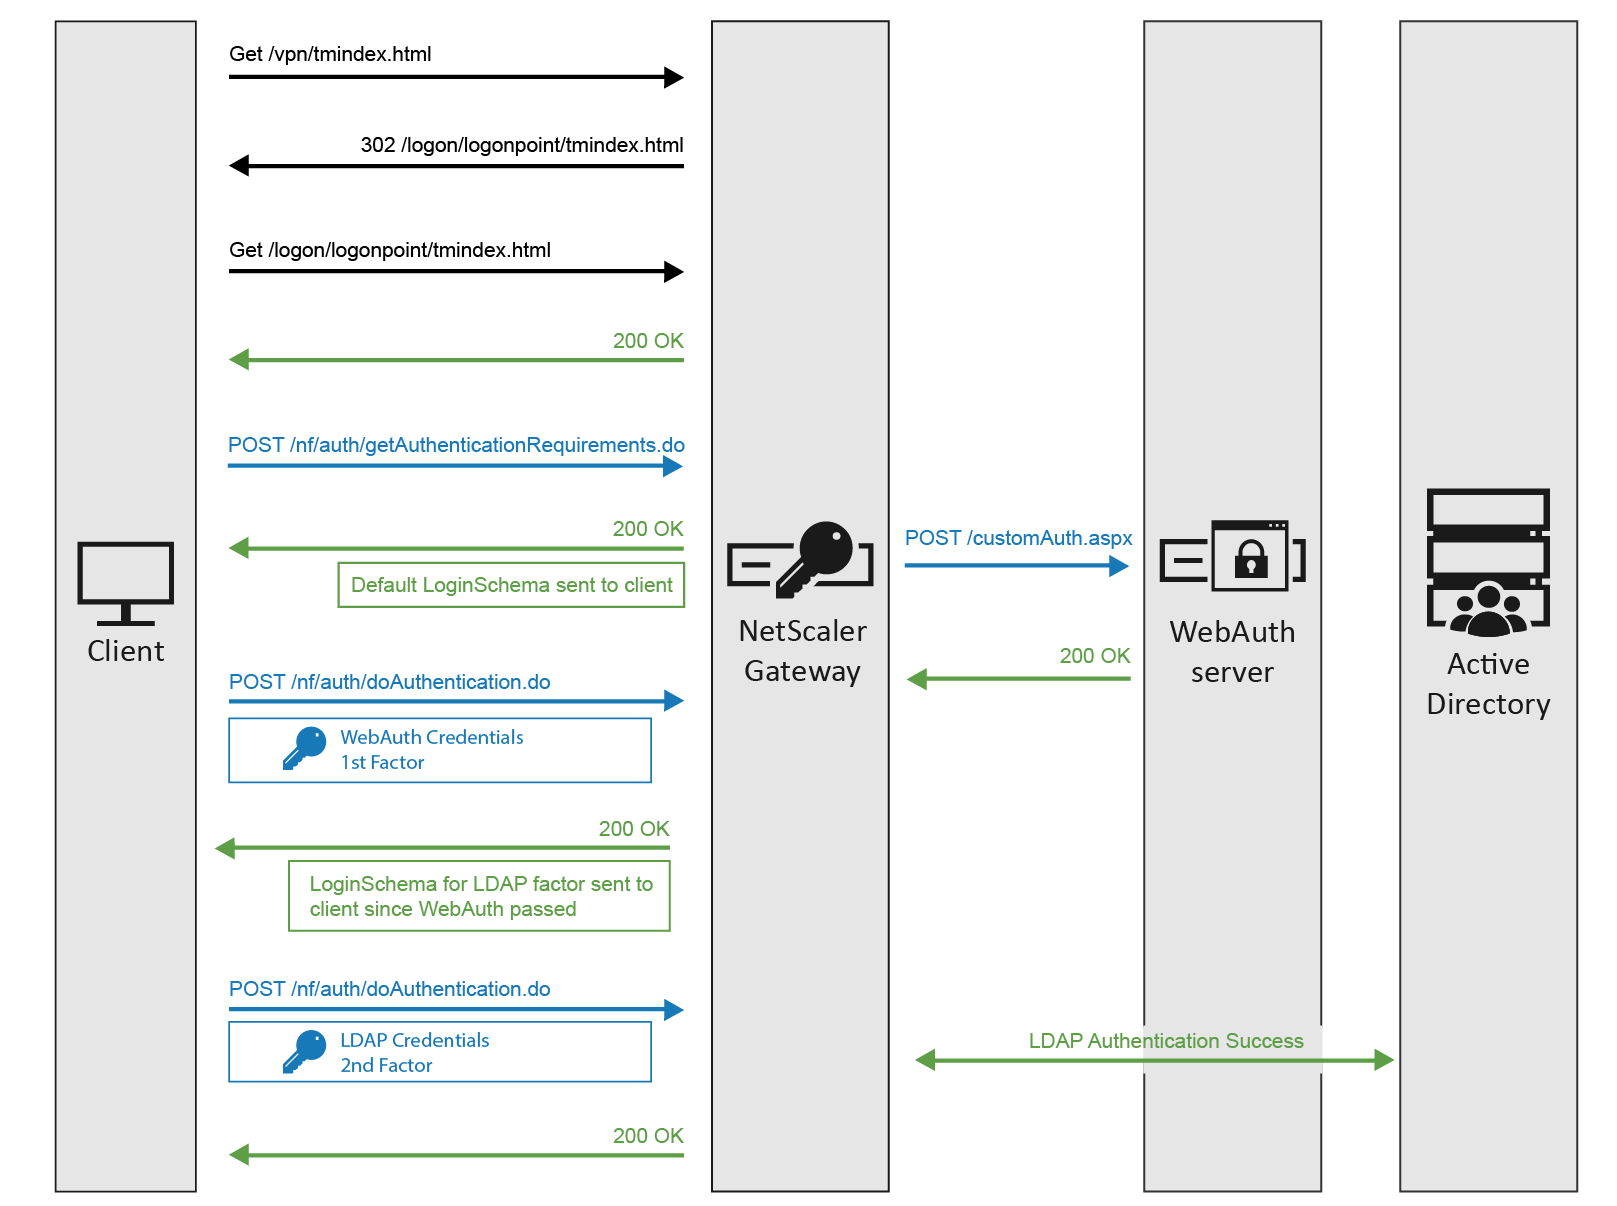
Here’s the nFactor authentication flow:
- User connects to a AAA or Citrix Gateway Virtual Server.
- Citrix Gateway uses an Authentication Profile to select a AAA vServer than has a nFactor configuration.
- The Login Schema bound to the AAA Virtual Server is displayed to the user.
- Advanced Authentication Policies bound to the AAA Virtual Server are evaluated.
- If the Advanced Authentication Policy succeeds, go to the configured Next Factor, which is an Authentication Policy Label.
- If Next Factor is not configured, then authentication is complete and successful.
- If the Advanced Authentication Policy fails, and if Goto Expression is Next, then evaluate the next bound Advanced Authentication Policy.
- If none of the Advanced Authentication Policies succeed, then authentication failed.
- If the Advanced Authentication Policy succeeds, go to the configured Next Factor, which is an Authentication Policy Label.
- If the Next Factor Authentication Policy Label has a Login Schema bound to it, display it to the user.
- Evaluate the Advanced Authentication Policies bound to the Next Factor Authentication Policy Label.
- If the Advanced Authentication Policy succeeds, go to the configured Next Factor, which is an Authentication Policy Label.
- If Next Factor is not configured, then authentication is complete and successful.
- If the Advanced Authentication Policy fails, and if Goto Expression is Next, then evaluate the next bound Advanced Authentication Policy.
- If none of the Advanced Authentication Policies succeeds, then authentication failed.
- If the Advanced Authentication Policy succeeds, go to the configured Next Factor, which is an Authentication Policy Label.
- Continue evaluating the Next Factor Authentication Policy Label until authentication succeeds or fails. You can chain together an unlimited number of Authentication Policy Labels.
When binding a Login Schema to an Authentication Policy Label, you only need the Login Schema Profile. There’s no need to create a Login Schema Policy.
Not every Factor needs a Login Schema. It’s possible for a prior Factor to gather all of the credential information and simply pass it on to the next Factor. If you don’t need a Login Schema for a particular Authentication Policy Label, simply select LSCHEMA_INT, which is mapped to noschema. Or create a new Login Schema Profile based on noschema.
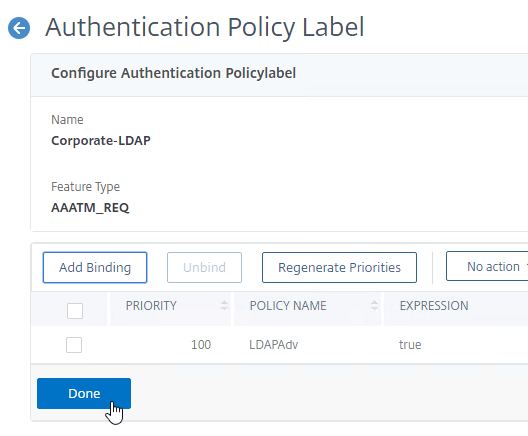
Create Authentication Policy Label
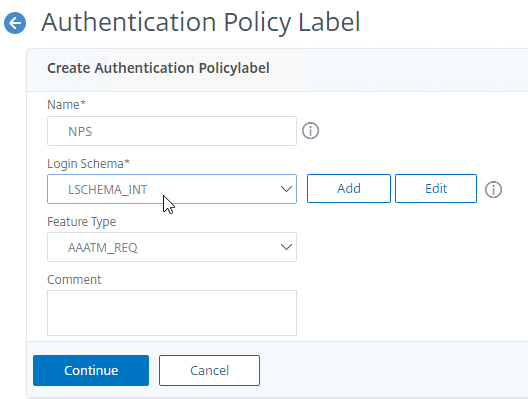
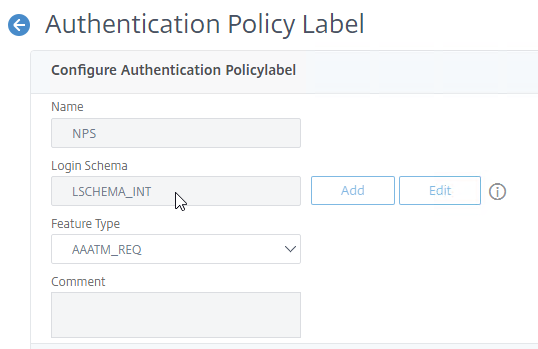
To create an Authentication Policy Label:
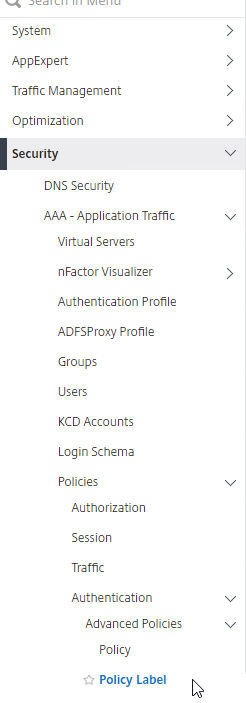
- Authentication Policy Labels (Factors) are configured at Security > AAA > Policies > Authentication > Advanced Policies > Policy Label.
- On the right, click Add.
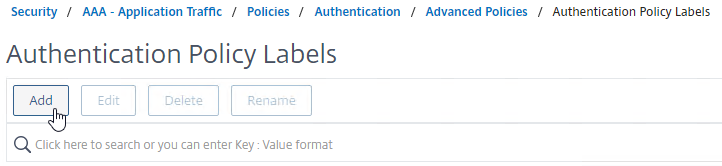
- Give the Policy Label a name which identifies this factor.
- Select a Login Schema Profile or click the Add button to create one.
- If you don’t want this factor to display anything to the user, then select LSCHEMA_INT.
- Click Continue. Note: you won’t be able to change the Login Schema later. But you can create a new Policy Label with a different Login Schema.
- In the Policy Binding section, click where it says Click to select.
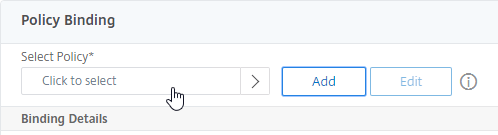
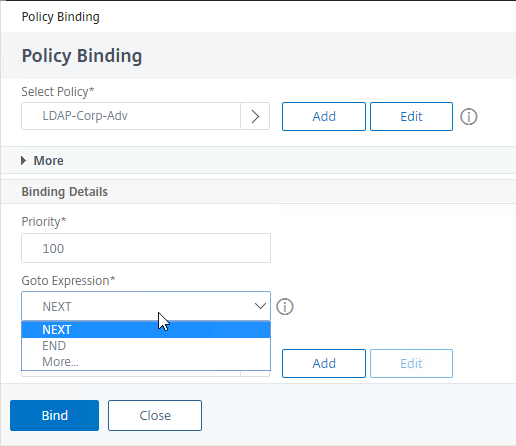
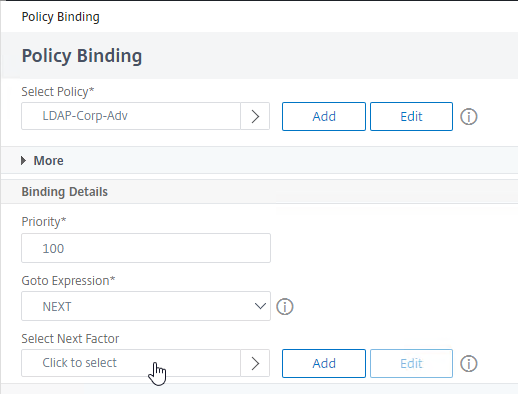
- Click the radio button next to an Advanced Authentication Policy that evaluates this Factor and then click the blue Select button at the top of the page.

- Use the Goto Expression drop-down to select NEXT or END. If you want to bind more Advanced Authentication Policies to this Factor, then select NEXT.

- In the Select Next Factor field, if you want to chain to another Factor, click where it says Click to select, and bind the next Authentication Policy Label (Next Factor).
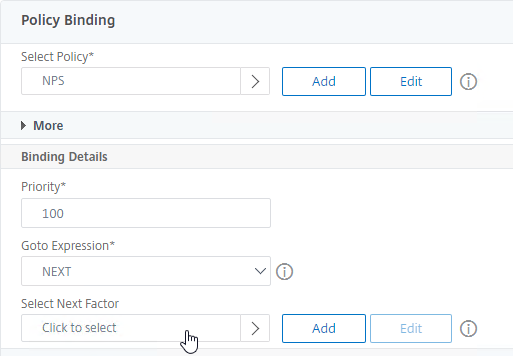
- If you haven’t created the Policy Label for the next factor yet, you can either do it now by clicking the Add button, or return here later after you create the next Policy Label.
- If you don’t configure a Next Factor, and if this Advanced Authentication Action succeeds, then authentication is successful and complete.
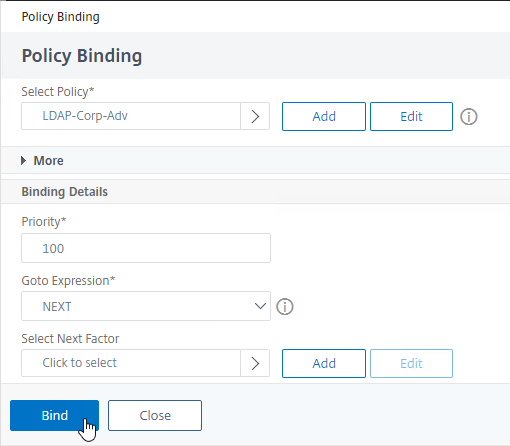
- Click Bind when done.
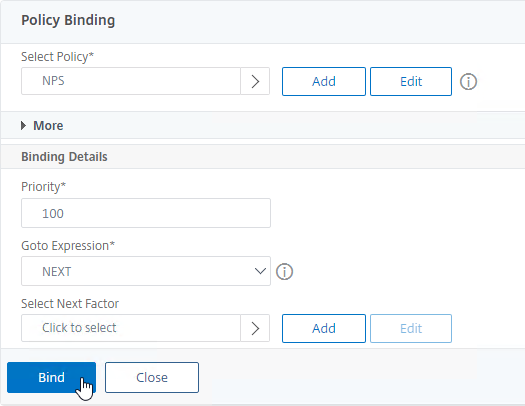
- You can optionally click Add Binding to add more Advanced Authentication Policies to this Policy Label (Factor). If any one of the Authentication Policies succeeds, then nFactor moves to the Next Factor and ignores the remaining Authentication Policies in this factor.

- When done, click Done.

- If you edit the Policy Label you created, notice that it’s not possible to change the Login Schema. The only way to change the Login Schema is to create a new Policy Label.
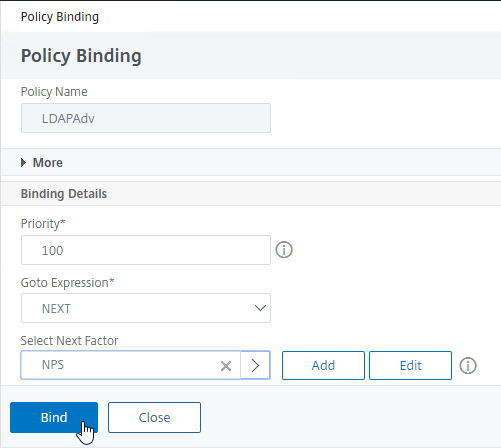
Bind Authentication Policy Label to Next Factor
Once the Policy Label (Factor) is created, you link to it from an existing Authentication Policy binding. You can select a Next Factor (Policy Label) in two places:
- Edit an existing AAA Virtual Server that has an Authentication Policy (first factor) already bound to it and edit the binding to include the Next Factor.
- Edit a different Policy Label, and edit an Advanced Authentication Policy binding to include the Next Factor.
To link to a Policy Label Next Factor from a AAA Virtual Server first factor:
- Edit an existing AAA Virtual Server that has an Advanced Authentication Policy already bound to it.
- On the left, in the Advanced Authentication Policies section, click the existing Authentication Policy bindings.
- Right-click an existing binding, and click Edit Binding.
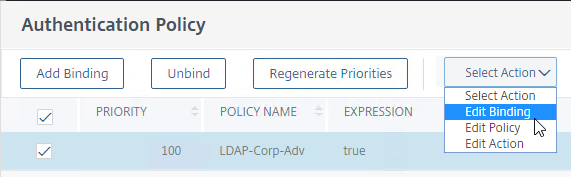
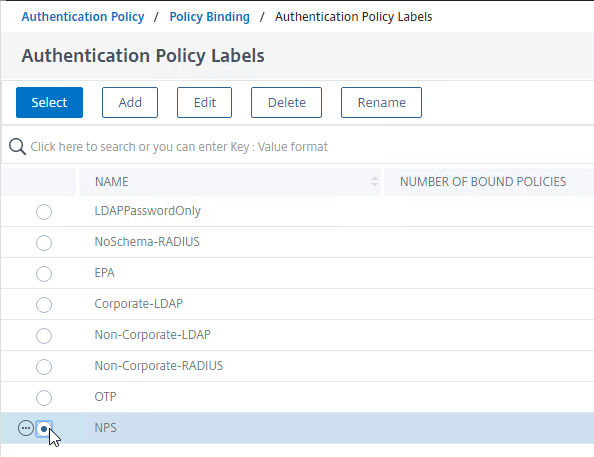
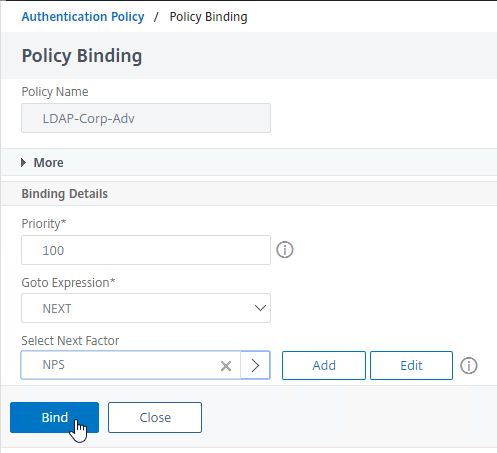
- In the Select Next Factor field, click where it says Click to select.
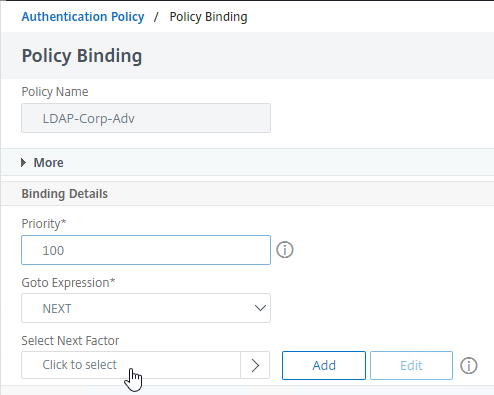
- Click the radio button next to the Policy Label for the Next Factor, and then click the blue Select button at the top of the page.
- Click Bind.
- In the list of bound Authentication Policies, the far right shows the Next Factor.
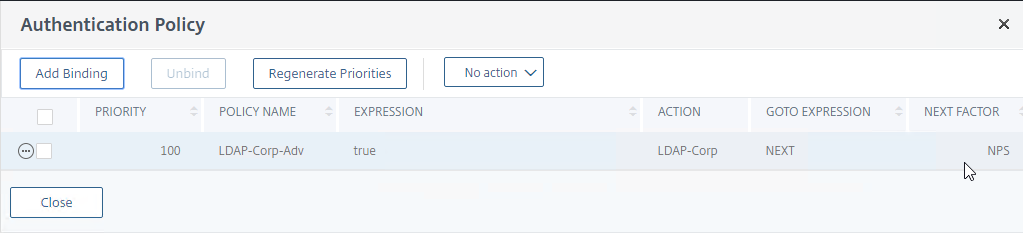
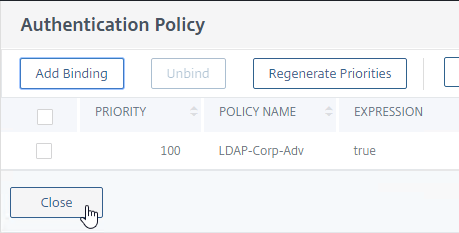
- Click Close.
To link to a Policy Label Next Factor from a different Policy Label:
- Go to Security > AAA – Application Traffic > Policies > Authentication > Advanced Policies > Policy Label.
- On the right, edit a different Policy Label.
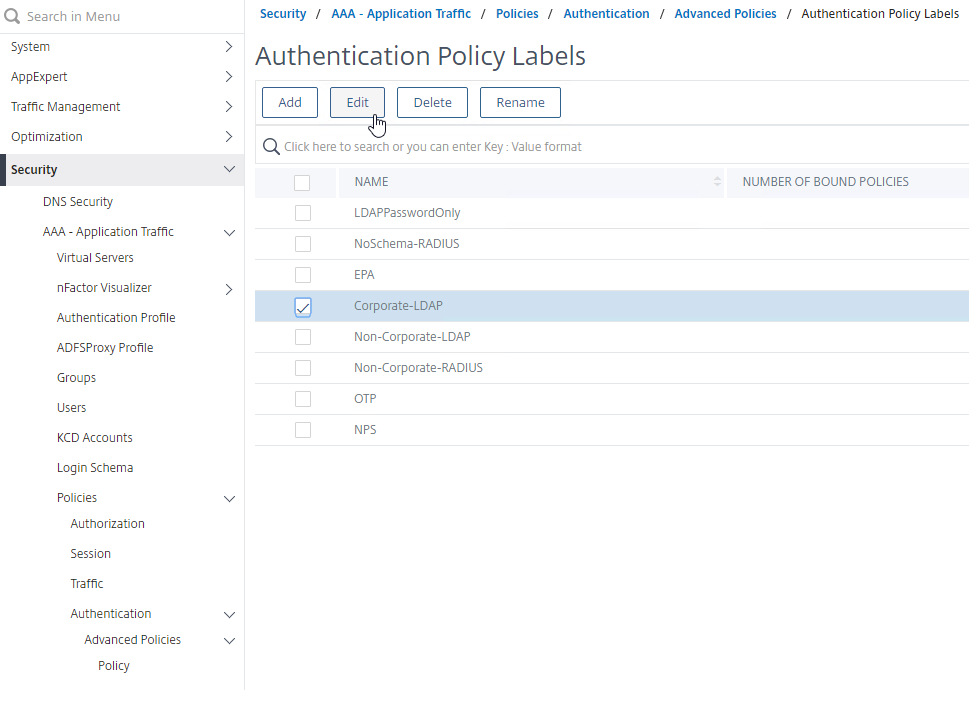
- Right-click an existing Authentication Policy binding and click Edit Binding.
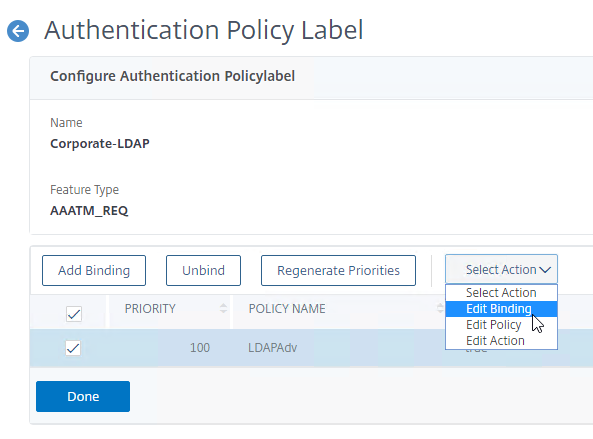
- In the Binding Details section, next to Select Next Factor, click Click to select.

- Click the radio button next to a Policy Label for the next factor, and then click the blue Select button at the top of the window.
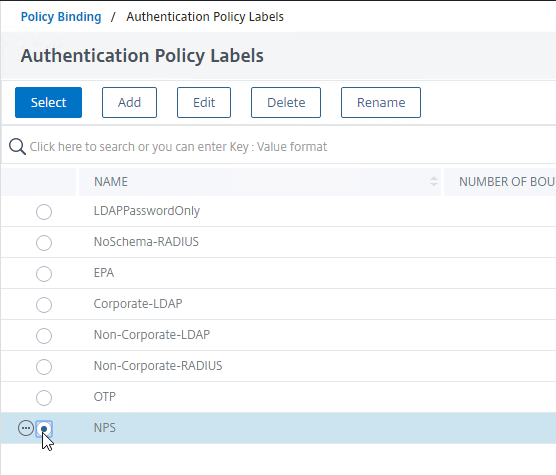
- Click Bind.
- In the list of bound Authentication Policies, on the far right, you can see the configured Next Factor.
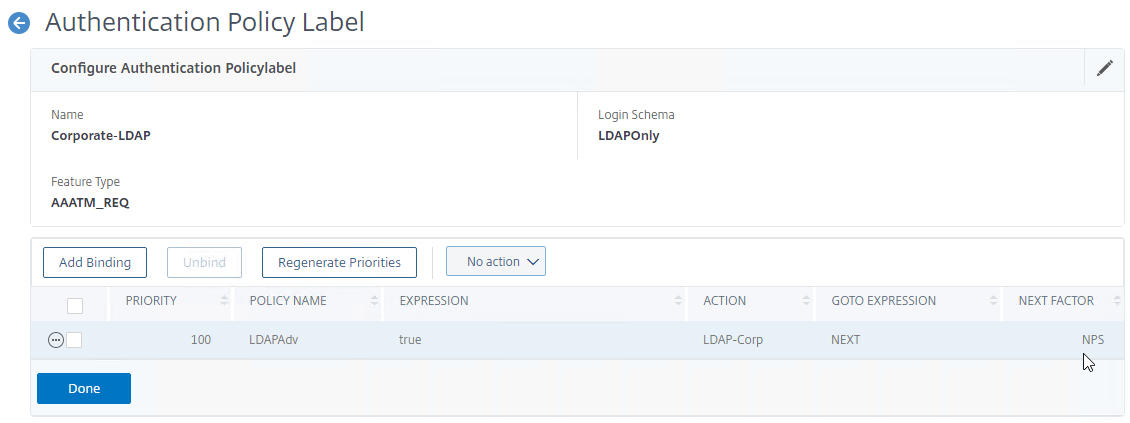
- Click Done to close the Policy Label.
- Repeat linking Policy Labels (Factors) together until your nFactor flow configuration is complete.
nFactor Flow Visualizer
ADC 13 and newer have a nFactor Flow Visualizer that you can use to create flows like this:

Find the Visualizer under Security > AAA – Application Traffic > nFactor Visualizer > nFactor Flows
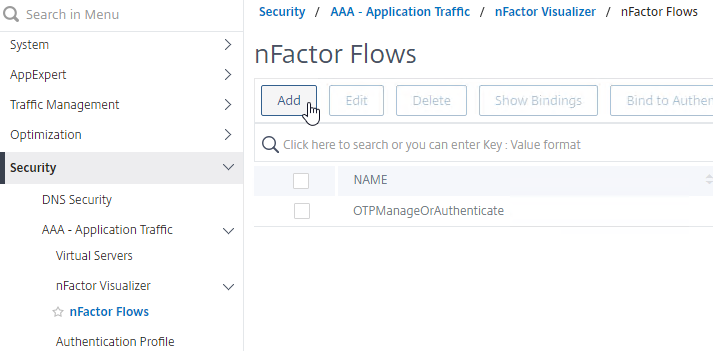
For an example usage of this tool, see Native One Time Passwords (OTP) – Citrix Gateway 13.
Here are some differences for the Visualizer method vs the manual method detailed in this article:
- Manual: First factor without Policy Label – With the manual method, the first factor is bound to the AAA vServer without using a Policy Label.
- Visualizer: First Factor is a Policy Label – The Visualizer creates a Policy Label for the first factor. Then it binds the Policy Label to the AAA vServer.
- Manual: Login Schema Policies for First Factor – With the manual method, you create Login Schema Policies to bind the first factor’s Login Schema to the AAA vServer. Login Schema Policies have expressions that are evaluated to determine if the Login Schema should be shown or not. This lets you bind multiple Login Schemas to the AAA vServer and a policy expression determines which Login Schema is shown to the user.
- Visualizer: no Login Schema Policies – The Visualizer does not support Login Schema Policies and thus the Login Schema configured for a Factor is always shown.
For more information, see nFactor Visualizer for simplified configuration at Citrix Docs.
nFactor for Citrix Gateway
All nFactor configuration is performed in the menu under Security > AAA – Application Traffic. When done, your nFactor Flow should be bound to a AAA vServer.
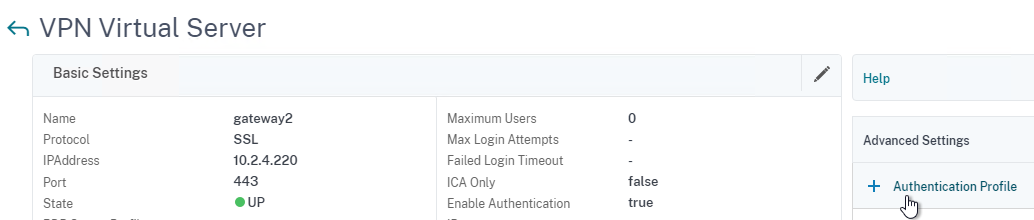
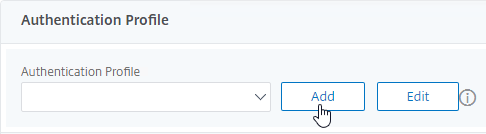
To enable nFactor for a Citrix Gateway Virtual Server, you simply create an Authentication Profile and bind it to the Gateway Virtual Server. If you unbind the Authentication Profile from the Gateway Virtual Server, then nFactor is no longer used by that Gateway.
AAA Authentication Profile
Authentication Profile links a AAA Virtual Server to Citrix Gateway and enables nFactor on Citrix Gateway.
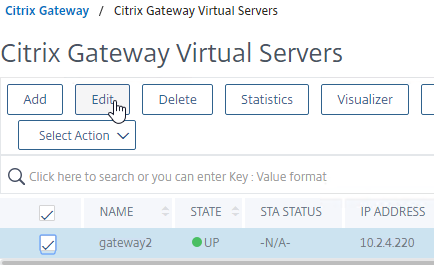
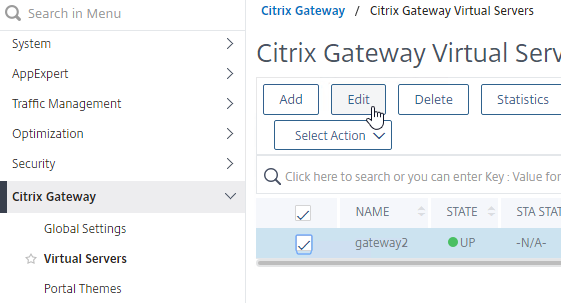
- Go to Citrix Gateway > Virtual Servers.
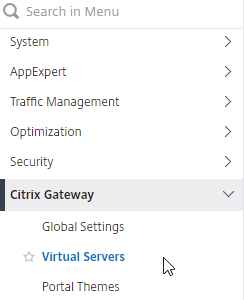
- On the right, edit an existing Citrix Gateway Virtual Server.
- On the right, in the Advanced Settings column, click Authentication Profile.
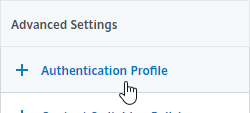
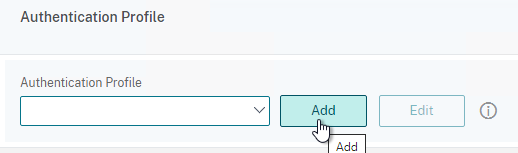
- On the bottom left, click the Add button next to the Authentication Profile drop-down.
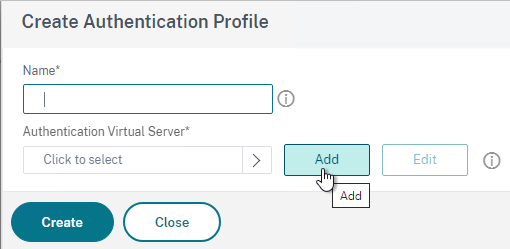
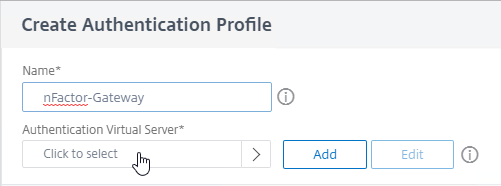
- Give the Authentication Profile a name.
- In the Authentication Virtual Server field, click where it says Click to select.
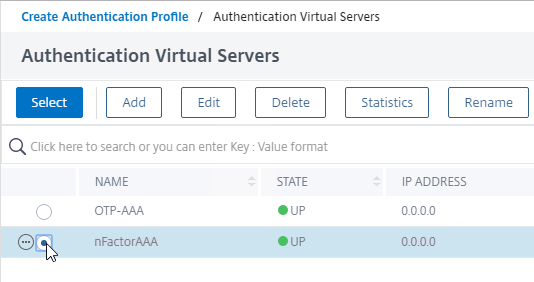
- Click the radio button next to the AAA Virtual Server that has nFactor configured. The AAA Virtual Server does not need an IP address. Then click the blue Select button at the top of the page.
- Then click Create.
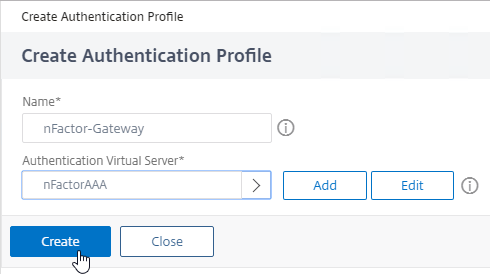
- And click OK to close the Authentication Profile section. The Authentication Profile isn’t enabled until you click this OK button.
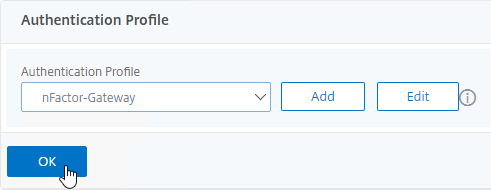
- Note: the Authentication Profile enables nFactor, which overrides any authentication policies that are bound to the Gateway Virtual Server.
- If one of your Factors is client certificates, then you’ll need to configure SSL Parameters and CA certificate as detailed in the next section.
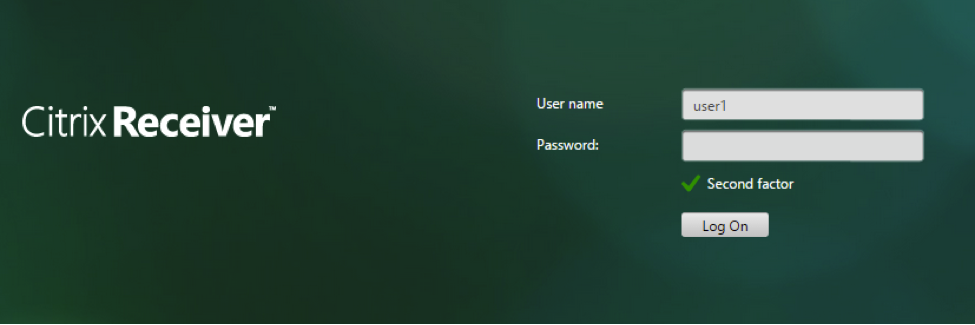
- When you browse to your Gateway, you’ll see the Login Schema that is bound to the AAA Virtual Server.
- Workspace app 1809 and newer with Gateway/ADC 12.1 build 49 and newer should support nFactor authentication. Older clients with older builds do not support nFactor, so those users will have to use a web browser.
Gateway and Client Certificate Authentication
If one of your authentication Factors is certificate, then you must perform some SSL configuration on the Citrix Gateway Virtual Server:
- Go to Traffic Management > SSL > Certificates > CA Certificates, and install the root certificate for the issuer of the client certificates. Certificate Authority certificates do not need key files.
- If default SSL Profiles are enabled, then you should have already created an SSL Profile that has Client Authentication enabled.
- Go to Citrix Gateway > Virtual Servers, and edit an existing Citrix Gateway Virtual Server that is enabled for nFactor.

- If default SSL Profiles are enabled:
- Scroll down to the SSL Profile section, and click the pencil icon.

- In the SSL Profile drop-down, select the SSL Profile that has Client Authentication enabled and set to OPTIONAL. Then click OK.
- Scroll down to the SSL Profile section, and click the pencil icon.
- If default SSL Profiles are not enabled:
- On the left, in the SSL Parameters section, click the pencil icon.
- Check the box next to Client Authentication.
- Make sure Client Certificate drop-down is set to Optional, and click OK.

- On the left, in the SSL Parameters section, click the pencil icon.
- For both Default SSL Profile and SSL Parameters, on the left, in the Certificates section, click where it says No CA Certificate.
- In the CA Certificate Binding page, click where it says Click to select.
- Click the radio button next to the root certificate for the issuer of the client certificates, and click the blue Select button at the top of the page.
- Click Bind.
- You might have to also bind any Intermediate CA Certificates that issued the client certificates.
Traffic Policy for nFactor Single Sign-on to StoreFront
When performing Single Sign-on to StoreFront, nFactor defaults to using the last entered password. If LDAP is not the last entered password (e.g. RADIUS), then you need to create a Traffic Policy/Profile to override the default nFactor behavior.
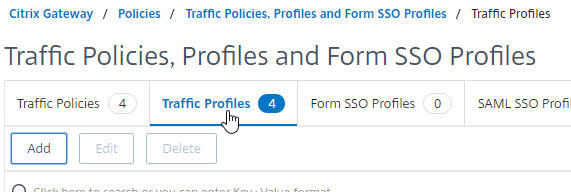
- Go to Citrix Gateway > Policies > Traffic.
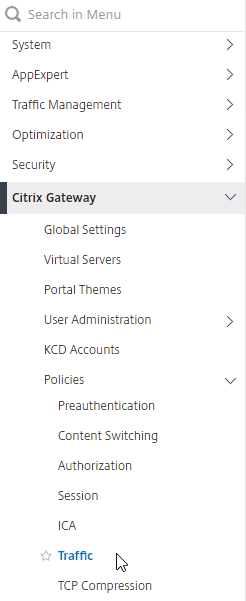
- On the right, switch to the tab named Traffic Profiles.
- Click Add.
- Give the Traffic Profile a name.
- In the Protocol section, select HTTP.
- Set the Single Sign-on drop-down to ON. Scroll down.
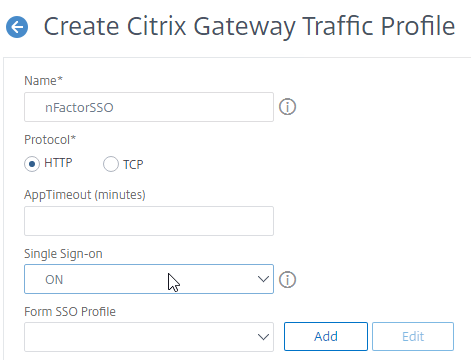
- In the SSO Expression fields, enter an AAA.USER.ATTRIBUTE(#) expression that matches the indexes specified in the Login Schema.
- Click Create.
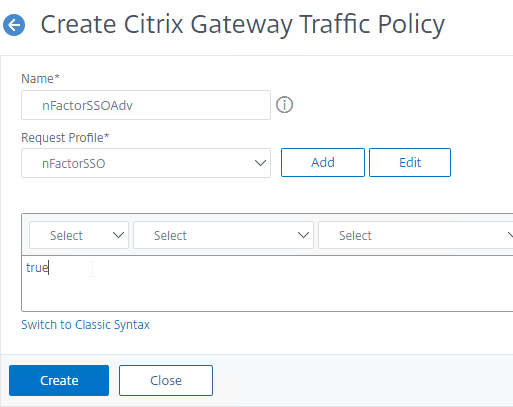
- On the right, switch to the tab named Traffic Policies, and click Add.
- Give the policy a name.
- Select the previously created Traffic Profile.
- Enter an Advanced Expression (e.g. true), and click Create.
- Edit an existing Citrix Gateway Virtual Server.
- Scroll down to the Policies section and click the plus icon.

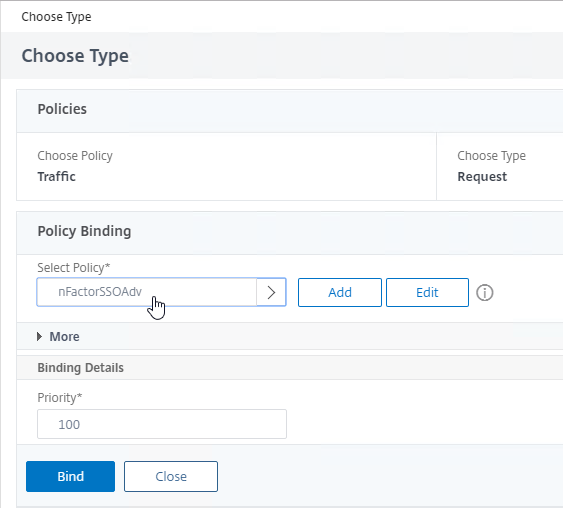
- In the Choose Type page, select Traffic > Request, and click Continue.
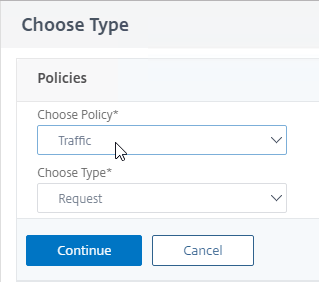
- Select the previously created Traffic Policy, and click Bind.
Sample Configurations
From Citrix Docs: Sample deployments using nFactor authentication:
- Get two passwords up-front, then pass-through the second password to the next factor. Read
- Username and 2 passwords, then group extraction in third factor. Read
- Configure nFactor to process the second password before the first password, Read
- Modify first factor username for use by second factor. Read
- NO_AUTHN authentication policy expression checks first factor POST Body login value for UPN format. If true, Next Factor is noschema Login Schema with User Expression that transforms the HTTP.REQ.USER.NAME to DOMAIN\Username before passing to second factor authentication policy.
- Group extraction followed by certificate or LDAP authentication, based on group membership. Read
- SAML followed by LDAP or certificate authentication, based on attributes extracted during SAML. Read
- SAML in first factor, followed by group extraction, and then LDAP or certificate authentication, based on groups extracted. Read
- Capture email address in first factor, and then choose one of multiple SAML iDP based on email address suffix. Read (Manuel Kolloff)
- Prefill user name from certificate. Read
- Certificate authentication followed by group extraction for 401 enabled traffic management virtual servers. Read
- Certificate fallback to LDAP in same cascade; one virtual server for both certificate and LDAP authentication. Read
- LDAP in first factor and WebAuth in second factor. Read
- WebAuth in first factor, LDAP in second factor. Read
- Domain drop down in first factor, then different policy evaluations based on selected domain. Read

- Domain drop-down, then send Domain\Username to RADIUS. Read
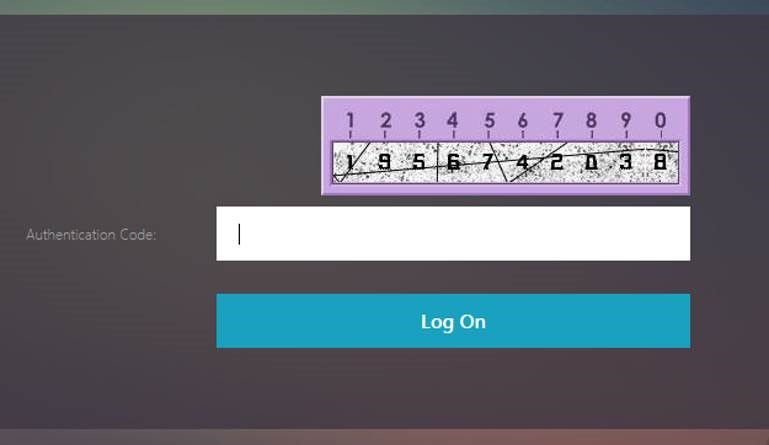
- ADC 13 has a CAPTCHA authentication action instead of WEBAUTH as described in the following reCAPTCHA guides. (source = Graham Constantine in the comments) 💡
- CTX225938 nFactor – Customizing UI to Display Images – e.g. Swivel
- Use EPA (Endpoint Analysis) in nFactor flows . See CTX223597 Concepts and Entities Used for EPA in nFactor Authentication Through NetScaler.
- Configure Post-Authentication EPA (Endpoint Analysis) Scan as a Factor. Read
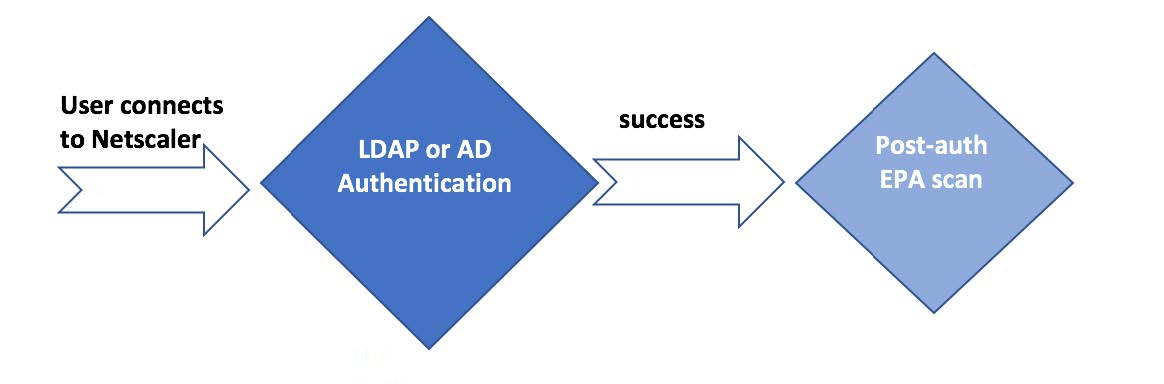
- Configure Pre-Authentication EPA (Endpoint Analysis) Scan as a Factor. Read
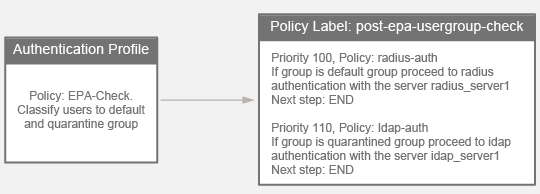
- Configure EPA domain check combined with Smartaccess feature. Read

- Configure EULA (End User License Agreement) as an Authentication Factor. Read
- Show a drop-down box in the logon form and automatically hide or show certain fields based on drop-down selection. Read

- Step-up authentication – i.e. one Unified Gateway website needs single factor, while other website needs multi-factor. Read
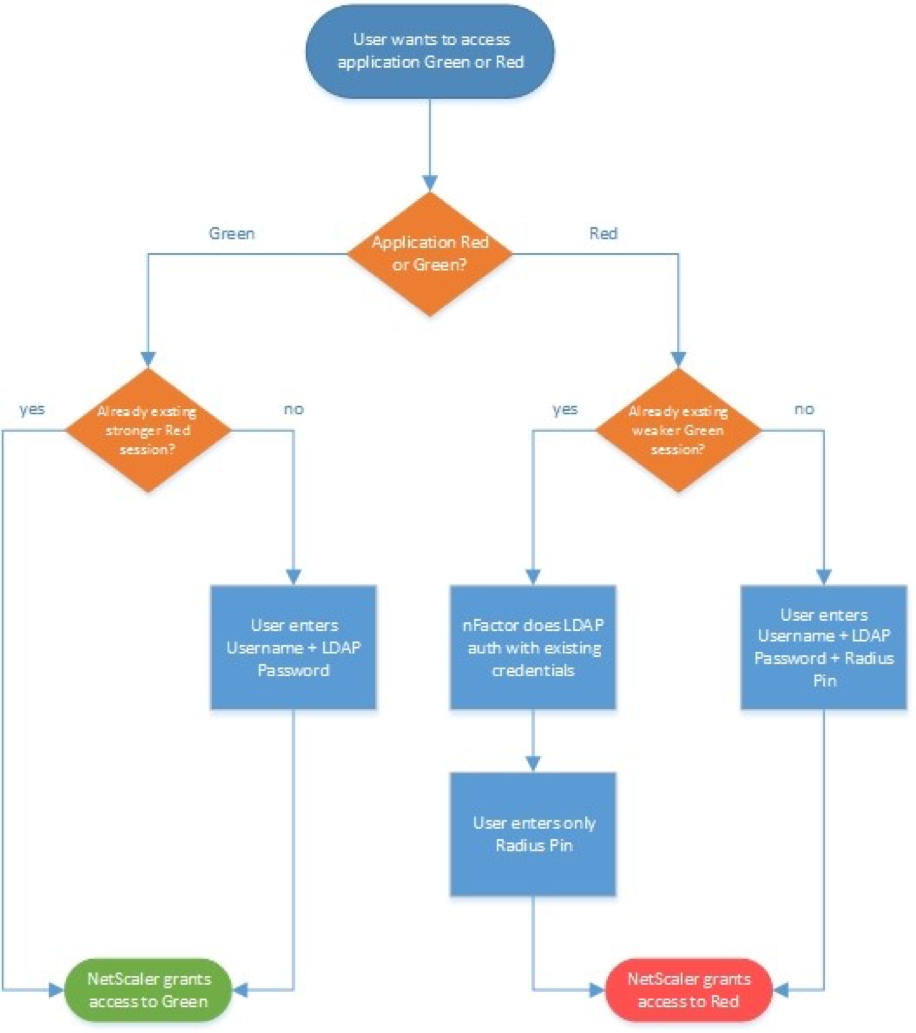
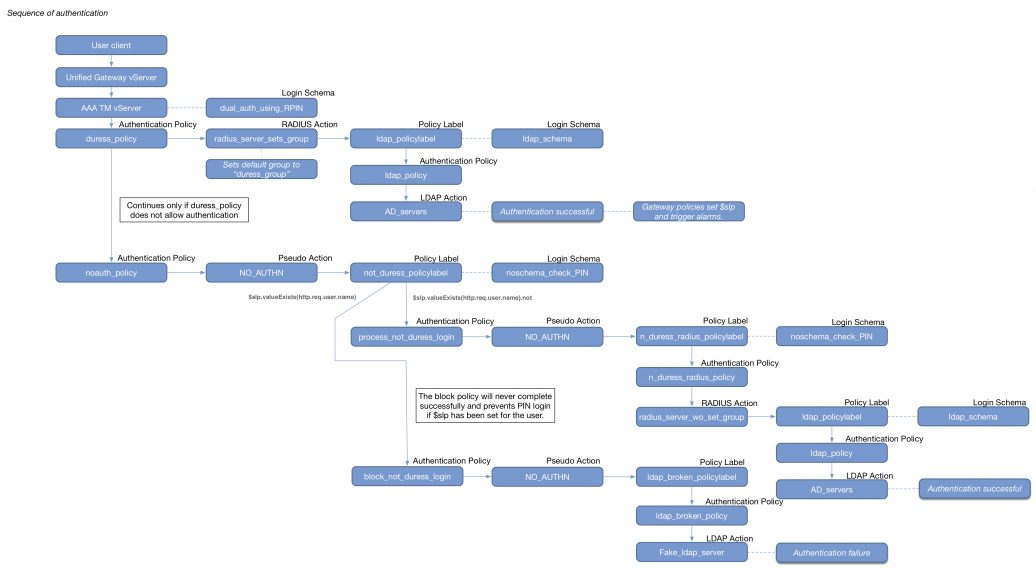
- RADIUS authentication with reversed PIN – if user enters reversed PIN, then user is under duress. This sample configuration has some interesting components: Read
- Policy Extension Function using the Lua language
- Usage = HTTP.REQ.BODY(1000).TYPECAST_NVLIST_T(’=’,’&’).VALUE(”passwd1”).RPIN
- Citrix ADC Variable of type Map with Expiration timer
- Responder to set the variable
- Variable identifies duress state for four hours
- Custom syslog message (audit messageaction) triggered by a Responder
- Default Authentication Group to put duressed user on site/farm with Session Recording enabled
- nFactor sequence:
- Policy Extension Function using the Lua language
- nFactor Extensibility at Citrix Docs explains how to use JavaScript to add custom login labels, add custom login credentials, customizing UI displays and so on.
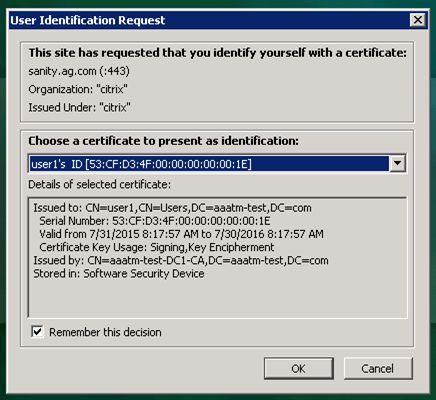
Certificate auth: If Successful, LDAP only. If Failure, LDAP+RADIUS
This scenario is described in Citrix Blog Post Configuration Notes on nFactor
The authentication process flows like this:
- User connects to Citrix Gateway.
- Citrix Gateway asks user for certificate.
- If user selects a certificate, Citrix Gateway compares certificate signature to the CA certificate that is bound to the Citrix Gateway. If it doesn’t match, then user certificate is ignored.
- Bound to the Citrix Gateway Virtual Server is an Authentication Profile, which links Citrix Gateway to AAA nFactor.
- Certificate authentication: The lowest priority number authentication policy on the AAA Virtual Server is Certificate. If there’s a valid user certificate:
- Extract the user’s userPrincipalName from the certificate.
- Next Factor = policy label that displays a logon screen (Single-factor Login Schema)
- The username field is pre-populated with the userPrincipalName attribute extracted from the certificate.
- User is prompted to enter the LDAP password only.
- LDAP policy/server is configured to use userPrincipalName to login to LDAP.
- If successful, Citrix Gateway authentication is complete. Next step is to Single Sign-on to StoreFront.
- If LDAP authentication fails, then Citrix Gateway authentication fails, and the user is prompted to try LDAP-only authentication again.
- LDAP authentication: If certificate authentication fails, try next authentication policy bound to the AAA Virtual Server, which is a different LDAP Policy.
- Bound to the AAA Virtual Server is a Dual Factor Login Schema that asks for username, LDAP password, and RADIUS password.
- LDAP policy/server is configured to use sAMAccountName to login to LDAP. SAMAccountName means users don’t have to enter full userPrincipalName.
- If LDAP authentication is successful:
- Put username in Credential Index 1 and put password in Credential Index 2. These will later be used by a Traffic Policy to Single Sign-on to StoreFront.
- Proceed to next factor (Policy Label), which is RADIUS.
- If LDAP authentication fails, Citrix Gateway login fails, and the user is prompted to try two-factor authentication again.
- RADIUS authentication: the second factor Policy Label is configured with Noschema. This means no additional logon form is displayed because the RADIUS password was already collected in the previous factor.
- When multiple passwords are collected, they are tried in order. The first password was used by the previous factor. The second password is tried by this factor (Policy Label).
- RADIUS policy/profile attempts authentication.
- If RADIUS authentication is successful, Citrix Gateway authentication is complete. Next step is Single Sign-on to StoreFront.
- If RADIUS authentication fails, Citrix Gateway login fails, and the user is prompted to try two-factor authentication again.
- Single Sign-on to StoreFront: Citrix Gateway uses the last password collected by nFactor to Single Sign-on with StoreFront. If the last password is LDAP, then no additional configuration is needed. If the last password is not LDAP, then a Traffic Policy/Profile is needed.
- Bound to the Citrix Gateway Virtual Server is a Traffic Policy.
- The Traffic Policy/Profile users Credential Index 1 for username and Credential Index 2 for Password. These are the same indexes configured in the Dual Factor Login Schema.
The order of configuration shown below doesn’t match the authentication flow because some objects have to be created before others. This is the bottom-up approach.
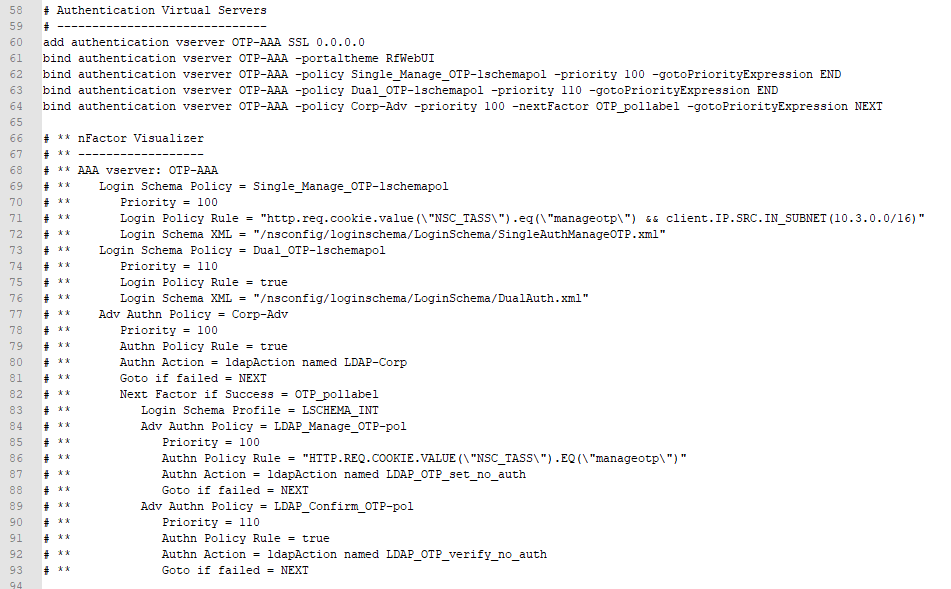
# Create Auth vServer, bind server cert, bind CA cert for client certificates
# Enable Optional client certificates
add authentication vserver nFactorAAA SSL 0.0.0.0 443
bind ssl vserver nFactorAAA -certkeyName WildCorpCom
bind ssl vserver nFactorAAA -certkeyName CorpRoot -CA -ocspCheck Optional
set ssl vserver nFactorAAA -clientAuth ENABLED -clientCert Optional -ssl3 DISABLED

# Create auth policy for LDAP-UPN. UPN is extracted from certificate.
add authentication ldapAction Corp-UserPrincipalName -serverIP 10.2.2.220 -serverPort 636 -ldapBase "dc=corp,dc=local" -ldapBindDn "corp\\ctxsvc" -ldapBindDnPassword "MyPassword" -ldapLoginName userPrincipalName -groupAttrName memberOf -subAttributeName CN -secType SSL -passwdChange ENABLED
add authentication Policy Corp-UserPrincipalName -rule true -action Corp-UserPrincipalName

# Create PolicyLabel LDAPPasswordOnly with Single-factor Login Schema
# Login Schema has InitialValue with username from certificate.
add authentication loginSchema SingleAuth -authenticationSchema "/nsconfig/loginschema/LoginSchema/SingleAuth-Corp.xml"
add authentication policylabel LDAPPasswordOnly -loginSchema SingleAuth
bind authentication policylabel LDAPPasswordOnly -policyName Corp-UserPrincipalName -priority 100 -gotoPriorityExpression NEXT

# Create Cert policy and bind to AAA vServer with LDAPPasswordOnly PolicyLabel as Next Factor
# Cert policy must have lower priority number (higher priority) than LDAP-SAM policy
# Cert is evaluated first. If succeed, ask for LDAP password. If fails, ask for two factor.
add authentication certAction Cert_Auth_Profile -userNameField SubjectAltName:PrincipalName
add authentication Policy Cert_Auth_Policy -rule true -action Cert_Auth_Profile
bind authentication vserver nFactorAAA -policy Cert_Auth_Policy -priority 100 -nextFactor LDAPPasswordOnly -gotoPriorityExpression NEXT

# Create LDAP-SAM Auth Policy for two-factor
# Only evaluated if cert auth fails. Login Schema asks for user, password, and passcode.
add authentication ldapAction Corp-Gateway -serverIP 10.2.2.220 -serverPort 636 -ldapBase "dc=corp,dc=local" -ldapBindDn "corp\\ctxsvc" -ldapBindDnPassword "MyPassword" -ldapLoginName samaccountname -groupAttrName memberOf -subAttributeName CN -secType SSL -passwdChange ENABLED
add authentication Policy Corp-SAMAccountName -rule true -action Corp-Gateway

# Create RADIUS Auth Policy for two-factor
add authentication radiusAction RADIUS-Action -serverIP 10.2.2.42 -serverPort 1812 -radKey MyKey
add authentication Policy RADIUS-Policy -rule true -action RADIUS-Action

# Create Dual-factor Login Schema and bind directly to AAA vServer
# This Login Schema is only shown if Cert auth fails
add authentication loginSchema DualAuth -authenticationSchema "/nsconfig/loginschema/LoginSchema/DualAuth.xml" -userCredentialIndex 1 -passwordCredentialIndex 2
add authentication loginSchemaPolicy DualAuth -rule true -action DualAuth
bind authentication vserver nFactorAAA -policy DualAuth -priority 100 -gotoPriorityExpression END

# Create RADIUS Policy Label with noschema and RADIUS Auth Policy
# Already got passcode from previous factor so don't show Login Schema again
add authentication loginSchema Noschema -authenticationSchema noschema
add authentication policylabel NoSchema-RADIUS -loginSchema Noschema
bind authentication policylabel NoSchema-RADIUS -policyName RADIUS-Policy -priority 100 -gotoPriorityExpression NEXT

# Bind LDAP-SAM Auth Policy to AAA vServer with RADIUS as next factor
# LDAP-SAM Auth Policy must have higher priority number (lower priority) than Cert Policy
bind authentication vserver nFactorAAA -policy Corp-SAMAccountName -priority 110 -nextFactor NoSchema-RADIUS -gotoPriorityExpression NEXT

# Create Authentication Profile to link AAA with Gateway. Bind to Gateway.
add authentication authnProfile nFactor -authnVsName nFactorAAA -AuthenticationHost aaa.corp.com
add vpn vserver gateway.corp.com SSL 10.2.2.220 443 -icaOnly ON -dtls ON -Listenpolicy NONE -tcpProfileName nstcp_default_XA_XD_profile -appflowLog ENABLED -authnProfile nFactor

# Enable Optional Client certs on Gateway
set ssl vserver gateway.corp.com -clientAuth ENABLED -clientCert Optional -ssl3 DISABLED
bind ssl vserver gateway.corp.com -certkeyName CorpRoot -CA -ocspCheck Optional

# Create Traffic Policy to SSON to StoreFront. Bind to Gateway.
add vpn trafficAction nFactorSSO http -kcdAccount NONE -userExpression "http.req.user.attribute(1)" -passwdExpression "http.req.user.attribute(2)"
add vpn trafficPolicy nFactorSSO ns_true nFactorSSO
bind vpn vserver gateway.corp.com -policy nFactorSSO -priority 100
Group Extraction, followed by LDAP (Active Directory), or Azure MFA (NPS)
Also see Mark DePalma Running RSA SecurID/Azure MFA side-by-side using an AD group on NetScaler Gateway 💡
Azure MFA is available as a plug-in for Microsoft Network Policy Server (NPS), which is a Microsoft RADIUS server and a built-in Windows Server Role.
NPS performs both AD authentication and Azure MFA authentication. Citrix Gateway sends the user’s AD password to NPS. NPS verifies AD, and then the NPS Azure MFA plug-in calls the user (or push notification to the user). If both AD and MFA are successful, then NPS sends back RADIUS-Accept.
This sample nFactor configuration will first ask for username only. Depending on the user’s group membership and client IP address, nFactor will either perform RADIUS NPS authentication (multi-factor), or nFactor will do LDAP only (single-factor).
Summary:
- First factor Login Schema asks for Username only.
- LDAP Group Extraction (with Authentication disabled) reads the user’s groups from AD.
- Second factor checks for group membership and sends to one of two different third factors.
- If user is in LDAP Group, or Client IP is on internal network, then perform LDAP-only authentication.
- Login schema asks for AD password.
- LDAP Policy authenticates with LDAP Server (Active Directory).
- Otherwise, perform RADIUS (two-factor) authentication.
- Login schema asks for AD password.
- Note: NPS with MFA plugin only needs the AD password. Alternatively, you could use a Login Schema that asks for both LDAP password and RADIUS password.
- RADIUS Policy uses the entered AD password to authenticate to Microsoft NPS and Azure MFA.
- Login schema asks for AD password.
CLI Commands. Note, these objects are created in the required order, which is backwards from how you would want to configure them.
- Add cert for AAA vServer. Link the cert to Intermediate.
add ssl certKey WildcardCorpCom -cert WildcardCorpCom.pfx -key WildcardCorpCom.pfx -inform PFX -passcrypt "myPassword"

link ssl certKey WildcardCorpCom Intermediate
- Enable AAA feature if not already enabled.
enable ns feature AAA
- Create first factor LDAP Action (LDAP Server) and LDAP Policy (expression) for Group Extraction. Authentication is disabled. This is the first factor that is bound directly to the AAA vServer.
add authentication ldapAction LDAP-Corp-GroupExtract -serverIP 10.2.2.11 -serverPort 636 -ldapBase "dc=corp,dc=local" -ldapBindDn ctxsvc@corp.local -ldapBindDnPassword MyPassword -ldapLoginName sAMAccountName -groupAttrName memberOf -subAttributeName cn -secType SSL -authentication DISABLED

add authentication Policy LDAP-Corp-GroupExtract -rule true -action LDAP-Corp-GroupExtract
- Create a third-factor LDAP Action (LDAP Server) and Authentication Policy (expression) for Active Directory Authentication. This is the authentication factor if user is in the LDAP Users group.
add authentication ldapAction LDAP-Corp -serverIP 10.2.2.11 -serverPort 636 -ldapBase "dc=corp,dc=local" -ldapBindDn ctxsvc@corp.local -ldapBindDnPassword MyPassword -ldapLoginName sAMAccountName -groupAttrName memberOf -subAttributeName cn -secType SSL -passwdChange ENABLED

add authentication Policy LDAP-Corp -rule true -action LDAP-Corp
- Create a third-factor RADIUS Action (RADIUS Server) and Authentication Policy (expression) for NPS.
add authentication radiusAction NPS -serverIP 10.2.2.42 -serverPort 1812 -radKey MySecret

add authentication Policy NPS -rule true -action NPS
- Create the second factor NO_AUTHN authentication policies to determine the next factor based on the user’s group membership. NO_AUTHN means don’t authenticate. Instead, these policies will have a Next Factor that points to the Authentication Policies that we created earlier. If the policy expression is true, then go to Next Factor. Next Factor is configured later when binding these policies to the second factor PolicyLabel. Note: the group name is case sensitive and must match the Active Directory group name.
add authentication Policy LDAP-Only -rule "http.REQ.USER.IS_MEMBER_OF(\"LDAP\") || client.IP.SRC.IN_SUBNET(10.2.2.0/24)" -action NO_AUTHN

add authentication Policy TwoFactor -rule "client.IP.SRC.IN_SUBNET(10.2.2.0/24).NOT" -action NO_AUTHN
- Create first factor Login Schema Profile for username-only group extraction. You can copy the built-in OnlyUsername.xml and modify it with your desired labels. Since this Login Schema Profile is bound to the AAA vServer, it needs a Login Schema Policy (expression). The other two Login Schema Profiles are bound to PolicyLabels and thus don’t need Login Schema Policies.
add authentication loginSchema OnlyUsername -authenticationSchema "/nsconfig/loginschema/LoginSchema/OnlyUsername.xml"

add authentication loginSchemaPolicy OnlyUsername -rule true -action OnlyUsername
- Create third factor Login Schema Profile for AD Authentication. The .xml file is copied from the built-in PrefillUserFromExpr.xml but with modified labels for AD authentication. The username is pre-filled in from the first factor.
add authentication loginSchema LDAPPasswordOnly -authenticationSchema "/nsconfig/loginschema/LDAPPassword.xml"
- Create third factor Login Schema Profile for NPS Authentication. The .xml file is copied from the built-in PrefillUserFromExpr.xml but with modified labels for NPS authentication. The username is pre-filled in from the first factor.
add authentication loginSchema NPSPasswordOnly -authenticationSchema "/nsconfig/loginschema/NPSPassword.xml"
- Create third factor PolicyLabel for Active Directory authentication with Active Directory Login Schema and Active Directory Authentication Policy.
add authentication policylabel LDAPPasswordAuth -loginSchema LDAPPasswordOnly

bind authentication policylabel LDAPPasswordAuth -policyName LDAP-Corp -priority 100 -gotoPriorityExpression NEXT
- Create third factor PolicyLabel for NPS authentication with NPS Login Schema and NPS Authentication Policy.
add authentication policylabel NPSPasswordAuth -loginSchema NPSPasswordOnly

bind authentication policylabel NPSPasswordAuth -policyName NPS -priority 100 -gotoPriorityExpression NEXT
- Create second factor PolicyLabel with Policies that choose Next Factor. This PolicyLabel is processed before the two we just created.
add authentication policylabel CheckForAuthType -loginSchema LSCHEMA_INT

bind authentication policylabel CheckForAuthType -policyName TwoFactor -priority 90 -gotoPriorityExpression NEXT -nextFactor NPSPasswordAuth

bind authentication policylabel CheckForAuthType -policyName LDAP-Only -priority 100 -gotoPriorityExpression NEXT -nextFactor LDAPPasswordAuth
- Create AAA vServer. Bind Login Schema Policy (username only) and Group Extraction Policy.
add authentication vserver AAA SSL 10.x.x.218 443
bind authentication vserver AAA -policy OnlyUsername -priority 100 -gotoPriorityExpression END
bind authentication vserver AAA -policy LDAP-Corp-GroupExtract -priority 100 -nextFactor CheckForAuthType -gotoPriorityExpression NEXT
- Perform additional steps not detailed here:
- For Traffic Management:
- Create a Session Policy and bind it to the AAA vServer.
- Enable authentication on the Load Balancing or Content Switching vServer.
- For Citrix Gateway, create an Authentication Profile, and bind it to the Gateway vServer.
- For Traffic Management:
Hi:
I have been using drop down for domain selection for years in nfactor flow and default to the most common LDAP domain (of 5). A question that comes up quite often with the customer… Is there a way to have the default set to last drop down selection? I’m thinking there would have to be a stored cookie involved but no idea how the nfactor flow might read this. All ideas welcome, thanks.
Hi Phil,
We are just preparing authentication with similar approach. In our case I am to prepare single point of login to multiple accounts/domains farms (currently 4 different logins – from 7 domains). All accounts have in all domains have filled custom AD attribute with some generic user ID (taken as user id from central IDP). I use this id to match MFA (PKI/RSA) with account of target domain/account and as second factor I ask for password with prefilled username.
I want to allow user to choose target farm/domain using selection list (like domain list).
I found this article, chapter – show hide fields. Core functionality is based on javascript.
https://docs.netscaler.com/en-us/citrix-adc/current-release/aaa-tm/authentication-methods/multi-factor-nfactor-authentication/nfactor-extensibility.html#customize-netscaler-nfactor-logon-form-to-show-or-hide-fields
Our approach is to collect all pairs farm/domain:username in user attribute let’s say number 6 (taking IDP userid and do cascading ldap search for account with same id in AD attribute) pass content of this attribute in hidden field (prefill (AAA.USR.ATTRIBUTE(6))) and than javascript code will modify listbox entity appropriately and with list box change username will be preffilled with corresponding entry.
We will use cookie as well to select favorite farm/domain of user (some users are accessing just jump/admin farm not others).
Back to your case: javascript code will than select list item based on cookie content.
I am setting up LDPA + NPS(MS) as 2nd factor, only primary schema bound for singleauth, for 2nd NPS factor no schema. It works, however I would need to change the “Password” label to Passcode on OTP login page. I tried configuring schema, it reflects properly and shows the schema values as “passcode” but when I submit the passcode, it redirecting back to password 2nd factor page again, also it accepts any random number as passcode.
Is there anyway to fix this?
Have you been able to get the new authentication policy bind/nfactor page to work?
I find it unintuitive, so I prefer to use the older binding method. To unlock it, I use the CLI to bind an authentication policy to the AAA vServer. Then I can use the GUI to bind policies using the older method. I think Citrix is planning to add a toggle in the visualizer to switch back to the older method.
Hi there
I try to get Nested Group Extraction work on LDAP Group Extraction. I have LDAP Group Extraction configured as first factor. As long the user is a direct member of the group, it works. As soon the user is a member of a nested group, LDAP Group Extraction fails with “No active policy during authentication”. I tried with enabling Nested Group Extraction on the Group Extraction Policy, but it don’t work. Do you have a tip?
Best regards, John
Did you enable Nested Group Extraction in the LDAP Policy/Server? Click More to see it.
Yes, Nested Group Extraction is enabled with Maximum Nesting Level 2 without Group Search Filter. Group Name Identifier is “SAMAccountName”, Group Search Attribute is set to “memberOf” and Group Search Sub-Attribute is set to “CN”
Are you able to find requested group going thru user’s memberof?
If not, than most probably the user is from different domain in and group is local security. You can find user from ‘group side’ but not the group from user side for user pro other domain.
I tried to work around this situation and found no solution for it – see https://stackoverflow.com/questions/12562275/ldap-nested-group-membership-filter.
Hi Petr
There is only one domain. I tried with the group search filter, but as soon I add the search filter with the identifier, group extraction won’t work anymore (it ends with “No active policy during authentication”)
Ok, in case it is just single domain than it is other issue.
I always test more complex LDAP queries using LDP.exe, and or dsac.exe switching to LDAP mode search – preparing search sequence for search field in LDAP action can be tricky – I use very often such basic sequence, to check that account is not disabled ‘!(userAccountControl:1.2.840.113556.1.4.803:=2)’ ADC extend this with e.g. (&(samaccountname=)()), or another filter sequence extended by checking that looked for account is really user account and not something else (in this case I am looking for user using email attribute, which is part of contact AD object as well) ‘&(!(userAccountControl:1.2.840.113556.1.4.803:=2))(ObjectClass=user)’
Looking at /tmp/aaad.debug log may leads you to find the issue.
ADC record in log ldap query being used during authentication sequence.
May be search base does not match groups locations, all should be seen in this log and it is quite easily reproducible in above applications.
Hi Carl,
We have the following requirement:
UPN and Password + Azure MFA/NPS – users must approve access on their mobile phones.
This works fine but users wanted something to tell them to check their phones for the approval request.
I decided to move them to nFactor and achieved this by modifying the landing page – chose a simple USername and password loginscheme, modified the text from First Factor to Please check your phones. Bound the MFA policy as a 2nd factor/policy label, and that works.
Now I have another client that wants the same experience, but acheived with a 2nd page that tells them “Please check your phone” rather than on the landing page. Tried to use 1st factor – LDAP policy, 2nd factor – EULA message with no auth policy, 3d factor MFA policy. However, when I get to the EULA page, clicking on the Continue button shows this error “Try again after some time or contact your help desk” and cant move on to the next factor. Is what I want to acheived possible at all?
Thank you in advance.
Try setting the auth policy binding to NEXT and then bind a NoAuth policy after it at the same factor.
Hey Carl,
Thanks for this write up! I thought I would let you know the link for setting up EULA no longer works. There appears to be two older support articles, not sure how they compare with the one you linked to.
Trying to figure this out, wasn’t sure if either or both of these links are usable.
Here is what you link to that doesn’t seem to exist anymore:
https://support.citrix.com/article/CTX226488
Here are the two I found:
https://support.citrix.com/article/CTX223524
https://support.citrix.com/article/CTX219625
Thanks for pointing out the broken link.
No problem,
I think I may have found the right link! It is not a CTX article but looks to be their new documentation site. Hope this helps.
https://docs.netscaler.com/en-us/citrix-adc/current-release/aaa-tm/configure-eula-as-auth-factor-in-nfactor.html
Thanks for finding the correct link.
Hello Carl,
I have a question.
In netscaler 13.0.91.13 and we are prompted to add the public key, in order for the nessus team to Authenticate with the private key and scann the netscaler to posibile vulnerabilities attacks.
The question is. The adding of public key and creating of a local user, would LOSt us the Citrix support for the netscaler?
If not.
Do you have a procedures or commands that can be use to get this done. From my findings, i couldn’t Find anything helpful.
Are you asking about SSH Authorized Keys? https://support.citrix.com/article/CTX120804/how-to-access-the-netscaler-appliance-by-using-the-ssh-keys
As long as you don’t install anything on the NetScaler then remote monitoring shouldn’t be an issue.
Hi Carl,
I keep getting No active policy is found in Primary authentication cascade when I add in Radius policy to the LDAP authentication using Advanced auth profiles and the proper login schema. As soon as I remove the Radius, LDAP works fine. Thoughts?
Thanks
What expressions do you have in your policies? Maybe all expressions are evaluating to false.
I have both the LDAP and RADIUS set to a simple “true”. Is there another expression I should be using?
Okay. So, I updated my expressions from “true” to HTTP.REQ.HEADER(“User-Agent”).CONTAINS(“CitrixReceiver”).NOT and now do not get the “no active policy found in primary authentication cascade” but the issue now is it’s not enforcing both LDAP and RSA. User can place password and log right now. I have auth set up as LDAP first then RSA. Does this need to be flipped?
With nFactor, you don’t need to flip. Just put LDAP in the first factor. Then put RADIUS in the second factor policy label. No need for expressions that aren’t “true”. I think it’s documented here – https://www.carlstalhood.com/citrix-gateway-radius-authentication/#advanced2fa
Hi, I have problems if the native OTP timesout and the resendt OTP schema are presented. if resendt OTP are selected. and accepted then i get Cannot Complete your request dialog box.
Hi, I’m a bit at a loss here. Been trying to get my head around an issue I’m facing. I have a cvpn vserver, that is now authenticated by a separate RADIUS server (RCDevs) this checks LDAP + sends OpenOTP), I have a backend application relying on Kerberos (401) for authentication, so in my session profile I have KCD configured. The Kerberos authentication is not working out, I don’t really know why, but I figure I could use nFactor for this use case.
If I configure first factor to be RADIUS, would it be possible to use the username and password collected in first factor to seamlessly do 401 authentication?
Do I need a separate lb vserver to do this?
More detailed: lb vserver with service configured to the backend application on 443
cvpn vserver (RADIUS auth) session policy&profile configured with KCD using lb vserver previously mentioned.
ADC is able to resolve DNS and communicate with Domain Controllers?
Since you have the user’s password, did you configure Kerberos Impersonation? https://support.citrix.com/article/CTX222453/how-to-configure-the-netscaler-for-kerberos-impersonation
Sorry for the late response, I was not capable of looking into it earlier.
I managed to get it working, I did had to do a little bit more than the article, because I was authenticating from a trusted domain too, but it works! First tested with a simple AD auth policy to keep as close to the article provided, but I got it working with the RADIUS policy as well.
Great article as always. I am looking for a way to run a scan on a machine and if it doesn’t pass this scan, in this case it has to be a domain member, if it does not pass I would like it to display a page stating that “this machine is not authorized….” I have everything built, but I am not sure how to have it display the page upon failure.
Create a Session Policy/Profile with Web Interface address set to a website that has your error page. Assign this policy to your EPA Quarantine Group.
Are you referring to where you would have the StoreFront server address if you were publishing applications??
Yes.
This worked perfectly. Thank you so much for your help
Hi Carl,
We are in the process of deploying MFA to our Citrix environment, I am using nFactor to bind an authentication profile that calls out to our RADIUS Server (Microsoft NPS with Azure MFA extensions installed), that sends a MFA authentication signal to the Microsoft Authenticator app.
This all works great in my sandbox, but I noticed in your blog you state that “Workspace app 1809 and newer with Citrix Gateway 12.1 build 49 and newer support nFactor authentication.”.
I have a few clients still running Citrix Receiver (14.xx), using a test client machine I was able to authenticate with this older receiver without upgrading it first. This brings me to my question, nFactor seems to work – so is Workspace app 1809 or higher required only if you are prompting for MFA passcode inside the popup box? If this is being called out to a RADIUS server that performs the MFA signal, then older clients are supported?
Anything web-based (e.g., SAML) requires nFactor. Older Workspace app will emulate older non-HTML authentication methods (e.g., passcode box). Some RADIUS servers, (e.g., Duo) send back HTML challenges that require nFactor if you want the inline HTML experience.
Hi Carl,
As I am using SAML sp as well as idp (including both kind of policies on one gateway vserver, with gateway license – no nfactor possible) I would not agree with your statement. It seems that you made shortcut for very wide theme.
some strange corticate window is appearing on the source computer, after citrix vdi is launched successfully in the receiver while using nfactor. Not using any certificate based authentications in nfactor, only ldap + radius.
In your Gateway, look at SSL Parameters. Do you see Client Authentication? Is it set to Optional?
Hi Carl, thanks.
It was/is set to optional. But I added the CA intermediate certificate in the gatway virtual server, the popup is no longer coming.
Thanks
Ashish
Hi, I need to update an NetScaler VPX that’s still running on 11.1. The Citrix documentation states that you should upgrade to each adjecent major release, so the first one should be 12.0. However since its EOL state it’s no longer available for download. Should I just try updating to 12.1->13.0->13.1?
Yes.
Thank you for this great guide. But, can you tell me how to create the client certificates? Preferably via a Windows CA….
Here’s is one method – https://www.prajwaldesai.com/deploying-the-client-certificate-for-windows-computers/
Thanks for this. Is it possible to use User Certificates too? So the Username is picking up from the cert?
Yes. Here’s another guide – https://docs.druva.com/Knowledge_Base/inSync/How_To/How_to_set_up_automatic_certificate_enrollment_in_Active_Directory. Microsoft CA is a popular product so you can usually find guides by Google searching for them.
Thanks. This was really helpful for me
Carl, your website is always a place of inspiration (and transpiration) and great source for tips. I appreciate your effort.
Is there a way to modify the timeout between one factor and the second factor?
User is authenticating with a certificate (1st), then on the second page he needs to enter his LDAP password. This new schema (username is pre-filled from certificate) should be valid only for 1 minute.
Is there a way to modify the timeout value without messing up with the login-jscripts?
hi, using DualAuth login schema for ldap and radius logon in nfactor chain, it sends radius passcode as ldap passwd from password field instead of a passwd1 field which belongs to radius passcode. does this needs to flip the passwd fields in schema or it is recomended to use a cascading nfactor? or perhaps other easier/logical solution. thanks!
The Login Schema profile has a checkbox for “Enable Single Sign On Credentials”, which I’m guessing uses the first password collected by the form.
Another option is to configure the Login Schema profile to put AD password in a AAA Attribute and then configure a Traffic Policy to use the AAA Attribute for SSO.
Thanks for an input. after some elaborating i had to add a password expression to an existing 2FA schema, based on article https://support.citrix.com/article/CTX229505, point 5.c, just for future reference…
Does anyone have a good tutorial on creating multi domain with multiple ldap servers for nfactor auth?
Hi Carl, hope you’re well.
I now (mis)use the CitrixGateway for providing access to an internal hosted website (Apex).
The front (authentication page) is heavily customized, and I use a single basic authentication policy (RADIUS bridge + OpenOTP)
The current version I’m using is 13.0.36.27.nc so I really need to update asap!
Update completes ok, without any errors, and everything seems to be working (authentication succeeds) however after authentication the site hangs on /cgi/setclient?wica. I know that after the update I need to re-enable SSO on the vServer so that’s already done, still no forward to the apex website.
Another thing I see is that under the header of Basic authentication I see Primary Authentication twice (cannot delete 1, just remains 2 displayed)
The internal website is on a custom port other than 443 i.e. SSL over 7878 but is specified in the session policy (Published applications URL)
To be honest I don’t know why it’s not working, but I can imagine that the newer firmware is more restrictive, and I also know that Citrix is trying to move everyone to nFactor and advanced policies.
The latter I have to give in to anyway sooner or later, and nFactor is well documented and probably just as customize-able too, still it remains unclear to me why Primary Authentication is displayed twice, and why it stops working after the upgrade.
Another vServer which services the Storefront server is working like a charm by the way.
Hi Carl, just a dumb question about AAA group and Intranet applications. I want to filter Applications access by AD groups. Cannot find solution.
I have AAA Auth server with policy with AD groups extration as nFactor.. Also have AAA group named TestGroup. So user belonging to AD group TestGroup should be automatically associated to AAA group with the same name?
Then.. I want to restrict access to Intranet Application to this group.I can bing Application to AAA Group, but what next? How to bind this application to Virtual Server so that it was available only for TestGroup?
When I bind Application directly to Virtual Server it is available for all users.
Yes, just bind it to the AAA Group. It will work for all Gateway Virtual Servers.
Hi Carl ,
I have followed complete complete and used EPA as the first factor and Raduis and 2nd . The authentication via web happens successfully but through the workspace we get the below error after the authentication .
error /warning ” your account cannot be added using this server address . Make sure you entered it correctly .you may need to enter your email address instead .
Let me know if i need to create a separate traffic policy
Hi.
How do i configure an nfactor flow for handling authentiction for citrix endpoint management cert plus domain?
Great write up as always!
Using EPA as an nFactor is fantastic but I’m having trouble with the reporting that information back to the IT team.
I understand EPA checks log locally on the client device.
ADM reports as pre-auth even though this happens after LDAP/SAML and thus does not pass any usernames.
EPA is configured as last factor and the failure only shows up in ADM when no quarantine group is configured/when connection fails. I must be doing something wrong?
I don’t fancy having an nFactor for each EPA check!
Hi Larry,
May be you need to rethink how to work with EPA. In general EPA is not intended to generate result set for reporting.
General use of EPA is to assign user to specific group (based on device scan) and than later assign policy for such group. E.g. we use EPA for differentiating client PC (home PC, company PC, company PC with admin rights) and than we assign related CVAD policies for drive/clipboard mappings.
If you need to use EPA for inventory (as I understand your question), than you must have policy for every EPA check to get those specific results.
Hi Carl,
Any tips on how to troubleshoot the Citrix workspace client on the iOS. I get the error There are no Apps avaialble at this time.
i’ve tried this:
https://support.citrix.com/article/CTX215337?_ga=2.50154150.1646705457.1587616376-513537756.1582680958
https://support.citrix.com/article/CTX216768
From what I see, it’s only an issue with iOS workspace client.
there are no aunthenciation issues in aad.debug
You should be able to enable logging and then examine the log. https://support.citrix.com/article/CTX136380
Hi,
Is it possible to automatically redirect the user to the manageotp site if no device is registered?
I’m also looking for this option, any news on this? Is this possible?
Is there a command to track the nfactor flow when a user connect something like nsconmsg to understand which factor user flow through.
Does this work? https://support.citrix.com/article/CTX138840
May be better solution is to use debug audit log and then in ns.log are all nfactor steps recorded.In nsconnmsg you can track policy hits but there is no information about time – policies processing sequence.
Thanks for the information Carl, superb as always.
I have an additional question regarding EPA as an nfactor authentication.
Do you know if it is possible to execute an EPA check for a certain set of users (AD group).
I want to allow file/folder redirection when the EPA check is successful.
would it be possible to setup for particular set of users like IT group before deploying to all users connection from NS/ADC? Also, is there a difference in the application between 12 and 13 version?
nFactor is the same in both versions, except that 13 has the Visualizer.
nFactor is either on or off. You can use nFactor to choose an authentication method based on AD group membership.
Thanks for the detailed ADC information.
captcha WebAuth has changed with ADC upgrade as per https://support.citrix.com/article/CTX256004 which states:
Symptoms: “nFactor: Could not find matching captcha policy”
Solution: Use Captcha authentication action type instead of Webauth.
Note the GUI (12.1 51.19.nc) does not support creating a policy of “Action Type” CAPTCHA. The policy must be created via the command line:
add authentication Policy recaptcha_captcha_pol -rule true -action recaptcha_act
Thanks for pointing this out. I added some text to indicate this change.
great information, thanks. However, I’m having an issue not addressed with NPS, when passing from the LDAP factor to the Azure SAML factor the username ${HTTP.REQ.USER.NAME} is not being passed to the assertion for Azure.