Navigation
This article applies to all 7.x versions of Citrix Provisioning, including 2411, 2402 LTSR, and 2203 LTSR.
- Change Log
- Updater Device
- Update a vDisk – Versioning Method
- Merge Versions
- Expand vDisk VHD
- Reverse Image – BCDEDIT Method
- Automatic Scheduled vDisk Update – SCCM
💡 = Recently Updated
Change Log
- 2023 Sept 27 – Reverse Image – added link to Citrix Image Portability Service can take a VHD from a Citrix Provisioning (PVS) store and recreate the original vSphere image.
- 2022 Oct 12 – added link to CTA Nishith Gupta VMware Tools In PVS Image
- 2019 Jun 8 – Update a vDisk – added link to Citrix Blog Post The vDisk Replicator Utility is finally finished!
- 2018 Sep 3 – replaced Provisioning Services with Citrix Provisioning
- 2018 June 9 – Update a vDisk – added link to Citrix Blog Post vDisk Replicator Utility
Updater Device
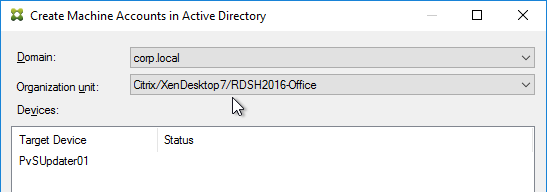
- Create a new Updater Target Device that is only used when you need to update a vDisk. You can create the Updater device manually or you can use the Citrix Virtual Desktops Setup Wizard.
- Put the Updater device in a new Device Collection. This is to avoid assigning the device to a Catalog in Studio. Users must not connect to an Updater device while it is powered on.
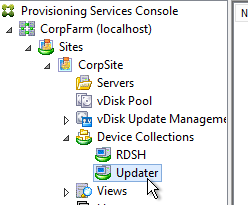
- Set the Updater device to boot from the Maintenance Type. This is used by the Versioning method of updating a vDisk.
- When adding the Updater device to Active Directory, be mindful of group policies. Sometimes it is helpful to apply the group policies to the Updater device so they are stored in the vDisk you are updating.
- An Updater device can only boot from one vDisk at a time but it can boot from any vDisk. If you need to do updates to multiple vDisks simultaneously, create more Updater devices.
- If you are using Enterprise Software Deployment tools (e.g., System Center Configuration Manager) to maintain a vDisk, keep the Updater device constantly booted to a Maintenance version so the ESD tool can push updates to it. This basically requires a separate Updater device for each vDisk.
Update a vDisk – Versioning Method
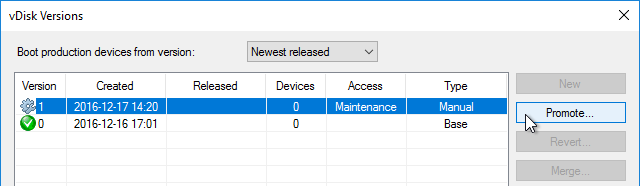
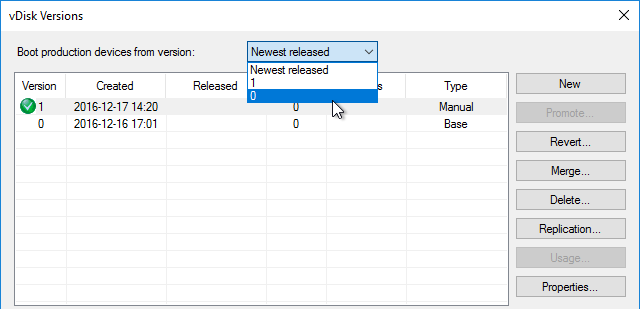
- In the Citrix Provisioning Console, right-click a Standard Mode vDisk, and click Versions.
- In the vDisk Versions window, click New.
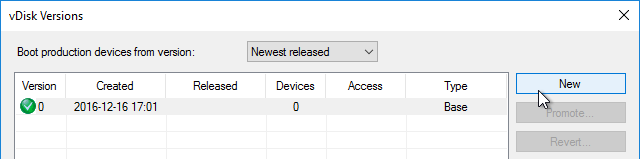
- Notice that the Access is set to Maintenance. Click Done.
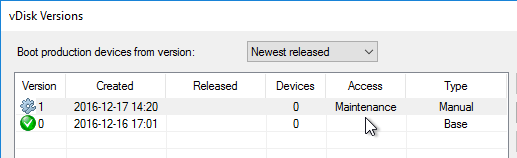
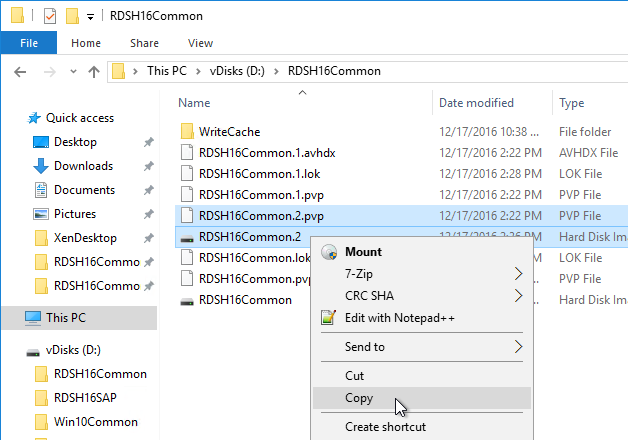
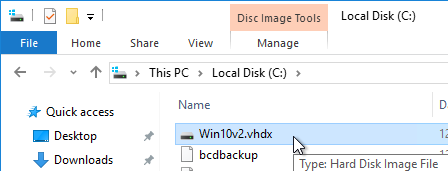
- If you look at the physical location where the vDisks are stored, you’ll see a new .avhdx file.

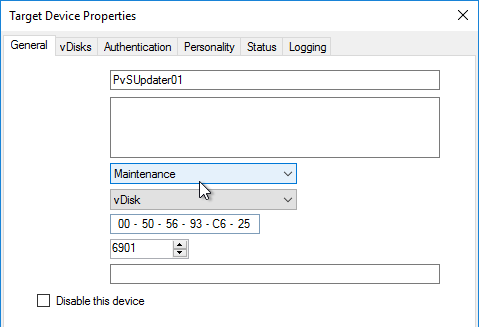
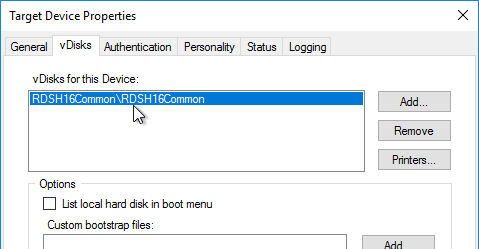
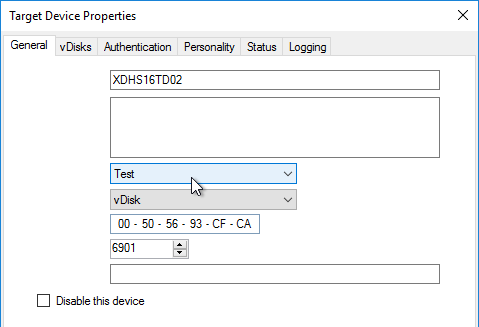
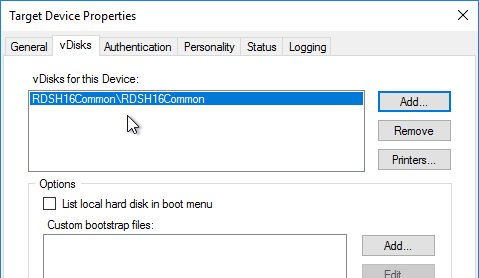
- Go to the properties of an Updater Target Device, and change the Type to Maintenance. You’ll use this Target Device to update the vDisk. Make sure this Target Device you are using for vDisk Updating is not in any Delivery Group so that users don’t accidentally connect to it when it is powered on.
- Of course this Target Device will need to be configured to use the vDisk you are updating.
- Power on the Updater Target Device.
- If you did not configure the DWORD registry value HKLM\Software\Citrix\ProvisioningServices\StreamProcess\SkipBootMenu to 1 on the Provisioning Servers, then you’ll see a boot menu.

- Login to your Updater Target Device. The Virtual Disk Status icon by the clock should indicate that the vDisk Mode is now Read/Write.

- Make any desired changes.
- The Citrix Provisioning Image Optimization tool disables Windows Update. To install Windows Updates, use the following script to enable Windows Update, install updates, then disable Windows Update – http://www.xenappblog.com/2013/prepare-a-provisioning-services-vdisk-for-standard-mode/
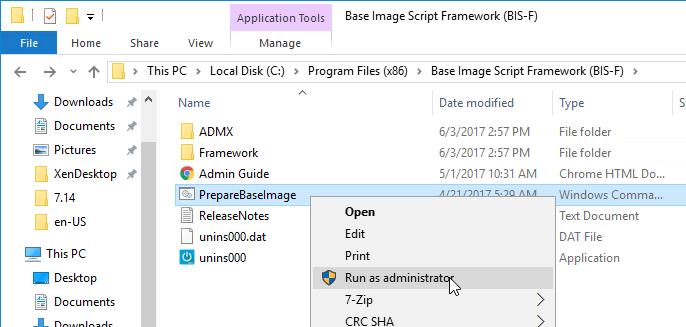
- Before powering off the target device, run your sealing tasks. Run antivirus sealing tasks. See VDA > Antivirus for links to antivirus vendor articles.
- Citrix Blog Post Sealing Steps After Updating a vDisk contains a list of commands to seal an image for Citrix Provisioning.
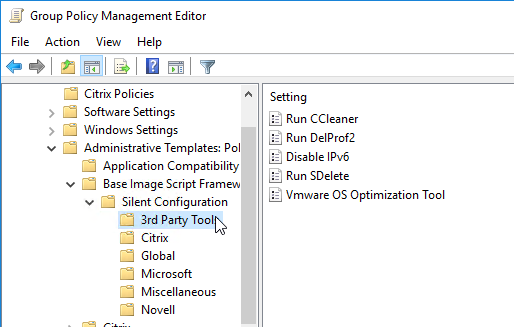
- Base Image Script Framework (BIS-F) automates many sealing tasks. The script is configurable using Group Policy.
- Power off the target device so the vDisk is no longer being used.
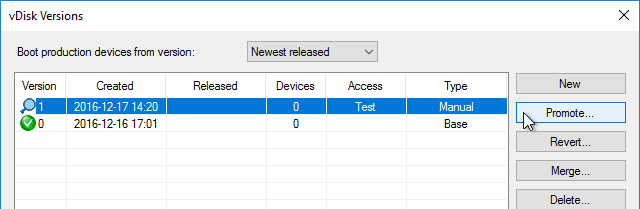
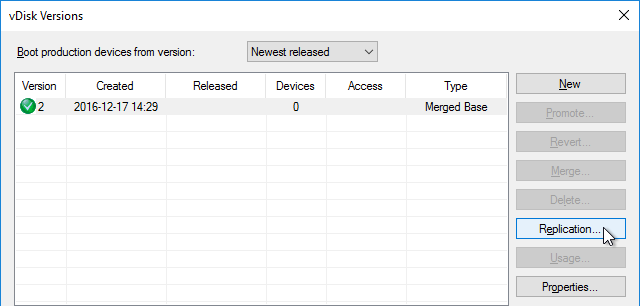
- Go back to the Versions window for the vDisk.
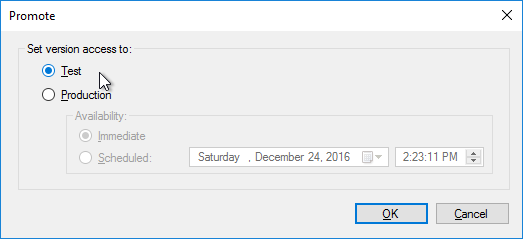
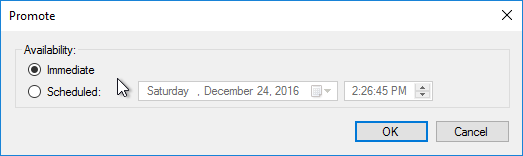
- Highlight the version you just updated, and click Promote.
- Best practice is to promote it to Test first. Or you can go directly to Production if you’re confident that your updates won’t cause any problems. Note: if you select Immediate, it won’t take effect until the Target Devices are rebooted. For scheduled promotion, the Target Devices must be rebooted after the scheduled date and time.
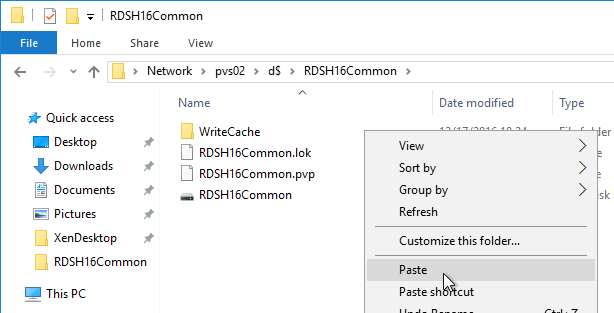
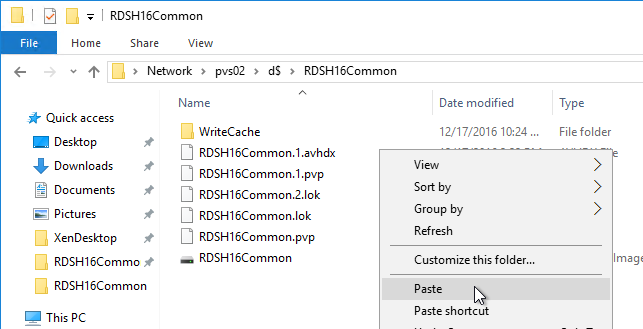
- The Replication icon should have a warning icon on it indicating that you need to copy the files to the other Provisioning server.
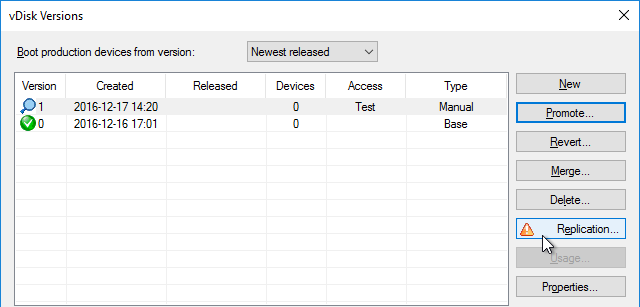
- Only copy the .avhdx and .pvp files. Do not copy the .lok file.
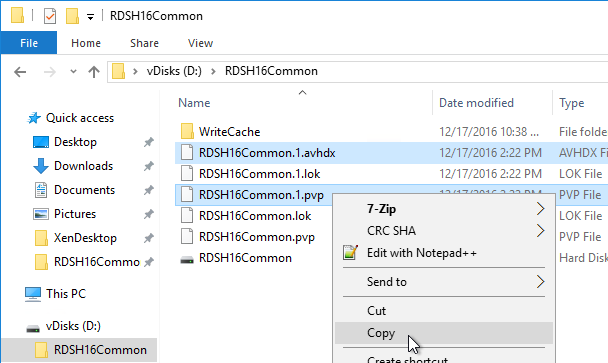
- Another method of copying the vDisk files is by using Robocopy:
Robocopy D:\vDisks\ \\pvs2\d$\vDisks *.vhd *.avhd *.pvp *.vhdx *.avhdx /b /mir /xf *.lok /xd WriteCache /xo
- Citrix Blog Post The vDisk Replicator Utility is finally finished! has a GUI utility script that can replicate vDisks between Citrix Provisioning Sites and between Citrix Provisioning Farms.


- Then click the Refresh button, and the warning icon should go away.

- Configure a Target Device to boot the Test vDisk Type. Then boot it.
- Once testing is complete, promote the vDisk version again.
- Immediate means it will take effect only after Target Devices are rebooted, whether immediately or later. Scheduled means the Target Device has to be rebooted after the scheduled date and time before it takes effect; if the Target Device has been rebooted before the scheduled date, then the older version is still in effect. Click OK.
- If you need to Revert, you can use the Revert button, or the drop-down on top of the window.
Merge Versions
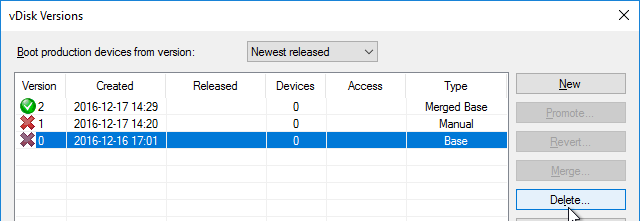
- Citrix recommends no more than five .avhd files in the snapshot chain. To collapse the chain of .avhd files, you can Merge the versions. Don’t Merge until the files on both Provisioning servers are replicated.
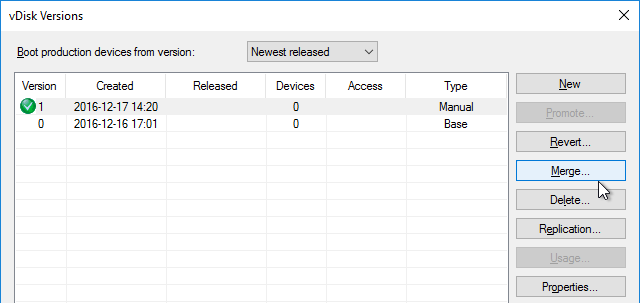
- You can merge (Merged Updates) multiple .avhdx files into a single new .avhdx file that is linked to the original base file. Or you can merge (Merged Base) the original base, plus all of the .avhdx files into a new base .vhdx file, without any linked .avhdx files.

- The Merged Base process creates a whole new .vhdx file that is the same size or larger than the original base. After merging, replicate the merged file to both Provisioning Servers.
- Make sure there is no warning icon on the Replication button.
- If your merged version is currently in Test mode, then you can promote it to Production.
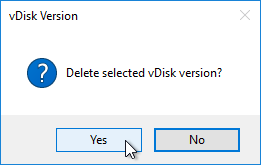
- After merging, you can delete older versions if you don’t need to revert to them.
Citrix CTX207112 Managing Provisioning Services VDisk Versions with VhdUtil Tool: CLI tool that can do the following outside of Citrix Provisioning Console:
- dump header/footer
- merge chain
- rename chain
Expand vDisk VHD
To expand a vDisk file, create a Merged Base. Then use normal VHD expansion tools/methods.
One method is described below: (Commands in fixed width font)
- Open cmd or powershell as administrator
diskpartselect vdisk file=“<path to your visk>” (e.g. V:\store\my.vhd)list vdisk(you should now see your vdisk and the path)expand vdisk maximum=60000(This is the size in megabytes of the size you want to extend, so 60000 is 60Gb)attach vdisklist disklist volume(take note of the Volume number of the your vdisk, you should see the old size)select volume 5(or whatever volume number from list volume command)extendlist volume(you should now see the size you want for your disk. This should also be seen in the Citrix Provisioning console)detach vdiskexit
Reverse Image – BCDEDIT Method
If you want to upgrade the Citrix Provisioning Target Device Software on a vDisk, and if your current Target Devices Software installation is 7.6 Update 1 or newer then you can simply install the new Target Device Software. No special steps required. However, if your Target Device software is 7.6 or older then you’ll need to Reverse Image as detailed in this section.
If you want to update the NIC driver (e.g., VMware Tools), then you can’t use the normal vDisk versioning process since NIC interruptions will break the connection between Target Device and vDisk. Instead, you must reverse image, which essentially disconnects the vDisk from Citrix Provisioning.
One method of reverse imaging is to boot directly from the vDisk VHD. All you need to do is copy the vDisk VHD/VHDX to a Windows machine’s local C: drive, run bcdedit to configure booting to the VHD/VHDX, reboot into the VHD/VHDX, make your changes, reboot back into the original Windows OS, copy the VHD/VHDX back to Citrix Provisioning and import it. Details can be found later in this section.
Instead of the BCDEDIT method, you can try one of these alternative reverse image methods:
- Citrix Image Portability Service can take a VHD from a Citrix Provisioning (PVS) store and recreate the original vSphere image.
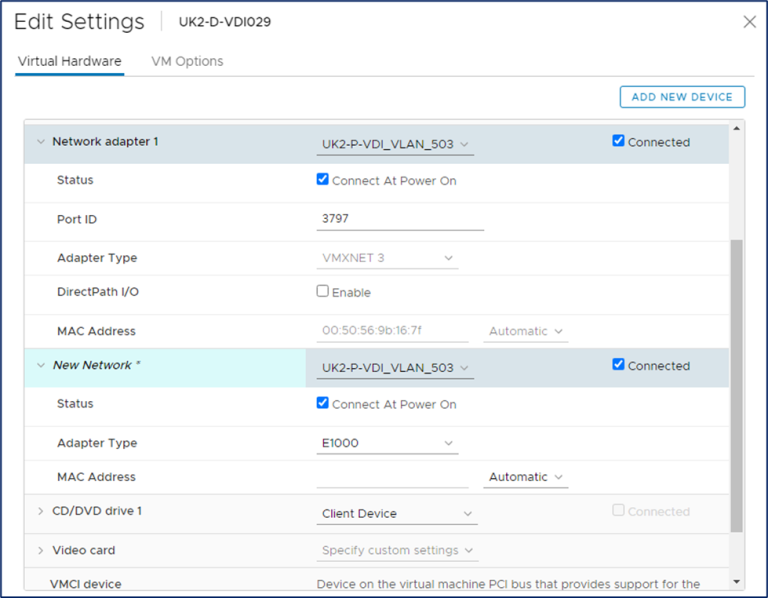
- Aaron Silber How to update VMware Tools without Reverse Imaging – The gist is to add an E1000 NIC, boot from that, upgrade VMware Tools, and then remove the E1000 NIC. CTA Nishith Gupta has detailed this process in VMware Tools In PVS Image.
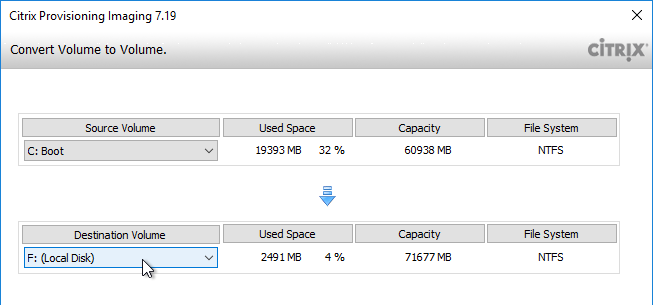
- The traditional method of reverse imaging is to use Citrix Provisioning Imaging (P2PVS.exe), or similar, to copy a vDisk to a local disk, boot from the local disk, make changes, and then run the Imaging Wizard again to copy the local disk back to a new vDisk. Select Volume to Volume. On the next page, select C: as source, and local disk as Destination. If you don’t see the C: drive as an option, then make sure your vDisk is in read/write mode (Private Image or Maintenance Version).

- George Spiers PVS Reverse Image with VMware vCenter Converter. This article has troubleshooting steps if the reverse image won’t boot.
- Jan Hendriks Citrix PVS Reverse Imaging with Windows Backup.
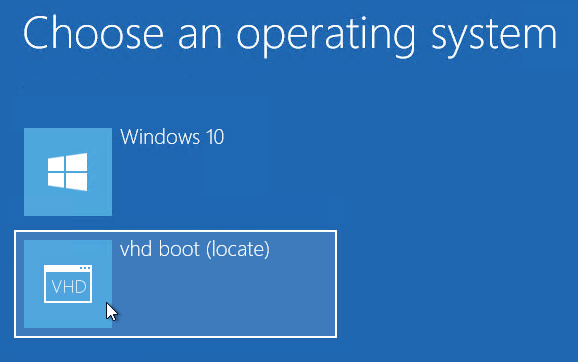
To use bcdedit to boot from directly from vDisk VHD (Microsoft TechNet Add a Native-Boot Virtual Hard Disk to the Boot Menu):
- In Citrix Provisioning Console, if using versioning, create a merged base.
- Copy the merged based vDisk (VHDX file) to any supported Windows machine. Note: the C: drive of the virtual machine must be large enough to contain a fully expanded VHDX file.
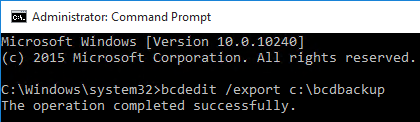
- Run the following command to export the current BCD configuration:
bcdedit /export c:\bcdbackup
- Run the following command to copy the default BCD entry to a new entry. This outputs a GUID that you will need later.
bcdedit /copy {default} /d "vhd boot (locate)"
- Run the following commands to set the new BCD entry to boot from the VHD file. Replace {guid} with the GUID outputted from the previous command. Include the braces.
bcdedit /set {guid} device vhd=[locate]\MyvDisk.vhd
bcdedit /set {guid} osdevice vhd=[locate]\MyvDisk.vhd
- Make sure you are connected to the console of the virtual machine.
- Restart the virtual machine.
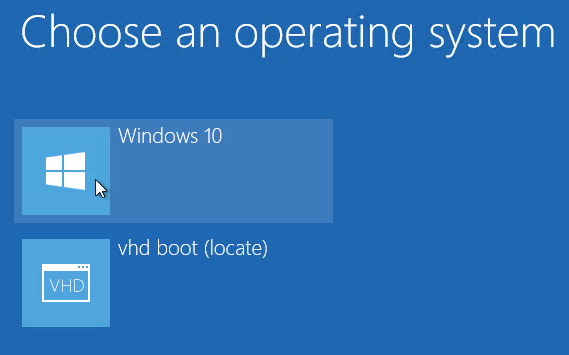
- When the boot menu appears, select the VHD option. Note: if you see a blue screen, then you might have to enlarge your C: drive so the VHD file can be unpacked.
- Login to the virtual machine.
- Perform updates:
- Uninstall the Citrix Provisioning Target Device software.
- Upgrade VMware Tools.
- Reinstall Citrix Provisioning Target Device software. The Target Device software must be installed after VMware Tools is updated.
- When you are done making changes, reboot back into the regular operating system.

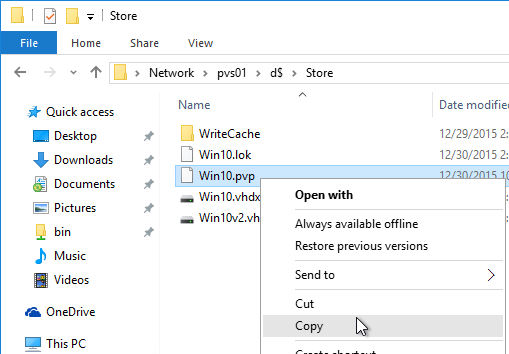
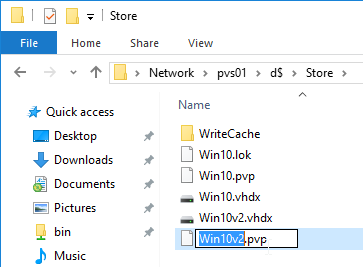
- Rename the updated VHD file to make it unique.
- Copy the updated VHD file to your Citrix Provisioning Store.
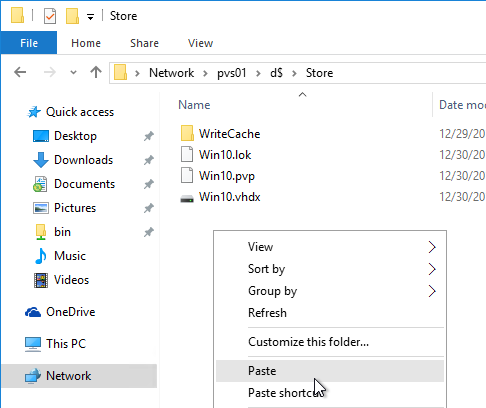
- Copy an existing .pvp file and paste it with the same name as your newly updated VHD.
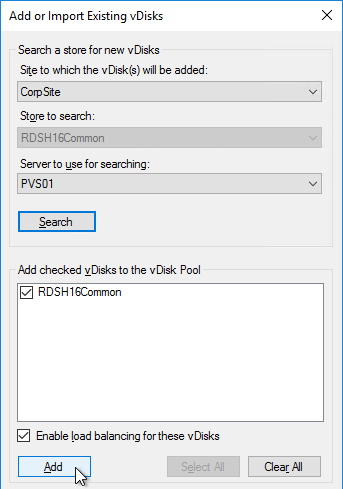
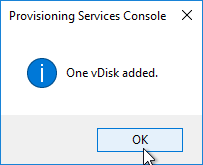
- In the Citrix Provisioning Console, right-click the store, and click Add or Import Existing vDisk.
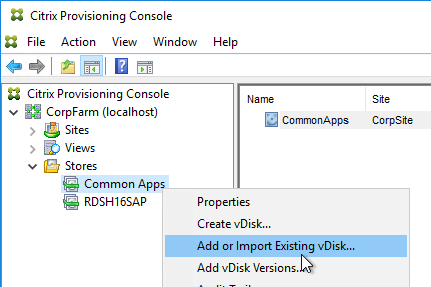
- Click Search.
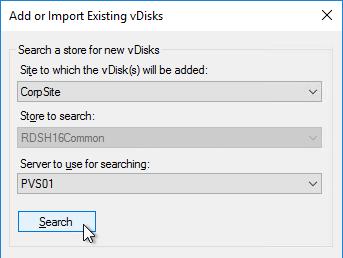
- It should find the new vDisk. Click Add. Click OK.
- You can now assign the newly updated vDisk to your Target Devices.
Automatic Scheduled vDisk Update – SCCM
You can use the vDisk Update Management node (and Hosts node) in Citrix Provisioning Console to schedule an updater machine to power on, receive updates from System Center Configuration Manager, and power off. The new vDisk version can then be automatically promoted to Production, or you can leave it in Maintenance or Test mode and promote it manually.
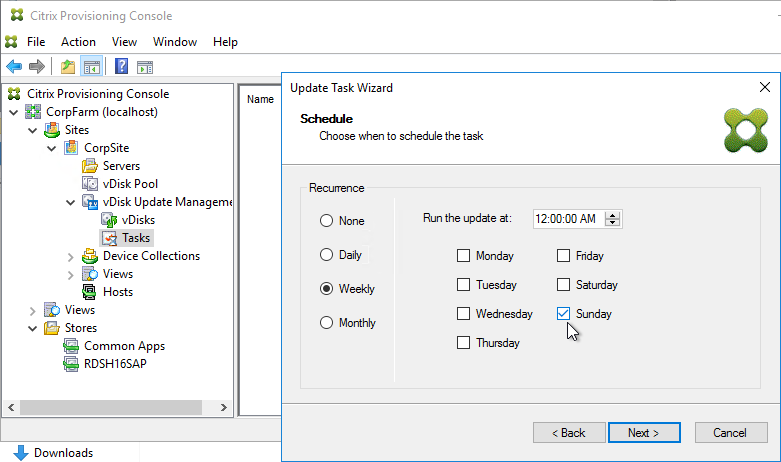
See the following Citrix links for instructions:
- CTX205394 How to Configure PVS vDisk Update Management Using SCCM
- CTX137757 How to Create a Designated Update Virtual Machine and Add a Host Connection to Hosts Node
- CTX140209 How to Add a Managed vDisk to the vDisks Node Under vDisk Update Management
- CTX140210 How to Create an Update Task to be Performed at a Scheduled Time in Provisioning Services
Hi Carl,
I just wanted to say thank you for this site its been a great help for me for any questions I have about XenApp or PVS. I also do have a question about performing a PVS upgrade though 🙂 I currently have PVS version 7.6.0.5019 installed on two servers in HA mode. I’m trying to work out if I can do a version upgrade for the PVS agent on my maintenance vDisk and not have to do a reserve image and create a new vDisk?
Can I get away with doing a version vDisk upgrade if I go from 7.6.0.5019 to 7.6.4? Once everything is complete I can schedule another upgrade from 7.6.4 to 7.12? Or it doesn’t matter any upgrade to a version above my current version of 7.6.0.5019 I will have to do a reserve image of all my different vDisks?
You can upgrade from 7.6.1 to newer. But if older (7.6.0), then need to reverse image.
Thanks Carl, I was hoping you wouldn’t say that 🙁 Again thanks for the website its brilliant and I really appreciate the time you have put into it 🙂
Hi Carl,
I am having a strange topic which I cannot explain as this has worked without problems in the past with Windows 7 and the Citrix forum is not that helpful this time:
– Created a golden master machine XYZ001 (Windows 10 – 1607)
– Used the Imaging Wizard to close the disk and make it available to the other machines
>> This part always works fine
– But now I need to create a new master XYZ003 from the existing PVS disk (another Office app needed) and close the image again.
– What I have always done is to create a new machine in XenCenter, let it boot from network (the previously closed PVS image), attached a new disk from the NFS and use the P2V.exe to copy from volume to volume.
– The P2V.exe says the conversion is successfull.
– If I now start the new virtual master it says, that “the boot configuration data file is missing”
– What I have done:
LIST DISK
SELECT DISK
LIST PARTITION
SELECT PARTITION
ACTIVE
EXIT
C:
CHKDSK /R
BOOTREC /FIXMBR
BOOTREC /FIXBOOT
BOOTREC /REBUILDBCD
BOOTREC /SCANOS
BCDBOOT C:\Windows
Also tried to use the old XenConvert 2.5, but this also did not work.
Any idea or any other tool you would recommend?
Regards,
Stefan
Why not just copy the existing vDisk VHD to a new vDisk, import it to PvS Console, set it to Private Image, then create a new “master” target device that boots from the vDisk copy? Then you can make any changes you want. When done, assign it to your Target Devices.
“Where one cannot see the wood for the trees.”
Thanks Carl, of course this should be the easy one…..
Hi Carl,
We are upgrading from 7.6 to 7.12. I have several PVS Win2012R2 targets….do I need to upgrade the VDA and Target Device software on the targets to 7.12 before upgrading the Delivery Controllers and PVS Servers to 7.12, or can I still use my 7.6 PVS targets on a 7.12 environment, then upgrade the VDAs and TD software later?
You can upgrade VDA any time, before or after.
For PvS, you upgrade the servers first.
We have two PVS servers in a setup. Have you experienced issues where the update target vm can’t find the vdisk? I occasionally have to reboot the PVS server responsible for updating, for it to work. It’s almost as if the boot process directs the target to the other PVS server not hosting the maintenance version of the image.
SkipRIMSForPrivate is supposed to fix that.
When you want to add a new disk version to an existing vdisk, it says that i must have a manifest file(xml), i mean if you try to use powershell to do this. I have not found anywhere to script to create a manifest file.
If you use gui, it is not need any manifest file. How shall i do this throgh powershell?
Carl Webster is an expert on the PvS PowerShell cmdlets.
Carl,
We have about 20 PVS vDisks in production (version 7.6). Our maintenance devices are in VMware and each one is different as far as having or not having a write cache drive, which drive letter is assigned to the existing write cache drive, etc. We want to make it consistent across the farm – what would be the best method of doing this?
Are the Target Devices also inconsistent? If so, you might have to rebuild all of them too.
I recommend a single Target Device template that you clone for all Target Devices, including updaters.
Boot your maintenance vDisks and set the drive letter as desired.
Carl,
At what point in the process of creating a brand new vDisk and provisioning target devices does the write cache drive letter get assigned? I seem to remember a prompt for selecting the drive letter initially.
Boot a vDisk in Maintenance mode. Go to Disk Management and assign a drive letter.
I noticed that on a few of the vDisks the page file on the write cache drive has been manually set but on others it’s set to automatically manage paging file for all drives. Should we be setting the page file for the write cache drive?
Yes. If the pagefile is too big to fit on the cache disk, then it will fail back to server.
Hi Carl, can merge Base be done while in production or does it need an outage
It can definitely be done during production. It creates a new version.
Regarding updating VM Tools. I use this method:
http://www.npbconsultants.com/archives/207
Hi Carl, one more thing. What is best way to add more disk space to a vDisk?
Create a merged base. Then use normal VHD tools to expand the VHD. Boot the expanded VHD and expand the partition. Then import the expanded VHD as a new vDisk.
Hi Carl, can an PVS upgrade disrupt target devices? Am thinking of upgrading to LTSR & starting with one PVS while the other remains intact serving streams to target devices. Then when 1st is done I’ll upgrade the 2nd server. Is my thinking correct? Will the old version target device software still work with the updated PVS LTSR server & console version? That gives me time to later update the update the vdisk with the LTSR target device software. Looking for direction. Thanks.
If HA is configured correctly (and no bugs), then there’s no downtime. When you restart one PvS server, the targets move to the other server. Note: I did see an HA issue fixed in 7.6.2.
Don’t upgrade the TD software until the servers are updated. Then you can update them at any time.
Hi Carl,
is it possible to use Windows Server 2008 R2 inside a vhdx file?
I updated the VHD using the bcdedit method.
After that I converted the VHD to VHDX using StarWind V2V and the system is no longer booting.
I get error 0xc03a0001 🙁
My Windows Server 2012 R2 based vDisk is working fine after bcdedit and vhdx conversation.
The BCDEDIT instructions are very confusing. I copied the vhd file to a blank vdisk which is the E: drive on this VM. I tried following your directions. I don’t know how you tell it where the vhd file is. I tried your method with [locate] in the brackets and it simply bluescreened and went back to the Windows 7 boot screen again. I tried replacing [locate] with [E:] no luck, I also tried partition=E:, no luck. Same bluescreen error and kick back to boot options. This method doesn’t seem to work.
I usually put the VHD file on the C: drive.
I just followed Microsoft’s instructions at https://technet.microsoft.com/en-us/library/dd799299(v=ws.10).aspx
If bluescreen during boot, it usually means not enough free disk space to expand the Dyanmic VHD.
The C: drive is the VHD it’s booting from PVS on though…
The idea is to boot from the VHD file, not boot from PvS. So you need a regular non-PvS VM, copy the VHD to that VM, configure that VM to boot from VHD, and reboot it.
Ok thanks trying this now. I keep looking at the help file for this and it says vhd=[C:]\filename.vhd should be the syntax but you put [locate], did you mean that literally?
That’s the example from the bottom of the file. I’m not sure it matters.
I finally got it to boot off the VHD on a Windows 10 standalone machine and then I get the error that booting from VHD is not supported by this license. UGH. I’m pretty sure it’s Windows 7 enterprise. I don’t get it.
Both the VHD and the host machine are Enterprise?
Ooops, nope, the Windows 7 image is apparently on Professional. I’m going to try and fix that. Thanks for your help here.
Hello Carl, thanks
Is it at all possible to use the same vDisk (on same shared storage) for 2 PVS sites in the same farm?
I don’t want 2 copies of vDisks if I can get away with it. Device collections will be different on each site.
thank you!
I’ve never tried that. Not sure if the .lok file will be a problem.
Hello Carl, quick question.
I need to modify software at vdisk, so this method looks great, but i need to add a new drive too for SWAP and WC. You think this method will work to recognize the drive too? or i need to reverse the disk?
thank you!
Reverse image should not be necessary. If you’re using versioning, add a new maintenance version, configure a device to boot from it. Add a second disk to the updater device. Boot. Format the drive and reboot. Make sure no reboot prompts. Shut down. Promote image.
If you don’t currently have cache disks on your devices, then you’ll need to add them either manually, or by deleting the targets and remaking them. It’s best to clone the updater VM so the hardware config is identical.
Carl, i really appreciate your help!!
I have cloned a few VMs from the one updated and worked like a charm!
Thanks again.
Hey again Carl,
Appreciate you take the time to reply.
What kind of experience do you have running the post-update scripts?
In terms of, running the scripts as elevated etc…we have a particular seal script which has some quirks around UAC etc.
What do you do?
I don’t use any of the sealing scripts, except for antivirus.
Is it necessary in PVS 7.9 to reverse image in order to upgrade VMware tools and PVS target software? Thanks
Yes for VMware Tools.
For TD software, it depends on what version you’re upgrading from. If 7.6 Update 1 or newer then no. Older versions need reverse image.
Carl, after following PVSGuy’s method of reverse imaging using BNImage and it failing (reversed VM BSOD, and we didn’t bother trying the XenConverter option), we stumbled across your guide. Mounting the .vhd on VMware ESXi worked! Thank you! You have saved us a LOT of further headaches!
Now the only thing we have to investigate still is why the VDA 7.7 to 7.9 upgrade has failed for the vDisk and a physical server :/ Citrix support blames Microsoft, but I think it’s Citrix because the installation file notes that it cannot locate the installation source path :/
Anyway, thank you again for this great, great guide!
We are having issues with some (very important) INI files missing after running BNimage to reverse image back to a local hard drive… we can duplicate the issue and the same INI files are missing the second time.
Have you seen this before and is there a recommendation for me to identify the cause and whether there are more files that got skipped? Or should I open a ticket with Citrix?
Same problem with XenConvert?
Hi Carl,
In our previous XD56 env, we had 40 machines with PVD. We decided to migrate to XD76 LTSR which does not support the PVD feature. It doesn’t mean it won’t work but if we want to be LTSR compliant we cannot use this feature anymore. Funny that Citrix decided to remove PVD from the supported features, maybe too much support cases with it ? The pooled approach with virtualized application packages would be by far my choice but again, LTSR complicates our possible choices : the new AppDisk technology is certainly interesting but it’s not in the LTSR scope (need to go with 7.8/7.9) so we have to stick with AppV. An other option would to transform these PVD machines into fat dedicated machines. How could I achieve that ?
Kind regards
Yvan
I don’t think it’s possible to convert PvD to full clone. The linked clone portion can certainly be converted to full clone by simply right-clicking the machine and clicking Clone. But the PvD portion would remain on a separate disk.
Note: 7.6.1000 doesn’t even include PvD. So if you start with 7.6.1000 then you don’t get PvD.
Thanks Carl for your quick answer. You confirmed my fears 🙁 and I saw now your thread in the Citrix forums about this subject http://discussions.citrix.com/topic/378336-vda-761000-windows-10-support-and-pvd/
Hi Carl,
Can we directly point it to Store drive instead copying to C drive ??
I mean something like this ” bcdedit /set {guid} device vhd=StoreDrive\MyvDisk.vhd ”
Thanks
I have not tried that. I think the VHD file has to be local. Are you thinking of doing this directly on the PvS server? I usually copy it to a different machine and do it from there.
Yap, I also usually do it from different machine.
Thought of doing it directly from PVS server will reduce the time of copying the vhd files and the space as well if have more vDisks.
Just checking with you if you could have already tried 🙂
Yah, Like you said it may required that VHD to be local. Will give it try if get chance and will post the status.
Anyway thanks for the quick response..!!
Hi Carl,
How many version of the vDisk that can be created? Our system is now at 95 version. I have meged it all the way but I can not reduce the version number if I keep on using that vDisk as changes will take place all the time. Do I need to clone or recreate a new vDisk if it reachs a certain stage of vDisk version such as at 100? Thanks.
Carl,
I am having issues with just coping a vdisk to the volume and booting from it. I can get the vhd to actually boot to the OS. I generally just get a blue screen or OS not found. any advice?
That usually means you don’t have enough free disk space. You need enough room to fit the expanded VHD (actual size of the size, not thin provisioned).
Carl, Thank you for this amazing post!
Its possible to revert an merged version?
When you merge, you’re essentially creating a new version. The old versions should still be there until you delete them. Does it not let you select the previous versions?
Hi Carl thanks for your amazing website. We are implementing PVS 7.8 with Personal vDisks and I was curious is it mandtory to run the PvD Inventory operation on every reboot? If I install software that requires a reboot can I skill inventory to complete the software installation THEN run the inventory?
*skip, not skill
You only need to run the inventory operation immediately before sealing the image and promoting it. You can skip it until you’re ready to promote.
Hey Carl,
Thanks again for the response.
Unfortuntaely out of the three environments I manage, only one has a true ‘LAB’ environment, and that envrionment is running SCCM 2007 which is stuffed…. I don’t have a LAB at home, as I just moved house last week.
The other two environments would require a process through change-control, which would take two weeks before I could make any changes….straight to prod cowboy-hat.jpg
So trying to get my eggs in order to submit a single change, otherwise it will take me months to get going :(. Thanks again, Carl.
Hey Carl,
Thanks for the response. I mean the schedule task automatic update w/ SCCM:
http://support.citrix.com/article/CTX140210
Everything I read states you need to either create a new or copy an existing vdisk. Just seems very strange to me, you would have to effectively double your vdisk storage, which we can’t do (and we’re currently at 1tb for vdisk).
The article indicates it’s creating a new vDisk version, not a whole new vDisk. There’s a screenshot for Maintenance, Test, Prod, which are “version” properties. “Version” is a snapshot, not a full copy.
Have you tried it yet?
Hey Carl,
Just getting my head around the PVS auto update. A question:
– Do you need to create a new vdisk? Can’t you just add an existing?
Cheers.
What do you mean by auto update? Are you referring to the ESD auto update task, which uses versioning? http://support.citrix.com/article/CTX140210
Or do you mean scheduling promotion of a new version to Production so TDs use it only after a specific time?
Or do you the older method of automatically using the newest vDisk? http://support.citrix.com/article/CTX119250
Hi Carl, in pvs is it possible to have some user desktops boot from into a vdisk test version before applying to prod – while the rest boot into normal version?
Of course.
If you’re using versioning, promote a version to Test mode. Then edit the target devices and change them from Production to Test. When they boot, they’ll boot from the Test version.
If you’re not doing versioning, then simply assign the test vDisk to specific test target devices.
Much appreciated! Thanks Carl.
You don´t mention the xml-file, I always do a export vDisk to have the xml-file on the Store?
Also I change the loadbalance Before I startup the new version in maintenance mode. If I need to reboot several times I will not flipp between the two PVS servers.
Is it advisable to change load balancing on a production vDisk?
The maintenance mode vDisk should only be on one PvS server. And PvS should figure out which server it’s on.
Are you exporting the XML simply to back it up? Or is it for some other purpose, like importing to a different PvS server?
I must have been some behaviour in the older 6.1 version where I ended up switching to the other PVS server during an update of a new version of a vDisk.
Yes, the XML is needed when you import the vDisk to another PVS server, but I feel that its needed or “good” to have on the Store even if you only have two PVS servers in the farm.
After following your steps I”m able to re-attach the disk to pvs but now I get a check disk failed on every reboot, any suggestions?
Corrupted?
An alternative method is to boot a device from a Maintenance Mode vDisk. Install XenConvert. Add a new .vmdk to the VM. Initialize and format the disk. Use XenConvert to copy vDisk to .vmdk. Mark .vmdk partition as active. Reboot into .vmdk (disable PXE, ISO, etc.). Make changes. Then run PvS Imaging Wizard to copy .vmdk to a new vDisk. I should probably write up these instructions in more detail since this might be the only way to change from VHD to VHDX.
Not sure if i just let it fail the system seems fine. But nevertheless everytime it reboots it comes up again. Even when I have it attached as a vhd.
Finally got that part fixed, I had to attach it as a vhd and then run a chkdsk on it from the host OS. In case anybody else runs into that. Now i’m getting a blue screen on my other one. It looks like none of the fixes mentioned here work though.
Carl,
What would be the best method of managing one image across two datacenters? For instance we have site A and site B in two different locations geographically. Both sites have two PVS servers but we want to manage one image instead of creating two identical images and having to update both everytime. Any suggestions?
One option is to copy the vDisk to the other side and import it. If your XenDesktop farms are different on both sides then you can use a GPO with Preferences that sets the ListOfDDCs registry key to register with the other datacenter’s Controllers.
ok my fault, it’s working
Attaching win7 to win7/win10/2012r2 gives error 0xc03a0001, attaching image to hyper-v boots correctly. Image is vhdx hypervisor XenServer. Any idea?
Hi Carl,
Is this BCDEDIT support for Windows 7 ??
Tried with Wiin 7 Professional 64 bit because after vm booted(with vhd) and when i tried to login got the error saying “Lincese error : Booting from vhd is not supported on this system”
I think Windows 7 Enterprise is required. https://technet.microsoft.com/en-us/library/dd799282%28v=ws.10%29.aspx?f=255&MSPPError=-2147217396
Is there an issue with simply copying an existing VHDX and PVP. renaming the files, and importing the vdisk? This has been standard practice at my current organization.
The only problem is extra disk space. And it takes a bit of training. Otherwise full copy is the safest method.
I have copied the vhd file to a Server 2012 R2 server and followed the bcdedit procedures. When I try to boot I get the blue screen with vhd boot initialization failure and it will never boot. I do have the vhd set in private mode. Any suggestions?
Same hypervisor? Enough free disk space for the .vhd to be expanded?
I am using VMware…copying the vhd to a windows machine that is in VMware. The drive does have enough space to expand.
Maybe this – https://blogs.technet.microsoft.com/danstolts/2011/03/23/blue-screen-booting-to-vhdyou-may-be-out-of-space-on-the-underlying-drive/
Does it say there’s no enough disk space?
What is the size of the C: drive in the booted VHD? I think you need the same amount of free disk space.
My C drive is 250GB total with 131GB free. The vhd is 105GB. The error is vhd_boot_initalization_failed.
If you can’t get VHD boot to work then you might have to do it the old fashioned way by booting a target device, attaching a .vmdk, and using XenConvert to copy from vDisk to .vmdk.
Every time I see VHD boot issues it’s because of lack of disk space. If the VHD is dynamic, you need disk space to expand the dynamic VHD.
I went ahead and used the converter with success. Do you suggest uninstalling antivirus after you run the converter and then installing after you run the imaging wizard? We are using McAfee. Thanks for your help.
Trying to use the new reverse image method so I can update the PVS target however when I boots I get a domain trust relationship error when trying to login. You have any ideas?
When you reverse image, it uses the computer name inside the vDisk. If you created the vDisk a long time ago then it might lose its trust. Just remove it from the domain and re-add it and it should be fine.
Hi Carl,
If we need to add additinal Disk to the existing V disk how to do it? BCDEDIT or reverse Imaging ?
How to enable the automatic replication of the V disk to the other PVS server?
Are you asking how to expand a vDisk? It would need to be a merged base first. Then see http://anilgprabhu.blogspot.com/2014/05/extending-vdisk-or-resize-pvs-or-normal.html. Then add it as a new vdisk.
Citrix doesn’t offer automatic replication. I use Robocopy scripts. Some have tried using DFS.
Hi Carl,
First, excellent and very helpful blog!! Thanks a lot!
Regarding the BCDEDIT Method: Do you know how to remove the extra boot entry? With your suggested CMDs I have now several entries with the same GUID…
Regards,
Hong
Just found it! You can manage your boot options via MSCONFIG (Windows Server 2012 R2)
First off, thanks for the loads of info on the site. Can’t tell how many times I’ve used it 🙂
Small addition to the BCDEdit method. Just tried this on the environment of one of my customers and when selecting the vhd (locate) option, it simply returned to the menu…
Found out that it’s because of the UEFI boot. Solution:
http://blogs.msdn.com/b/dai/archive/2014/04/10/using-vhd-native-boot-with-uefi-firmware-bcdedit-vs-bcdboot.aspx
Hi Carl,
I am using a Windows 10 machine to BSD boot Windows Server 2008 vhd, but it gives me BSOD on booting to the VHD. Will it be drivers causing the issue?
Thanks
Do you mean bcdedit boot to VHD? If so, what hypervisor? Is it the same hypervisor that the vDisk came from?
Make sure you have double the amount of space needed to allow for VHD expansion. If your VHD file is 50 Gigs, make sure you have at least 100 GB of free space – 50GB for the VHD file and 50GB for the expansion of the VHD file
Hello Carl,
I have a quick quick question. I am updating a vdisk using versioning method. It is a static desktop so, i need to update the citrix personal vdisk as well. But when i open the gold image, i am not seeing “update vdisk inventory” option under Start > All programs > Citrix > Provisioning services. Do you know how can i get it?
Was PvDisk originally installed on the master?
The command line to update inventory = “C:\Program Files\Citrix\personal vDisk\bin\CtxPvD.exe” -s inventory
Yes Carl pvdisk is installed on master. Thanks alot for the command line Carl. I will try this command.
You can also go to “\XenApp_and_XenDesktop_7_7\x64\Virtual Desktop Components\WS\personalvDisk_x64.msi” and reinstall it or repair it. That should give you the icon.
How do I now get my “host vm”‘s BCD file back to normal?
hey Carl!
It it okey to Upgrade the PVS Server to 7.7 and wait with the Target Devices which are currently 7.6?
greetings Tobi
Yes. You upgrade the servers first. The TDs you do when you can.
Hi Carl, my setup is everything 7.6 FP3 with shared desktops on Windows 2012 R2. Everything works as expected until I attempt to create a new version of the vDisk to perform maintenance/changes. I have a second hard disk attached to the maintenance device as I’m using the Cache on Device Hard Drive cache type.
No matter which cache type is use for the Standard vDisk every time I boot a device from the [maint] version of the vDisk the device blue screens, even though it says that Write Cache is disabled. If I boot the same device from the Production vDisk, there is not problem.
I have managed to get the versioned vDisk to boot by tinkering with the cache type and setting the it to Cache in Device RAM with overflow on hard disk, and increasing the RAM size. However If I promote this to production and then attempt create a version from this, it will then blue screen.
Is this something you have seen before. I feel as If I’m missing something obvious?
Maybe the drives on your updater device are connected to different SCSI IDs than the drives on your target devices.
Almost. It seems that when using PVS in conjunction with Hyper-V, something goes wrong in the creation of the VM’s. The NIC’s don’t get created in the same as format that they are configured in the PVS Template and it turned out that although the write cache drive in the template is on SCSI 0 ID 0, the VM creation process changed this to IDE.
Thanks for your help Carl.
I forgot to mention, this is all on Hyper 2012 R2
Hi Carl, I need to move some pvs images from xd 7.5 to a new xd 7.6 environment that also is running newer esxi 6 servers so need to update the image (vmtools, etc.) and move it to new environment. What method would you recommend using bcdedit or versioning? Is versioning same as reverse image? Am i making sense? I am a newbie to pvs. Much thanks
Versioning is for normal updates. VMware Tools is not a normal update since it sometimes updates the NIC drivers, which you can’t do while booted to PvS. Use the BCDEDIT method to update VMware Tools. VMware Tools and PvS Target Device Software updates are typically the only reasons to do a “reverse image”.
Hi Carl, in going along with the BCDEDIT method – do you recommend creating the merged base (new base disk) when there is little usage on the vdisk – say after business hours? I trying to see if there is going to be an impact to production users? Also, should I set access mode should to maintenance? I also don’t have much vmware datastore space left, is there a way to calculate the space needed to make sure I don’t end up with space issues? All vdisk file calculate to 60gb which is just about what i have left in the vdisk drive path and I have 140gb left in the datastore i could use to extend too. Would you agree i should extend the drive before i begin all this? thanks again
The BCDEDIT method requires a .vhd file, not an .avhd file. Merged Base gives you a .vhd file. You’ll need to copy it to a VM that has free-space at least double the size of the .vhd. Once you copy the .vhd to the reverse image machine it is no longer part of PvS so Maintenance Mode doesn’t matter.
Alternatively, you can use the XenConvert method. Boot a target to a Maintenance Mode version. Attach a .vmdk fo the target. Install and run XenConvert to copy from vDisk to .vmdk. Then boot from the .vmdk and make your changes. When done, run the PvS Imaging Wizard to convert from .vmdk back to a new vDisk version.
Thanks for the prompt response. I guess I am just worried if creating the merge base during business hours will cause any slow downs or other affects. But I will give BCDEDIT a try. On another note, have any recommendations toward changing IP address on a PVS server? – where you join the farm – & config errors show because the db contains the old IP. Thanks.
Merging the base does consume IOPS. This is generally only on the vDisk LUN and the most accessed blocks should already be cached in RAM so it probably won’t cause any performance issues.
After changing the IP, I just rerun the Config Wizard. Then I update the Bootstrap files with the new IP. I’m not aware of any database issues.
When I attempt to boot up the VM after choosing VHD Boot Locate from the boot menu, I get a BSOD. Is there some other prep I need to do before booting my image?
Assuming it has the correct drivers and the partition is marked as Active then it should work. At this point it’s just a VHD so it has nothing to do with Citrix. Can you boot it from Hyper-V?
Hello Carl,
do you knpw if BCEDIT Reverse Method with Vmware ESX virtual server is possible ?
Thanks
Yep. That’s how I do it.
Can you update vmware tools using the Versioning Method?
Only if it’s a minor update that doesn’t update the NIC driver.
Hello Carl,
Very helpful article
I have one query, can we merge multiple Vdisks at a time???(we have around 10 stores)
what parameters we need to consider to merge multiple Vdisks at a time…
please suggest
Not sure. When merging, check the disk I/O, CPU, and Memory of the PvS server. If any of them are maxed out then there’s probably no benefit to multiple merges.