Navigation
This post applies to all VMware Horizon 7 versions including 7.13 (ESB) and 7.10.3 (ESB).
- Change Log
- RDS Farms Overview
- RDS Farms – Instant Clones and Composer Linked Clones
- RDS Farms – Manual
- Publish Desktop
- Publish Applications
Change Log
- 2019 Jul 7 – change icon for published application
- 2019 Jul 6 – updated Horizon Console instructions for Horizon 7.9
- 2019 Mar 23 – Create Automatic RDS Farm – Horizon Administrator – added Load Balancing instructions for Horizon Administrator
- 2019 Jan 23 – Create an Automatic RDS Farm – added link to Upgrade Instant-Clone Desktop Pools at VMware Docs – if vCenter 6.7, must upgrade hosts to ESXi 6.7.
- 2018 June 8 – added Horizon Console instructions for creating an RDS Farm and other RDS tasks.
- 2018 May 13 – Published Apps, added Explorer /separate switch from RDS Desktop being presented when opening an app at VMware Communities
- 2018 Mar 15 – in Update Farm section, added link to VMware 2129528 Virtual Machine changes are not saved in App Volumes
- 2018 Mar 7 – in the Create Automatic Farm section, added link to Adam Gleeson’s limitations of VMware Horizon Virtual Desktop Session Collaboration
- 2018 Jan 8 – in the Create Automatic Farm section, added the Session Collaboration checkbox in Farm Settings.
Overview
This post details VMware Horizon configuration for Remote Desktop Session Host (RDS) Horizon Agents. Virtual Desktops are detailed at Master Virtual Desktop and Virtual Desktop Pools.
Before following this procedure, build a master RDS Session Host.
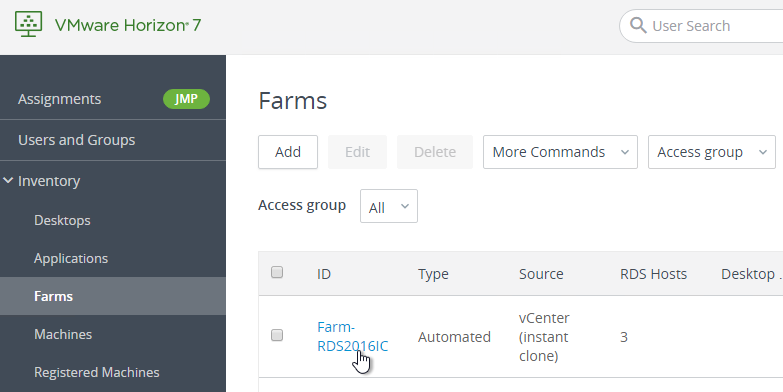
Before you can publish applications or RDS desktops, you must create an RDS Farm. An RDS Farm is a collection of identical (cloned) Remote Desktop Session Hosts. Applications must be installed identically on every machine in the farm. If you have different applications on different Remote Desktop Session Hosts, then these are different RDS Farms.
Horizon 7.7 and newer support up to 200 RDS farms, and each farm with up to 500 RDS hosts.
- Horizon 7.6 and older support up to 200 RDS farms, and each farm with up to 200 RDS hosts.
Once the RDS Farms are created, you publish icons from them by either creating a Desktop Pool or an Application Pool or both. When creating a Desktop Pool or Application Pool, all members of the RDS Farm are selected. It is not possible to select a subset of Farm members.
VMware Tech Paper Best Practices For Published Applications And Desktops in VMware Horizon 7:
- vSphere Best Practices – Hardware, Network Adapters, ESXi BIOS Settings, ESXi Power Management
- Core Services Best Practices – Active Directory, DNS, DHCP, NTP, KMS, RDS Licensing
- ESXi Host Sizing Best Practices
- RDSH Configuration Best Practices – Optimization
- Horizon 7 Best Practices – Instant Clones, Load Balancing
- User Environment Management Best Practices – Horizon Smart Policies, Folder Redirection, User Profiles, Printers, Hardware Graphics Acceleration
- App Volumes Best Practices – dedicated AppStacks
- Antivirus Best Practices
- Maintenance Operations Best Practices – scheduled reboots
RDS Farms – Instant Clones and Composer Linked Clones
Horizon 7.1 and newer offers two methods of creating RDS Farm linked clones:
- Instant Clones
- Composer Linked Clones
Instant Clones are the preferred method. Here is the process: Instant Clones for RDSH in VMware Horizon 7.1 YouTube video
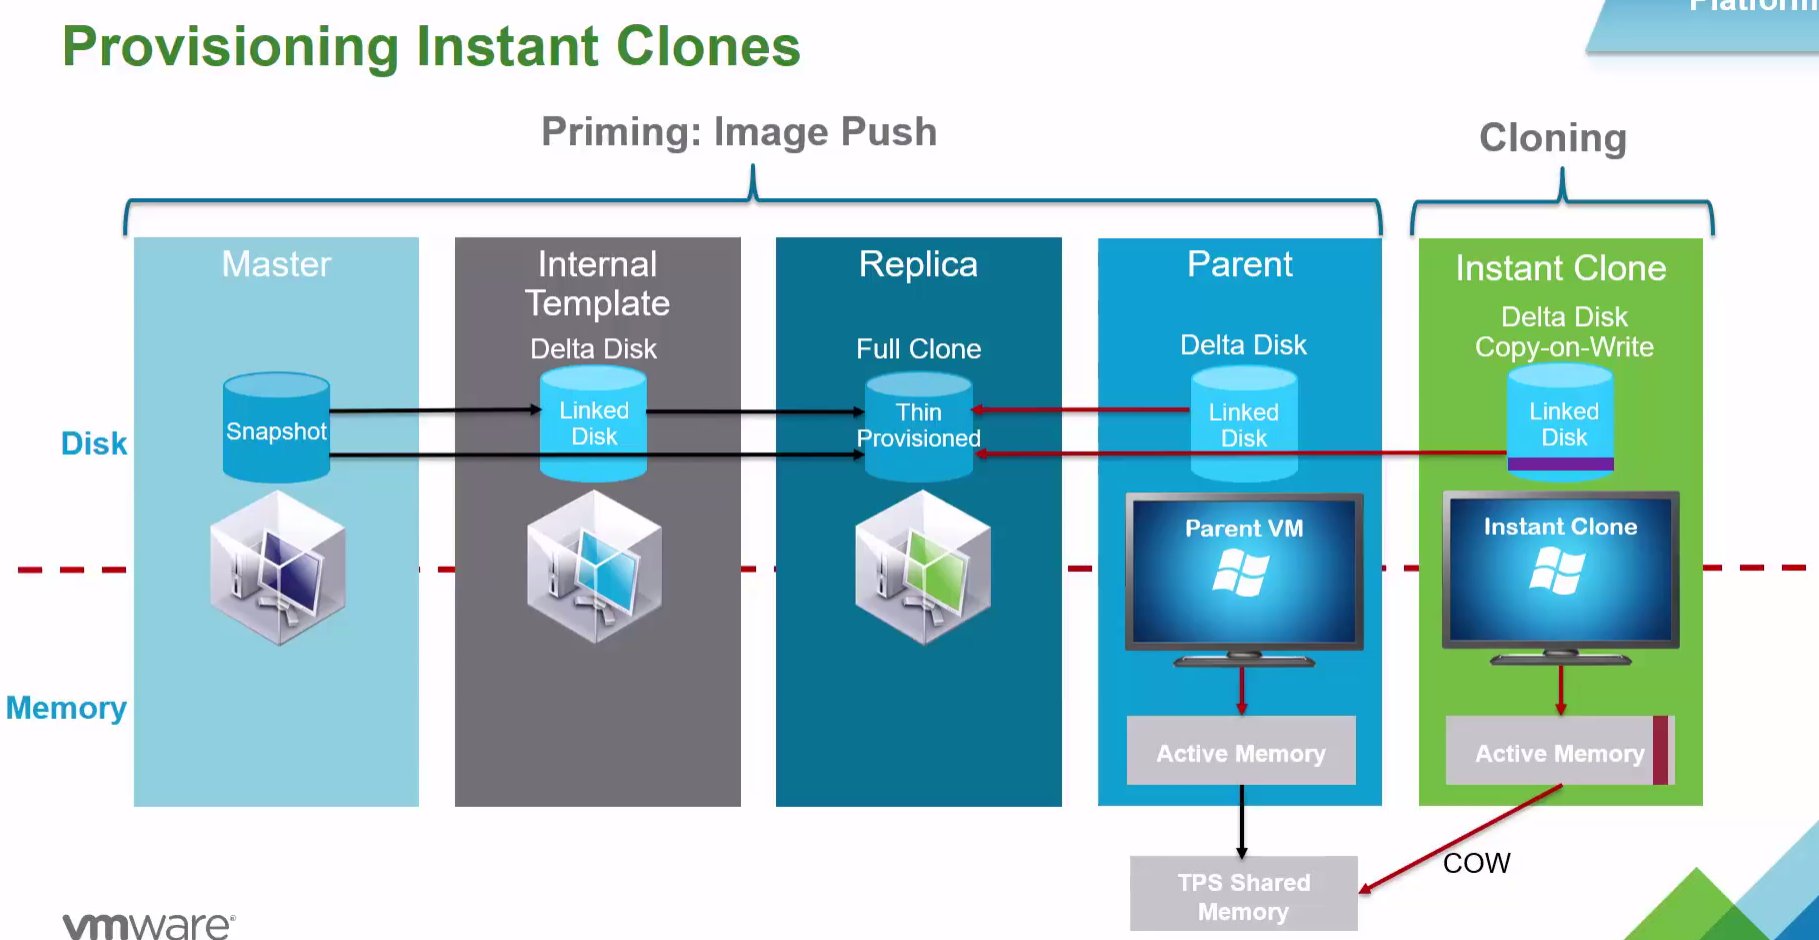
- You select a snapshot from a master image.
- Horizon creates a template VM that boots from the master snapshot. After some prep, the template VM shuts down and creates a new snapshot.
- The template snapshot is copied to a Replica VM on every LUN (datastore) that will host RDS Farm VMs.
- For each datastore, Horizon creates a Parent VM on every host in the cluster. This parent VM is powered on and running at all times.
- The linked clones can finally be created by forking the parent VM to new linked clone VMs. Notes:
- Once the Parent VMs are created, creating/recreating linked clones is fast. But it takes time to create all of the Parent VMs.
- And the Parent VMs consume RAM on every host. If you have multiple datastores and/or multiple pools, then there are multiple Parent VMs per host, all of them consuming RAM.
- You can schedule a periodic reboot of the Instant Clones, which causes the Instant Clone machines to refresh (revert) from the parent VM.
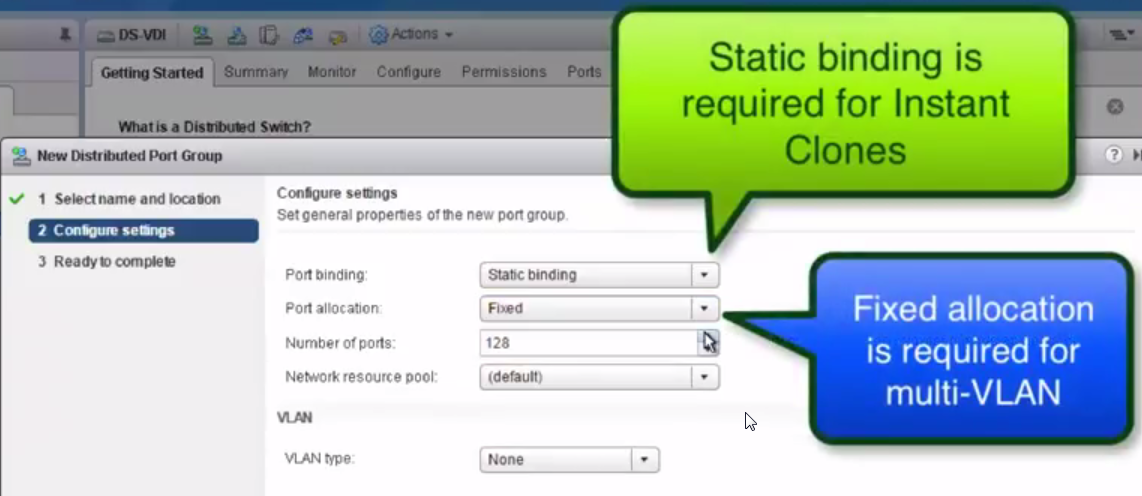
- Instant Clones require Distributed vSwitch and Distributed Port Group with Static Binding and Fixed Allocation. Standard vSwitch is not supported. Multi VLAN and vGPU for Instant Clones in VMware Horizon 7.1 YouTube video.
The other RDS Linked Clone option is Horizon Composer. Here are some notes:
- When Composer creates Linked Clones, Composer uses SysPrep with Customization Specifications. SysPrep is slow.
- SysPrep is also used whenever the RDS farm is updated with a new master image snapshot.
- No View Storage Accelerator.
- No Rebalance.
- No Refresh. The machines are persistent until you Recompose the farm.
- The delta disks continue to grow until you Recompose the farm.
- You can enable Space Reclamation to shrink the delta disks as files are deleted.
Customization Specification – Composer Linked Clones only
If you are using Instant Clones (7.1 and newer), then skip to creating the RDS farm. Customization Specifications are only needed for Composer Linked Clones.
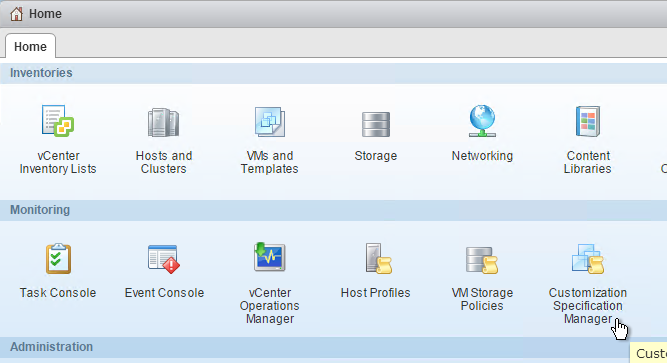
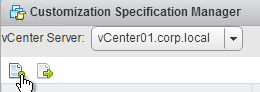
- In vCenter, from the Home page, click Customization Specification Manager.
- Click the icon to create a new Customization Specification.
- In the Specify Properties page, give the spec a name and click Next.
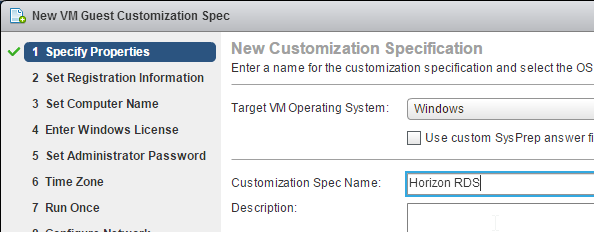
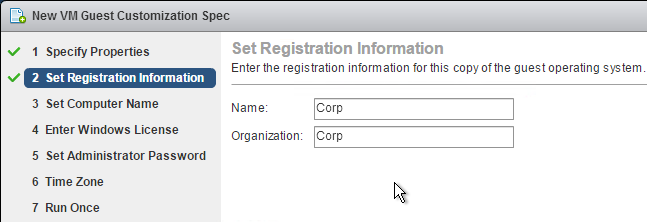
- In the Set Registration Information page, enter your normal settings and click Next.
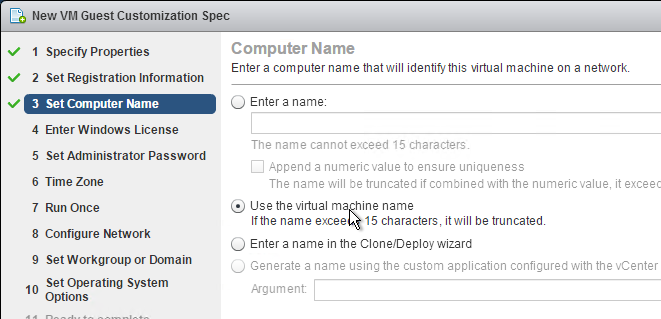
- In the Set Computer Name page, select Use the virtual machine name and click Next.
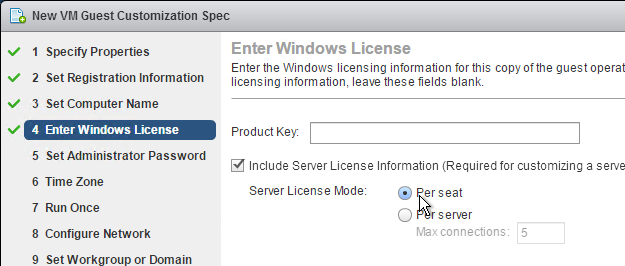
- In the Enter Windows License page, select Per seat and click Next.
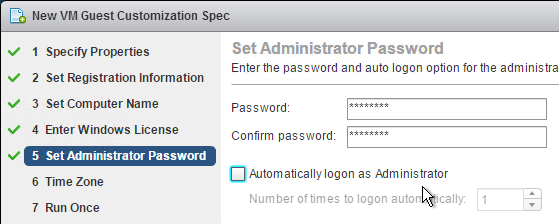
- In the Set Administrator Password page, enter the local administrator password and click Next.
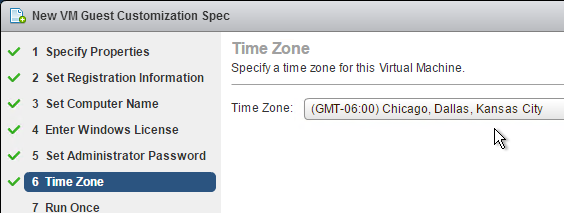
- In the Time Zone page, select the time zone and click Next.
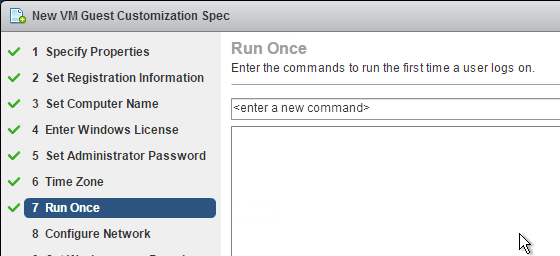
- In the Run Once page, click Next.
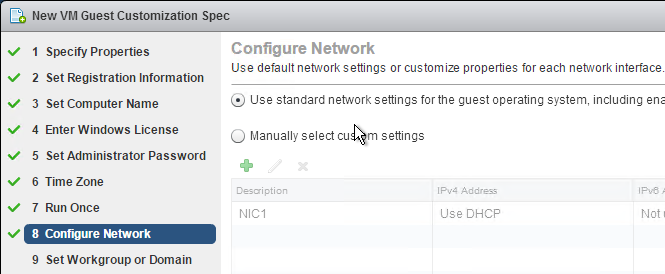
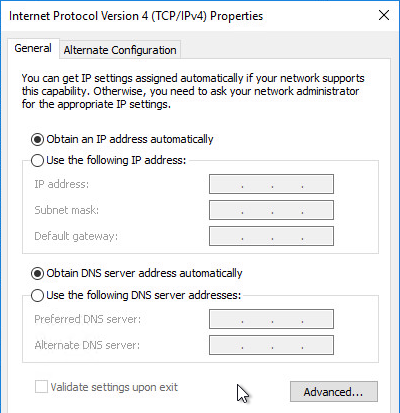
- In the Configure Network page, leave it set to Use standard network settings. Horizon requires the VMs to be configured for DHCP. Click Next.
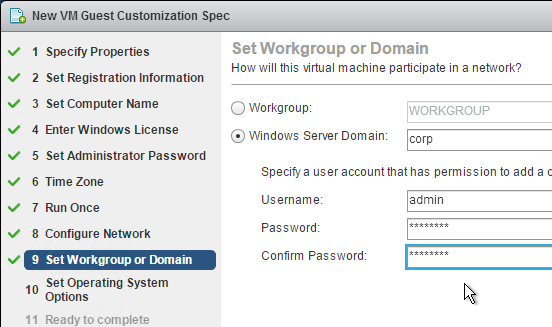
- In the Set Workgroup or Domain page, enter credentials that can join the machines to the domain, and click Next.
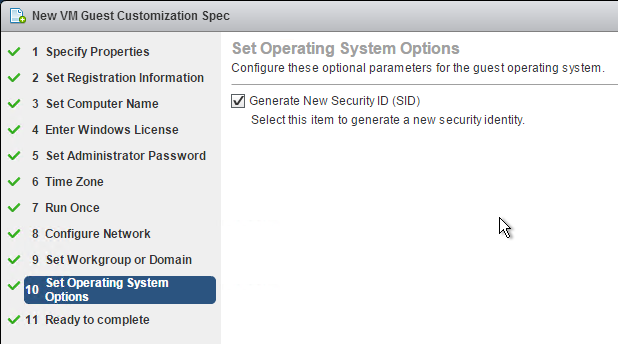
- In the Set Operating System Options page, leave the box checked, and click Next.
- In the Ready to complete page, click Finish.

Create an Automatic RDS Farm
If you upgrade vCenter to 6.7, then you must upgrade your ESXi hosts to 6.7 at the same time. Afterwards, take a new snapshot of the master image and perform a push operation. See Upgrade Instant-Clone Desktop Pools at VMware Docs.
Master Image Preparation
- Make sure your RDS master Agent has the VMware Horizon Instant Clone Agent feature, or the VMware Horizon View Composer Agent feature installed. You can install one or the other, but not both. Instant Clone Agent is the preferred option.

- Make sure your RDS master Agent is configured for DHCP.
- Computer Group Policy – Make sure the Master VM is in the same OU as the Linked Clones so the Master VM will get the computer-level GPO settings. Run gpupdate on the master after moving the VM to the correct OU. New Instant Clones do not immediately refresh group policy so the group policy settings must already be applied to the master VM. See VMware 2150495 Computer-based Global Policy Objects (GPOs) that require a reboot to take effect are not applied on instant clones.
- Shut down the master image.
- Edit the specs of the master VM to match the specs you want the linked clones to have.

- Take a snapshot of the master image.
Horizon Console
This section uses Horizon Console (https://<View_Connection_Server>/newadmin) to create a new RDS Farm. If you prefer Horizon Administrator, or if your Horizon isn’t 7.5 or newer, then skip to the next section.
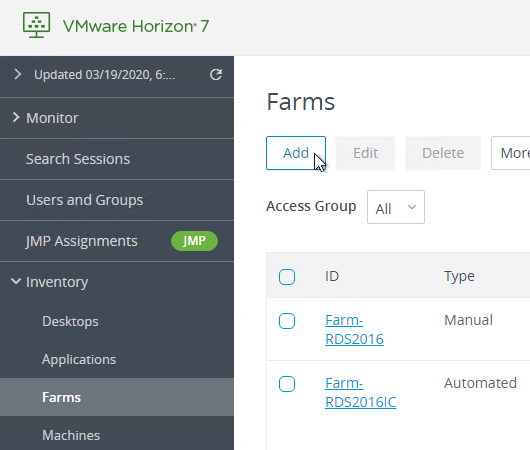
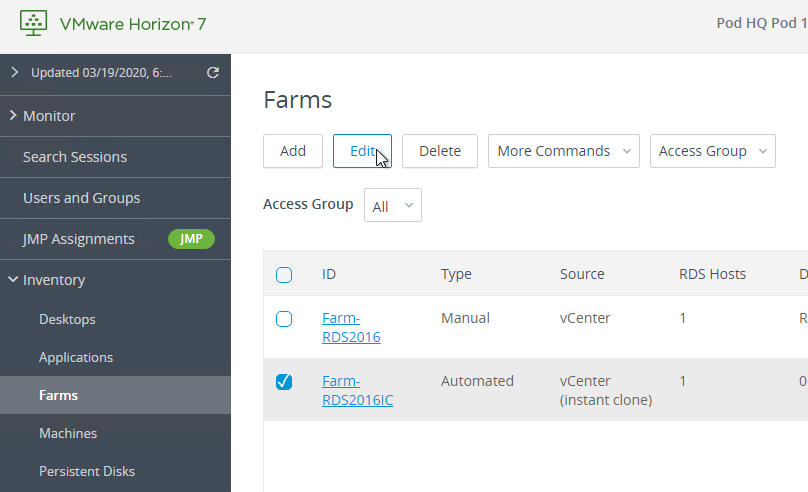
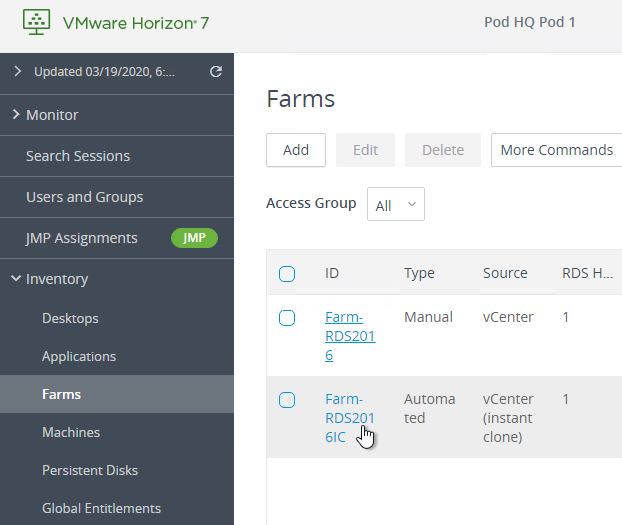
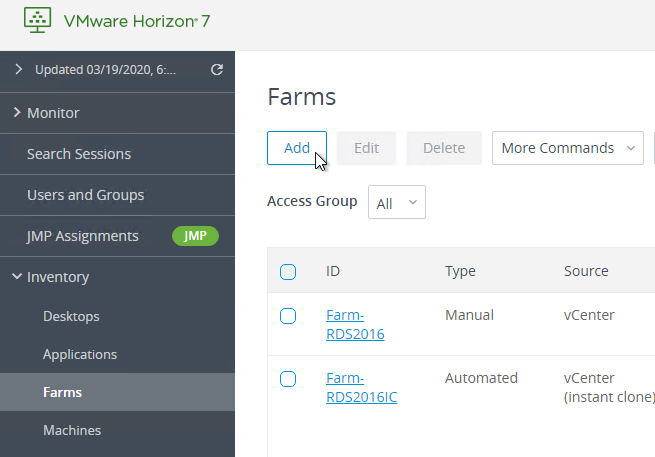
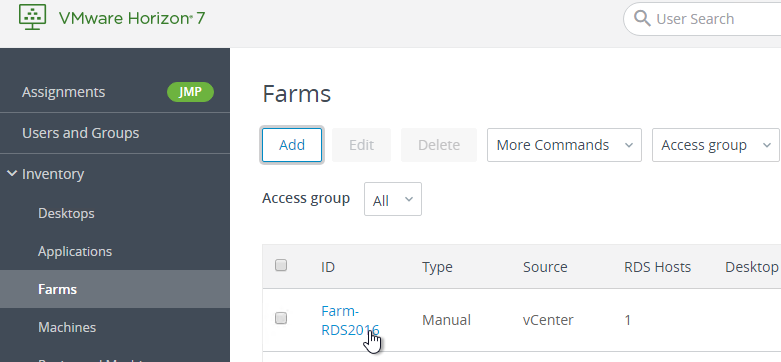
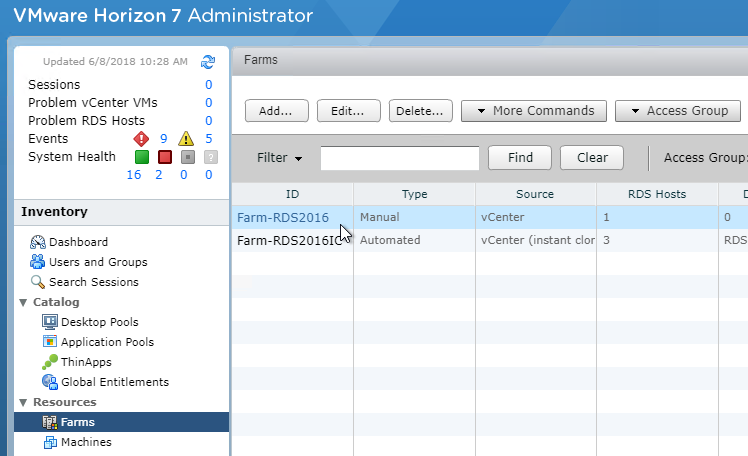
- In Horizon Console, on the left, expand Inventory, and click Farms.
- On the right, click Add.
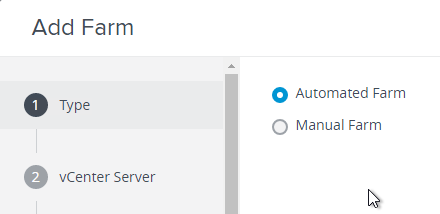
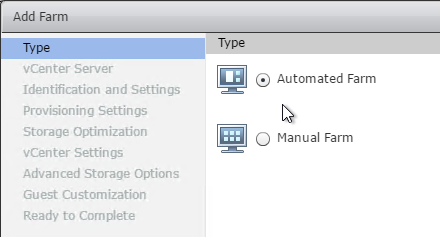
- In the Type page, select Automated Farm, and click Next.
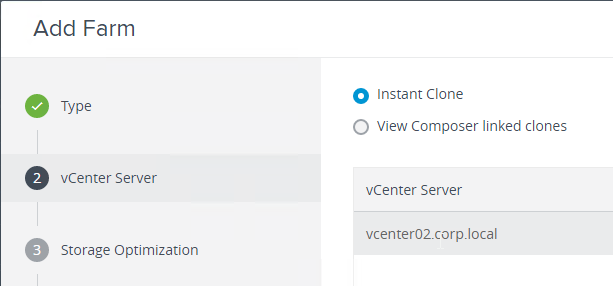
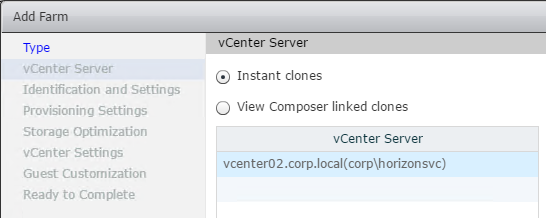
- In the vCenter Server page, select Instant Clone, select the vCenter Server, and then click Next.
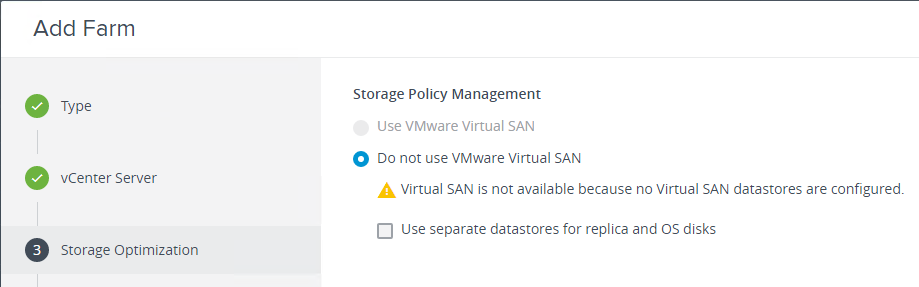
- In the Storage Optimization page, click Next.
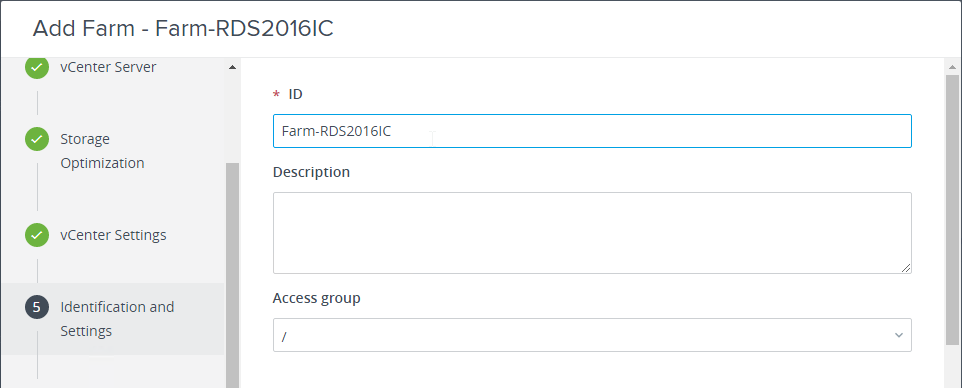
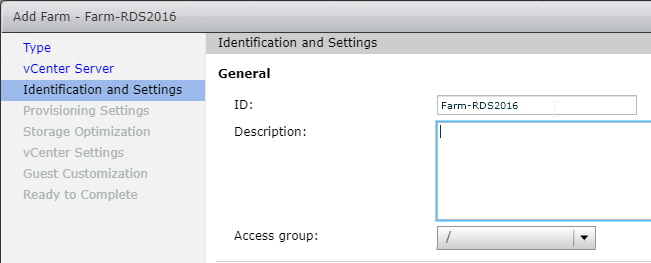
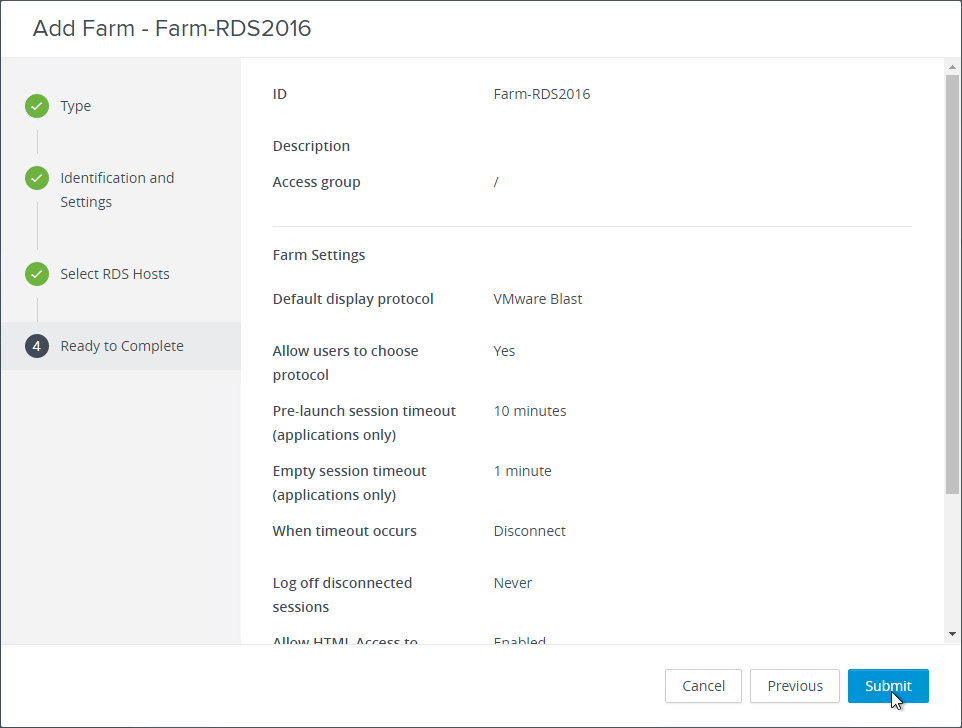
- In the Identification and Settings page:
- Enter a name for the Farm. A VM folder with the same name will be created in vCenter.
- Note: There’s no place to set the Display Name here. You do that later when creating a Desktop Pool.
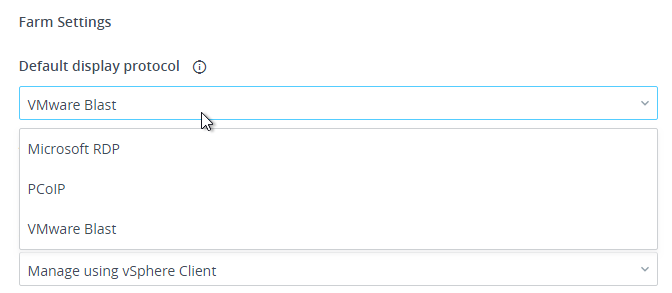
- Scroll down to the Farm Settings section.
- In the Identification and Settings page, in Horizon 7.3.1 and newer, if you set the Default display protocol to PCoIP, then HTML5 Blast won’t work unless Allow users to choose protocol is set to Yes. See VMware Communities Upgraded from 7.0.1 to 7.3.1, getting “You cannot access your applications or desktops”… error.
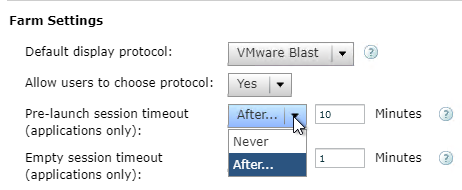
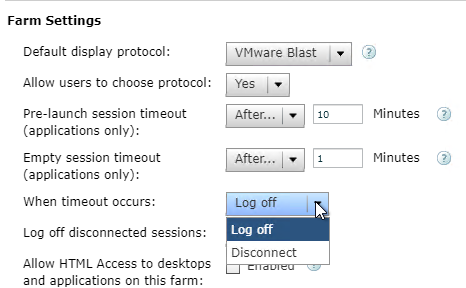
- Horizon 7.2 and newer support Pre-launch. If pre-launch is enabled on a published app, when the user logs into Horizon Client, an empty RDS Session is immediately established. When the user double clicks an icon, the program launches quickly since there’s already a pre-launched session. When the user closes Horizon Client, the pre-launch session is disconnected for the duration specified here. The minimum duration is 10 minutes.
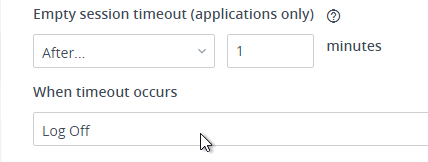
- For Empty session timeout, set it to 1 minute. For When timeout occurs, set it to Log off. You usually want the session to end when users close all of their applications.
- For Log off disconnected sessions, specify a disconnect timer. This is in addition to the idle timer configured in Global Settings.

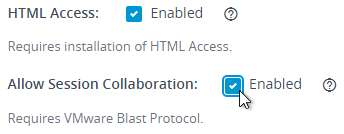
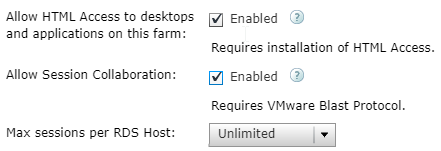
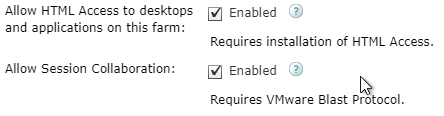
- To access the Pools/Farm from a web browser using HTML Blast, check the Enabled box next to Allow HTML Access.
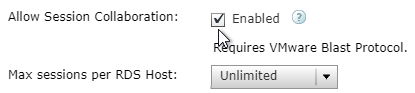
- There’s a Allow Session Collaboration checkbox, which adds a VMware Horizon Collaboration icon in the system tray of the remote desktop, which lets you invite users to collaborate. See Session Collaboration for details.
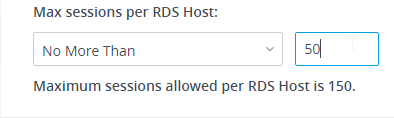
- Max sessions per RDS Host will block connections if this number is exceeded.
- Click Next.
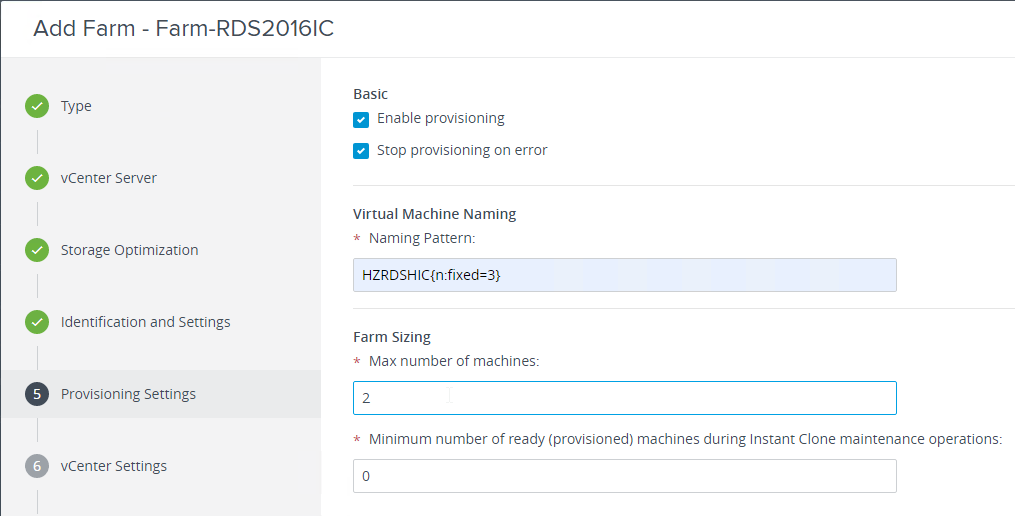
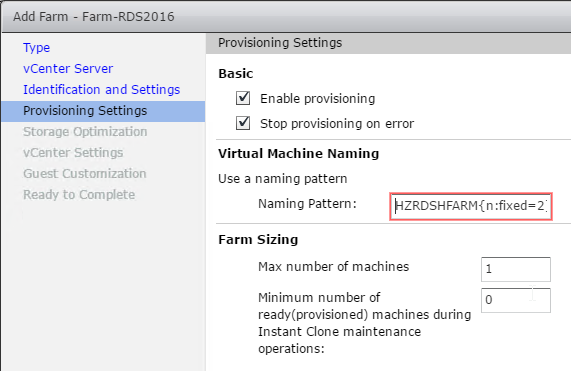
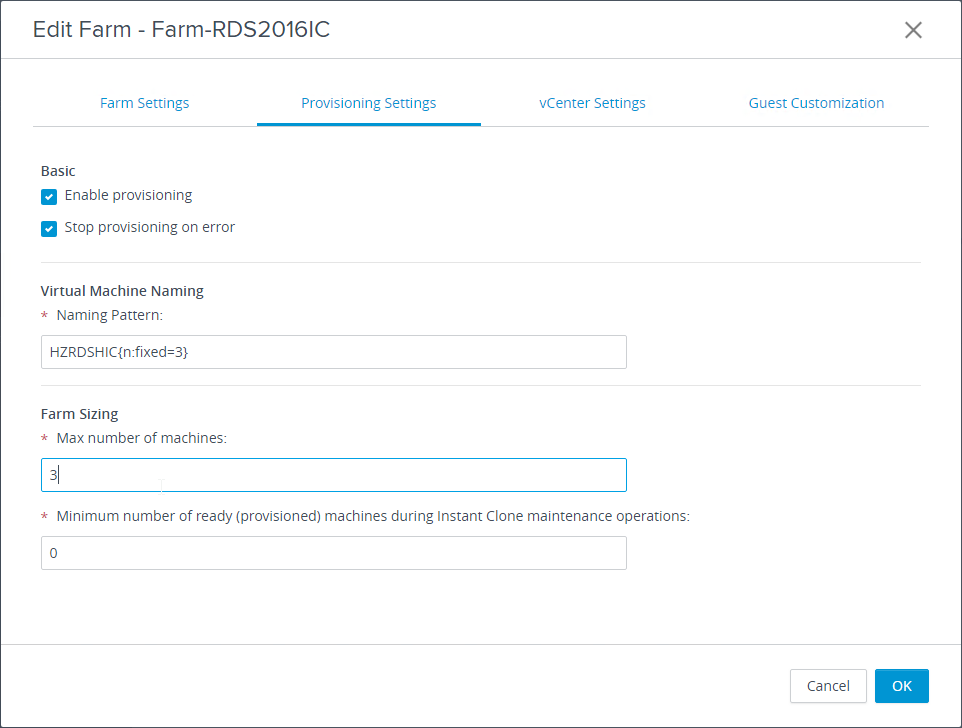
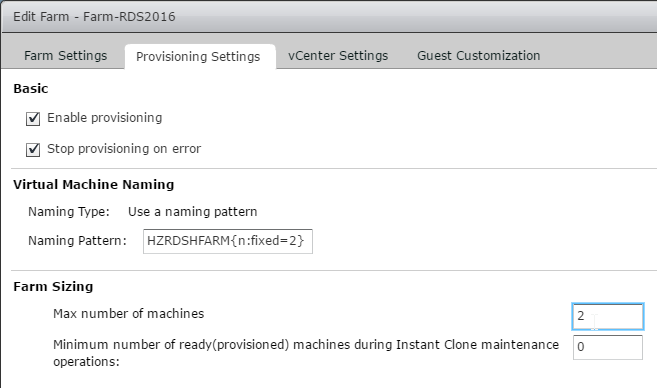
- In the Provisioning Settings page:
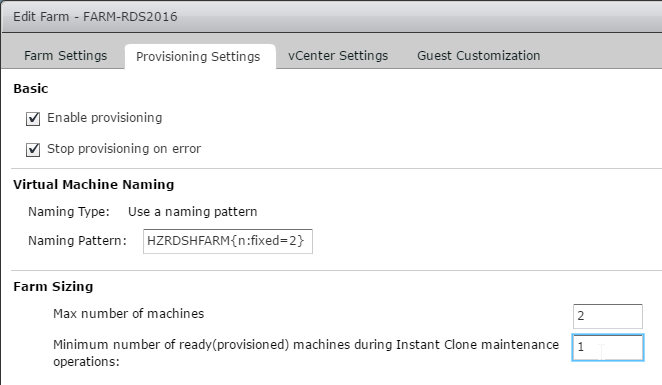
- Enter a Naming Pattern. Make sure the name includes {n:fixed=3} or something like that.
- In Farm Sizing, enter the number of machines to create.
- Click Next.
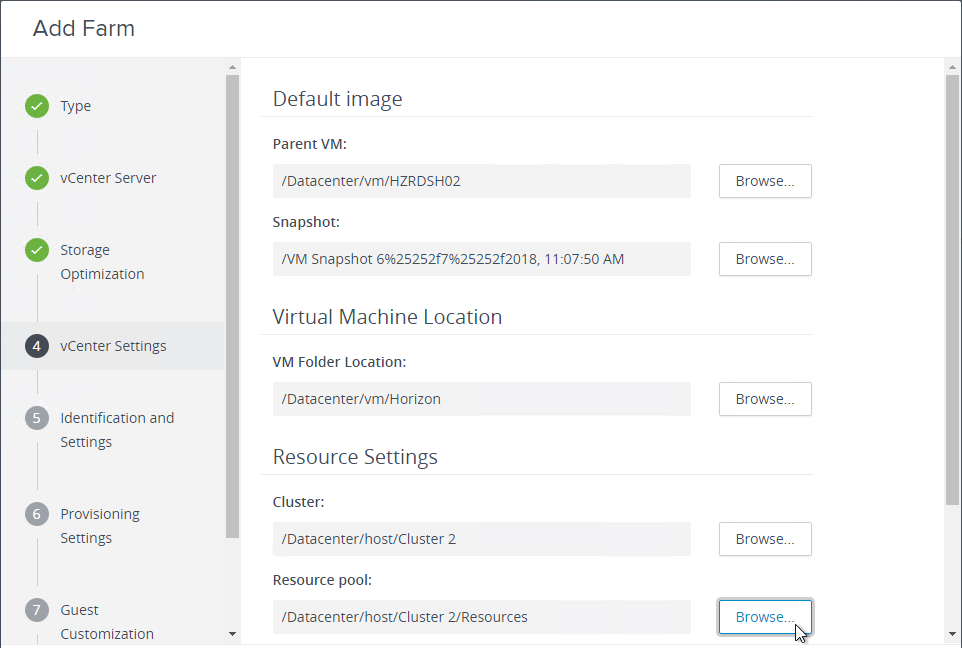
- In the vCenter Settings page, click Browse next to each option and make a selection. These are self-explanatory. Then click Next.
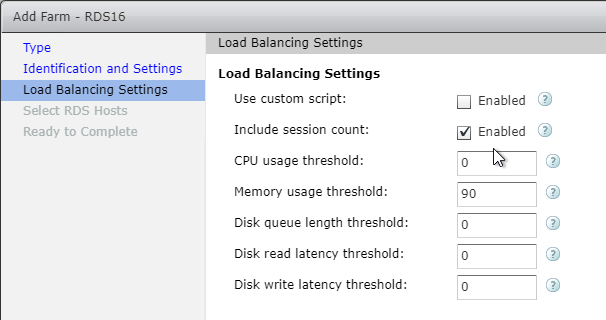
- Horizon Administrator 7.8 and newer let you configure Load Balancing Settings for the RDS Farm. You cannot yet configure these settings in Horizon Console. After the RDS Farm is created, you can use Horizon Administrator to edit these settings.
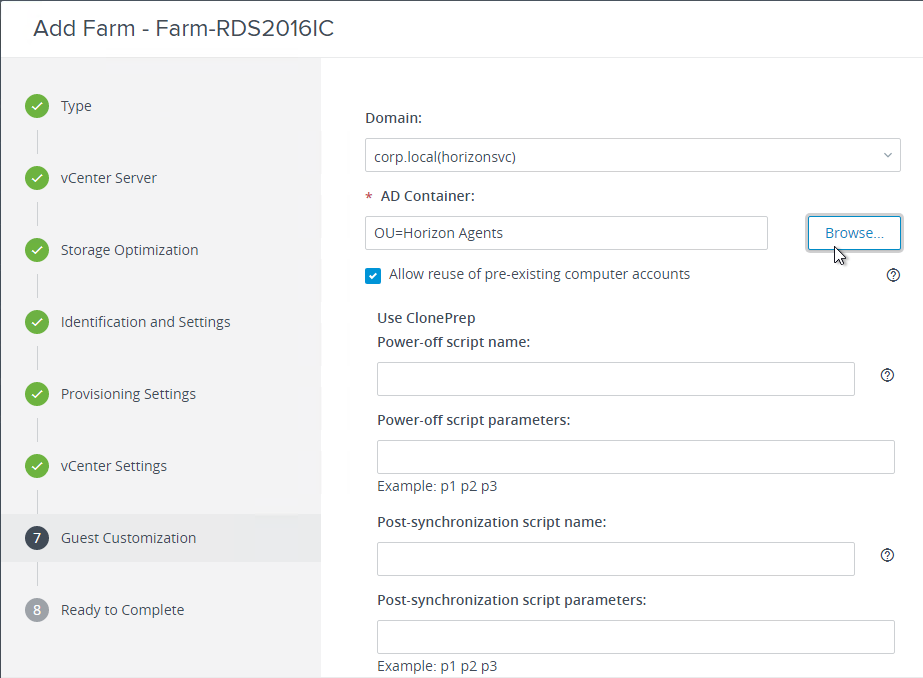
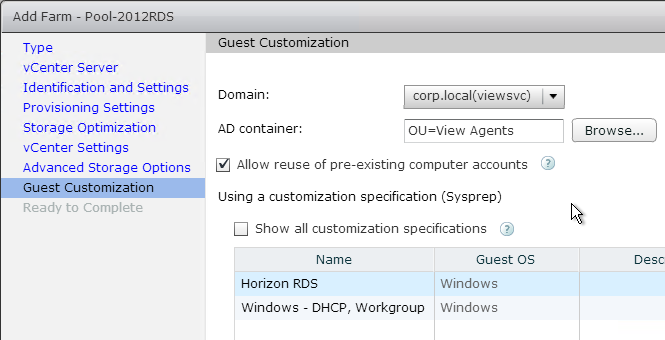
- In the Guest Customization page:
- Select an OU to place the new virtual machines. This should be an OU that is configured with group polices for the RDSH machines.
- Consider the Allow reuse of pre-existing computer accounts check box.
- Click Next.
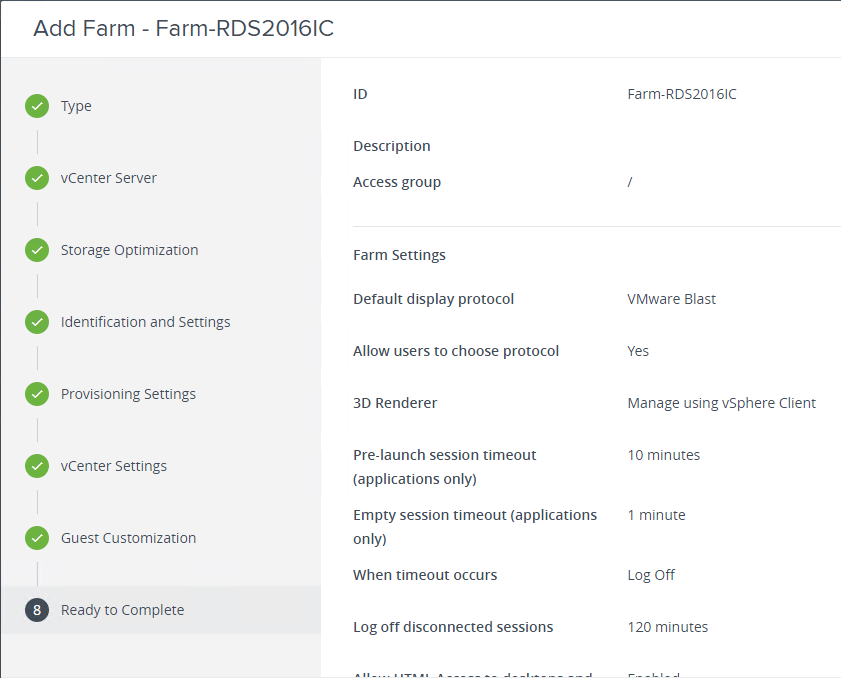
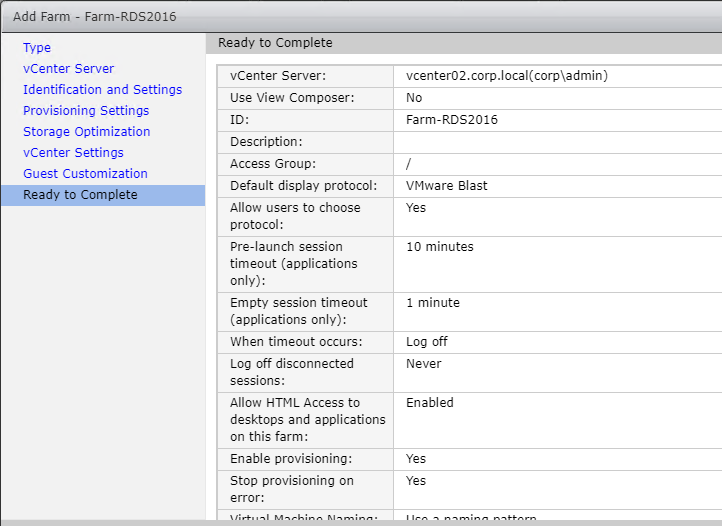
- In the Ready to Complete page, click Submit.
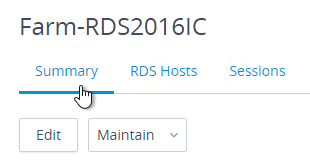
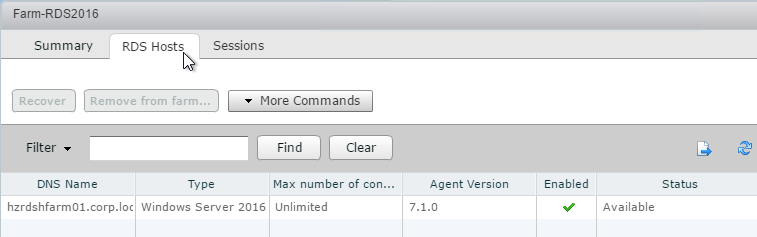
To view the status of RDS Farm creation:
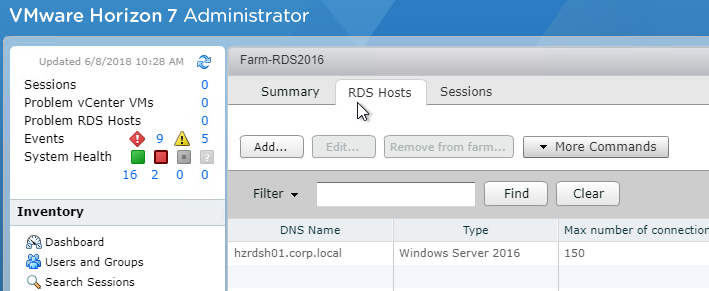
- Click the farm name.

- The bottom of the Summary tab shows you the State of the Publishing progress.

- You can watch the progress in vSphere Client. It goes through a couple longer tasks, including cloning the snapshot, and creating a digest file.
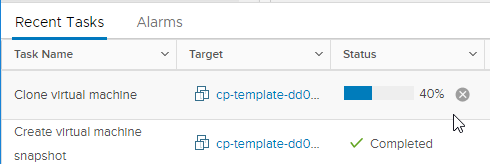
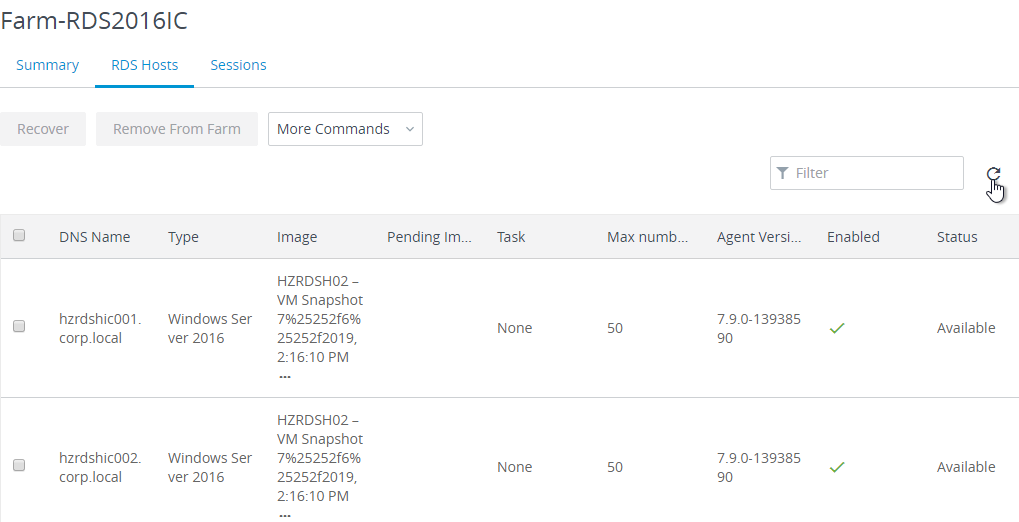
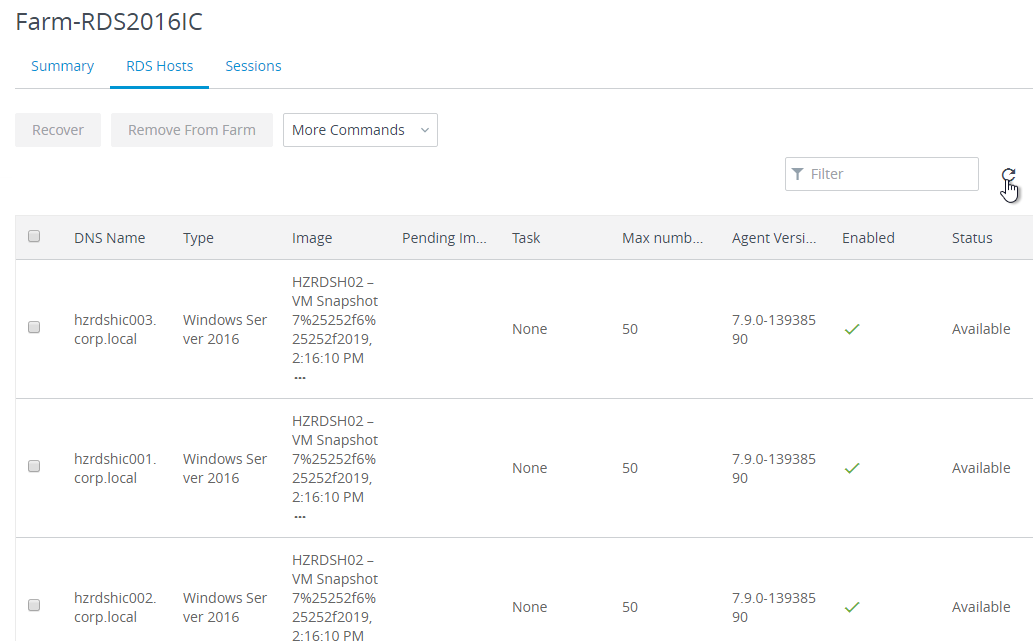
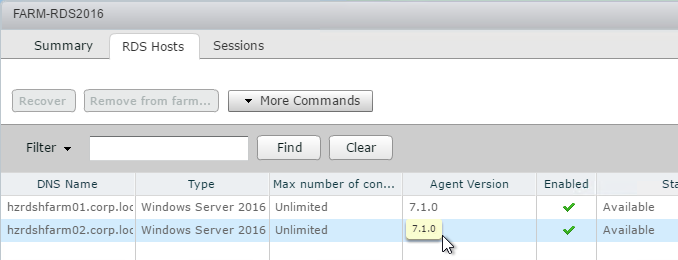
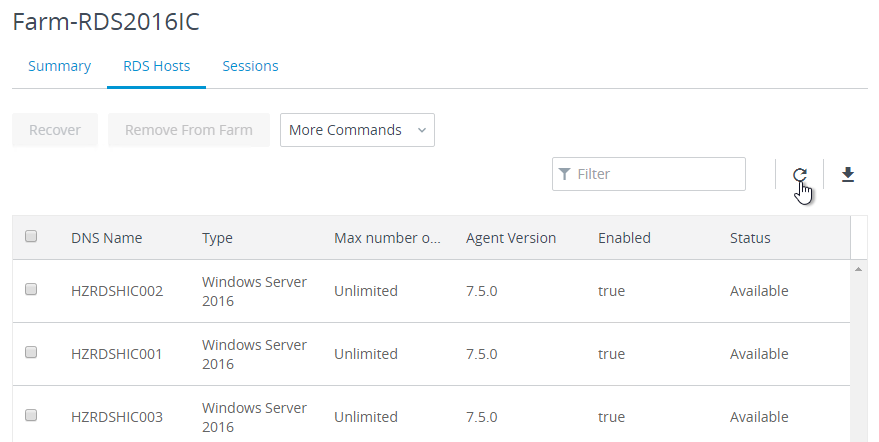
- Eventually the tab named RDS Hosts will show the new virtual machines.
- Once the RDS Hosts are created, you publish resources from them by either creating a Desktop Pool, or an Application Pool, or both.
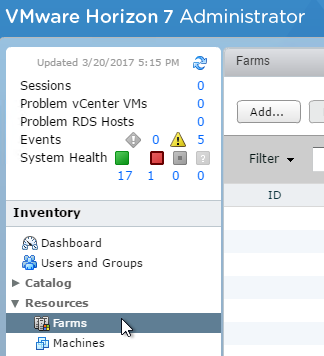
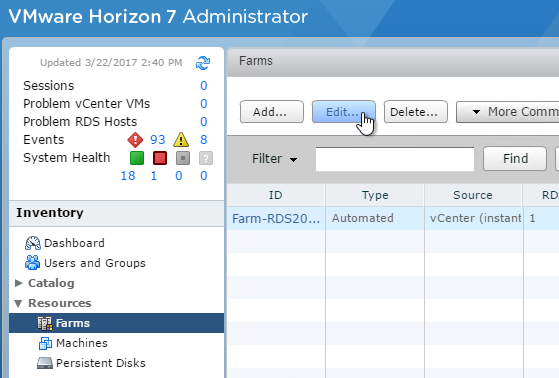
Horizon Administrator
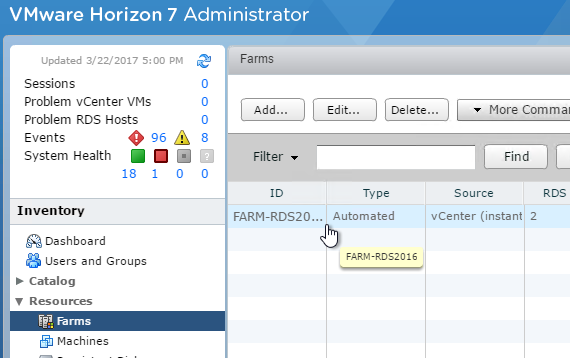
- In Horizon Administrator, on the left, expand Resources, and click Farms.
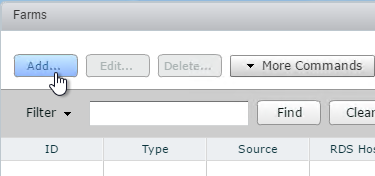
- On the right, click Add.
- In the Type page, select Automated Farm, and click Next.
- In the vCenter Server page, select Instant clones or View Composer linked clones depending on which agent you have installed on your RDS master Agent machine.
- Select the vCenter Server, and click Next.
- In the Identification and Settings page, enter a name for the Farm. A VM folder with the same name will be created in vCenter.
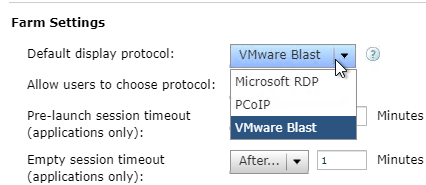
- In the Farm Settings section, set Default Display protocol to VMware Blast.
- In Horizon 7.3.1 and newer, if you set the Default display protocol to PCoIP, then HTML5 Blast won’t work unless Allow users to choose protocol is set to Yes. See VMware Communities Upgraded from 7.0.1 to 7.3.1, getting “You cannot access your applications or desktops”… error.
- Horizon 7.2 and newer support Pre-launch. If pre-launch is enabled on a published app, when the user logs into Horizon Client, an empty RDS Session is immediately established. When the user double clicks an icon, the program launches quickly since there’s already a pre-launched session. When the user closes Horizon Client, the pre-launch session is disconnected for the duration specified here. The minimum duration is 10 minutes.
- For Empty session timeout, set it to 1 minute. For When timeout occurs, set it to Log off. You usually want the session to end when users close all of their applications.
- For Log off disconnected sessions, specify a disconnect timer. This is in addition to the idle timer configured in View Configuration > Global Settings.
- To access the Pools/Farm from a web browser using HTML Blast, check the Enabled box next to Allow HTML Access.
- Horizon 7.4 adds a new Allow Session Collaboration checkbox, which adds a VMware Horizon Collaboration icon in the system tray of the remote desktop, which lets you invite users to collaborate. See Session Collaboration for details.
- Click Next.
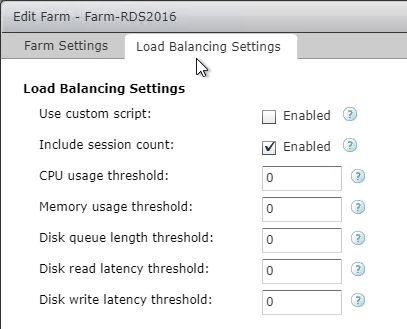
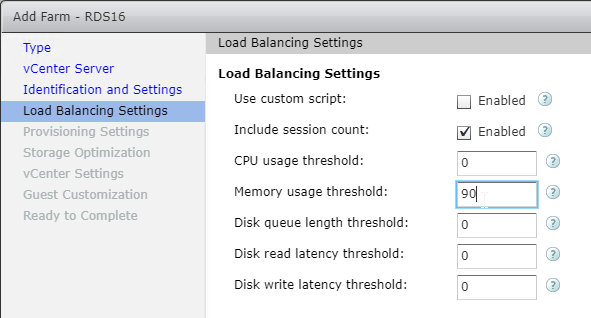
- Horizon 7.8 and later have a Load Balancing Settings page that lets you configure the load evaluator rules without having to modify any script. In general, use stable, non-fluctuating rules like session count and Memory usage. Note that CPU usage tends to wildly fluctuate and can prematurely disable connections to an RDS Host. Click Next when done configuring rules.
- In the Provisioning Settings page, enter a naming pattern. Make sure the name includes {n:fixed=3} or something like that.
- Enter the number of machines to create, and click Next.
- In the Storage Optimization page, click Next.

- In the vCenter Settings page, click Browse next to each option, and make a selection.
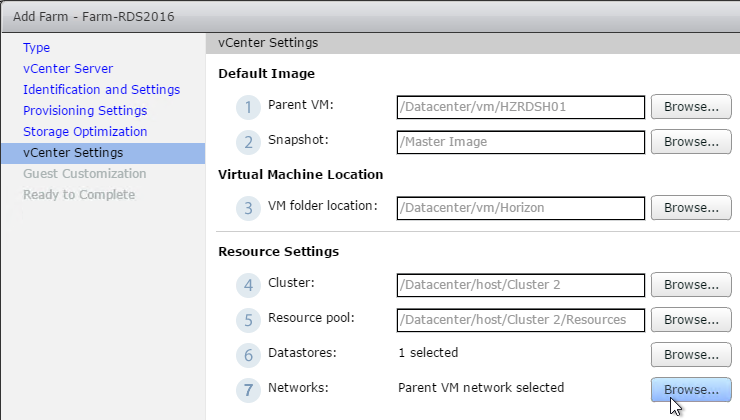
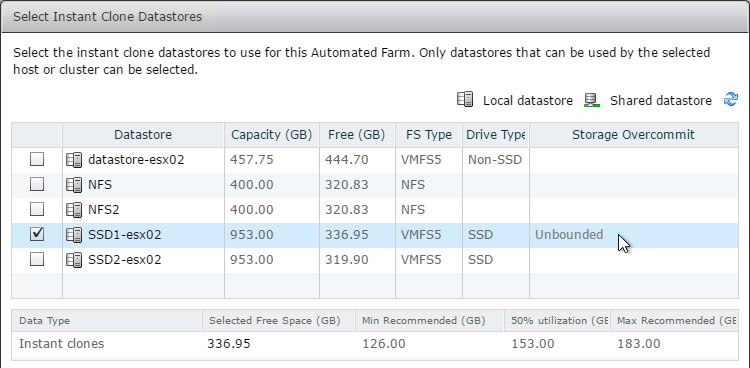
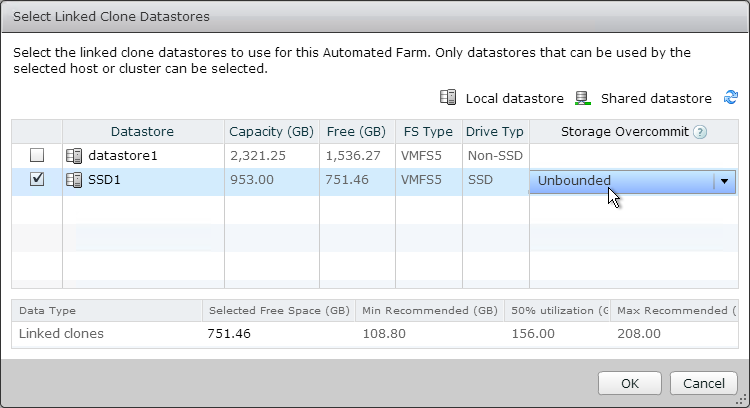
- When selecting a datastore, Instant Clones sets the Storage Overcommit to Unbounded automatically. For Composer Linked Clones, set it to Unbounded. Click OK, and then click Next.
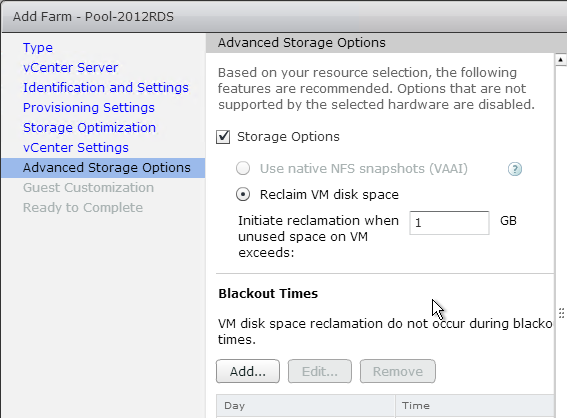
- If Composer, in the Advanced Storage Options page, decide if you want space reclamation or not. Space reclamation does reduce disk space but increases IOPS while the operation is occurring. If space reclamation is enabled, also configure a Blackout window so the increased IOPS does not affect production usage. Scroll down.
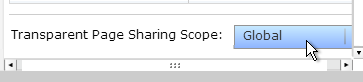
- If you scroll down, you’ll see an option for Transparent Page Sharing. By default it is disabled. You can enable it by setting it to Global. This should reduce some memory consumption. Click Next.
- For both Instant Clones and Composer, in the Guest Customization page, select an OU.
- Consider the Allow reuse of pre-existing computer accounts check box.
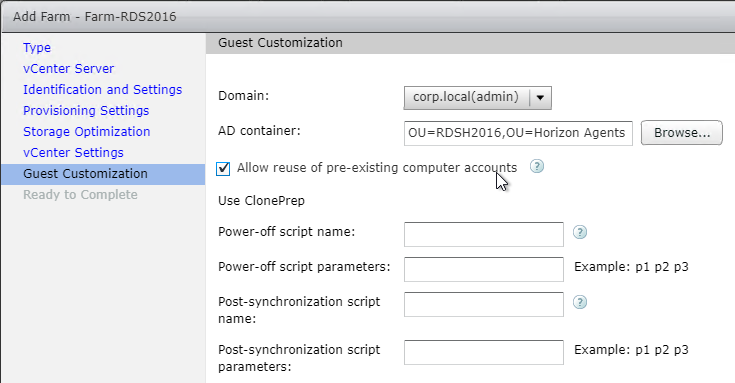
- For Composer Linked Clones, select a customization specification, and click Next.
- In the Ready to Complete page, click Finish.
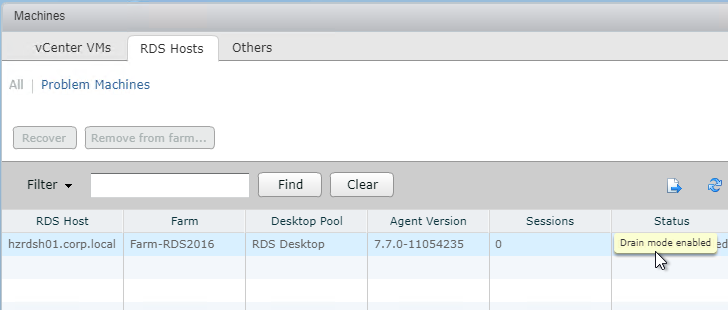
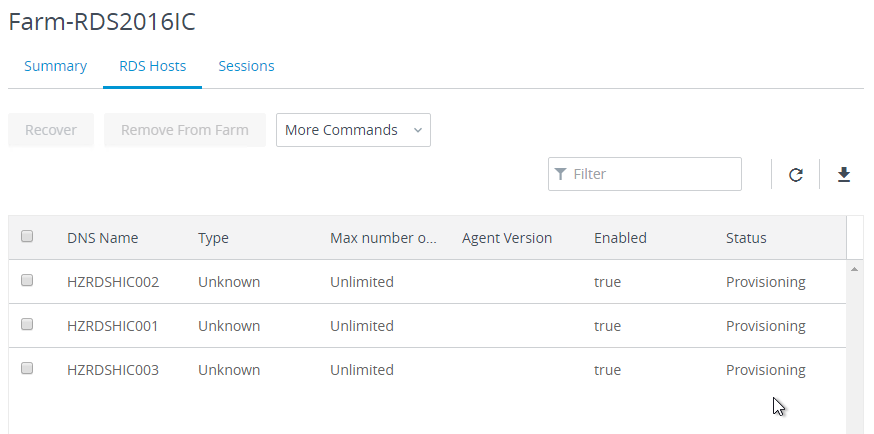
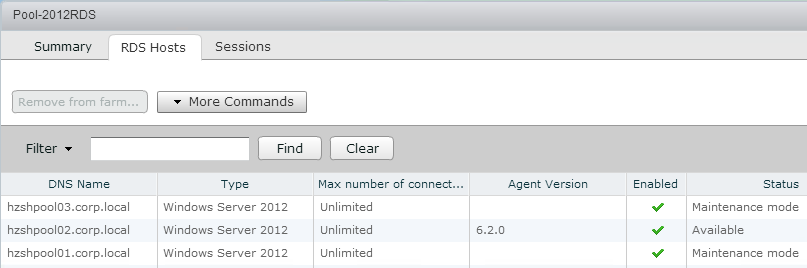
- If you double-click the farm, on the RDS Hosts tab, you can see the progress of the farm creation operation.
- Horizon 7.7 and newer show you the status of RDS Drain Mode, which can be enabled on the RDS Host by running change logon /drain.
- If Composer, since RDS Farms use SysPrep, it will take some time before they become available.
- Once the RDS Hosts are created, you publish resources from them by either creating a Desktop Pool, or an Application Pool, or both.
Add more RDS Hosts to an Automatic Farm – Instant Clones and Composer Linked Clones
Horizon Console
This section uses Horizon Console (https://<View_Connection_Server>/newadmin) to add RDS hosts to an existing RDS Automatic Farm. If you prefer Horizon Administrator, or if your Horizon isn’t 7.5 or newer, then skip to the next section.
- On the left, expand Inventory, and click Farms.
- On the right, select an existing Automated Farm, and click Edit.
- Switch to the Provisioning Settings tab and change the Max number of machines. Then click OK.
- If the parent VM is already running on destination host/datastore, then it should only take a minute to add the new VM.
- The RDS Hosts tab of the RDS farm shows the new RDS host(s).
Horizon Administrator
- On the left, expand Resources, and click Farms.
- On the right, highlight an existing Automated Farm, and click Edit.
- Switch to the Provisioning Settings tab, and change the Max number of machines. Then click OK.
- For Instant Clones, if the parent VM is already running on destination host/datastore, then it should only take a minute to add the new VM.
- Composer Linked Clones use SysPrep, which takes a while to add the virtual machines. The new VMs reboot several times during the provisioning and customization process.
- The farm now has new RDS host(s).
Update an Automatic Farm – Instant Clones and Composer Linked Clones
Master Image Preparation
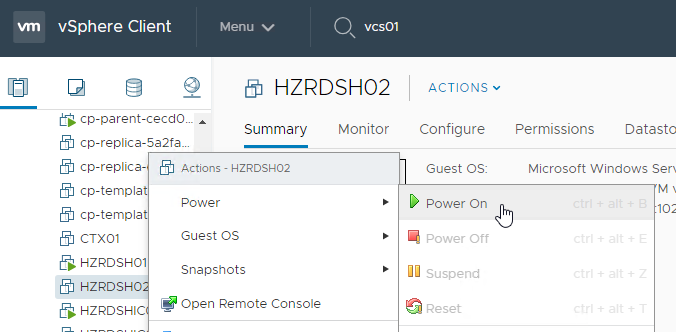
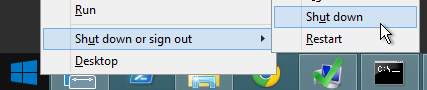
- Power on the master session host.
- Login and make changes.
- If App Volumes agent is installed, you might have to disable svservice before you can make changes. See VMware 2129528 Virtual Machine changes are not saved in App Volumes.
- After making your changes, shut down the master session host.
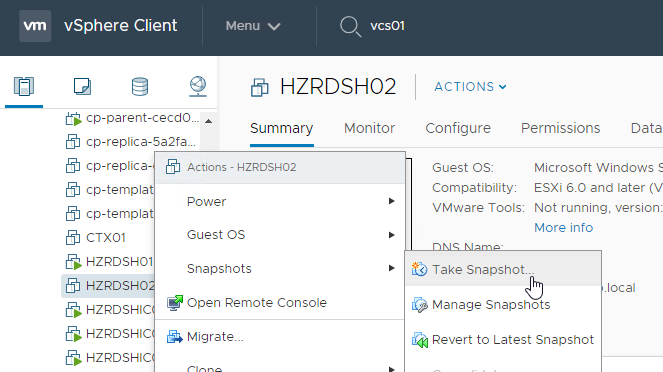
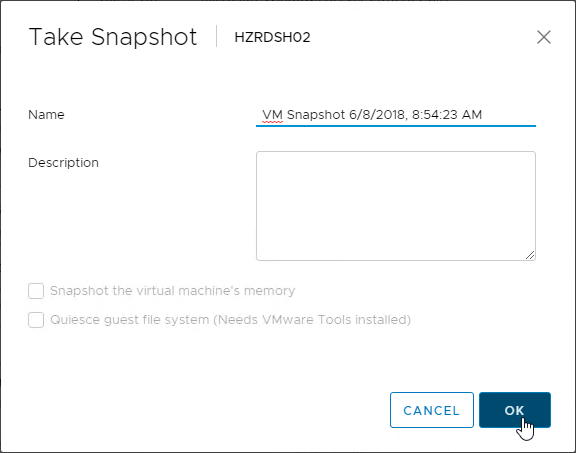
- Right-click the virtual machine, and take snapshot. You must create a new snapshot.
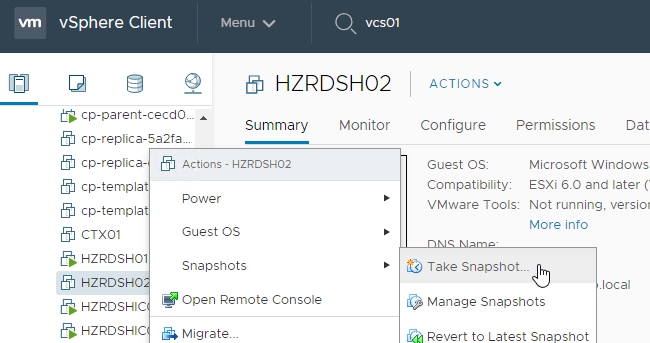
- Name the snapshot, and click OK.
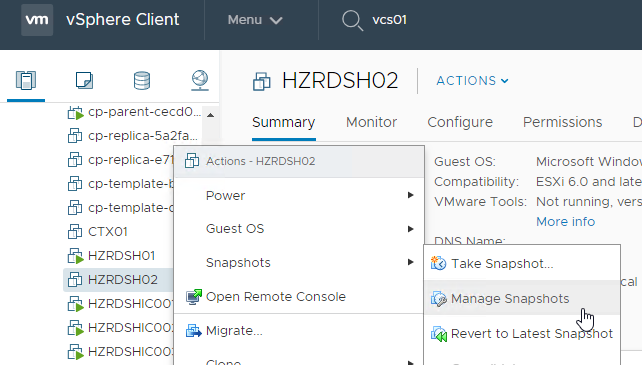
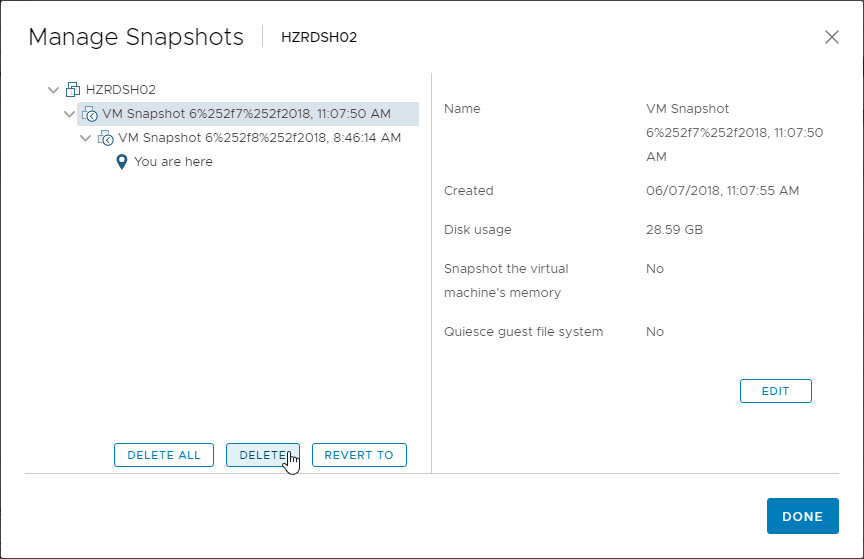
- You’ll need to periodically delete the older snapshots. Right-click the master VM, and click Manage Snapshots.
- Delete one or more of the snapshots.
Horizon Console
This section uses Horizon Console (https://<View_Connection_Server>/newadmin) to add RDS hosts to an existing RDS Automatic Farm. If you prefer Horizon Administrator, or if your Horizon isn’t 7.5 or newer, then skip to the next section.
- In Horizon Console, go to Inventory > Farms.
- Click the farm name’s link.
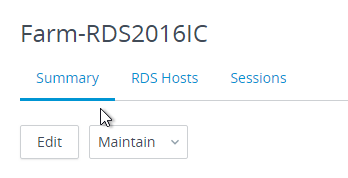
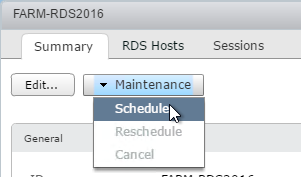
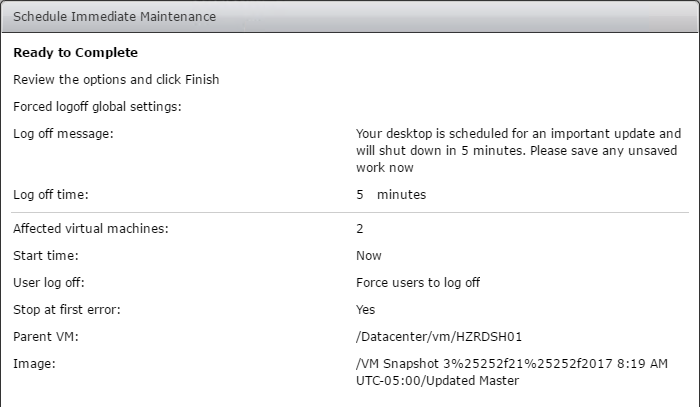
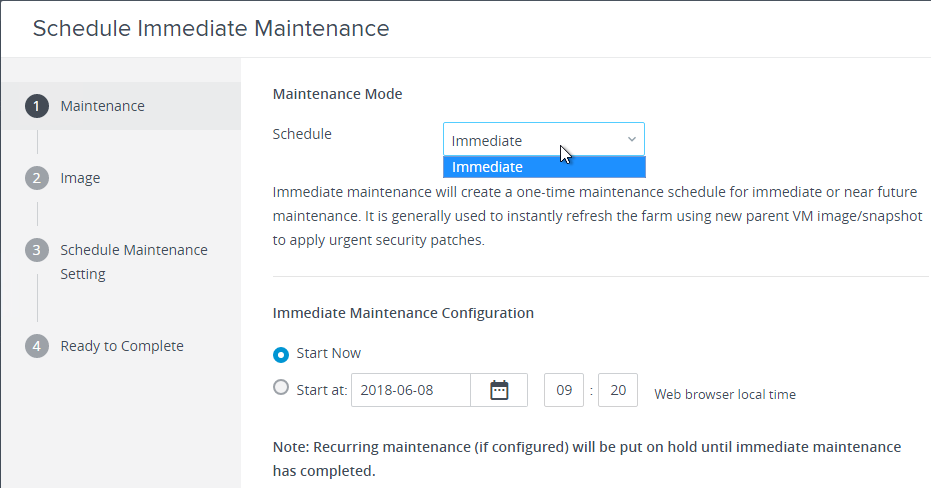
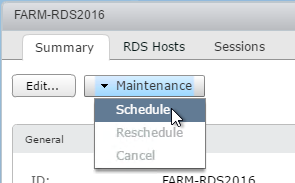
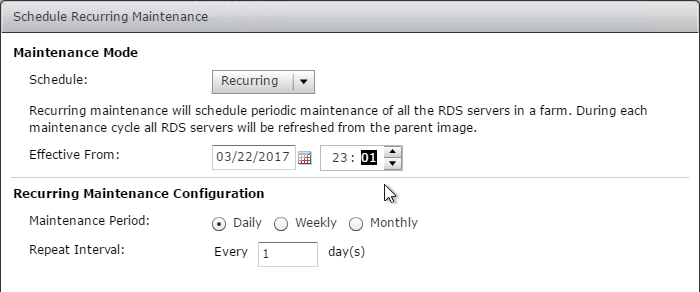
- On the Summary tab, click Maintain, and then click Schedule.
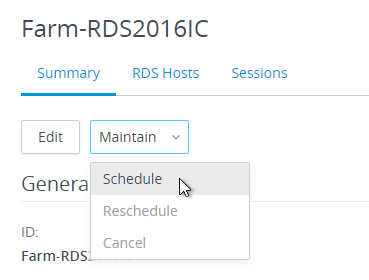
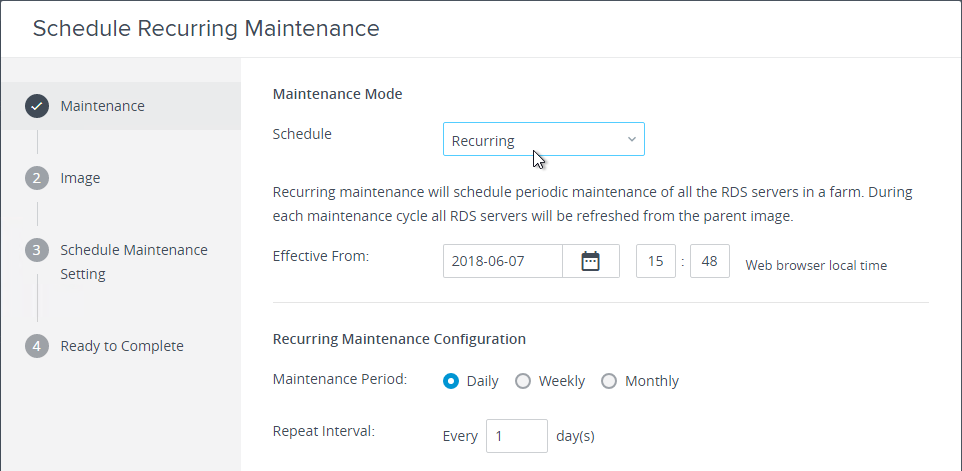
- One option is to schedule Recurring reboots, which revert the RDS Hosts to a clean state.
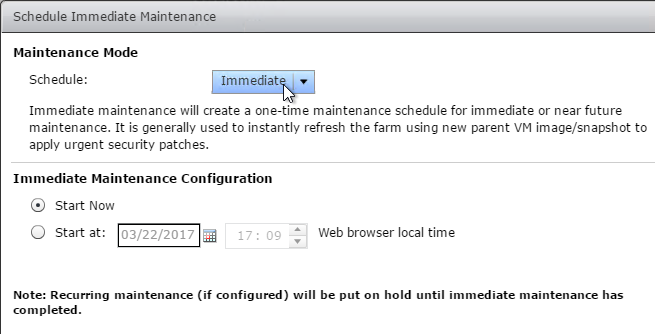
- To push out an updated Master Image, change the Schedule to Immediate.
- Select Start Now, or select Start at a future date/time. Click Next.
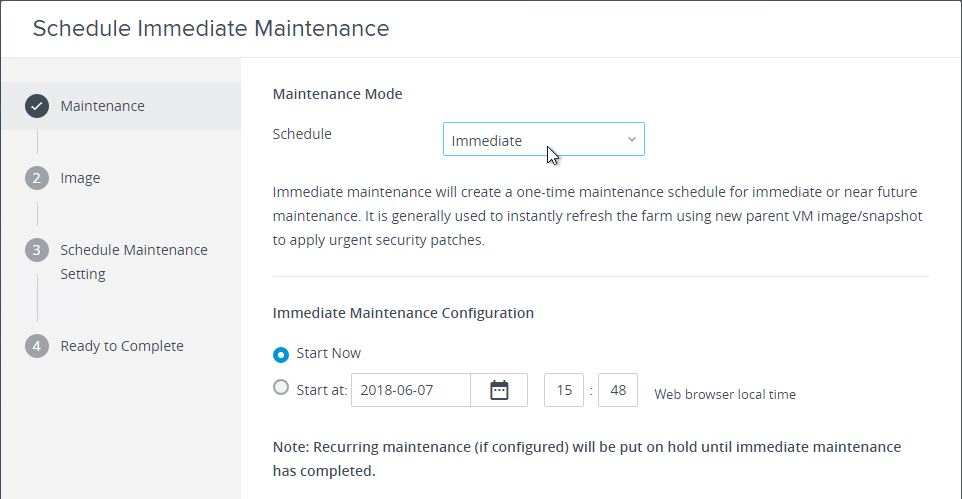
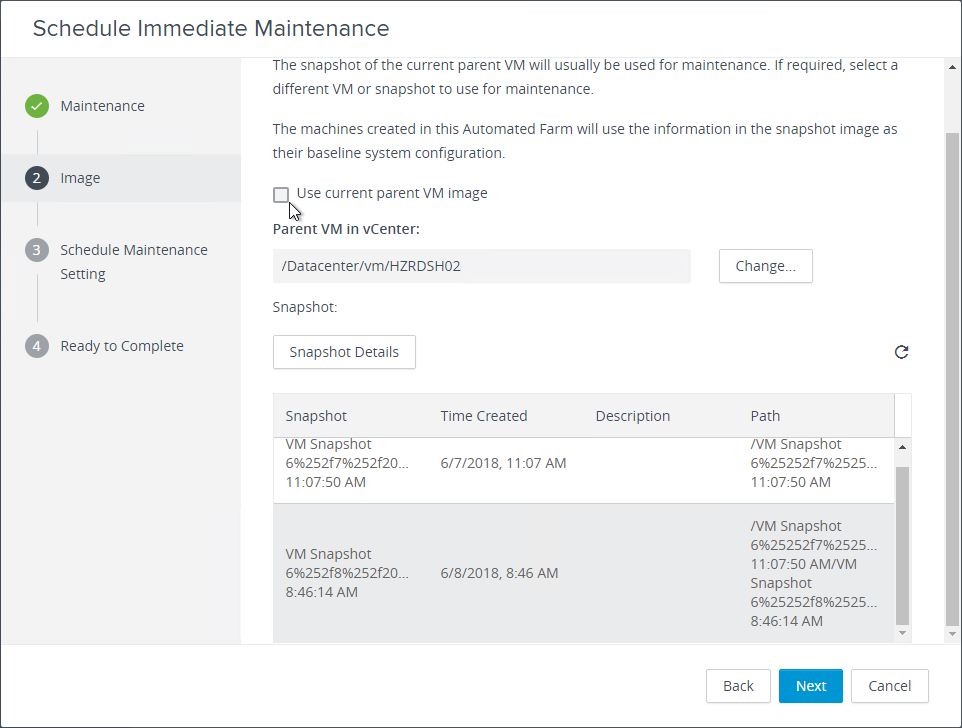
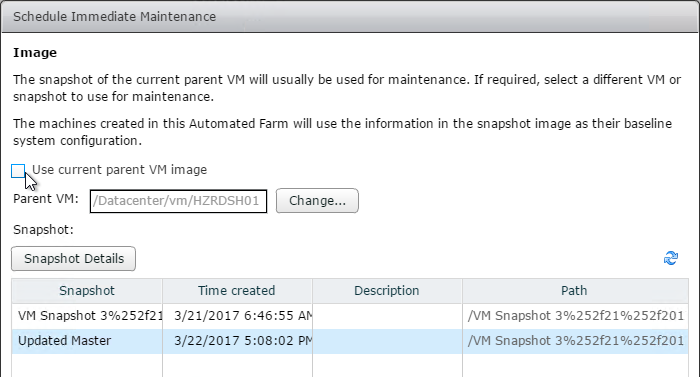
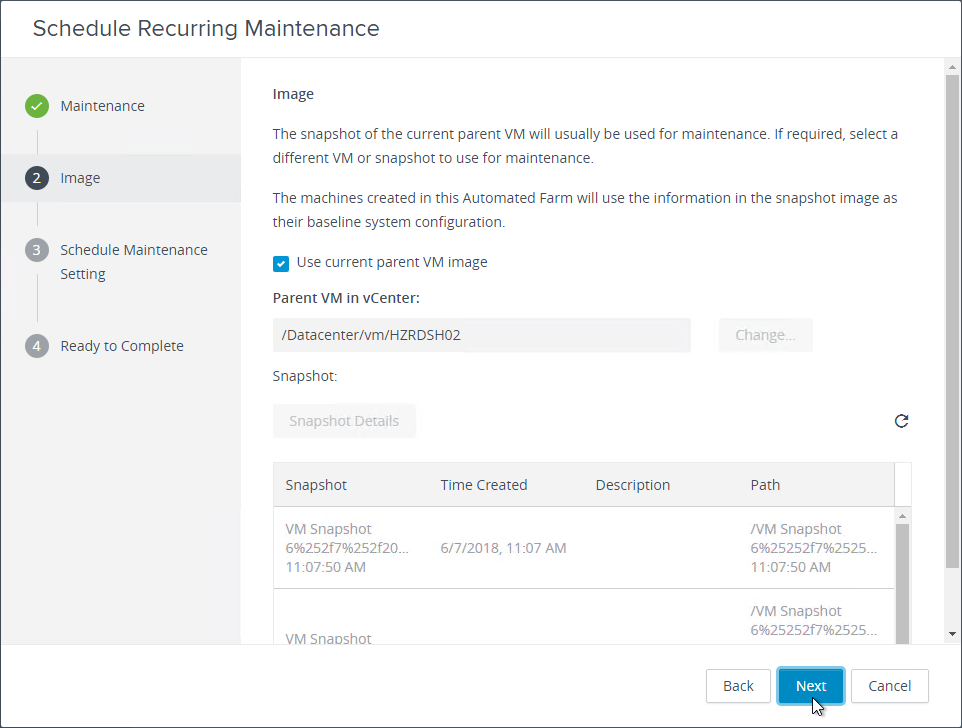
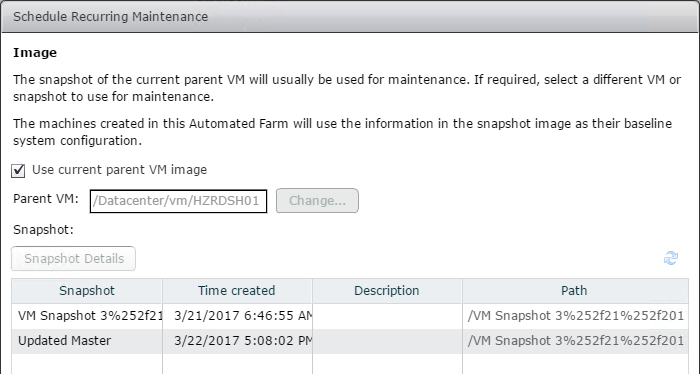
- In the Image page, uncheck the box next to Use current parent VM image, select the new snapshot, and click Next.
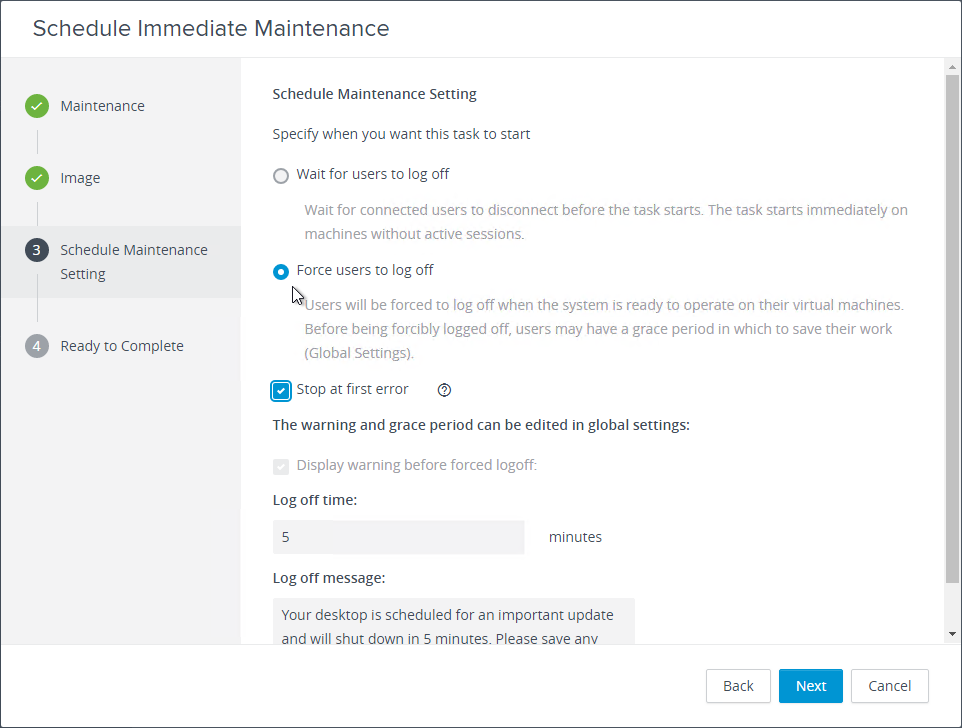
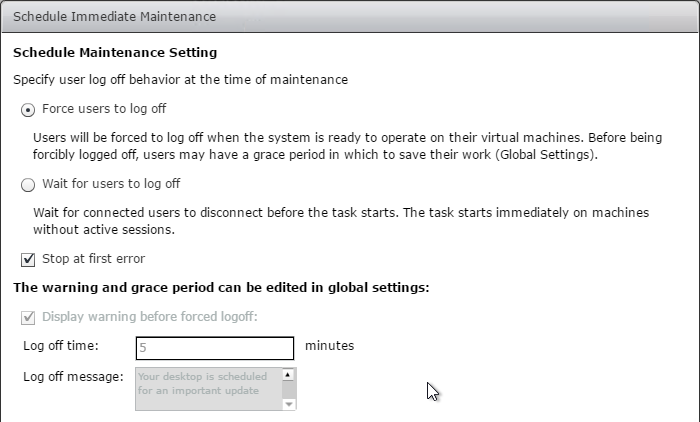
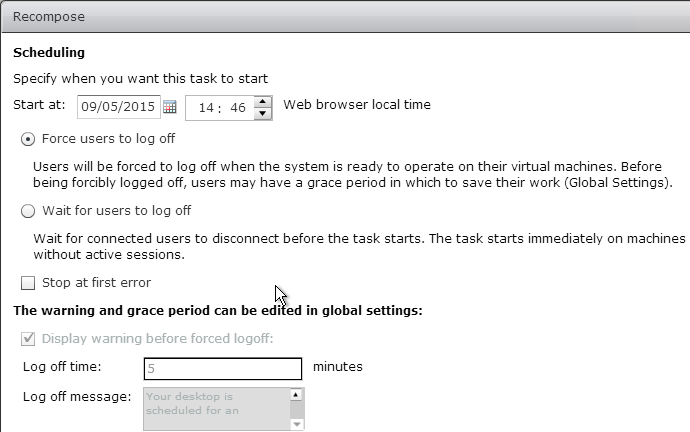
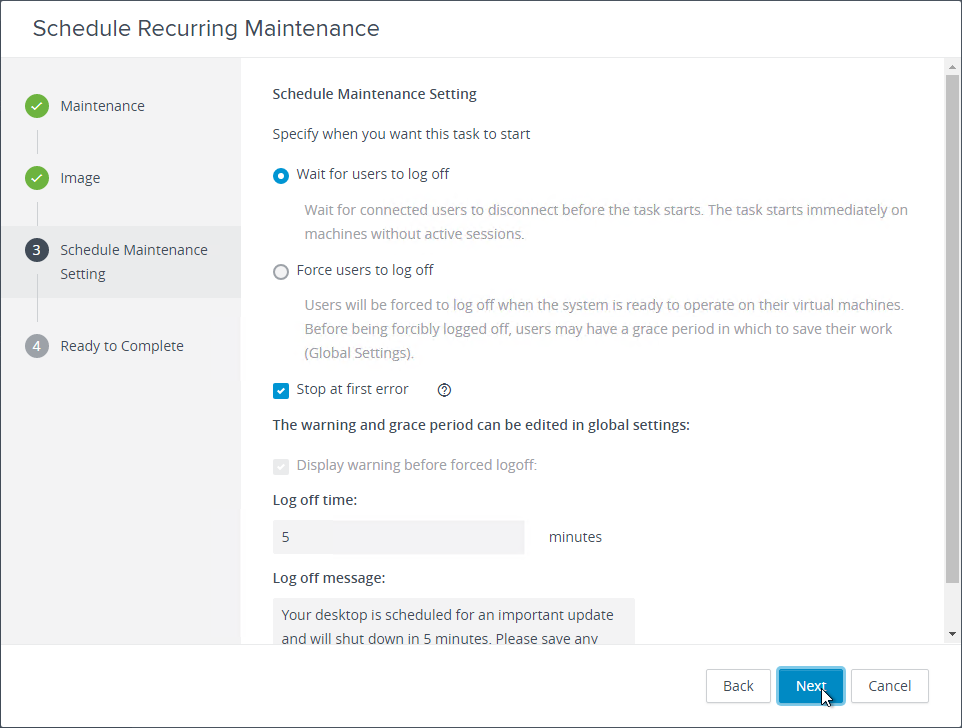
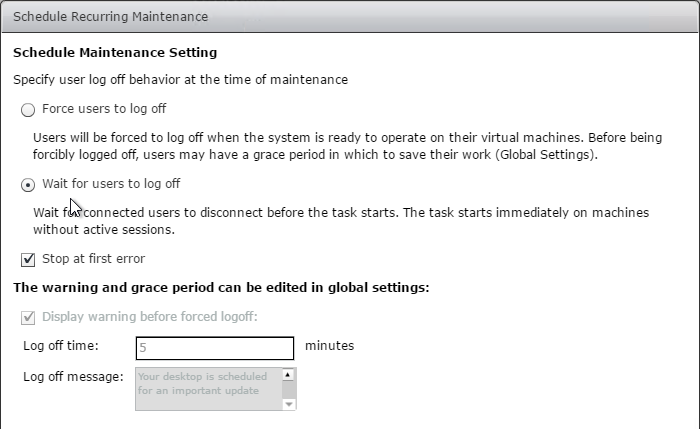
- In the Scheduling page, decide if the reboot should wait for users to logoff, decide when to apply this new image, and then click Next.
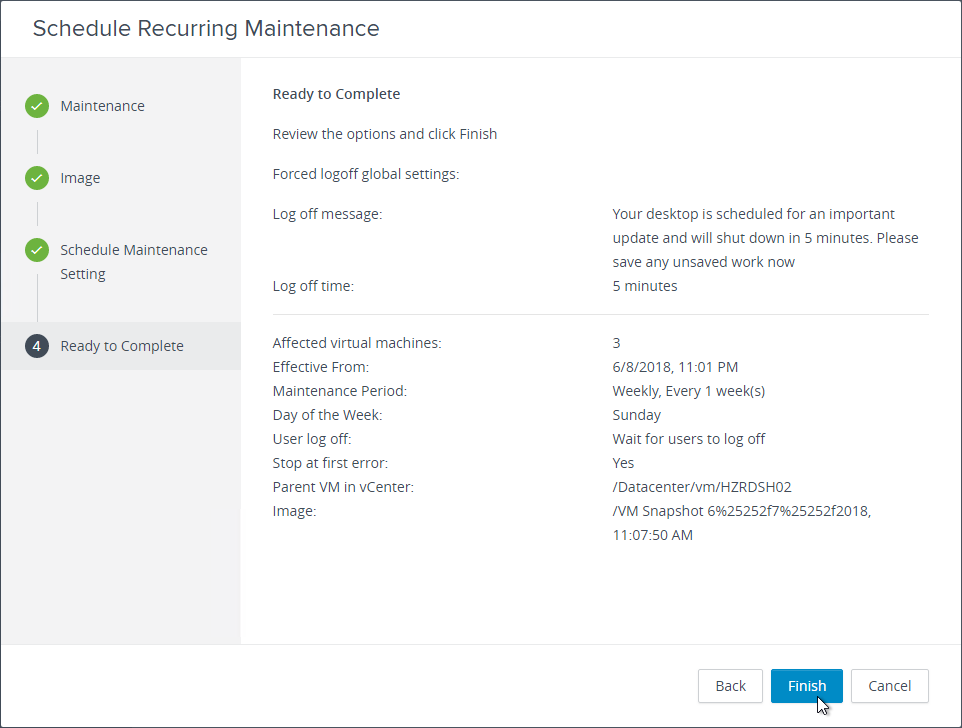
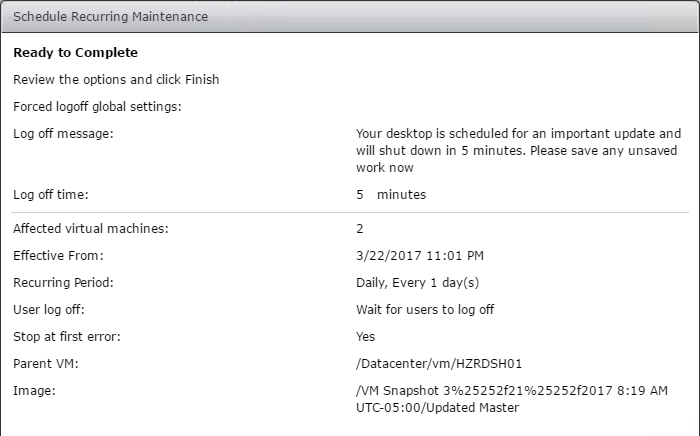
- In the Ready to Complete page, click Finish.
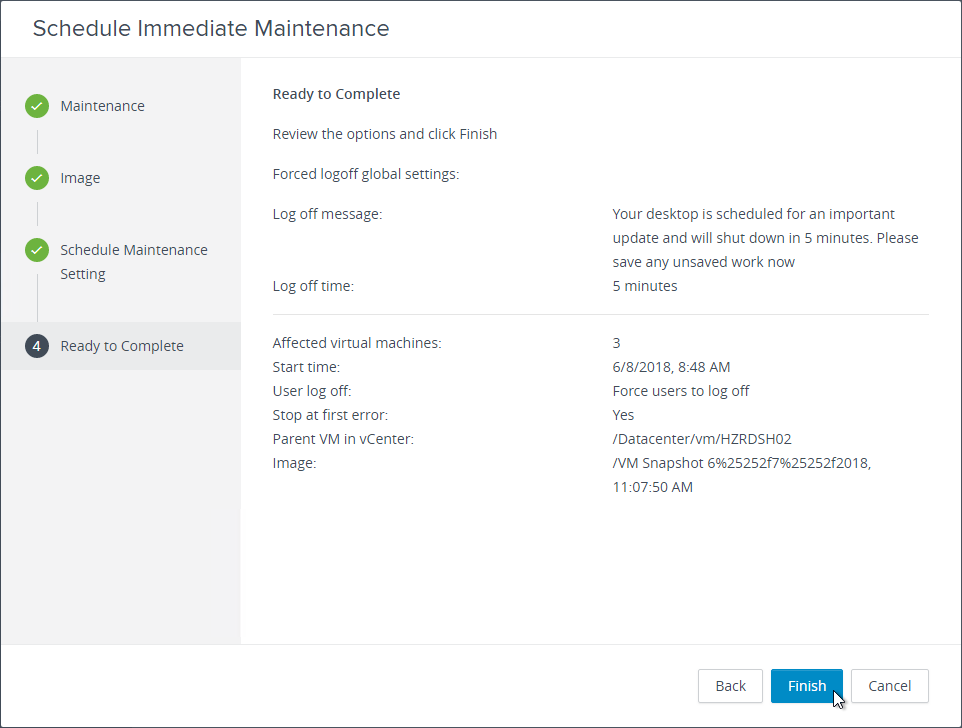
- The RDS Farm’s Summary tab (scroll down) shows you that it’s publishing the new image.
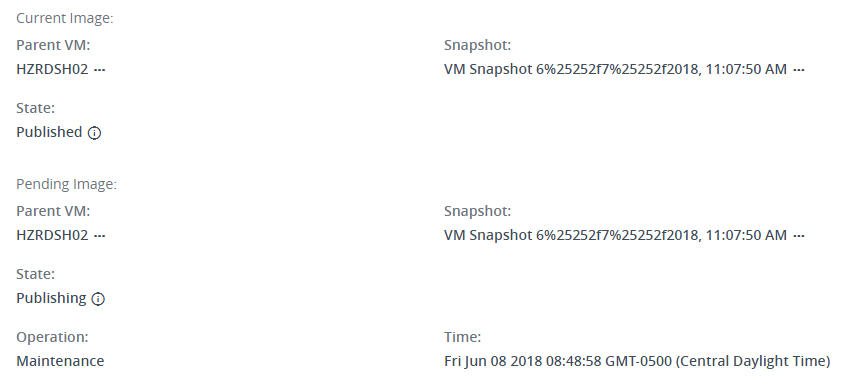
- On the RDS Hosts tab, you can check on the status of the maintenance task.
- It will take a few minutes to create a new parent VM. Once the parent VM is created, the Instant Clones are quickly deleted and recreated.
Horizon Administrator
- In View Administrator, go to Resources > Farms.
- Double-click a farm name.
- For Composer Linked Clones, before beginning the Maintenance/Recompose operation, edit the Farm, and on the Provisioning Settings tab, consider specifying a minimum number of ready machines during Instant Clone (or View Composer) maintenance operations. If you leave this set to 0, then all machines will be in maintenance mode, and nobody can connect until Maintenance/Recompose is complete. Instant Clones are recreated quickly enough that this setting might not be needed.
- If Instant Clones, on the Summary tab, click Maintenance, and then click Schedule.
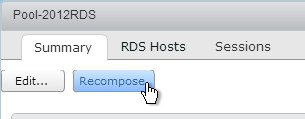
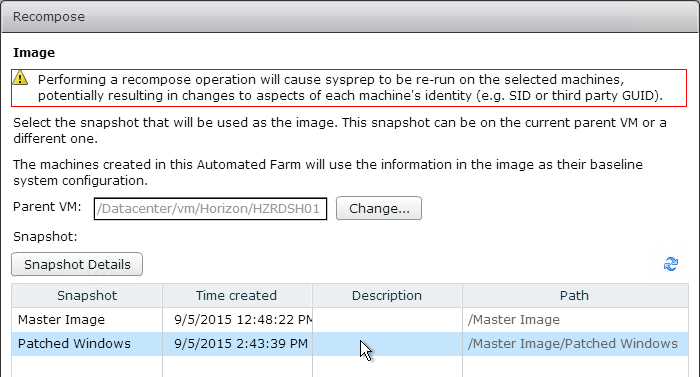
- If Composer Linked Clones, on the Summary tab, click Recompose.
- Instant Clones lets you either schedule recurring reboots, or you can change the Schedule to Immediate to update the machines now (or one time in the future). Click Next.
- In the Image page, uncheck the box next to Use current parent VM image, select the new snapshot, and click Next.
- In the Scheduling page, decide if the reboot should wait for users to logoff, decide when to apply this new image, and then click Next.
- In the Ready to Complete page, click Finish.
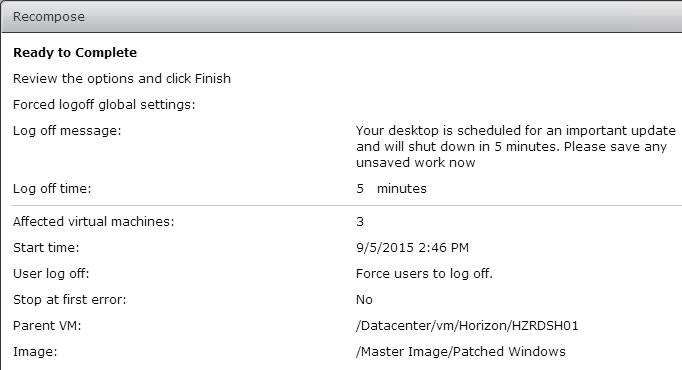
- On the RDS Hosts tab, you can check on the status of the maintenance/recompose task.
- Horizon 7.7 and newer show you the status of RDS Drain Mode, which can be enabled on the RDS Host by running change logon /drain.
- If Instant Clones, it will take a few minutes to create a new parent VM. Once the parent VM is created, the Instant Clones are quickly deleted and recreated.
- If Composer Linked Clones, Composer uses SysPrep, which means this will take a while.
Instant Clones Maintenance
Horizon Console
This section uses Horizon Console (https://<View_Connection_Server>/newadmin) to perform Instant Clone Maintenance. If you prefer Horizon Administrator, or if your Horizon isn’t 7.5 or newer, then skip to the next section.
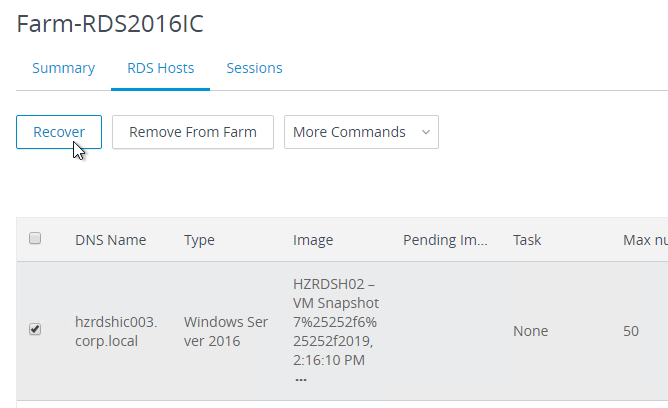
- If you click an Instant Clones RDS Farm name…
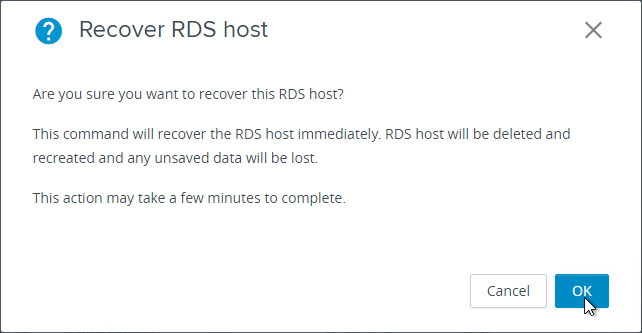
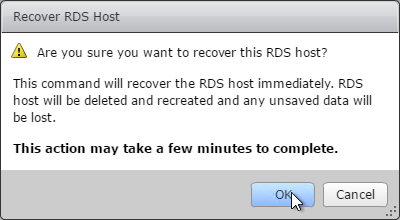
- And switch to the RDS Hosts tab, you can select a machine, and then click Recover, this causes the VM to be deleted and recreated, thus reverting to the master image snapshot.
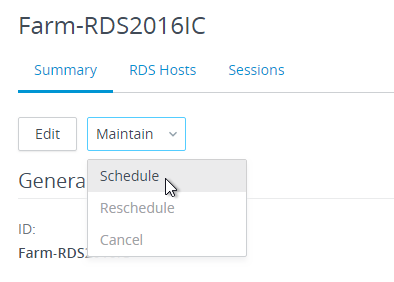
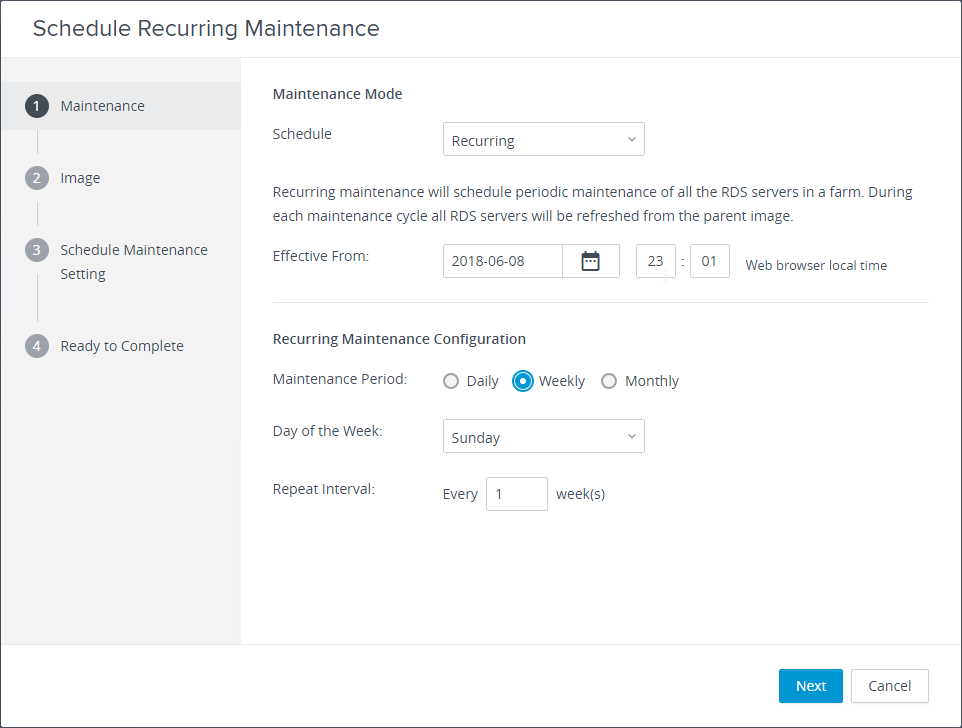
- On the Summary tab of the RDS Farm, you can click Maintain > Schedule to schedule a reboot of every VM in the RDS Farm. Rebooting causes the VMs to revert to the master image snapshot.
- Specify how often you want the reboot to occur, and then click Next.
- In the Image page, you don’t have to change the snapshot. Click Next.
- Decide what to do about logged on users, and click Next.
- In the Ready to Complete page, click Finish.
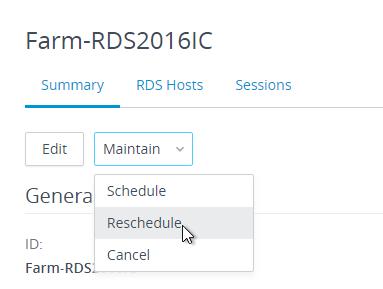
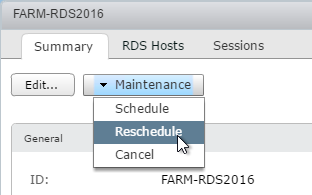
- If you click the Maintain menu again, you can click Reschedule to change when the reboots are scheduled. Or click Cancel.
- If you click Schedule again, you can only schedule a one-time update, typically to replace the master image snapshot used by the RDS Farm.
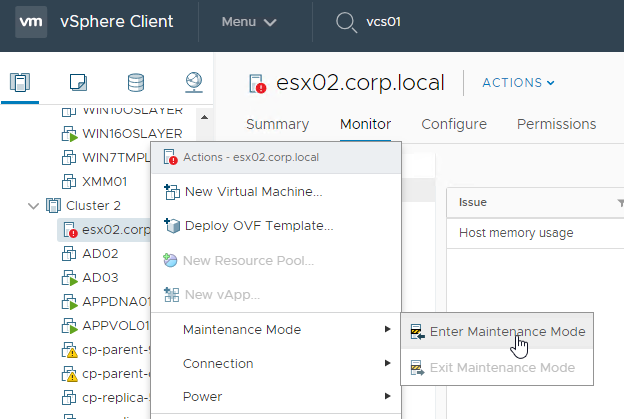
- In Horizon 7.1 and newer, ESXi hosts running Instant Clones can be placed into maintenance mode without any special instructions.
Horizon Administrator
- If you double-click an RDS Farm that contains Instant Clones, and switch to the RDS Hosts tab, you can right-click a machine, and click Recover. This causes the VM to be deleted and recreated, thus reverting to the master image snapshot.

- On the Summary tab of the RDS Farm, you can click Maintenance > Schedule to schedule a reboot of every VM in the RDS Farm. Rebooting cases the VMs to revert to the master image snapshot.
- Specify how often you want the reboot to occur, and then click Next.
- In the Image page, you don’t have to change the snapshot. Click Next.
- Decide what to do about logged on users, and click Next.
- In the Ready to Complete page, click Finish.
- If you click the Maintenance menu again, you can click Reschedule to change when the reboots are scheduled. Or click Cancel.
- If you click Schedule again, you can only schedule a one-time update, typically to replace the master image snapshot used by the RDS Farm.

- In Horizon 7.1 and newer, ESXi hosts running Instant Clones can be placed into maintenance mode without any special instructions.

RDS Farms – Manual
Horizon Console
This section uses Horizon Console (https://<View_Connection_Server>/newadmin) to publish a manual RDS Farm. If you prefer Horizon Administrator, or if your Horizon isn’t 7.5 or newer, then skip to the next section.
- Make sure neither the View Composer Agent nor the Instant Clone Agent is installed on your RDS servers, and make sure you saw the screen to register the Agent with a Horizon Connection Server.

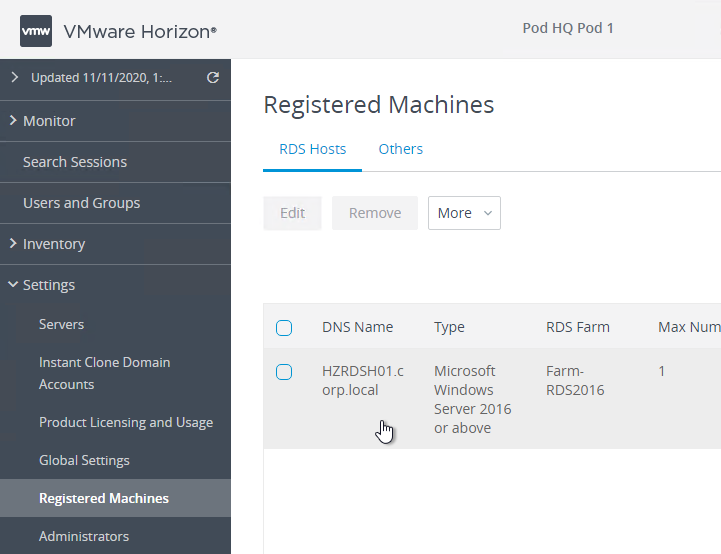
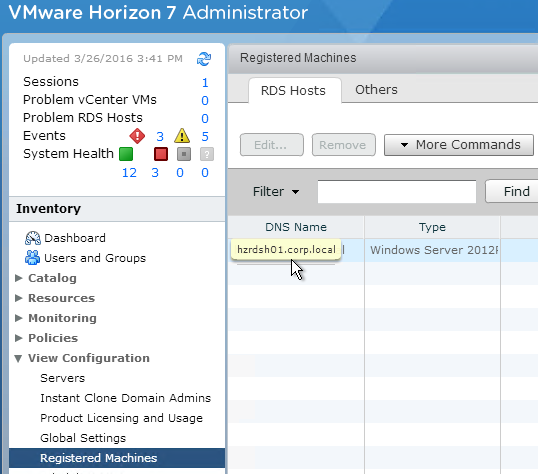
- In Horizon Console, go to Settings >Registered Machines and make sure your manually-built RDS Host is registered and listed on the RDS Hosts tab.
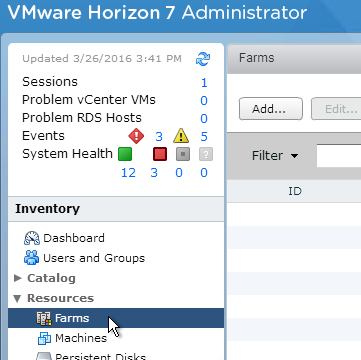
- On the left, expand Inventory, and click Farms.
- On the right, click Add.
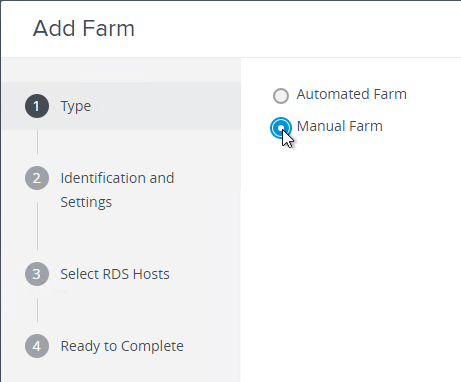
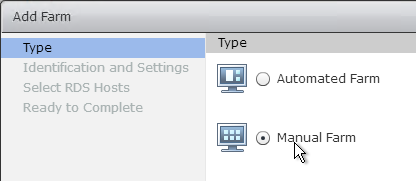
- In the Type page, select Manual Farm, and click Next.
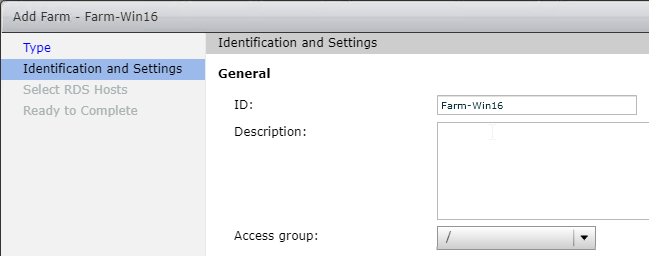
- In the Identification and Settings page, enter a name for the Farm.
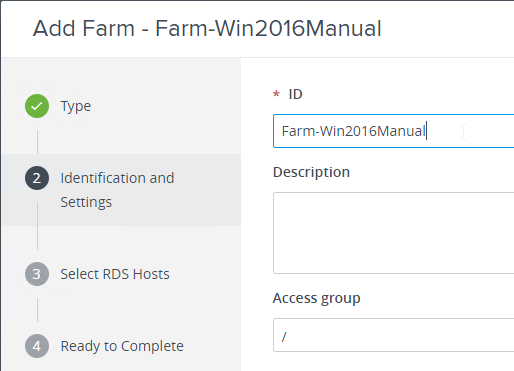
- Scroll down to the Farm Settings section.
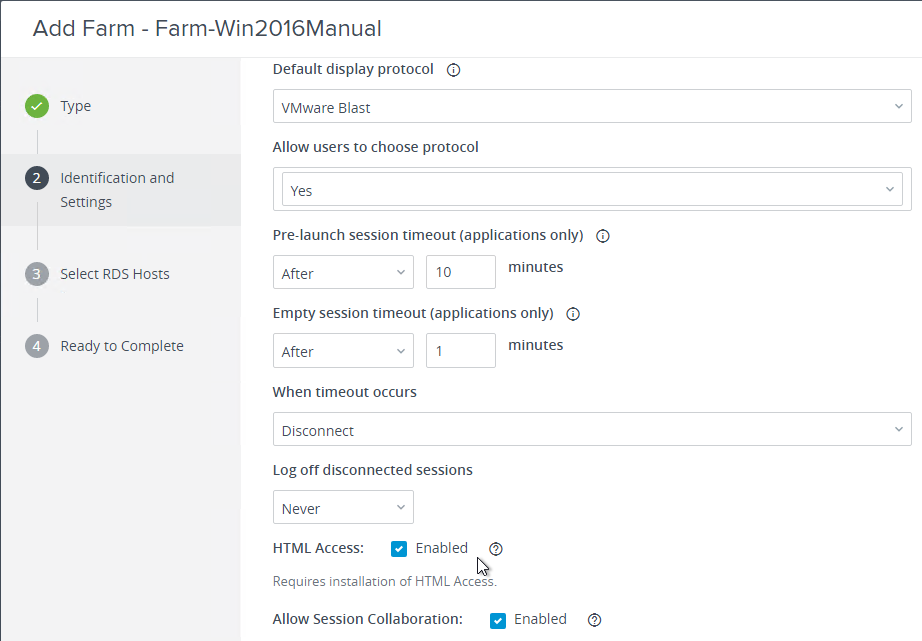
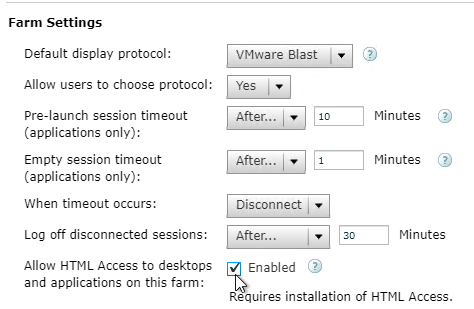
- There is a pre-launch option. If pre-launch is enabled on a published app, when the user logs into Horizon Client, an empty RDS Session is immediately established. When the user double clicks an icon, the program launches quickly since there’s already a pre-launched session. When the user closes Horizon Client, the pre-launch session is disconnected for the duration specified here. The minimum duration is 10 minutes.
- For Empty session timeout, set it to 1 minute. For When timeout occurs, set it to Log off. You usually want the session to end when users close all of their applications.
- For Log off disconnect sessions, specify a disconnect timer. This is in addition to the idle timer configured in View Configuration > Global Settings.
- Check the Enabled box next to Allow HTML Access.
- There is an Allow Session Collaboration checkbox, which adds a VMware Horizon Collaboration icon in the system tray of the remote desktop, which lets you invite users to collaborate. See Session Collaboration for details.
- Click Next.
- Horizon Administrator 7.8 and newer let you configure Load Balancing Settings for the RDS Farm. You cannot yet configure these settings in Horizon Console. After the RDS Farm is created, you can use Horizon Administrator to edit these settings.
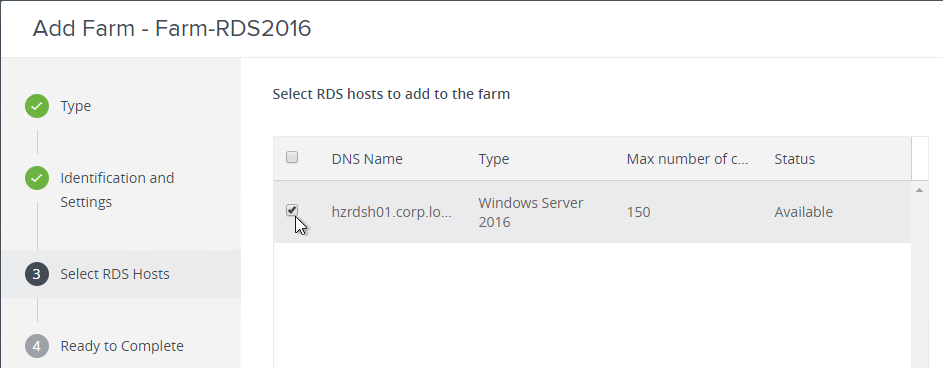
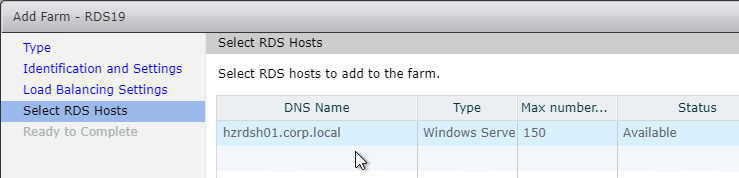
- In the Select RDS Hosts, select one or more identical Remote Desktop Session Hosts. Click Next.
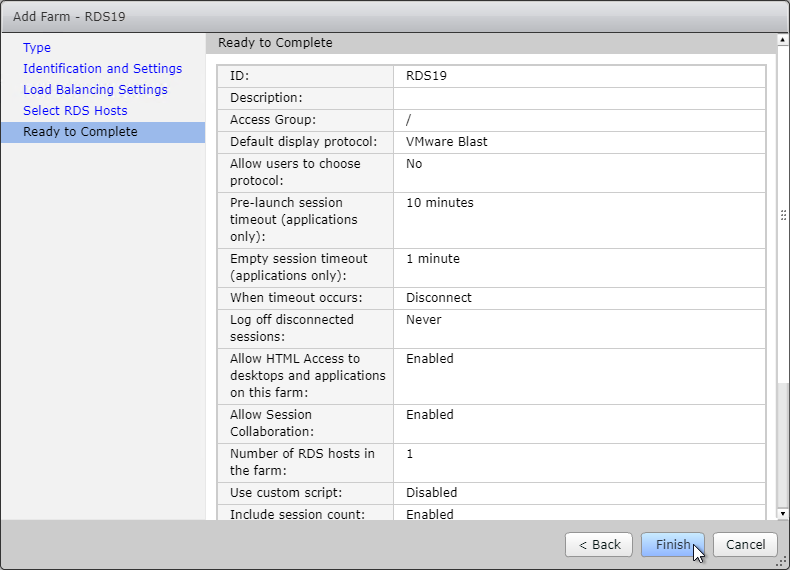
- In the Ready to Complete page, click Submit.
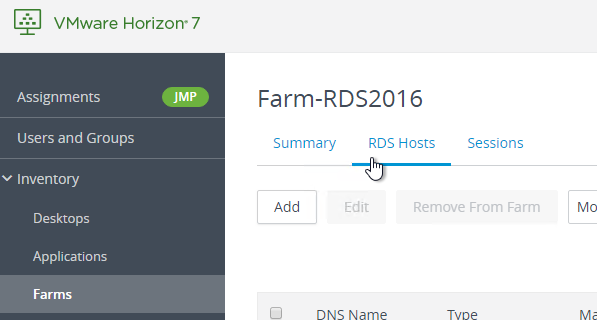
- If you click the farm name…
- On the RDS Hosts tab, you can click Add to add more registered RDS Hosts. Make sure every Host in the RDS Farm is identical.
Horizon Administrator
To create a manual RDS Farm (no linked clones), do the following:
- Make sure neither the View Composer Agent nor the Instant Clone Agent is installed on your RDS servers, and make sure you saw the screen to register the Agent with a Horizon Connection Server.
- In View Administrator, expand View Configuration and click Registered Machines. Make sure your manually-built RDS Host is registered and listed on the RDS Hosts tab.
- In View Administrator, on the left, expand Resources and click Farms.
- On the right, click Add.

- In the Type page, select Manual Farm and click Next.
- In the Identification and Settings page, enter a name for the Farm.
- In the Farm Settings section, set the Default display protocol to VMware Blast.

- Horizon 7.2 adds pre-launch. If pre-launch is enabled on a published app, when the user logs into Horizon Client, an empty RDS Session is immediately established. When the user double clicks an icon, the program launches quickly since there’s already a pre-launched session. When the user closes Horizon Client, the pre-launch session is disconnected for the duration specified here. The minimum duration is 10 minutes.
- For Empty session timeout, set it to 1 minute. For When timeout occurs, set it to Log off. You usually want the session to end when users close all of their applications.
- For Log off disconnect sessions, specify a disconnect timer. This is in addition to the idle timer configured in View Configuration > Global Settings.
- Check the Enabled box next to Allow HTML Access.
- Horizon 7.4 adds a new Allow Session Collaboration checkbox, which adds a VMware Horizon Collaboration icon in the system tray of the remote desktop, which lets you invite users to collaborate. See Session Collaboration for details.
- Click Next.
- Horizon 7.8 and later have a Load Balancing Settings page that lets you configure the load evaluator rules without having to modify any script. In general, use stable, non-fluctuating rules like session count and Memory usage. Note that CPU usage tends to wildly fluctuate and can prematurely disable connections to an RDS Host. Click Next when done configuring rules.
- In the Select RDS Hosts, select one or more identical Remote Desktop Session Hosts. Click Next.
- In the Ready to Complete page, click Finish.
- If you double-click the farm name…
- On the RDS Hosts tab, you can click Add to add more registered RDS Hosts. Make sure every Host in the RDS Farm is identical.
Publish Desktop
Horizon Console
This section uses Horizon Console (https://<View_Connection_Server>/newadmin) to publish a desktop from an RDS Farm. If you prefer Horizon Administrator, or if your Horizon isn’t 7.5 or newer, then skip to the next section.
- In Horizon Console, on the left, expand Inventory, and click Desktops.
- On the right, click Add.
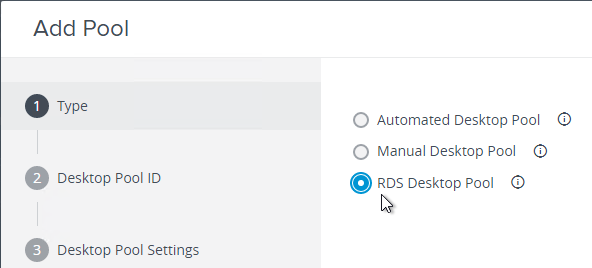
- In the Type page, select RDS desktop Pool, and click Next.
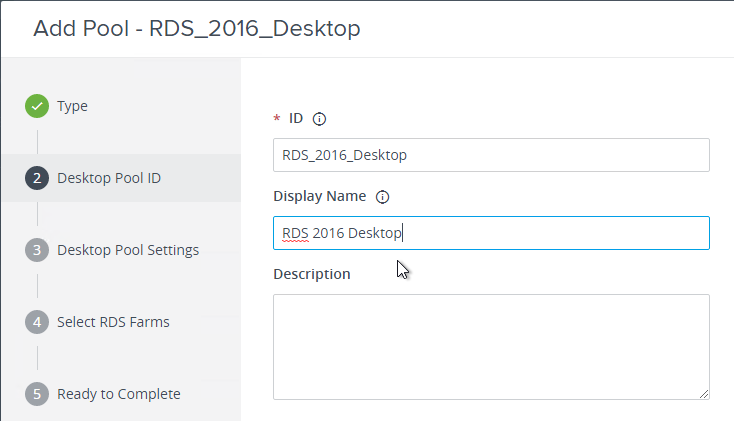
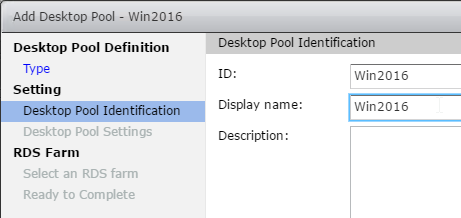
- In the Desktop Pool ID page, enter an ID and name. They can be different. The ID cannot contain spaces. Click Next.
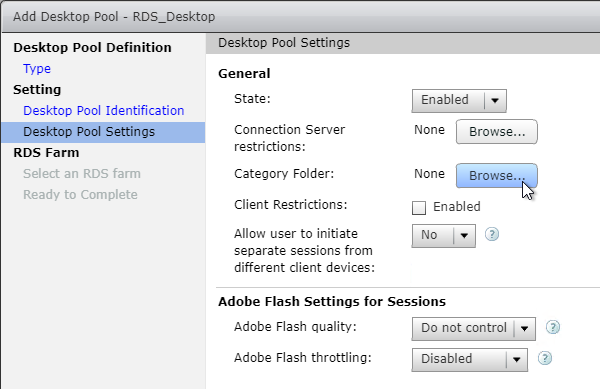
- In the Desktop Pool Settings page:
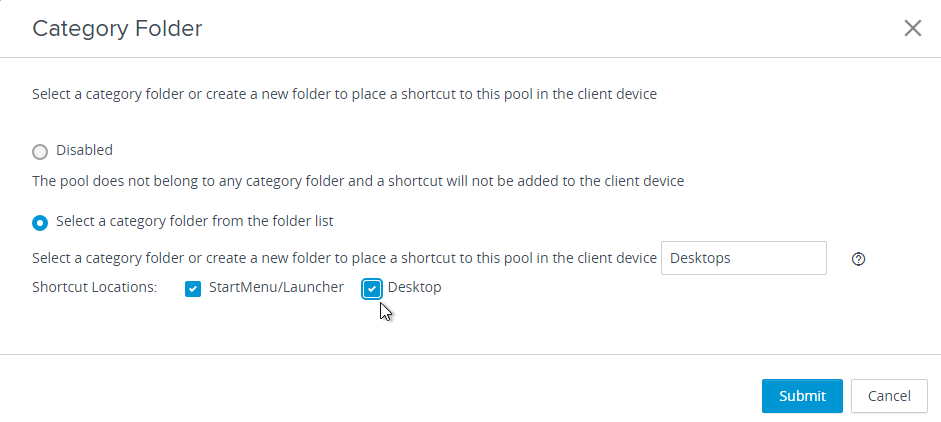
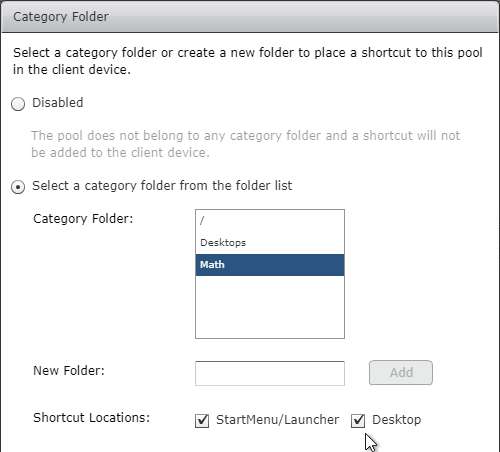
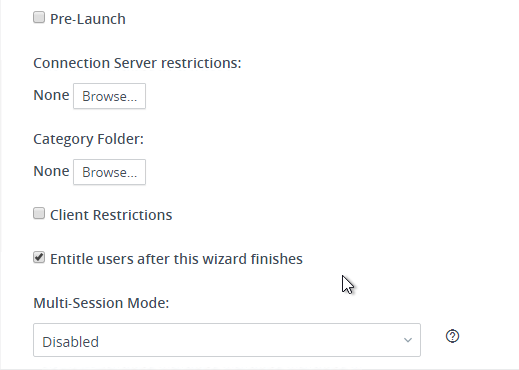
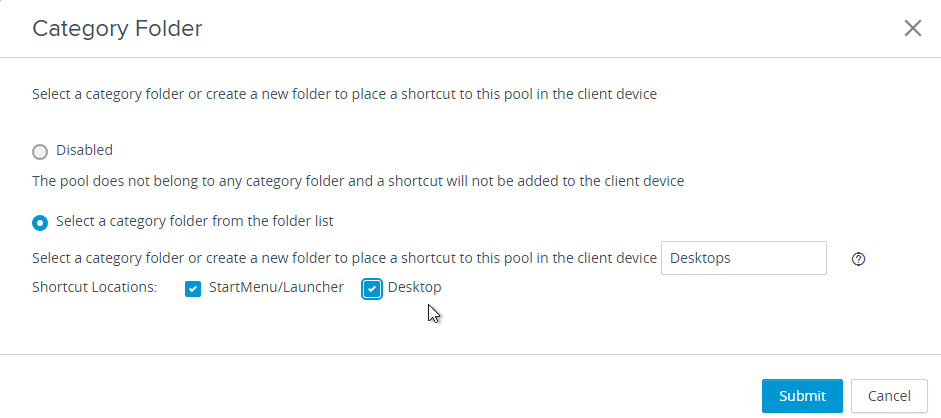
- You can select a Category Folder where the published icon will be placed on the client’s Start Menu. This feature requires Horizon Client 4.6 and newer. See Create Shortcuts for a Desktop Pool at VMware Docs.
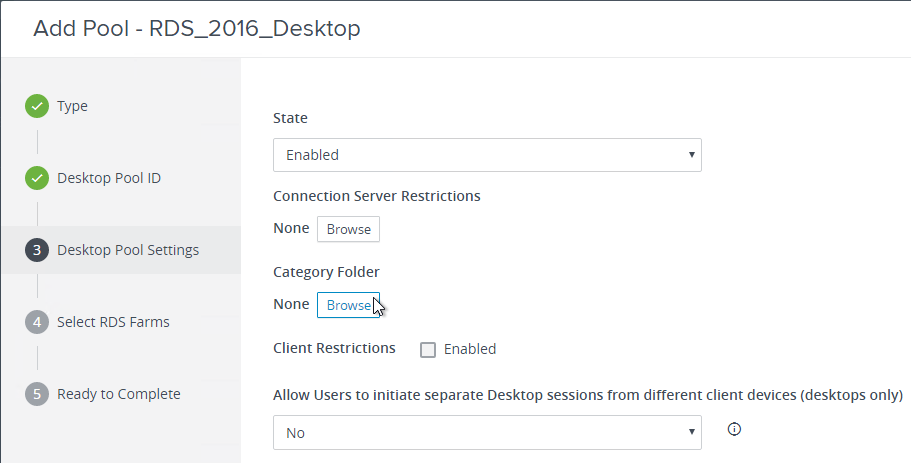
- You can type in a new category folder name, or select an existing one. Also select Shortcut Locations.
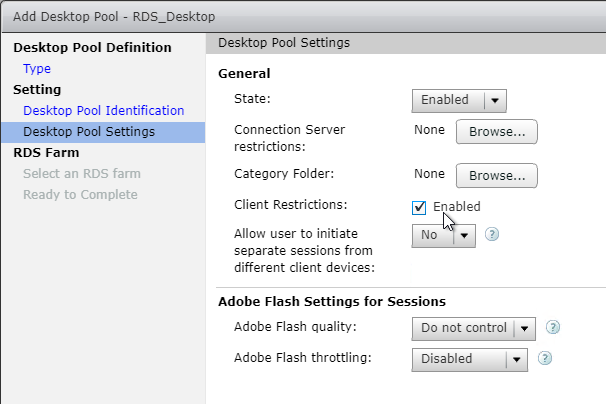
- Horizon 7.3 and newer have a checkbox named Client Restrictions. When this is enabled, you can add Client Computer Accounts to an AD Group and entitle the published desktop to that computer AD group. The published desktop can then only be accessed from the client computers in the AD group.
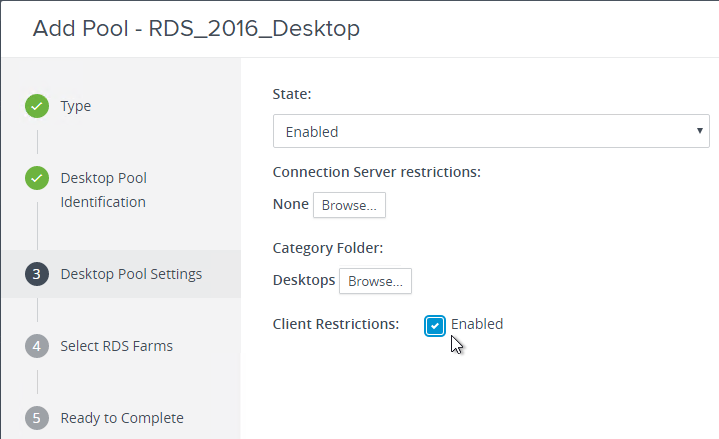
- Notes on Client Restrictions:
- Windows clients only. If this feature is enabled, then all non-Windows clients are blocked.
- Horizon Client 4.6 and newer. All other versions are blocked.
- In Horizon 7.8 and newer, the Active Directory security group can contain client computers that belong to any AD Organizational Units (OUs) or default Computer container. For older versions of Horizon, the computers must be in the Computer container.
- See Implementing Client Restrictions for Desktop and Application Pools at VMware Docs.
- You can select a Category Folder where the published icon will be placed on the client’s Start Menu. This feature requires Horizon Client 4.6 and newer. See Create Shortcuts for a Desktop Pool at VMware Docs.
- Click Next.
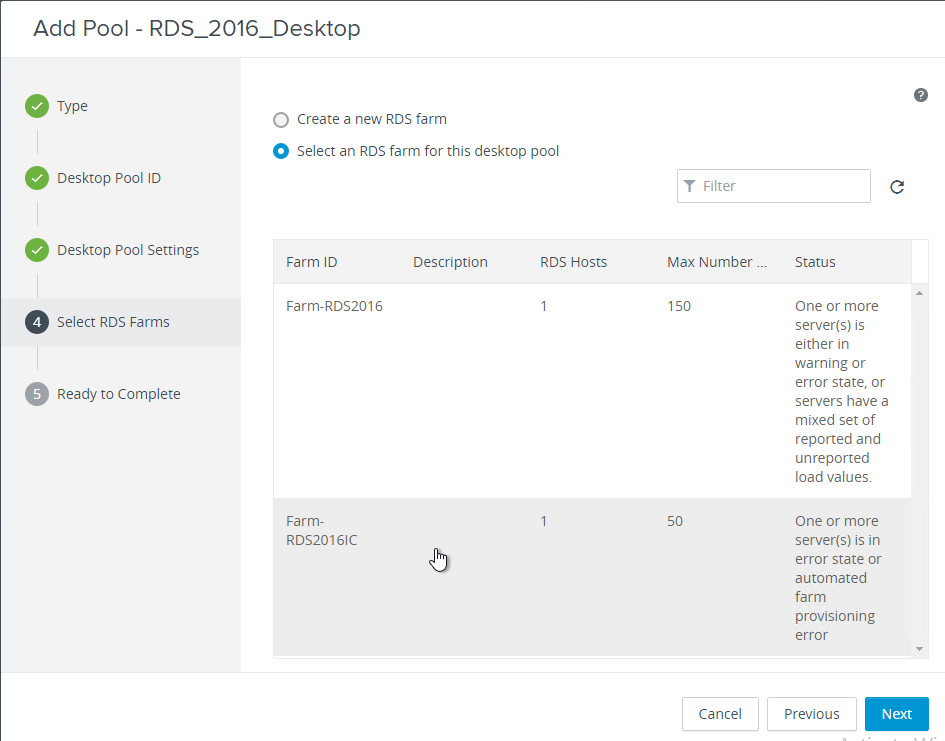
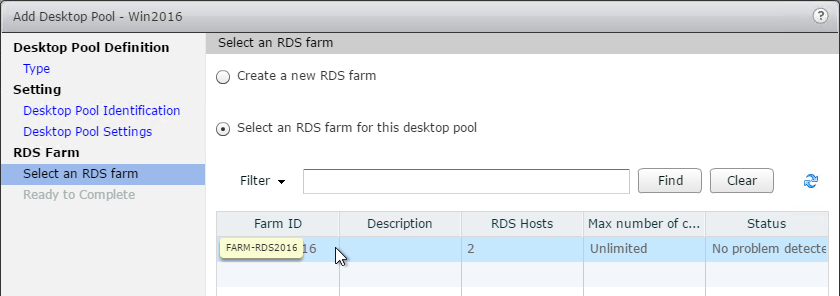
- In the Select an RDS farm page, select a farm, and click Next.
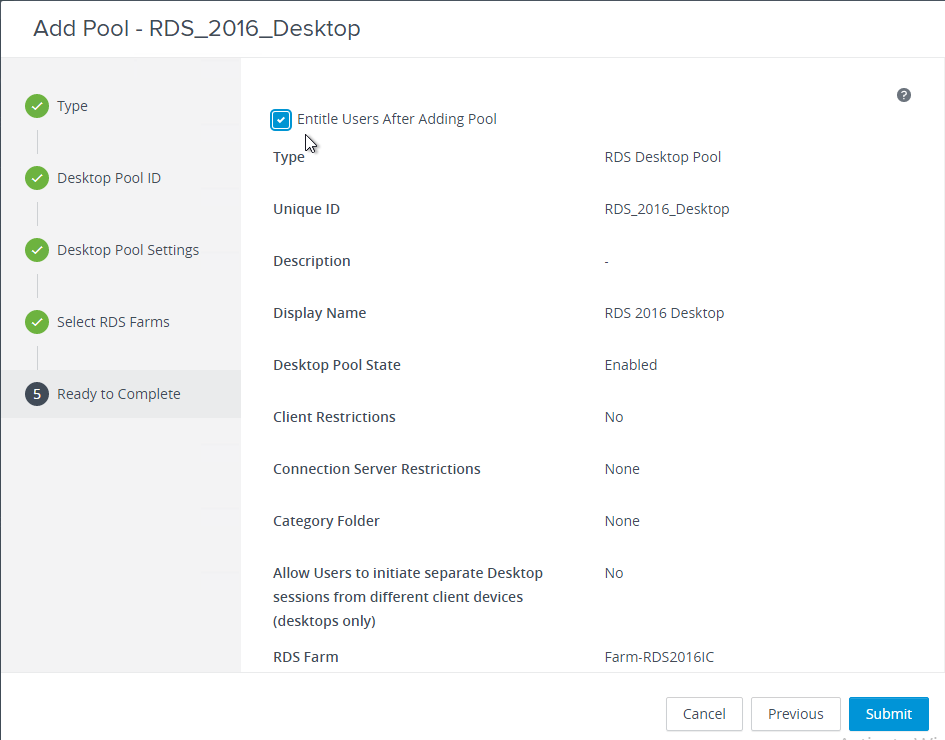
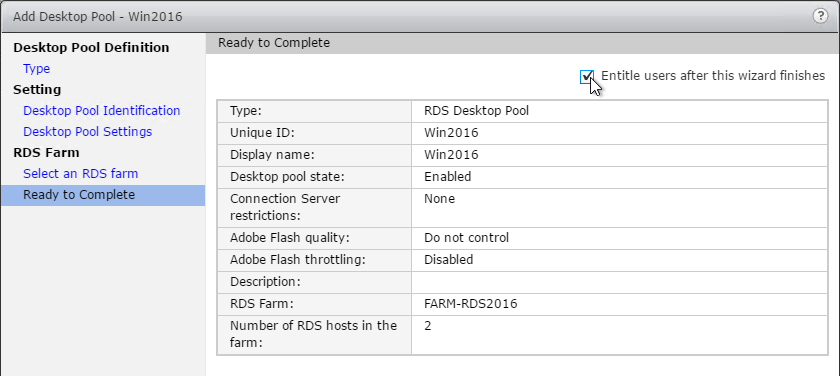
- In the Ready to Complete page, check the box next to Entitle users after this wizard finishes, and click Submit.
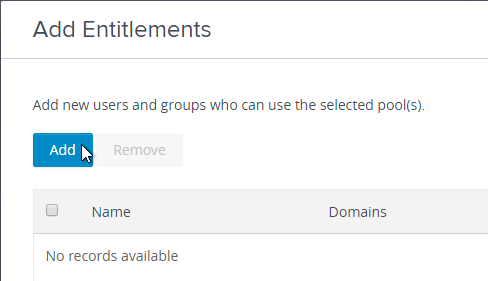
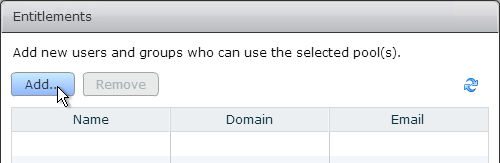
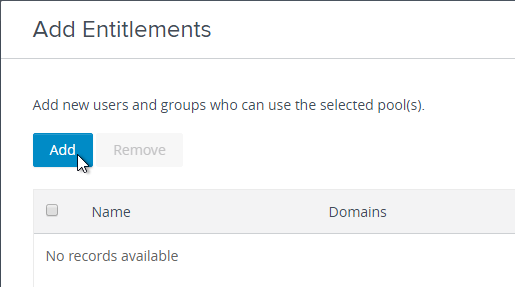
- In the Entitlements window, click Add.
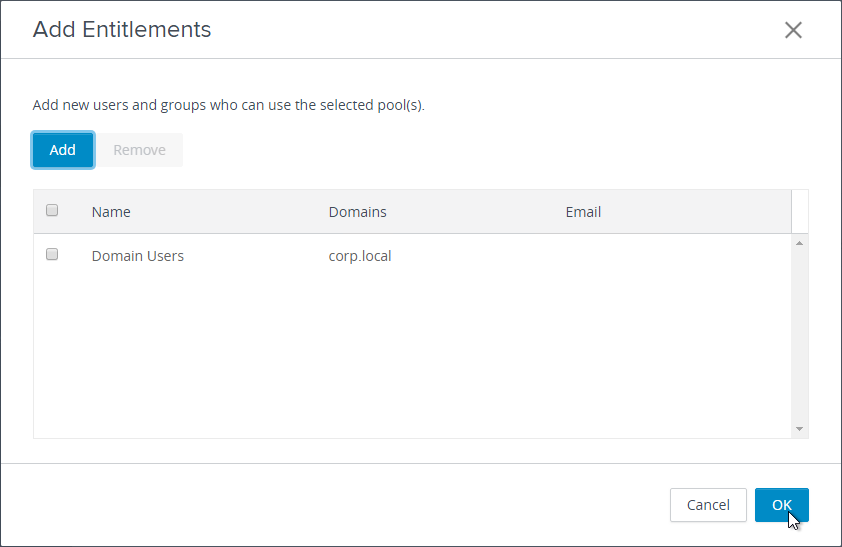
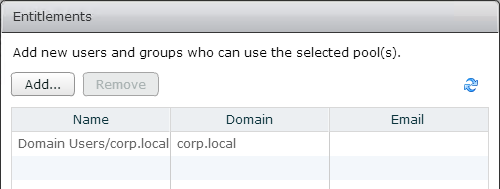
- Browse to an Active Directory group, and click OK.
- Then click Close.
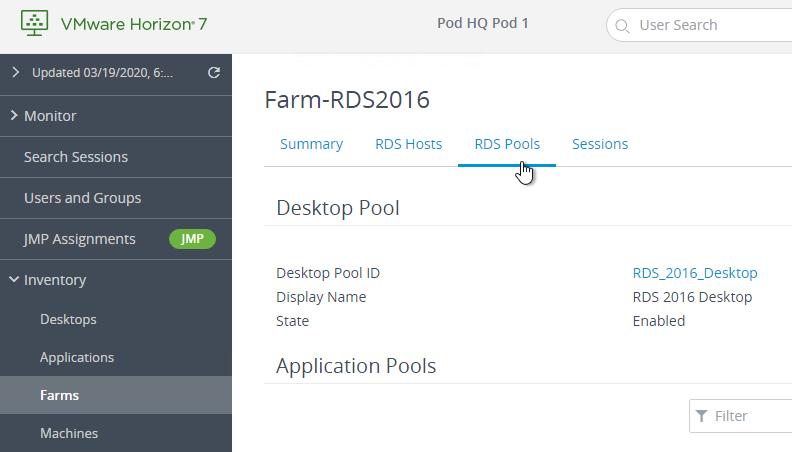
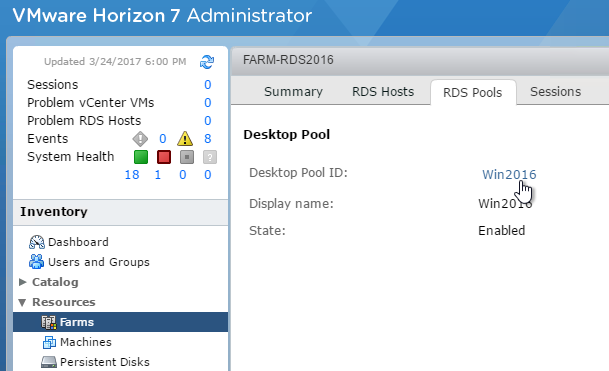
- If you go to Inventory > Farms, click your farm name, there will be a RDS Pools tab, where you can see which Desktop Pool is associated with this farm. An RDS Farm can only belong to one Desktop Pool.
Horizon Administrator
To publish a desktop from an RDS farm, do the following:
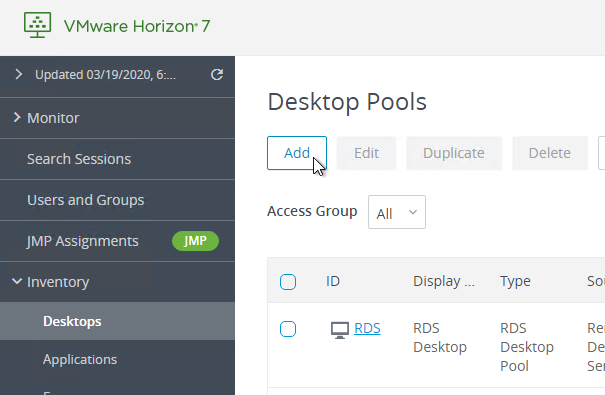
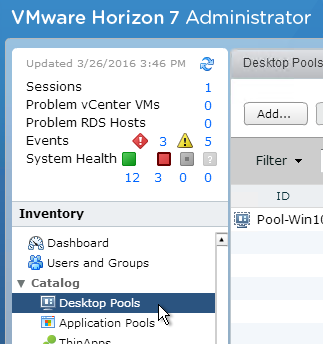
- In View Administrator, on the left, expand Catalog, and click Desktop Pools.
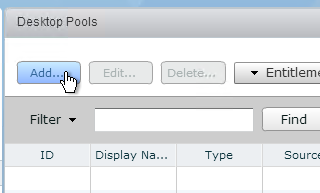
- On the right, click Add.
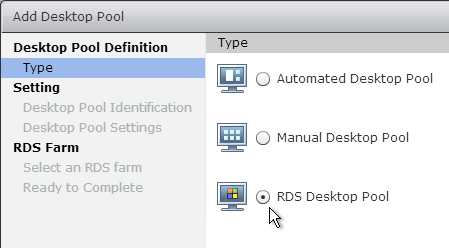
- In the Type page, select RDS Desktop Pool, and click Next.
- In the Desktop Pool Identification page, enter an ID and name. They can be different. Click Next.
- In the Desktop Pool Settings page:
- Horizon 7.3 and newer let you select a Category Folder where the published icon will be placed on the client’s Start Menu. This feature requires Horizon Client 4.6 and newer. See Create Shortcuts for a Desktop Pool at VMware Docs.
- Horizon 7.5 and newer let you put the shortcut on the endpoint’s desktop.
- Horizon 7.3 and newer have a checkbox named Client Restrictions. When this is enabled, you can add Client Computer Accounts to an AD Group and entitle the published desktop to that computer AD group. The published desktop can then only be accessed from the client computers in the AD group. Notes:
- Windows clients only. If the this feature is enabled, then all non-Windows clients are blocked.
- Horizon Client 4.6 and newer. All other versions are blocked.
- In Horizon 7.8 and newer, the Active Directory security group can contain client computers that belong to any AD Organizational Units (OUs) or default Computer container. For older versions of Horizon, the computers must be in the Computer container.
- See Implementing Client Restrictions for Desktop and Application Pools at VMware Docs.
- Horizon 7.7 and newer have an option to Allow user to initiate separate sessions from different client devices.
- Horizon 7.3 and newer let you select a Category Folder where the published icon will be placed on the client’s Start Menu. This feature requires Horizon Client 4.6 and newer. See Create Shortcuts for a Desktop Pool at VMware Docs.
- Click Next.
- In the Select an RDS farm page, select a farm, and click Next.
- In the Ready to Complete page, check the box next to Entitle users after this wizard finishes, and click Finish.
- In the Entitlements window, click Add.
- Browse to an Active Directory group, and click OK.
- Then click Close.
- If you go to Resources > Farms, double-click your farm, there will be a RDS Pools tab, where you can see which Desktop Pool is associated with this farm.
Publish Applications
Horizon Console
This section uses Horizon Console (https://<View_Connection_Server>/newadmin) to publish a desktop from an RDS Farm. If you prefer Horizon Administrator, or if your Horizon isn’t 7.5 or newer, then skip to the next section.
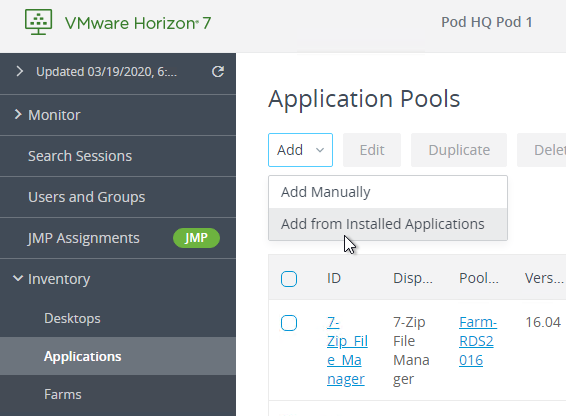
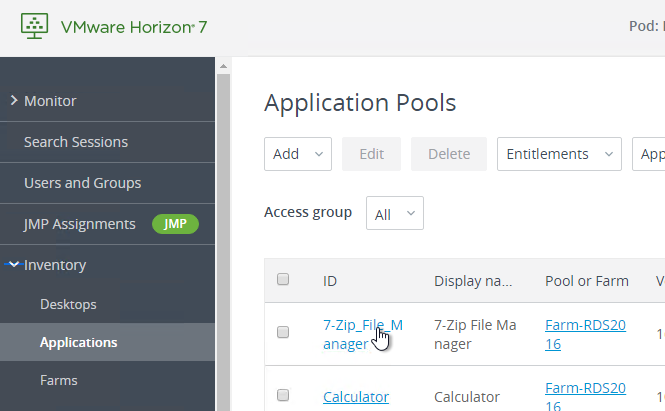
- In Horizon Console, on the left, expand Inventory, and click Applications.
- On the right, click Add, and then click Add from Installed Applications.
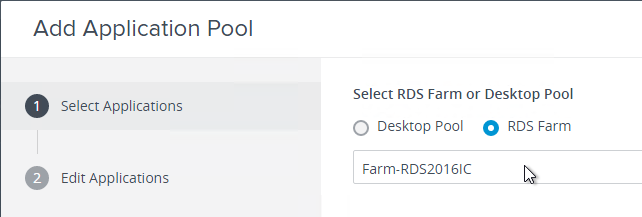
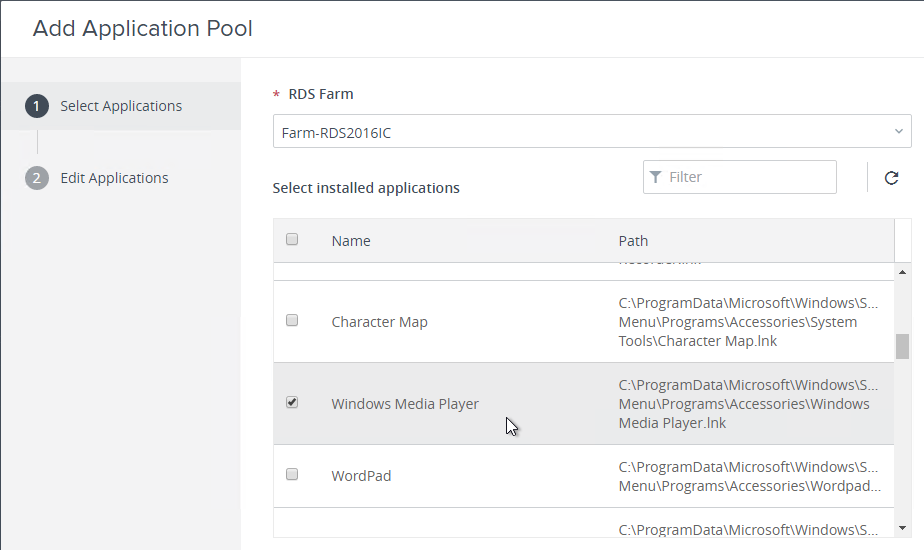
- In the Select Applications page, select a RDS Farm.
- The purpose of this wizard is to publish and entitle applications from an RDS Farm. The entitlements will apply to all of the applications you select on this page. If you want different entitlements for different applications, run this wizard multiple times and select different applications. Once the applications are published, you can change their entitlements individually.
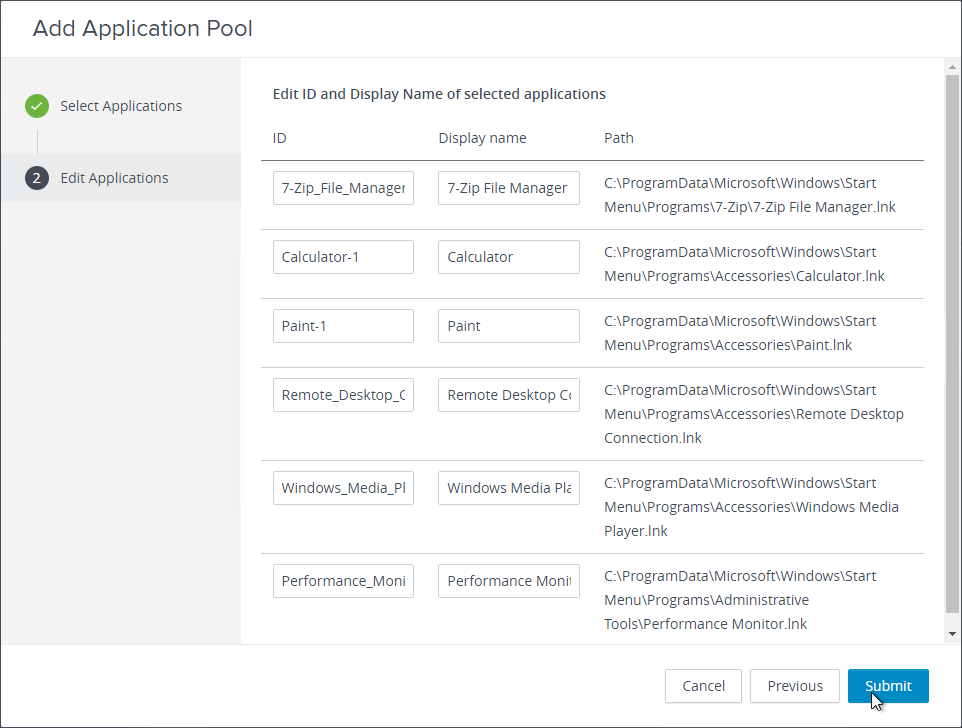
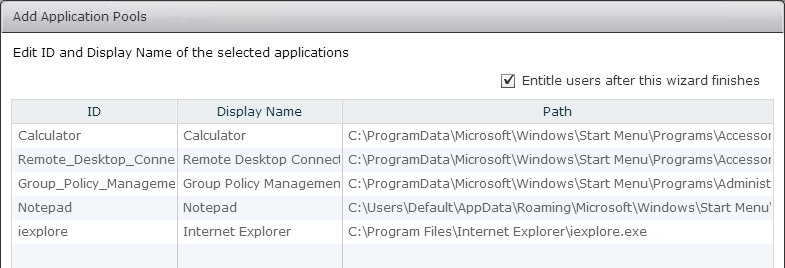
- Select one or more applications. Notice that File Explorer is not one of the options. You can manually add that application later.
- There are additional options at the bottom of the Select Applications page. Notice the Entitle users box is checked by default.
- There’s a Pre-launch option for published applications. You can optionally enable it on at least one application, and then entitle the pre-launch application to the users that need the Pre-launch feature.
- You can assign tags for Connection Server restrictions, which lets you control visibility of icons for internal users vs external users.
- You can select a Category Folder where the published icon will be placed on the client’s Start Menu and/or Desktop. This feature requires Horizon Client 4.6 and newer. See Create Shortcuts for a Desktop Pool at VMware Docs.
- There’s a checkbox named Client Restrictions. When this is enabled, you can add Client Computer Accounts to an AD Group and entitle the published application to that computer AD group. The published application can then only be accessed from the client computers in the AD group. Notes on Client Restriction:
- Windows clients only. If this feature is enabled, then all non-Windows clients are blocked.
- Horizon Client 4.6 and newer. All other versions are blocked.
- In Horizon 7.8 and newer, the Active Directory security group can contain client computers that belong to any AD Organizational Units (OUs) or default Computer container. For older versions of Horizon, the computers must be in the Computer container.
- See Implementing Client Restrictions for Desktop and Application Pools at VMware Docs.
- Click Next when done.
- The Edit Applications page lets you rename the published icons. Click Submit when done.
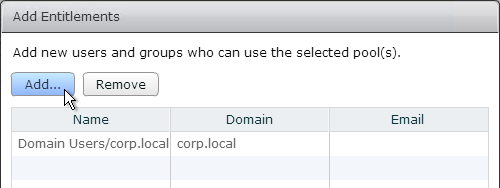
- Click Add to select a group that can see these icons. This is the normal entitlement process.
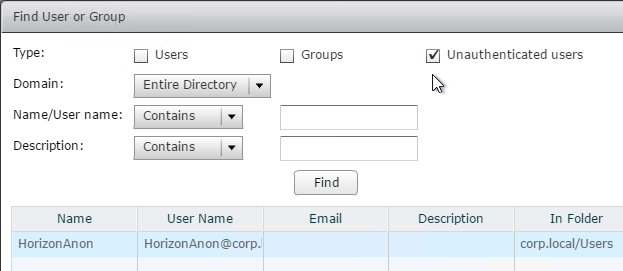
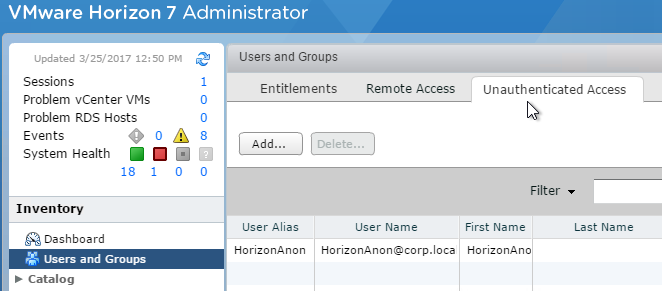
- There is an option for Unauthenticated users, which is detailed at Providing Unauthenticated Access for Published Applications at VMware Docs.
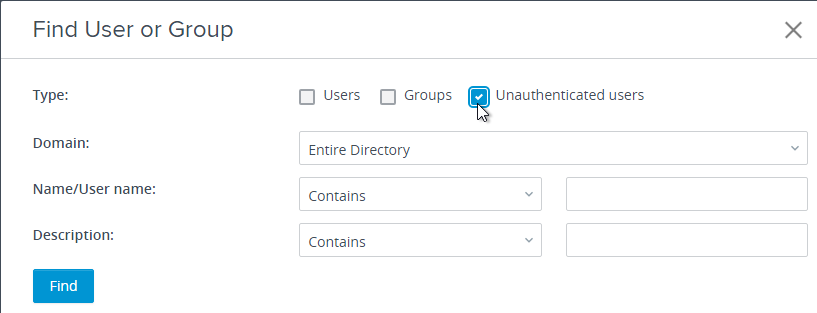
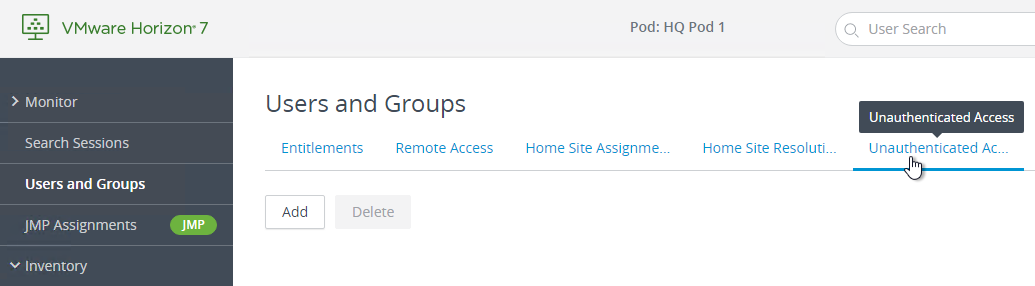
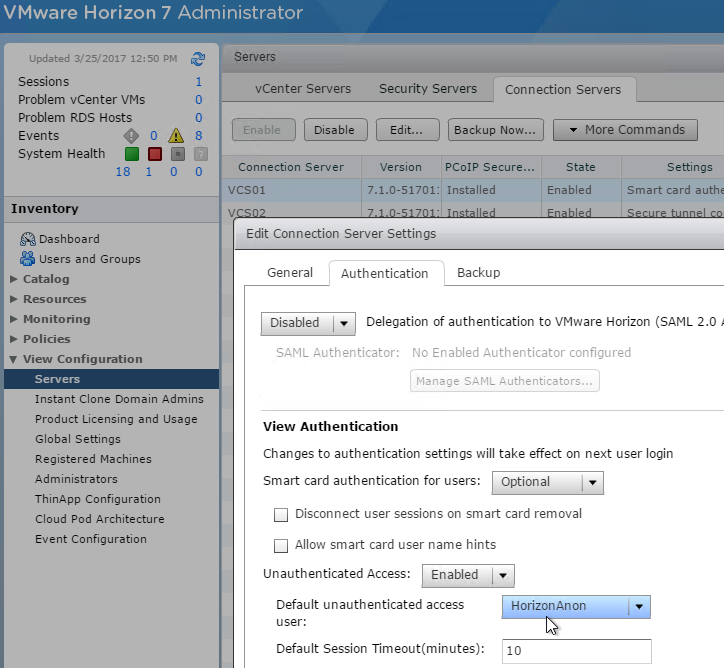
- Before you can configure Uauthenticated Access on published applications, you must add a Domain Account that will be used for anonymous access at Users and Groups > Unauthenticated Access.
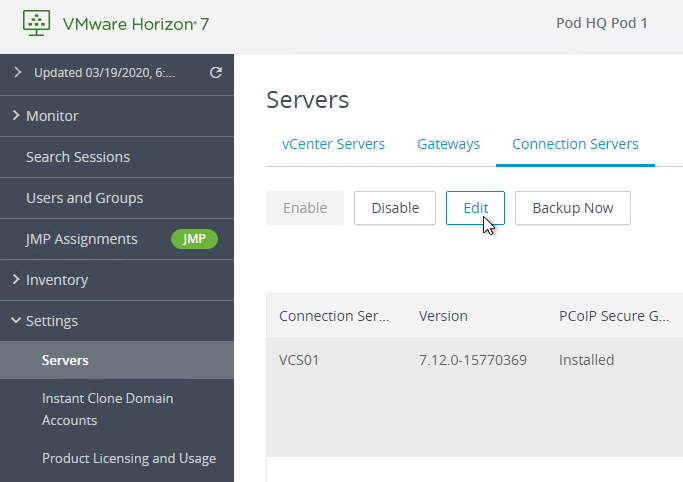
- Then go to Settings > Servers and Edit a Connection Server.
- On the Authentication tab…
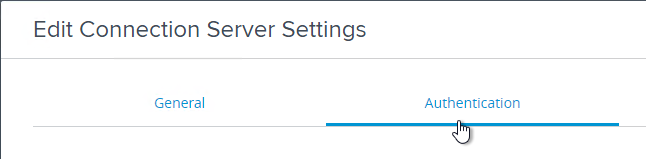
- …enable Unauthenticated Access, and select the Default unauthenticated access user account.

- Horizon 7.6 and newer have a Login Deceleration Level option, which requires Horizon Client 4.9. See Configure Login Deceleration for Unauthenticated Access to Published Applications at VMware Docs.
- Back in your entitlement, you select Unauthenticated Users, and entitle it to the Domain User that is your anonymous account.

- There is an option for Unauthenticated users, which is detailed at Providing Unauthenticated Access for Published Applications at VMware Docs.
- You can run the Add Application Pool wizard again to publish more applications with different entitlements.
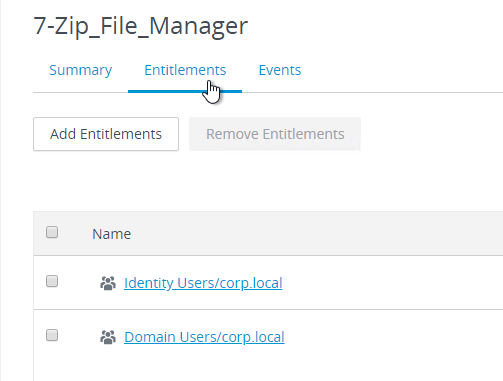
- If you click the name one of the application pools…
- …on the Entitlements tab, you can change the entitlements
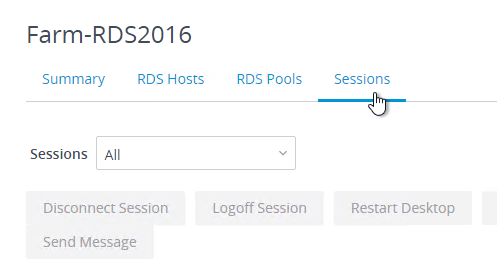
In Horizon Console 7.11 and newer, if you click a Farm name, you can view Sessions connected to that Farm and the published application each user is running. Monitor > Sessions does not show published application information, but RDS Farm > Sessions does.
- In Horizon Console, on the left, expand Inventory and click Farms.
- On the the right, click the link for one of the farms.
- Switch to the tab named Sessions.
- As you scroll down the table you’ll see sessions with Type = Application.
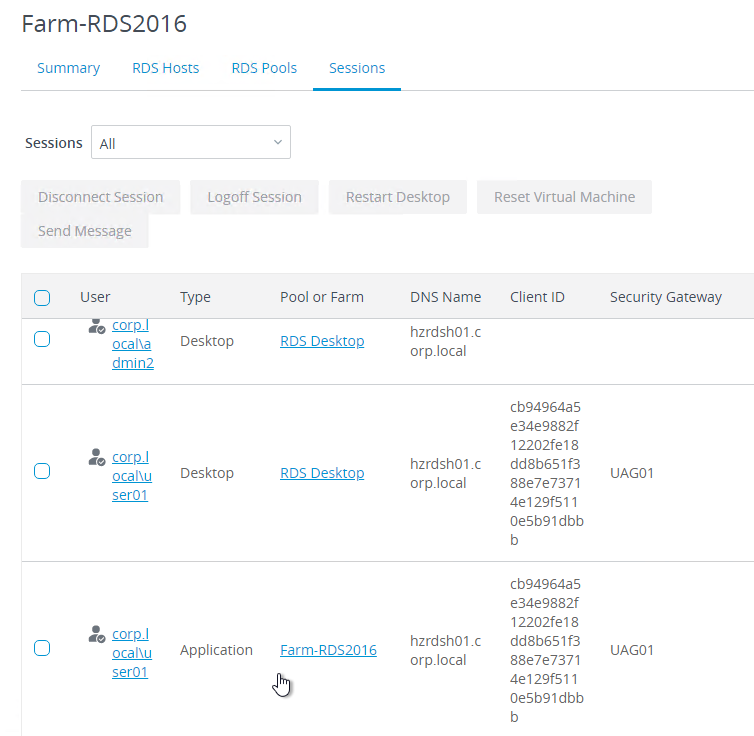
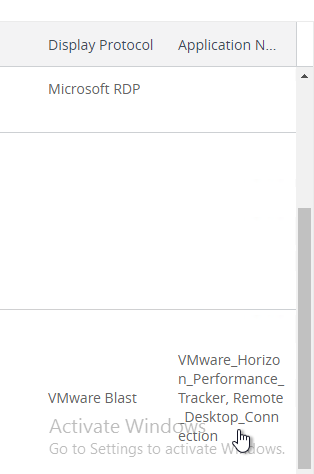
- If you scroll to the right, you’ll see the Application Name in the far-right column.
Icon for Published Application
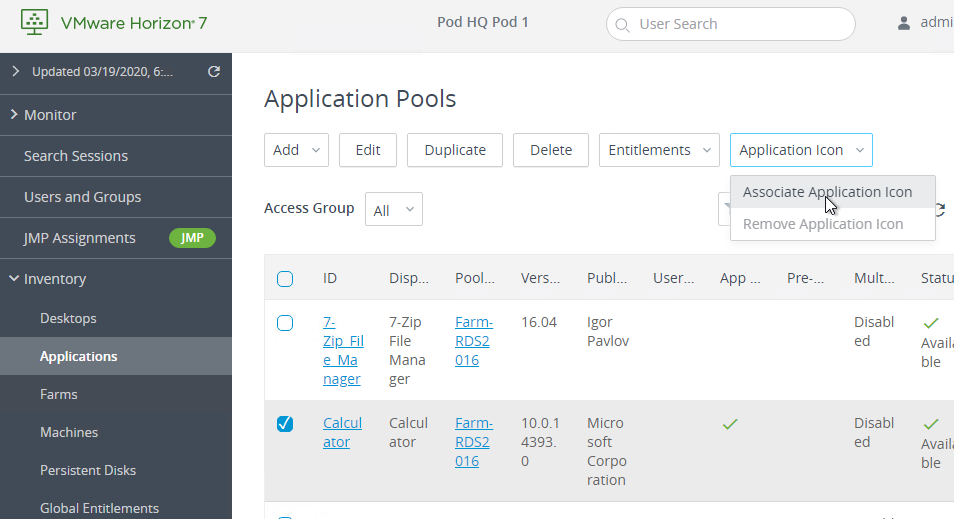
- In Horizon 7.9 and newer, you can select an Application Pool, then open the Application Icon menu and click Associate Application Icon.
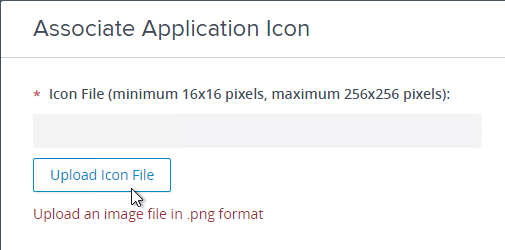
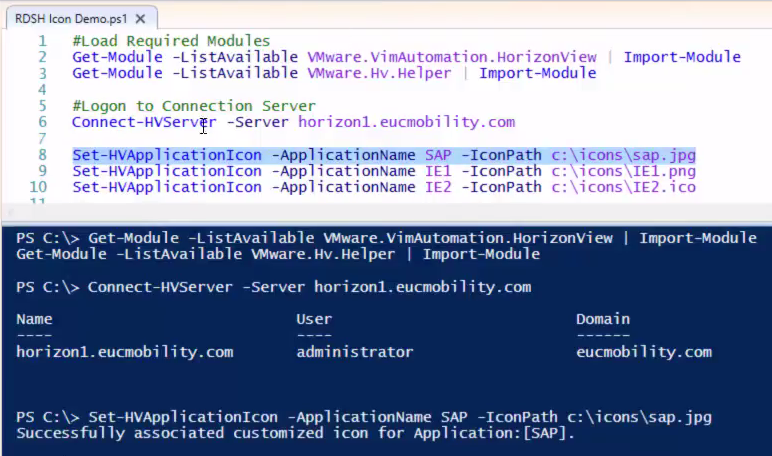
- In older Horizon, use PowerShell to change the icons. See the YouTube video Customizing Horizon RDSH Application Icons.
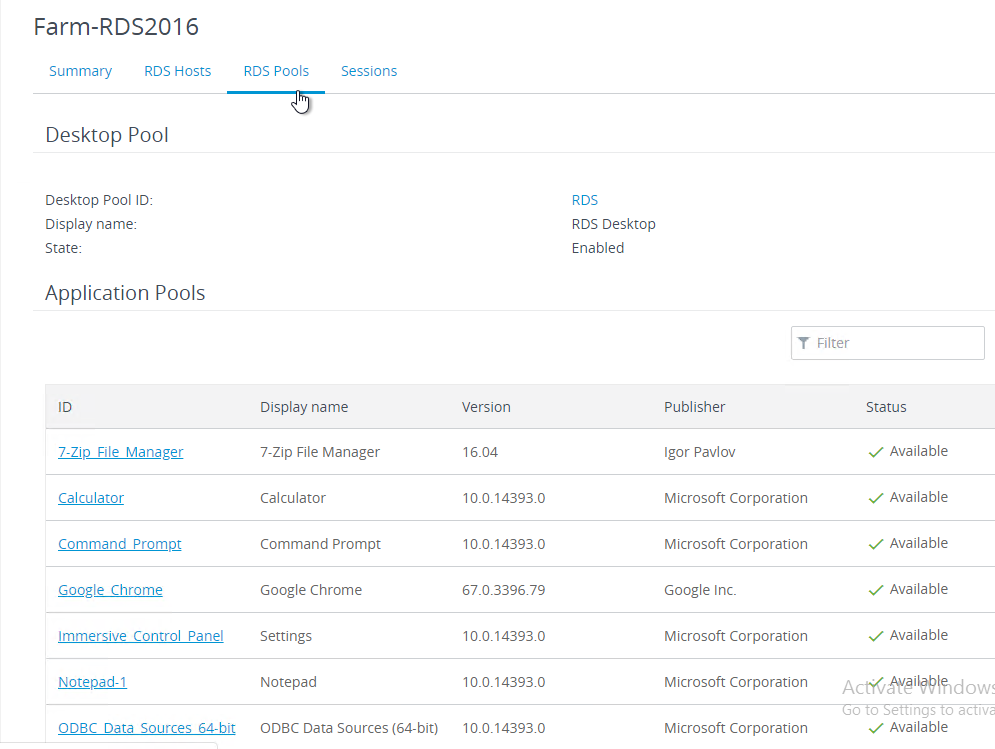
Show application pools associated with RDS Farm:
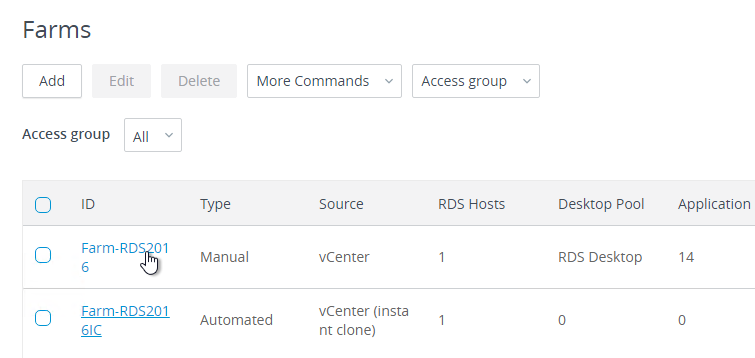
- If you go to Inventory > Farms, click your farm name…
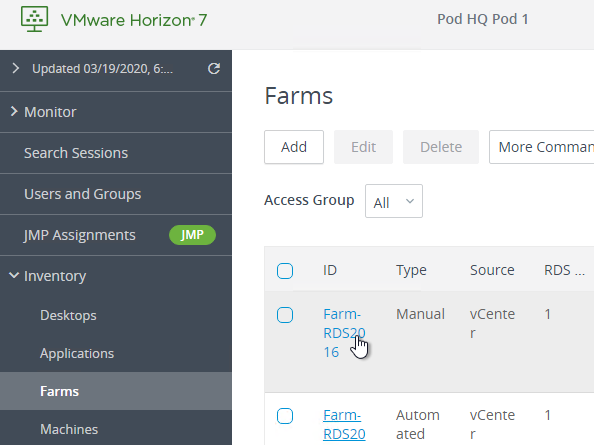
- …and switch to the RDS Pools tab, you can see which Application Pools (published applications) are associated with this farm. You can click the link for a pool to be taken to the pool’s property pages.
Instead of publishing an existing application from the Start Menu, you can add an application manually:
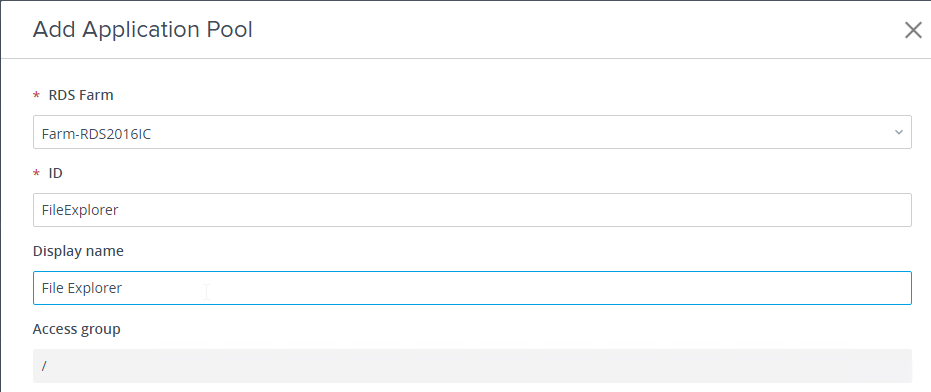
- Go to Inventory > Applications, click Add, and select Add Manually.
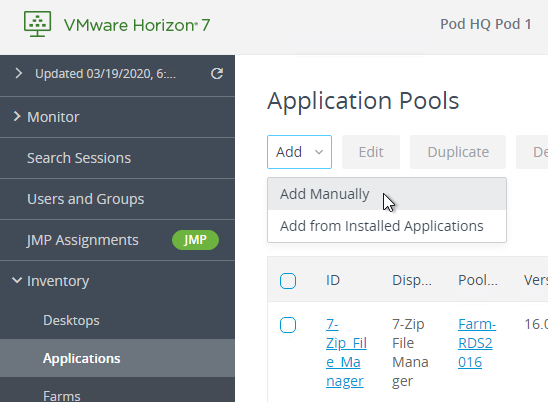
- File Explorer is an application that has to be added manually.
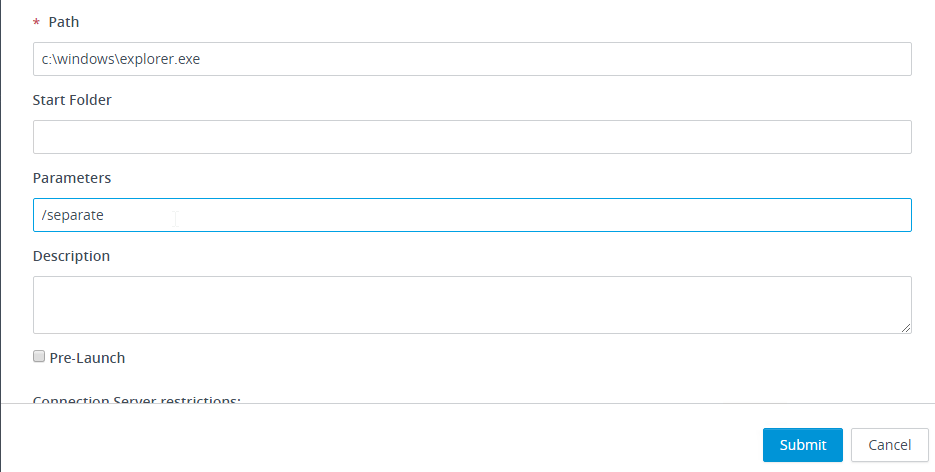
- When publishing Explorer, add the /separate switch. This prevents the full desktop from appearing when launching published Explorer through HTML Blast (Source = RDS Desktop being presented when opening an app at VMware Communities)
Horizon Administrator
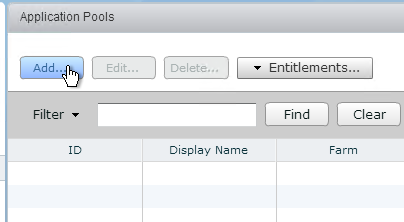
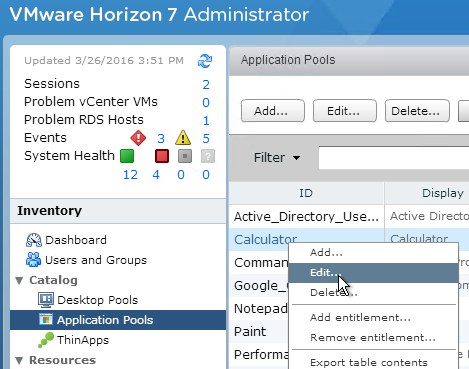
- In View Administrator, on the left, expand Catalog, and click Application Pools.
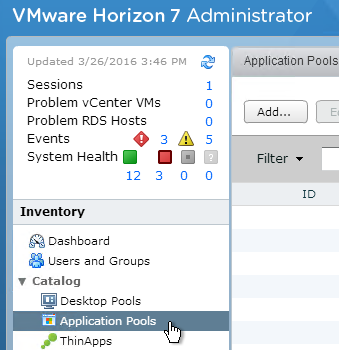
- On the right, click Add.
- The purpose of this wizard is to publish applications from an RDS Farm, and entitle them. The entitlements will apply to all of the applications you select on this page. If you want different entitlements for different applications, run this wizard multiple times, and select different applications. Once the applications are published, you can change their entitlements individually.
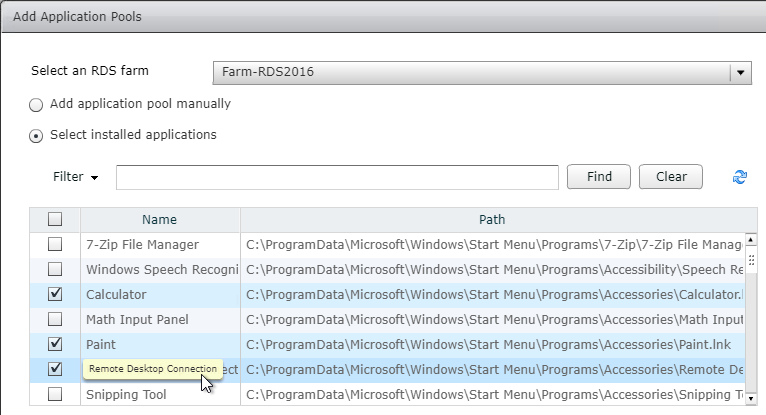
- At the top of the window, select an RDS farm.
- Select one or more applications.
- There are additional options at the bottom of the window.
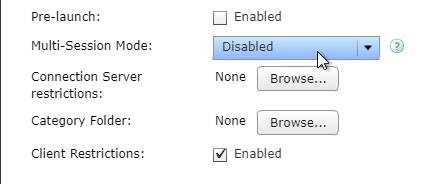
- Horizon 7.2 and newer have a Pre-launch option for published applications. Enable it on at least one application, and entitle the application to the users that need the Pre-launch feature.
- Horizon 7.7 and newer have an option for Multi-session Mode, which lets users launch multiple sessions from different clients.
- Horizon 7.2 and newer have the ability to assign tags (Connection Server restrictions) to RDS Desktop Pools.
- Horizon 7.3 and newer let you select a Category Folder where the published icon will be placed on the client’s Start Menu. This applies to Horizon Client 4.6 and newer. See Create Shortcuts for a Desktop Pool at VMware Docs.
- Horizon 7.5 and newer lets you put the shortcut on the endpoint’s desktop.
- Horizon 7.3 adds a checkbox named Client Restrictions. When this is enabled, you can add Client Computer Accounts to an AD Group and entitle the published application to that computer AD group. The published application can then only be accessed from the client computers in the AD group. Notes:
- Windows clients only. If the this feature is enabled, then all non-Windows clients are blocked.
- Horizon Client 4.6 and newer. All other versions are blocked.
- In Horizon 7.8 and newer, the Active Directory security group can contain client computers that belong to any AD Organizational Units (OUs) or default Computer container. For older versions of Horizon, the computers must be in the Computer container.
- See Implementing Client Restrictions for Desktop and Application Pools at VMware Docs.
- Click Next when done.
- Or you can add an application manually by changing the radio button to Add application pool manually. Notice that Explorer is not one of the listed applications, so Explorer will need to be added manually.
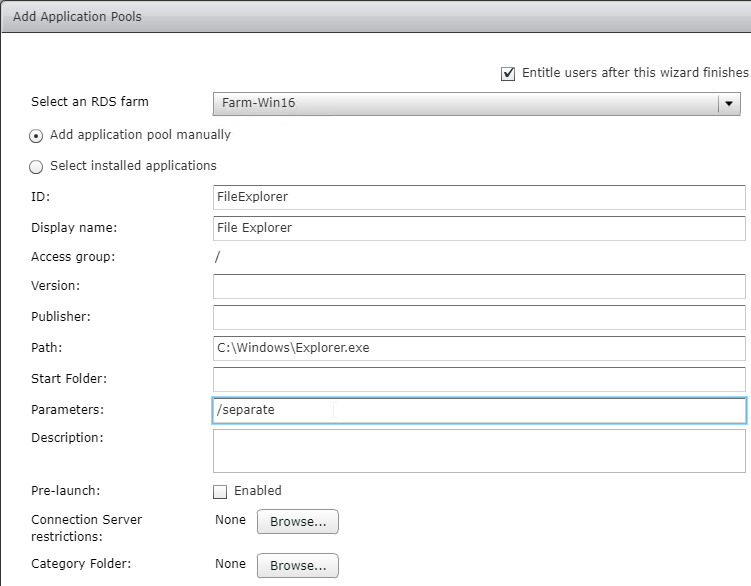
- When publishing Explorer, add the /separate switch. This prevents the full desktop from appearing when launching published Explorer through HTML Blast (Source = RDS Desktop being presented when opening an app at VMware Communities)
- Notice the Entitle users box is checked by default. All of the applications in this list will receive the same entitlements. Click Finish.
- Then click Add to select a group that can see these icons.
- Horizon 7.1 and newer supports Unauthenticated users, which is detailed at Providing Unauthenticated Access for Published Applications at VMware Docs. Click OK when done.
- You can run the wizard again to publish more applications with different entitlements.
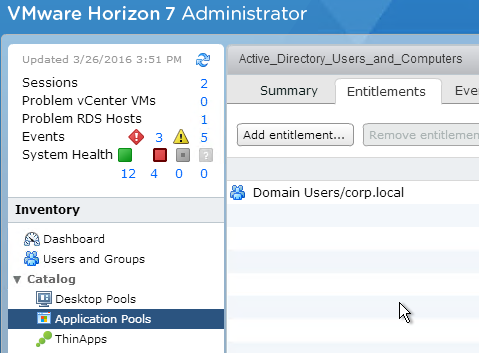
- If you double-click one of the application pools, on the Entitlements tab, you can change the entitlements.
- In Horizon 7.1 and newer, icons for the published apps can be changed using PowerShell. See the YouTube video Customizing Horizon RDSH Application Icons.
- If you go to Resources > Farms, double-click your farm, and switch to the RDS Pools tab, you can see which Application Pools (published applications) are associated with this farm. Notice you can’t really do anything from here.

Anti-affinity
You can configure Horizon to restrict the number of instances of an application running on a particular RDS host. Here are some limitations:
- If the user already has a session then anti-affinity is ignored.
- If the application is launched from within an RDS Desktop then anti-affinity is ignored.
- Not recommended for Horizon Mobile clients.
See Configure an Anti-Affinity Rule for an Application Pool at VMware Docs.
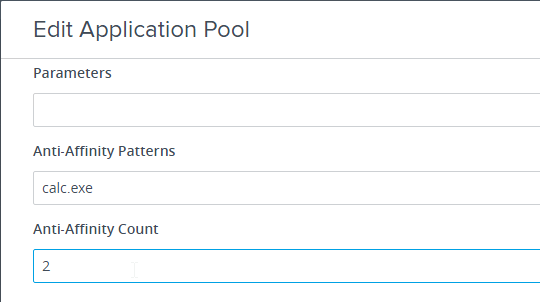
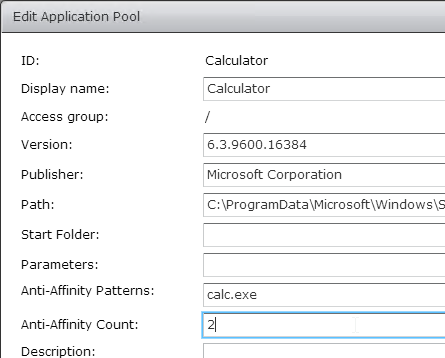
Do the following to configure Anti-Affinity in Horizon Console or Horizon Administrator:
- On the left, go to Inventory > Applications or go to Catalog > Application Pools.
- On the right, edit an existing application pool.
- In the Anti-Affinity Patterns field, enter process names to match. Wildcards are supported. Each match is counted.
- In the Anti-Affinity Count field, enter the maximum number of process name matches that can run on a single RDS Host.
Hi Carl,
Where can we check the periodic schedules that are configured for an RDS Farm?
We use Horizon 8 2209 and we can schedule recurring maintenance but don’t see the configured schedule.
Any place where we can check it?
Thank you again Carl.
The Summary tab of a Farm has a Farm Maintenance section. You can also click Maintain > Reschedule.
Hi Carl, I would like to point out what appears to be a mistake that cost me an embarrassing call to VMware support! Under Creating Manual Farms, point 2, it says to check the Inventory – Machines – RDS hosts to make sure your machine shows up after registering. My machine did not show up there, and I eventually opened the case with VMware support where it was pointed out to me that the newly registered machines show up under Settings – Registered machines, not in Inventory, until you create a Farm. We are on 7.11, so I don’t know if this changed from the time this documentation was created or not, but I thought you should know.
Thanks for pointing that out. I suspect the other location is only for machines that are added to an RDS Farm whereas Settings shows all registered machines whether in a farm or not.
By the way I am using the HTML5 console, not the old Administrator. But in my version of the Console which is the 7.11 version, the newly registered machines go into the Settings – Registered machines, not directly into Inventory – Machines. So it is somewhat similar to the old Administrator where the newly registered machines went into Configuration – Registered machines.
This is a great guide, I’m having an issue to where the published apps are not showing in the horizon client or via the web. Any assistance is greatly appreciated.
What is your licensed edition of Horizon?
Horizon 7 and I’m using Horizon client 5.4.3
What Edition? If you go to Product Licensing, does it show that Application Remoting is liensed?
It is disabled, i’m guessing I need to reach out to VMware and get an add-on license?
Hi Carl,
Excellent guide – thank you. We have an issue where, if a pre-existing ‘prelaunch’ session does not exist on the RDS host, then it tries to create a new one, this newly created session expires almost immediately (from the horizon logs, we can see it expires consistently after 1 minute) and user gets a black screen. This happens consistently when connecting externally, but not when we connect internally.
Its very weird – but I can (rarely) get a successful launch of the app externally. The farm settings are correct (prelaunch timeout is 999999 minutes, and empty session timeout is 10 mins. We’ve also tried removing pre-launch entirely from app and farm config – but still the immediate expiration of the session persists. Again, this all works when connecting internally.
Any ideas at all?!
Thanks
As below – the agent accepts the session, but then the session immediately expires 1 minute later.
04/09/2020, 1:56 PM Agent Warning: The pending session on machine AS12UATGoal101 for user XXX has expired
04/09/2020, 1:55 PM Agent The agent running on machine AS12UATGoal101 has accepted an allocated session for user UKDN\s008816
Hello Carl. In application pools we have published notepad application, when de user execute notepad, the notepad is opened ,in this moment , if you touch on the right, appear the desktop server rdsh, settings, poweroff, etc, etc ¿any solution for this problem?. thanks a lot !!
Hi Carl, During installation of Horizon Agent on RDS Server 2016 Im receiving error message.
“Error 2739. Could not access JavaScript run time for custom action”
Have you troubleshoot this issue before?
Thank’s
Did somebody in security block access to jscript.dll?
Its a fresh installation of Server 2016
Check permissions on c:\windows\system32\jscript.dll. One of your GPOs might have denied access to it.
Would you know or is there something I need to do while I install view agent on RDSH server?
facing weird problem. I have published the application but do not see any of the apps.
I am trying to use browsers like Firefox, chrome and internet explorer through RDSH but the first time when I open any of the 3 apps it takes me to login to the RDSH servers and after successful login it closes the server login and opens browser window. Anyone knows how to fix this behavior ? Also, I am trying to use a default homepage when browser opens, basically like a kiosk. I will appreciate any recommendations on how to accomplish it seamlessly. Thanks.
You need to make sure SSO is configured on the Web Access server and Connection Broker(s) as well as ensure the applicable Group Policies are applied to the workstations attempting to connect.
Hello Carl,
When and app is launched from citrix we dont see complete user session login process to desktop but incase of horizon view user will see the complete user session login process. Is there any way to hide it?
When I launch an app, I don’t see anything until the app appears. Maybe a group policy setting or custom registry value is interfering?
Thanks Carl for your reply.
When I launch the application for the first time I see the server login message followed by connection server preparing the desktop/application.. ”
Following launch of the same application wont show the server login message.
Unable to relate to any group policy too , may be I need to open a case with VMware
We had similar issue in our environment. We found that a logon banner registry key was interfering. After fixing the value of one of the registry key, the app was launching perfectly fine similar to Citrix published application.
( On Windows 2008 R2 OS )
HKEY_LOCAL_MACHINE\Software\Microsoft\Windows\CurrentVersion\Policies\System
Before the issue:
• Legalnoticecaption = “”
• Legalnoticetext=””
Fix : ( we had to blank out the value)
• Legalnoticecaption = “”
• Legalnoticetext=””
Please test on a server and if it works then probably you may need to permanently change via GPO.
Sorry I missed to mention the value for the Legalnoticecaption key
Before the issue:
• Legalnoticecaption = “Press OK to continue”
• Legalnoticetext=””
Hello
First of all ,thank you for sharing !
We are deploying an Automatic Farm, allowing HTML access with Blast
At the begining we had certificates alert regarding autosigned blast certificates.
We now used a wildcard certificate, and have installed it on the RDS Host with success following Vmware KB.
But composed RDS Host seems to lost certificate private key with the sysprep.
Have you ever encountered this problem ?
Thanks in advance
This is a common problem with pooled machines.
One option is to create a computer startup script that imports the wildcard, sets the registry key, and restarts the Blast service.