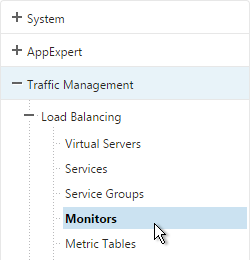
Navigation
This procedure is only needed if you are running Web Interface instead of StoreFront.
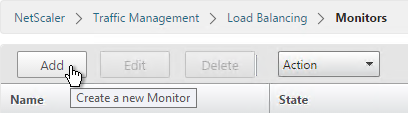
Monitor
- On the left, expand Traffic Management, expand Load Balancing, and click Monitors.
- On the right, click Add.
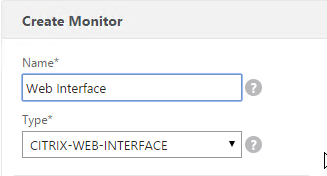
- Name it Web Interface or similar.
- Change the Type drop-down to CITRIX-WEB-INTERFACE.
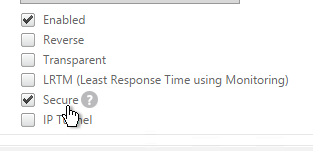
- If you will use SSL to communicate with the Web Interface servers, then scroll down and check the box next to Secure.
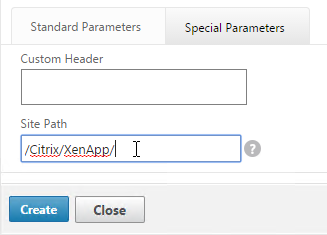
- Switch to the Special Parameters tab.
- In the Site Path field, enter the path of a XenApp Web site (e.g. /Citrix/XenApp/).
- Make sure you include the slash (/) on the end of the path or else the monitor won’t work.
- The site path is also case sensitive.
- Click Create.
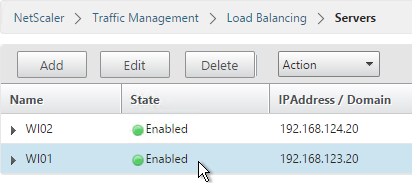
Servers
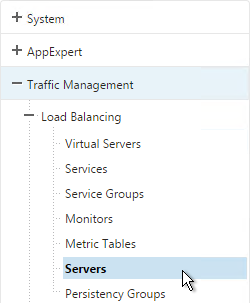
- On the left, expand Traffic Management, expand Load Balancing, and click Servers.
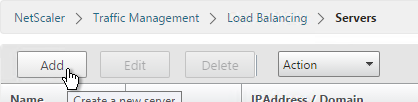
- On the right, click Add.
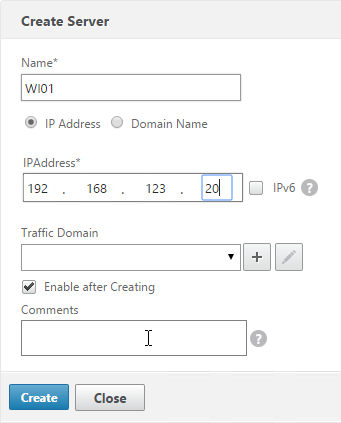
- Enter a descriptive server name, usually it matches the actual server name.
- Enter the IP address of the server.
- Enter comments to describe the server. Click Create.
- Continue adding Web Interface servers.
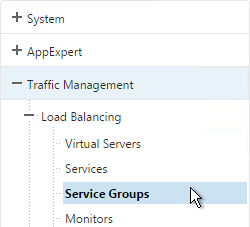
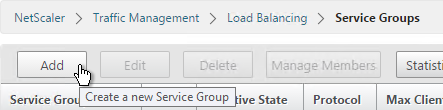
Service Group
- On the left, expand Traffic Management, expand Load Balancing, and click Service Groups.
- On the right, click Add.
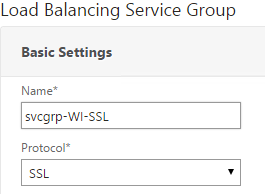
- Give the Service Group a descriptive name (e.g. svcgrp-WI-SSL).
- Change the Protocol to HTTP or SSL. If the protocol is SSL, ensure the Web Interface Monitor has Secure enabled.
- Scroll down and click OK.

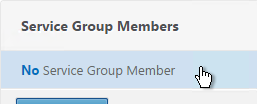
- Click where it says No Service Group Member.
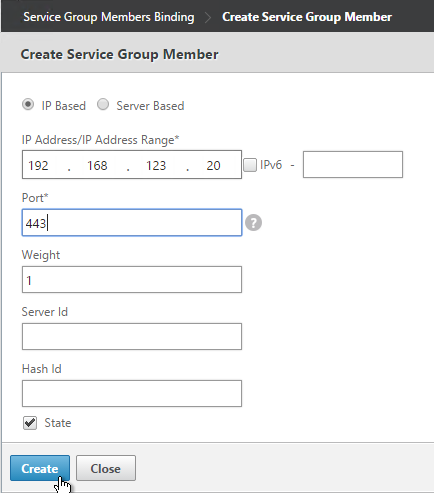
- If you did not create server objects then enter the IP address of a Web Interface Server. If you previously created a server object then change the selection to Server Based and select the server object.
- Enter 80 or 443 as the port. Then click Create.

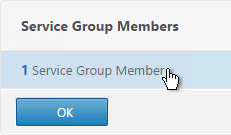
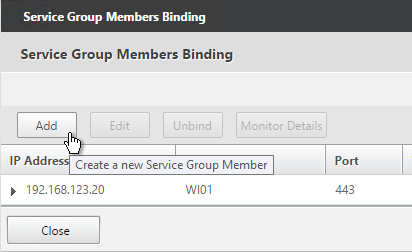
- To add more members, click where it says 1 Service Group Member and then click Add. Click Close when done.
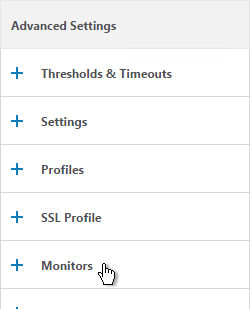
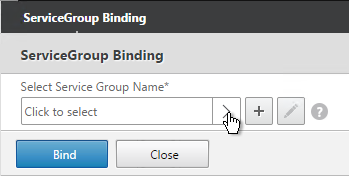
- On the right, under Advanced Settings, click Monitors.
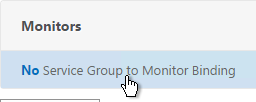
- On the left, in the Monitors section, click where it says No Service Group to Monitor Binding.
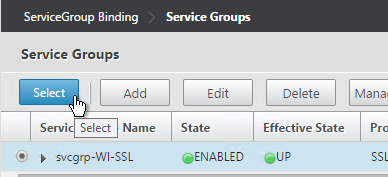
- Click the arrow next to Click to select.
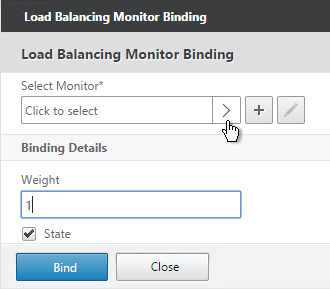
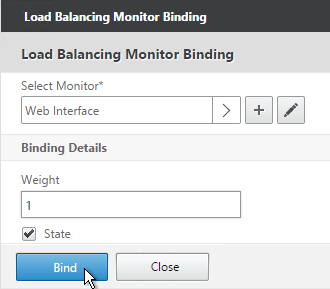
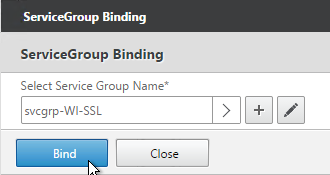
- Select the Web Interface monitor and click Select.

- Then click Bind.
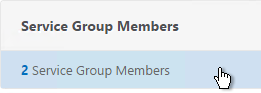
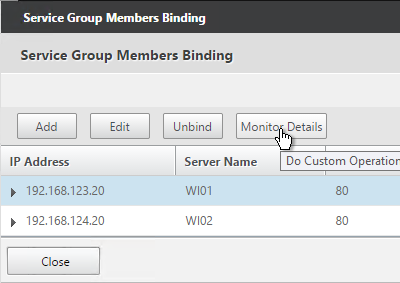
- To verify if the monitor is working or not, on the left, in the Service Group Members section, click the Service Group Members line.
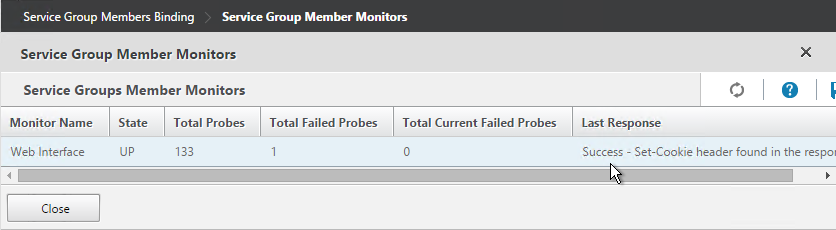
- Highlight a member and click Monitor Details.
- The Last Response should indicate that Set-Cookie header was found. Click Close twice when done.
- Then click Done.

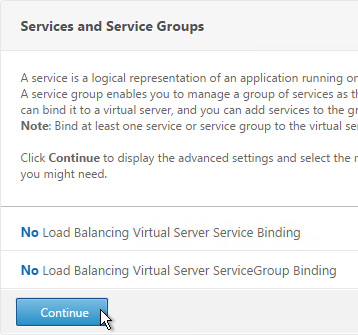
Load Balancing Virtual Server
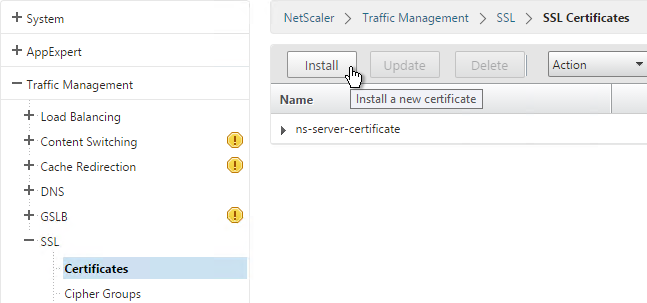
- Create or install a certificate that will be used by the SSL Virtual Server. This certificate must match the DNS name for the load balanced Web Interface servers.
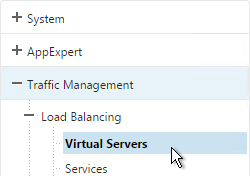
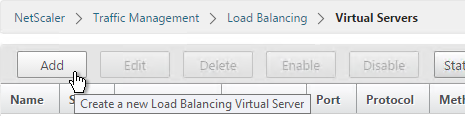
- On the left, under Traffic Management > Load Balancing, click Virtual Servers.
- On the right click Add.
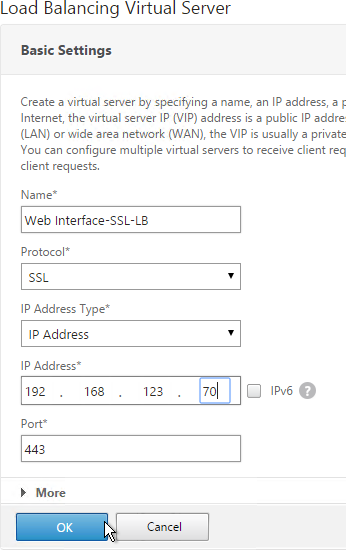
- Name it Web Interface-SSL-LB or similar.
- Change the Protocol to SSL.
- Specify a new internal VIP.
- Enter 443 as the Port.
- Click OK.
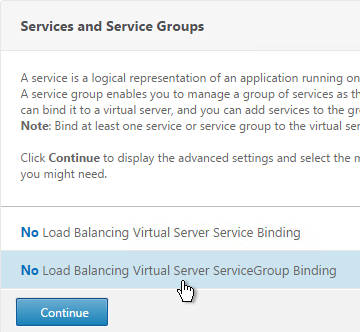
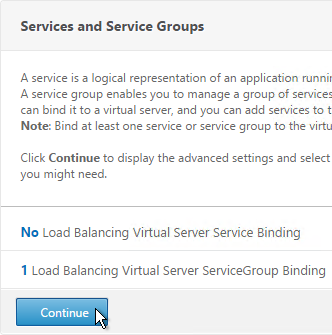
- On the left, in the Services and Service Groups section, click where it says No Load Balancing Virtual Server ServiceGroup Binding.
- Click the arrow next to Click to select.
- Select your Web Interface Service Group and click Select.
- Click Bind.
- Click Continue.
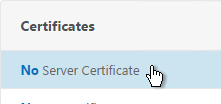
- Click where it says No Server Certificate.
- Click the arrow next to Click to select.
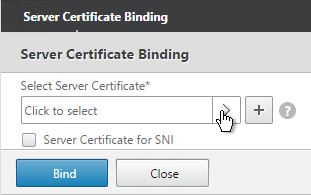
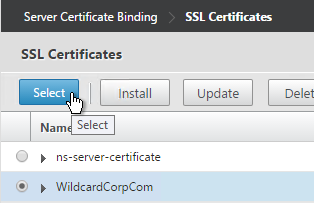
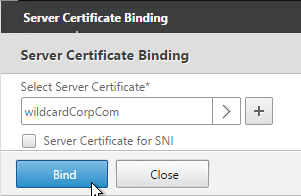
- Select the certificate for this Web Interface Load Balancing Virtual Server and click Select.
- Click Bind.
- Click Continue.

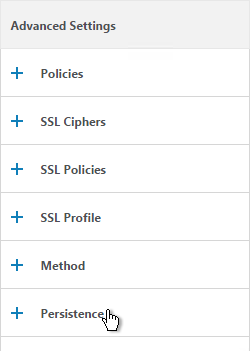
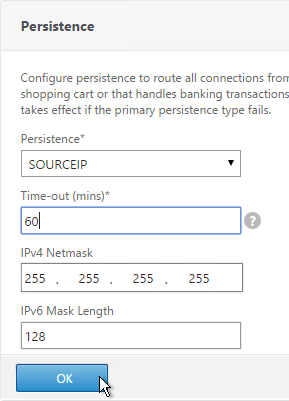
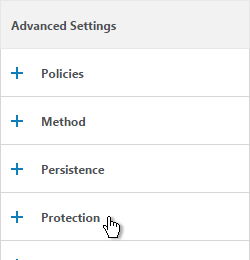
- On the right, in the Advanced Settings column, click Persistence.
- Select SOURCEIP persistence. Note: COOKIEINSERT also works with Web Interface. However, it doesn’t work with StoreFront.
- Set the timeout to match the timeout of Web Interface.
- The IPv4 Netmask should default to 32 bits.
- Click OK.
- If you haven’t enabled the Default SSL Profile, then perform other normal SSL configuration including: disable SSLv3, bind a Modern Cipher Group, and enable Strict Transport Security.
bind ssl vserver MyvServer -certkeyName MyCert

set ssl vserver MyvServer -ssl3 DISABLED -tls11 ENABLED -tls12 ENABLED

unbind ssl vserver MyvServer -cipherName ALL

bind ssl vserver MyvServer -cipherName Modern

bind ssl vserver MyvServer -eccCurveName ALL

bind lb vserver MyvServer -policyName insert_STS_header -priority 100 -gotoPriorityExpression END -type RESPONSE
SSL Redirect – Down vServer Method
If you created an SSL Virtual Server that only listens on SSL 443, users must enter https:// when navigating to the website. To make it easier for the users, create another load balancing Virtual Server on the same VIP that listens on HTTP 80 and then redirects the user’s browser to reconnect on SSL 443. This section details the Down vServer method. Alternatively you can configure the Responder method.
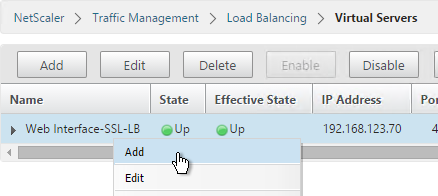
- On the left, under Traffic Management > Load Balancing, click Virtual Servers.
- On the right, find the SSL Virtual Server you’ve already created, right-click it and click Add. Doing it this way copies some of the data from the already created Virtual Server.
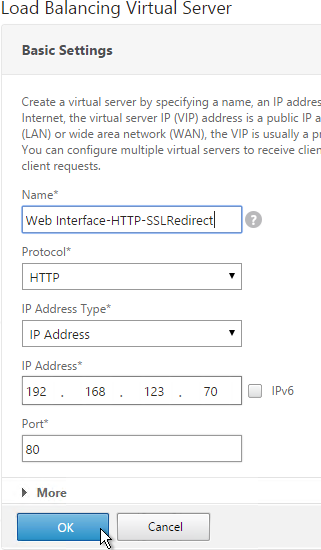
- Change the name to indicate that this new Virtual Server is an SSL Redirect.
- Change the Protocol to HTTP on Port 80.
- The IP Address should already be filled in. It must match the original SSL Virtual Server. Click OK.
- Don’t select any services. This vServer must intentionally be marked down so the redirect will take effect. Click Continue.
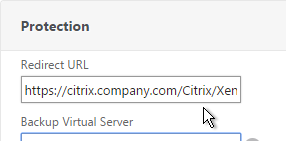
- On the right, in the Advanced Settings column, click Protection.
- In the Redirect URL field, enter the full URL including https://. For example: https://citrix.company.com/Citrix/XenApp. Click OK.
- Click Done.

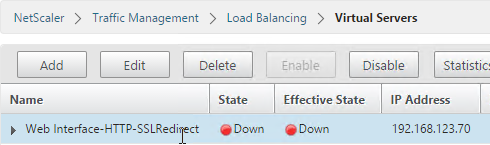
- When you view the SSL redirect Virtual Server in the list, it will have a state of DOWN. That’s OK. The Port 80 Virtual Server must be DOWN for the redirect to work.
Hello,
I have an issue related to a service that is showing “down” after the server object was patched. (traffic mgm->services)
SSL port 443 traffic enabled between the NetScaler and server object.
We tried also to reboot the server object, and also do re-enable the service.
Right-click the service and click Monitor Details. What does it say?
Did the ciphers change? Maybe your NetScaler isn’t configured with the same ciphers as the server.
Hello,
On monitor service at “last response” column says “failure – http response code 302 received”
Same patching was applied to another server (which is in Lb with this one) and the other one is OK. I assume the ciphers did not change.
Thanks.
That’s a redirect. You can change the monitor to probe a path that doesn’t have redirect (e.g. /Citrix/XenApp/Logon.aspx), or add 302 as an acceptable response.
I’m Running VPX Netscaler 12.1. I have an old Netscaler 9.3 instance that I’m retiring from another datacenter configured with Access Gateway. It’s hosting a load balanced Web Interface which is hosting only XenApp application.
I’m still a netscaler noob. Do I need to build a Access gateway or am I ok with just balancing a Web Interface server and presenting that to the outside?
There are two connections from every Citrix client. One connection is HTTP to Web Interface. The second connection is ICA/HDX to the VDA machine. The ICA/HDX connection usually only works on the internal network unless you proxy the ICA connection through Citrix Gateway. I’m guessing you have Secure Gateway doing the ICA proxy today.
how can separate traffic for each server in service group ,if I have 3 servers 40% 40% 20%
When you add a member to a Service Group, you can specify a weight for each member.
can we modify the headers to include the backend server information on netscaler.
To see which backend server is being hit while the app is being tested out
On Web Interface, you should be able to customize the Footer text to show the server name. I think this is configurable in the GUI.
Can you please let me know how to customize the Footer
Hi Carl, your pages really help a lot. I do have a question on which I cannot seem to find an answer to on the internet. I have a web interface behind the netscaler vpx, which is working fine. Now that web interface server also needs to service another domain of ours because of a merger. I can seem to authenticate to the web interface successfully, though after silent detection, I get a 401. Only from the domain, where in the session profile the item Single Sign-on Domain is configured with the appropriate domain, it works. If I give the other session profile preference, then that domain is able to resolve the applications for that user, and the ‘normal’ domain fails. It seems that the credentials passed on from the netscaler are not recognized completely by the web interface.
How can I resolve this?
I have some multi-domain info at https://www.carlstalhood.com/netscaler-gateway-11-1-ldap-authentication/#domainsaaagroup
Thanks a lot. I will start reading right away.
Thank you Carl, that saved the day, works like a charm. I have a follow up question. How can I add the inherited xenapp 5 farm the web interface server? Can I just add the servers to my XML broker vip? Or do I have to add another VIP for them and configure the web interface to use the new VIP?
And may I propose to incorporate a donate button on this site? So I can at least buy you a beer?
Each farm is a separate entity in Web Interface. Manage Server Farms. You should have an entry for each farm, each pointing to different XML Brokers. You can optionally load balance XML.
Yes, exactly that is how I set up the first farm, now the other farm is also configured, and running like that. Thanks again Carl!
Hi Carl, is there a way that one can change an existing lb vserver service type from tcp to ssl_tcp without having to recreate it?
I usually extract the commands from the configuration, modify them as desired, then remove the old config, and run the edited commands. Similar to a router/switch.
I have Some issue when assign IP assdress to SDX management port 2/0
SDX-10.176.8.78
Xserver IP-10.176.8.79
NS -10.176.8.80
LOM IP- Default
But after assign SDX -10.176.8.78 management ip it showing blank .not pinging
Xerver IP showing correct and it’s pinging .
Please Help
Hi Carl, do you have some documentation about Load Balacing a JDEdwards because i tried to do it and i failed …
I have not specifically done that. What are the load balancing requirements? Protocols? Ports? SSL? Persistence? Does it use JSESSIONID?
Hi Carl, I’m looking for a way to present a maintenance page if the web server takes too much time to response. Not if the web server is down. Thanks. Didier
Maybe SureConnect – http://docs.citrix.com/en-us/netscaler/11/security/ns-sc-gen-wrapper-10-con.html
Hi Carl , Once again thank you for taking the time and effort to make our lives easier.I have multiple web servers , each having a different path ie /citrix/captown and /citrix/jhb. , I see that you created only 1 monitor. How would i load balance my webservers if the paths are not the same.
Probably the same way you do Exchange. Create multiple LB vServers, each with different monitors. Then create a Content Switching vServer in front of them to direct traffic based on the path.