Navigation
These App Layering pages focus on VMware vSphere as the hypervisor.
- Change Log
- Licensing
- Upgrade Enterprise Layer Manager
- Import Enterprise Layer Manager Appliance
- ELM IP Address
- First Login
- Appliance Certificate
- File Share
- Active Directory
- User Layers Storage Locations
- Provisioning Services Publishing Agent
- OS Layer and Platform Layer (separate page)
- App Layers, Image Templates, and Publishing (separate page)
Change Log
- 2025 March 31 – Updated Upgrade section, Import Appliance section, and PVS Agent section for Layering 2503
- 2023 July 2 – Updated Upgrade section, Import Appliance section, and PVS Agent section for Layering 2306
- RBAC available in 2306+
- 2022 May 14 – Updated Upgrade section, Import Appliance section, and PVS Agent section for Layering 2204
- Added some newer screenshots/procedures for the HTML5 interface in Layering 2204.
- 2022 Mar 10 – Updated Upgrade section, Import Appliance section, and PVS Agent section for Layering 2202
- In version 2202 and newer, upgrades can now be performed in the HTML5 interface.
Licensing
From Citrix Blog Post A Breakdown of Citrix App Layering Features by Edition: Citrix App Layering is available in all Citrix Virtual Apps and Desktops (CVAD) editions and all Citrix DaaS (Citrix Cloud) editions. This means that you can do the following across any number of Citrix Virtual Apps and Desktops (CVAD) sites in your environment:
- Create an unlimited number of OS, platform and application layers
- Create an unlimited number of layered images
- Create an unlimited number of elastic layers
Citrix Virtual Apps and Desktops (CVAD) Premium Edition customers and all Citrix DaaS customers (Citrix Cloud) also benefit from:
- Multiple hypervisors and/or cloud connections (e.g., Citrix Hypervisor and Azure or Citrix Hypervisor and Hyper-V).
- Non-Premium sites are limited to one hypervisor or cloud connection type.
- Multiple provisioning mechanisms (e.g. Machine Creation Services and Citrix Provisioning).
- Non-Premium sites must select MCS or CPV and use it exclusively with Citrix App Layering.
- Multiple broker types/platforms (e.g. Citrix Virtual Apps and Desktops (CVAD) with VMware Horizon View).
- Non-Premium sites can only use App Layering within their Citrix Virtual Apps and Desktops (CVAD) sites
- User Layers
For Citrix Cloud – Those customers using the Citrix Virtual Apps and Desktops (CVAD) Service are entitled to Premium-level features including all Citrix App Layering capabilities.
Upgrade Enterprise Layer Manager
If you are deploying a new ELM appliance, skip to Import Enterprise Layer Manager.
If you are upgrading from 2403 or older, first upgrade the existing appliance to version 2403.9. Then deploy a new 2503 appliance. Then run the migration wizard from the 2403.9 appliance.
To upgrade the older appliance:
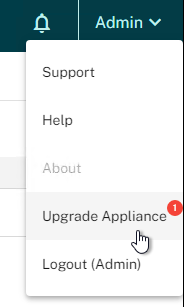
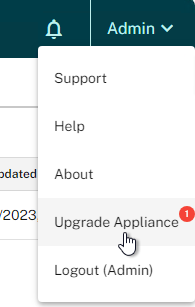
- When you login to the ELM, if you click your user menu on the top right, then you might see Upgrade Appliance with an alert next to it. If you don’t see it yet, then you might have to wait for the Download task to complete.
- If you don’t see the upgrade notification, then download it manually:
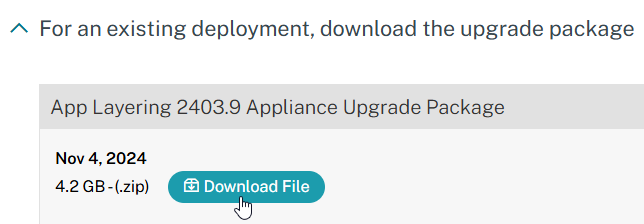
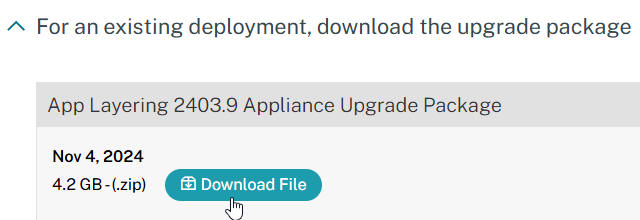
- Download version 2403.9 upgrade package from Citrix App Layering 2403 at Citrix Downloads. Look for the section named For an existing deployment, download the upgrade package.
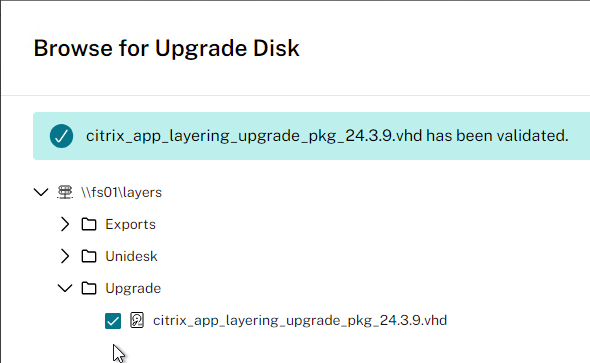
- In the App Layering file share, create an Upgrade folder.
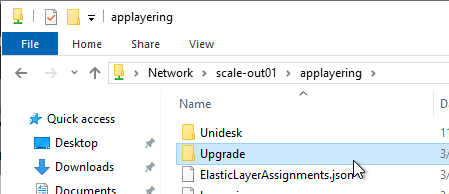
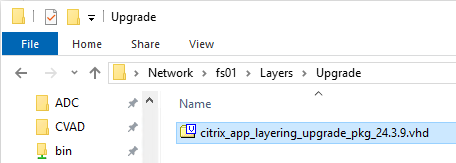
- Unzip the Upgrade Package and copy the citrix_app_layering_upgrade_pkg_24.3.9.vhd file to the Upgrade folder in the App Layering file share.
- Click your name on the top right and then click Upgrade Appliance.
- If the field is not already populated, then click Browse.
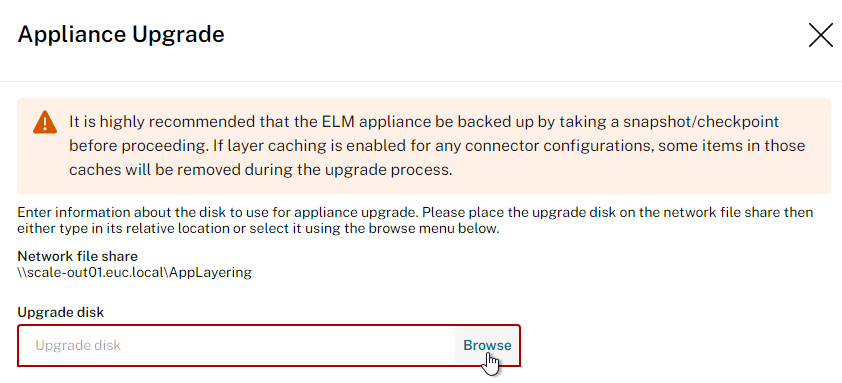
- Browse the file share, select the upgrade disk, and then click Save.

- Download version 2403.9 upgrade package from Citrix App Layering 2403 at Citrix Downloads. Look for the section named For an existing deployment, download the upgrade package.
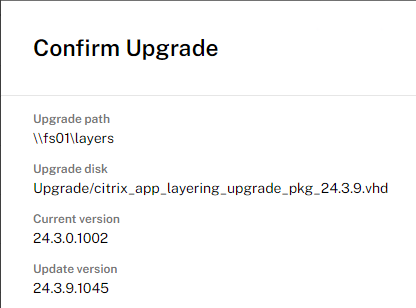
- Click Confirm and Complete.

- In the Confirm Upgrade page, click Upgrade.

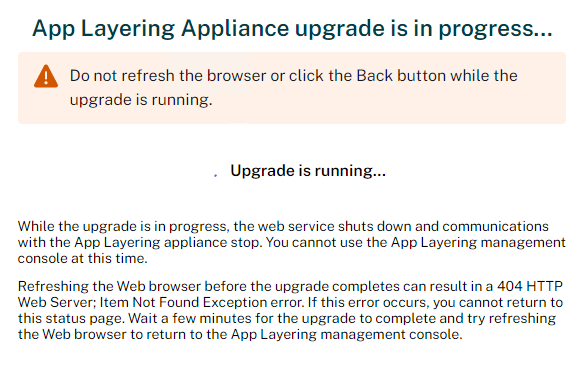
- Wait for the upgrade to complete.
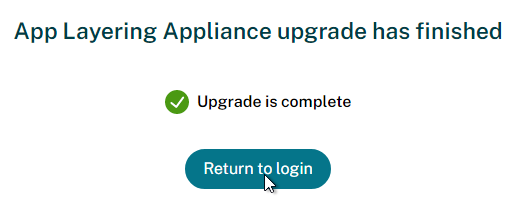
- Then click Return to login and login.
- Click Dismiss acknowledging that connector caches have some items removed.

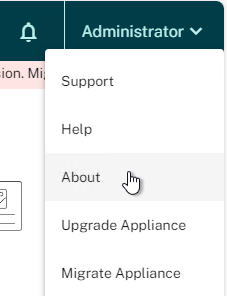
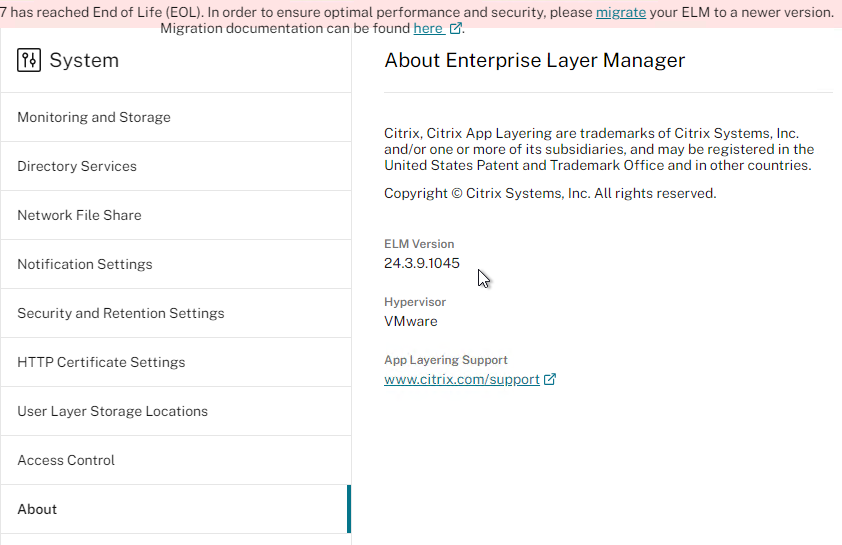
- On the top right, click your username and then click About to see the current version, which should be 24.3.9.
- Import a new ELM with version 2409 or newer.

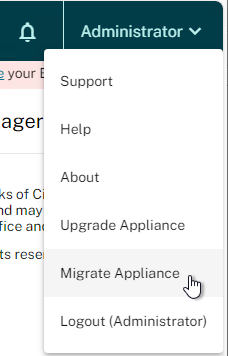
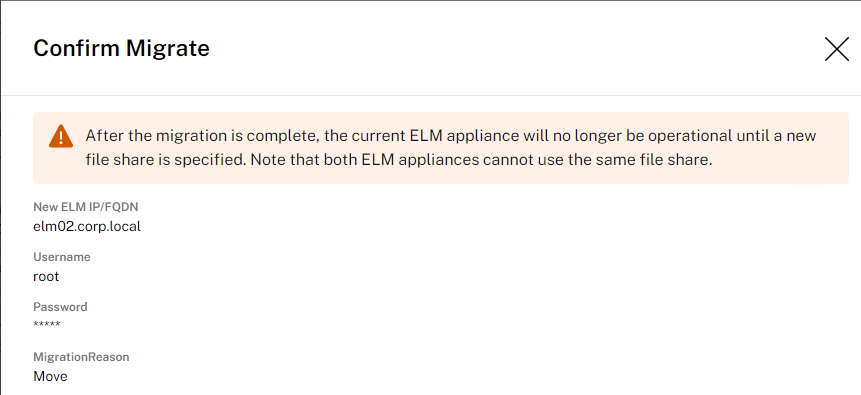
- In the older 2403.9 appliance, click your name on the top right and then click Migrate Appliance.
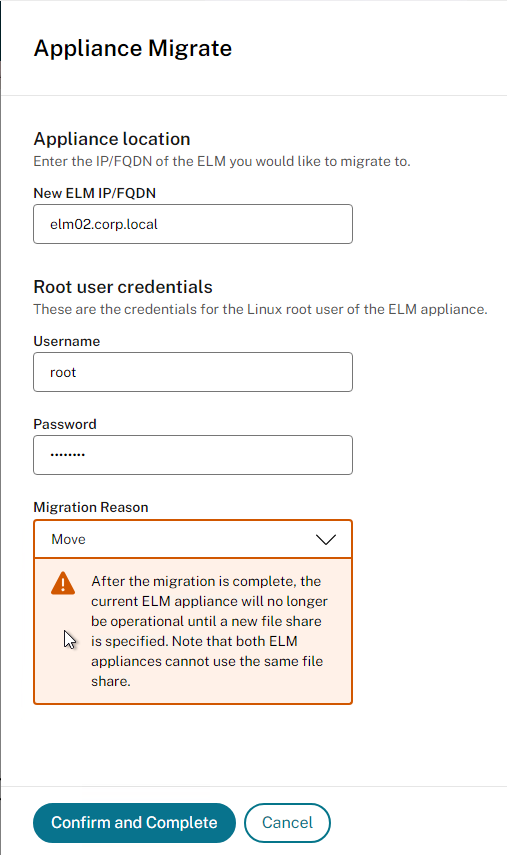
- Enter the address for the new 2409 or newer appliance.
- Change Migration Reason to Move.
- Click Confirm and Complete.
- Click Confirm. Click Migrate.

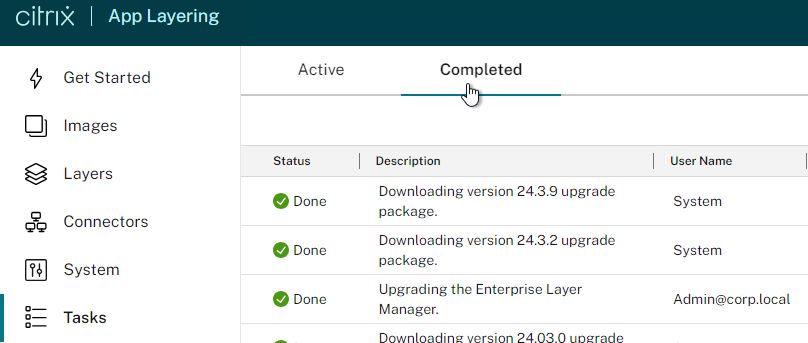
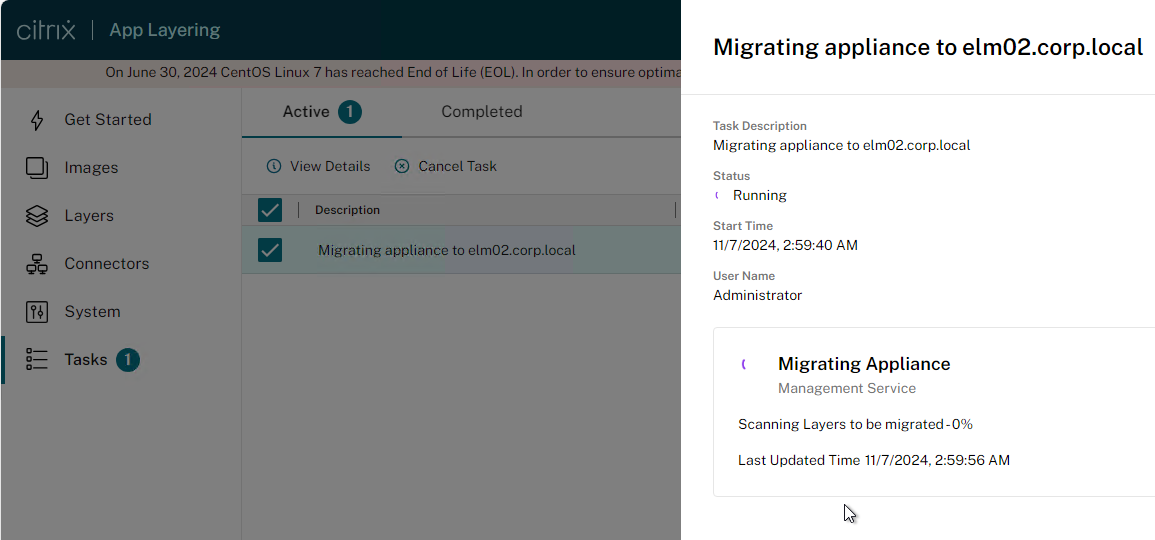
- In the Tasks page, click View Details for the Active task to see the progress.
Upgrade OS Layer
- From Gunther Anderson at Citrix: You do not uninstall or upgrade the Citrix App Layering Image Preparation Utility – Setup_x64.exe. The current drivers are installed in the ELM, and every time the ELM produces an image for any purpose, it injects the current drivers into it. You do not need to touch your OS layer for that. But you should re-publish all images.
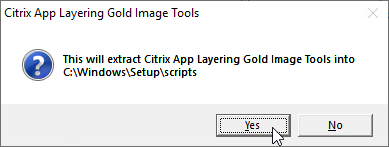
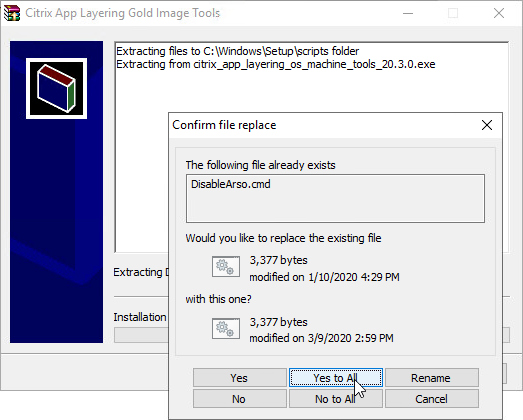
- In a new OS Layer version, you should download and run citrix_app_layering_os_machine_tools_25.3.0.exe to allow it to upgrade your system scripts, but you don’t need to do anything beyond that. For Office 2019, your Machine Tools scripts must be version 1905 or later.

- When Yes when prompted that the tools will be extracted into C:\Windows\Setup\Scripts.
- Replace the existing files. This is especially important for fixing Office activation issues.
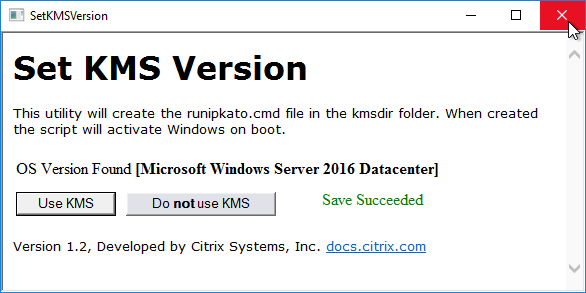
- If you look on the taskbar, you might see an open program called Set KMS Version.
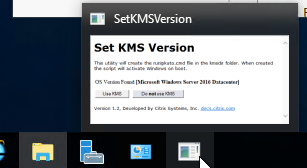
- Click Use KMS.
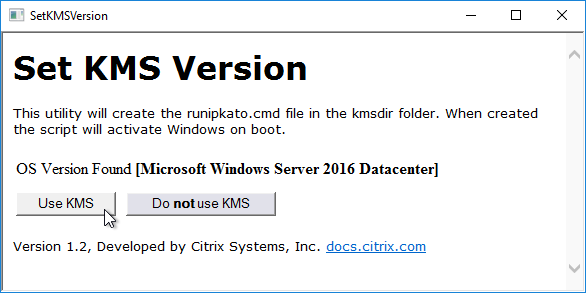
- Then close the window.
- To fix Office activation issues, you’ll also need to create a new version of your Office layer, rerun the optimization tool, and then publish the updated image. More details at Office MAK licensing issues at Citrix Discussions.
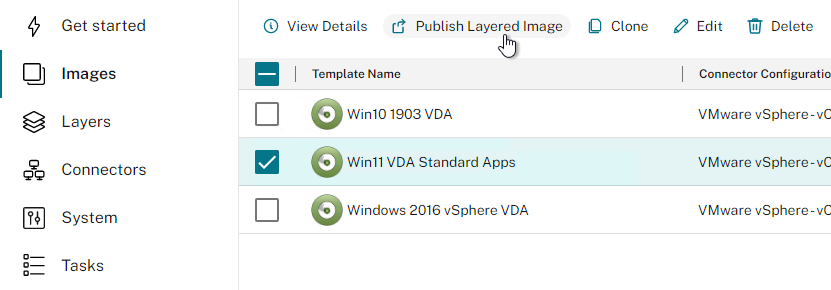
- Re-publish your images so ELM can inject the new drivers.
Upgrade Provisioning Services Agent
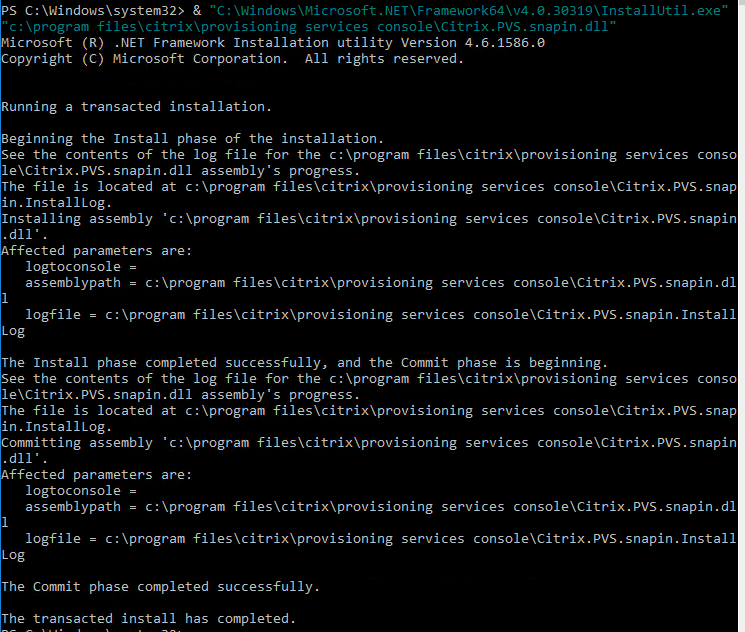
- If you recently upgraded Provisioning Services server, then you might have to re-register the PVS snap-in:
"C:\Windows\Microsoft.NET\Framework64\v4.0.30319\InstallUtil.exe" "c:\program files\citrix\provisioning services console\Citrix.PVS.snapin.dll"
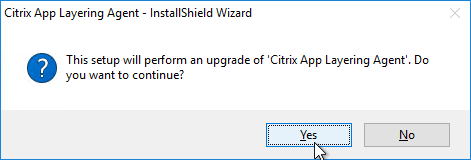
- Go to the Citrix App Layering 2503 files and run citrix_app_layering_agent_installer.exe.

- Click Yes to upgrade the agent.
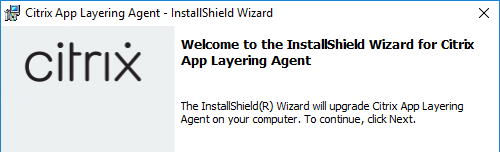
- In the Welcome to the InstallShield Wizard for Citrix App Layering Agent page, click Next.
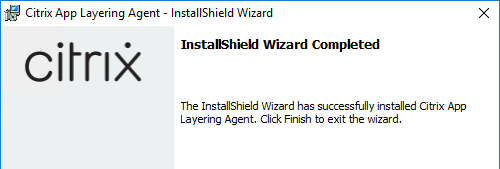
- In the InstallShield Wizard Completed page, click Finish.
Import Enterprise Layer Manager Appliance
This section is for new installs.
Reference Architecture: App Layering:
- Layered images, Elastic Layers, and User Layers do not communicate with ELM, so ELM’s availability is not a concern.
- Do not change the vCPUs or memory allocated to the ELM appliance.
- All created layers are stored on the ELM appliance. Simply backup the appliance.
- Layers can be exported from the ELM appliance to a file share and optionally imported to another ELM appliance.
- Elastic Layers and User Layers are always-open VHD files stored on a file share(s) that is separate from the ELM.
- The file share(s) should be highly available. Use a clustering technology (e.g. Scale Out File Server) that supports always-open VHD files.
- It’s not necessary to backup Elastic Layers, but you might want to replicate them to a different datacenter for multi-datacenter access. Make sure the replication tool supports always-open VHD files.
- User Layers should be backed up and/or replicated. Use a backup method that supports always-open VHD files.
Download Appliance
- You can download App Layering 2503 Appliance Installation Package from Citrix Downloads.

- After downloading, extract the 2503.zip file.

Import ELM Appliance
To import the ELM appliance:
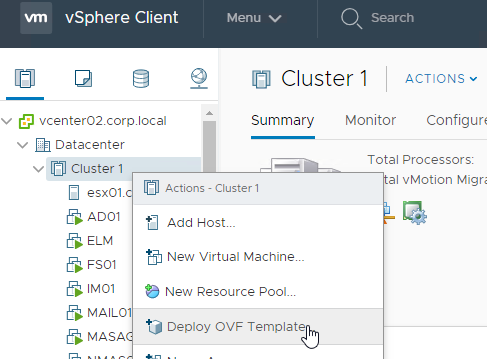
- In vSphere Web Client, right-click a cluster, and click Deploy OVF Template.
- In the Select an OVF template page, browse to the vmware_25.3.0.9.ova file, and click Next.

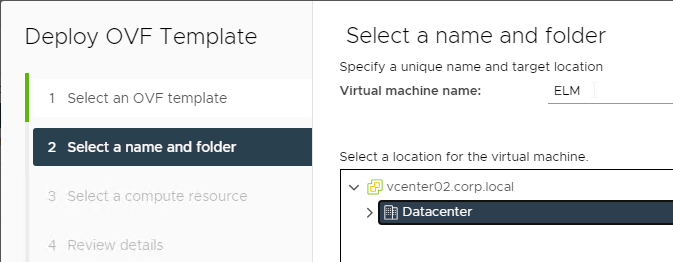
- In the Select name and location page, give the machine a name, and click Next.
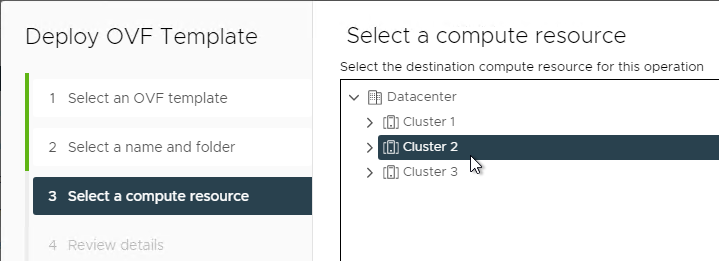
- In the Select a compute resource page, select a cluster, and click Next.
- In the Review details page, click Next.

- In the Accept license agreements page, click Accept, and then click Next.

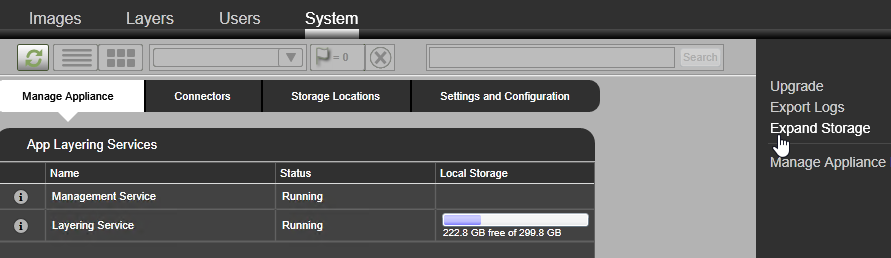
- In the Select storage page, select a datastore. The ELM appliance stores all master layers inside the appliance, so ensure there’s sufficient disk space (typically 300-500 GB) for the virtual appliance.
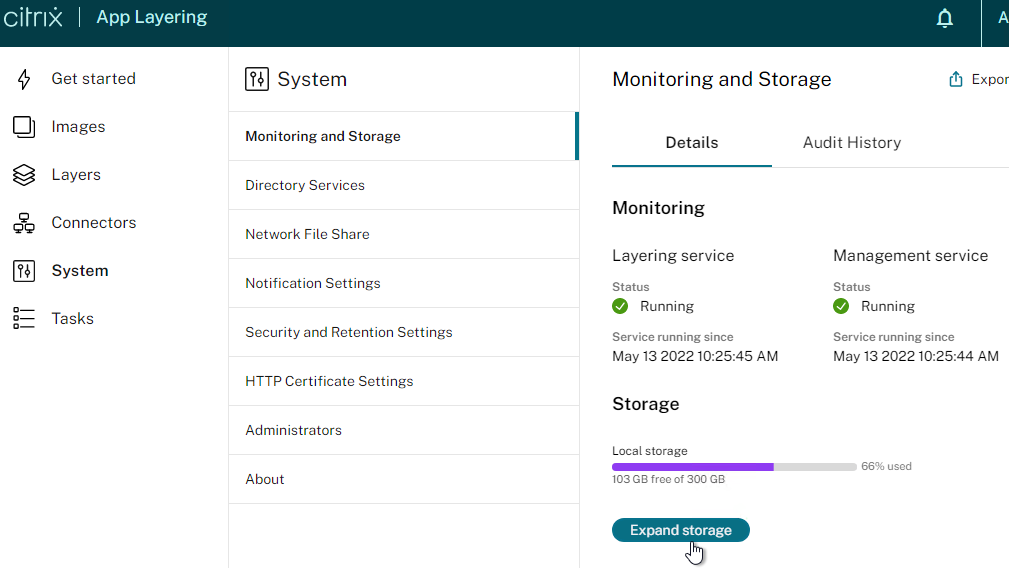
- You can view the appliance’s consumed disk space inside the ELM Management Console at System > Monitoring and Storage, or System > Manage Appliance.
- To expand the storage, either increase the existing disk size, or add a disk to the VM. Then, on the right, is a link to Expand Storage.
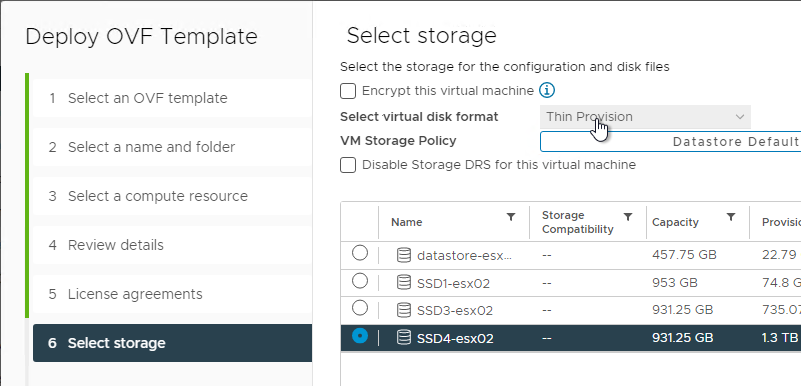
- Select a datastore, select thin provision, or not, then click Next.
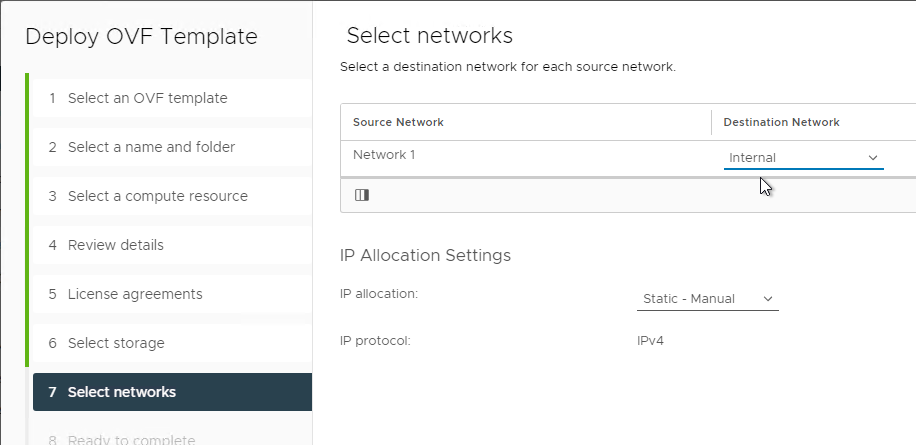
- In the Select networks page, click Next.
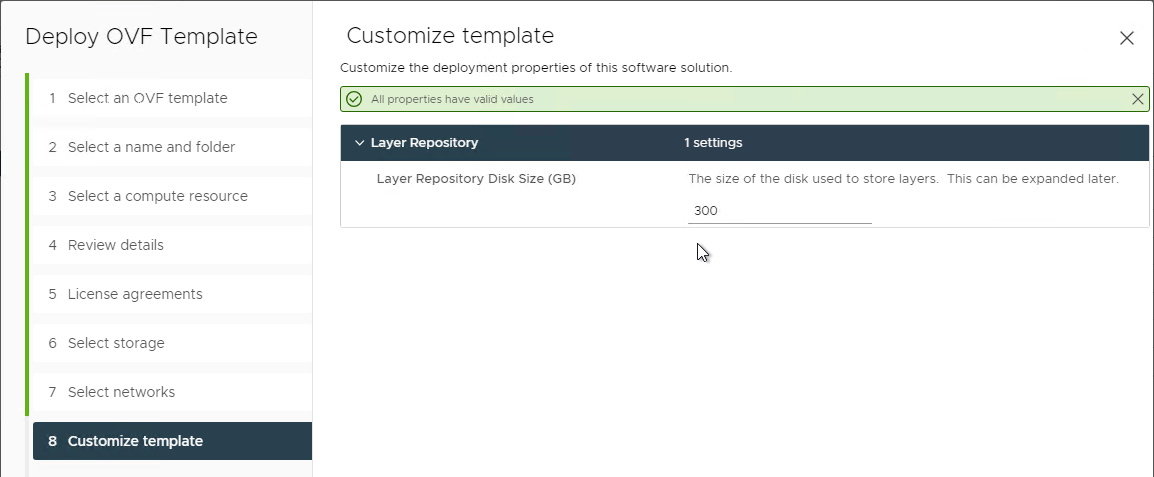
- In the Customize template page, click Next.
- In the Ready to complete page, click Finish.

- See Firewall ports at Citrix Docs.
- ELM requires TCP 443 access to every ESXi host. (Source = Citrix CTX228486 Unable to import App Layering OS Layer to ELM from vSphere)
Configure ELM IP Address
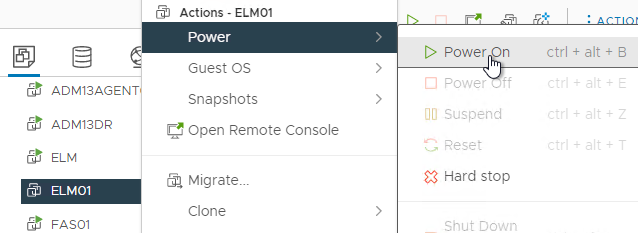
- Once imported, power on the ELM appliance.
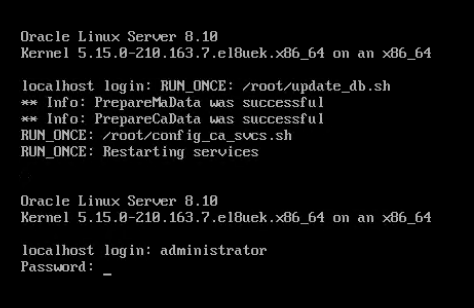
- Open the virtual machine console.
- After the RUN_ONCE commands are complete, press enter to show the login prompt, and then login to the console as administrator with a password of Unidesk1.
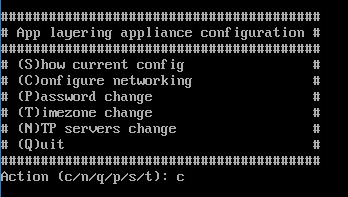
- Enter c to configure networking.
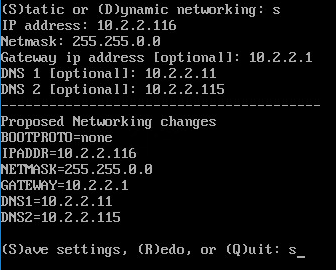
- Enter s to assign a static network.

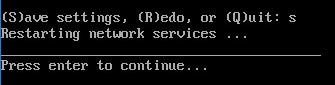
- Enter a new IP address for this appliance. Then enter y to save settings and restart networking.
- Press <Enter> to continue.
- While here, feel free to configure the time zone.
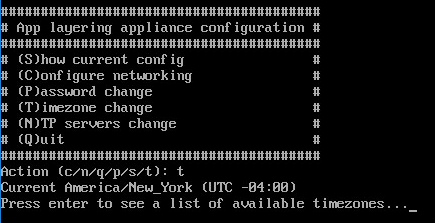
- Press / to search. For Central Time, search for chicago, and note the time zone number.
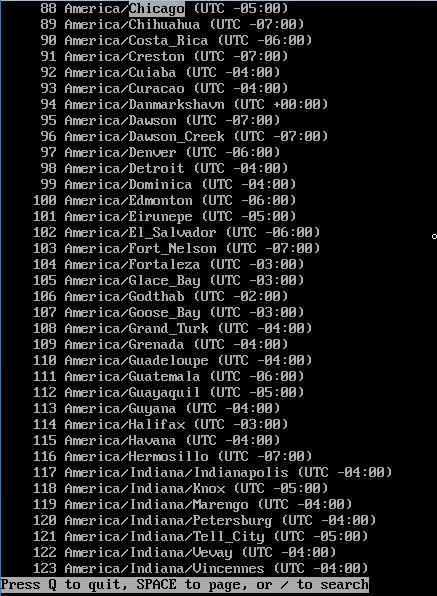
- Press Q to quit the display.
- Enter the time zone number to configure it.

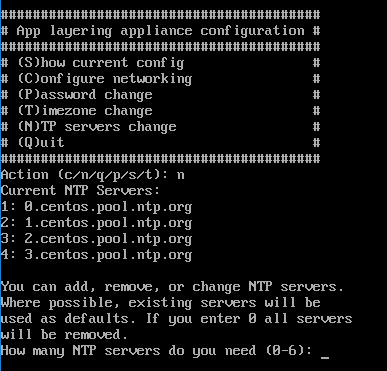
- NTP is configured to use Internet servers. Feel free to change them.
First Login
- In App Layering 2206 and newer, use Edge or Chrome to connect to the ELM. Login using administrator and Unidesk1.
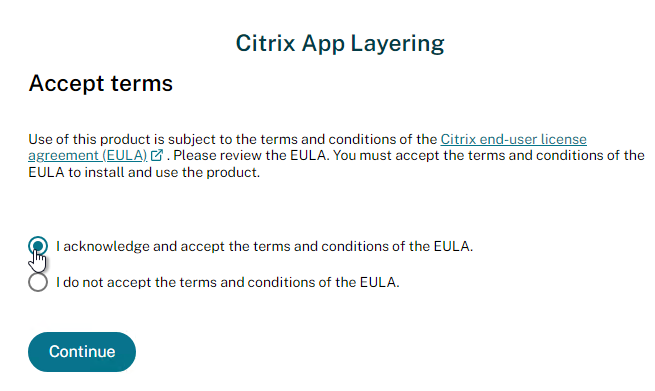
- The first time you logon, you are prompted to accept the End User License Agreement.
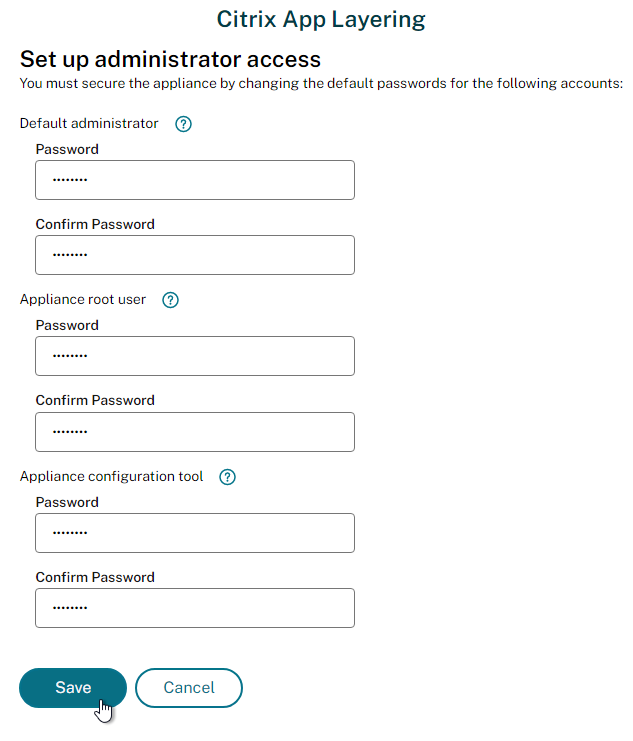
- Then you are prompted to set three passwords.
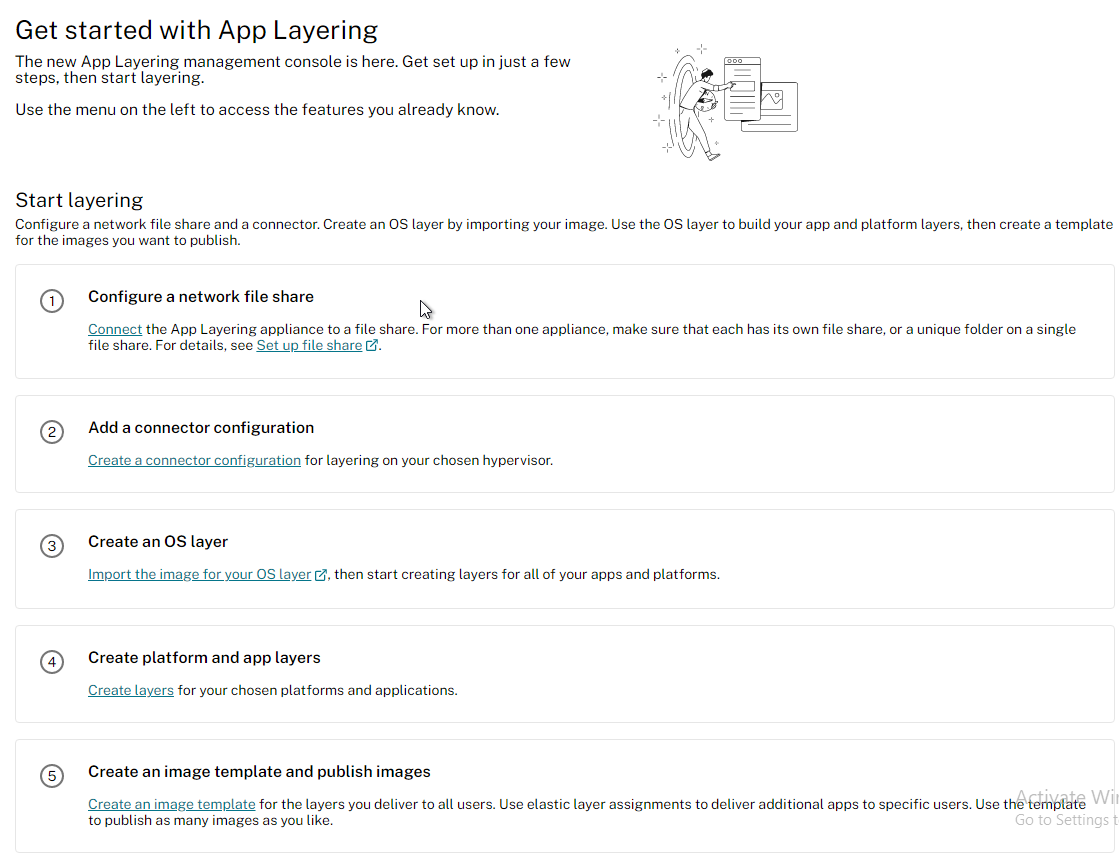
You then see the Get Started wizard.
Appliance Certificate
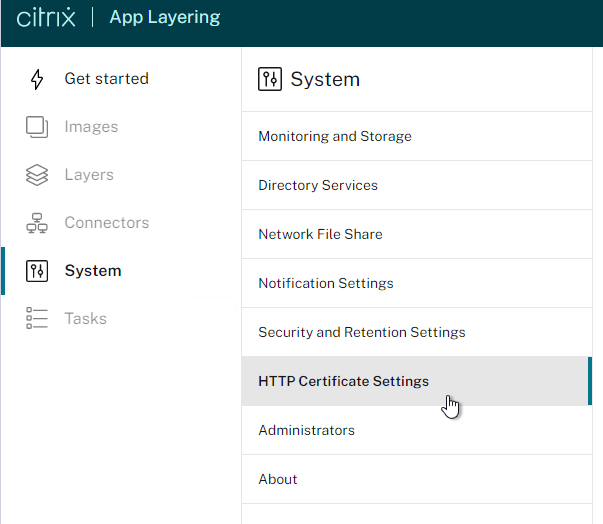
- In the HTML5 console, go to System > HTTP Certificate Settings.
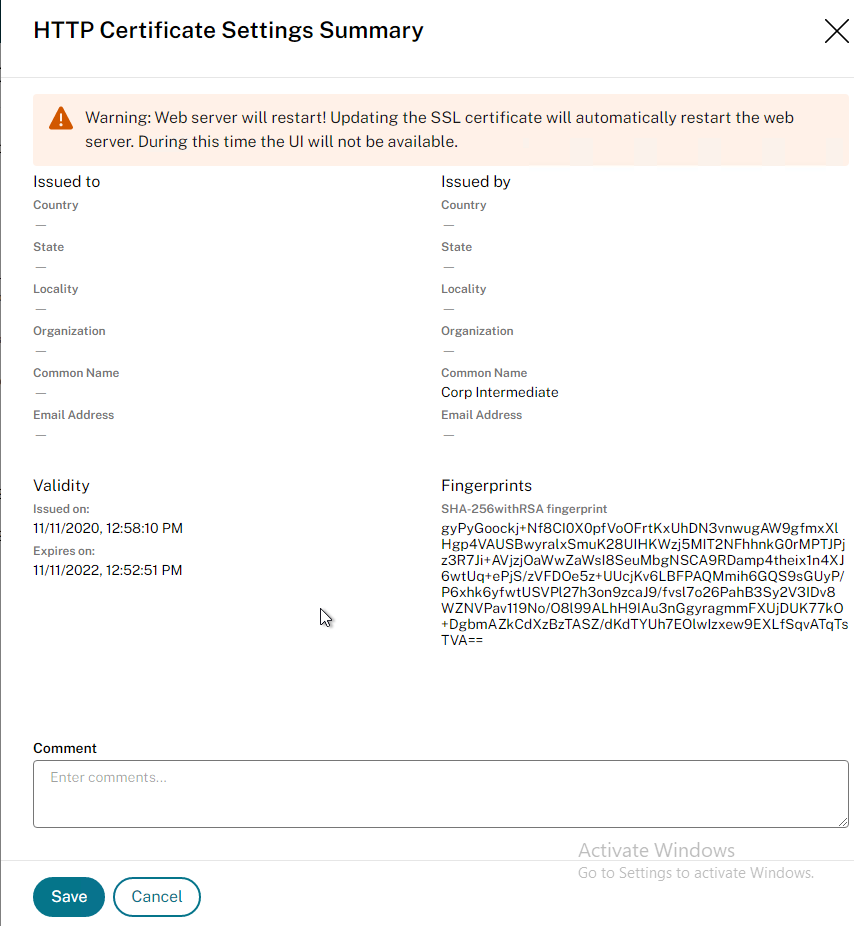
- In HTML5 console, on the right, click Upload to replace the default management certificate.
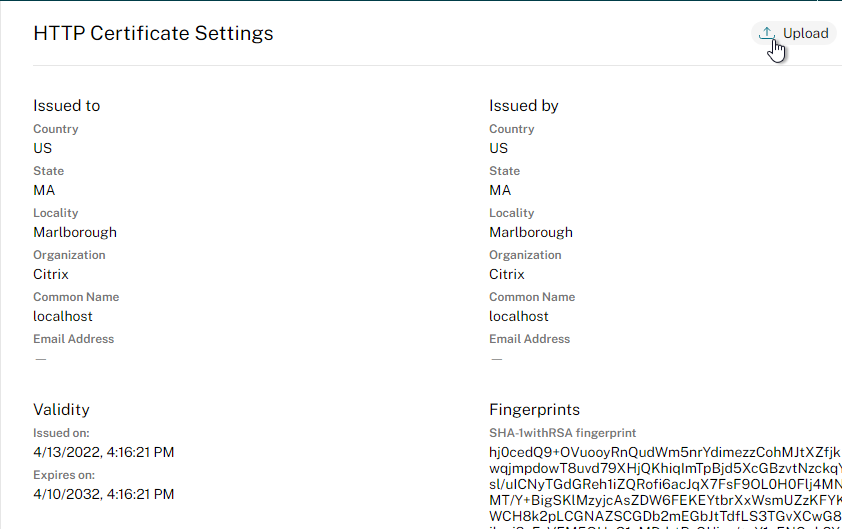
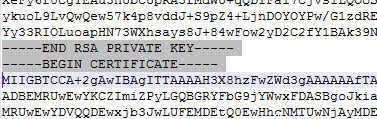
- Browse to a PEM file that contains an unencrypted RSA key, and one certificate (no chain). You can use OpenSSL to convert a .pfx file to a PEM file.
- Make sure it says that the web server will restart, which means that it’s a valid certificate.
- It might take a few minutes to apply. Eventually, you should be able to point your browser to the https URL and not see any certificate errors.

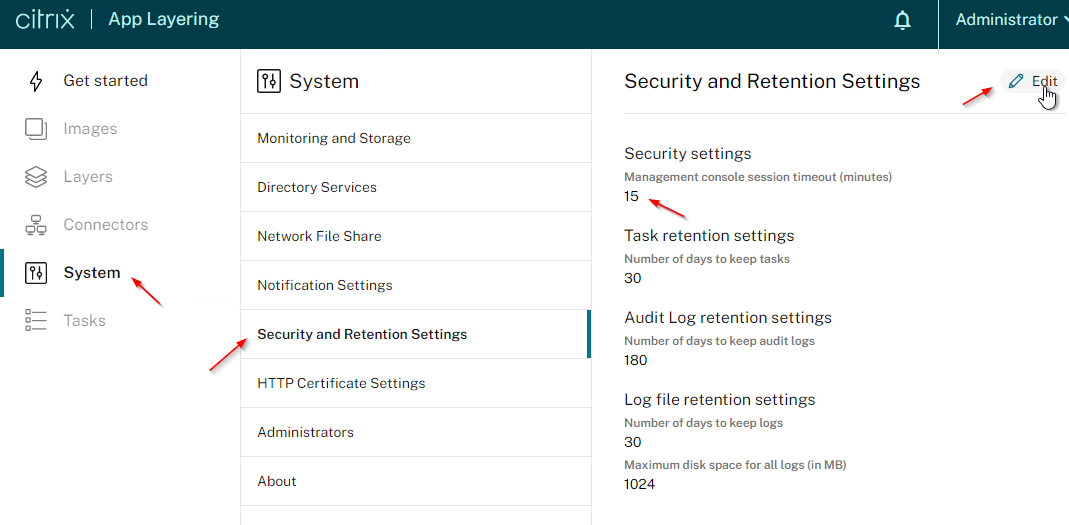
- In HTML5 console, at System > Security and Retention Settings, you can change the management console timeout.
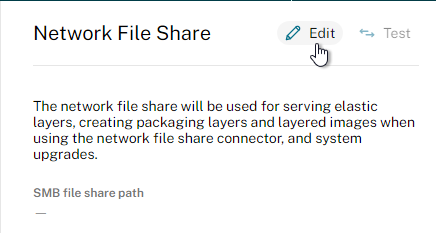
File Share
- On a Windows file server, create a new share that will store the Elastic Layers. Only SMB shares are supported with Elastic Layers. NFS shares will not work with Elastic Layers.
- For High Availability, you can use any file server High Availability technology like File Server Scale-out Clustering, DFS, etc. For local high availability, Citrix recommends clustering over DFS Replication since DFS failure requires reboot of Elastic Layered Machines.
- Elastic Layers are always-open VHDX files that can’t be replicated using DFS. For HA, build a File Server cluster, like Microsoft Scale Out File Server.,that supports SMB3 Continuous Availability.
- For DR Elastic Layer machines, the registry value HKEY_LOCAL_MACHINE\SOFTWARE\Unidesk\ULayer:RepositoryPath can be configured to point to a file share in a DR site. See CTX222107 You can change the Elastic Layer repository in the registry without reimaging (4.x).
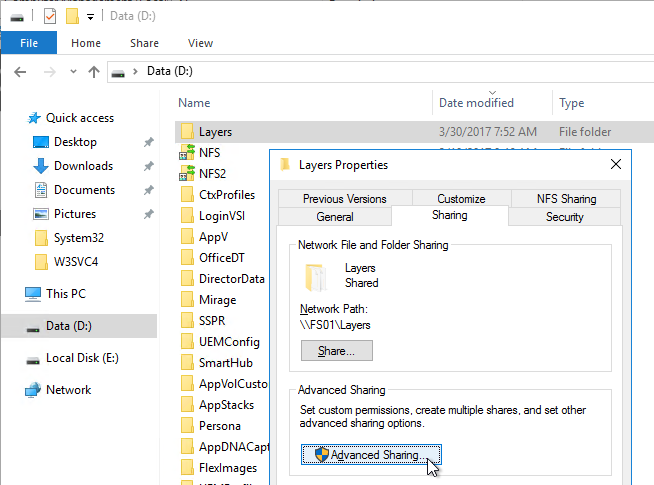
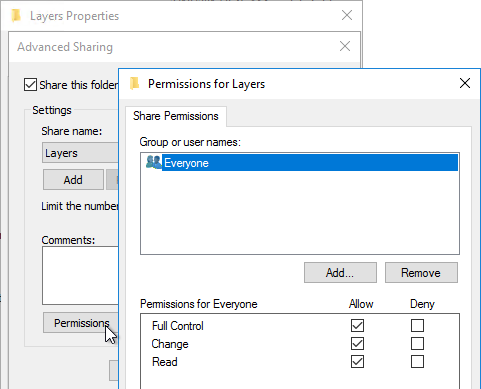
- Give Everyone (or equivalent) Full Control to the share.
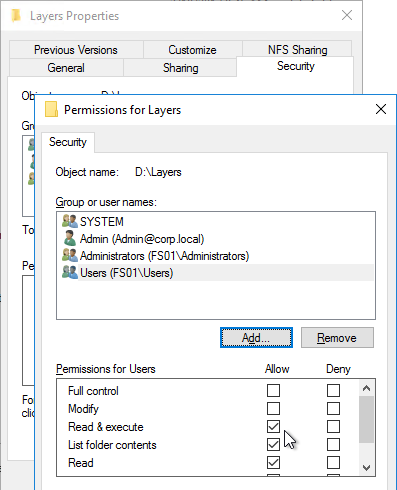
- On the Security tab, make sure the Users groups only have Read access (no Modify/Write).
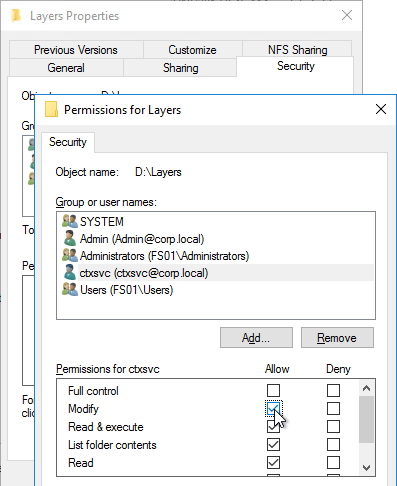
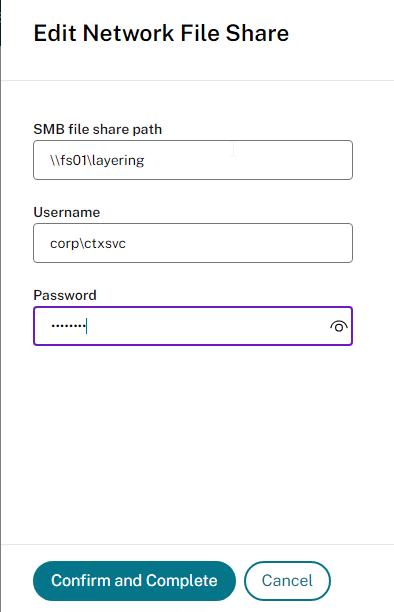
- Add a service account to the share and give it Modify access. ELM uses this service account to upload elastic layers to the share.
- In App Layering 2206 and newer, in Chrome or Edge, go to System and then Network File Share.
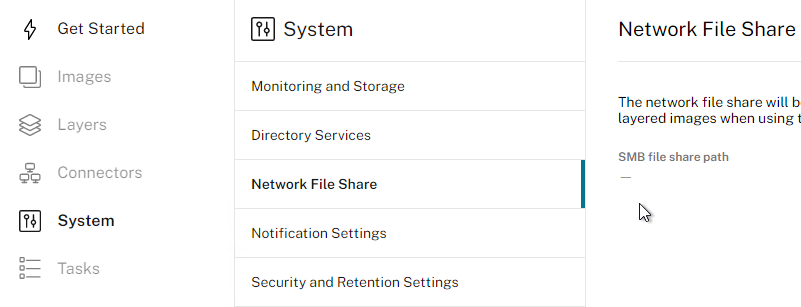
- On the top right, click Edit.
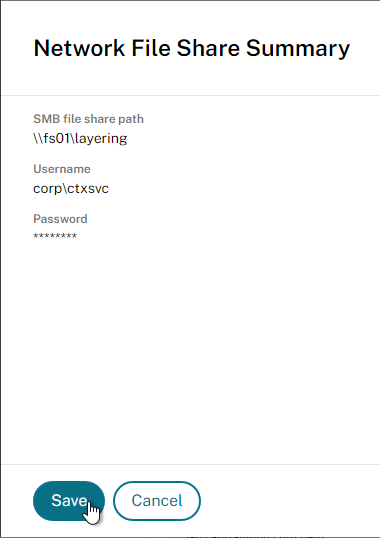
- Enter the path and service account credentials. Click Confirm and Complete.
- Click Save.
- On the top right, click Edit.
Active Directory
In App Layering newer than 2204, you can use Chrome/Edge.
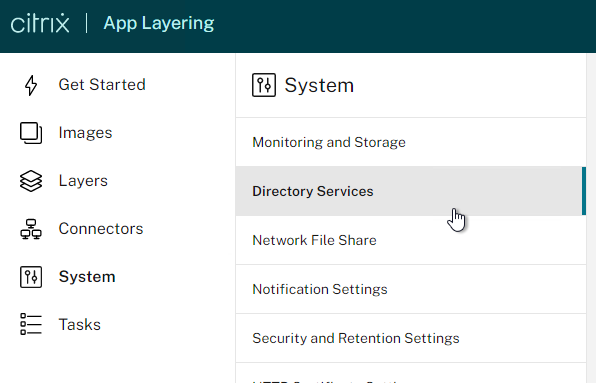
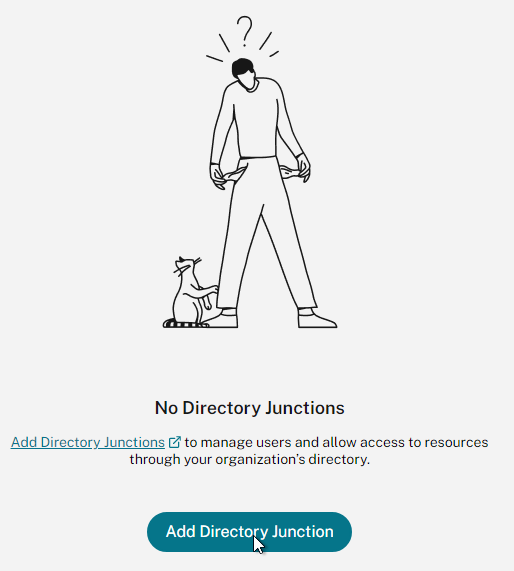
- Go to System > Directory Services.
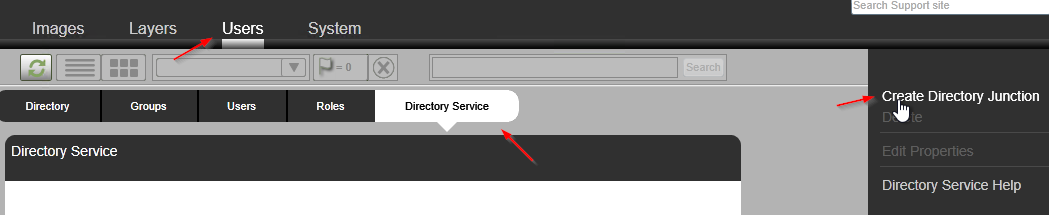
- Click Add Directory Junction.
- Enter the address of a domain controller or LDAP Load balancing VIP. According to CTP George Spiers at Citrix Discussions, instead of entering a single domain controller address, you can enter your domain’s FQDN (domain.local) and it will use DNS to find a domain controller.
- . Enter bind account credentials. Click Connect.
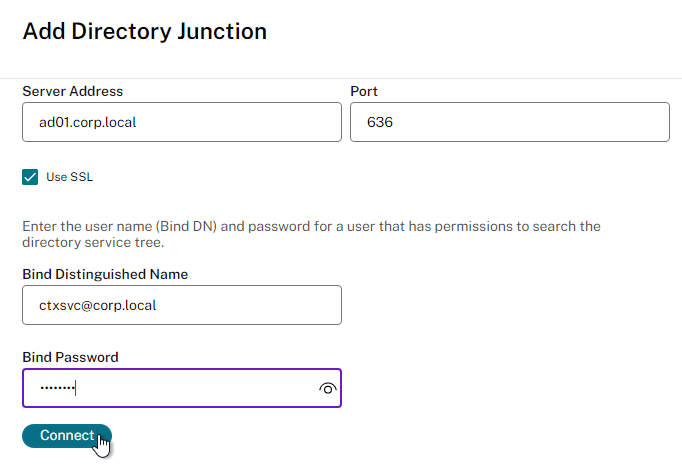
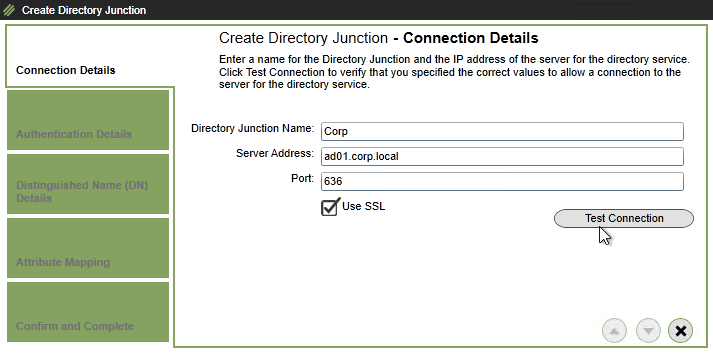
- Click Accept and Continue.

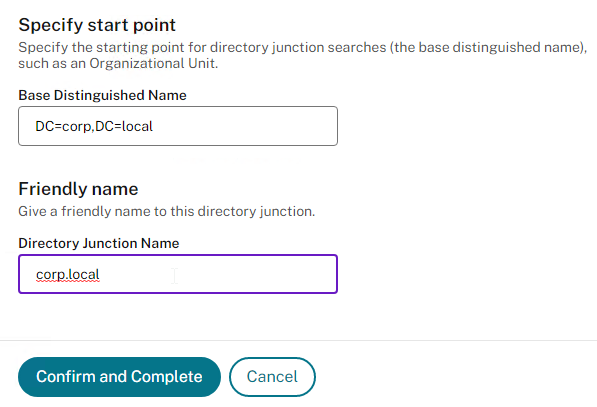
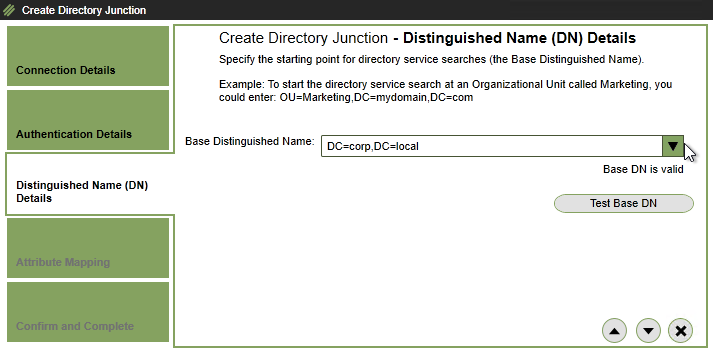
- For Specify start point, click the field and select the Base Distinguished Name.
- Give the directory junction a friendly name. Then click Confirm and Complete.
Role Based Access
This is configurable in the HTML5 interface in Citrix App Layering 2204 and newer.
- On the left, click System. In the middle, click Administrators. On the right, on the Directory Administrators tab, click Add Administrators.
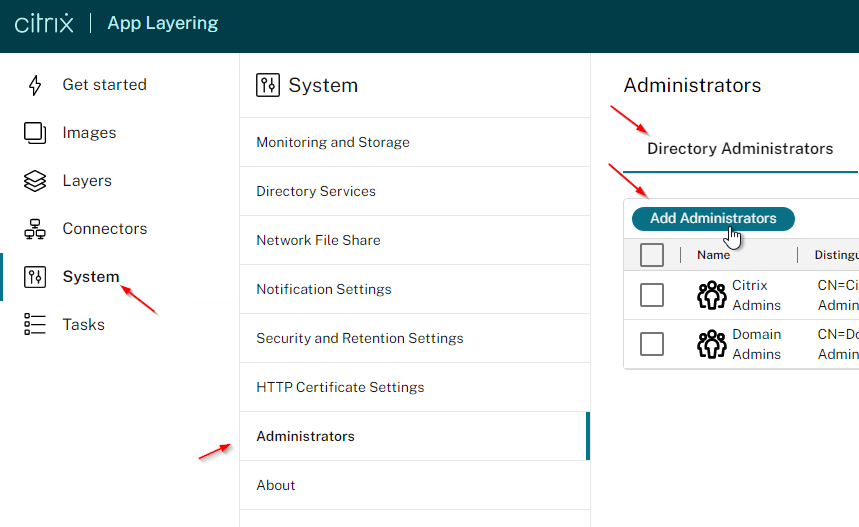
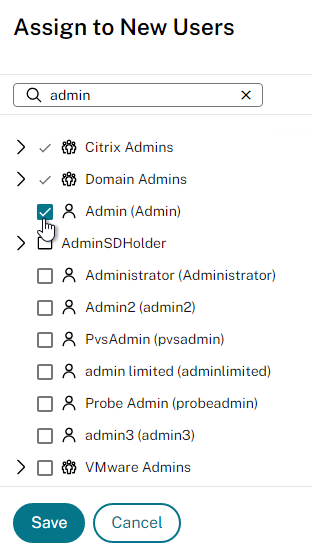
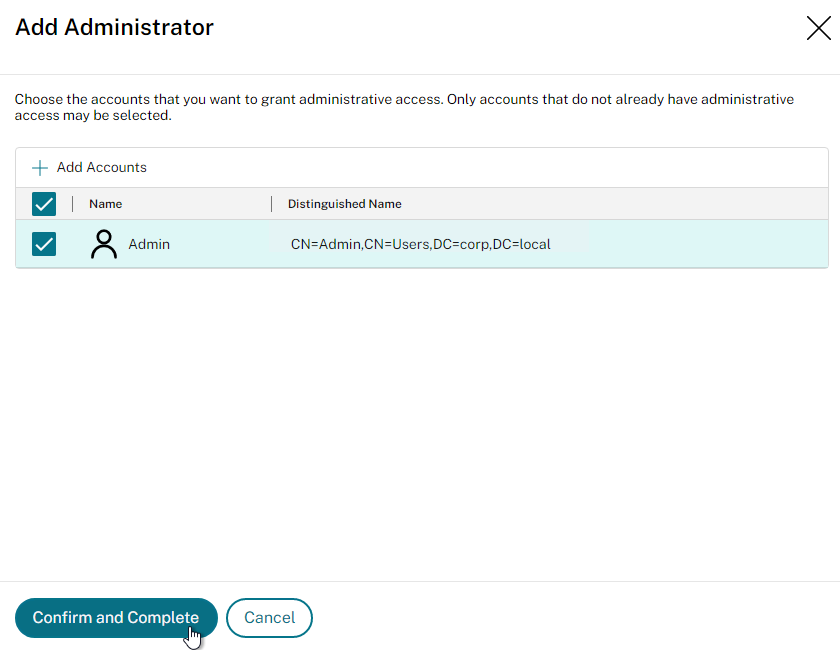
- Click Add Accounts.
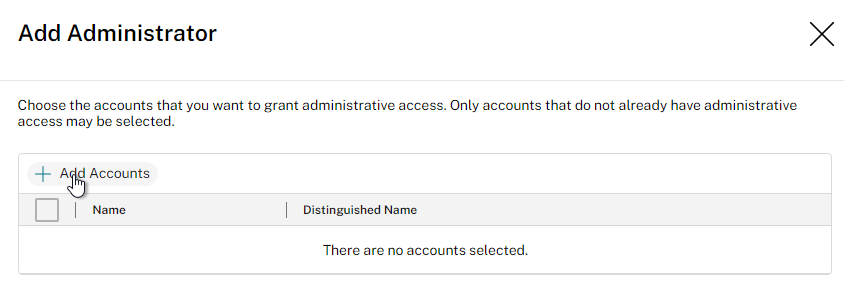
- Search for the new admin group, check the box next to it, and click Save.
- Click Confirm and Complete.
- Click Add User.
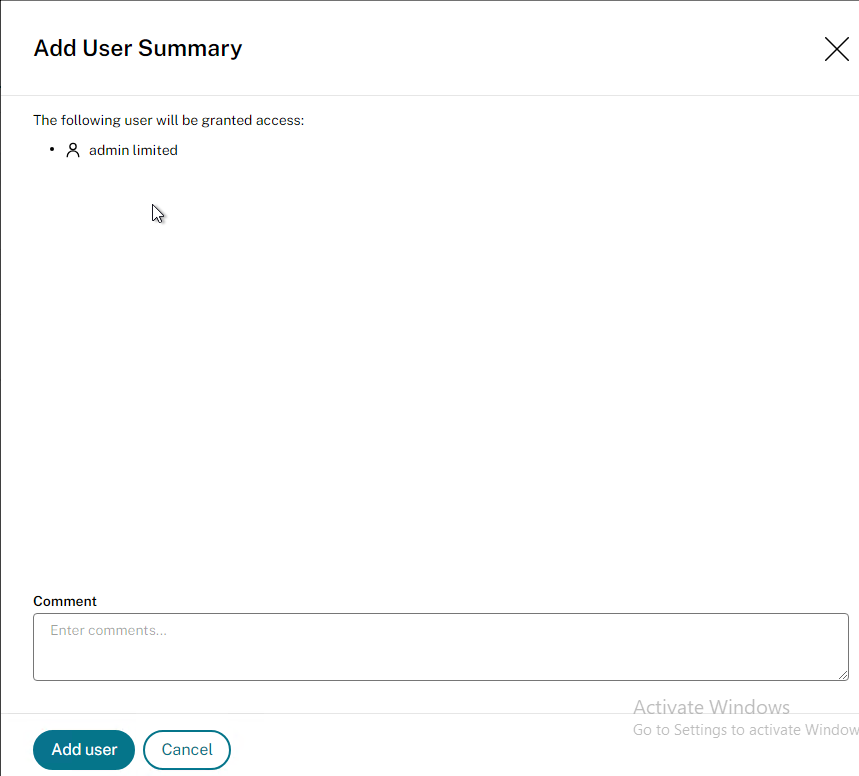
- App Layering 2306 grant the Reader role by default. You can change the role by editing the user.
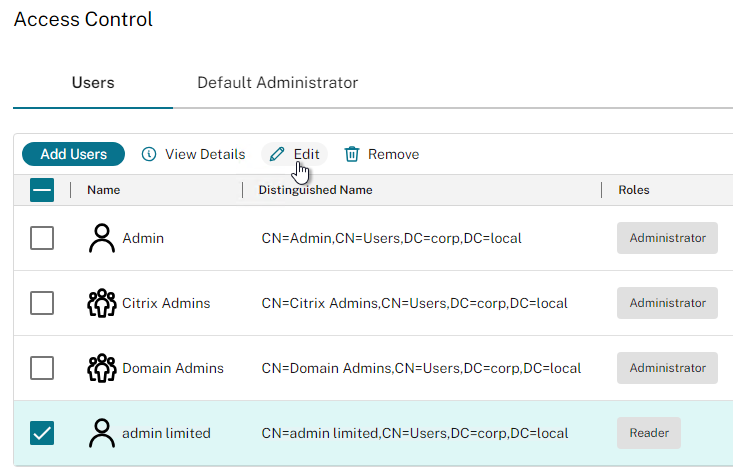
- Click the drop-down to see other available roles.


- When done, click Confirm and Complete.

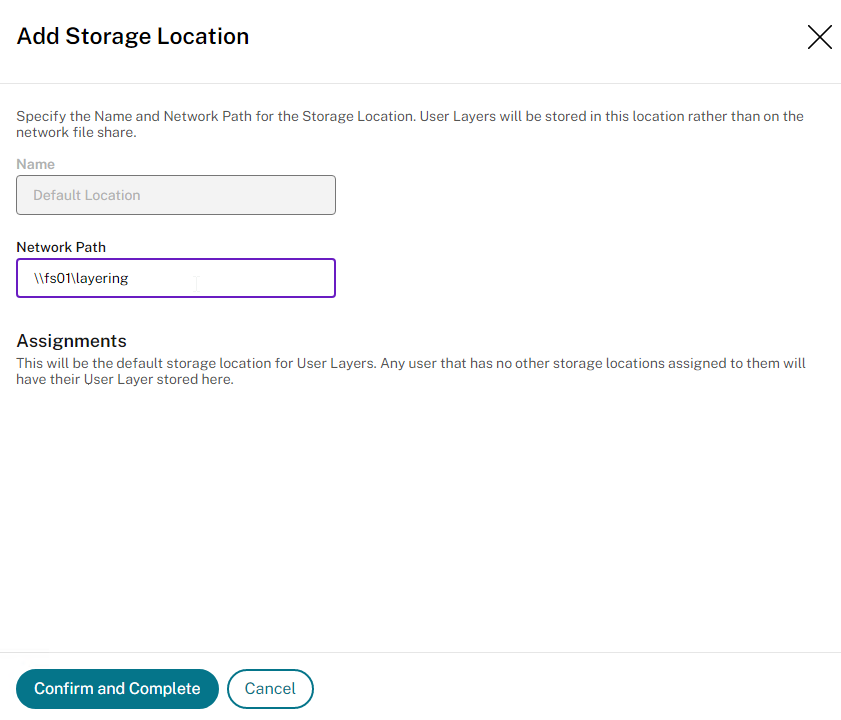
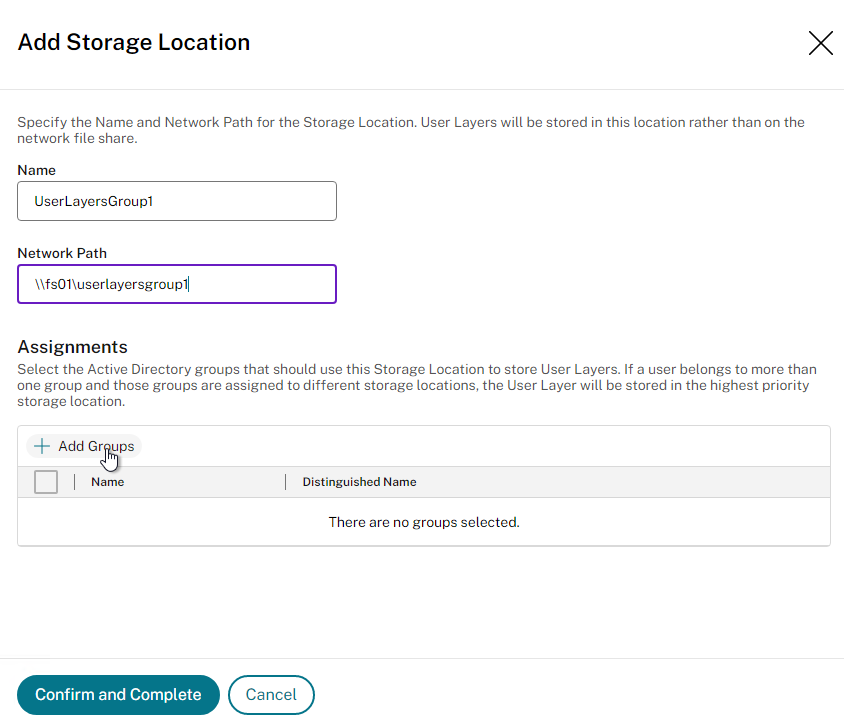
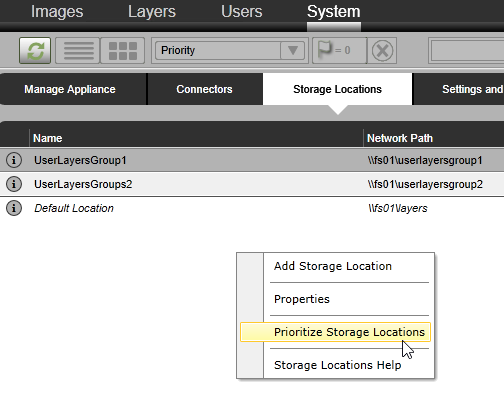
User Layers Storage Locations
ELM 4.14 and newer support User Layers.
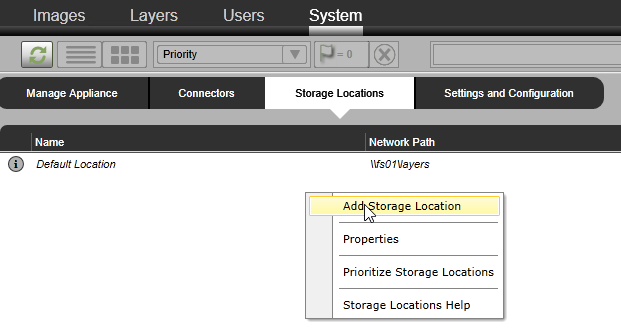
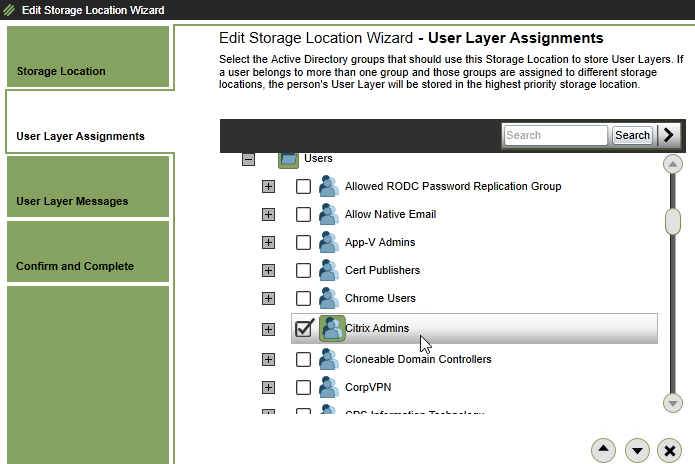
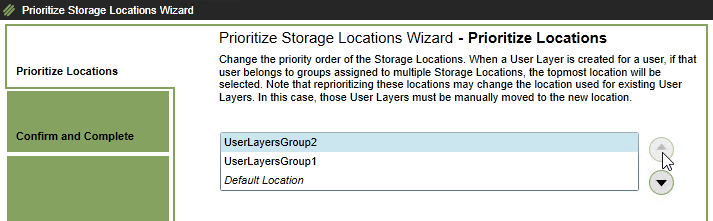
File shares for User Layers are configured at System > User Layer Storage Locations. Each Storage Location can be assigned to different user groups. And you can prioritize the Storage Locations. See Add storage locations for User layers at Citrix Docs. And see David Wilkinson Citrix Application Layering – User layers.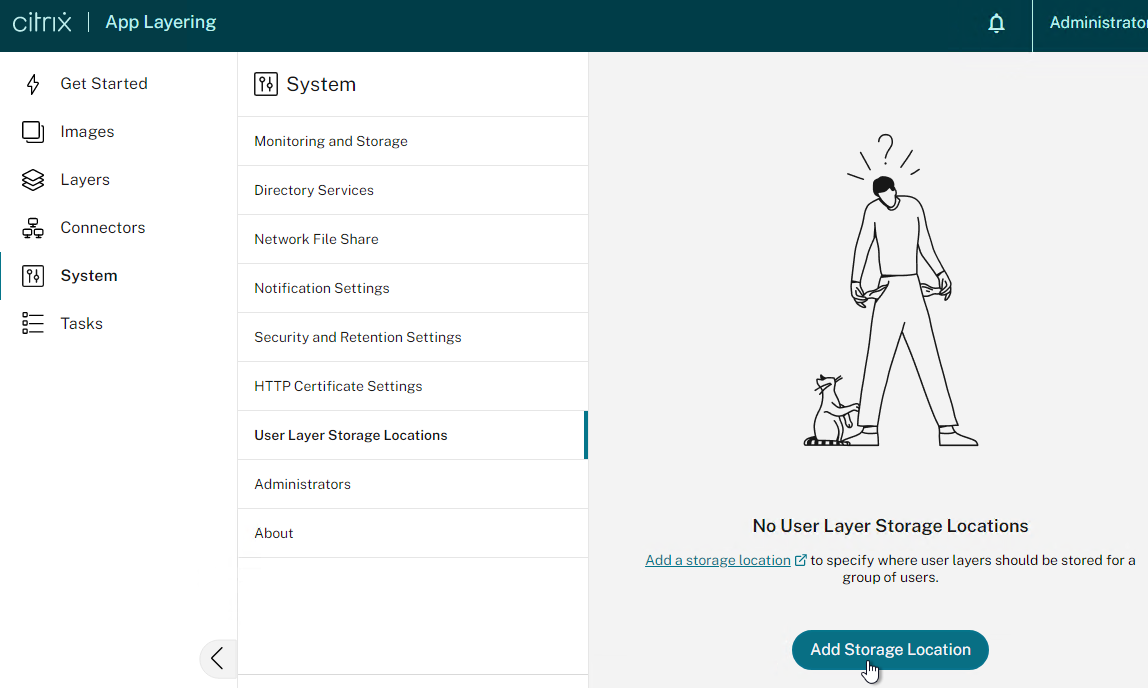
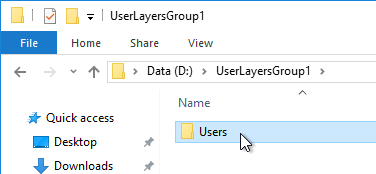
For each new Storage Location:
- Create a Users folder in the root of each share.
- Each Users folder needs permissions that look like the following. CREATOR OWNER needs Full Control. The Users group needs Create Folder/Append Data permission to This folder only.

- In ELM, add Storage Locations and assign them to groups. The first one you add is the default Storage Location for users not assigned to any other Storage Location.
- Then you can add more Storage Locations for specific user groups.
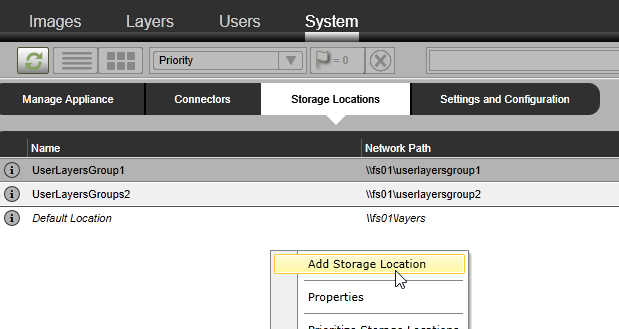
- If users are assigned to multiple Storage Locations, click Prioritize Storage Locations to prioritize the assignment.
Citrix Provisioning Publishing Agent
To publish to Citrix Provisioning, you install the App Layering Agent on the Citrix Provisioning Servers. It’s only needed on one Provisioning Server.
The installation of the Agent can be automated. See Dennis Span Citrix App Layering Agent unattended installation.

From Install the App Layering Agent (required for PVS and Connector Scripts) at Citrix Docs.
- Ensure the Citrix Provisioning services are running as a domain account. Network Service won’t work.
- Run the following command on the PvS 7.7 or newer Server. Note, if you upgrade PvS, you’ll have to run this command again.
"C:\Windows\Microsoft.NET\Framework64\v4.0.30319\InstallUtil.exe" "c:\program files\citrix\provisioning services console\Citrix.PVS.snapin.dll"
- If Citrix Provisioning 7.6 or newer, then run the following command instead:
"C:\Windows\Microsoft.NET\Framework64\v4.0.30319\InstallUtil.exe" "c:\program files\citrix\provisioning services console\MCliPSSnapIn.dll"
- If Citrix Provisioning 7.6 or newer, then run the following command instead:
- Go to the App Layering 2503 files you downloaded from Citrix Downloads and run citrix_app_layering_agent_installer.exe.

- In the Welcome to the InstallShield Wizard for Citrix App Layering Agent page, click Next.
- In the License Agreement page, select I accept the terms in the license agreement, and click Next.
- In the Agent Port page, click Next.
- In the Ready to Install the Program page, click Install.
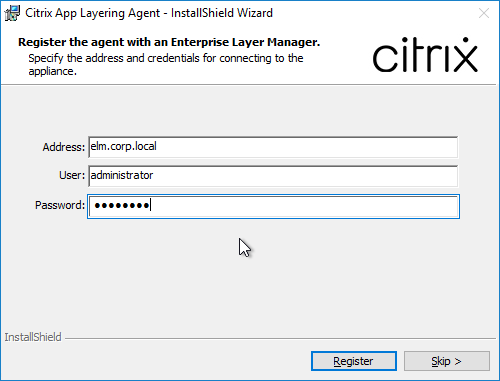
- Enter the ELM FQDN, enter ELM credentials, and click Register.
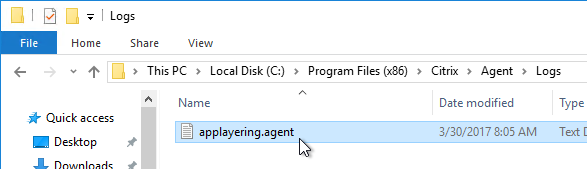
- Registration logs can be found at C:\Program Files (x86)\Citrix\Agent\Logs.
- In the InstallShield Wizard Completed page, click Finish.

- When an image is published to Provisioning Services, ELM can run a script. Citrix has a sample Versioning and Convert VHD to VHDX script that converts the VHD file to VHDX, and/or adds the published image as a version. The script files can be installed on the PvS server at this time. Later, you specify the path to the script when you create the PvS Connector in ELM while creating an image template.

- Citrix also has a BootPrivate script that modifies the vDisk mode to Private, boots the vDisk on a pre-defined target so that it can run pre-defined layer scripts, shuts down the target, waits for that shutdown, and then switches the mode back to standard.

Has anyone tried to use App Layering with Azure Local / Arc. I have installed the latest VAD LTSR and connected to Azure Arc with no issues now trying to work out how to do the images and get them in Azure Arc there is no native connector so looking at going Fileshare route but it still needs a compositing engine but the hosts in our Azure Arc are applainces so can’t run the agent. Thinking i may have to scrap App Layering all together and go old skool and just have a gold image with everything on that gets updated. Or keep a solitary Hyper-V server for building then trying to import the final image into Azure Arc
Wanted to add my 2 cents on the certificate for the appliance.
My org uses venafi internally for certificates and our own CA.
We used https://www.digicert.com/easy-csr/openssl.htm to get an CSR
Then used Putty to connect to the Citrix layering appliance.
pasted in the CSR openSSL request.
That created a csr and key file in ./root/ on the appliance.
Used WinSCP to connect to the appliance to get the files.
Copied the CSR text using notepad++ and used for Venafi.
Once Venafi had create the cert. :
downloaded in PEM format (OpenSSL ) without the root chain. That actually downloaded as a .CER file.
Then took the key file from the appliance , copied the contents via notepad ++
and pasted into a new PEM file that created with notepad++.
Then within that new PEM file we also pasted below the contents of the private .CER file.
We were then able to use that new PEM file and upload into the Citrix layering appliance.
Awesome article! Thank you!
We have multiple app layers, and I need to uninstall one app, but I don’t know which layer it’s in. I’m wondering if there is any practical way of determining which app is installed in each layer, without, creating a new version of each, and looking in appwiz.cpl.
It is indicated that “App Layering v2208” only support CVAD-v2203 in its release note, could this create any issues when used with CVAD-2203CU1/2, CVAD-v2206, CVAD-v2209?
We would like to move to latest CR of CVDA components.
https://docs.citrix.com/en-us/citrix-app-layering/4/system-requirements.html#layered-images only shows up to 2203 but I assume it works with newer products. Try leaving feedback for the article and ask them.
Hi Carl,
I am trying to export the layers from the ELM console, while doing so, am encountering an error which says “Access to the path ‘/mnt/maserviceshare/………/System Volume Information’ is denied”. I am assuming this is the message from the appliance itself, i have tried to use a domain account which has administrator access and with the built in Administrator also, getting the same error message.
Where do we find the Versioning and Convert VHD to VHDX script for PVS 7.6?
There’s a download button at https://support.citrix.com/article/CTX226060/citrix-app-layering-4x-pvs-connector-script-to-convert-vhd-to-vhdx
Yes I see that link and have followed it to the page, but the page says:
This script has been written to support PVS Powershell CMDLETS for PVS 7.7 and later. A separate script is required for earlier versions of PVS.
There is no links for the earlier versions of PVS?
I suspect you’d have to write it yourself since PVS 7.6 is EOL unless you bought extended support – https://www.citrix.com/support/product-lifecycle/product-matrix.html
how did you enable HTML5 instead of IE to use ELM management consol
Upgrade to latest version. Then use Chrome or Edge to access the ELM.
We currently have the ELM deployed as a VM on Hyper-V. We need to move to VMware vSphere, and wondering if there is an export/import option to export config from ELM1[on Hyperv] and import in ELM2[On VMware]
There might be a generic VM conversion tool, like StarWind https://www.starwindsoftware.com/starwind-v2v-converter
Another option is to build a new ELM and then export/import layers – https://docs.citrix.com/en-us/citrix-app-layering/4/layer/export-import-layers.html
When do they stop using Silverlight??
See https://www.citrix.com/blogs/2021/03/24/citrix-app-layering-whats-new-and-whats-next/
Where is ELM console in the Citrix cloud ? or is it there at all ?
I think they removed it.
Issue creating AHV_Connector from Azure -> OnPrem
OnPrem Hypervisor: Nutanix
ELM Appliance: Azure
I am able to authenticate into Nutanix, I select the Template and the Storage Container, and hit Test. And after awhile it fails with Error 502. I’ve exported the ELM Appliance Logs and it says:
Please check that the ELM is in the container’s ‘white list
The ELM is in Nutanix’s Filesystem Whitelist.
I created an Azure NSG and applied it to our Citrix Subnets in Azure that allows:
Ports 3000,3500,3006,3506,3004,3504,3015,3515,9440,8016,2409
Still with no luck, I have a case with Citrix open and they’ve acknowledged my configurations stated above.
Any source NAT between ELM and Nutanix? Can you do a network trace or tcpdump on Nutanix to confirm the source IP?
Hi Carl,
After upgrading from 2005 to 2009 App Layering in Prod I am getting an error message while creating a version to OS Layer “The issuing certificate does not have a usable private key”. FYI – I never made any changes to HTTP certificate settings.
In Dev App Layering I am getting “Waiting for the Compositing Engine machine to be ready” before the upgrade it used to work fine.
Can I have your suggestions on this please. Thanks!!
If you post your questions to Citrix Discussions (https://discussions.citrix.com/forum/1672-app-layering-4x/), then somebody from Citrix usually replies.
Hi bvravikumar09
you got any solution for this issue
Having the same error.
Hi Carl,
After upgrading to 2009 elastic applications on server VDA works only first time logon. If i logoff and try to logon again the servers hang and i have to hard reboot from hypervisor Vsphere. I have this issue on Windows 2016 and Windows 2019. If i use an image template with 2003 agent layer it works.
we are having similar issues which seem to have started after the upgrade to 2009 and publishing a new template from the appliance. We are getting random server hangs and machines doing unregistered. We are also seeing people with multiple sessions on the same server. DId you manage to resolve the issues with 2009 or did you rollback to 2003?
Hi Carl have you noticed anything strange after the update to 20.8.3, when using pvs i have republish the new image it seam the c: drive has an extra partition added with a extra 20gb?
I think Elastic Layers do that.
Hi Carl yes they are attached as separate disks but the c drive is now showing as 20gb in size.in explorer I have checked an old image and it does have the same partition layout for the c drive but the older image would have the correct size in explorer and the ulayeredmage partition would be the partition you would see in mypc now the UdiskP1V0R1 shows and when I’m optimising the image I use the sdelete utility that when I noticed the change
Trying to trial this in a test environment, imported the ova into vsphere, installed silverlight and tried to access via Internet Explorer. I’m presented with the login box but every time I enter the credentials and press the login button I keep getting this error message “The Layering Management Console is having trouble communicating with the Management Service. This issue usually indicates that a service interruption occurred, the service restarted, or the connection was lost.” I have not modified the appliance in anyway after importing it.
Upgrading to ELM 2001 completely broke our Office 2016 Layer. Even when I followed various articles where to open up the OS layer, install the 2001 tools, create a new Office version with this OS layer and then re-run optimizer, kms etc…it still wouldn’t load up properly (“configuring Office”) when installed on a new template. Needless to say I soon reverted back to an earlier ELM snapshot.
I would be interested to know anybody’s thoughts on this?
Hi Carl,
Once again a great article. Thank you. we are planning to migrate from UserLayer to UPM to make profiles file based for real time replication. Please a suggest a best way to migrate user data from the UserLayer VHDs to file share.
Hi Carl,
We imported the OS layer ane when we are taking version with offloading composite enabled on vsphere, we are unable to finalize and close the version. It’s failing all the time..
Can you help me on this…
Finally issue resolved on App Layering 1911 with offload Composite..Fix was provided from Citrix.