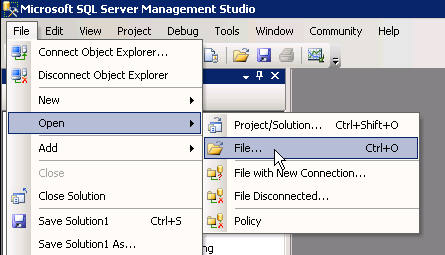
Navigation
- Change Log
- Preparation
- Delivery Controller 7.6 LTSR CU9 Upgrade
- Delivery Controller 7.6 LTSR CU9 New Install
- Other 7.6 LTSR CU9 Updates
- Studio – Slow Launch
- Database Maintenance:
- split databases, change db connect strings, read-committed snapshot, Director grooming, etc.
- Studio Administrators
- vCenter Connection
- Citrix Director
- Citrix Licensing Server
- Remote Desktop Licensing Server
- Health Check
💡 = Recently Updated
Change Log
- 2020 Nov 7 – updated all Upgrade and Install sections for version 7.6.9000 (update 9)
- 2019 Aug 29 – updated all Upgrade and Install sections for version 7.6.8000 (update 8)
- 2019 Feb 7 – updated all Upgrade and Install sections for version 7.6.7000 (update 7)
- 2018 Aug 14 – updated all Upgrade and Install sections for version 7.6.6000 (update 6)
- 2018 Feb 8 – updated all Upgrade and Install sections for version 7.6.5000 (update 5)
Preparation
Citrix Licensing – If you are going to use an existing Citrix Licensing Server, upgrade it to 11.15.0.0 build 27000.
SQL Databases
- Citrix CTX209080 Database Sizing Tool for XenDesktop 7
- Citrix article CTX114501 – Supported Databases for Citrix Products
- XenApp and Desktop typically connect to three databases: one for the Site (aka farm), one for Logging (audit log) and one for Monitoring (Director).
- The monitoring database name must not have any spaces in it. See CTX200325 Database Naming Limitation when Citrix Director Accesses Monitoring Data Using OData APIs
- If you want Citrix Studio to create the SQL databases automatically, then the person running Studio must be a sysadmin on the SQL instances. No lesser role will work.
- As an alternative, you can use Citrix Studio to create SQL scripts and then run those scripts on the SQL server. In that case you only need the dbcreator and securityadmin roles.
- It is possible to create the databases in advance. However, you must use the non-default Latin1_General_100_CI_AS_KS collation. Then use Citrix Studio to configure the database tables.
- Citrix recommends SQL Mirroring because it has the fastest failover.
- SQL Mirroring requires two SQL Standard Edition servers and one SQL Express for the witness server.
- You can setup SQL Mirroring either before installing XenDesktop or after installing XenDesktop. If after, then see Citrix CTX140319 to manually change XenDesktop’s database connection strings How to Migrate XenDesktop Database to New SQL Server.
- To setup SQL Mirroring, see Rob Cartwright: Configure SQL Mirroring For Use With XenDesktop, XenApp, and PVS Databases.
- If you try to stretch the mirror across datacenters, the SQL witness must be placed in a third datacenter that has connectivity to the other two datacenters. However, stretching a single XenApp/XenDesktop site/farm and corresponding SQL mirror across datacenters is not recommended.
- AlwaysOn Availability Groups and SQL Clustering are also supported. However, these features require the much more expensive SQL Enterprise Edition.
Windows Features
- Installing Group Policy Management on the Delivery Controller lets you edit GPOs and have access to the Citrix Policies node in the GPO Editor. Or you can install Studio on a different machine that has GPMC installed.
- vSphere Web Client – if you will connect to vSphere Web Client from the Controller machine, Flash Player is only available for IE if you install the Desktop Experience feature. Or you can use Google Chrome.
vSphere
- Create a role in vSphere Client. Assign a service account to the role at the Datacenter or higher level.
- If the vCenter certificates are not trusted, import the vCenter server certificate into the Trusted People store of the Delivery Controller.
Delivery Controller – Upgrade to 7.6.9000
- Media – The latest update for 7.6 is 7.6 LTSR Cumulative Update 9, which is also known as 7.6.9000. You can do a fresh, full install of 7.6.9000 or you can upgrade 7.6.x to 7.6.9000. Download LTSR CU9 (7.6.9000).
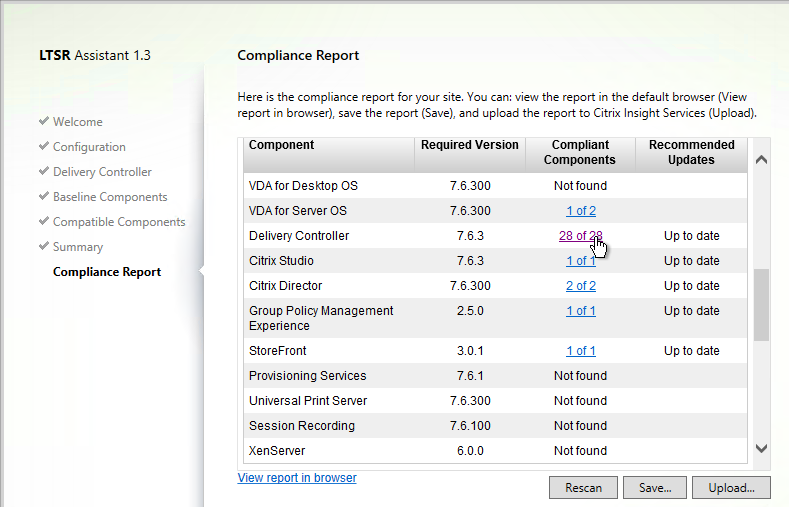
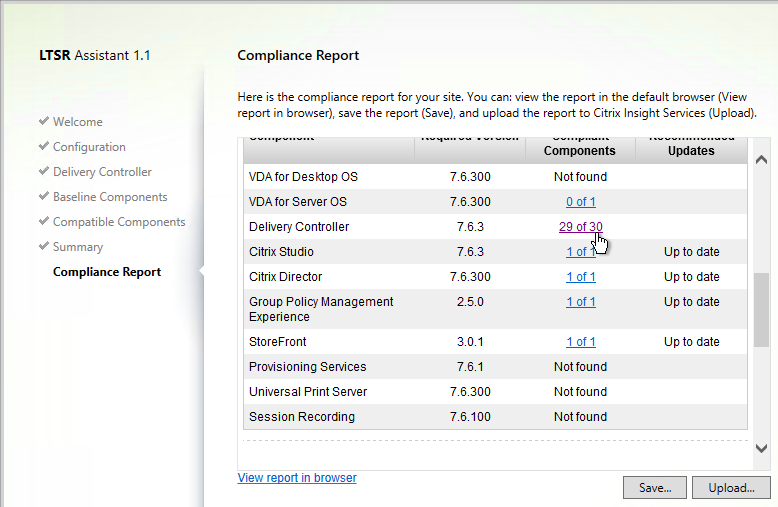
- LTSR compliance – To remain compliant with LTSR (5 years of support), you must install the exact versions detailed at Cumulative Update 9 (CU9) at Citrix Docs. If you upgrade a single component beyond LTSR, then you must upgrade all components to the latest release. Citrix LTSR Assistant can determine your LTSR compliance.
- LTSR Assistant downloads its configuration from ctxsym.citrix.com, so you don’t have to update LTSR Assistant after installing a new Cumulative Update.
- LTSR Assistant downloads its configuration from ctxsym.citrix.com, so you don’t have to update LTSR Assistant after installing a new Cumulative Update.
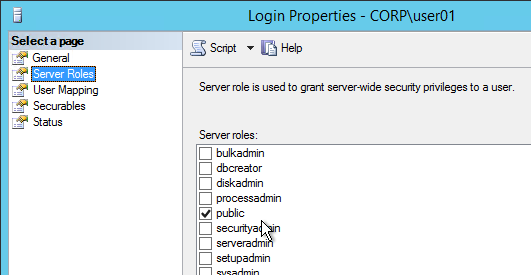
- SQL Permissions – During the upgrade of Delivery Controller, you will be prompted to upgrade the database. Ask a DBA to grant your AD account (the account doing the upgrade) temporary sysadmin Server Role on the SQL Server. If the DBA is unwilling, then immediately after the upgrade, use Citrix Studio to generate SQL scripts, and ask the DBA to run those SQL scripts.
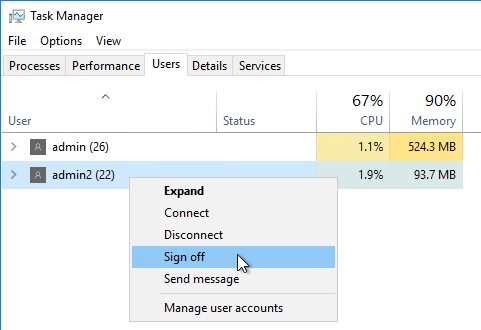
- Other Users – Use Task Manager > Users tab to logoff any other user currently logged into the machine.
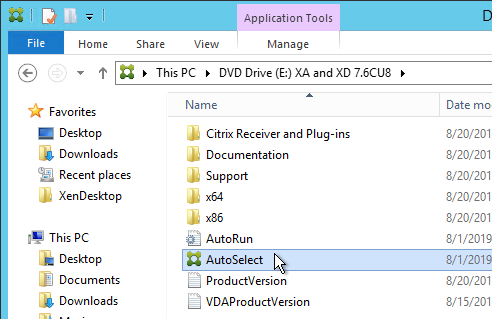
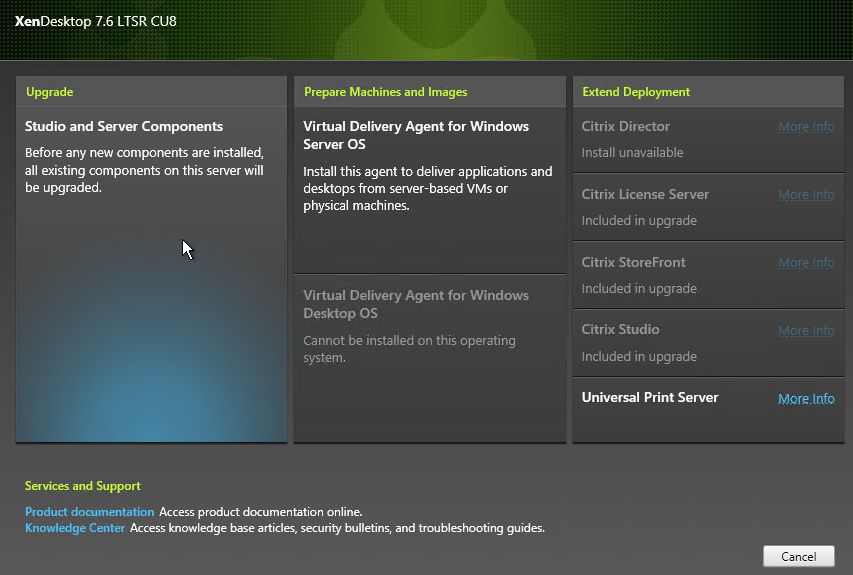
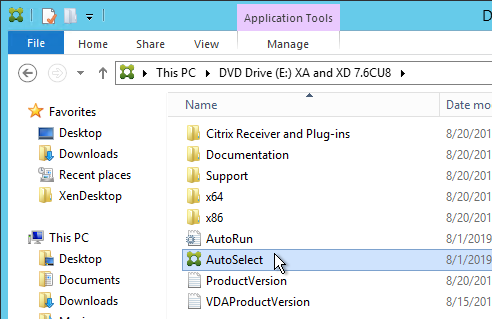
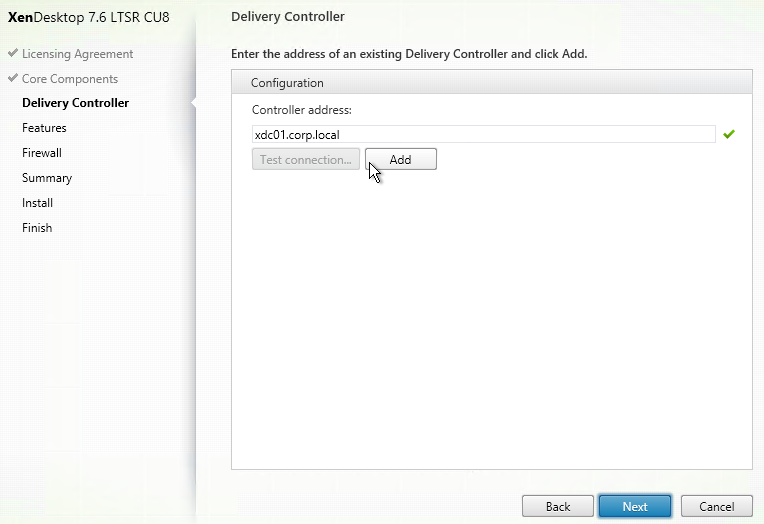
- On one of your existing Controllers, run AutoSelect.exe from the XenApp and XenDesktop 7.6 LTSR CU9 (7.6.9000) media.
- On the top left, click Studio and Server Components to begin the upgrade.
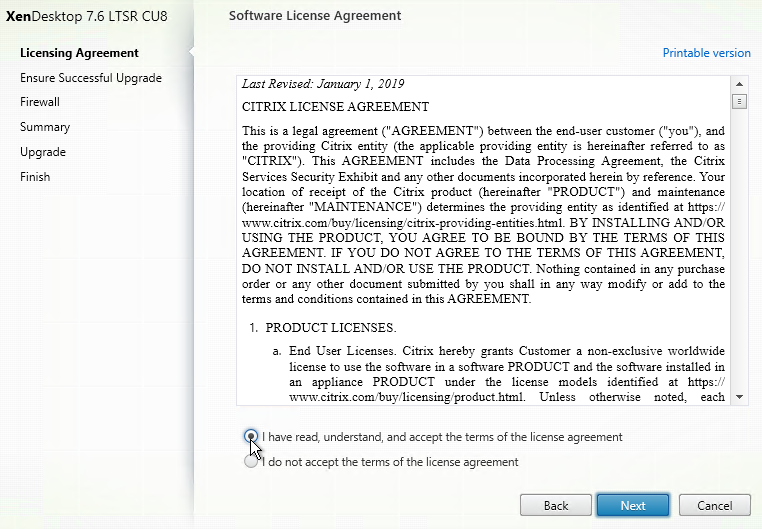
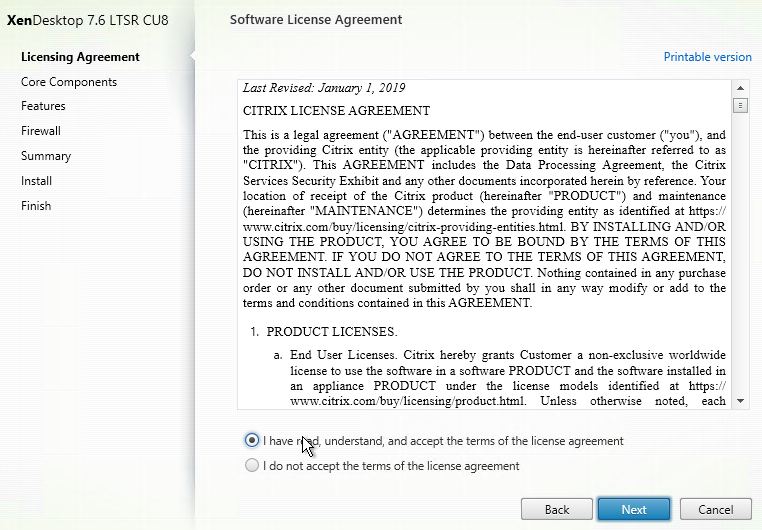
- In the Software License Agreement page, select I have read, understand, and accept the terms, and click Next.
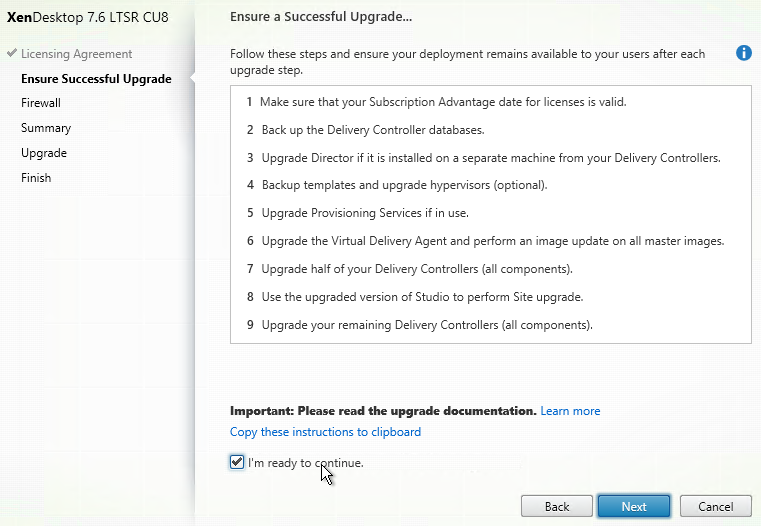
- In the Ensure a Successful Upgrade page, check the box next to I’m ready to continue, and click Next.
- In the Firewall page, click Next.
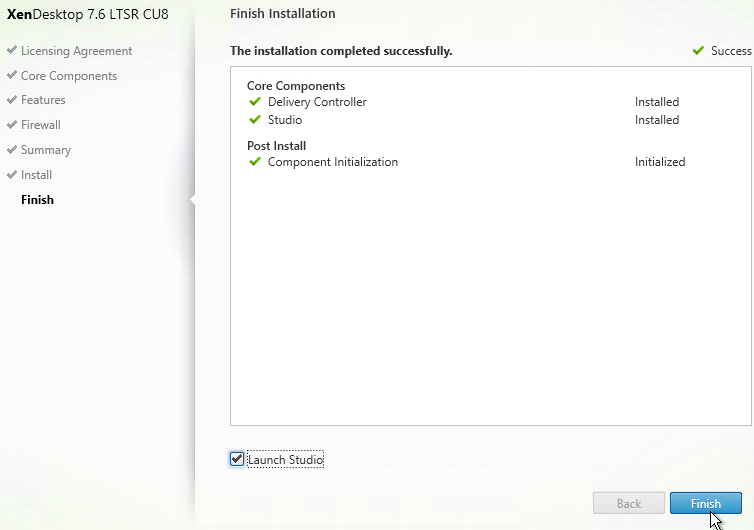
- In the Summary page, click Upgrade.
- In the Finish page, check the box to Launch Studio, and click Finish.
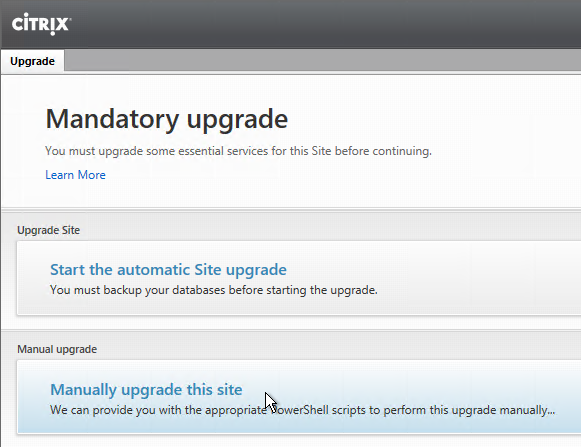
- When Studio launches, you will be prompted to upgrade the database. If you have sysadmin permissions on SQL, then you can click Start the automatic Site upgrade. If you don’t have sysadmin permissions, then you need to click Manually upgrade this site, generate SQL scripts, and get a DBA to run the SQL scripts.
- Once the database is upgraded, you can then upgrade the remaining Delivery Controllers.
Other XenApp/XenDesktop components can also be in-place upgraded:
- StoreFront
- Director
- VDAs
- Citrix Policy Management Plug-in
- Profile Management Group Policy Templates
- Receiver Group Policy Templates
- Workspace Environment Manager
- AppDNA
- Provisioning Services
- SCOM Management Packs
- Session Recording
Delivery Controller 7.6.9000 – New Install
- Sizing – A typical size for the Controller VMs is 2-4 vCPU and 8 GB of RAM.
- Media – The latest update for 7.6 is LTSR Cumulative Update 9, which is also known as 7.6.9000. You can perform a fresh, full install of 7.6.9000, or you can upgrade 7.6.x to 7.6.9000. Download 7.6 LTSR CU9 (7.6.9000).
- LTSR compliance – To remain compliant with LTSR (5 years of support), you must install the exact versions detailed at Cumulative Update 9 (CU9) at Citrix Docs. If you upgrade a single component beyond LTSR, then you must upgrade all components to the latest release. Citrix LTSR Assistant can determine your LTSR compliance.
- LTSR Assistant downloads its configuration from ctxsym.citrix.com, so you don’t have to update LTSR Assistant after installing a new Cumulative Update.
- LTSR Assistant downloads its configuration from ctxsym.citrix.com, so you don’t have to update LTSR Assistant after installing a new Cumulative Update.
- On two Controllers, install the Delivery Controller software from the XenApp/XenDesktop 7.6 LTSR CU9 media. Go to the downloaded XenDesktop 7.6.9000 ISO, and run AutoSelect.exe.
- Click Start next to either XenApp or XenDesktop. The only difference is the product name displayed in the installation wizard.
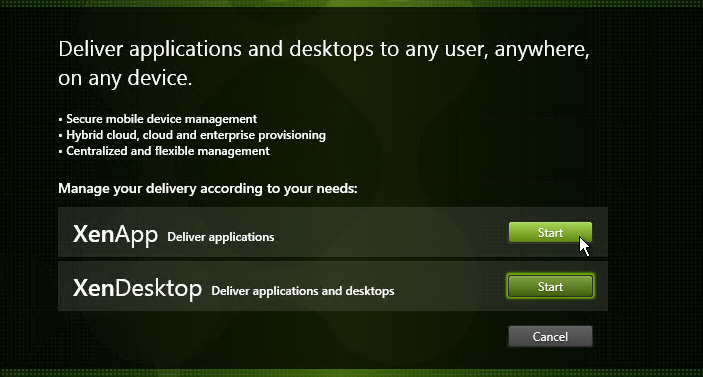
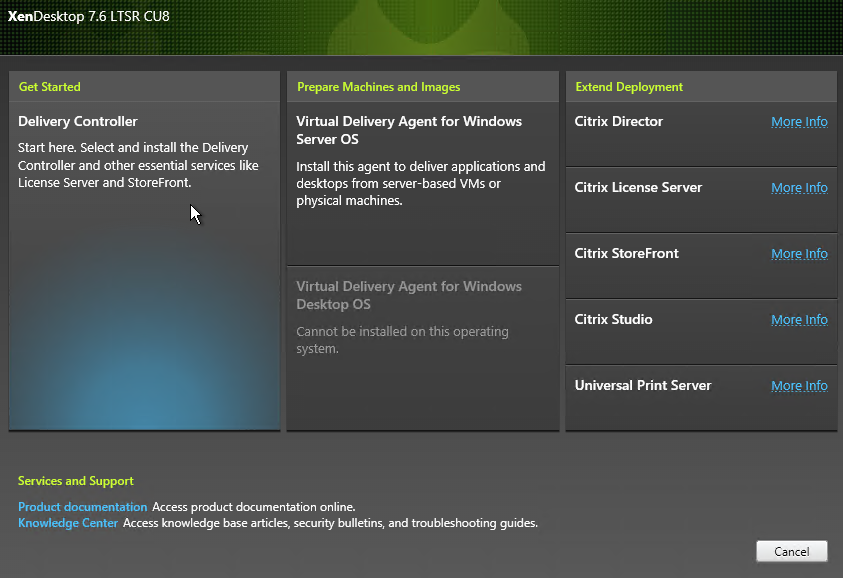
- On the top left, click Delivery Controller.
- In the License Agreement page, select I have read, understand, and accept the terms, and click Next.
- In the Core Components page, you can leave everything checked to install all components on one server. Or you can install different components on different servers. StoreFront, Director, and Licensing are typically installed on separate servers so they can more easily support multiple sites/farms.
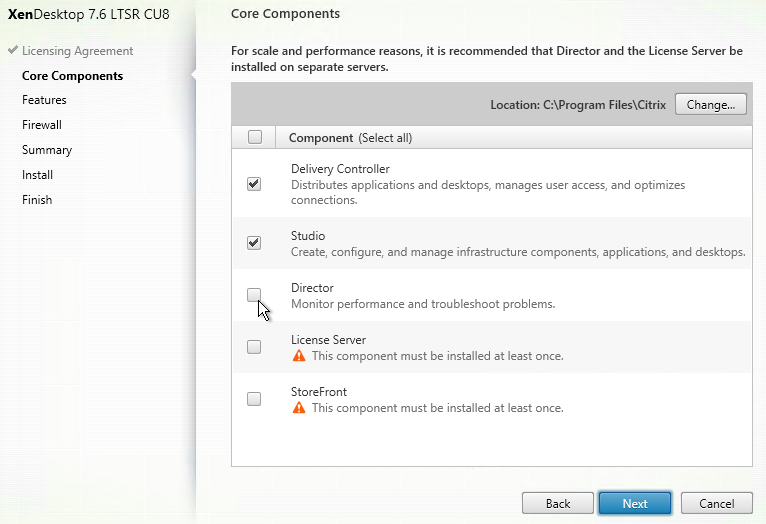
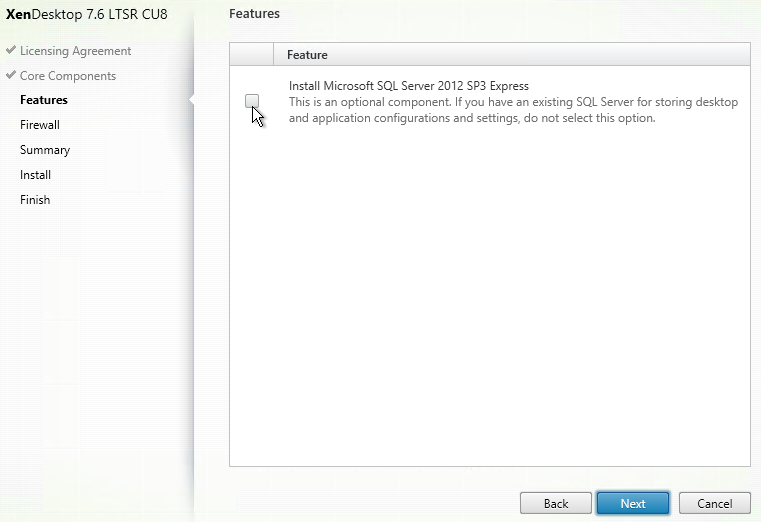
- In the Features page, uncheck the box next to Install Microsoft SQL Server 2012 SP3 Express, and click Next.
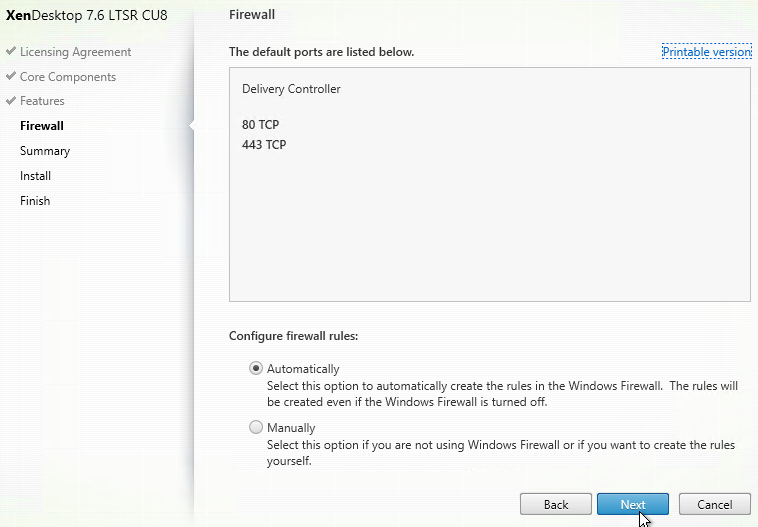
- In the Firewall page, click Next.
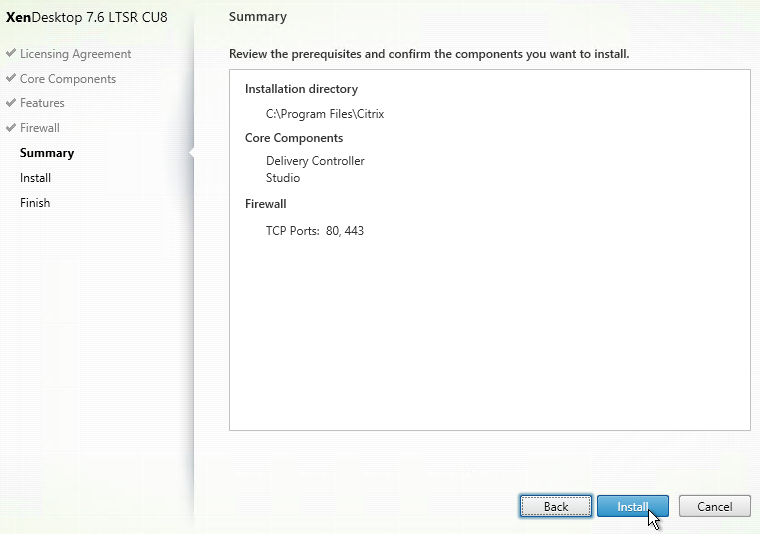
- In the Summary page, click Install.
- In the Finish page, click Finish. Studio will automatically launch.
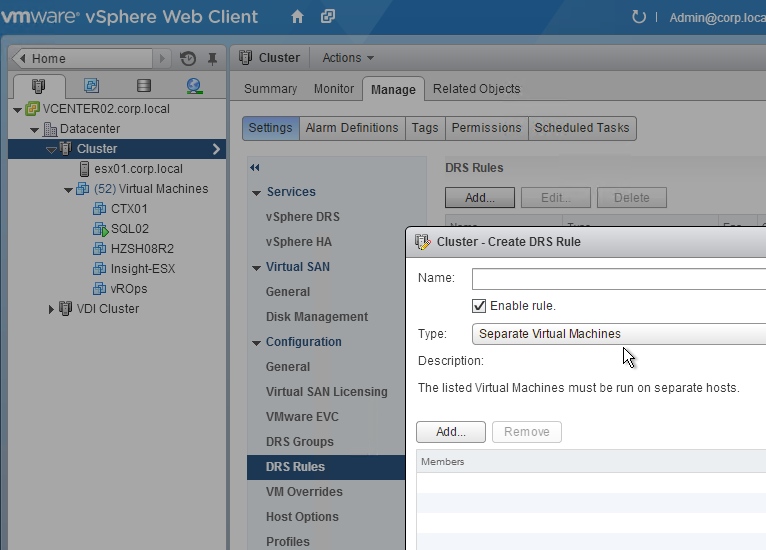
- Ensure the two Controller VMs do not run on the same hypervisor host. Create an anti-affinity rule.
Create Site – Create Databases
There are several methods of creating the databases for XenApp/XenDesktop:
- If you have sysadmin permissions to Microsoft SQL, let Citrix Studio create the databases automatically.
- If you don’t have sysadmin permissions to Microsoft SQL, then do one of the following:
- Use Citrix Studio to generate SQL scripts and send them to a DBA.
- Use PowerShell to generate SQL scripts and send them to a DBA.
Database Mirroring
If you are not using database mirroring then skip to the next section.
You can setup SQL Mirroring either before configuring XenDesktop or after configuring XenDesktop.
- If before, then the empty databases (Site, Logging, Monitoring) must use the Latin1_General_100_CI_AS_KS collation, which is not the default.
- If SQL Mirroring is already setup then XenDesktop will detect it and set the database connection strings accordingly. Or you can manually change the database connection strings later as detailed at Citrix CTX140319 How to Migrate XenDesktop Database to New SQL Server.
- If you use Citrix Studio to create SQL scripts that populate the databases, then there will be separate SQL scripts for the Primary and Partner.
To verify mirroring after the XenDesktop configuration has completed, run the PowerShell cmdlet get-configdbconnection and ensure that the Failover Partner has been set in the connection string to the mirror.

Use PowerShell to Create SQL Scripts
From Sinisa Sokolic XenDesktop 7.x DB creation with locked SQL Servers: Citrix Studio 7.6 only creates one SQL Script at a time. In a typical two-Controller configuration, that means you need 4 SQL scripts: one for each Controller, one for Monitoring, and one for Logging. That’s four round trips between you and the DBA. You can instead use PowerShell Commands to generate three of the SQL scripts now rather that doing one at a time:
Get-XDDatabaseSchema -SiteName SITENAME -DataStore Site -DatabaseName DBNAME -DatabaseServer DBSERVERNAME -ScriptType FullDatabase > c:\prep\dev_create_site_script.sql

Get-XDDatabaseSchema -SiteName SITENAME -DataStore Logging -DatabaseName DBNAME -DatabaseServer DBSERVERNAME -ScriptType FullDatabase > c:\prep\dev_create_logging_script.sql

Get-XDDatabaseSchema -SiteName SITENAME -DataStore Monitor -DatabaseName DBNAME -DatabaseServer DBSERVERNAME -ScriptType FullDatabase > c:\prep\dev_create_monitor_script.sql
Use Studio to Create the Database
Or use Citrix Studio to create the SQL Scripts:
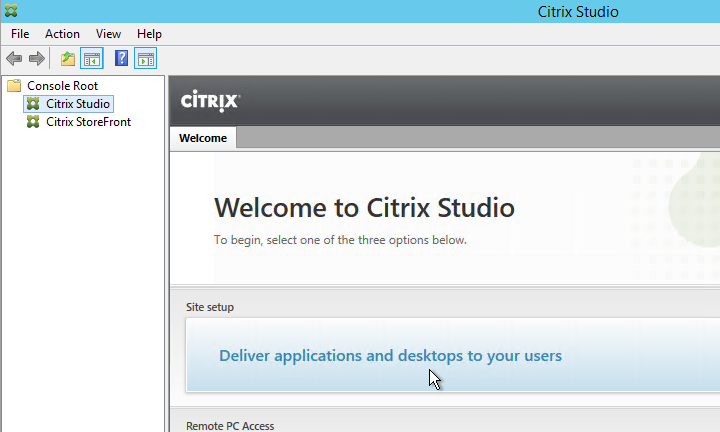
- Launch Citrix Studio. After it loads, click Deliver applications and desktops to your users.
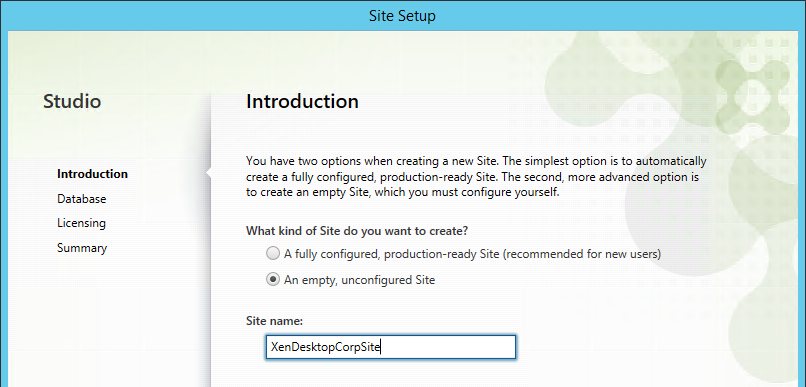
- In the Introduction page, select An empty, unconfigured site. This reduces the number of pages in the Setup wizard. The other Setup Wizard pages will be configured later.
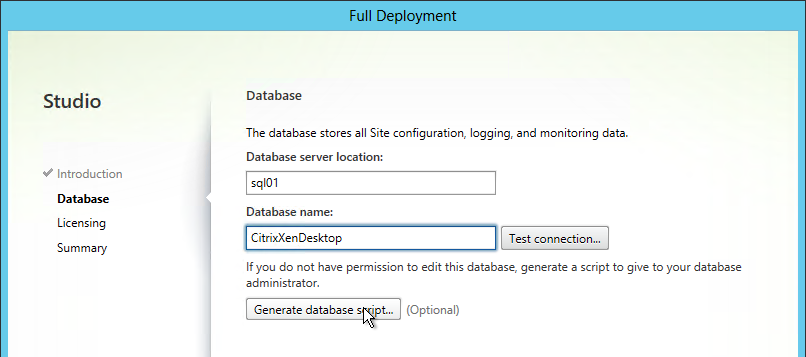
- Enter a Site Name (aka farm name) and click Next. Only administrators see the farm name.
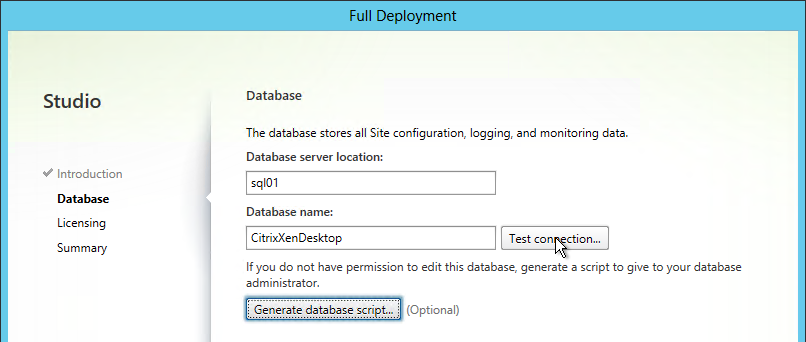
- In the Database page, enter the name of the SQL server where the database will be created. Enter a name for the new Database. No spaces in the database name.
- If the person running Studio is a sysadmin on the SQL server then you can click Test Connection and click Yes when asked to automatically create the database.
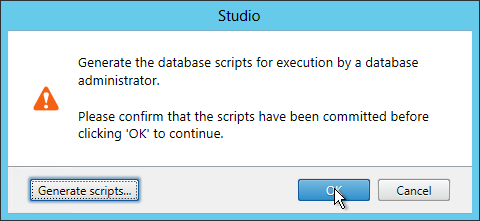
- If you are not a sysadmin, then click Generate database script.
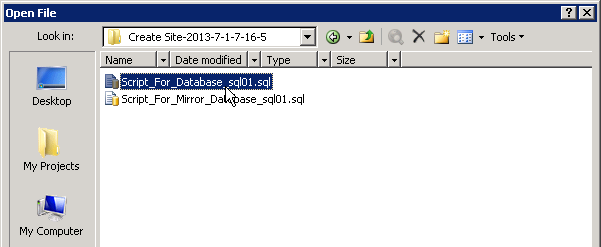
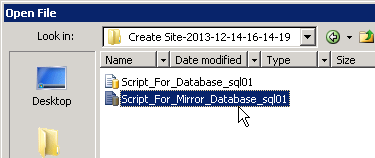
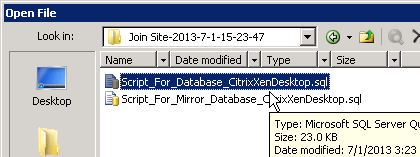
- A folder will open with two scripts. The top script needs to be sent to a DBA.
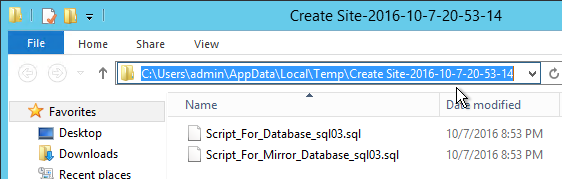
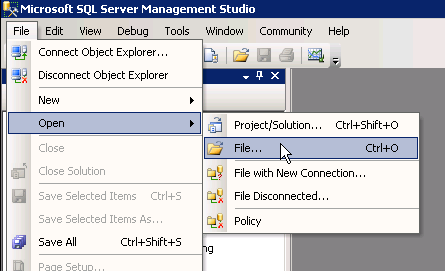
- On the Principal SQL Server, open the query file (Script_For_Database…sql).
- At the top of the script, is a commented line that creates the database. Either uncomment it or copy it to a second query window and execute it. Or in the case of mirroring, the database is already created so there’s no need to create the database again.

- Open the Query menu and click SQLCMD Mode.
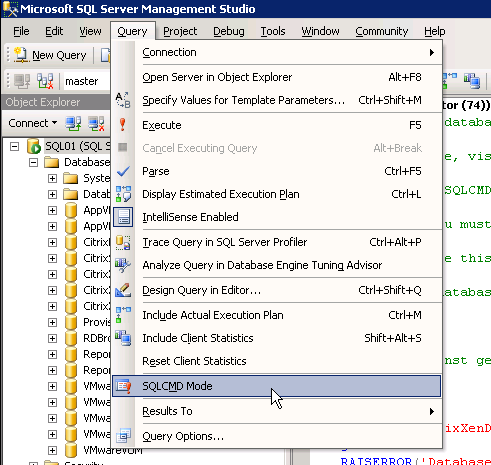
- Then execute the rest of the script.

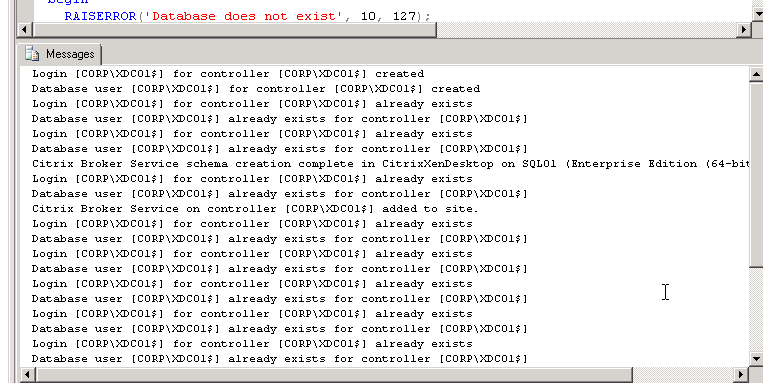
- If SQLCMD mode was enabled properly then the output should look something like this:
- If you have a mirrored database, run the second script on the mirror SQL instance. Make sure SQLCMD mode is enabled.
- The person running Citrix Studio must be added to the SQL Server as a SQL Login, and granted the public server role.
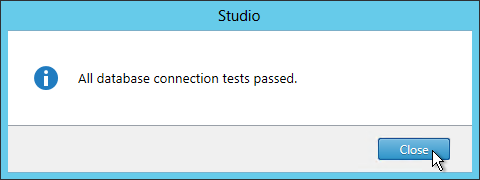
- Back in Citrix Studio, click the Test connection button.
- Click Close once the tests have passed. Then click Next.
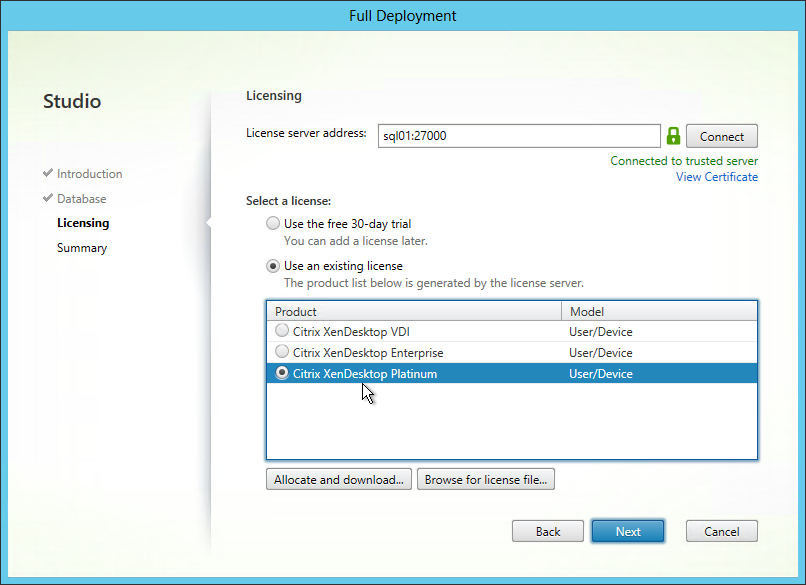
- On the Licensing page, enter the name of the Citrix License Server, and click Connect.
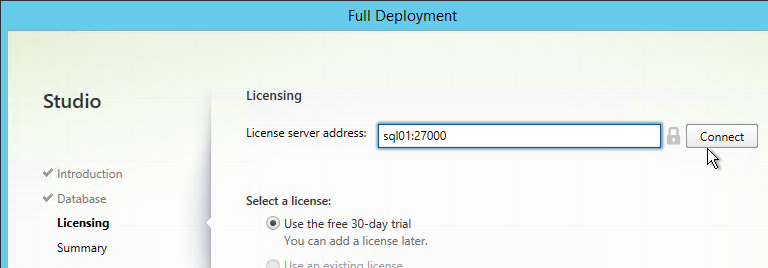
- If the Certificate Authentication appears, select Connect me, and click Confirm.
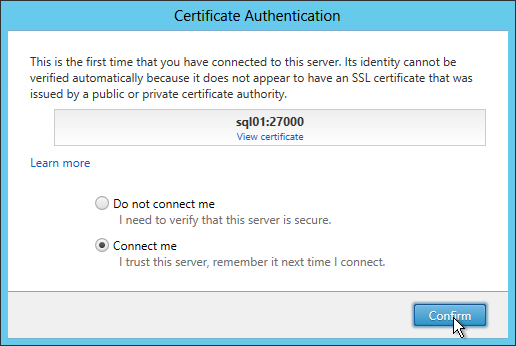
- Then select your license, and click Next.
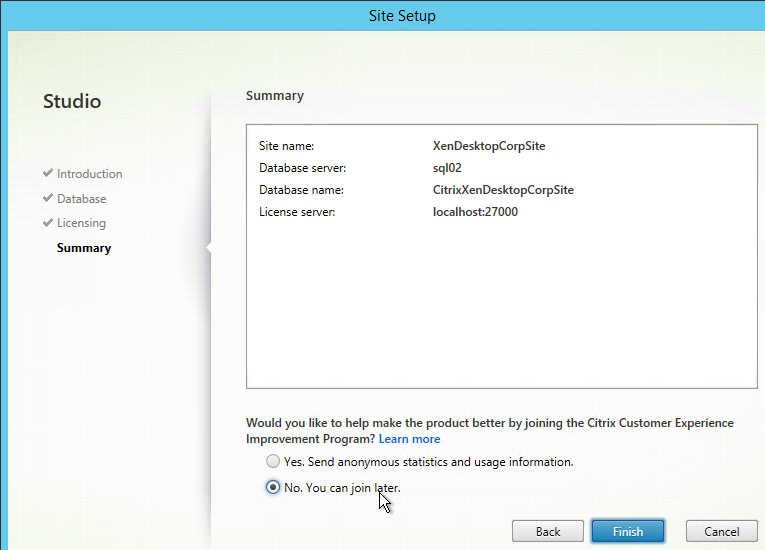
- In the Summary page, make your selection for Customer Experience Improvement Program, and click Finish.
Verify Database Mirroring
If your database is mirrored, when you run get-brokerdbconnection, you’ll see the Failover Partner in the database connection string.
Second Controller
There are several methods of adding a second Controller to the databases for XenApp/XenDesktop:
- If you have sysadmin permissions to SQL, let Citrix Studio modify the databases automatically.
- If you don’t have sysadmin permissions to SQL then do one of the following:
- Use Citrix Studio to generate SQL scripts and send them to a DBA.
- Use PowerShell to generate SQL scripts and send them to a DBA.
From Sinisa Sokolic XenDesktop 7.x DB creation with locked SQL Servers: The PowerShell Commands to generate the SQL scripts that add a Controller to the databases are shown below:
Get-XDDatabaseSchema -AdminAddress CONTROLLERNAME-SiteName SITENAME -DataStore Site -DatabaseName DBNAME-DatabaseServer DBSERVERNAME -ScriptType AddController > C:\prep\dev_add_controller_site_script.sql

Get-XDDatabaseSchema -AdminAddress CONTROLLERNAME-SiteName SITENAME -DataStore Logging -DatabaseName DBNAME-DatabaseServer DBSERVERNAME -ScriptType AddController > C:\prep\dev_add_controller_logging_script.sql

Get-XDDatabaseSchema -AdminAddress CONTROLLERNAME-SiteName SITENAME -DataStore Monitor -DatabaseName DBNAME-DatabaseServer DBSERVERNAME -ScriptType AddController > C:\prep\dev_add_controller_monitor_script.sql
Or use Citrix Studio to create the SQL Scripts:
- On the first Delivery Controller, if desired, delete the default StoreFront store (/Citrix/Store) and recreate it with your desired Store name (e.g. /Citrix/CompanyStore).
- On the second Delivery Controller, install XenDesktop as detailed earlier.
- After running Studio, click Connect this Delivery Controller to an existing Site.
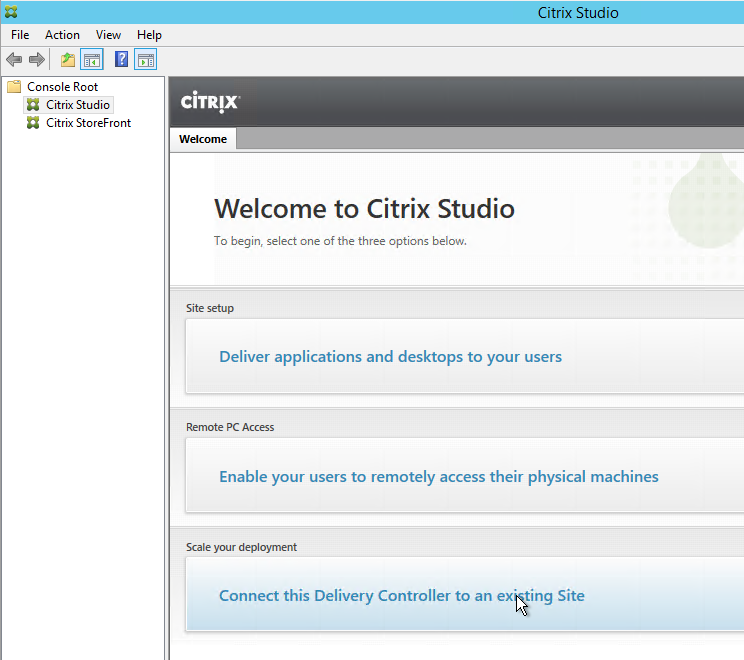
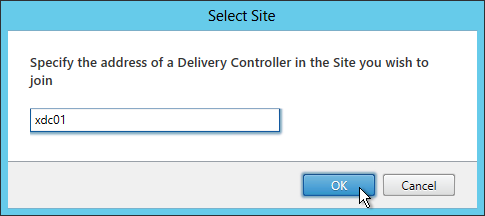
- Enter the name of the first Delivery Controller, and click OK.
- If you don’t have elevated SQL permissions, click No when asked if you want to update the database automatically.
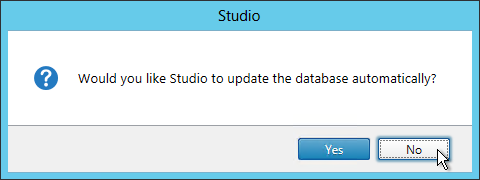
- Click Generate scripts.

- A folder will open with two scripts. The top script needs to be sent to a DBA.
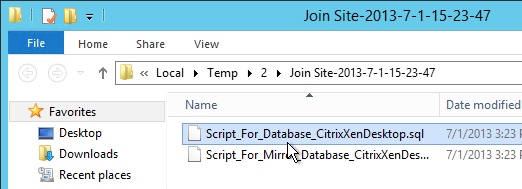
- On the SQL Server, open the query (Script_For_Database…sql).
- Open the Query menu, and click SQLCMD Mode.
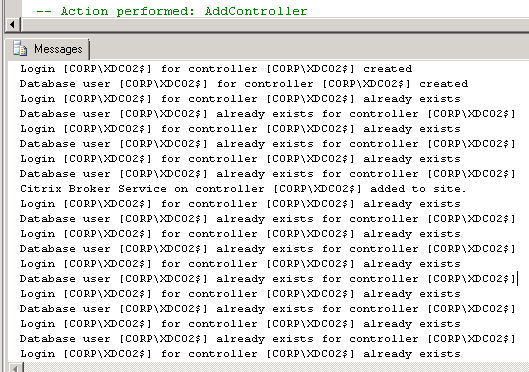
- Then execute the XenDesktop script.

- If SQLCMD mode was enabled properly then the output should look something like this:
- Back in Citrix Studio, click OK.
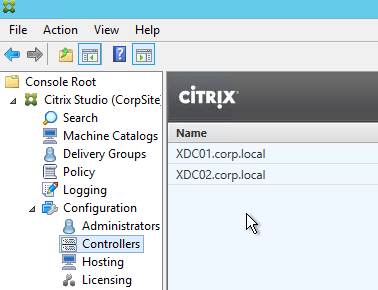
- In the Studio, under Configuration > Controllers, you should see both controllers.
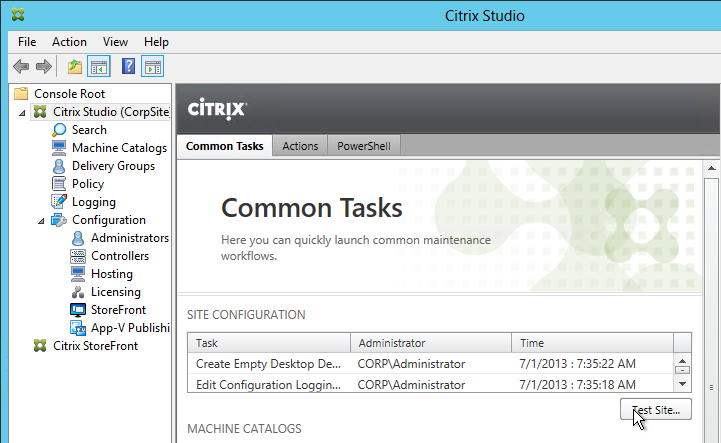
- You can also test the site again if desired.
Other LTSR CU9 Updates
The components installed on the 7.6.9000 Delivery Controllers should already be at their .9000 versions.
Studio
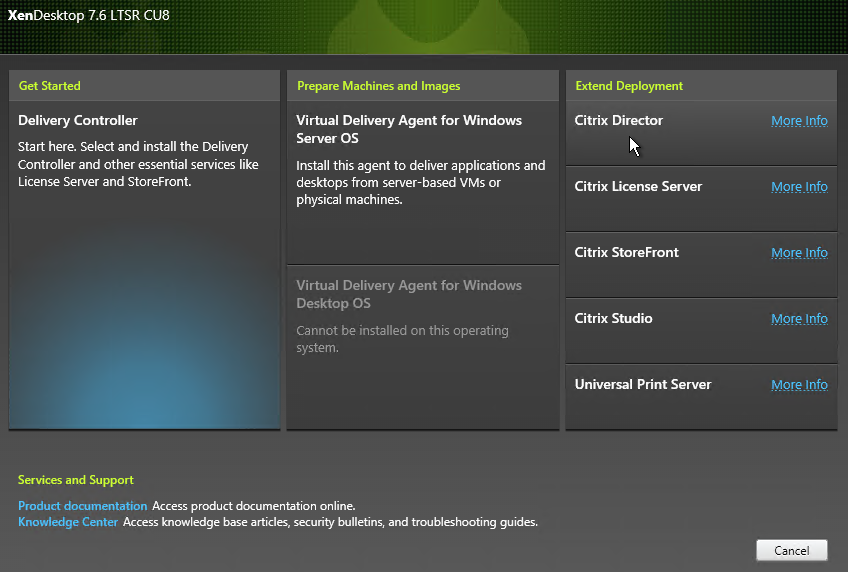
If Citrix Studio 7.6.x is installed on separate machines, upgrade it to 7.6.9000. You can run the installer from the 7.6.9000 ISO’s AutoSelect.exe program, and then click Studio and Server Components.


StoreFront
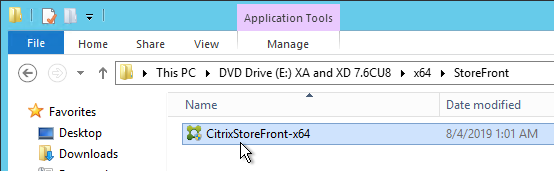
If StoreFront 3.0.x is installed on separate servers, upgrade it to 3.0.9000. You can run the installer from the 7.6.9000 ISO’s AutoSelect.exe program, or from the 7.6.9000 ISO under \x64\StoreFront.

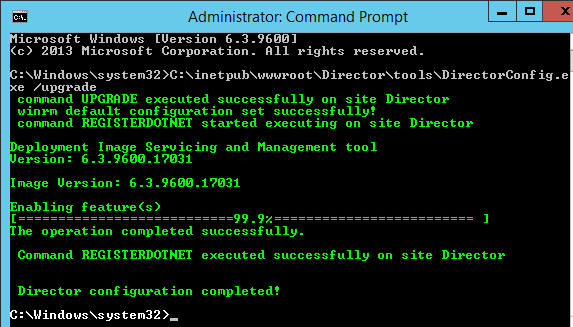
Director
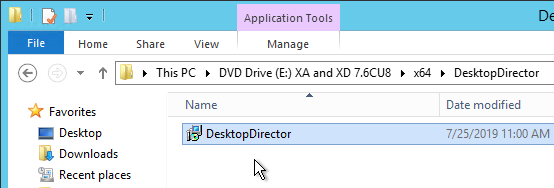
If Director 7.6.x is installed on separate servers, upgrade it to 7.6.9000. You can run the installer from the 7.6.9000 ISO’s AutoSelect.exe program, or from the 7.6.9000 ISO under \x64\DesktopDirector.

After upgrading Director, run the following command from an elevated command prompt:
C:\inetpub\wwwroot\Director\tools\DirectorConfig.exe /upgrade
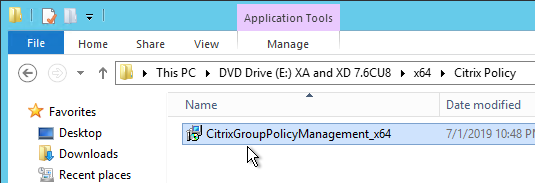
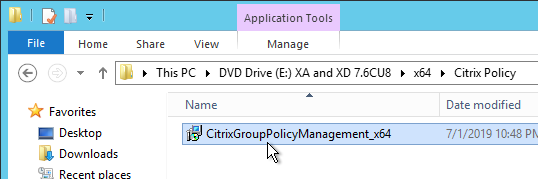
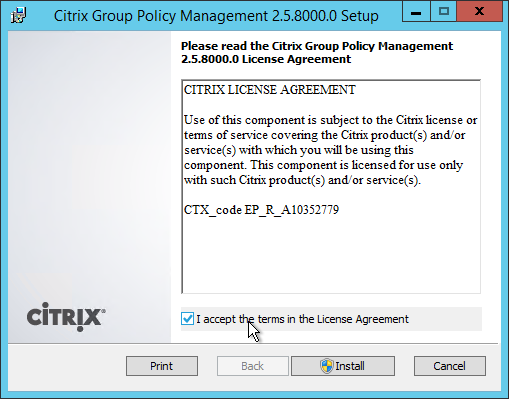
Also upgrade Citrix Group Policy Management on the Director server to 2.5.9000 (aka 7.6.9000). Find CitrixGroupPolicyManagement_x64.msi on the 7.6.9000 ISO under \x64\Citrix Policy

Other Components
Other upgradeable components on the 7.6.9000 ISO include:
- Virtual Delivery Agent 7.6.9000 – Upgrade this on all master images and all persistent machines.
- Citrix Group Policy Management 2.5.9000 – Upgrade this on any Microsoft Group Policy Management machine that is used to manage Citrix Policies in Microsoft GPOs.
- Universal Print Server 7.6.9000 – Upgrade this on any Print Server that has Citrix Universal Print Server installed.
- Citrix License Server 11.15.0.0 build 27000
Platinum Components
Other upgradeable components on separate ISOs include the following. Download them from XenDesktop 7.6 LTSR Cumulative Update 7 – Platinum Edition.
- Citrix Provisioning Services 7.6.10
- Citrix Session Recording 7.6.9000
There is no longer an LTSR version of Citrix AppDNA, so you can upgrade the latest version Citrix AppDNA 1906.
Receiver 4.9.7000 qualify for a different LTSR program. See Citrix Docs for the minimum Receiver versions.
For Windows 10 VDAs, VDA 7.9 is “compatible” with LTSR, but VDA 7.9 doesn’t receive LTSR benefits (5 years of support). See Citrix Blog Post Adding Windows 10 Compatibility to XenApp and XenDesktop 7.6 LTSR. If you need Windows 10 support, you should be installing VDA 7.15.1000, or whatever the latest version is.
Studio – Slow Launch
From B.J.M. Groenhout at Citrix Discussions: The following adjustments can be made if Desktop Studio (and other Citrix management Consoles) will start slowly:
- Within Internet Explorer, go to Tools – Internet Options – Tab Advanced – Section Security and uncheck the option Check for publisher’s certificate revocation
After adjustment Desktop Studio (MMC) will be started immediately. Without adjustment it may take some time before Desktop Studio (MMC) is started.
Registry setting (can be deployed using Group Policy Preferences):
- HKEY_CURRENT_USER\Software\Microsoft\Windows\CurrentVersion\WinTrust\Trust Providers\Software Publishing
- “State“=dword:00023e00
Database Maintenance
Split the Databases
Once the site is configured, split the Monitoring and Log data into separate databases.
- In Citrix Studio, on the left click the Configuration node.
- In the middle, click the Monitoring datastore to highlight it. On the right, click Change Database.
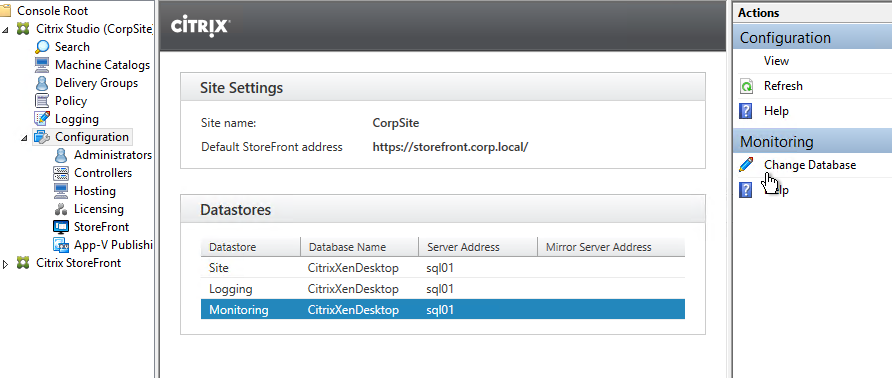
- Repeat for the Logging datastore.
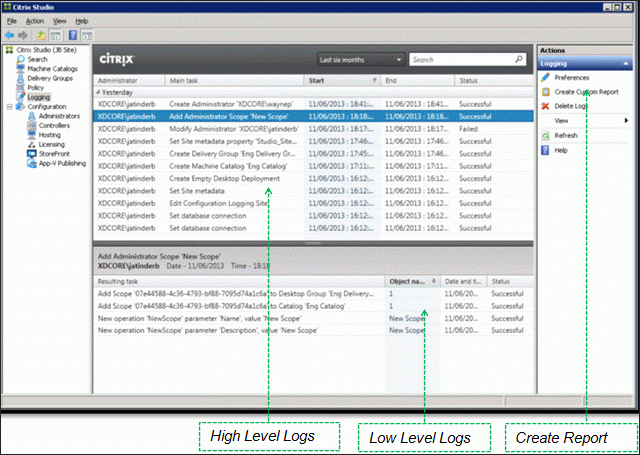
View Logging Database
To view the contents of the Logging Database, in Studio, click the Logging node. On the right is Create Custom Report. See Citrix article CTX138132 Viewing Configuration Logging Data Not Shown for more info.
Enable Read-Committed Snapshot
The XenDesktop Database can become heavily utilized under load in a large environment. Therefore Citrix recommends enabling the Read_Committed_Snapshot option on the XenDesktop databases to remove contention on the database from read queries. This can improve the interactivity of Studio and Director. It should be noted that this option may increase the load on the tempdb files. See Citrix article CTX137161 How to Enable Read-Committed Snapshot in XenDesktop for configuration instructions.
Change Database Connection Strings
Sometimes the database connection strings need to be modified:
- When moving the SQL databases to a different SQL server
- When enabling mirroring after the databases have already been configured in Studio.
From Citrix Docs Update database connection strings when using SQL Server high availability solutions: Citrix offers several PowerShell scripts that update XenApp and XenDesktop database connection strings when you are using SQL Server high availability database solutions such as AlwaysOn and mirroring. The scripts, which use the XenApp and XenDesktop PowerShell API, are:
- DBConnectionStringFuncs.ps1: The core script that does the actual work. This script contains common functions that the other scripts use.
- Change_XD_Failover_Partner_v1.ps1: Updates (adds, changes, or removes) the failover partner. This script prompts for the failover partner location (FQDN) for each database. (Providing a blank failover partner removes the failover partner. You can also use the ClearPartner option to remove a partner.) Do not set the failover partner to the same location as the principal database server.
- Change_XD_To_ConnectionString.ps1: Uses the provided connection strings to update the connection strings to the databases. This script ensures that certain Citrix services are up and running, and then updates those services in the correct order on all Controllers in the site. Enclose connection string information for each database in quotes.
- Change_XD_To_MultiSubnetFailover.ps1: Toggles the addition and removal of MultiSubnetFailover=true. If you use AlwaysOn Availability Groups, Microsoft recommends that the connection string include MultiSubnetFailover=true. This option speeds up recovery when a high availability event occurs, and is recommended for both single and multi-subnet environments. Run this script once to add the option. Run the script again to remove it.
- Change_XD_To_Null.ps1: Resets all the connection strings on the localhost because something has gone wrong. By resetting the connection strings to null, this script places the Controller into an “initial” state. If you run Studio after running this script, you’ll be asked if you want to create a site or join an existing site. This is useful if something has gone wrong and a reset is needed. After the reset, you can try again to set the connection strings.
Director Grooming
If XenDesktop is not Platinum Edition then all historical Director data is groomed at 7 days.
For XenDesktop/XenApp Platinum Edition, by default, most of the historical Director data is groomed at 90 days. This can be adjusted up to 367 days by running a PowerShell applet.
- On a Delivery Controller, run PowerShell and run asnp Citrix.*

- Run Get-MonitorConfiguration to see the current grooming settings.
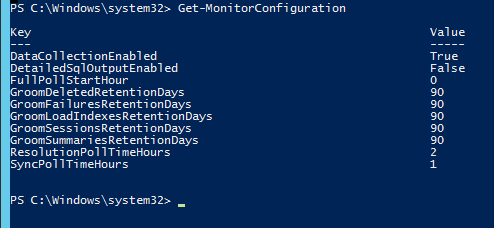
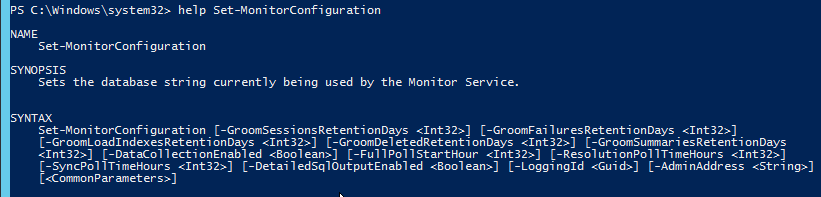
- Run Set-MonitorConfiguration to change the grooming settings.
Studio Administrators
Full Administrators
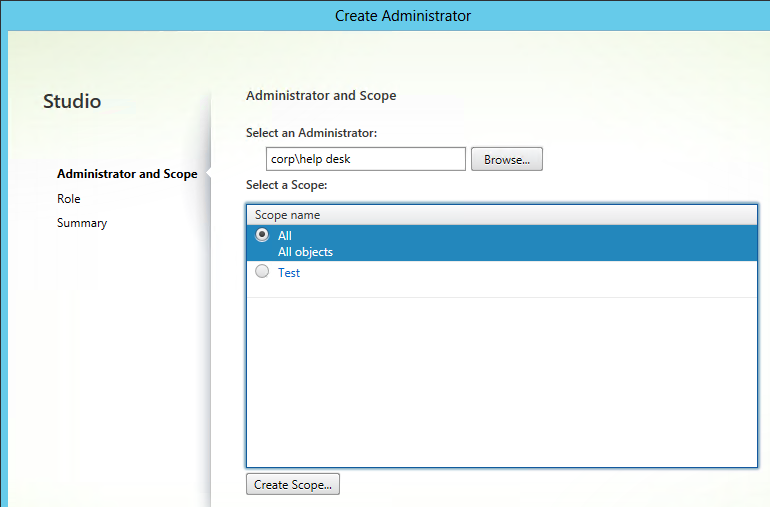
- In the Studio, under Configuration, click the Administrators node. The first time you access the node you’ll see a Welcome page. Feel free to check the box and then click Close.
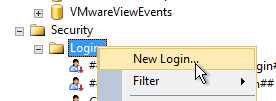
- On the Administrators tab, right-click, and click Create Administrator.
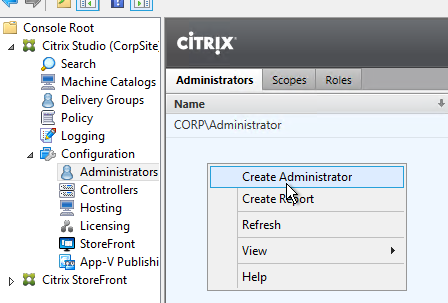
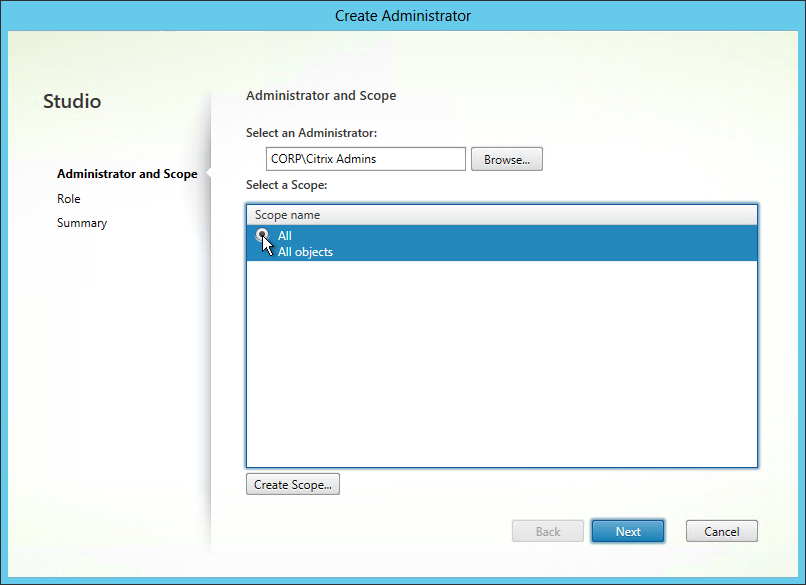
- In the Administrator and Scope page, specify a group (e.g. Citrix Admins or Help Desk) that will have permissions to Studio and Director. Click Next.
- On the Role page, select a role and then click Next. For example:
- Full Administrator for the Citrix Admins group
- Help Desk Administrator for the Help Desk group
- Machine Catalog Administrator for the desktop team
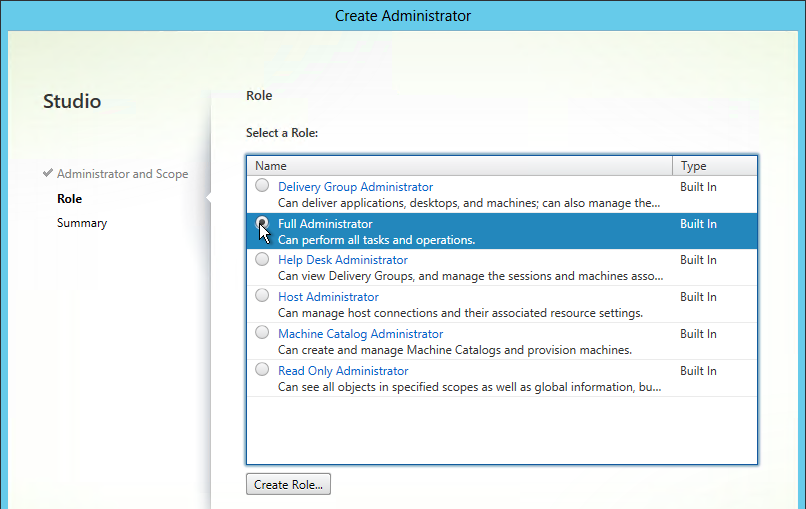
- In the Summary page, click Finish.
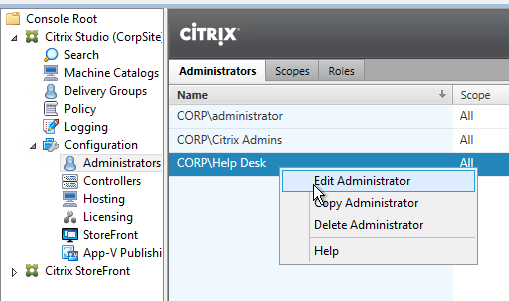
Help Desk
- In the Studio, under Configuration, click the Administrators node. On the Administrators tab, right-click and click Create Administrator.
- In the Administrator and Scope page, specify a Help Desk group that will have permissions to Studio and Director. Click Next.
- On the Role page, select the Help Desk Administrator role and then click Next.
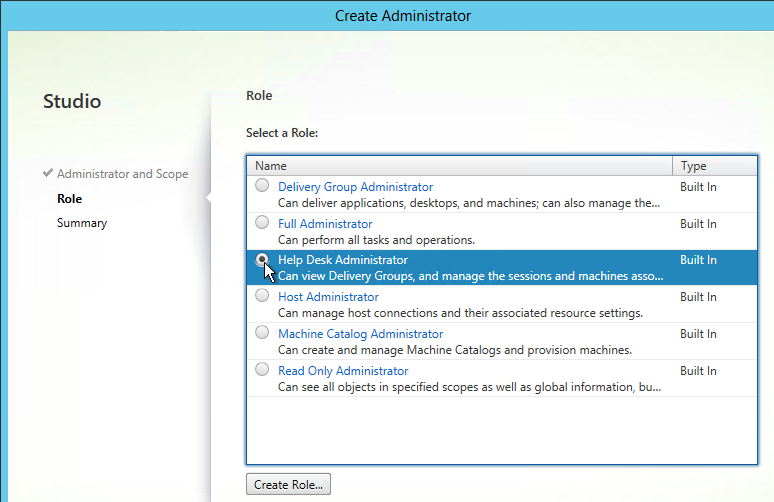
- In the Summary page, click Finish.
- When administrators in the Help Desk role log into Director, all they see is this.
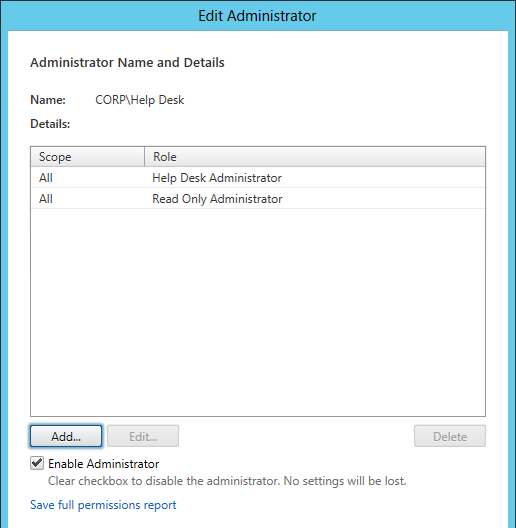
To jazz it up a little, add the Help Desk group to the read-only role. - Right-click the Help Desk Administrator and click Edit Administrator.
- Click Add.
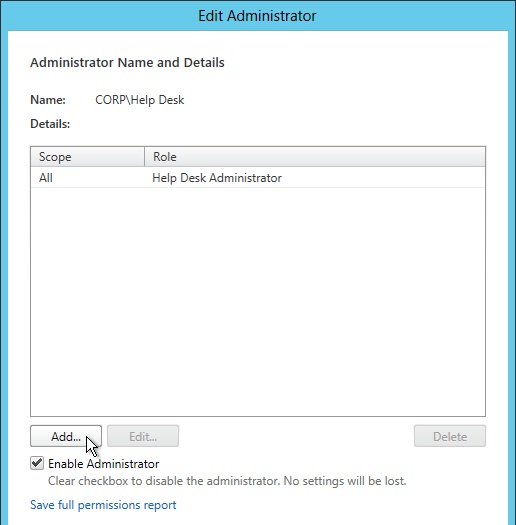
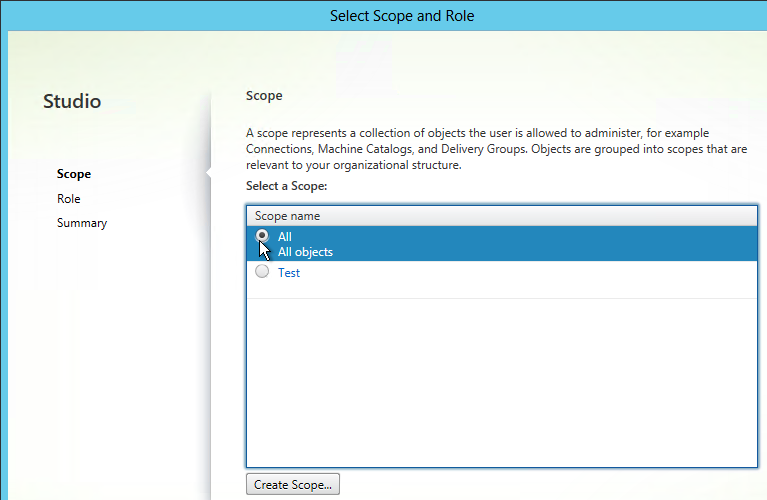
- In the Scope page, select a scope and click Next.
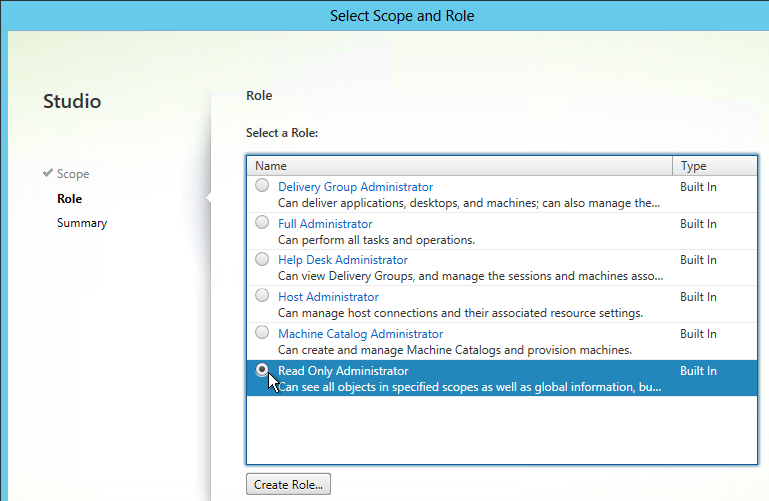
- In the Role page, select Read Only Administrator and click Next.
- In the Summary page, click Finish.
- Then click OK. Now Director will display the dashboard.
Provisioning Services w/Personal vDisk
From Citrix docs.citrix.com: The Provisioning Services Soap Service account must be added to the Administrator node of Studio and must have the Machine Administrator or higher role. This ensures that the PvD desktops are put into the Preparing state when the Provisioning Services (PVS) vDisk is promoted to production.
vCenter Connection
XenDesktop uses an Active Directory service account to log into vCenter. This account needs specific permissions in vCenter. To facilitate assigning these permissions, create a new vCenter role and assign it to the XenDesktop service account. The permissions should be applied at the datacenter or higher level. CTX214389 How to Define VMware vSphere User Privileges for XenApp and XenDesktop defines the minimum permissions needed for various activities in XenDesktop: MCS, PvS, Power Management, and AppDisks. 💡
Import vCenter Certificate
If you replaced the certificates on your vCenter server, then skip this section.
If vCenter is using a self-signed certificate, in order for Delivery Controller to trust the vCenter certificate, you must import the vCenter certificate on both Delivery Controllers.
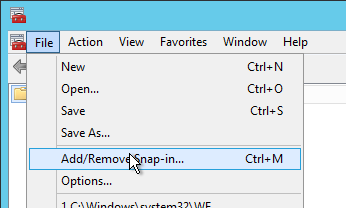
- On each Delivery Controller, run mmc.exe. Open the File menu and click Add/Remove Snap-in.
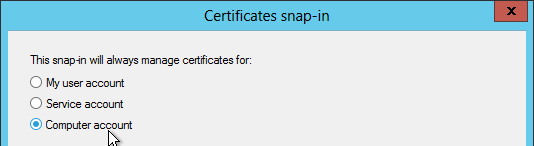
- Move the Certificates snap-in to the right by highlighting it and clicking Add.

- Select Computer account and click Next.
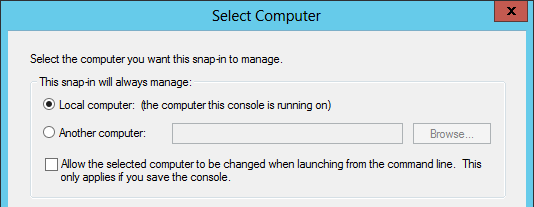
- Select Local computer and click Finish.
- Click OK.
- After adding the snap-in, right-click the Trusted People node, expand All Tasks and click Import.
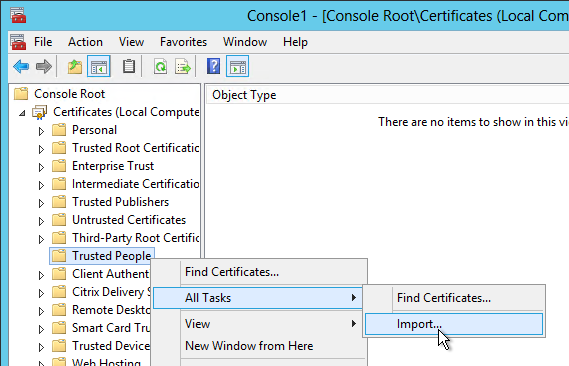
- In the Welcome to the Certificate Import Wizard page, click Next.
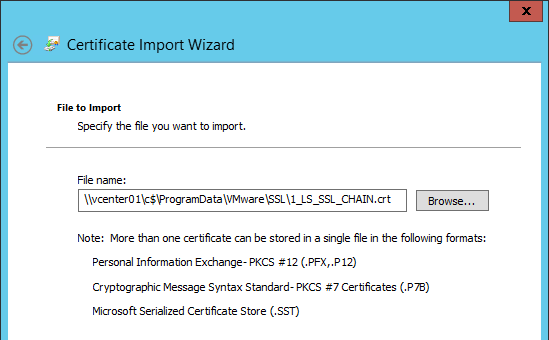
- In the File to Import page, browse to \\vcenter01\c$\ProgramData\VMware\VMware VirtualCenter\SSL and select crt. Click Next.
- In the Certificate Store page, click Next.
- In the Completing the Certificate Import Wizard page, click Finish.
- Click OK to acknowledge that the import was successful.
- Repeat these steps on the second Controller. It is important that you do both Controllers before adding the vCenter connection.
Hosting Resources
A Hosting Resource = vCenter + Cluster (Resource Pool) + Storage + Network. When you create a machine catalog, you select a previously defined Hosting Resource and the Cluster, Storage, and Network defined in the Hosting Resource object are automatically selected. If you need some desktops on a different Cluster+Storage+Network then you’ll need to define more Hosting Resources in Studio.
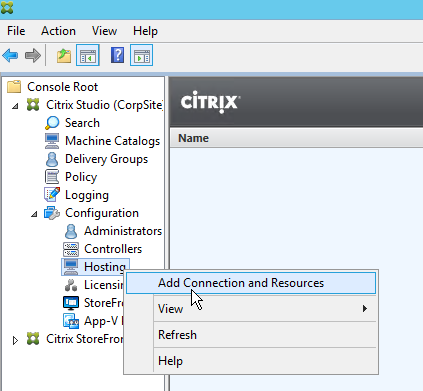
- In Studio, expand Configuration and click Hosting. Right-click it and click Add Connection and Resources.
- In the Connection page, select VMware vSphere as the Host type.
- Enter https://vcenter01.corp.local/sdk as the vCenter URL. The URL must contain the FQDN of the vCenter server. If the vCenter certificate is self-signed, ensure it is added to the Trusted People certificate store on all Delivery Controllers. Ensure the entered URL has /sdk on the end.
- Enter credentials of a service account. Click Next.
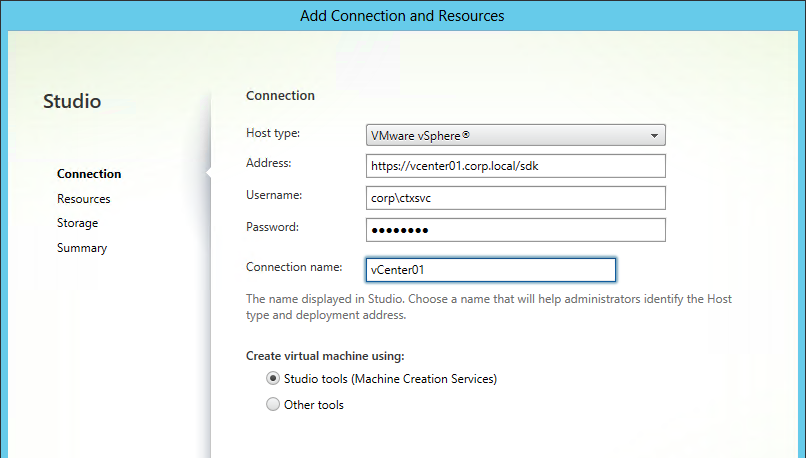
- Enter a name for the hosting resource. Since each hosting resource is a combination of vCenter, Cluster, Network, and Datastore, include those names in this field (e.g. vCenter01-Cluster01-Network01-Datastore01).
- In the Cluster page, click Browse and select a cluster or resource pool.
- Select a network and click Next.
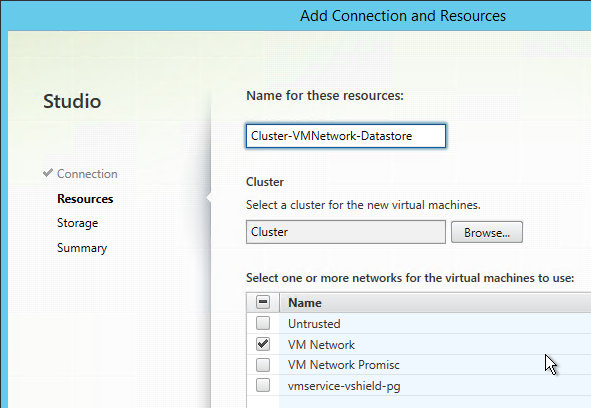
- On the Storage page, select a datastore for the virtual machines.
- If desired, change the selection for personal vDisk to use a different storage. Click Next.
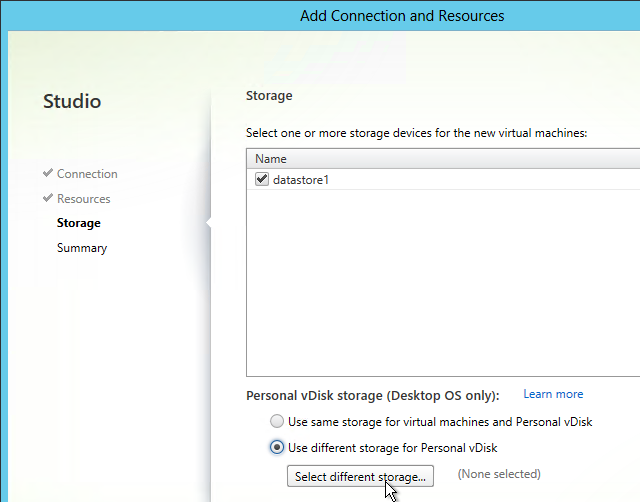
- In the Summary page, click Finish.
Citrix Director 7.6.9000
Director on Standalone Server
If you are installing Director 7.6.9000 on a standalone server, see Citrix CTX142260 Installing or Upgrading to Citrix Director 7.6.200
- If you intend to install Director on a standalone server, start with running AutoSelect.exe from the XenApp/XenDesktop 7.6.9000 media.

- On the top right, click Citrix Director.
- It will ask you for the location of one Controller in the farm. If you have multiple Director servers, point each Director server to a different Controller in the same farm. From Citrix Docs: Director automatically discovers all other Controllers in the same Site and falls back to those other Controllers if the Controller you specified fails. Then finish the installation wizard.
- If you upgraded an existing Director installation the upgrade, run the following command from an elevated command prompt:
C:\inetpub\wwwroot\Director\tools\DirectorConfig.exe /upgrade
- Also install Citrix Group Policy Management 2.5.9000 (aka 7.6.9000) on the Director server. Find CitrixGroupPolicyManagement_x64.msi on the 7.6.9000 ISO under \x64\Citrix Policy
Director Tweaks
Prepopulate the domain field
From http://www.xenblog.dk/?p=33: On the Controllers having the Director role installed, locate and edit the ‘LogOn.aspx’ file. By default you can find it at “C:\inetpub\wwwroot\Director\Logon.aspx”
In line 328 or line 358 you will have the following. To find the line, search for ID=”Domain”. Note: onblur and onfocus attributes were added in newer versions of Director.
<asp:TextBox ID="Domain" runat="server" CssClass="text-box" onfocus="showIndicator(this);" onblur="hideIndicator(this);"></asp:TextBox>
In the ID=”Domain” element, insert a Text attribute and set it to your domain name. Don’t change or add any other attributes. Save the file.
<asp:TextBox ID="Domain" runat="server" Text="Corp" CssClass="text-box" onfocus="showIndicator(this);" onblur="hideIndicator(this);"></asp:TextBox>
This will prepopulate the domain field text box with your domain name and still allow the user to change it, if that should be required.
Session timeout
By default the idle time session limit of the Director is 245 min. If you wish to change the timeout, here is how to do it.
- Log on to the Director Server as an administrator
- Open the ‘IIS Manager’
- Browse to ‘\Sites\Default Web Site\Director’ in the left hand pane.
- Open ‘Session State’ in the right hand pane
- Change the ‘Time-out (in minutes)’ value under ‘Cookie Settings’
- Click ‘Apply’ in the Actions list
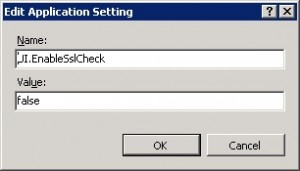
SSL Check
From http://euc.consulting/blog/citrix-desktop-director-2-1: If you are not securing Director with an SSL certificate you will get this error at the logon screen.

To stop this:
- Log on to the Director Server as an administrator
- Open the ‘IIS Manager’
- Browse to ‘\Sites\Default Web Site\Director’ in the left hand pane.
- Open ‘Application Settings’ in the right hand pane
- Set EnableSslCheck to false.
Disable Activity Manager
From docs.citrix.com: By default, the Activity Manager in Director displays a list of all the running applications and the Windows description in the title bars of any open applications for the user’s session. This information can be viewed by all administrators that have access to the Activity Manager feature in Director. For Delegated Administrator roles, this includes Full administrator, Delivery Group administrator, and Help Desk Administrator.
To protect the privacy of users and the applications they are running, you can disable the Applications tab from listing running applications.
- On the VDA, modify the registry key located at HKLM\Software\Citrix\Director\TaskManagerDataDisplayed. By default, the key is set to 1. Change the value to 0, which means the information will not be displayed in the Activity Manager.
- On the server with Director installed, modify the setting that controls the visibility of running applications. By default, the value is true, which allows visibility of running applications in the Applications Change the value to false, which disables visibility. This option affects only the Activity Manager in Director, not the VDA. Modify the value of the following setting:
UI.TaskManager.EnableApplications = false
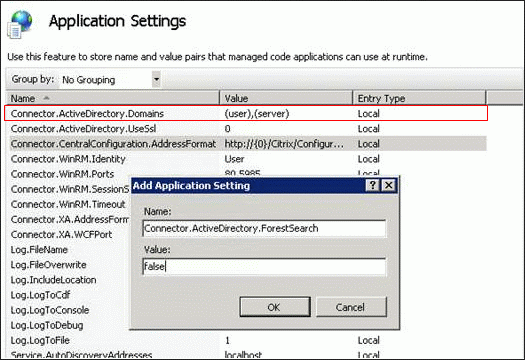
Large Active Directory
From CTX133013 Desktop Director User Account Search Process is Slow or Fails: By default, all the Global Catalogs for the Active Directory Forest are searched using Lightweight Directory Access Protocol (LDAP). In a large Active Directory environment, this query can take some time or even time out.
- In Information Server (IIS) Management, under the Desktop Director site, select Application Settings and add a new value called Connector.ActiveDirectory.ForestSearch. Set it to False. This disables searching any domain except the user’s domain and the server’s domain.
- To search more domains, add the searchable domain or domains in the Connector.ActiveDirectory.Domains field.
Site Groups
From Citrix Blog Post Citrix Director 7.6 Deep-Dive Part 4: Troubleshooting Machines:
If there are a large number of machines, the Director administrator can now configure site groups to perform machine search so that they can narrow down searching for the machine inside a site group. The site groups can be created on the Director server by running the configuration tool via command line by running the command:
C:\inetpub\wwwroot\Director\tools\DirectorConfig.exe /createsitegroups
Then provide a site group name and IP address of the delivery controller of the site to create the site group.
Director – Multiple XenDesktop Sites
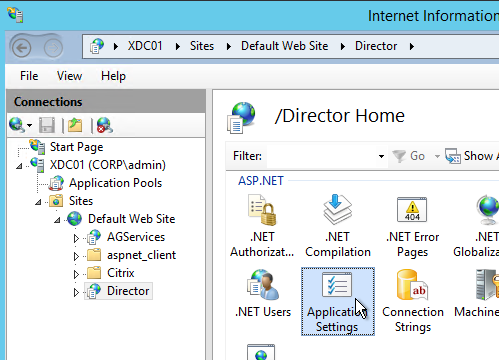
- Run IIS Manager. You can launch it from Server Manager (Tools menu) or from the Start Menu or by running inetmgr.
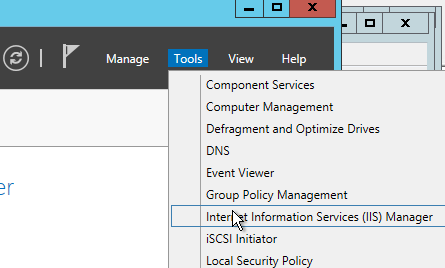
- On the left, expand Sites, expand Default Web Site, and click Director.
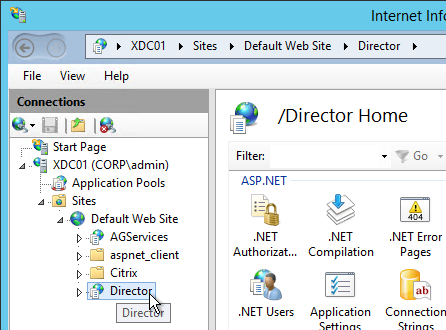
- In the middle pane, double-click Application Settings.
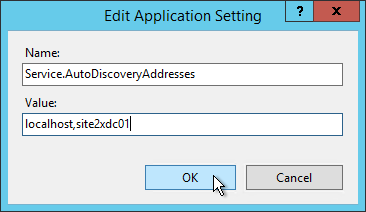
- Find the entry for AutoDiscoveryAddresses and double-click it.
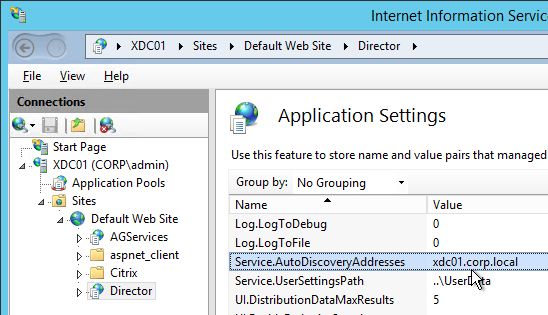
- If Director is installed on a Controller, localhost should already be entered.
- Add a comma and the NetBIOS name of one of the controllers in the 2nd XenDesktop Site (farm). Only enter one Controller name. If you have multiple Director servers, you can point each Director server to a different Controller in the 2nd XenDesktop Site (farm). From Citrix Docs: Director automatically discovers all other Controllers in the same Site and falls back to those other Controllers if the Controller you specified fails.
- According to Citrix CTX200543 Desktop Director Access Fails After XenDesktop 7.5 is Upgraded to 7.6, the addresses should be NetBIOS names, not FQDN. Click OK.
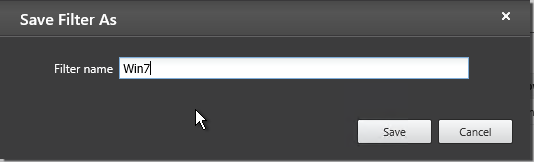
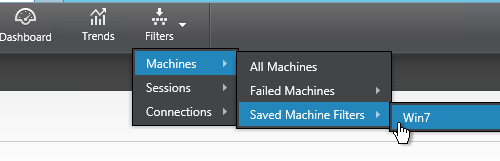
Director – Saved Filters
From Scott Osborne and Jarian Gibson at Citrix Discussions: In Director, you can create a filter and save it.
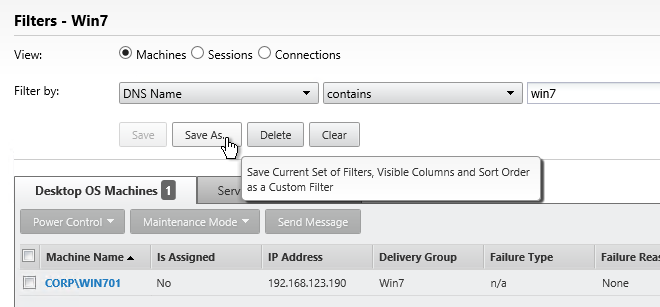
The saved filter is then accessible from the Filters menu structure.
The saved filters are stored on each Director server at C:\Inetpub\wwwroot\Director\UserData. Observations:
- Each user has their own saved filters.
- The saved filters are not replicated across Director servers. You can schedule a robocopy script to do this automatically.
- When upgrading Director, the saved filters are deleted?

You can instead configure multiple Director servers to store the filters on a shared UNC path: (h/t CTP Jarian Gibson)
- Create and share a folder (e.g. DirectorData).

- The Director server computer accounts need Modify permission to the share.

- On each Director server, run IIS Manager.
- Go to Sites > Default Web Site > Director. In the middle, double-click Application Settings.

- Change the Service.UserSettingsPath setting to the UNC path of the new share.

- Repeat this on other load balanced Director servers.
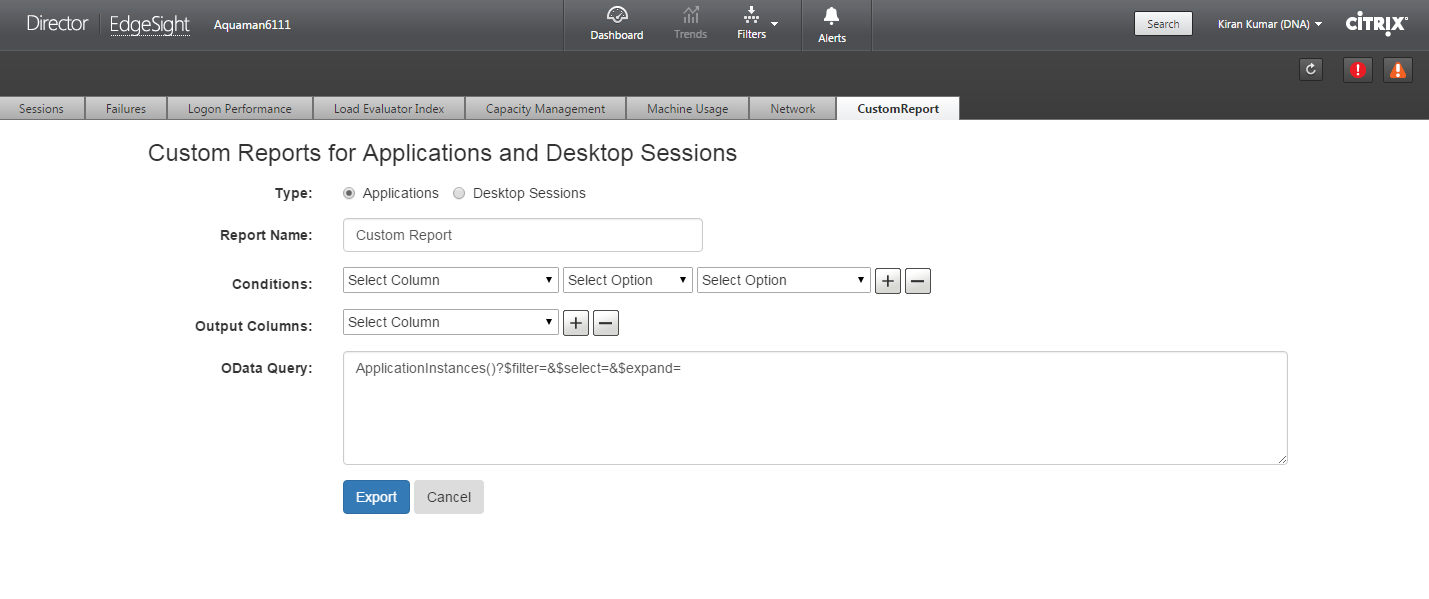
Director – Custom and Scheduled Reports
The Monitoring database contains more data than is exposed in Director. To view this data, the Monitoring service has an OData Data Feed that can be queried.
You can use Excel to pull data from the OData Data feed. See Citrix Blog Post – Citrix Director – Analyzing the Monitoring Data by Means of Custom Reports. This particular blog post shows how to use an Excel PivotChart to display the connected Receiver versions.
Or for Linqpad, see Citrix Blog Post – Creating Director Custom reports for Monitoring XenDesktop using Linqpad
Go to Citrix Blog Post Obtain XenDesktop Custom report through Citrix Director and download the tool. Once installed you can create custom reports from within Director.
Citrix Licensing Server
Upgrade
If you installed the Licensing Server that came with XenApp 7.6.9000, then it is already 11.15.0.0 build 27000.
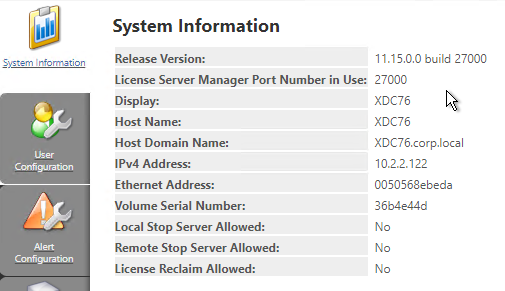
If you have a standalone Licensing Server, then install or upgrade it to 11.15.0.0 build 27000.
- Go to the 7.6.9000 ISO, and run AutoSelect.exe.

- Click Studio and Server Components to begin the upgrade.

- In the Licensing Agreement page, select I have read, understand, and accept the terms, and click Next.
- In the Ensure a successful upgrade page, check the box next to I’m ready to continue, and click Next.
- In the Firewall page, click Next.
- In the Summary page, click Upgrade.
- In the Finish page, click Finish.
- If you login to the License Administration Console, on the Administration tab, it shows it as version 11.15.0.0 build 27000.
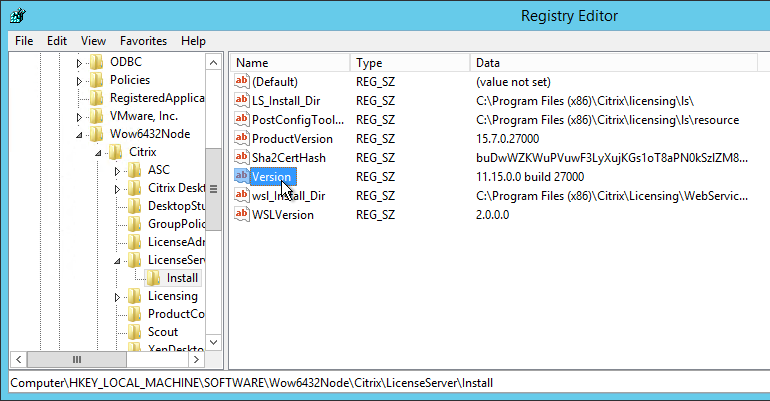
- You can also view the version in the registry at HKLM\Software\Wow6432Node\Citrix\LicenseServer\Install.
Licensing Server HA using GSLB
From Dane Young – Creating a Bulletproof Citrix Licensing Server Infrastructure using NetScaler Global Server Load Balancing (GSLB) and CtxLicChk.ps1 PowerShell Scripts. Here is a summary of the configuration steps. See the blog post for detailed configuration instructions.
- Build two License Servers in each datacenter with identical server names. Since server names are identical, they can’t be domain-joined.
- Install identical licenses on all License Servers.
- Set the DisableStrictNameChecking registry key on all Citrix Licensing servers.
- Synchronize the certificate files located at C:\Program Files (x86)\Citrix\Licensing\WebServicesForLicensing\Apache\conf. They must be identical on all Licensing Servers.
- Download CtxLicChk.exe from http://support.citrix.com/article/CTX123935 and place on all Licensing Servers.
- Schedule the PowerShell script CtxLicChk.ps1 on all Licensing Servers. Get this script from the blog post linked above.
- Configure NetScaler:
- Configure GSLB ADNS services.
- Add wildcard Load Balancing service for each Citrix Licensing Server.
- Configure service TCP monitoring for ports 27000, 7279, 8082, and 8083.
- Create Load Balancing Virtual Server for each Licensing Server.
- Set one Load Balancing Virtual Server as backup for the other.
- Repeat in second datacenter.
- Configure GSLB Services and GSLB Monitoring.
- Configure GSLB Virtual Servers. Set one GSLB Virtual Server as backup for the other.
- Delegate the Citrix Licensing DNS name to the ADNS services on the NetScaler appliances.
- Configure Citrix Studio to point to the GSLB-enabled DNS name for Citrix Licensing.
Citrix License Server Monitoring
Citrix Licensing 11.13.1 and newer has historical usage reporting:
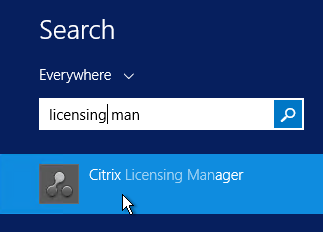
- Run Citrix Licensing Manager from the Start Menu. Or use a browser to connect to https://MyLicenseServer:8083
- Use the drop-down menus to select a license type, select dates, and export to a .csv file.

- The Update Licenses tab lets you check for renewals and download them.

- On the top right is a gear icon where you can set the historical retention period.


http://www.jonathanmedd.net/2011/01/monitor-citrix-license-usage-with-powershell.html.
Lal Mohan – Citrix License Usage Monitoring Using Powershell
Jaroslaw Sobel – Monitoring Citrix Licenses usage – Graphs using WMI, Powershell and RRDtool. This script generates a graph similar to the following:

Remote Desktop Licensing Server
Install Remote Desktop Licensing Server
Do the following on your XenDesktop Controllers:
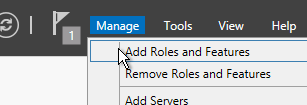
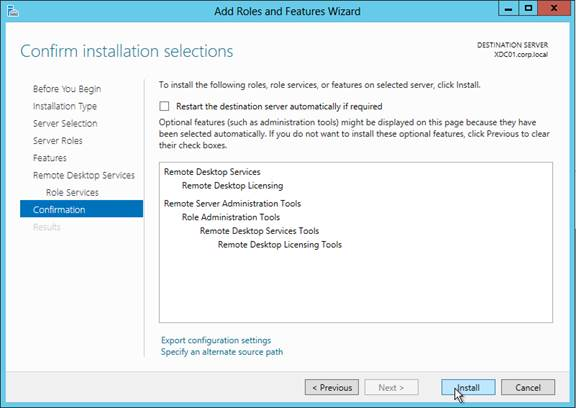
- In Server Manager, open the Manage menu and click Add Roles and Features.
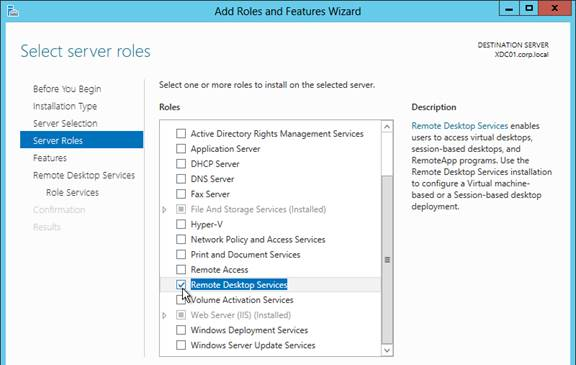
- Click Next until you get to the Server Roles Check the box next to Remote Desktop Services and click Next.
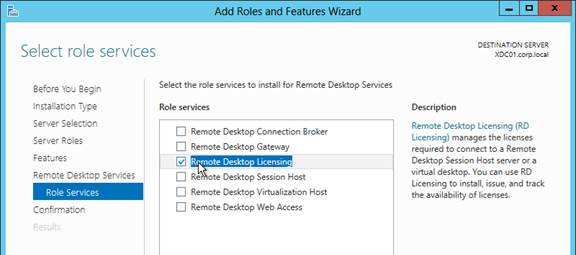
- Click Next until you get to the Role Services Check the box next to Remote Desktop Licensing and click Next.
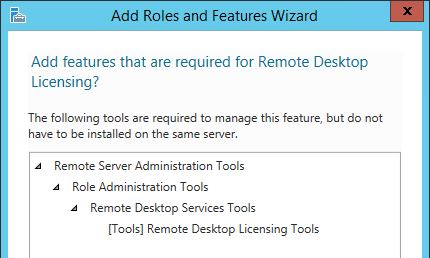
- Click Add Features if prompted.
- Then finish the wizard to install the role service.
Activate Remote Desktop Licensing
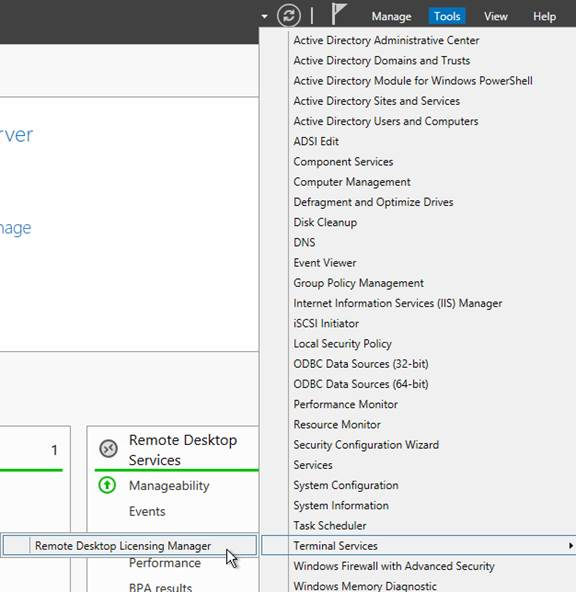
- After RD Licensing is installed, in Server Manager, open the Tool menu, expand Terminal Services and click Remote Desktop Licensing Manager.
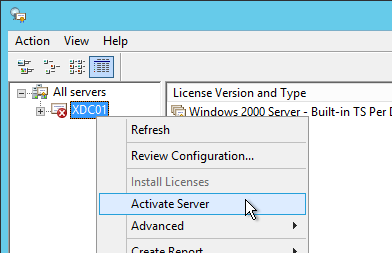
- The tool should find the local server. If it does not, right-click All servers, click Connect and type in the name of the local server. Once the local server can be seen in the list, right-click the server and click Activate Server.
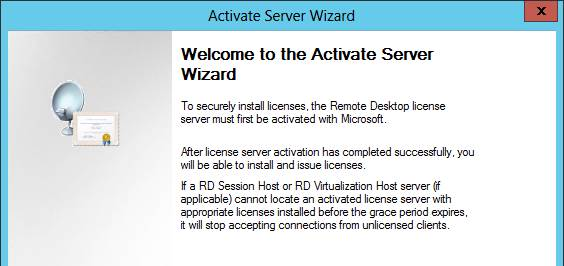
- In the Welcome to the Activate Server Wizard page, click Next.
- In the Connection Method page, click Next.
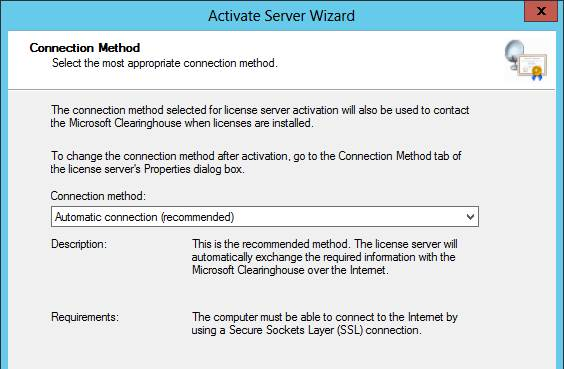
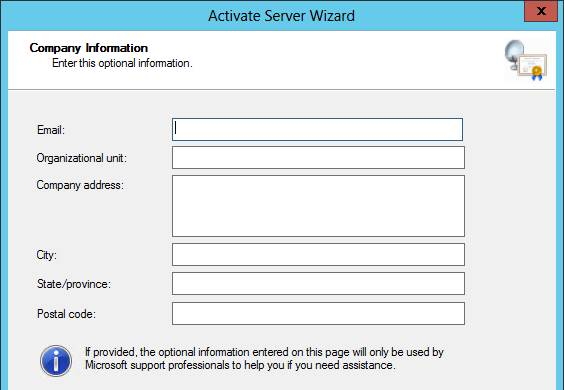
- In the Company Information page, enter the required information and click Next.

- All of the fields on the Company Information page are optional so you do not have to enter anything. Click Next.
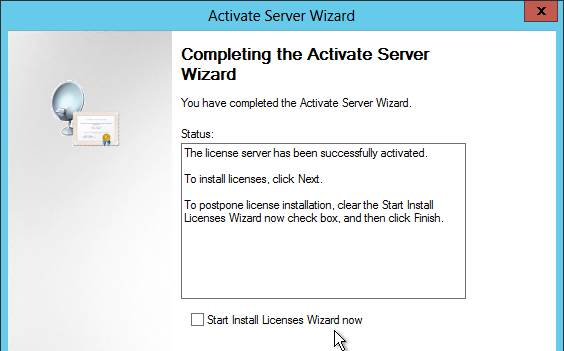
- In the Completing the Activate Server Wizard page, uncheck the box next to Start Install Licenses Wizard now and click Finish. Since the session hosts will be configured to pull Per User licenses, there is no need to install licenses on the RD Licensing Server.
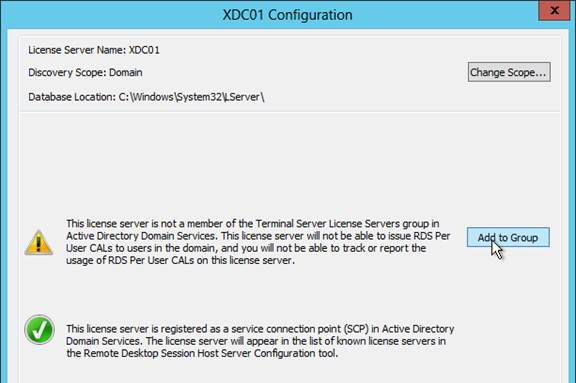
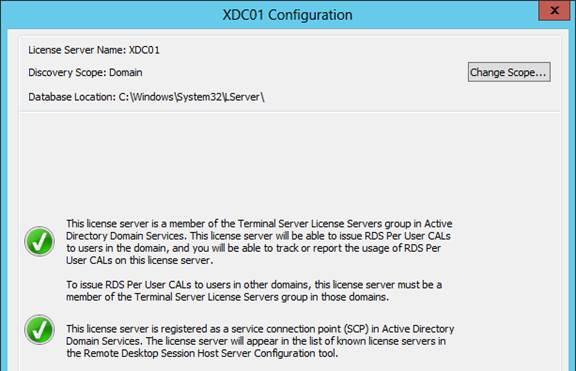
- In RD Licensing Manager, right-click the server and click Review Configuration.
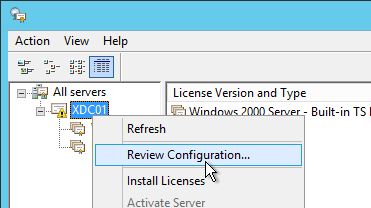
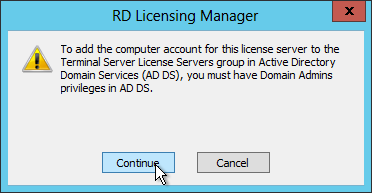
- Ensure you have green check marks. If the person installing Remote Desktop Licensing does not have permissions to add the server to the Terminal Server License Servers group in Active Directory, ask a domain admin to do it manually. If you have the proper permissions, click Add to Group.
- Click Continue when prompted that you must have Domain Admins privileges.
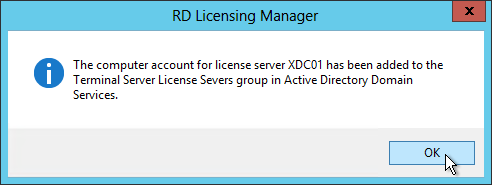
- Click OK when prompted that the computer account has been added.
- Click OK to close the window.
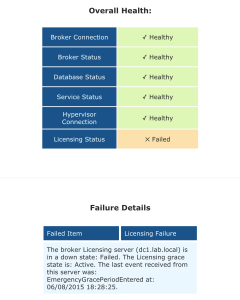
Health Check
Sacha Tomet Finally 1.0 – but never finalized!: XenApp & XenDesktop 7.x Health Check script has now Version 1.0.

Andrew Morgan – New Free Tool: Citrix Director Notification Service: The Citrix Director Notification service sits on an edge server as a service (or local to the delivery controller) and periodically checks the health of:
- Citrix Licensing.
- Database Connections.
- Broker Service.
- Core Services.
- Hypervisor Connections.
And if any of these items fall out of bounds, an SMTP alert is sent to the mailbox of your choice for action. The tool will also send “All Clear” emails when these items are resolved, ensuring you are aware when the service has resumed a healthy state.
If I use Remote Desktop Licensing Server on the Citrix Licensing Server, then I assume I would not be able to utilize the GSLB config of having all the servers the same name and not joined to the domain? What would be the ideal set up for Citrix License servers and Remote Desktop Licensing servers?
I usually put Remote Desktop licensing on my Delivery Controllers.
Hi Carl,
Hope you are doing well.
Currently we are facing issue with 7.6 LTSR, the issue is related with VDA server OS 2012 on which we have published application and using MCS on VMWare. whenever user open Citrix and click published application at that time user session not getting open and director shown Failure type: unavailable capacity and Failure reason: Not Machine available.
we checked on the same time at VDA server there is no high utilization of Memory, CPU, and Disk etc.
Requesting you please guide me how can I fix such kind of issue of unavailable capacity.
Regards,
Ilyas Ahmed
Do you have registered machines? Is the Load Index below 10000? What Load Evaluator rules do you have configured in your Citrix Policy?
Hi Carl,
Thanks for reply 🙂
Machines are registered when issue comes and we have not configured load evaluator rules in our environment using default one.
Hi Carl,
Thanks for reply ????
Machines are registered when issue comes and we have not configured load evaluator rules in our environment using default one.
Hey
We are having the same exact issue. Did you ever find a solution
hi carl, for profile management what is best practice for location setting for IE cookies and cache. I’ve followed all your UPM exclusions etc, on Windows 7 the default location is normally “%USERPROFILE%\AppData\Local\Microsoft\Windows\Temporary Internet Files but we save it to C:\temp\ie. If we choose the profile location would this bloat the profile?
Hi Carl, Just a quick question. We are looking to disable Web Access on our Citrix InfraStructure Servers.
Are there any impact if we disable it for PVS Servers, Delivery Controller, Director, StoreFront and SQL? I am not sure if the License server needs internet access?
Certificate revocation checking typically needs to be allowed to the Internet.
Hello Carl, Getting this error when attempting to launch an application from a 7.6 Site through a remote access portal. Internally everything works. Are we missing something at the Net Scaler level? Applications from a 7.8 site are working fine and were setup by a previous co-worker who is no longer here. We are not using StoreFront, only Web Interface for now..
The error message: Unable to launch your application. Contact your help desk with the following information: Cannot connect to the Citrix Xenapp server. The Citrix SSL server you have selected is not accepting connections.
Thanks,
Steve
I’m guessing the Gateway configuration is not setup correctly. Save the launch.ica file https://support.citrix.com/article/CTX115304 . Look for SSLProxyHost in the file and make sure it is correct.
cloud.northmemorial.com:443 is what it says. We have SSL front end then port 80 inside. Our network guy can see my connection hit 443 then switch to 80 after I launch a test app from our 7.8 environment, which is working. Not sure if the issue is on the NetScaler, Firewall, or 7.6 site for this new farm. The Gateway configuration no where shows any reference to knowing about the internal Citrix farms. Thanks in advance.
Hi Carl, whats best practices to upgrade Delivery Controler? First upgrade VDA´s?
If upgrade DDC from 7.6 to 7.6 (CU3) my VDA´s 7.6 will keep registred state?
Thanks!
Hi,
Thanks for all your help with our deployment.
We started off without enabling Personal vDisks, we now require some linked-clones that will persist MACHINE installations and customizations, I suppose the only way is PvD.
Any ideas the best way to enable PvD for some VDAs?
Regards
Another options is full clone persistent desktops.
I would avoid PvD since it will be replaced by Unidesk User Layers.
I am needing to perform the LTSR upgrade from 7.6.0 on our Controllers. Following your steps, are there any gotchas to look out for? Does this cause any downtime for a live healthcare environment?
Only for new connections. While the database is upgrading, users can’t connect.
How long of a downtime are we talking? a few minutes or seconds or 5 minutes or longer? I do not have a test controllers to try this on, or I would.
Depends on how you’re upgrading the database. If you are a sysadmin, then it will upgrade automatically and be quick. If not, then you have to generate SQL scripts and run some scripts to disable services while the DBA runs the SQL script.
So I started this upgrade tonight. I got to the second screen about “Ensure successful upgrade…” Do I really need to complete all 9 steps prior to doing the Controller upgrade? For instance, we have 3 sets of licenses, some dating back a couple years. Should I download and reapply all new ones before doing the upgrade? Upgrade Director before Controllers? Etc…
Thanks for all your help and everything you do for us Citrix Admins.
The license server needs to be the newest version. And the license file used by your site needs an SA date that hasn’t expired yet. Otherwise, the order doesn’t really matter.
On another note, I can see that it extracts the files to the c:\windows\temp\ctx* but that is as far as it gets
I have attempted to install on several different images. The only security software is McAfee proxy.
I do not see anything out of the norm. I see the “VDAWorkstationSetup_7.6.3000.exe *32” process start…..then stop. Logs are empty…I even deleted everything in %localappdata%\temp and nothing…..
Same problem on a clean machine? Any security software on this machine?
A little help with the VDA please….I have updated all of my component servers (License, DDC, PVS and Director) to 7.6.3000 however when I attempt to update the desktop image VDA, the installer starts then simply stops. I have tried using the Xendesktop ISO as well as the standalone installer. I have even copmletely removed the older VDA with the removal tool and still the 7.6.3000 VDA installer starts and abruptly stops…..any suggestions?
I think there’s a log somewhere. Maybe under %localappdata%\Temp?
Can you run procmon while launching it and look for anything unusual?
Hi Carl, wonderful blog!
Do you know if it is possible to set Citrix Director to see AppFlow (Insight Center) information per XD site?
Multisite is set here and we’d like to set it up so that “NETWORK” tab shows information according to the site selected.
And… could it be a problem in terms of WAN bandwidth?
Thanks a lot!!
Hi
Does anyone also have the Problem, that after the CU3 Update the MS Policy getting Empty after edit HDX Policies? I can reproduce that everytime. In the Edit Mode the Policies are set, but at the Overview -> Settings it is empty and it does not work anymore. Good that i had a Backup to restore it.
Are you saying that editing a domain GPO, adding a Citrix Policy setting, wipes out the entire GPO? Or is it just a display issue?
Yes thats correct. But it is not a Display issue, because after i did that i get immediatly calls, that Users are having problems. I could track it down to a GPO issue and saw, that the Settings were wiped out. It only happens, when i add or change a Citrix Policy. When i change Windows Policy, the Policy is still fine. It stands, “No Settings defined”. I had to Restore the GPO and the User needed to Log off and Log in again. If you want, i can show you.
It wipes out both the Citrix settings and the Windows settings?
Well, the Citrix Policy had not always showed up. So at this point i cant say much. But its completly empty.
Thats how it looks.
https://filedrop.everyware.ch/link/vcxbaq8NFQrnKky4GkIm6I
I created a new GPO, added a Microsoft Setting, added a Citrix Setting. The Microsoft setting is still there. The Citrix Policy is not showing in GPMC Settings tab but the setting is still there inside the policy.
I made the same now, by creating a new GPO. It looks like that its only affecting the existing GPOs.
You might have to call Citrix Support.
Yes, we will open a case. I was just wondering, if someone else have similar Issues. We never had an issue like that and the day after the Upgrade, this happend when i wanted to change a setting.
Thanks for checking it.
I had Contact with Citrix Support. After a week the called me today. It is a known issue. So I am not alone with that. Their Workaround is deinstall the GPMC, restart Server and install GPMC. It does not work for everyone. But I probably give it a try.
Could you please provide more details about the setup, like Controller Version upgrading from, What OS you are using? Are you using Server or Desktop OS VDA?
Unfortunately I cannot say anymore, what Version we had before. It was an Installation in August 2015 and it was XenApp 7.6. We are using Server OS VDA and all Servers are W2012R2.
This documentation states that License Server version 11.13.1 is LTSR CU1 Compatible: http://docs.citrix.com/en-us/xenapp-and-xendesktop/7-6-long-term-service-release/xad-whats-new.html. Our existing License Server is 11.13.1 build 15004. Do we have to upgrade to 11.13.1.2 build 16002?
Does the LTSR assistant check the license server version?
I ran LTSR Assistant and it says that 11.12.1 is the minimum for License Server as a “compatible” component. “Compatible” means it’s not eligible for LTSR benefits.
Thanks!