Navigation
This article applies to all versions, including 7.18, and 7.15
- Change Log
- Planning
- Server Prerequisites
- Server Installation/Upgrade 💡
- SQL Database
- Configuration Wizard
- Launch and Login
- Welcome Wizard
- Customer Experience Improvement Program (CEIP)
- Users
- Direct Import
- Install Capture
- Self Provisioning
- Solutions
Change Log
- 2018 June 6 – updated Install/Upgrade for AppDNA 7.18
- 2017 Dec 15 – in Install Capture sections, added link to Citrix Blog Post Speed Up AppDNA Install Capture by Using a Pre-captured Before Snapshot
Planning
Your Citrix License Server must have XenApp or XenDesktop Platinum Edition licenses. If you don’t have Platinum Edition licenses, then work with a Citrix Partner to perform AppDNA analysis.
AppDNA server should have the following:
- 12 GB of RAM
- 80 GB free disk space for up to 200 applications. 150 GB if more applications.
- Cannot be installed on a Delivery Controller. Must be a separate machine.
SQL Server:
- SQL 2008 R2, 2012, 2014, or 2016. SQL Express is not supported.
- AppDNA generates load on SQL during install (duration = few hours) and during import and analysis.
- See Optimize AppDNA > Optimize SQL Server at Citrix Docs.
- Disk space could easily be 20+ GB.
AppDNA can directly import and analyze .msi installers. For non-.msi installers, you’ll need a machine to capture the install process. The machine(s) should be the same operating system as what you are migrating from. The machine can either be directly accessible through a hypervisor, which means AppDNA can automate the capture process. Or it can be any machine where a user can perform Self Provisioning.
Server Prerequisites
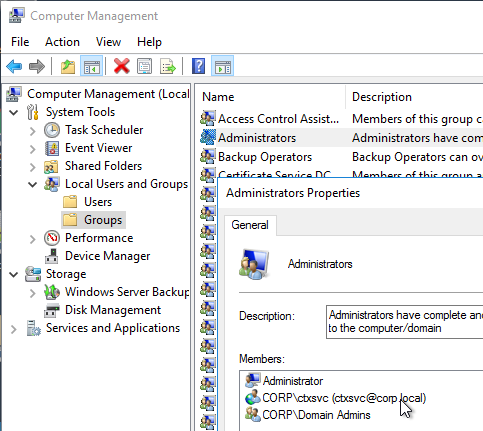
- On the AppDNA Server, open Computer Management. Edit the Administrators group, and add the service account.
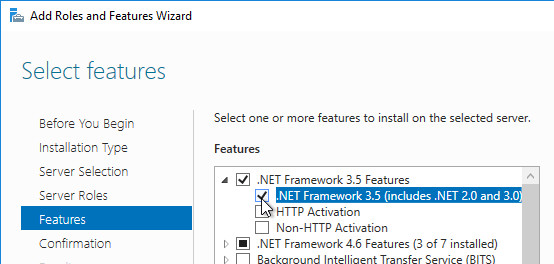
- In Server Manager, start the Add Roles and Features Wizard.
- In the Select features page, select .NET Framework 3.5. Click Next.
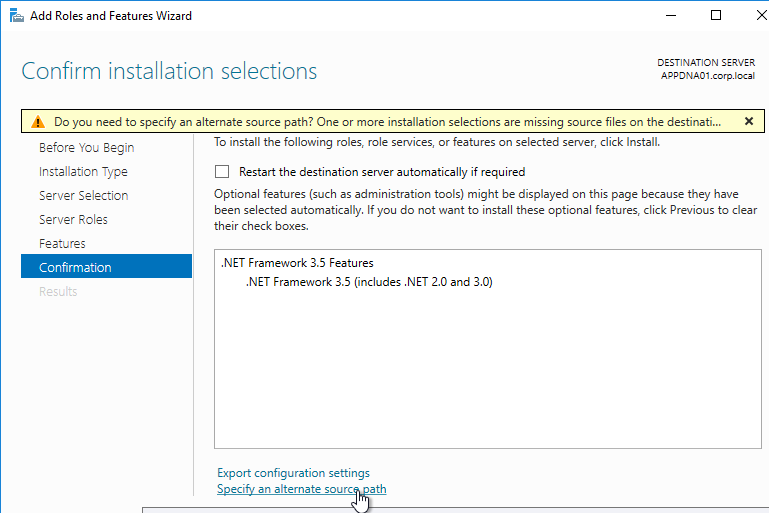
- In the Confirm installation selections page, click Specify an alternate source path.
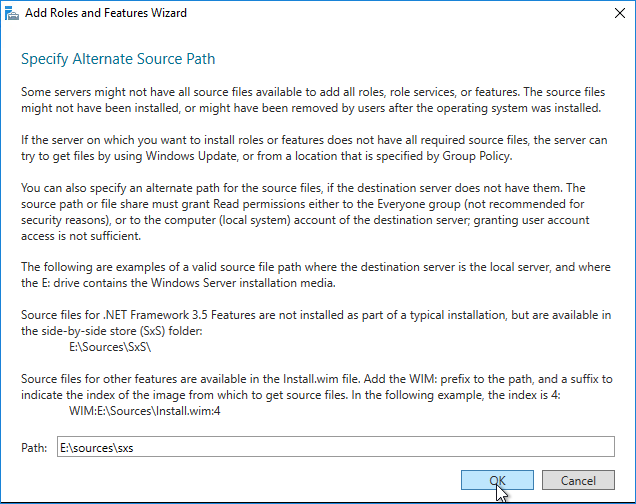
- Browse to the sources folder on the Windows Server 2012 R2 or newer DVD, and click OK.
- Click Install.
Server Installation/Upgrade
The same installation process is used for both new installs and upgrades.
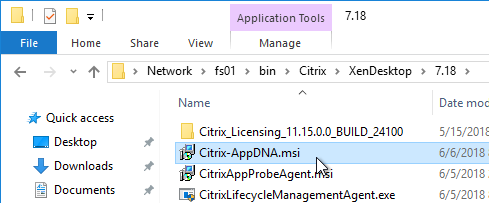
- On the AppDNA server, run the downloaded AppDNA 7.18 (Citrix-AppDNA.msi).
- It takes a few minutes to launch.
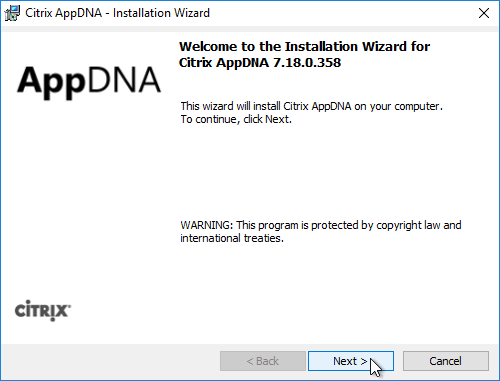
- In the Welcome to the Installation Wizard for Citrix AppDNA 7.18 page, click Next.
- In the License agreement page, select I accept the terms, and click Next.
- In the Citrix AppDNA Installation Type page, select Complete, and click Next.

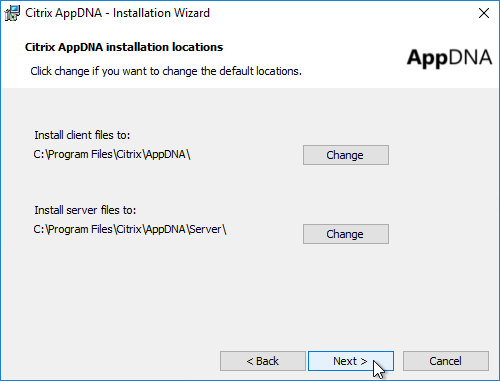
- In the Citrix AppDNA installation locations page, click Next.
- In the Ready to install Citrix AppDNA page, click Install.
- In the Installation Wizard Completed page, click Finish.
SQL Database
Instructions from CTP Eric Haavarstein Configure Citrix AppDNA 7.11 in Minutes instead of Hours:
- If you are upgrading an existing installation, then skip to the Configuration Wizard.
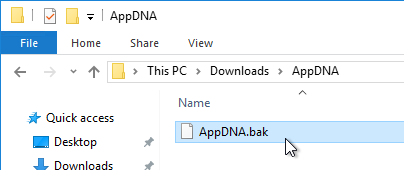
- If this is a new installation, on the AppDNA server, go to C:\Program Files (x86)\Citrix\AppDNA\Server\Bin, and extract the AppDNA.bz2 file.
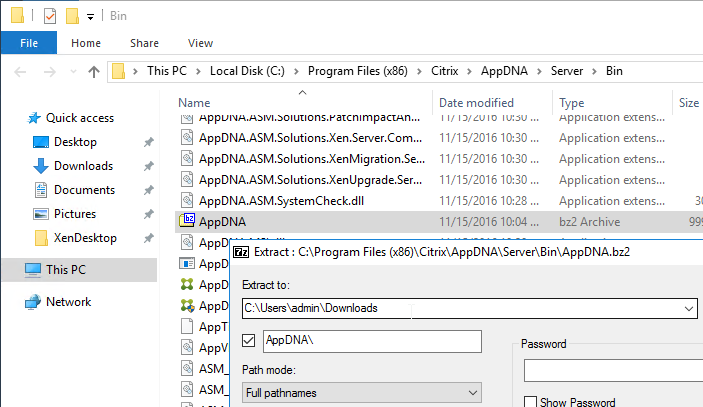
- Rename the extracted file with a .bak extension.
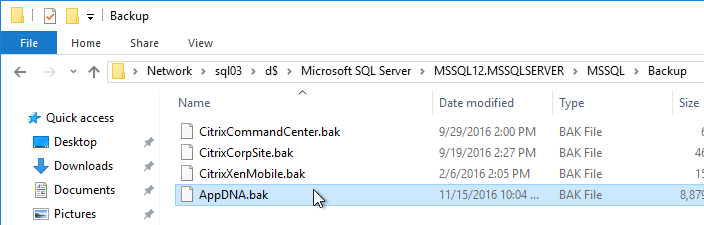
- Copy the file to the backup folder on the SQL server.
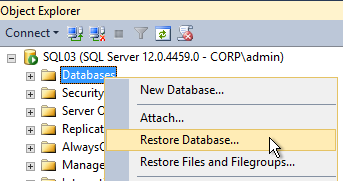
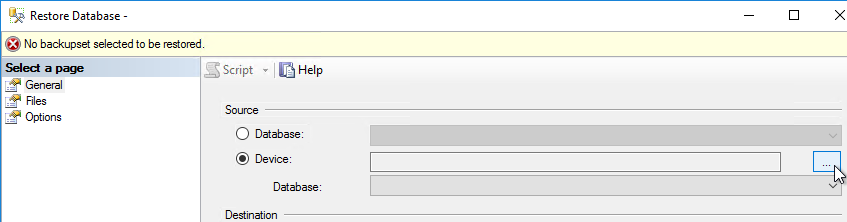
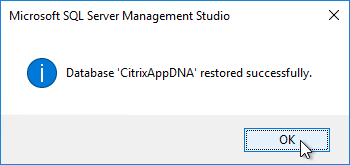
- In SQL Studio, right-click Databases, and click Restore Database.
- Change the Source to Device, and click the ellipsis.
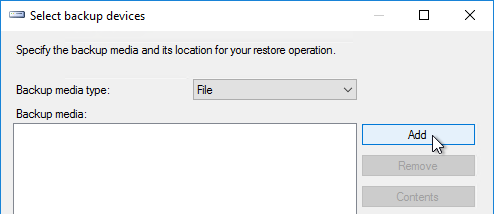
- Click Add.
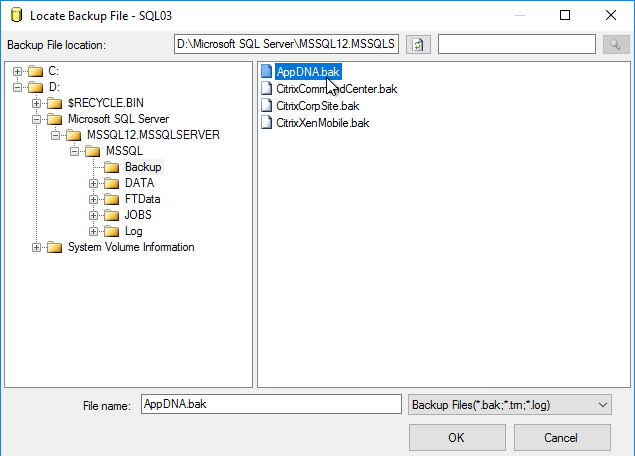
- Select the AppDNA.bak file, and click OK twice.
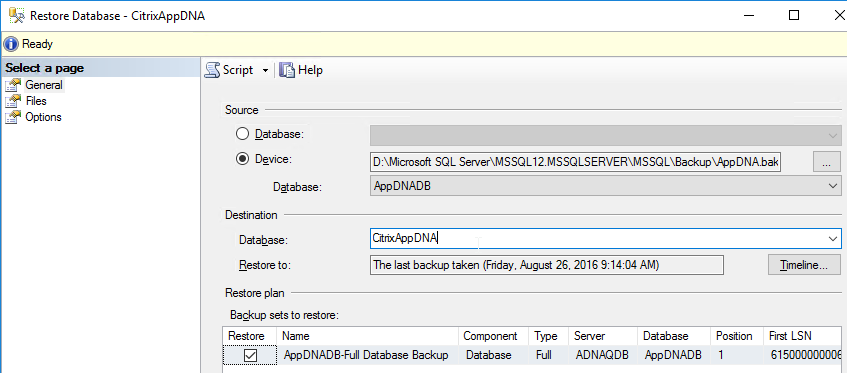
- Change the destination database name as desired, and click OK to begin the restore.
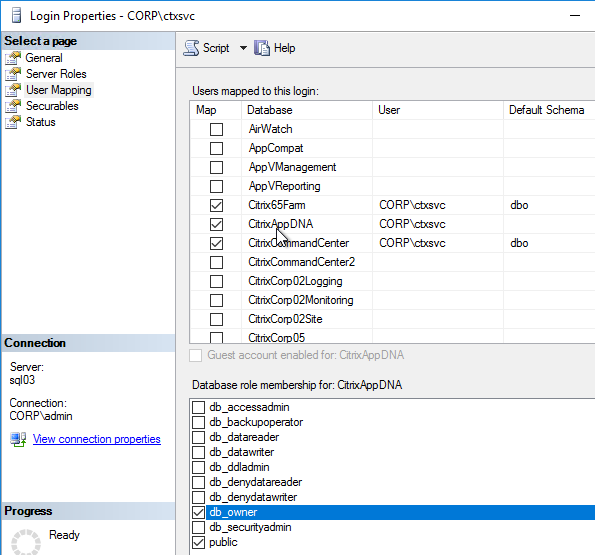
- Add a service account to SQL logins.
- On the Server Roles page, add the service account to the bulkadmin role.
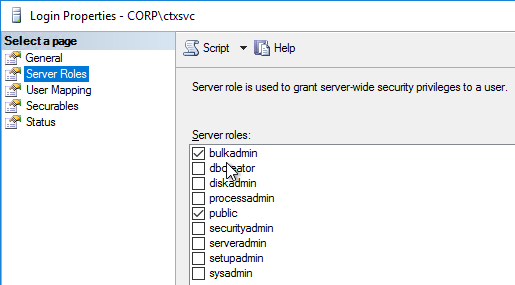
- Give the service account db_owner permission to the AppDNA database.
Configuration Wizard
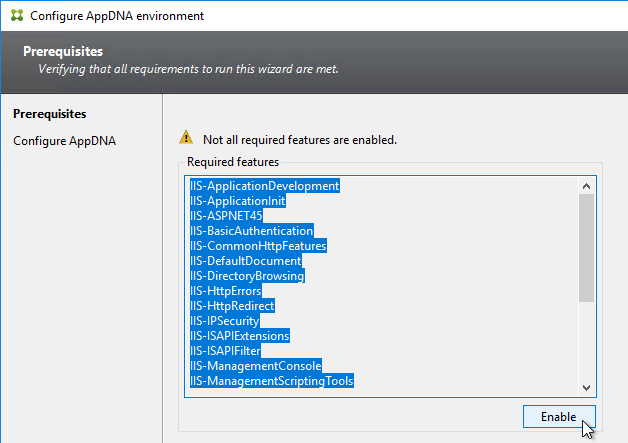
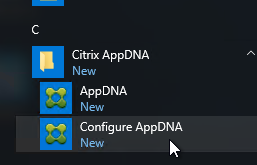
- The Configuration wizard launches. Or you can launch Configure AppDNA from the Start Menu.
- In the Prerequisites page, click Enable.
- In the Configure AppDNA page, if you are upgrading, select the Upgrade installation option, and click Next. The remaining wizard screens will be different but similar.

- Or leave it set to Configure new installation, and click Next.
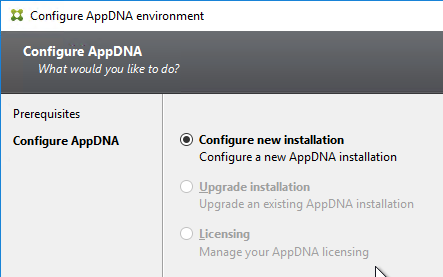
- Or leave it set to Configure new installation, and click Next.
- If you are upgrading, on the Choose database page, after selecting your database and clicking Next, if you see a message about Subscription Advantage expiration, click OK, and go back a couple pages.
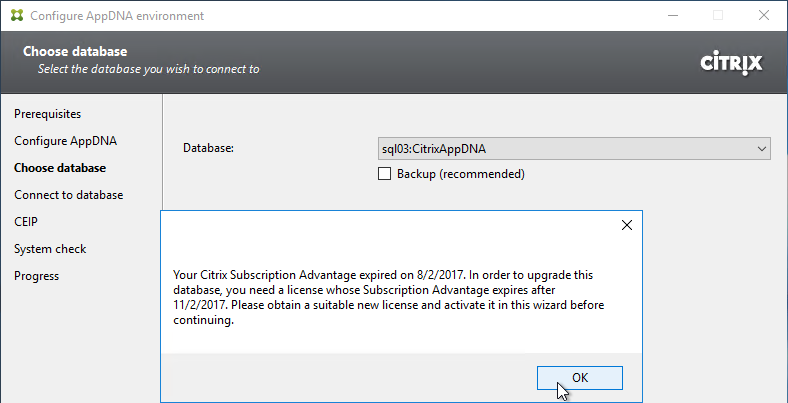
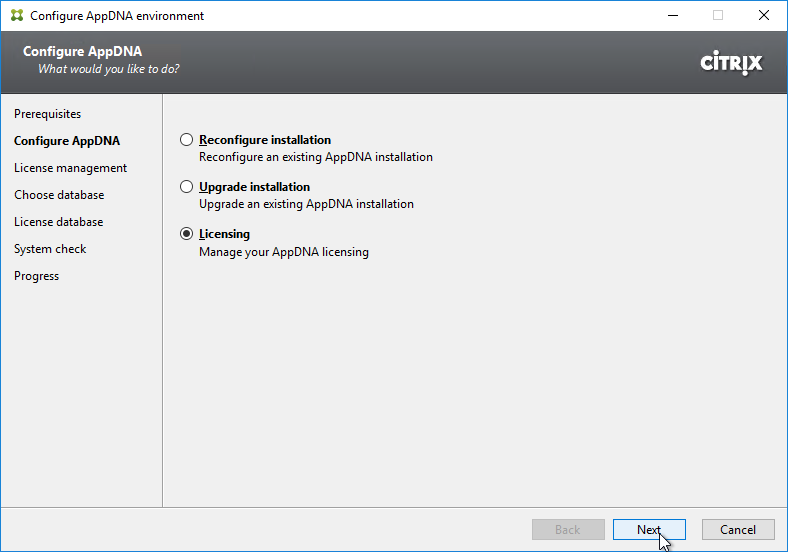
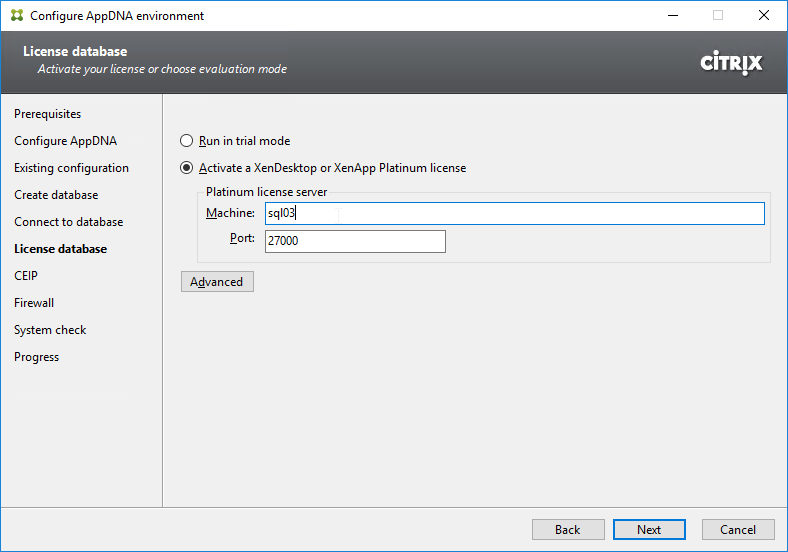
- Back on the Configure AppDNA page, change the selection to Licensing, and click Next.
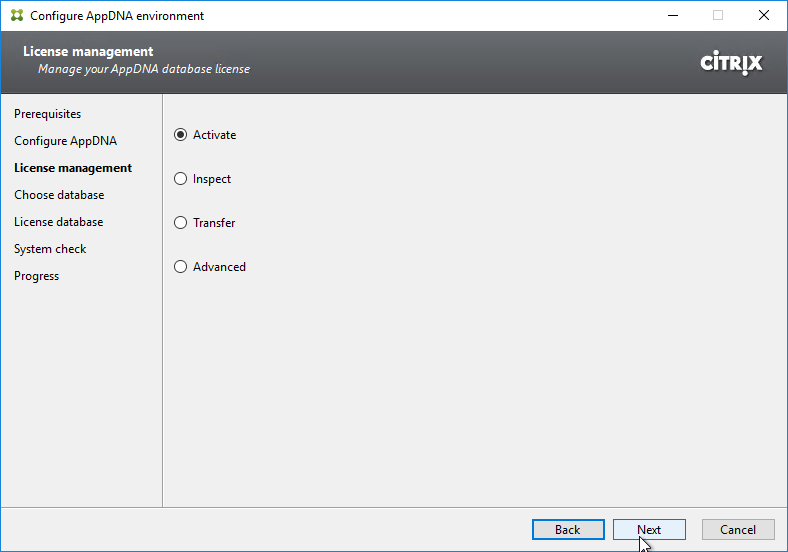
- In the License management page, leave the selection set to Activate, and click Next.
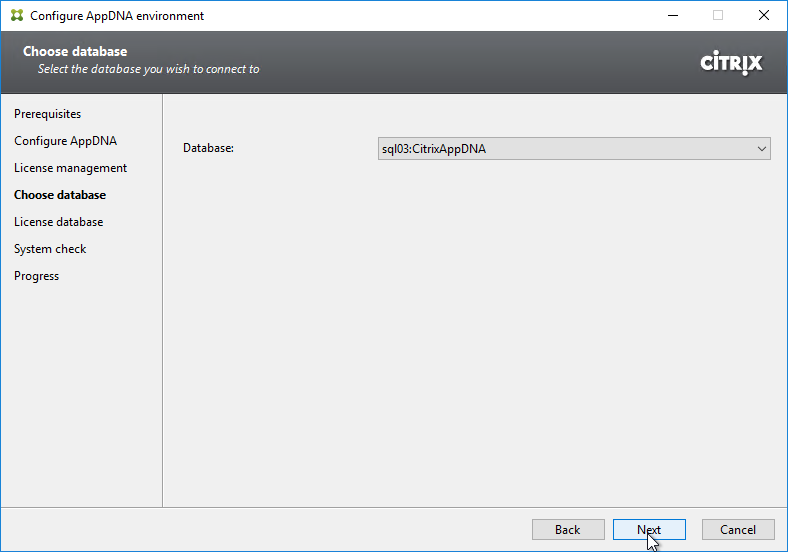
- In the Choose database page, click Next.
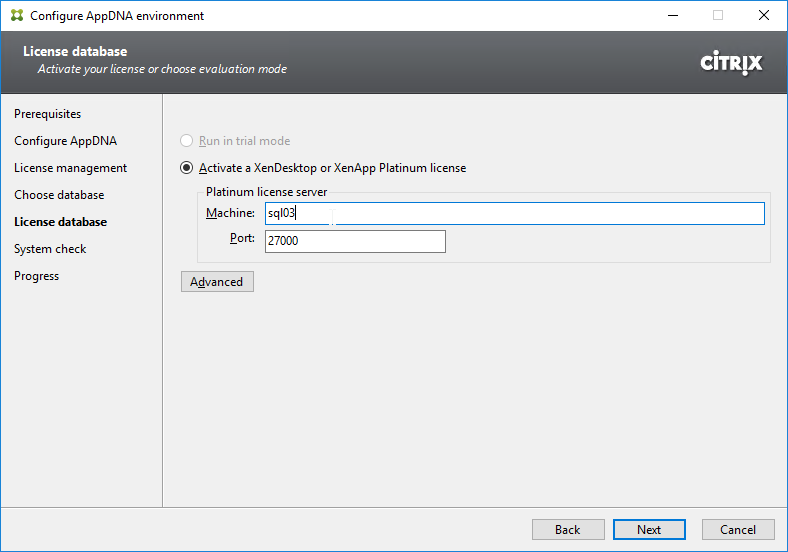
- In the License database page, enter your license server name, and click Next.
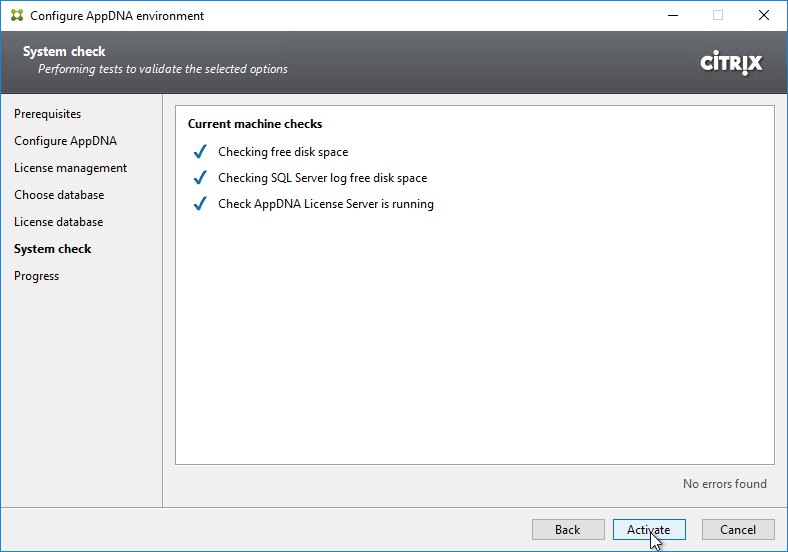
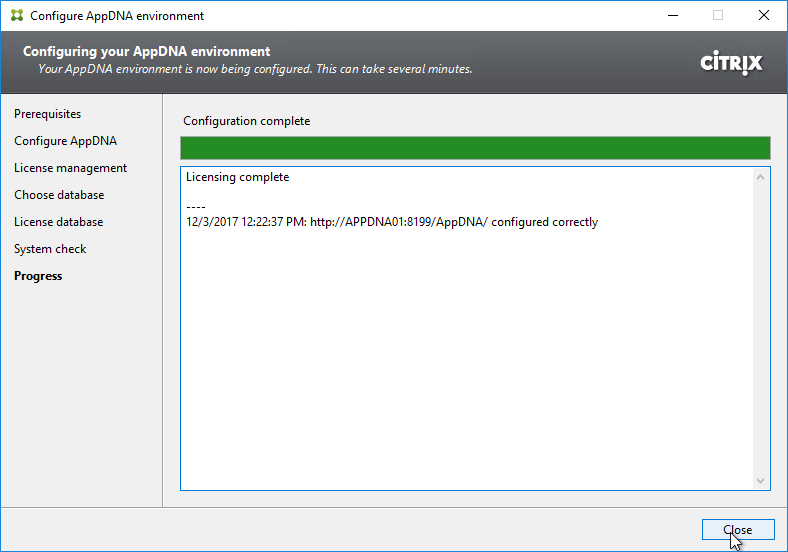
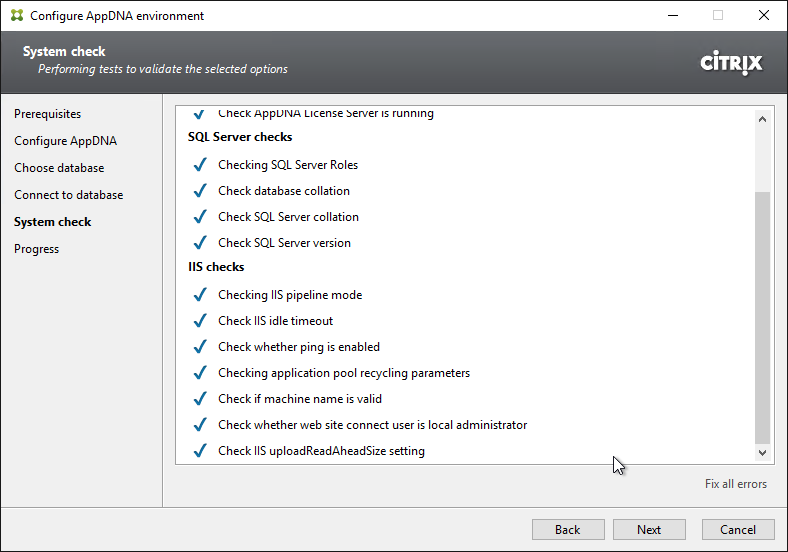
- In the System check page, click Activate.
- In the Progress page, click Close, which closes the wizard.
- Relaunch the Configure AppDNA wizard and attempt the upgrade again.
- Back on the Configure AppDNA page, change the selection to Licensing, and click Next.
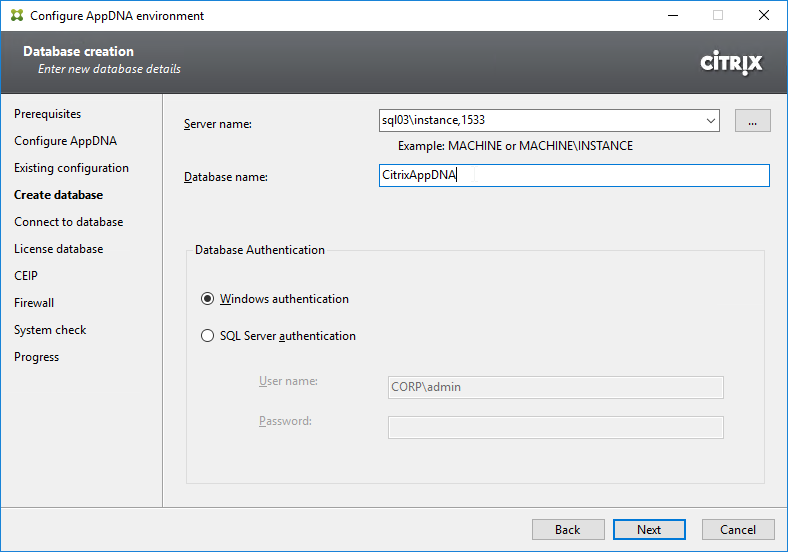
- If this is a new installation, in the Create database page, enter the SQL server name, enter the database name, and click Next. Note: in order for the Configure AppDNA wizard to create the database, the person running the wizard must have sysadmin permissions on the SQL Server.
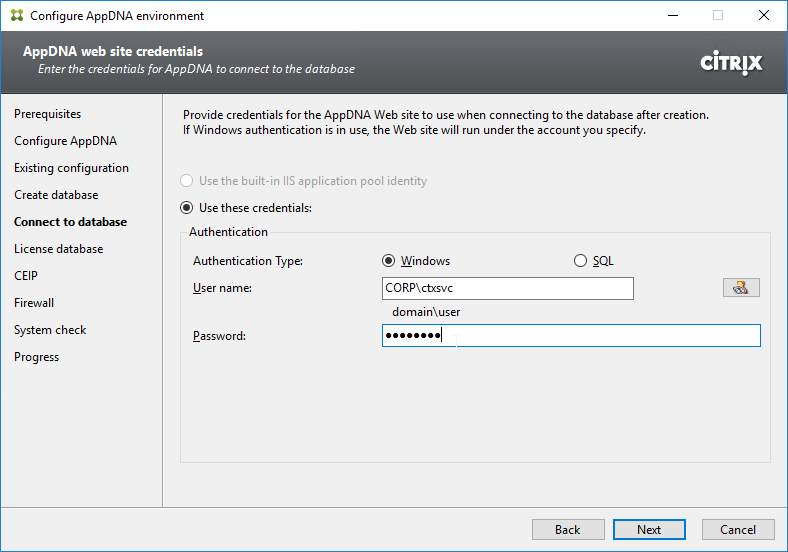
- In the Connect to database page, enter the credentials of your service account, and click Next. AppDNA will use this service account to connect to the database.
- If this is a new installation, in the License database page, enter the address of a Citrix License server that has XenApp/XenDesktop Platinum Licenses, and click Next.
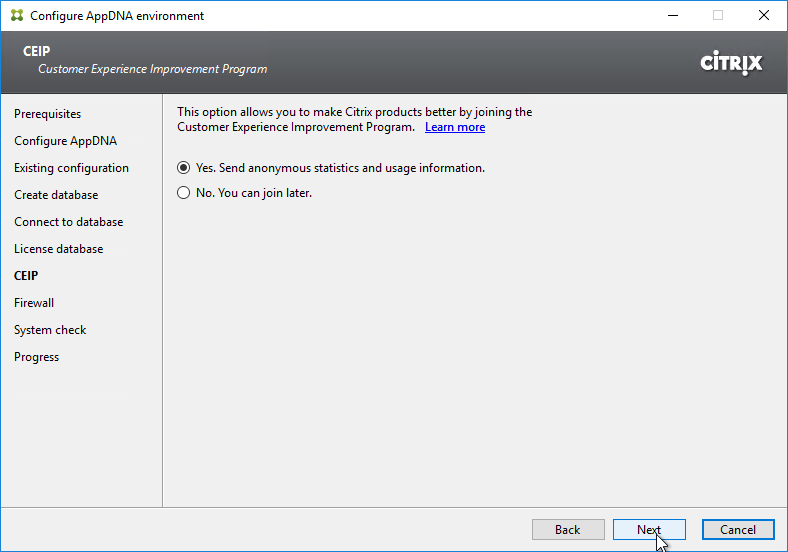
- In the CEIP page, make a selection, and click Next.
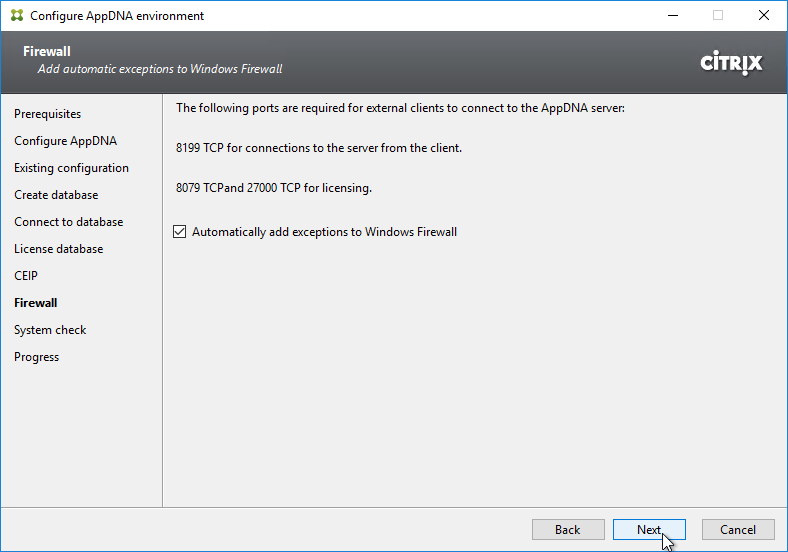
- In the Firewall page, click Next.
- In the System check page, click Fix next to any errors it finds. Then click Next, Configure, or Upgrade.
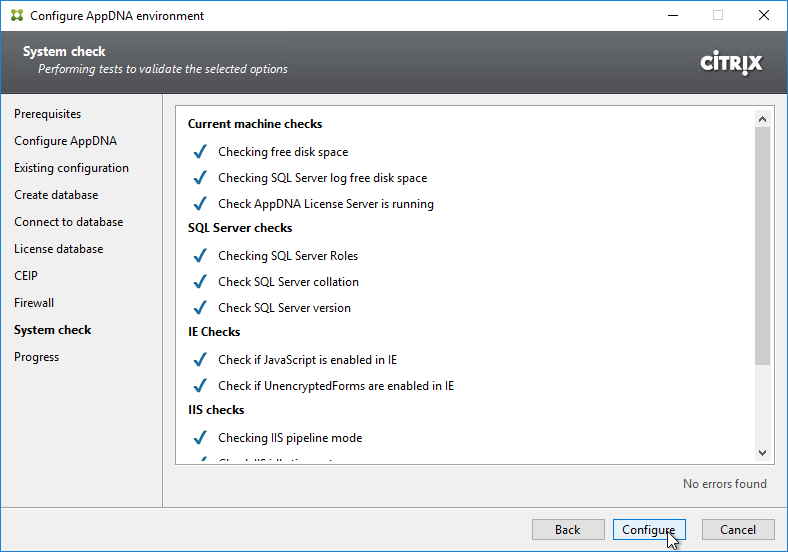
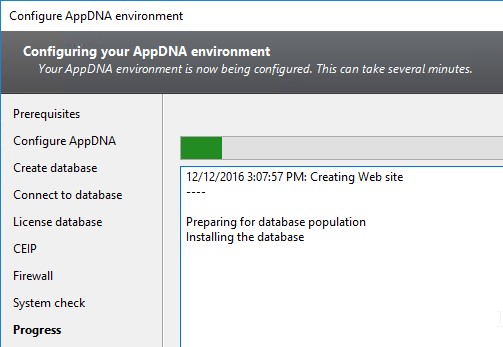
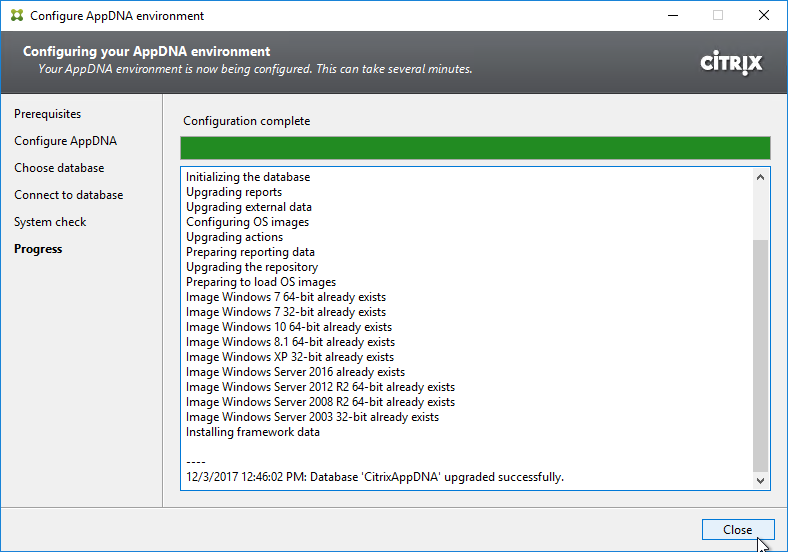
- It will take several minutes to update the database.
- Click Close when done.
- See Optimize AppDNA > Optimize IIS at Citrix Docs.
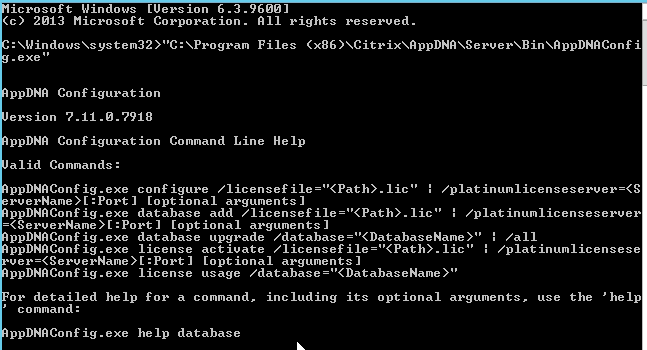
Note: Database and License Configuration can also be run from the command line: “C:\Program Files (x86)\Citrix\AppDNA\Server\Bin\AppDNAConfig.exe”
Logging
CTX219766 Understanding Logging in AppDNA explains how to enable the various logs, and where to find the logs.
- Verbose logs
- On the client
- On the server, including Configuration Wizard
- QueueProcessor Verbose logs
- Event logs
- Application Import logs
- Other miscellaneous logs
SSL/TLS
See Citrix CTX222781 Configuring AppDNA for SSL/TLS:
"%windir%\system32\inetsrv\appcmd.exe" set config -section:system.webServer/serverRuntime /uploadReadAheadSize:"104857600" /commit:apphost- Import a certificate, and in IIS, bind it to the Default Web Site.
- Edit the file C:\Program Files\Citrix\AppDNA\Server\web.config. Adjust ReportBaseUrl to https and port 443.
- Configure the AppDNA Client to connect using https.
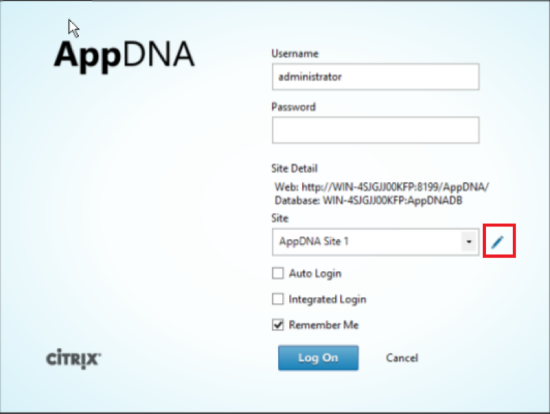
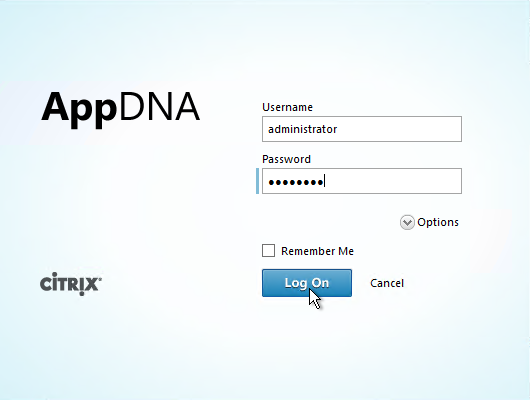
Launch and Login
- Launch AppDNA from the Start Menu.
- Login as administrator and apps3cur3.
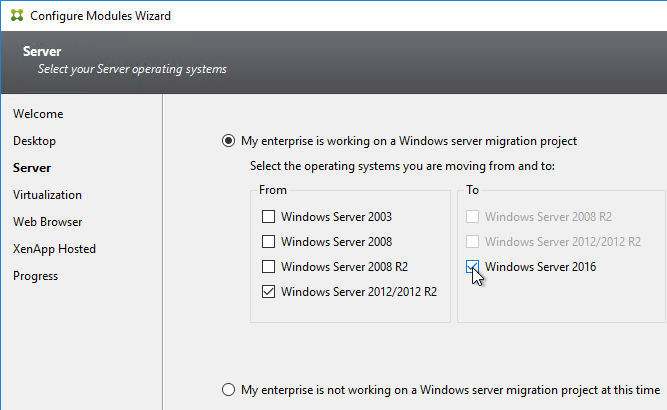
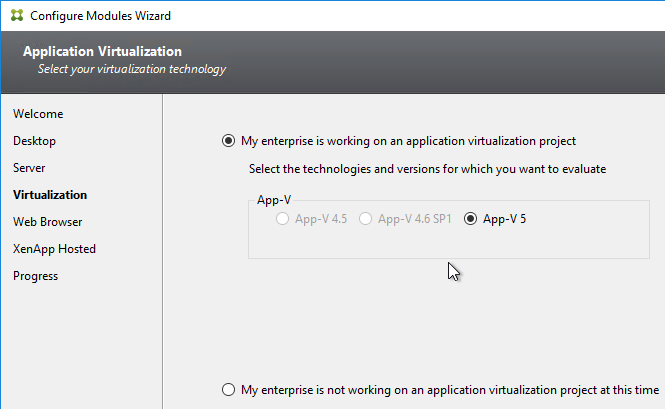
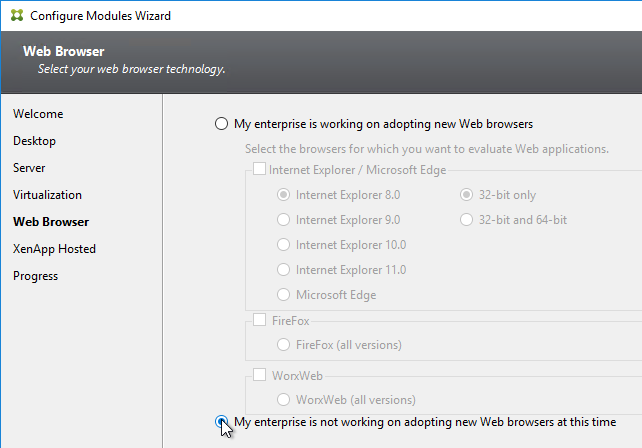
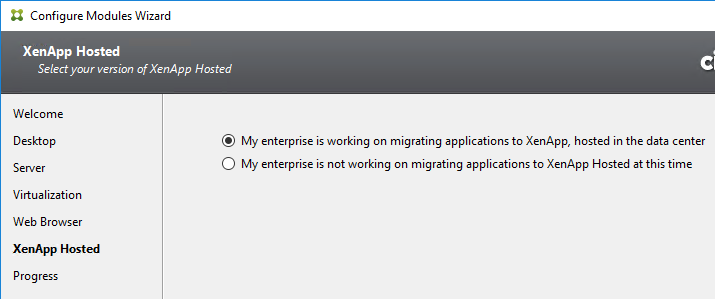
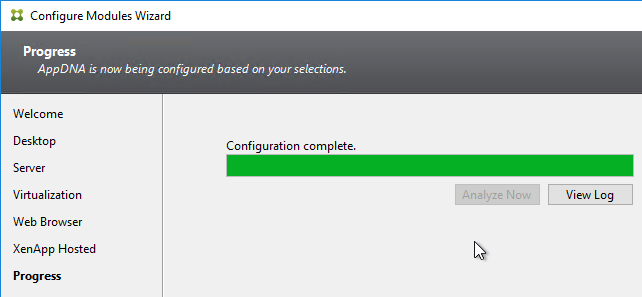
Configure Modules Wizard
- In the Welcome page, click Next.
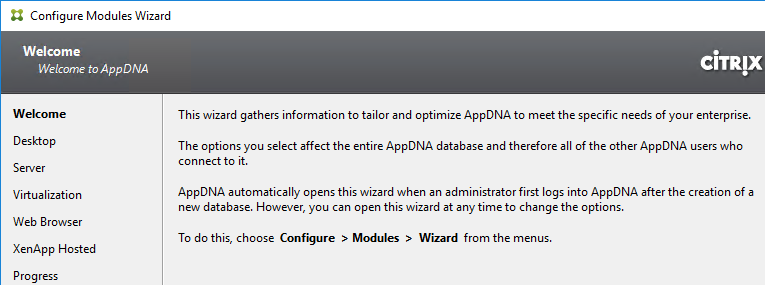
- This wizard lets you select which modules to enable. The more modules you enable, the longer it takes to analyze an application. Go through each page and make your selections.

- AppDNA 7.11 and newer support analysis of Windows Server 2016.
- Then click Configure.
- And click Close.
- AppDNA 7.9 adds a new Compliance Manager module. The module was enhanced in AppDNA 7.14 to check for FIPS compliance, NTLM, and Credential Guard.
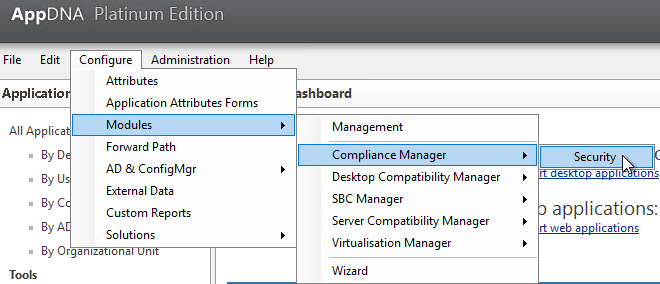
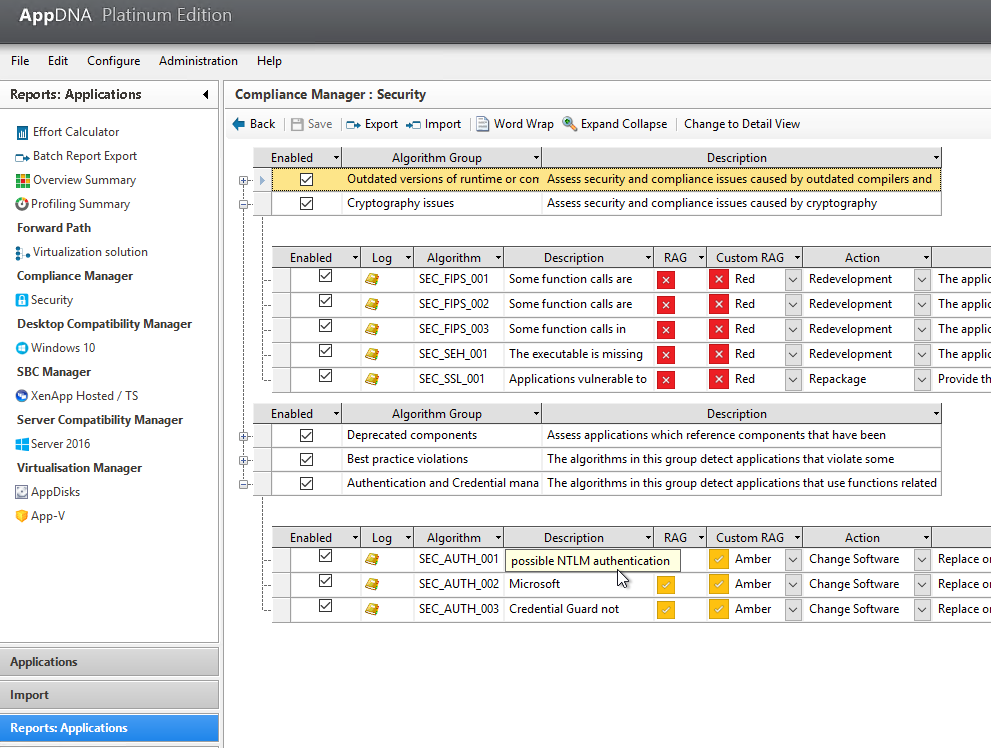
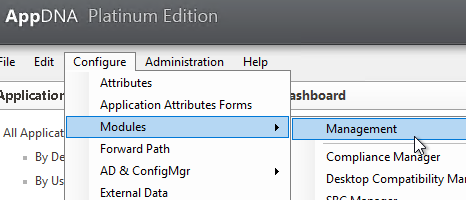
- You can use the Module Manager (Configure > Modules > Management) to see what each module is checking for.
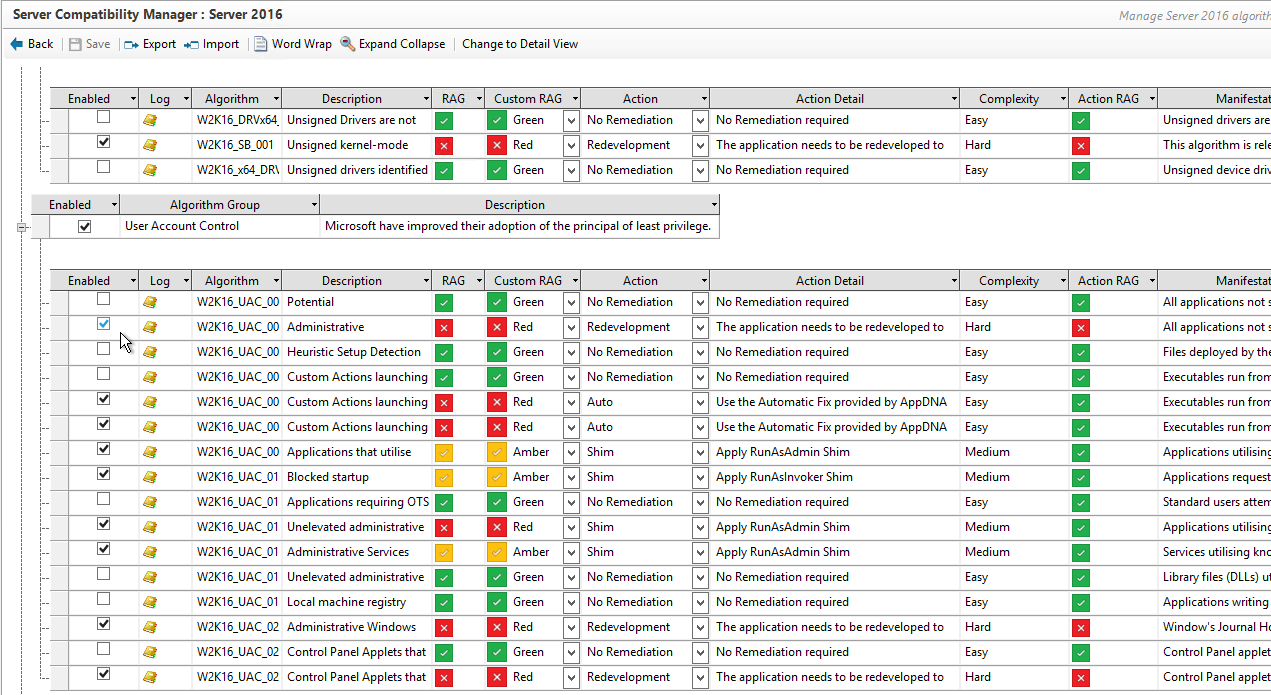
- Click Groups next to one of the modules.
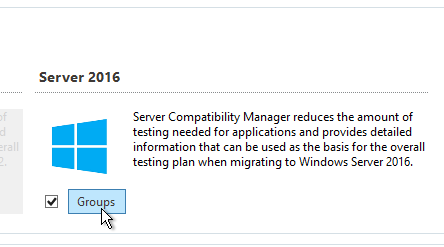
- Notice that not every analysis rule is enabled.
Customer Experience Improvement Program
Do the following to disable CEIP:
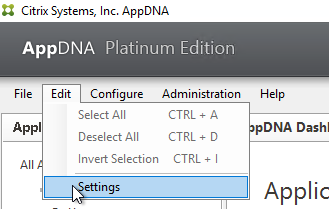
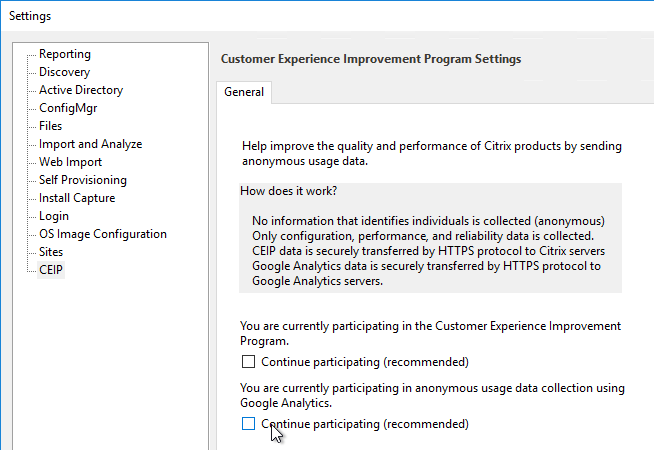
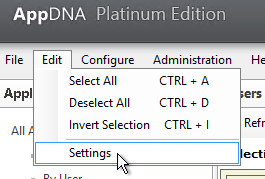
- Open the Edit menu, and click Settings.
- On the CEIP page, uncheck both boxes next to Continue participating. Click Save. Google Analytics was added in AppDNA 7.16.
- See https://www.carlstalhood.com/delivery-controller-7-16-and-licensing/#ceip for additional places where CEIP is enabled.
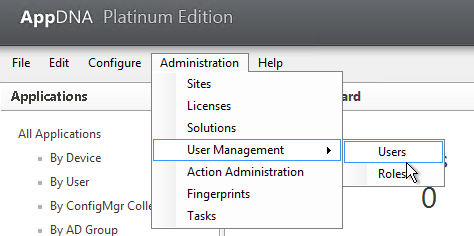
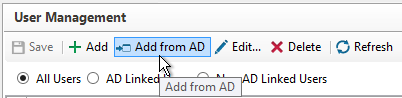
Users
- Open the Administration menu, expand User Management, and click Users.
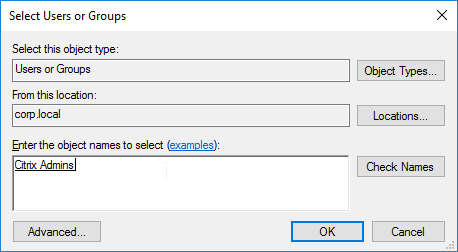
- In the toolbar, click Add from AD.
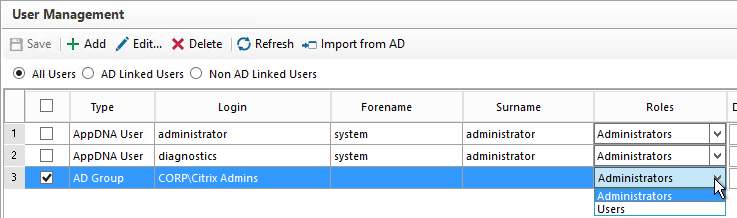
- Select your Citrix Admins group, and click OK.
- On the right, notice that Administrators role is selected by default.
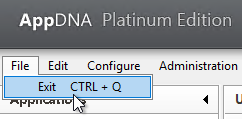
- Open the File menu and click Exit.
- Launch AppDNA again.
- On the login page, click Options.

- You can check the box next to Integrated Login and click Log On.

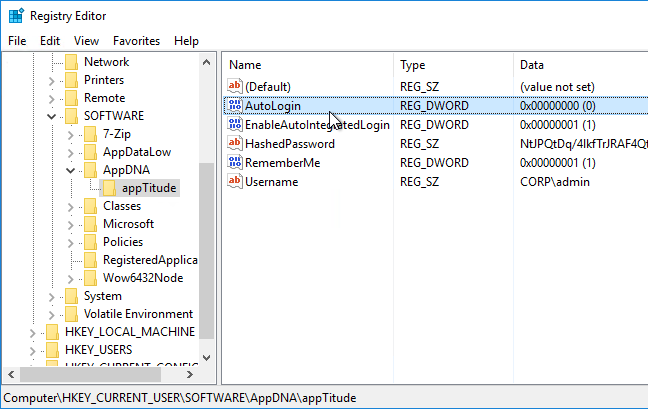
- Note: if you enable Auto Login and want to disable it, edit the registry.
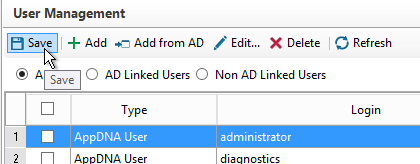
- Go back to Administration > User Management > Users.
- Edit the administrator account.

- And change its password.

- Then click Save.
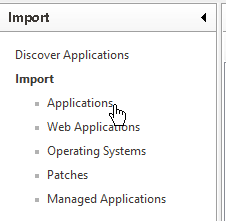
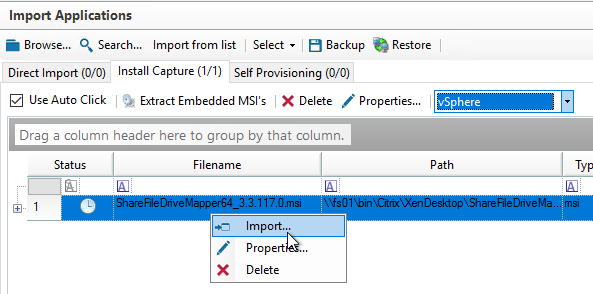
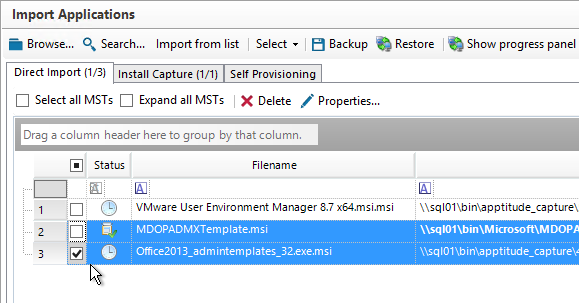
Direct Import
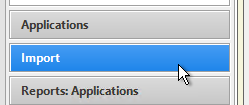
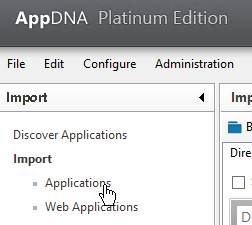
- Switch to the Import workspace.
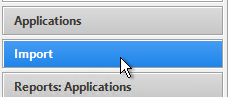
- On the left, under Import, click Applications.
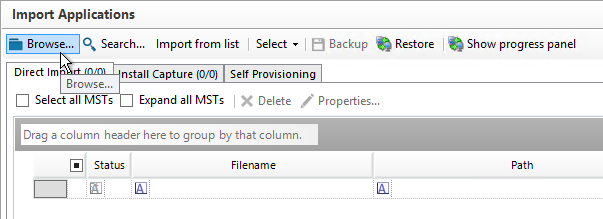
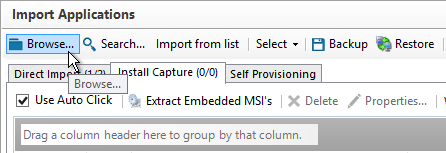
- On the right, switch to the Direct Import tab.
- Click Browse in the toolbar. Then browse to an .MSI file.
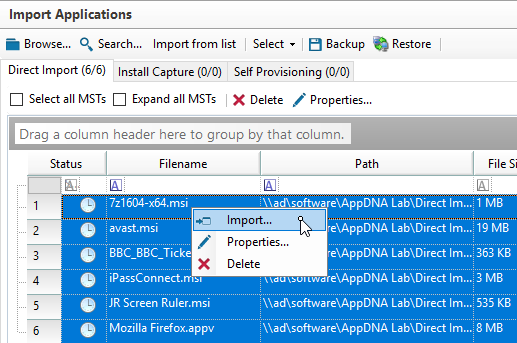
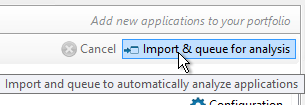
- The .msi files are shown in the list. Select one or more, right-click, and click Import to begin analysis.
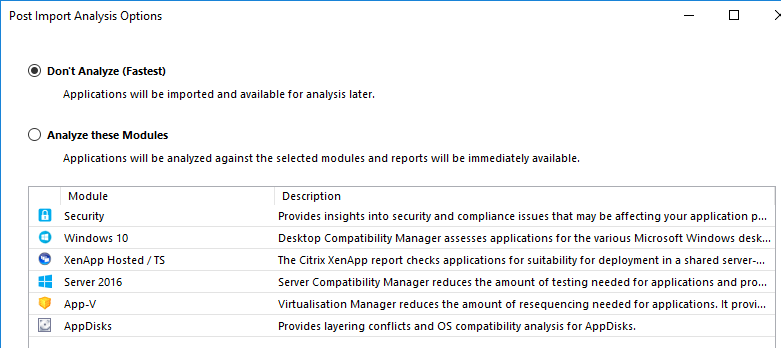
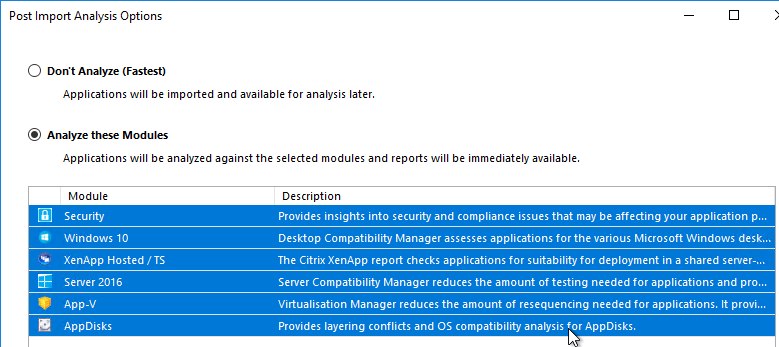
- You can select one or more modules for analysis. Note: it might take a few seconds for the list to appear. Click Import.
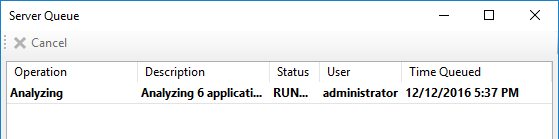
- The Server Queue is displayed. If needed, you can cancel a task in the Server Queue.
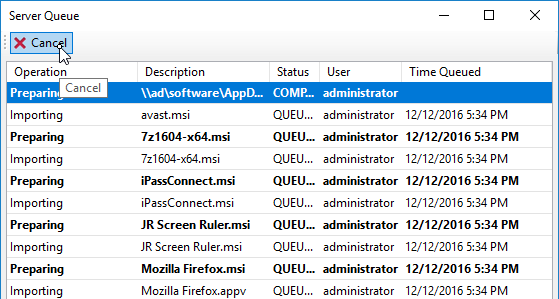
- If you close the Server Queue, you can reopen it by clicking the View Server Queue link on the bottom right.

- Analysis is performed against the modules you selected.
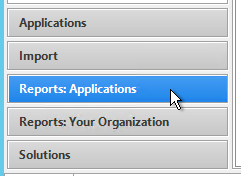
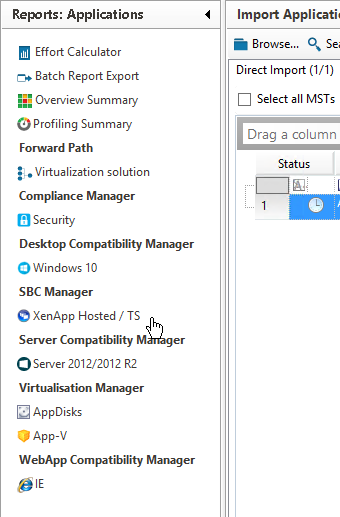
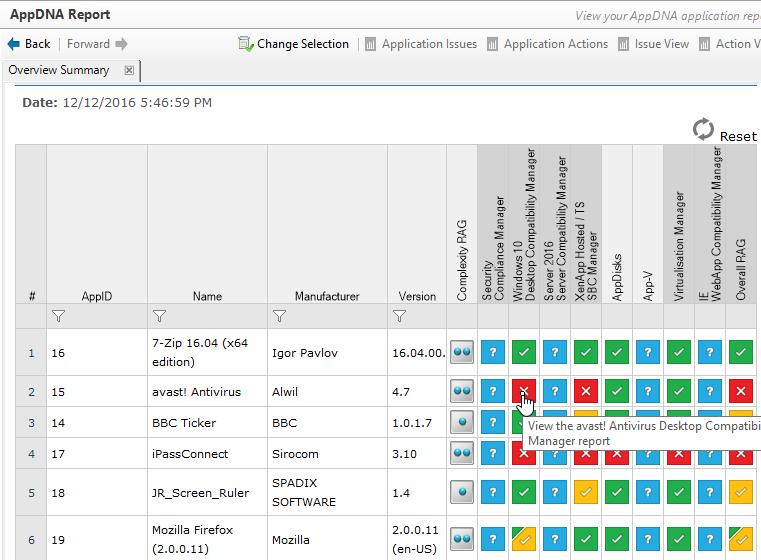
- After analysis is complete, switch to the Reports: Applications workspace.
- On the left, select a report you want to view.
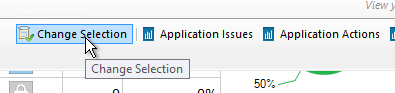
- You might be prompted to select applications. If you want to change this selection later, there’s a Change Selection button on the toolbar.
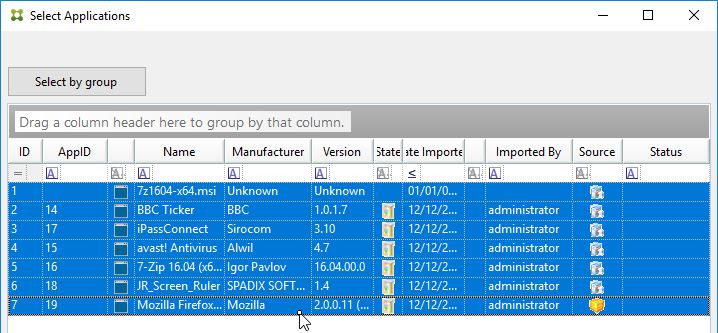
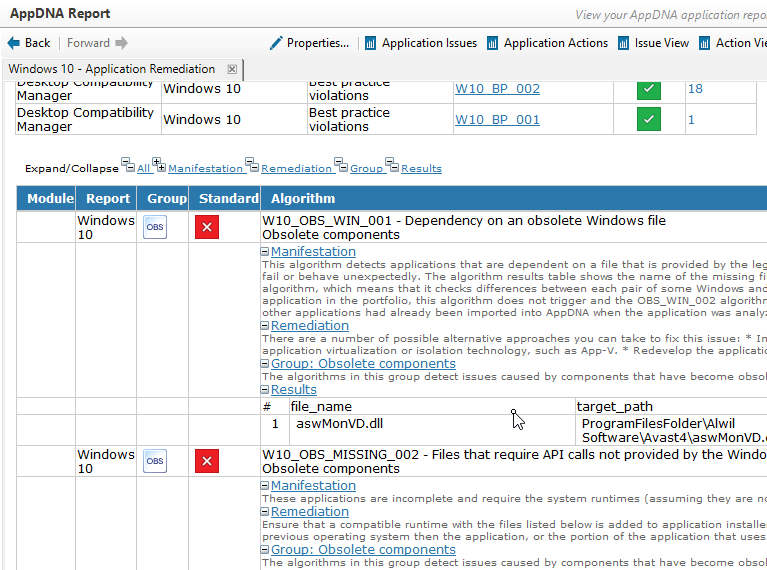
- The report displays a list of applications with color coding. Click the colored boxes to view more details.
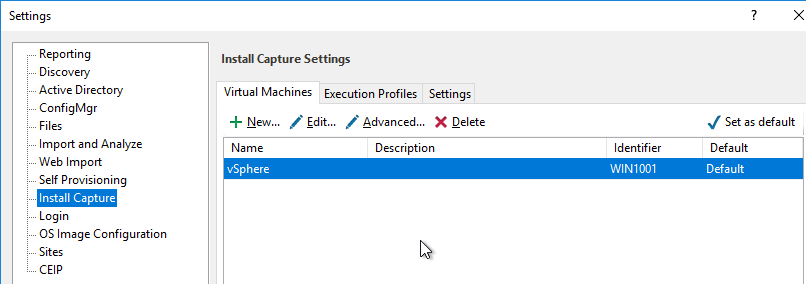
Install Capture
Install Capture lets you import application installers that are not available as MSI files. AppDNA uses a hypervisor connection to automate the Install Capture process. Alternatively, you can do a manual capture using the Self Provisioning process.
Prepare Install Capture Machine
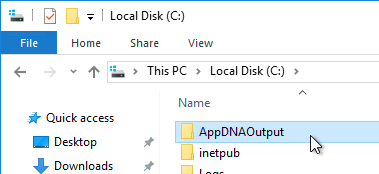
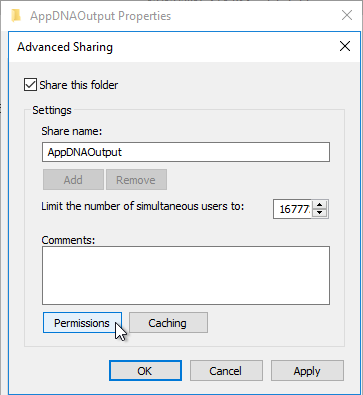
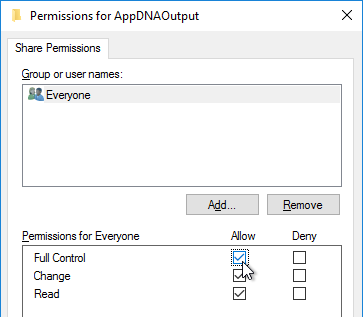
- Create a share on the AppDNA machine. The captured data is stored in this share.
- The operating system of the Install Capture machine should match the operating system version you are migrating from.
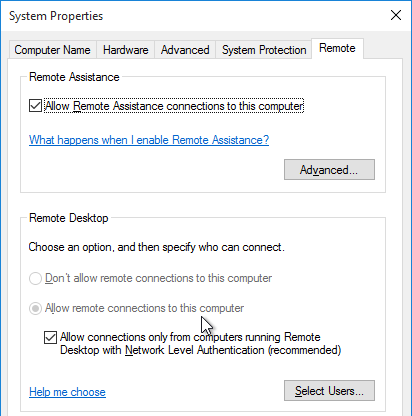
- On the Install Capture machine, make sure Remote Desktop is enabled.
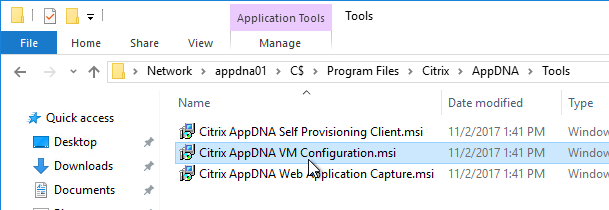
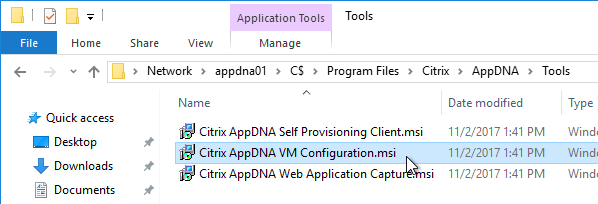
- On the Install Capture machine, browse to the AppDNA server in the \\AppDNAServer\C$\Program Files\Citrix\AppDNA\Tools folder, and run Citrix AppDNA VM Configuration.msi.
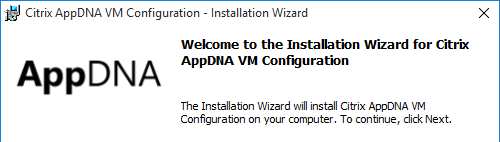
- In the Welcome to the Installation Wizard for Citrix AppDNA VM Configuration page, click Next.
- In the License Agreement page, select I accept the terms and click Next.
- In the Ready to Install the Program page, click Install.
- In the Installation Wizard Completed page, click Finish.
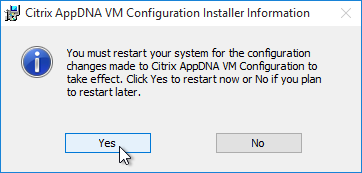
- Click Yes when prompted to reboot.
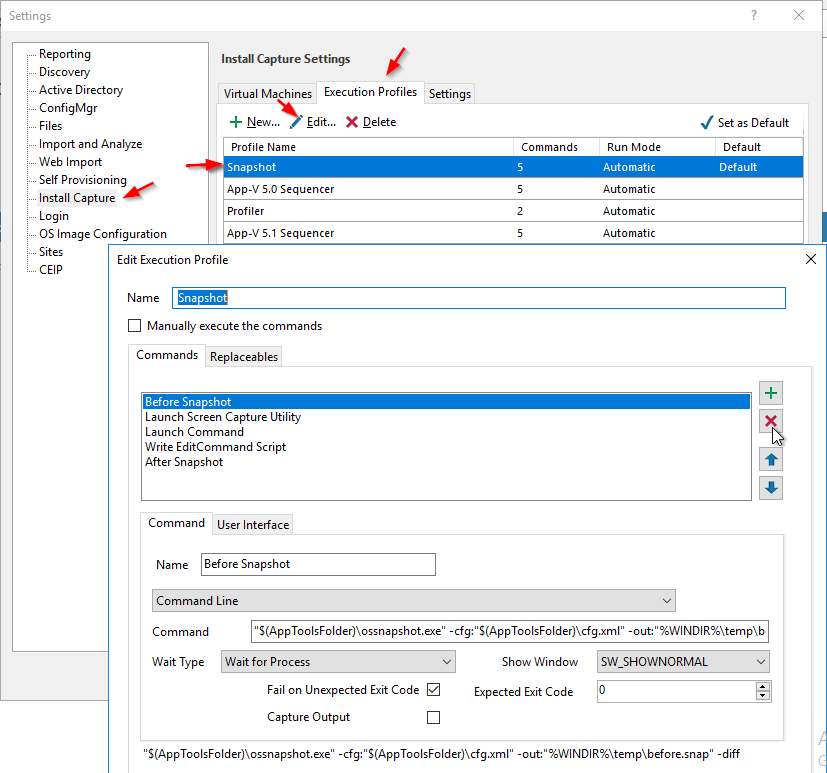
- Citrix Blog Post How to Speed Up AppDNA Install Capture by Using a Pre-captured Before Snapshot details how to take an Install Capture Snapshot manually, store it in the Install Capture machine, and then configure the Install Capture profile to skip taking an Install Capture snapshot. This Install Capture snapshot process is separate from hypervisor snapshot.
"C:\Program Files\Citrix\AppDNA\VM Configuration\ossnapshot.exe" -cfg:"C:\Program Files\Citrix\AppDNA\VM Configuration\cfg.xml" -out:"c:\windows\temp\before.snap" -diff
- You can either take a snapshot now, or AppDNA will do it for you.
Configure AppDNA for Install Capture
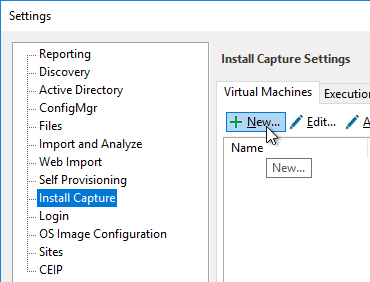
- In the AppDNA Console, open the Edit menu and click Settings.
- On the left, switch to the Install Capture page.
- On the right, click New.
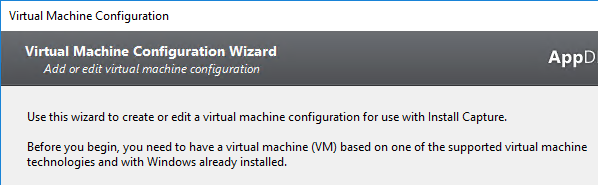
- In the Virtual Machine Configuration Wizard page, click Next.
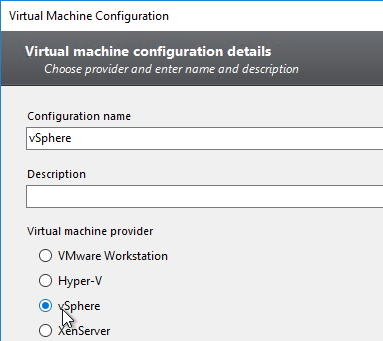
- In the Virtual machine details page, give the configuration a name.
- Select vSphere and click Next.
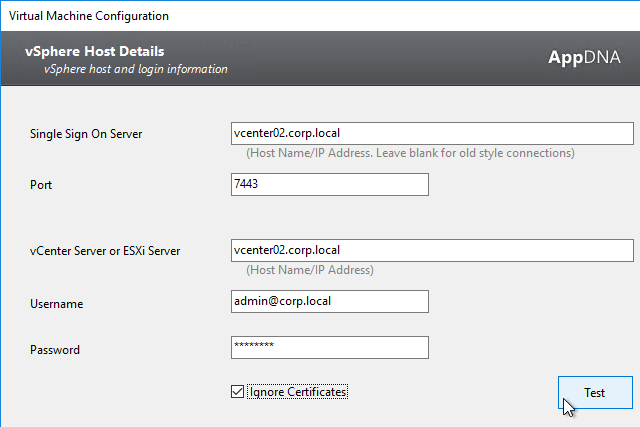
- In the vSphere Host Details page, in the Single Sign-on Server field, enter the Platform Services Controller hostname
- In the Port field, enter 7443.
- In the vCenter Server field, enter the hostname of the vCenter server.
- Enter credentials that can snapshot and perform power operations on the Install Capture machine. Click Test and then click Next.
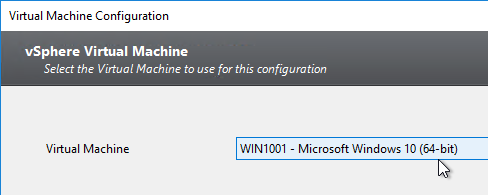
- In the vSphere Virtual Machine page, in the list of machines, select the Install Capture machine and click Next.
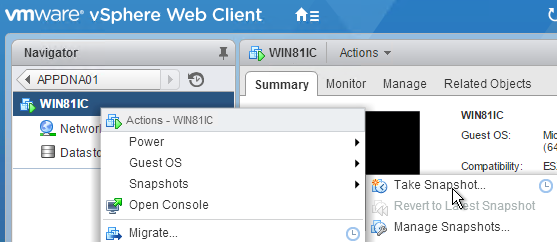
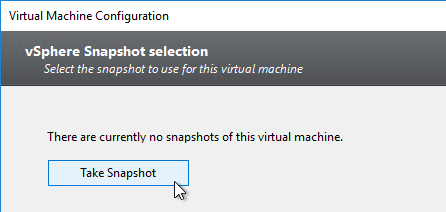
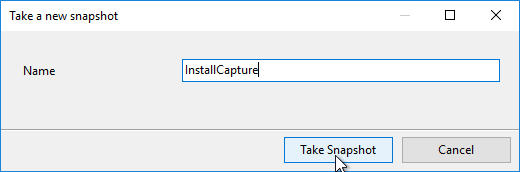
- In the vSphere Snapshot selection page, if there are no snapshots, click Take Snapshot.
- Click Test. At least confirm that the machine can be reverted to snapshot. Don’t worry if the console doesn’t open. Click Next.

- In the Virtual machine connection page, enter the hostname of the Install Capture machine, and click Test. Note: the RemoteAdmin.exe process only runs while somebody is logged into the machine. Click Next.
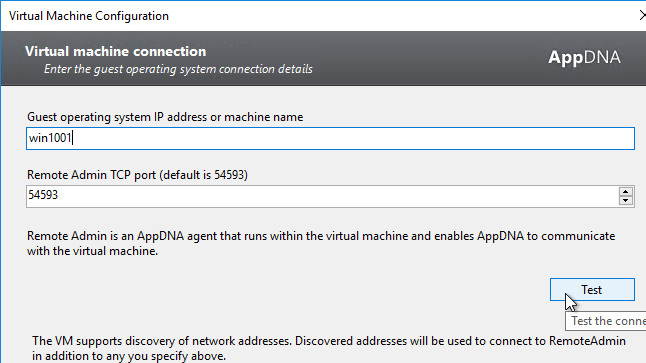
- In the Capture output location page, enter the UNC path to the file share on the AppDNA server, and click Test. Then click Next.

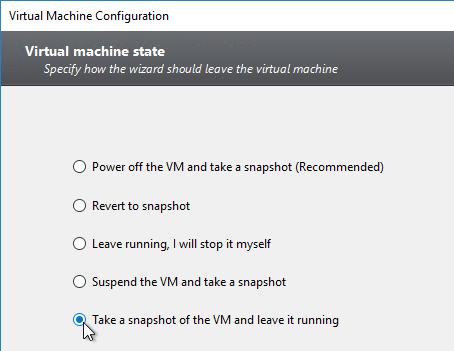
- In the Virtual machine state page, make a selection, and click Next.
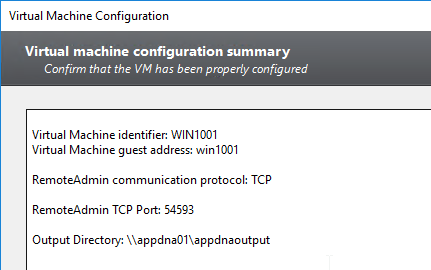
- In the Virtual machine configuration summary page, click Finish.
- Citrix Blog Post How to Speed Up AppDNA Install Capture by Using a Pre-captured Before Snapshot details how to take an Install Capture Snapshot manually, store it in the Install Capture machine, and then configure the Install Capture profile to skip taking an Install Capture snapshot. This Install Capture snapshot process is separate from hypervisor snapshot.
- Click Save to close the Settings window.
Perform Install Capture
- Switch to the Import workspace.
- On the left, under Import, click Applications.
- On the right, switch to the Install Capture tab. Click Browse and find an installer you want to import using Install Capture.
- If you have more than one Install Capture machine, use the drop-down to select the one you want to use.

- Select the apps. Then right-click, and click Import.
- Select the modules for analysis. Then click Import.
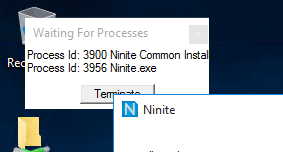
- The Install Capture VM will be started.
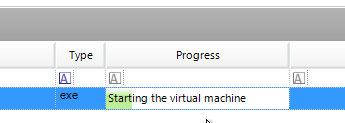
- Eventually you’ll be prompted to RDP to the Install Capture machine.
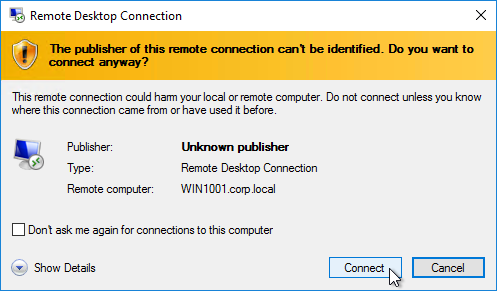
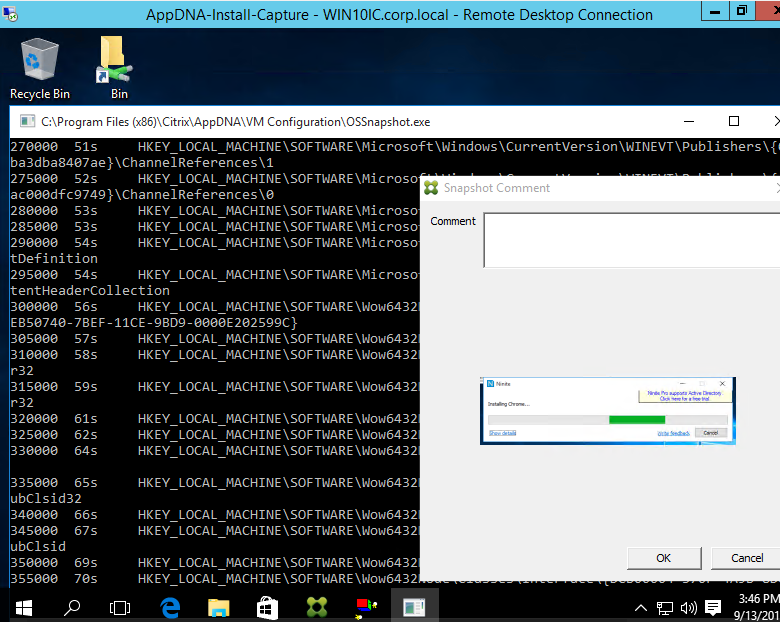
- The capture process begins with a snapshot of the Install Capture machine.

- Then the application is installed. This should happen automatically.
- Then a differencing snapshot is taken and uploaded to AppDNA Server.
- Analysis is performed against the modules you selected.
- After analysis is complete, switch to the Reports: Applications workspace.
- On the left, select a report you want to view.
Self Provisioning
Self Provisioning is very similar to Install Capture except there’s no need for direct connectivity between AppDNA server and the hypervisor that hosts the Self Provisioning machine. Once the process is started in the AppDNA console, a different user can complete the snapshot process on the Self Provisioning machine.
Prepare Self Provisioning Machine
- Make sure AppDNA VM Configuration is installed first.
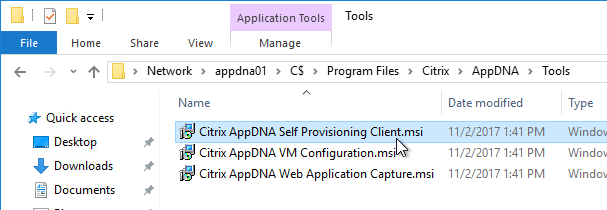
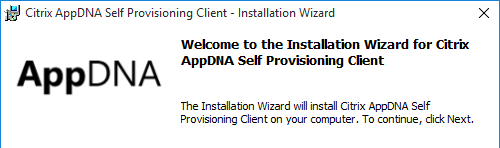
- On the Self Provisioning machine, browse to the AppDNA server in the C$\Program Files\Citrix\AppDNA\Tools folder, and run Citrix AppDNA Self Provisioning Client.msi.
- In the Welcome to the Installation Wizard for Citrix AppDNA Self Provisioning Client page, click Next.
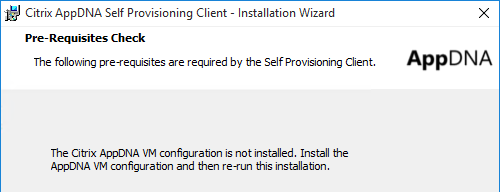
- If you see the Pre-Requisites Check page, stop the installer, install the AppDNA VM Configuration Client and then restart this installer.
- In the License Agreement page, select I accept the terms, and click Next.
- In the Destination Folder page, click Next.
- In the Ready to Install the Program page, click Install.
- In the Installation Wizard Completed page, click Finish.
- Take a snapshot of the Self Provisioning machine.
Perform Self Provisioning Capture
- In the AppDNA Console, switch to the Import workspace.
- On the left, click Applications.
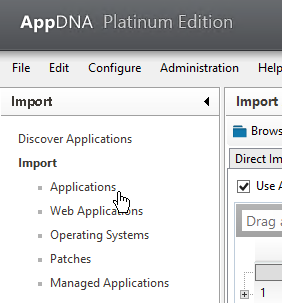
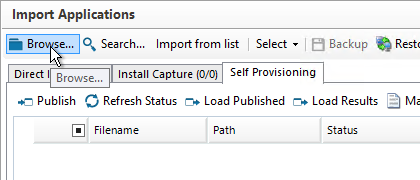
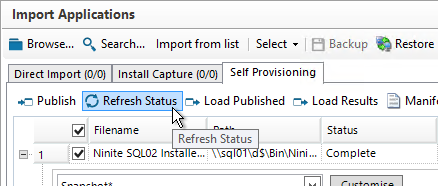
- On the right switch to the Self Provisioning tab.
- Then click the Configuration icon in the toolbar.

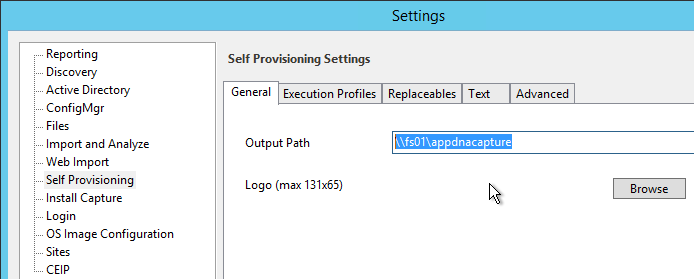
- In the Self Provisioning page, enter the UNC path to a share that both machines (AppDNA server and Self Provisioning machine) can access.
- In the toolbar click Browse and browse to the application installer.
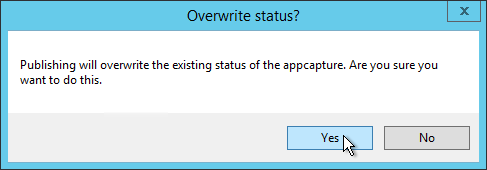
- Click Publish to push the files to the file share.
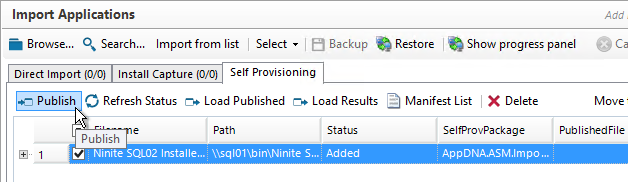
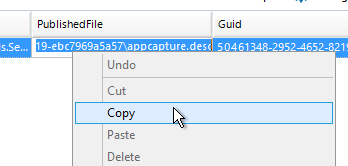
- Click in the PublishedFile column to access the full path and copy it to the clipboard.
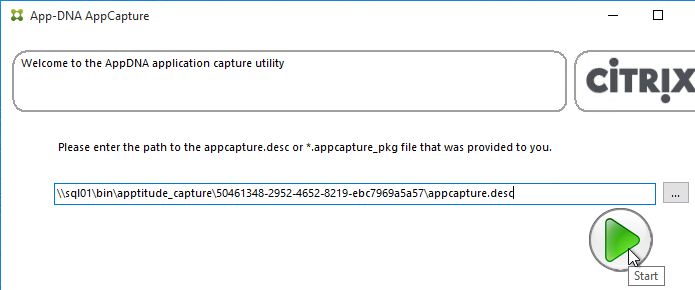
- On the Self Provisioning machine, run the Self Provisioning Client from the Start Menu.
- Paste in the path and click Start.
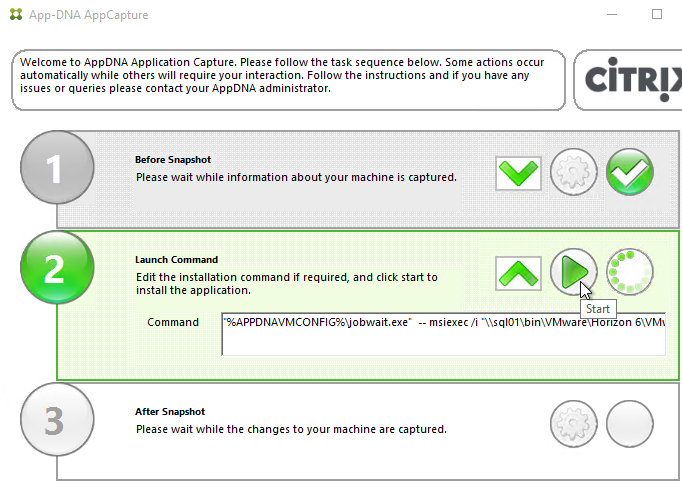
- After the snapshot is taken, click the Start button and install the application.
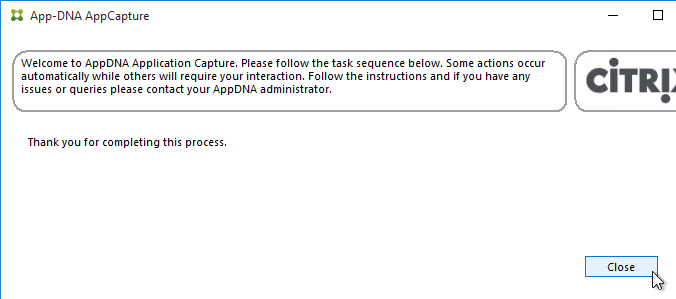
- Once the install is complete, another snapshot will be taken and the results will be uploaded to the share. Click Close.
- Back in the AppDNA console, click Refresh Status and make sure the status changes to Complete.
- Make sure the application is selected and then on the right side of the toolbar click Move to Import.
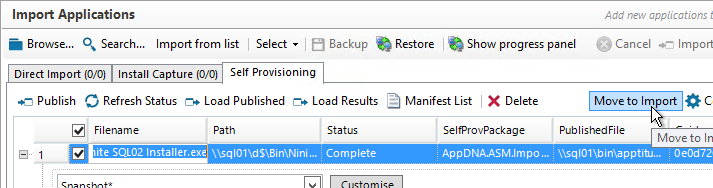
- This moves the application to the Direct Import tab where you can select the application and click Import & queue for analysis button to begin analysis.
Solutions
CitrixTV XenApp Upgrades with AppDNA demonstrates the Solutions feature of AppDNA 7.6 including: XenApp upgrades, operating system image upgrades, and application interoperability.
Other links on Solutions:
- Configure solutions at Citrix Docs.
- Citrix Blog Post Taming Patch Tuesday with Citrix AppDNA details the new Patch Impact Analysis Solution in AppDNA 7.8.
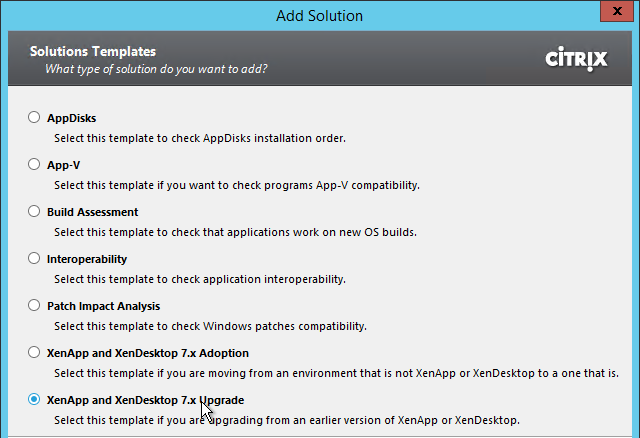
Here are generic instructions for adding a Solution:
- For some of the solutions it is helpful to import operating system images of the machines you are moving from and the machines you are moving to..
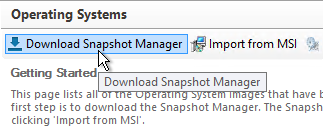
- In the Import workspace, on the left click Operating Systems.

- On the right, click Download Snapshot Manager. Run this on a operating system image that you want to import.
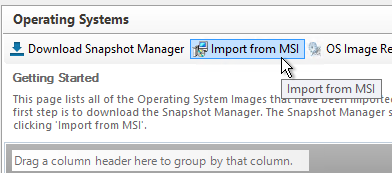
- Then click Import from MSI to import the MSI file generated by the Snapshot Manager.
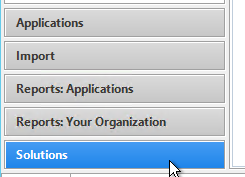
- Switch to the Solutions workspace.
- On the top left click Add solution.
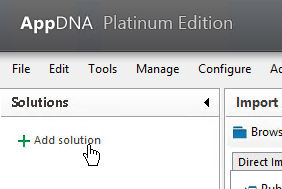
- In the Solutions Templates page, select a solution and click Next.
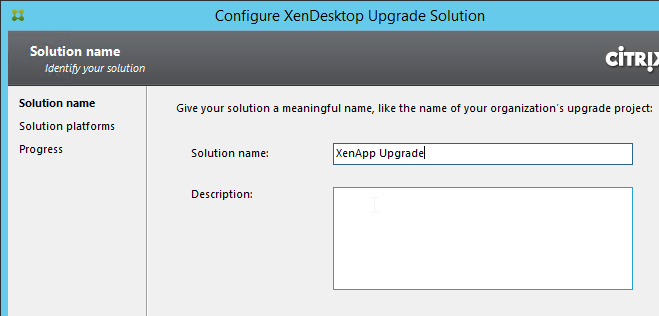
- In the Solution name page, give the solution a name and click Next.
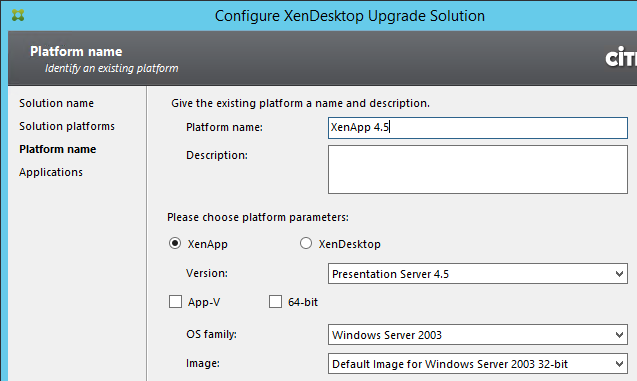
- In the Platform name page, choose the platform you are migrating from and click Next.
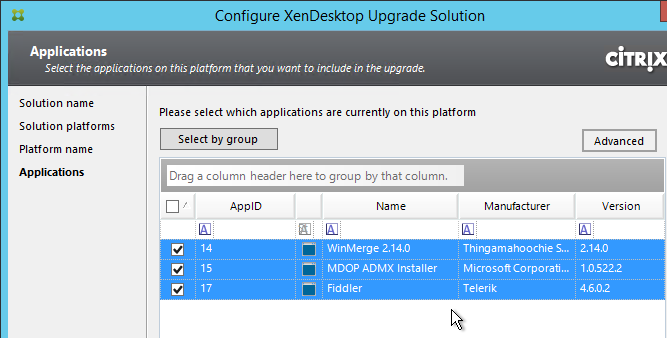
- In the Applications page, select the applications you want to analyze and click Next.
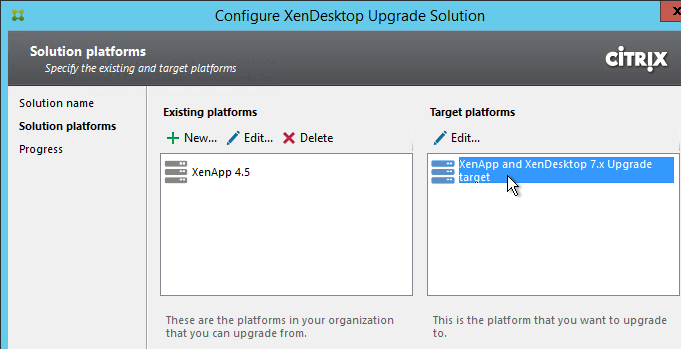
- In the Solution platforms page you can change the Target platforms or add more platforms.
- Click Build.
I analyzed an old 16-bit application with AppDNA and it’s saying it would be compatible on Server 2012 R2. I thought that rather odd considering I cannot even attempt to install the application on that OS. Am I doing something wrong in my analysis run?
Hello,
This is very useful guide, more detailed than Citrix one 🙂
I have followed it, and I got the same message every time I try:
“The user was not found in AppDNA or any of the groups granted access”.
I have a test environment with an AD domain, the AppDNA is on Windows Server 2019, with SQL Server 2016 Eval installed.
Any hint will be useful as I am struggling for the third day :/
Thank you.
Best regards,
Martin
Does the administrator account work? Windows Server 2019 is not supported. And they haven’t released AppDNA updates in a while.
Hello Carl,
for Administrator [local account] it says invalid username or password.
I am deploying now WS 2016 and will go through the same on that instance.
Still the same also on WS2016.
All the guide has been followed step by step and double checked.
Whenever I am trying to log in I got:
“Incorrect username or password” or
“the user Domain\UserName was not found in AppDNA or any of the AD groups granted access”.
I’ve tried with local Administrator, Service account of my own one. All of these are having security rights as per this blog.
I am new to Citrix, just wanted to test this and see how that works.
Ok, managed to log in, finally 🙂
I have missed that this Administrator account is not equal to local admin password. My apologies for problems 😐
BTW Carl, Both Sites, run a Citrix XenApp 7.X environment
Hi Carl, I am tasked with Setting up App-DNA for a major media company; Their infrastructure is based on 2 sites; Do I install the 3 Servers, App-DNA, SQL and Install/Capture on both sites to cover fail over functionality or Install just on one site and use the SQL Server to possibly replicate over both sites?
All AppDNA does is analyze apps for compatibility problems. There’s usually no need for HA or failover. How are you planning to use AppDNA?
Hi Carl, AppDNA will be used in a Application Packaging structure i.e. Discovery, AppDNA, Packaging, UAT and deployment. The AppDNA part is to analyse the apps for compatibility problems prior to packaging.
BTW, CTA Jani Anttila is an expert on AppDNA – http://janianttila.com/
Hi Carl, I am finding it most annoying and irritating to setup the SSL for App-DNA, I have done this before for a different client which works; I have setup the service account given the right permissions but cannot get the website to connect via https. All I get is the error “The request failed with HTTP status 403: Forbidden”
Hi Carl, I am having issues with SSL on AppDNA 7.8 setup. I have installed similar infrastructure with another client about 3 years ago (Earlier AppDNA version). I get this error “The request failed with HTTP status 403: Forbidden”
Hi Carl: When there is a need to migrate a few hundred Applications from, say, half a dozen Sites into a single new Site deployment, what are the best ways to plan for, and manage, this migration? With the organization having PVS (7.15) and App Layering (4.10) in place, is AppDNA the right tool? The goal would be to determine which Apps can be put on Common vDisks and which Apps are going to require their own Silos, and the migration will happen in “phases” over the next year… Thanks for any suggestions you might have.
Hi Carl – really good walk-through. I installed and configured everything as described however i’m getting a strange error when trying to install the Desktop Client from the web UI.
Error attempting to initiate a connection with server:
> Application installation did not succeed. cannot locate application files on server…
After reviewing the Details log file I noticed a section with the “Deployment URL” which has the https url, and a “Deployment Provider URL” that has the default port 8199 address: http://citrixappdna:8199/AppDNA/Client/AppDNA.application.
Any idea how to resolve this?
Hi Carl, during the AppDNA new install, after loading in the Windows OS images, it states “The database is not licensed. You must license the database using the AppDNA Configuration Manager”. Any idea why??
You might have to run the Config Wizard and there’s an option to configure Licensing. It asks you for the License Server name so it can get Platinum Edition licenses and enable them in the database.
It might be worth mentioning on step 5 that the user creating the DB should not be the service account used to connect the website to the DB, and that the user creating the DB needs to have the sysadmin server role in SQL.
Interesting way of working with SQL database restoration! Definetely it has been painfully slow setting up AppDNA in the past, it took a long time to remote SQL, but it was very fast for local SQL instances. However, looks like Citrix has done something to improve the database setup. It is just as fast today thru AppDNA UI as with this hack by Erik.
Please help….I am getting below error –
There was a problem running the current task. Invalid client sequence number. The database is out of sync with the license server. This may indicate that the database or the license server has been reverted, or the same client id is being used by multiple databases.AppDNA.ASM.Common.Exceptions.LicenseServerException: Invalid client sequence number. The database is out of sync with the license server. This may indicate that the database or the license server has been reverted, or the same client id is being used by multiple databases.Server stack
Hey Carl, is there any database maintenance, retention, purge, cleanup on data that is old? Or is there a way to configure that? I’m getting ready to stand this up in non-prod and our DBA’s asked me about that.
I don’t have any specific guidance on this, but if you post to https://discussions.citrix.com/forum/474-appdna-7x/, then CTA Jani Anttila usually responds.
Hi,
Do you think it is possible with AppDNA to test compatibility between same OS ? Like Window 10 1607 to Windows 10 1703 (creator update) for example ?
Hi Carl, I’ve updated to Version 7.14.1 today and everything is working like a dream, except I can no longer see my master image when I go to upgrade machines or build a new catalog. I’ve checked for things like tags in VMware. I can nav from the machine to the master template. I also restored an old master template and I can’t see that either. has something changed in this version
I assume you’re referring Controller 7.14.1. Have you tried rebooting? I’ve seen that fix weird issues.
Hi Carl, everything has been rebooted. nothing is flashed up in the even logs either. Is there some other logging I can look at. basically, anywhere in studio on the controller that I click update master image/update machines it sits there saying ‘expanding…’ and then nothing loads.
For the Hosting Connection, have you tried an account will full administrator permission?
Hi Carl, I followed the install, but getting an error when trying to login the first time: “To login with a domain account please ensure that AppDNA is running in the context of the correct account and check the “Integrated Login” option.
DB roles/permissions are correct using my domain account or the service account. Tried different ways logging in, but same error.
Any idea?
Service Account is a local administrator?
You’re using the server name to connect to it and not some other DNS name?
Thanks Carl, I made my service account a local administrator – check, and to be sure ran through the “Configure AppDNA” again without a hitch, I specified the domain service account during this process and the name of the server to connect to as well as the previously “attached” database as per instructions.
You wrote: “Login as administrator and apps3cur3”. I’m trying that on the same server where server+client is installed,not sure what is different for me, but then I get the message about unable to login and the context message.
However, logged on as the service account (now local admin) with the integrated option checked, the message is: “The user ‘Domain\user’ was not found in AppDNA or any of the AD groups granted access”. Not sure how else to add users if unable to get into it with administrator:apps3cur3 first to set that up?
Appreciate the help
ok got it working 🙂 Created a local account called “administrator” with the same password as per your explanation, signed in with that (while still logged on to the server with my domain account) and WHAM!…I’m in. Can now add the domain accounts… just wasn’t clear from the doco….
thanks
Hi Werner, Carl
I had the same problem on my two AppDNA servers – one was in a Dev domain and had been running for a while but I had not been using it. Other was built yesterday in Test domain – and I could not login via client app with apps3cur3 password. However – the web login to AppDNA site with IE works for same password..a good test of the basic access to the web site and database.
After some troubleshooting and reinstall of new one, checking with Carl and Citrix pre-reqs – was the same. I tried your fix – but could not create local administrator, and my corp SCCM build creates different account.
I then tried creating a new administrator – but found the local security policy – which had been changed by GPO to have complex password – prevented the new user.
SO – either amend the local Security Policy complex password settings – or remove the server from AD and try it.In my case I had to use my SCCM created local admin account to make the new administrator. Both ways should allow you to create “administrator” account with the “apps3cur3” as password. Hoping my AD guys don’t have a policy to remove the “administrator” from local server – now working!
regards
Colin
http://www.colinrainey.com
Hi,
I want to generate compatibility report against Windows 8 32-bit, 64-bit, Windows 10 – 32-bit, 64-bit, App-V 4.6, 5.1 etc. Is that possible using AppDNA 7.13 platinum edition ? I don’t see option for 32-bit, 64-bit OS separately. It just shows Windows 10 default OS and same for Windows 7, Windows 8 and App-V. For example I have an application and I want to generate its compatibility report for Windows 10-64 bit, Windows 8-32 bit, Windows 10-32-bit, App-V 4.6, App-V 5.1 is that possible ? Does it have VMware ThinApp option ?
Thanks!
Regards,
Faiz
Hello,
What are OS Images in AppDNA?
Thanks.
AppDNA uses a snapshot tool to analyze a OS installation. AppDNA comes with several clean OS Image snapshots. You can create your own with your own patches/apps. You can then analyze whether an app is compatible with your OS image or not.
I am starting to explore AppDNA possibilities. Does it allow to compare a build application, example: MS Office 2013 and analyze all other production applications against Office 2013? Is there a recommended way to do this maybe something like Importing a new OS with Office 2013 installed OR create Solutions using Interoperability. Something that could predict if third party applications will conflict with a newer version of a core app.
Hello, when you import a new SO, APPDNA shows the aplcations??? or only the operative system??,, anyway how could i capture the applications that are installed in my servers? any aidea, or i have to import one by one in the section of “IMPORT”?
You can import MSI installers. Or you can perform a packaged install and import that. However, you can’t import already installed applications.
Is it possible to migrate the SQL database for AppDNA to another SQL server and point the AppDNA server to it?
I assume you run Configure AppDNA > Reconfigure > Existing Database.
Hi Carl,
Thankyou your detailed explanation. I have followed these steps and it worked.
Hi Carl. AppDNA 7.9 supports SQL Express. Perhaps you could update the site?
Not sure if I would use SQL Express for a PROD deployment. Keep up the great work.
Carl, about 400 applications with varying degree of complexities. Hows that for a portfolio?
I would definitely do separate SQL. You can also ask Jani for his opinion. http://janianttila.com He also responds to AppDNA posts at discussions.citrix.com.
Hi Carl, hope you are well, Is it prudent in terms of functionality in the installation of App-DNA 7.8 to have 2 servers separate (App-DNA on W2012 R2, SQL 2014 R2 SP1 on W2012 R2) or both on one server W2012 R2?
Depends on the size of app portfolio.
Since SQL requires a license, I typically use an existing SQL server.
Hi Carl, I am about to embark on my first AppDNA project, will your very detailed write up above assist to a T? Also will you recommend installing the sql server within the appDNA or seperate. I have 400 apps to investigate
This should include everything you need to install AppDNA. How to actually use it is detailed elsewhere. Jani Anttila frequently helps people on Citrix Discussions. Also see http://janianttila.com
For that many apps, you definitely want separate SQL.
Thanks Carl, btw have you deployed AppDNA Express or the full version, built on the Microsoft Azure platform from the Citrix Workspace Cloud Labs. It would be interesting to assess its functionality.
Regards
I have not tried it. Isn’t it somewhat limited? Is there an option for a full version?
Apparently Yes; https://www.citrix.com/blogs/2015/11/09/introducing-appdna-express-as-a-workspace-cloud-labs-service-2/. From that link, there’s info about the full version option
That looks like the on-premises version, which is what’s detailed in this post. I’m not aware of a full version from Citrix Workspace Cloud.
Hi Carl, you were right that the appDNA express is somewhat limited when using in the Citrix Workplace Cloud, but can the full version i.e. AppDNA 7.8 work under the Azure Microsoft Cloud. And if so will the on premises Platinum License cover the hosting process
Hi Carl, will the on-premises version of AppDNA 7.8 work within a Azure Microsoft hosted environment and if yes, will the existing Platinum license cover the hosting costs?
If you deploy VMs in the traditional manner then I suspect it will work. Citrix licenses don’t cover Azure hosting costs.
Automated Install Capture probably won’t work but you can always do it manually.
Hi Carl, can I use your epic App-DNA run-through in installation on the Azure VMs or will it need a different approach? or what can you anticipate as blockers in this Azure based installation?
As long as you regular VMs and regular SQL then it should work fine. Install Capture is my only concern.
Hi Carl, I have installed AppDNA SQL Server succesfully, but when I try to install App-DNA on a separate server, I get errors when I get to the Configuration Wizard, “Access to path c:\users……….” is denied. any assistance will help
That’s new to me. Are you running the Config wizard as administrator? Is there a specific file name it’s trying to access?
Hi Carl, In reference to your Install Capture write up, can one use a Microsoft Option as opposed to Vmware VSphere. If Yes, Also did you go for Vmware for any functional reason?
VMware is used almost exclusively at my customers, which are medium to large enterprises. Hyper-V is supported – http://docs.citrix.com/en-us/dna/7-9/configure/install-capture/dna-install-capture-setup-vm/dna-vm-setup-hyper-v/dna-vm-config-hyper-v.html
Hello Carl, For the Install Capture Server, I have requested Server 2003 (as this is the platform that the applications are being migrated from), what other pre-reqs should I be looking for in the IC server?
Thanks
Are you asking about hypervisor requirements? http://docs.citrix.com/en-us/dna/7-9/system-requirements/additional-requirements.html
Otherwise, you simply install the AppDNA components, then use it to capture your app.
Hi Carl,
Thank you for the very detailed doc. Just one question though: I can not add AD groups on User Management .. I don’t see the Groups objects for AD.. I can add any user but. I have seen in the docs that the service AppDNA should run with a domain user which is my case .. a service account .. but still no luck. Any ideas?
Thank you,
John
Is your AppDNA IIS Application Pool running as a domain account?
I just tried adding a group and it works for me.
Yes it is running with the same domain service account the Citrix AppDNA service is running. I know for you it is working .. I have seen the screenshot you posted .. the Select Users or Groups window.. I have only select sers. Does the AppDNA License server need to run also as a domain account?
Are you seeing the normal Windows user/group selection dialog box? Does it say “Users and Groups”? Maybe there are some traces you can run on Windows to see the problem. Procmon, wireshark, etc.
No, it does not. As I previously said it only says “Users”
Hi Carl, tried to analyse a straight forward application but its coming up with an error “Column’ unique_identifier’ does not belong to the underlying table ‘attribute’
There a lot more under view stack track, is there a way that I can upload the screen shot to you?
Thanks
Kendolabsoncom
Are you able to post at discussions.citrix.com? That way more than just me is reading it and able to respond.
Hi Carl, I am preparing a Install Capture machine, does the machine have to be separate from the App-DNA box so long as Remote desktop is enabled?
Yes, needs to be separate because a snapshot is taken, the install is performed, and the snapshot is rolled back.
Thanks for the guide but I’ve got a bug when I try to do a URL Import on our corporate site with 7.8 on a fully patched Windows 2012R2 vm. Enter the internal URL as a new Import line item. Click Import. The “App-DNA Directed Spider” box flashes up, the last line in the Activity Log tab says “Waiting for response from Internet Explorer” then the window closes and the Import does nothing. It closes so fast I had to hit printscreen just to review what the window contents were before it closed. I’ve tried a couple of other internal websites (Director 7.8 for one) and the same thing happens – the Spider pops open and closes almost instantly.
Chris … did you ever figure this out? I am running into the same issue.
hi Carl!
do you have any idea wether sql-mirror is supported? we use sql2012 as seen below for mirroring.
Microsoft SQL Server Management Studio 11.0.6020.0
Microsoft Analysis Services Client Tools 11.0.6020.0
Microsoft Data Access Components (MDAC) 6.3.9600.17415
Microsoft MSXML 3.0 6.0
Microsoft Internet Explorer 9.11.9600.18231
Microsoft .NET Framework 4.0.30319.42000
Operating System 6.3.9600
thx tom
Hi Carl, we have over 1500 applications, do you recommend installing the sql on the appdna server or db cluster? how much storage space will require if db in cluster?
Definitely separate SQL. See https://discussions.citrix.com/topic/338266-sql-database-sizing/. Also, http://janianttila.com/ might be able to help you.
Hi Carl, Where to configure the account in step 2 “Login as administrator and apps3cur3.”. I try to logon, always error username or password…
Found it… Login as administrator and apps3cur3. Thanks anyway. 🙂
MInor point of clarification: you have got SQL Express is not supported. On the Citrix product documentation it has got •SQL Server 2012 Express Edition (built-in 10GB database size limit). I was wondering if 7.6.5 no longer supports Express Edition, but 7.6 does.
It’s OK for small PoCs or small number of app analysis. But Platinum customers will want a production implementation of AppDNA and thus should avoid SQL Express.
Hi Carl,
Why did you create database yourself and didn´t let the configuration wizard to do it?
DBAs at large enterprises prefer to create the database themselves. But you’re welcome to let AppDNA do it for you.
Epic walk-through, but has anyone used this software during a project…..it seems like lots of effort (cost) for what?, Package, UAT, fix if needed, vs AppDNA, package, UAT, fix if needed.
It’s going to be a bigger deal in XenDesktop 7.7 because of the AppDisk integration.
Hey Steve,
Say I use AppDNA for my project and you don’t: you’ll be spending a huge amount of time testing application that are very likely to work while I’ll only be focusing on critical/applications assessed red by AppDNA. Not to mention that static analysis (per binary PE dump) is way safer than manual smoke testing.