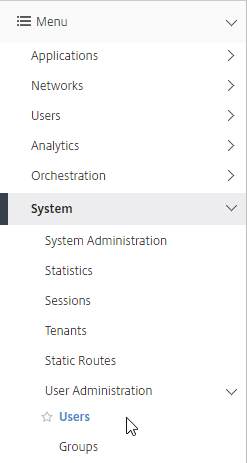
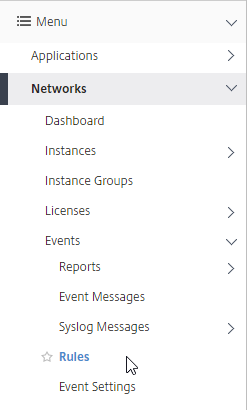
Navigation
The newer 12.1 version of NetScaler MAS (aka Citrix ADM, aka Citrix Application Delivery Management) is detailed in a different article.
The older 11.1 version of NetScaler MAS is detailed in a different article.
- Change Log
- Planning
- Import Appliance into vSphere
- IP Configuration and High Availability
- Add Instances
- Virtual Server Licensing
- Enable AppFlow
- Enable Syslog on Instances
- NSroot Password
- Management Certificate
- System Configuration
- System Email Notifications
- Authentication
- Analytics (Insight) Thresholds and Alerts
- Geo Map
- Instance Email Alerts (SNMP Traps)
- Director Integration
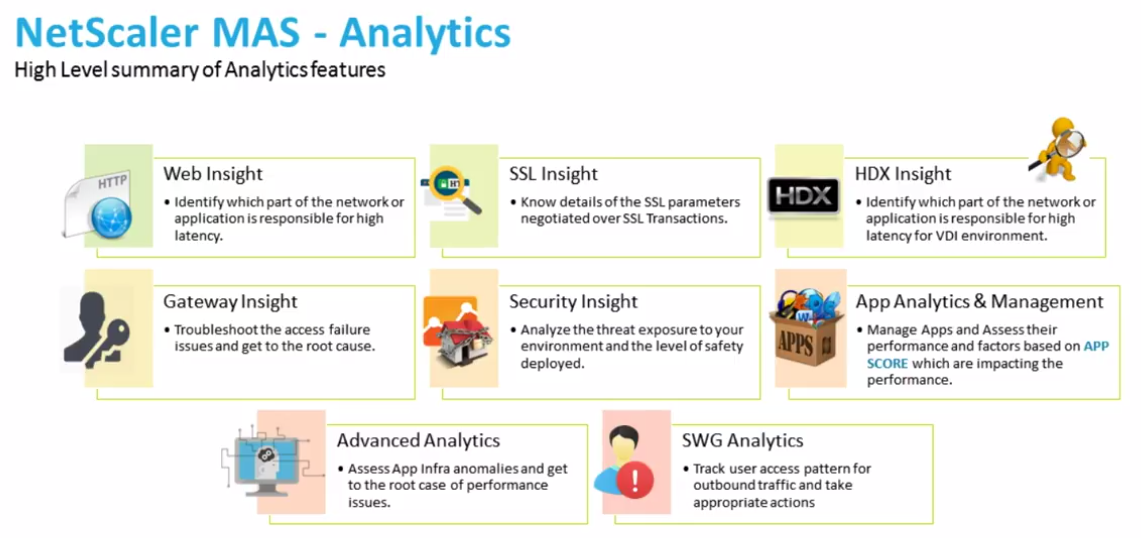
- Use NetScaler MAS – HDX Insight, Gateway Insight, Security Insight
- Troubleshooting
- Upgrade NetScaler MAS
💡 = Recently Updated
Change Log
- 2018 May 27 – added Events Digest section.
- 2018 Mar 4 – in the Licensing section, updated the screenshots for 12.0 build 57.
- 2018 Mar 4 – in the Authentication section, updated the Add Group instructions for 12.0 build 57.
- 2018 Mar 3 – in Import Appliance section, updated screenshots for 12.0 build 57 and vSphere HTML5 UI client.
- 2018 Mar 3 – in Upgrade MAS section, updated screenshots for 12.0 build 57
- 2018 Jan 13 – in Planning section, added link to Citrix’s YouTube video Citrix NetScaler MAS: Application visibility and control in the cloud
- 2017 Dec 26 – updated HDX Thresholds section for 12.0 build 56
- Updated all menu screenshots for 12.0 build 56 – black instead of blue
- 2017 Dec 25 – updated Upgrade section for 12.0 build 56
- 2017 Dec 7 – in System Config section, added instructions to disable SSON to instances
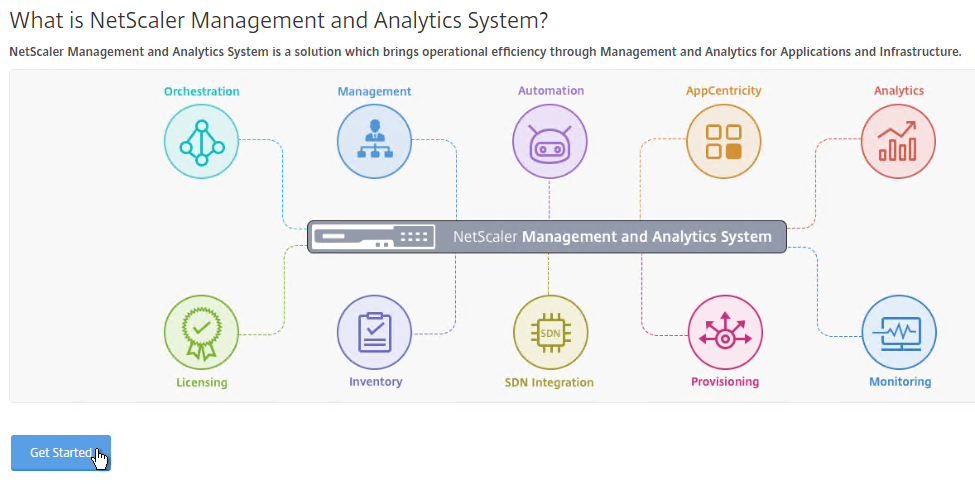
Planning
NetScaler MAS is a replacement for NetScaler Insight Center, Command Center, and Control Center. It’s a combination of these three different tools.
For an overview of MAS, see Citrix’s YouTube video Citrix NetScaler MAS: Application visibility and control in the cloud.

Cloud vs on-prem – MAS is available both on-premises and as a Cloud Service. For the Cloud Service, you import a MAS Agent appliance to an on-prem hypervisor, or deploy a MAS Agent to AWS or Azure. The MAS Agent is the broker between the Cloud Service and the on-prem (or cloud hosted) NetScaler appliances. For more info on the MAS Cloud Service, see the following:
- Demo: Citrix NetScaler Management and Analytics Service – YouTube video
- Most MAS features are supported in the Cloud Service, but some are missing.
- The Cloud Service uses subscription licensing.
- NetScaler Management and Analytics Service at Citrix Docs
- George Spiers NetScaler Management and Analytics Service
The rest of this article focuses on the on-premises version, but much of it also applies to the Cloud Service.
On-premises MAS Licensing:
- Instance management is free (unlimited). This includes Configuration Jobs, Instance Backups, Network Functions/Reporting. Basically everything in the Networks node is free.
- Analytics and Application monitoring are free for up to 30 Virtual Servers (Load Balancing, NetScaler Gateway, Content Switching, etc.).
- Beyond 30 Virtual Servers, licenses can be purchased in 100 Virtual Server packs. See NetScaler MAS Licensing at Citrix Docs.
- You can control assignment of licenses to Virtual Servers.
MAS version – The version/build of NetScaler MAS must be the same or newer than the version/build of the NetScaler appliances being monitored.
HDX Insight Requirements (AppFlow Analytics for ICA traffic):
- Your NetScaler appliance must be running Enterprise Edition or Platinum Edition.
- NetScaler must be 10.1 or newer.
- HDX Insight works with the following Receivers:
- Receiver for Windows must be 3.4 or newer.
- Receiver for Mac must be 11.8 or newer.
- Receiver for Linux must be 13 or newer.
- Notice no mobile Receivers. See the Citrix Receiver Feature Matrix for the latest details.
- For ICA Session Reliability with AppFlow: NetScaler 10.5 build 54 and newer.
- For ICA Session Reliability, AppFlow, and NetScaler High Availability: NetScaler 11.1 build 49 and newer.
- Internally, when a user clicks an icon from StoreFront, an ICA connection is established directly from Receiver to the VDA, thus bypassing the internal NetScaler. To produce AppFlow statistics, here are some methods of getting ICA traffic to flow through an internal NetScaler:
- Implement NetScaler Gateway ICA Proxy (SSL) internally. However, Single Sign-on (pass-through authentication) does not work through NetScaler Gateway. To use SSL ICA Proxy without authenticating at NetScaler Gateway, see CTX200129 – How to Force Connections through NetScaler Gateway Using Optimal Gateways Feature of StoreFront.
- Route ICA traffic (TCP/UDP 1494 and TCP/UDP 2598) through a NetScaler SNIP, and NetScaler routes it to the VDAs. Citrix Blog Post – How to Deploy NetScaler Insight Center with Policy Based Routing
- NetScaler 11 and newer can proxy ICA traffic through a SOCKS protocol Cache Redirection vServer. Advantages: no need to authenticate at NetScaler Gateway, and no routing changes. See Citrix Blog Post Gathering HDX Insight Analytics for LAN Users with NetScaler Using SOCKS for more information.
- Citrix Docs How NetScaler Insight Center is Deployed in a Network and Enabling HDX Insight Data Collection detail additional ICA routing/proxy considerations – Transparent Mode, NetScaler Gateway Single-Hop and Double-Hop, LAN User Mode (NetScaler as SOCKS Proxy), CloudBridge, Multi-Hop (NetScaler and CloudBridge with connection chaining)
- For ICA round trip time calculations, in a Citrix Policy, enable the following settings:
- ICA > End User Monitoring > ICA Round Trip Calculation
- ICA > End User Monitoring > ICA Round Trip Calculation Interval
- ICA > End User Monitoring > ICA Round Trip Calculation for Idle Connections
- Citrix CTX215130 HDX Insight Diagnostics and Troubleshooting Guide contains the following contents:
- Introduction
- Prerequisites for Configuring HDX Insight
- Troubleshooting
- Issues Related to ICA parsing
- Error Counter details
- Checklist before Contacting Citrix Technical Support
- Information to collect before Contacting Citrix Technical support
- Known Issues
Citrix CTX204274 How ICA RTT is calculated on NetScaler Insight: ICA RTT constitutes the actual application delay. ICA_RTT = 1 + 2 + 3 + 4 +5 +6:
- Client OS introduced delay
- Client to NS introduced network delay (Wan Latency)
- NS introduced delay in processing client to NS traffic (Client Side Device Latency)
- NS introduced delay in processing NS to Server (XA/XD) traffic (Server Side Device Latency)
- NS to Server network delay (DC Latency)
- Server (XA/XD) OS introduced delay (Host Delay)
Import MAS Appliance
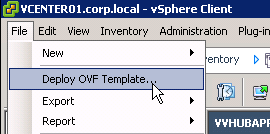
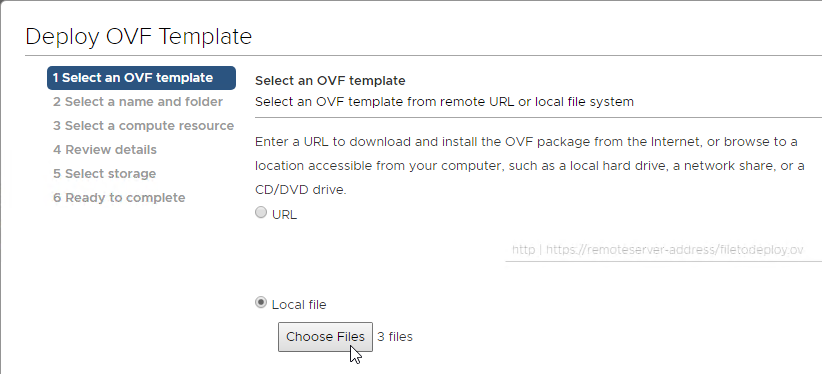
You can use either the vSphere Client, or the vSphere Web Client, to import the appliance. In vSphere Client, open the File menu, and click Deploy OVF Template. vSphere Web Client instructions are shown below.
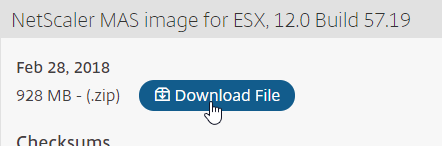
- Download NetScaler MAS for ESX, and then extract the .zip file.
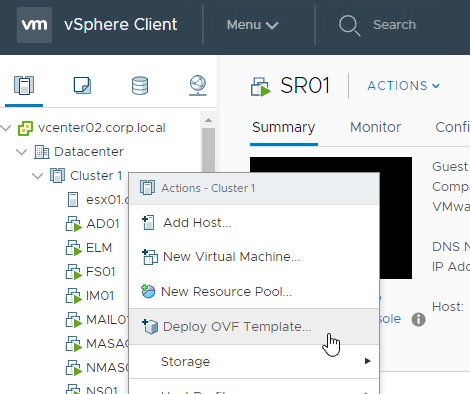
- In vSphere Web Client, right-click a cluster, and click Deploy OVF Template.
- In the Select an OVF Template page, select Local file, and browse to the NetScaler MAS .ovf files. If vCenter 6.5+, select all three files. Click Next.
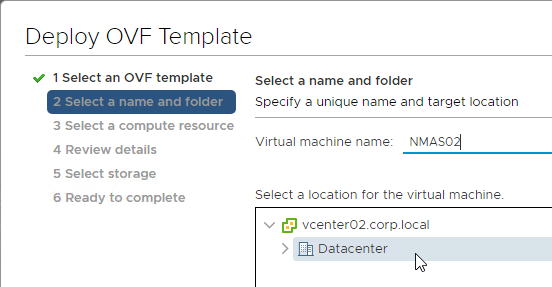
- In the Select name and folder page, enter a name for the virtual machine, and select an inventory folder. Then click Next.
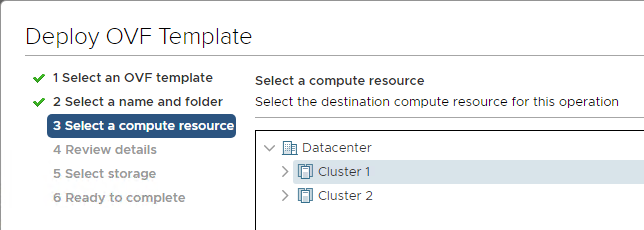
- In the Select a resource page, select a cluster or resource pool, and click Next.
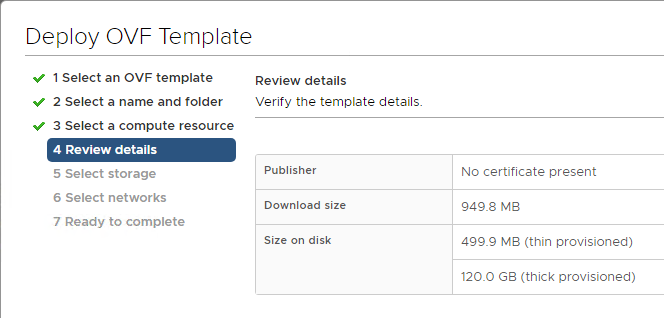
- In the Review details page, click Next.
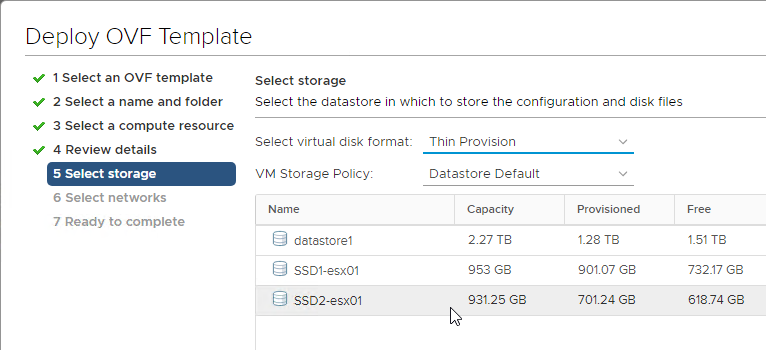
- In the Select storage page, select a datastore. If a single appliance, or if a database appliance, due to high IOPS, SSD or Flash is recommended.
- Change the virtual disk format to Thin Provision. Click Next.
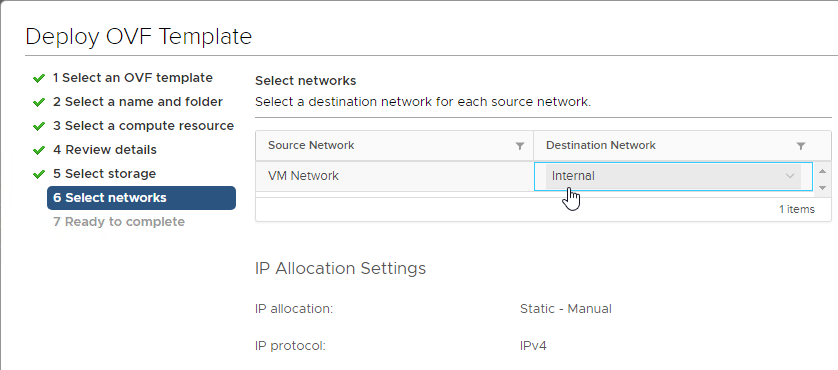
- In the Select networks page, choose a valid port group, and click Finish.
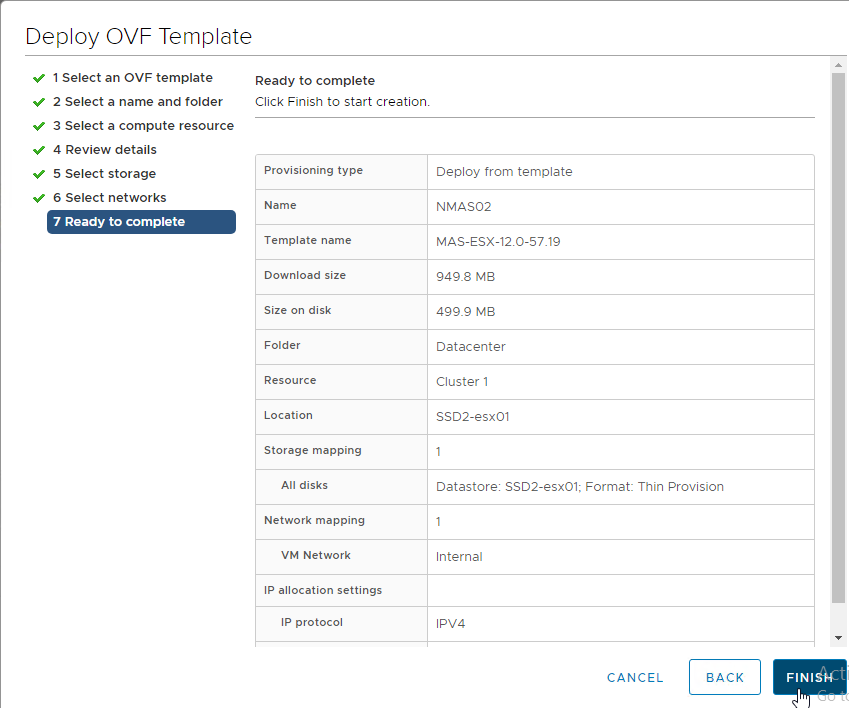
- In the Ready to Complete page, click Finish.
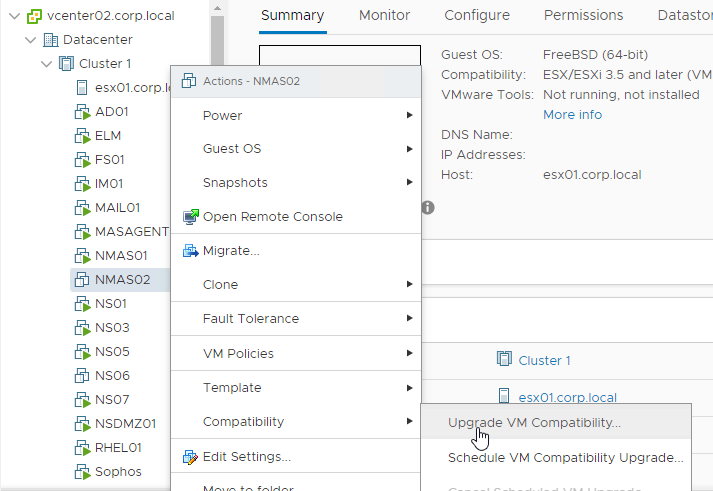
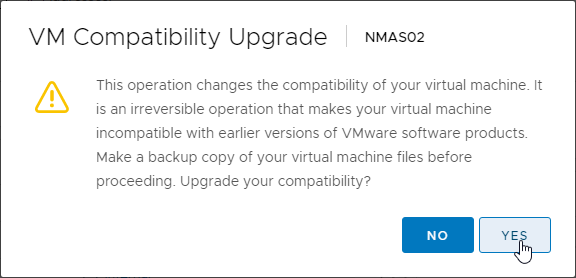
- In vSphere 6.5 and newer, you’ll need to upgrade the VM Compatibility.
- Right-click the NetScaler MAS appliance, expand Compatibility, and click Upgrade VM Compatibility.
- Click Yes.
- Select at least hardware version 7 (ESX/ESXi 4.0 and later).
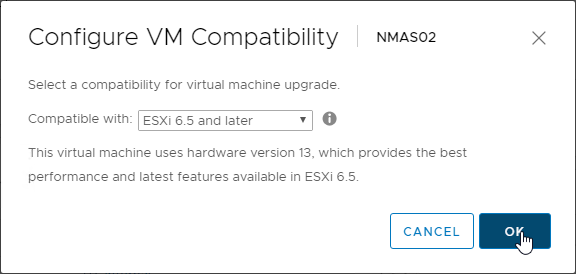
- Right-click the NetScaler MAS appliance, expand Compatibility, and click Upgrade VM Compatibility.
- Before powering on the appliance, you can review its specs.
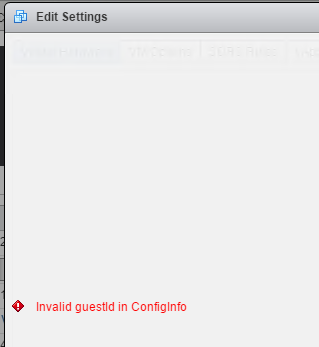
- If you see a message about Invalid guestid in Configinfo, then you’ll have to upgrade the VM hardware version first. VM hardware version 4 seems to be too old for vSphere 6.5.
- Now you can review the default specs and increase them. Citrix Docs VMware ESXi Hardware Requirements has recommended specs.

- Citrix Docs How to Attach an Additional Disk to NetScaler MAS: power off appliance, add a second disk that’s larger than the first, then power on the appliance. Note: you can only add one disk. Use the MAS storage calculator to determine the recommended size of the disk.

- Enabling more features on MAS means more disk space. MAS features that consume large amounts of disk space include: Web/SSL Insight. SNMP/Syslog/Network Reports have a configurable purge interval.
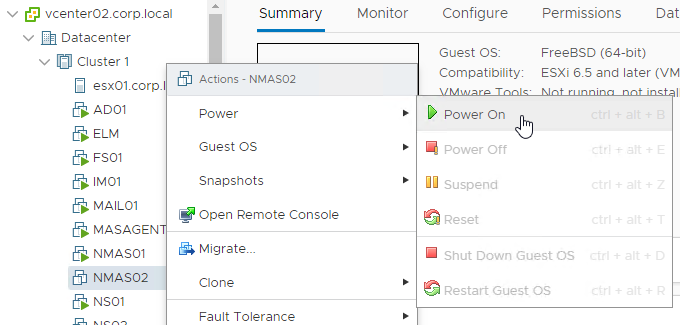
- Power on the VM if it’s not running already.
- If you see a message about freeBSD not being supported, then you might have to upgrade the VM Hardware Compatibility Level. VM hardware version 4 seems to be too old for vSphere 6.5.

Appliance IP Configuration and Deployment Modes
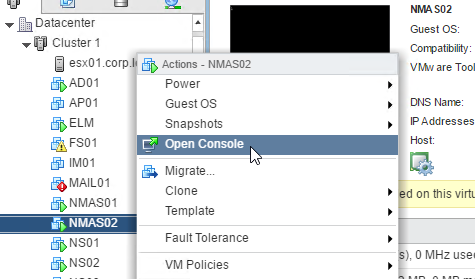
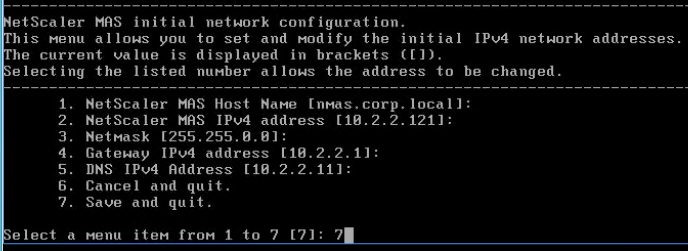
- Open the console of the virtual machine.
- Configure an IP address.
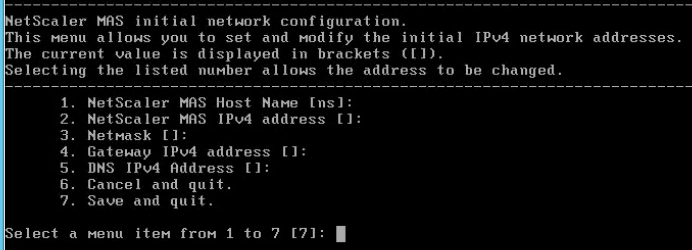
- Enter 7 when done.
- When prompted for Deployment Type, enter 1 for NetScaler MAS Server. The first appliance must always be NetScaler MAS Server.
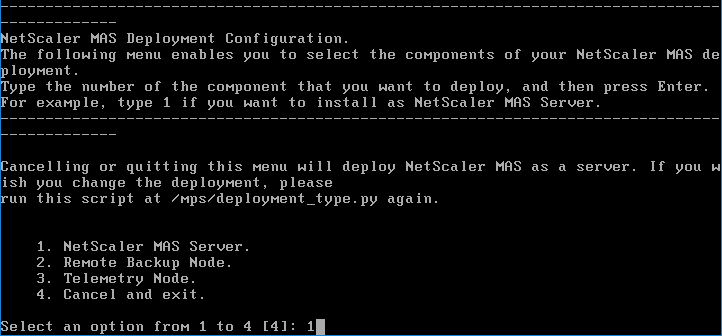
- Other deployment options:
- Notice the option for Remote Backup Node.
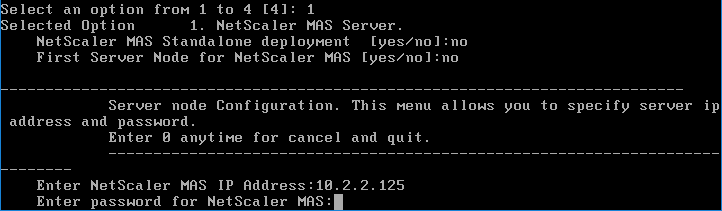
MAS High Availability
MAS 12.0 build 51 and newer support active/passive High Availability. Another option is the Remote Backup Node.
- If you want to deploy two NetScaler MAS appliances and HA pair them, enter no for Standalone, and yes for First Server Node.
- Note: HA is only for database redundancy. All other traffic (SNMP, AppFlow) only goes to one node.

- Note: HA is only for database redundancy. All other traffic (SNMP, AppFlow) only goes to one node.
- Enter Yes to reboot.

- Deploy another appliance.
- This time, when asked if First Server Node, enter no. You will then be asked for the IP address of the first node. Enter the nsroot password.
MAS Maintenance
- From CTX220000 How to reboot or shutdown NetScaler MAS using CLI: when using the MAS CLI, do not use the reboot command since it will cause data corruption. Instead, run shutdown -r now.

- If you need to add a static route to NetScaler MAS, then see CTX223282 How to Add a Static Route on NetScaler MAS.

Getting Started
- Once you’ve built all of the nodes, point your browser to the primary NetScaler MAS IP address, and login as nsroot/nsroot.
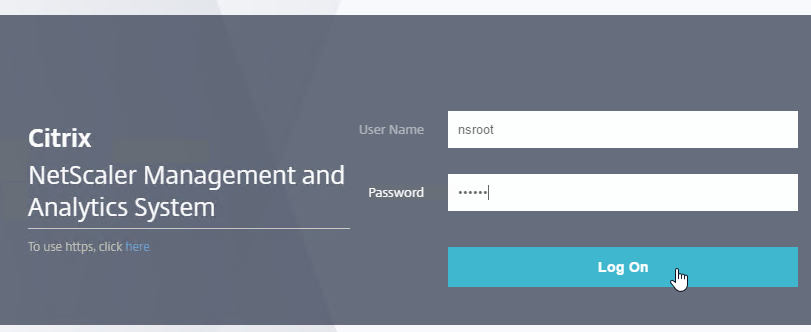
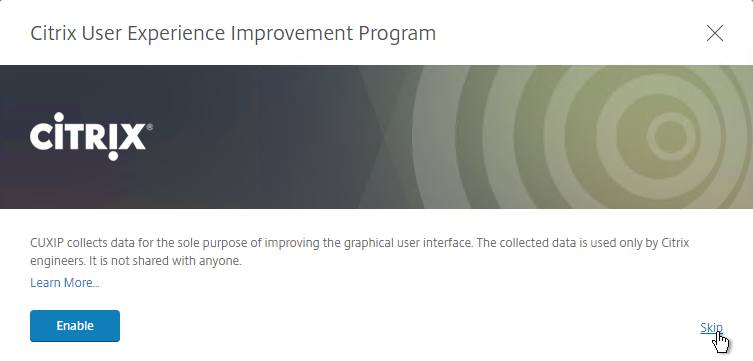
- If you see CUXIP, either Skip or Enable the Customer User Experience Improvement Program.
- Click Get Started
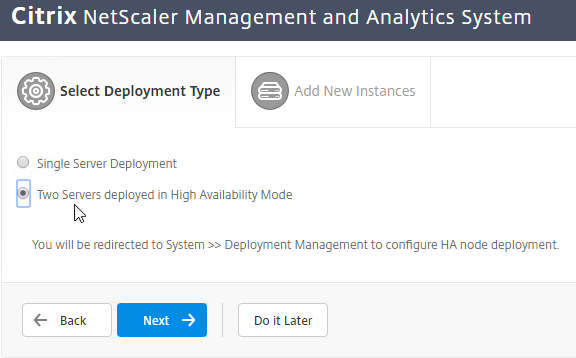
- If you did a standalone deployment, select Single Server Deployment, click Next, and skip to the next section to Add Instances.
- If you deployed high availability appliances, select Two servers deployed in High Availability Mode, and click Next.
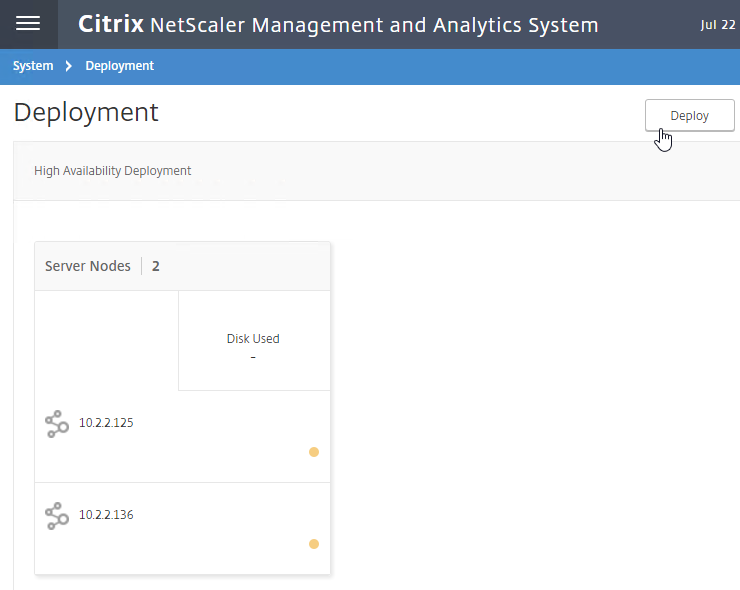
- It should show both nodes. Click Deploy on the top right.
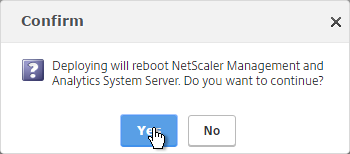
- Click Yes to reboot the appliances.

- If you login to one of the appliances, at System > Deployment, you’ll see the performance of each node. Notice the Break HA icon on the top right.
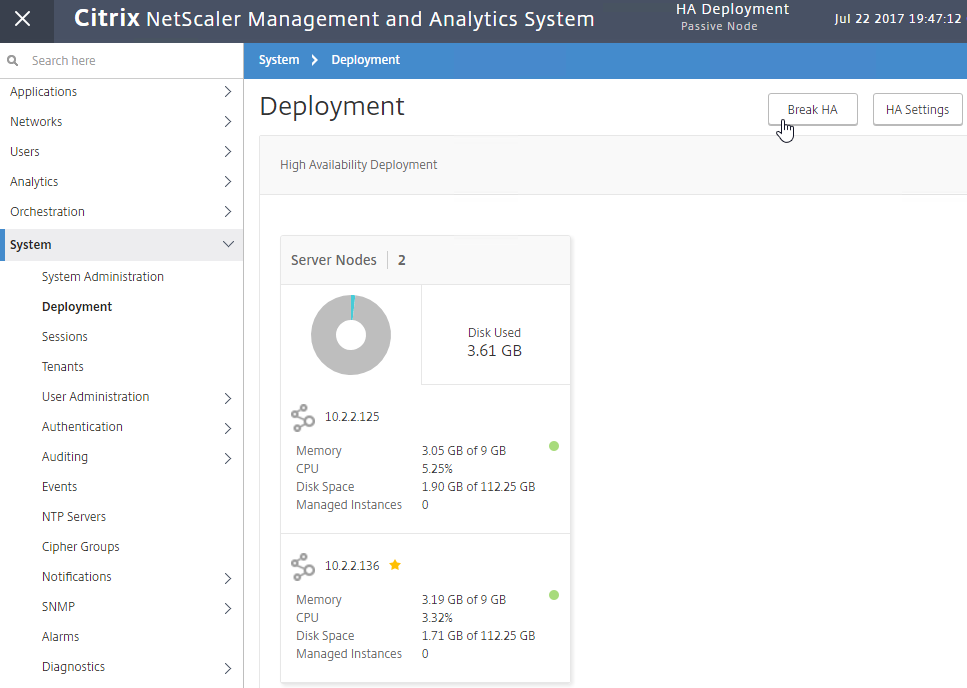
- You can manage the pair by logging in to either node.
- Or you can load balance the pair. Load Balancing is only useful for administration. All other communications (e.g. SNMP, AppFlow) go directly to one of the nodes. See High Availability Deployment at Citrix Docs for load balancing instructions. NetScaler Load Balancing can detect which node is Active and connect you to the Active node.
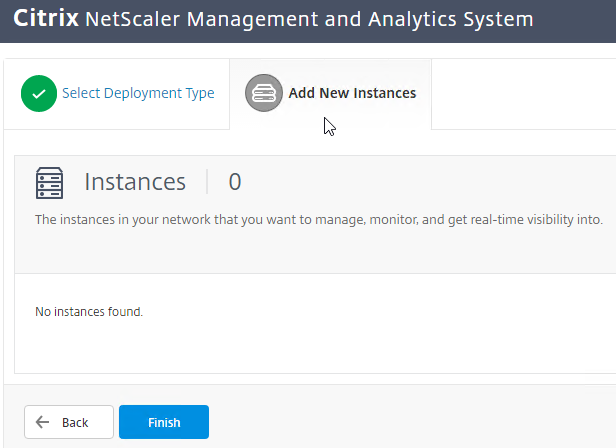
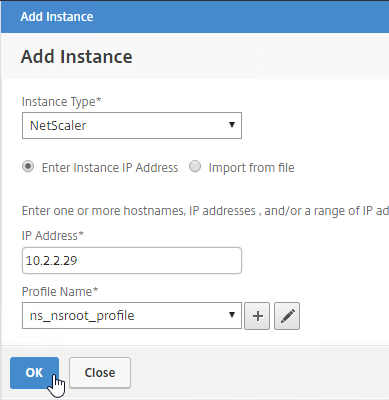
Add Instances
NetScaler MAS must discover NetScaler instances before they can be managed. Citrix Docs How NetScaler MAS Discovers Instances.
- On the Add New Instances page, click + New near the top right.

- Enter the NSIP address of a NetScaler appliance.
- Click the pencil next to ns_nsroot_profile.
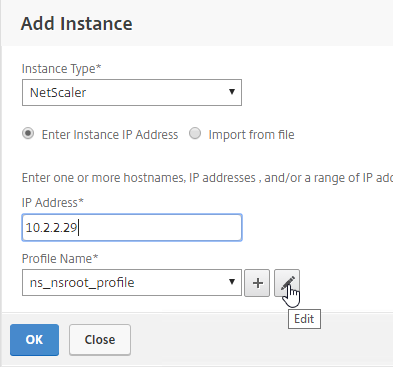
- Check the box next to Do you want to change the password and enter the password for the nsroot account. MAS will use this password to login to the NetScaler instance.
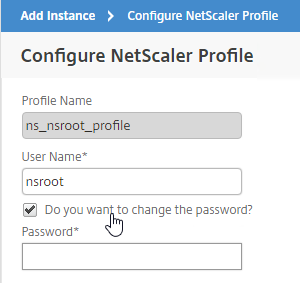
- The NetScaler Profile defaults to using https for instance communication. You can change it by unclicking Use global settings for NetScaler communication.
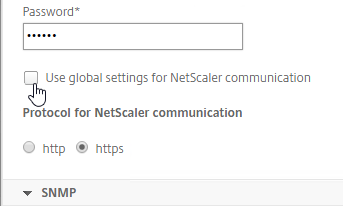
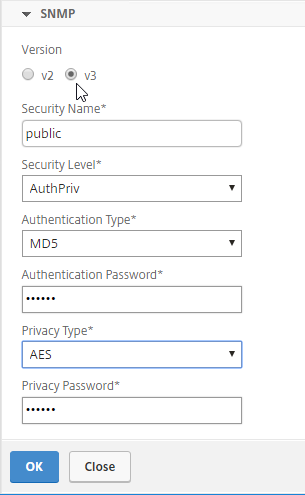
- Enter an SNMP v2 community string or SNMP v3 Security Name that NetScaler MAS will configure on the appliance.
- Click OK.
- Then click OK to add the instance.
- A progress window will appear.
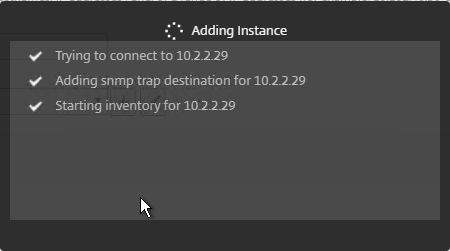
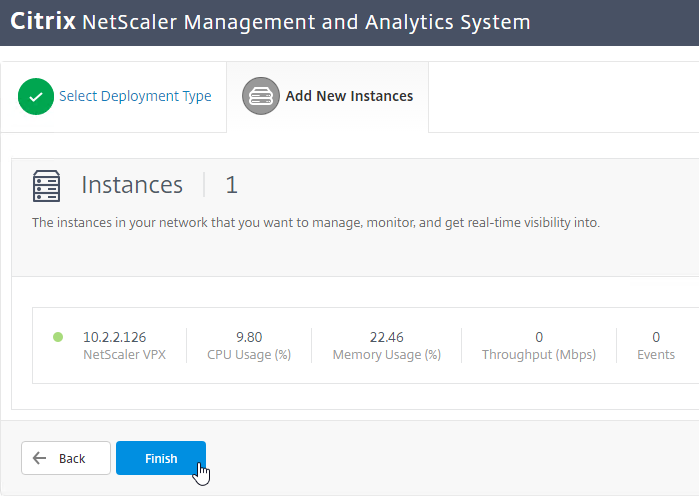
- You can add more instances, or just click Finish.
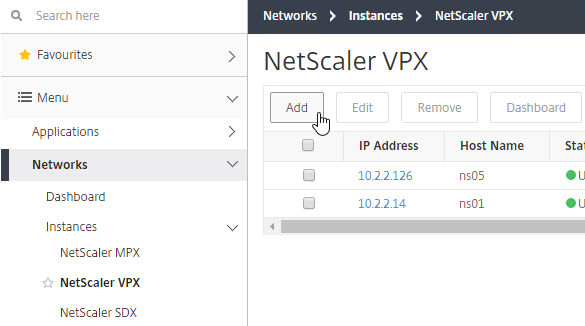
- To add more instances later, click the top left hamburger icon, go to Networks > Instances, select the Instance type, and on the right, click Add.

NetScaler SDX
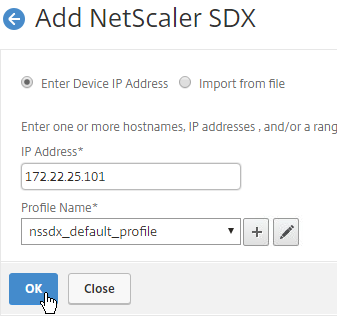
- At Networks > Instances > NetScaler SDX, you can click Add to discover a SDX appliance, and all VPXs on that appliance. You don’t have to discover the VPXs separately.
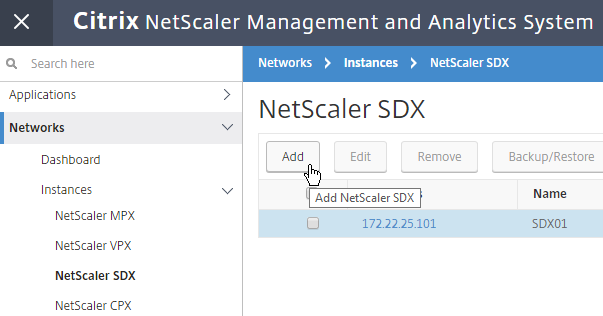
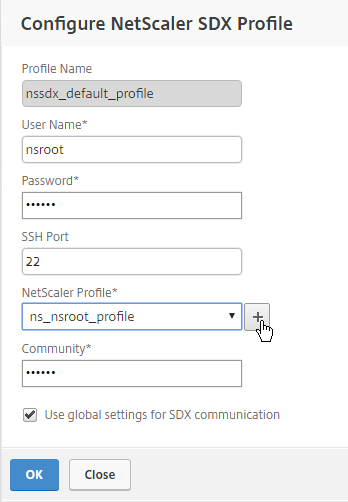
- In the Add NetScaler SDX page, click the pencil icon next to the Profile Name drop-down to edit nssdx_default_profile. Or you can click the plus icon to create a new SDX Profile. Note: SDX profiles are different than VPX profiles.

- Enter the credentials for the SDX SVM Management Service.
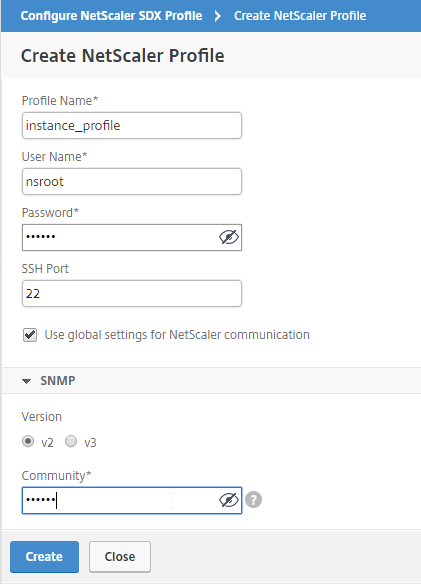
- For NetScaler Profile, select an admin profile that has nsroot credentials for the VPX instances. If you don’t have one in your drop-down list, click the plus icon. Note: You can only select one NetScaler Profile. If each VPX instance has different nsroot credentials, you can fix it after SDX discovery has been performed. The NetProfile Profile is different than the SDX Profile.
- In the Create NetScaler Profile page, enter the nsroot credentials for the VPX instances, and click Create.
- In the Create NetScaler Profile page, enter the nsroot credentials for the VPX instances, and click Create.
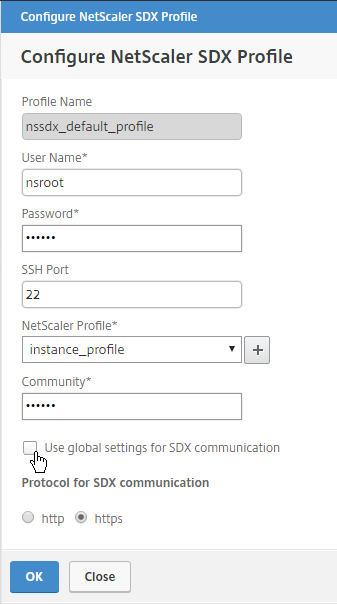
- Back in the Configure NetScaler SDX Profile page, you can uncheck the box for Use global settings for SDX communication, and change the protocol. Click OK when done.
- Back in the Add NetScaler SDX page, click OK to start discovery.
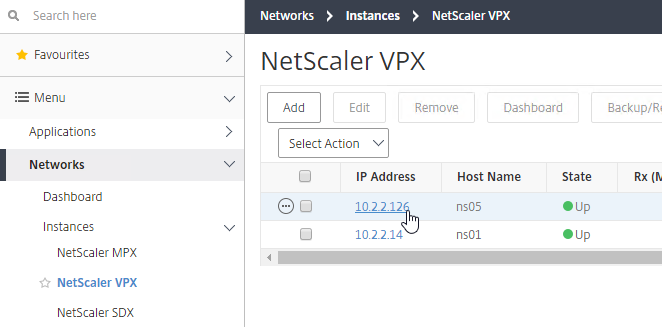
- After discovery is complete, on the left, go to Networks > Instances > NetScaler VPX. You should automatically see the VPX instances.
- To specify the nsroot credentials for a VPX, right-click the VPX, and click Edit.
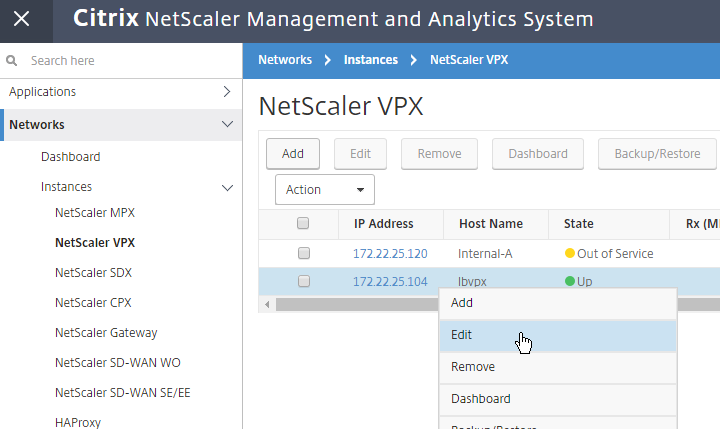
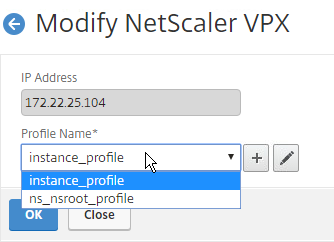
- In the Modify NetScaler VPX page, either select an existing Profile Name, or click the plus icon to create a new one. Click OK when done. It should start rediscovery automatically.
- In the Modify NetScaler VPX page, either select an existing Profile Name, or click the plus icon to create a new one. Click OK when done. It should start rediscovery automatically.
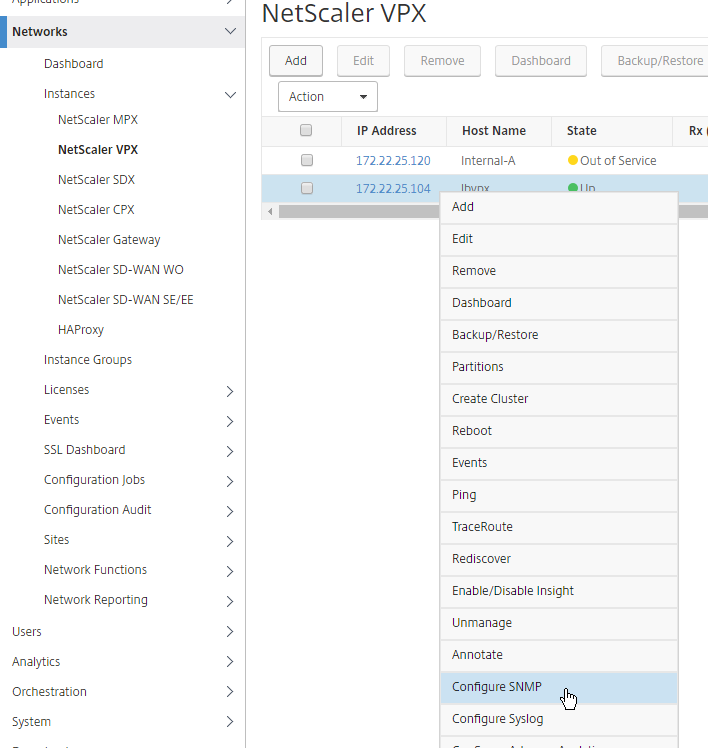
- After fixing the nsroot credentials, right-click the VPX instance, and click Configure SNMP. MAS will configure the VPX to send SNMP Traps to MAS.
Instance management
- REST API proxy – NetScaler MAS can function as a REST API proxy server for its managed instances. Instead of sending API requests directly to the managed instances, REST API clients can send the API requests to NetScaler MAS. See Citrix CTX228449 NetScaler MAS as an API Proxy Server
- NetScaler VPX Check-In/Check-Out Licensing – You can allocate VPX licenses to NetScaler VPX instances on demand from NetScaler MAS. The Licenses are stored and managed by NetScaler MAS, which has a licensing framework that provides scalable and automated license provisioning. A NetScaler VPX instance can check out the license from the NetScaler MAS when a NetScaler VPX instance is provisioned, or check back in its license to NetScaler MAS when an instance is removed or destroyed. See Citrix CTX228451 NetScaler VPX Check-In/Check-Out Licensing with NMAS
Licenses
Virtual Server License Packs
Without licenses, you can enable analytics features on only 30 Virtual Servers. You can install additional licenses in 100 Virtual Server packs. More info at NetScaler MAS Licensing at Citrix Docs.
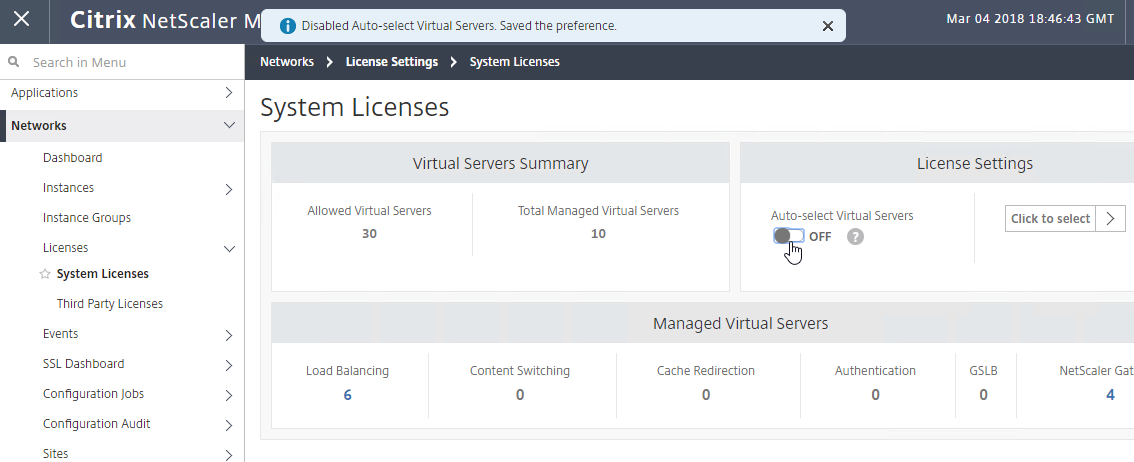
- Go to Networks> Licenses > System Licenses to see the number of currently installed licenses, and the number of managed virtual servers.
- By default, Auto-select Virtual Servers is enabled. If you disable this setting, then the Select Virtual Servers button appears.

- On the left, go to Networks > Licenses.
- On the right, notice the Host ID.
- At mycitrix.com, allocate your NetScaler MAS licenses to this Host ID.
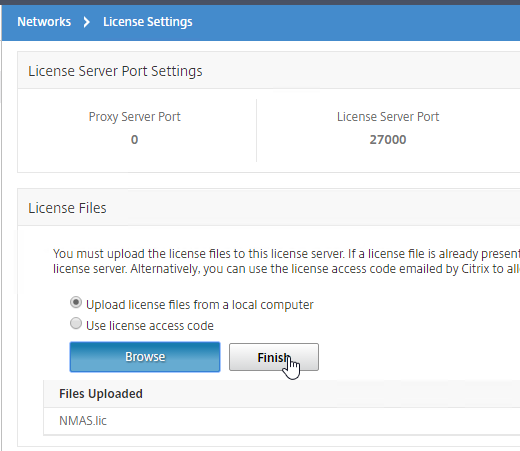
- Then use the Browse button to upload the allocated license file.
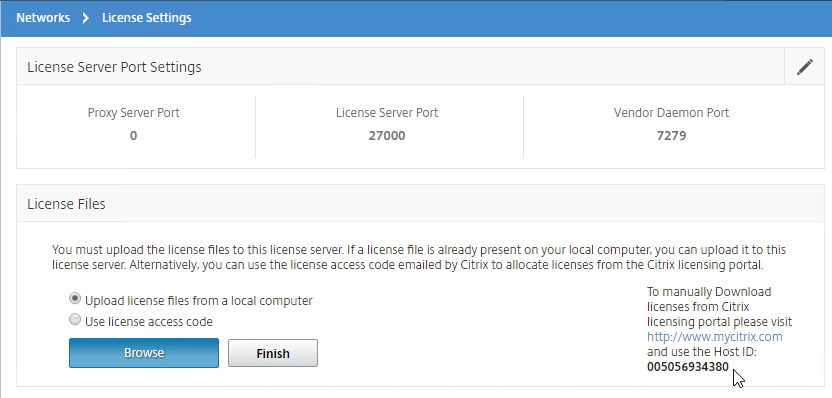
- Click Finish after uploading the license file to apply it.
- The License Expiry Information section shows you the number of installed licenses and when they expire.

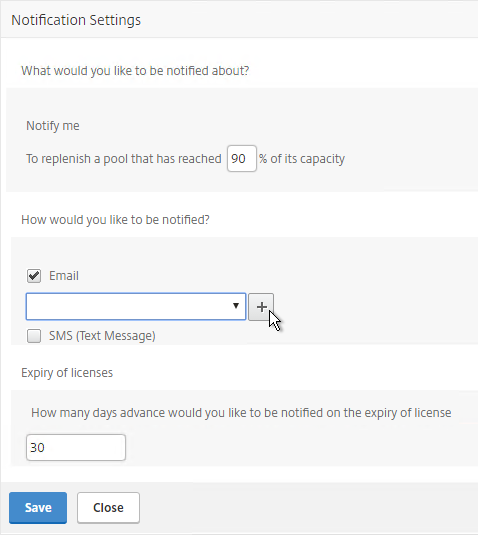
- You can use the Notification Settings section to email you when licenses are almost fully consumed or about to expire.

Allocate licenses to Virtual Servers
You can manually unassign a MAS Virtual Server license and reassign it to a different Virtual Server.
- Go to Networks > Licenses > System Licenses to see the number of Allowed Virtual Servers.
- By default, Auto-select Virtual Servers is enabled. If you disable this setting, then the Click to select button appears. Click it.
- In the top row, select the type of Virtual Server you want to unlicense or license. Yes, the headings are clickable.

- Select one or more Virtual Servers, and click the Mark Unlicensed button. Only the licensed Virtual Servers are listed.
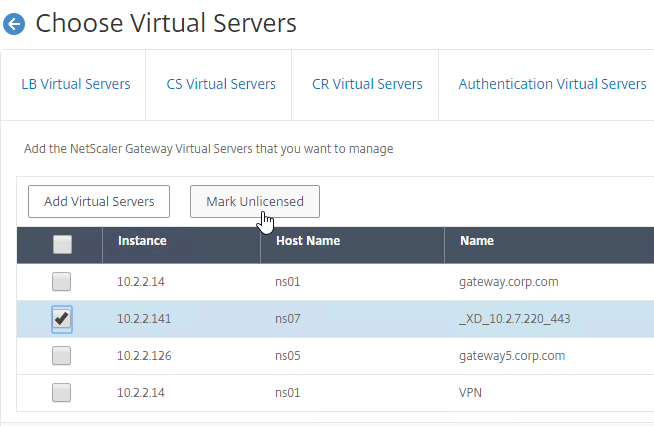
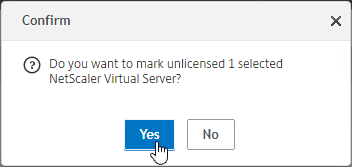
- Click Yes when asked to mark unlicensed.
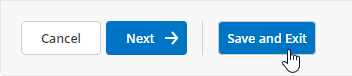
- The unlicensed Virtual Servers won’t be removed from the list until you click the Save and Exit or Finish button.
- Back in Choose Virtual Servers, to allocate a license to a Virtual Server, click the Add Virtual Servers button.
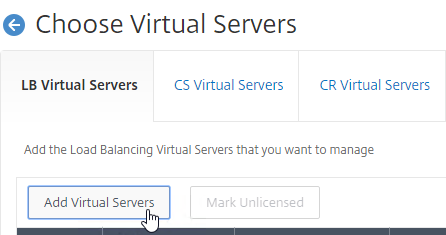
- Select the Virtual Server(s) you want to allocate.
- You can use the Search button.
- 12.0 build 57 adds a Throughput column, so you can see how much traffic each vServer is currently handling.
- At the top of the screen, click the blue Select button.
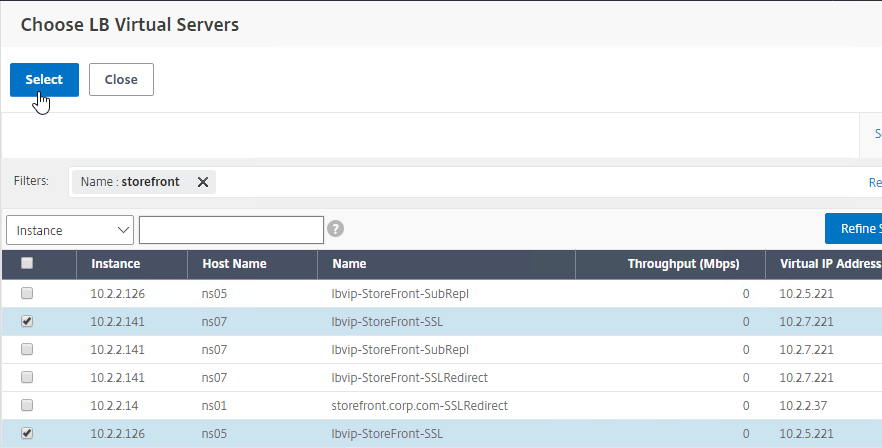
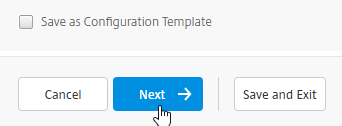
- Click Save & Exit or Finish when done.
Enable AppFlow / Insight
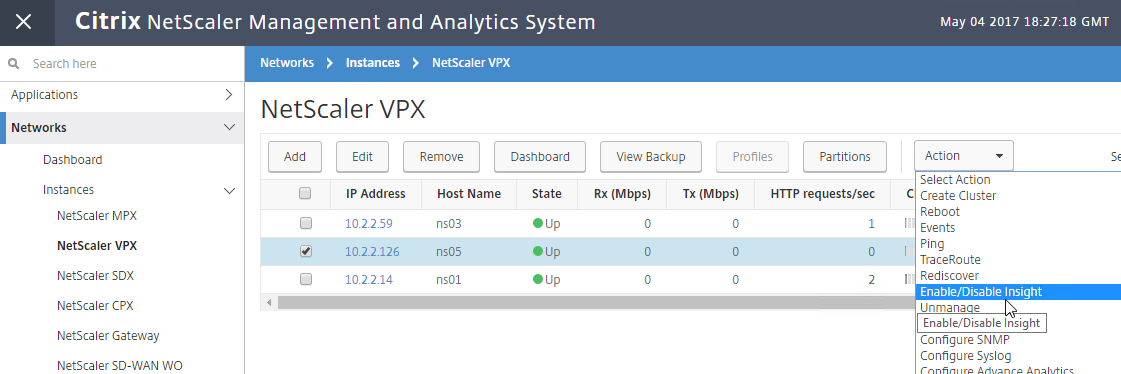
- Go to Networks > Instances > Instance type (e.g. NetScaler VPX).
- Right-click an instance, and then click Enable/Disable Insight.
- At the top of the page are boxes you can check.
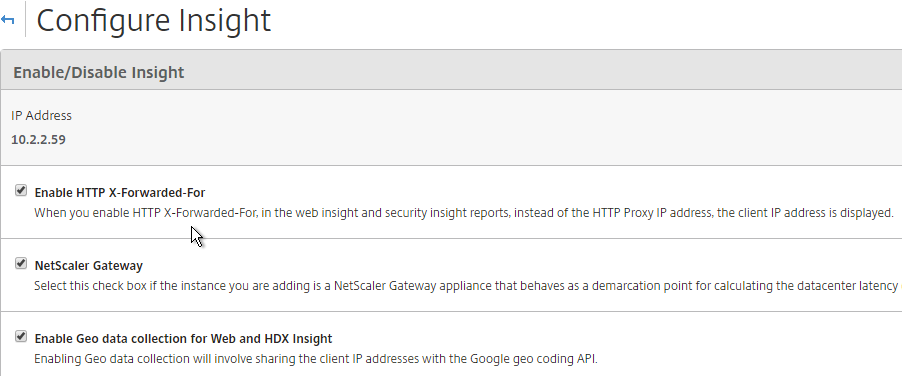
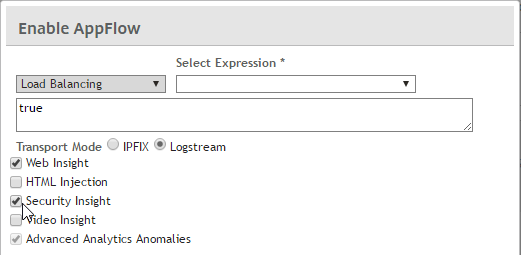
- With Load Balancing selected in the View list, right-click your StoreFront load balancer, and click Enable AppFlow. If you don’t see your Virtual Server in this list, then you need to assign a license.
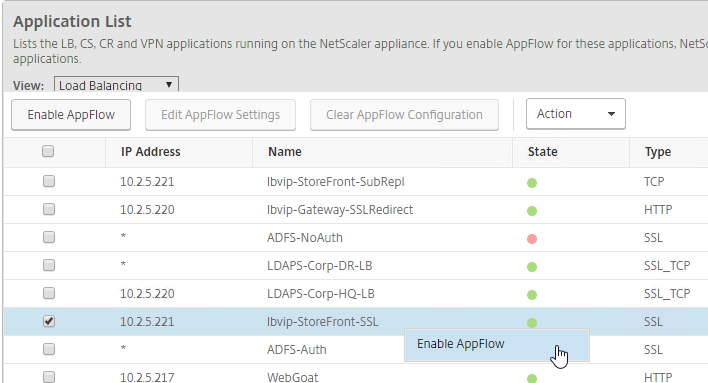
- Type in true.
- Select Web Insight.
- If App Firewall is enabled on the vServer, then also select Security Insight.
- HTML Injection injects JavaScript in HTTP responses to measure page load times.
- Click OK.
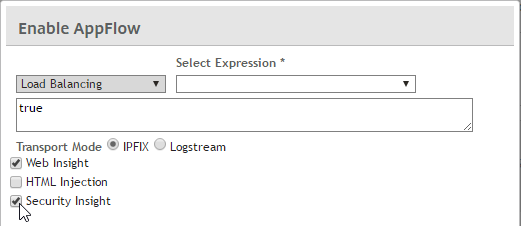
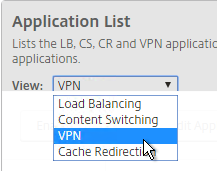
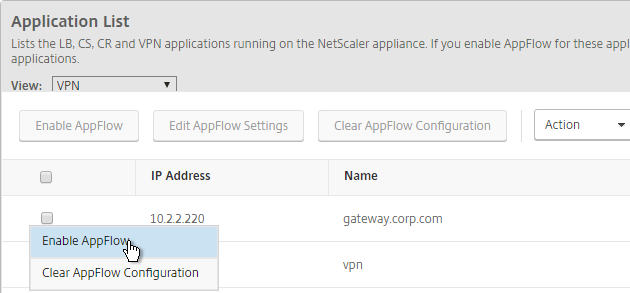
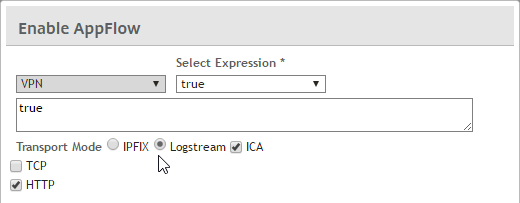
- Use the View drop-down to select VPN.
- Right-click a NetScaler Gateway Virtual Server, and click Enable AppFlow.
- In the Select Expression drop-down, select true.
- For Export Option, select ICA and HTTP, and click OK. The HTTP option is for Gateway Insight.
- The TCP option is for the second appliance in double-hop ICA. If you need double-hop, then you’ll also need to run
set appflow param -connectionChaining ENABLEDon both appliances. See Enabling Data Collection for NetScaler Gateway Appliances Deployed in Double-Hop Mode at Citrix Docs for more information.

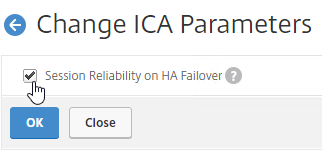
- By default, with AppFlow enabled, if a NetScaler High Availability pair fails over, all Citrix connections will drop, and users must reconnect manually. NetScaler 11.1 build 49 adds a new feature to replicate Session Reliability state between both HA nodes.
- From Session Reliability on NetScaler High Availability Pair at Citrix Docs: Enabling this feature will result in increased bandwidth consumption, which is due to ICA compression being turned off by the feature, and the extra traffic between the primary and secondary nodes to keep them in sync.
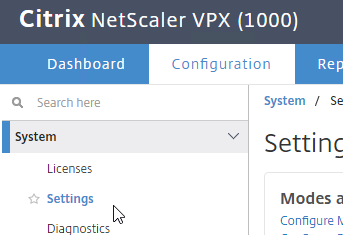
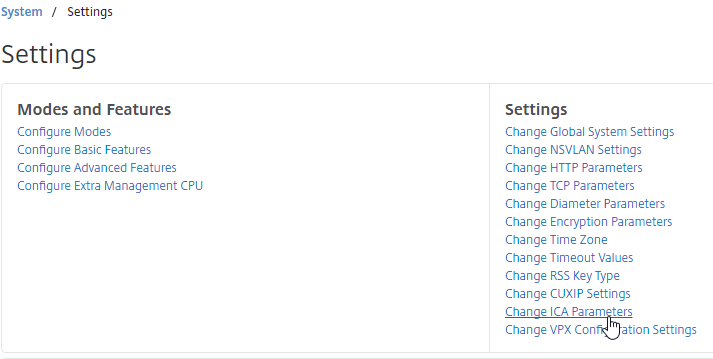
- If you still want this feature, on a NetScaler 11.1 build 49 and newer appliance, go to System > Settings.
- On the right, in the Settings section, click Change ICA Parameters.
- Check the box next to Session Reliability on HA Failover, and click OK.
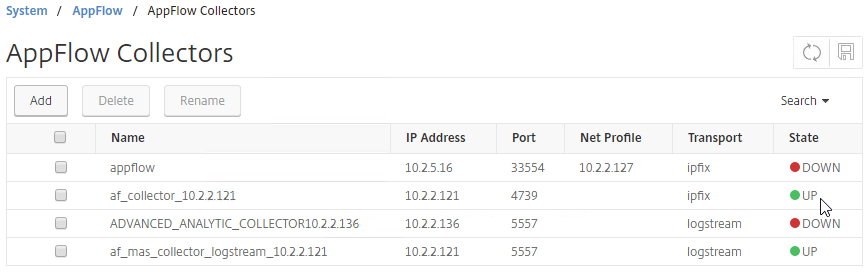
- In a NetScaler 12 instance, at System > AppFlow > Collectors, you can see if the Collector (MAS) is up or not. However, NetScaler uses SNIP to verify connectivity, but AppFlow is sent using NSIP, so being DOWN doesn’t necessarily mean that AppFlow isn’t working. Citrix CTX227438 After NetScaler Upgrade to Release 12.0 State of AppFlow Collector Shows as DOWN.
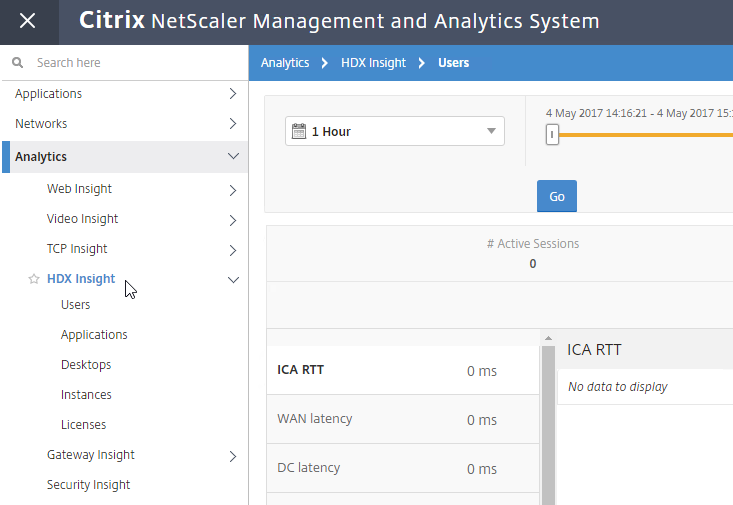
- AppFlow (e.g. HDX Insight) information can be viewed in NetScaler MAS under the Analytics node.
Citrix Blog Post – NetScaler Insight Center – Tips, Troubleshooting and Upgrade
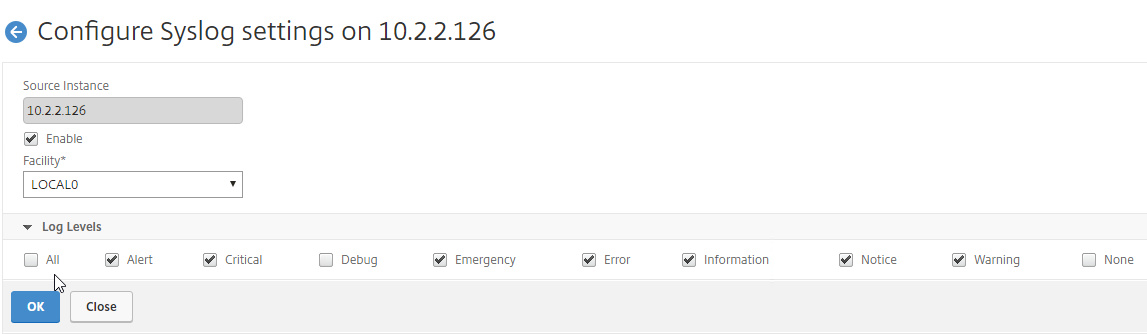
Enable Syslog on Instance
MAS can configure Syslog on the NetScaler instances, including sending Syslog to MAS.
Configure Syslog Method:
- Go to Networks > Instances > Instance Type.
- On the right, right-click an instance and click Configure Syslog.
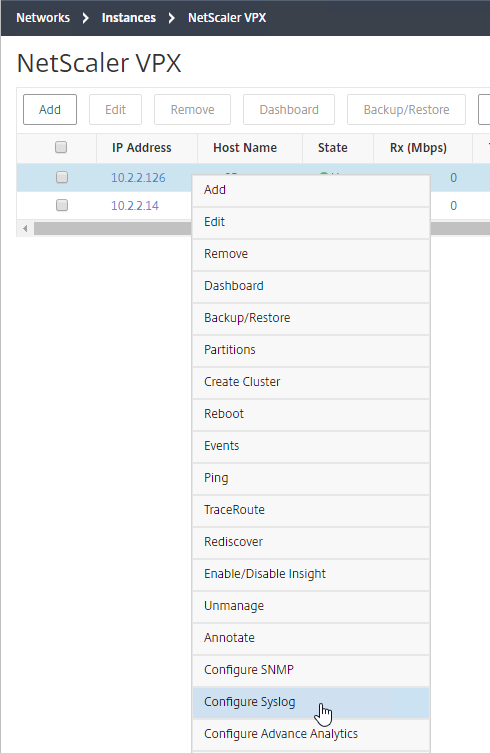
- Uncheck All and check the other boxes. You probably don’t want Debug. Click OK.
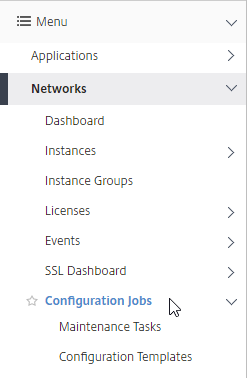
Configuration Job Method:
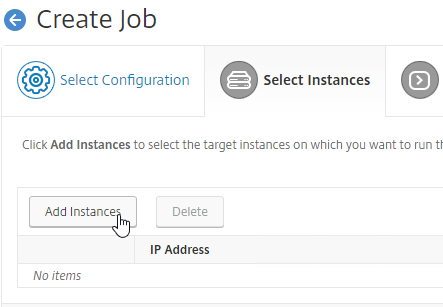
- Go to Networks > Configuration Jobs.
- On the right, click Create Job.

- Give the job a name.
- Change the Configuration Source drop-down to Inbuilt Template.

- On the left, drag the NSConfigureSyslogServer blue text to the right side of the screen. Notice that this job uses variables.
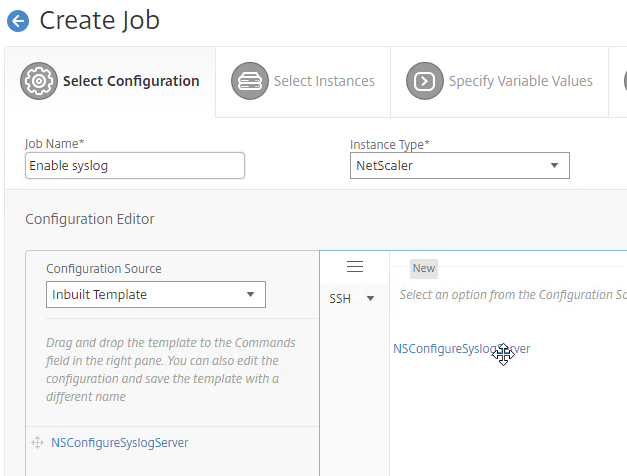
- On the bottom, click Next.
- On the Select Instances page, click Add Instances.
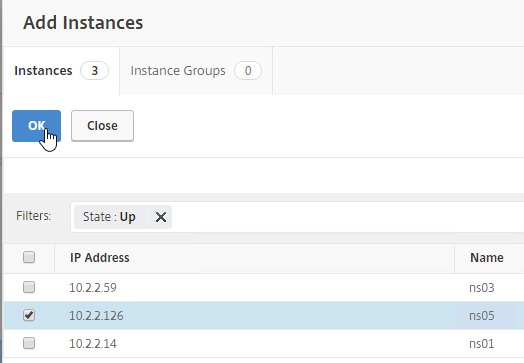
- Select one or more instances, and click OK.
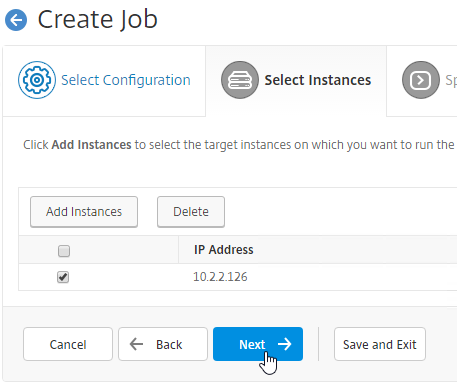
- Click Next.
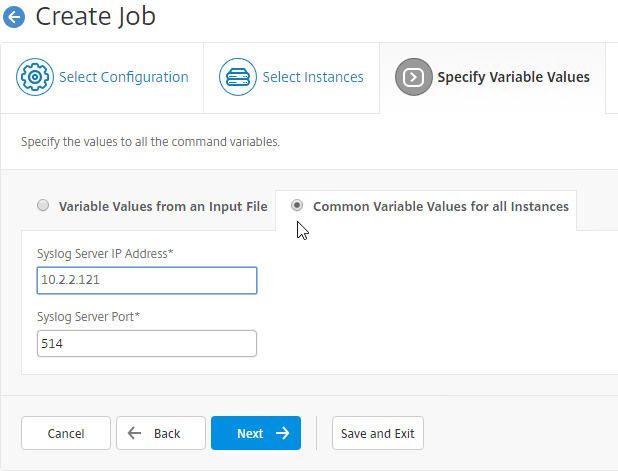
- In the Specify Variable Values page, switch to the Common Variable Values for all instances tab.
- Enter the Syslog server IP address (e.g. MAS IP address). Click Next.
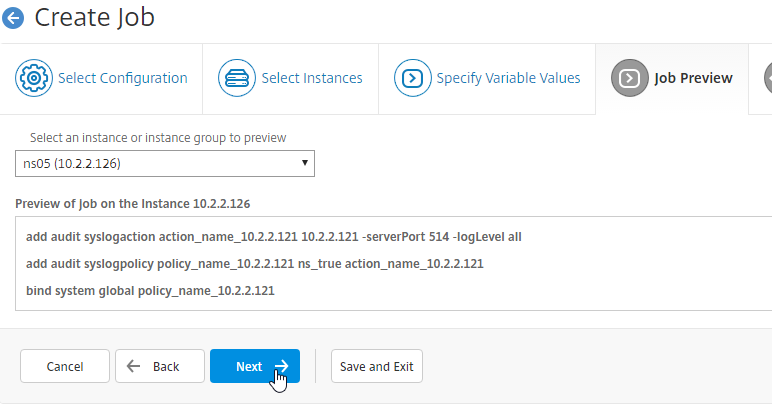
- In the Job Preview page, review the commands it’s going to run, and click Next.
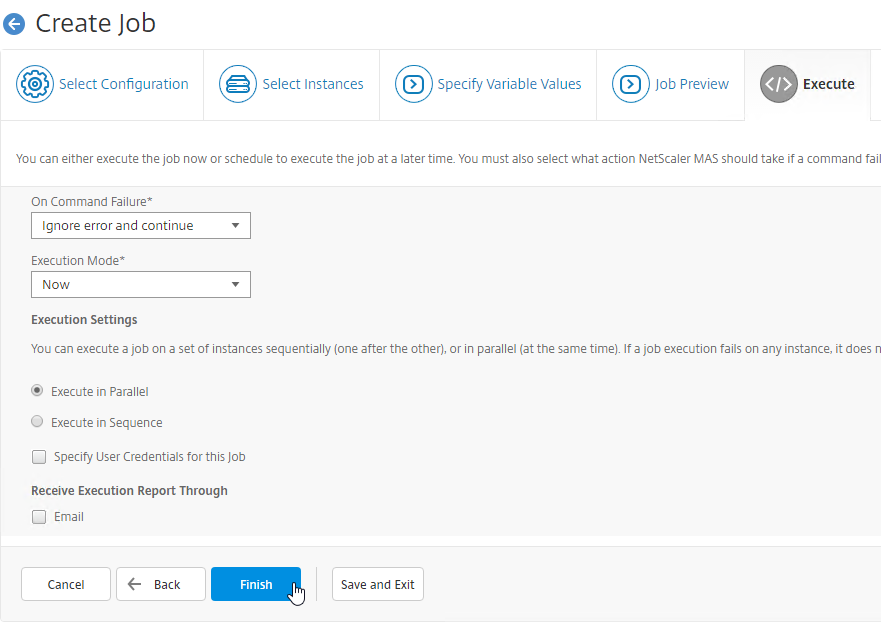
- In the Execute page, click Finish.
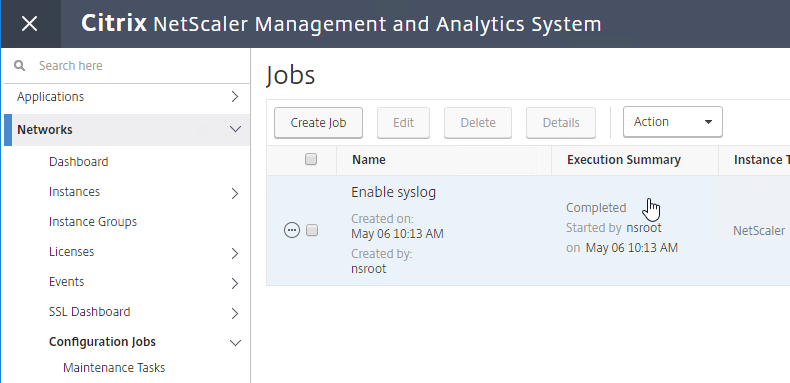
- The job will eventually say Completed.
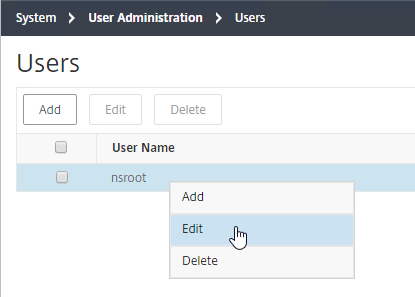
MAS Nsroot Password
- In MAS, go to System > User Administration > Users.
- On the right, right-click the nsroot account, and click Edit.
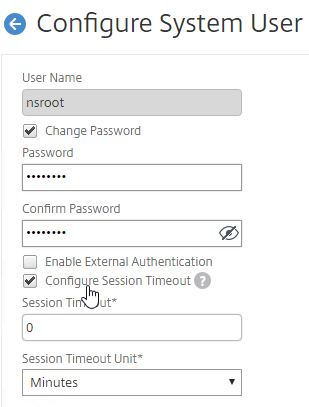
- Check the box next to Change Password and enter a new password.
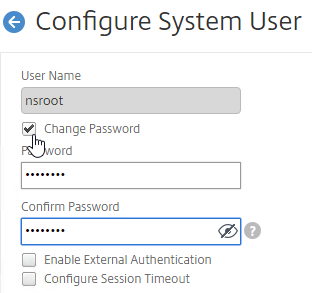
- You can also specify a session timeout by checking the box next to Configure Session Timeout. Click OK.
Management Certificate
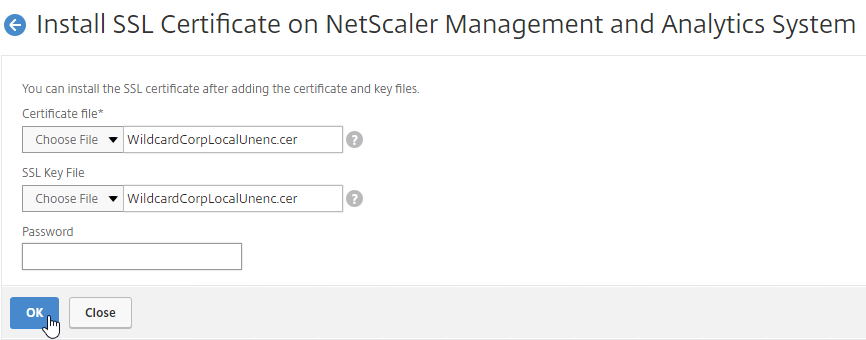
The certificate to upload must already be in PEM format. If you have a .pfx, you must first convert it to PEM (separate certificate and key files). You can use NetScaler to convert the .pfx, and then download the converted certificate from the appliance.
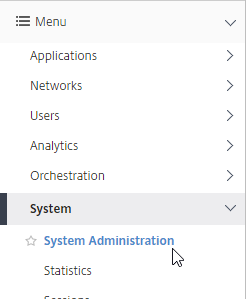
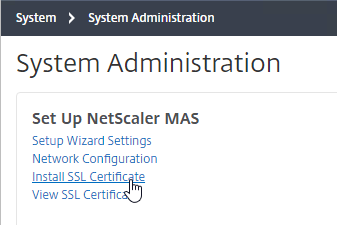
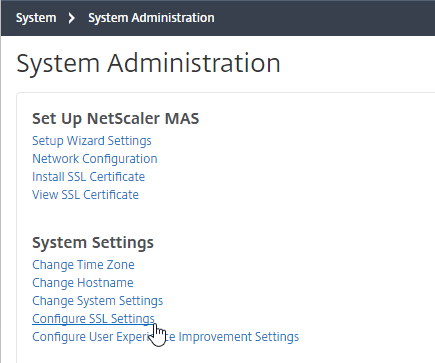
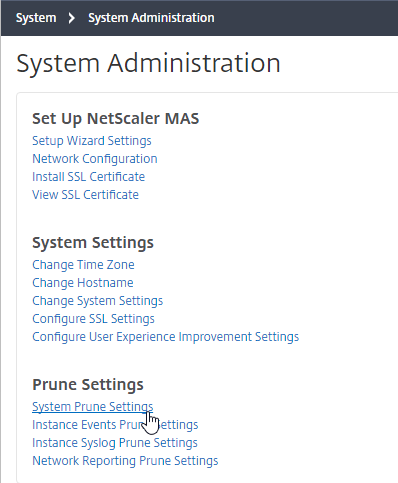
- Go to System > System Administration.
- On the right, in the Set Up NetScaler MAS section, click Install SSL Certificate.
- Click Choose File to browse to the PEM format certificate and key files. If the keyfile is encrypted, enter the password. Click OK.
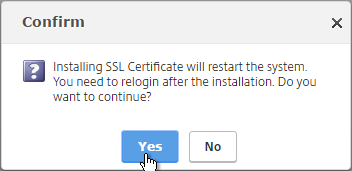
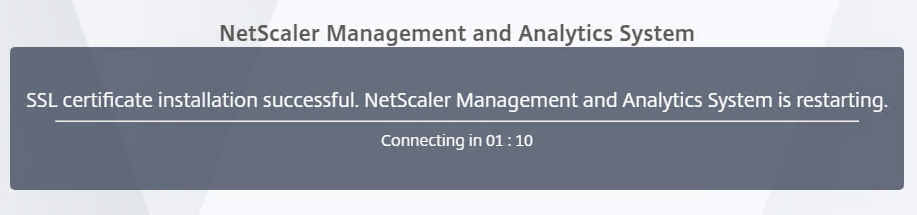
- Click Yes to reboot the system.
System Configuration
Note: the System Administration page has been rearranged slightly in MAS 12.0 build 53 and newer.
- Go to System > System Administration.
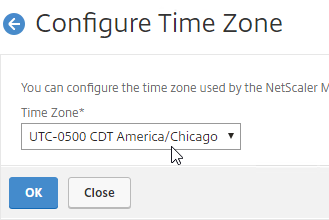
- On the right, modify settings (e.g. Change Time Zone) as desired.
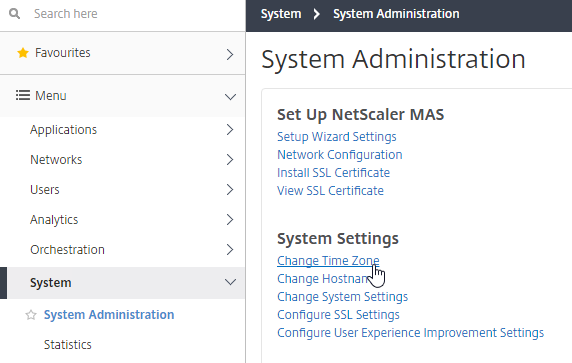
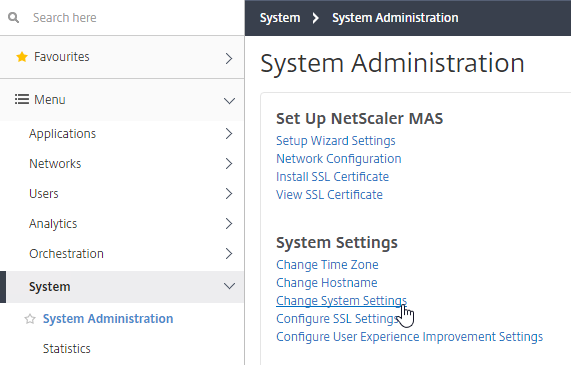
- Click Change System Settings.
- Check the box next to Enable Session Timeout, and specify a value.
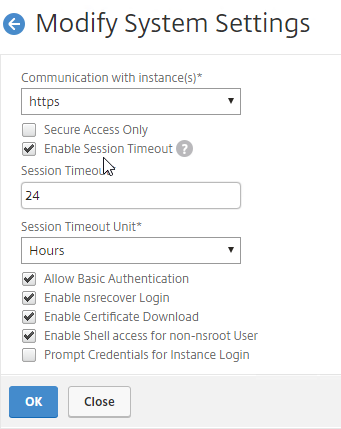
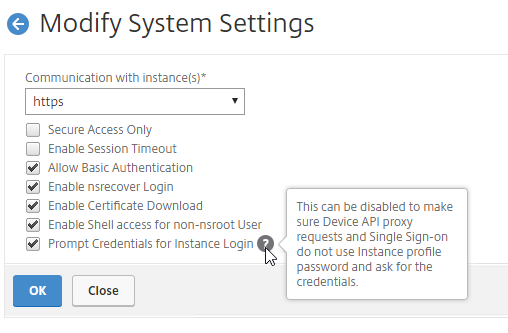
- By default, on the Instances page, if you click a blue IP address link, it opens the instance in a new webpage, and logs in using the nsroot credentials. If you want to force users to login using non-nsroot credentials, in Modify System Settings, check the bottom box for Prompt Credentials for Instance Login.
- Check the box next to Enable Session Timeout, and specify a value.
- Configure SSL Settings lets you disable TLS 1 and TLS 1.1.
- Click the Protocol Settings section in the Edit Settings section on the right side of the screen.
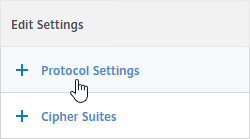
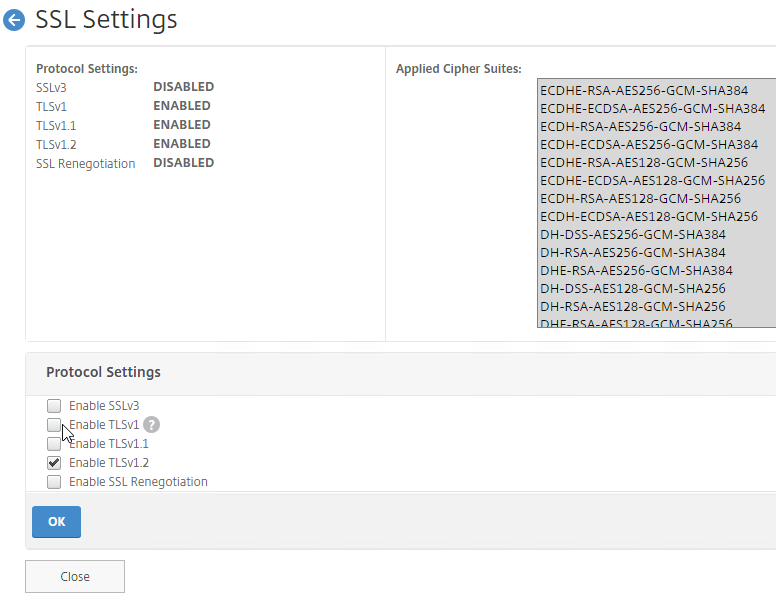
- Click the Protocol Settings section in the Edit Settings section on the right side of the screen.
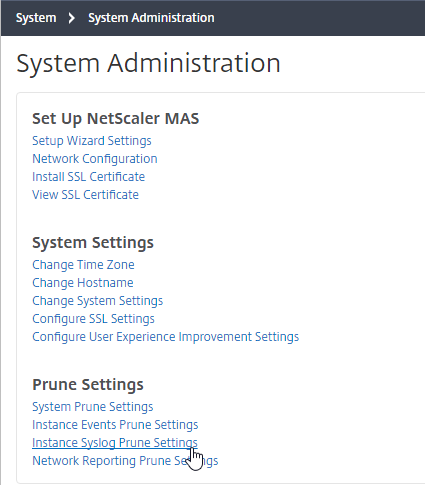
- On the left are Prune Settings.
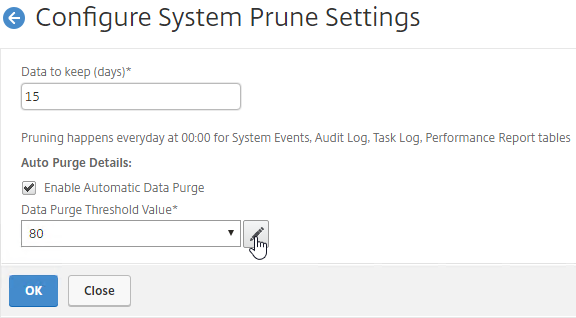
- System Prune Settings defaults to deleting System Events, Audit Logs, and Task Logs after 15 days. System events are generated by the MAS appliance, which contrasts with Instance events (SNMP traps) that are generated by NetScaler appliances.
- 12.0 build 53 and newer can initiate a purge automatically as the database starts to get full.
- If you click the pencil next to the purge threshold value, you can configure an alarm for when the database gets full.

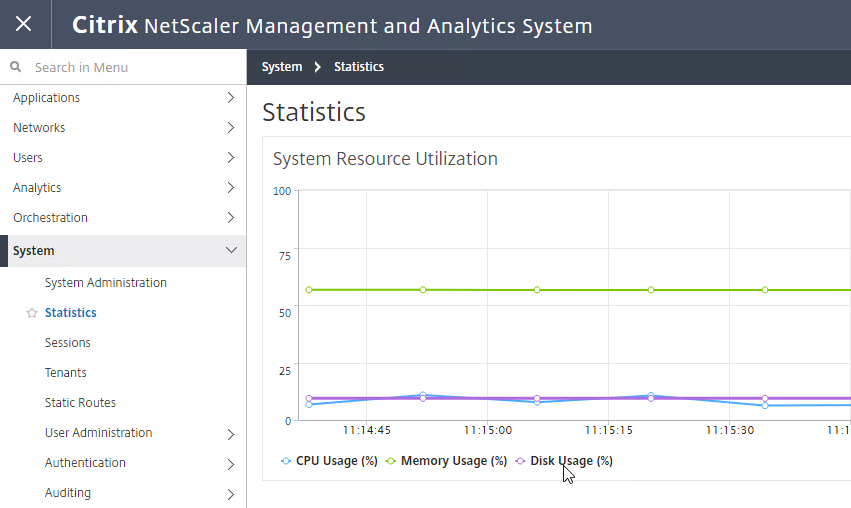
- To see the current database disk usage, go to System > Statistics.
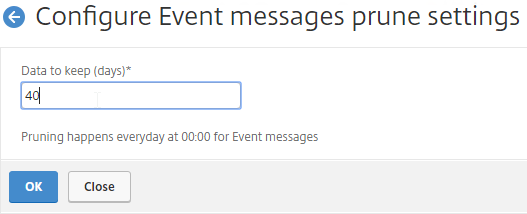
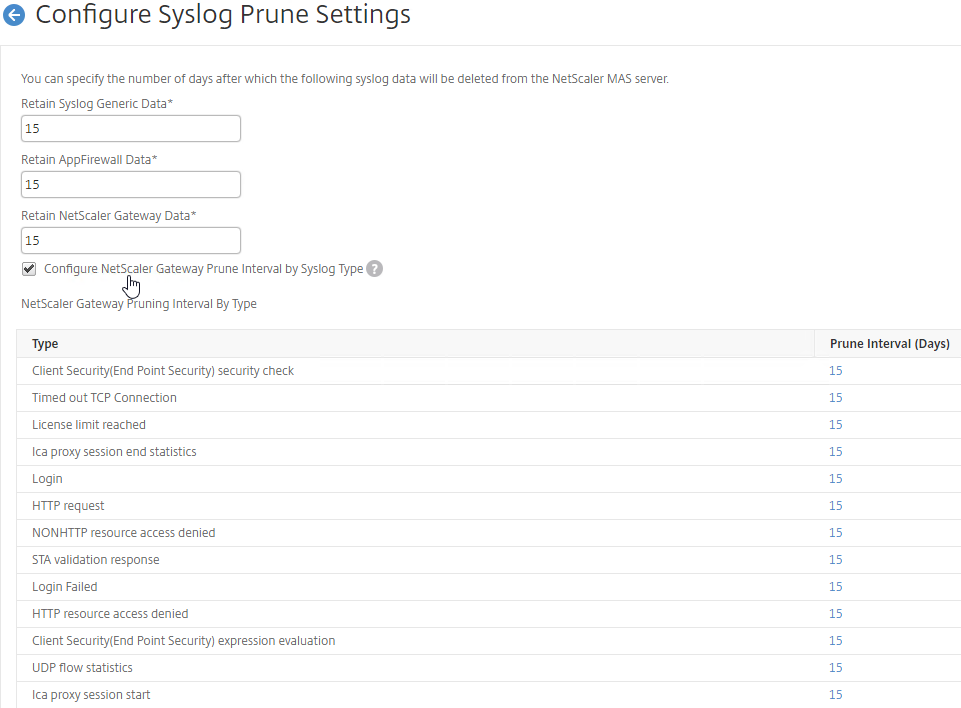
- Instance Events prune Settings controls when instance SNMP traps are pruned, which defaults to 40 days.
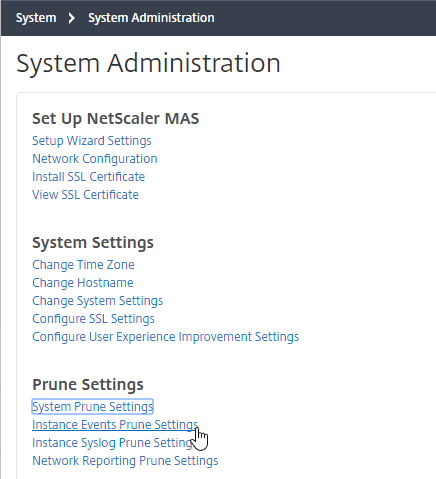
- If you are sending Syslog from instances to MAS, Instance Syslog Purge Settings controls when the log entries are purged. You can even configure different purge intervals for different types of NetScaler Gateway log entries.
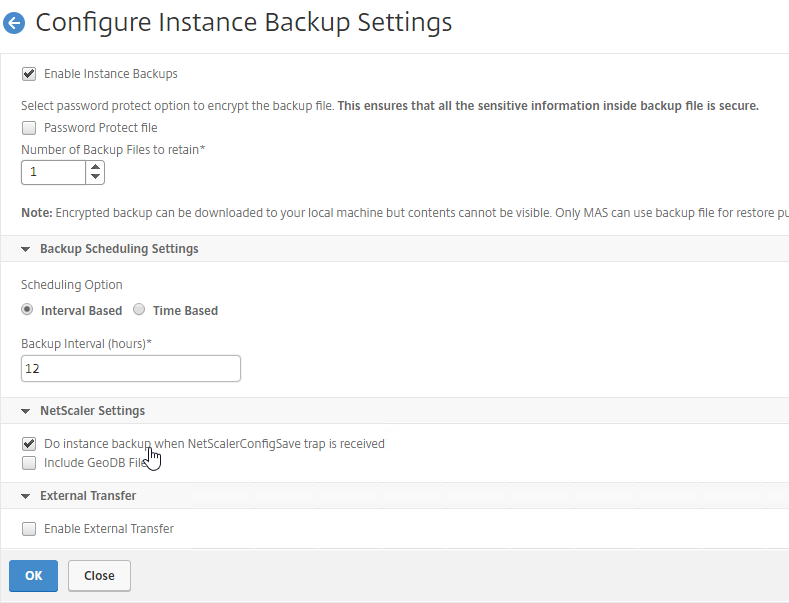
- In the right column, under Backup Settings, are additional settings.
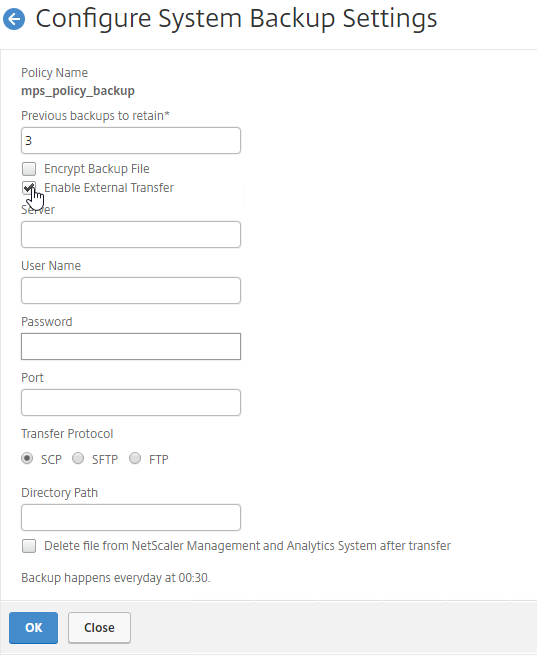
- System Backup Settings lets you export MAS backups to an external file server (External Transfer).
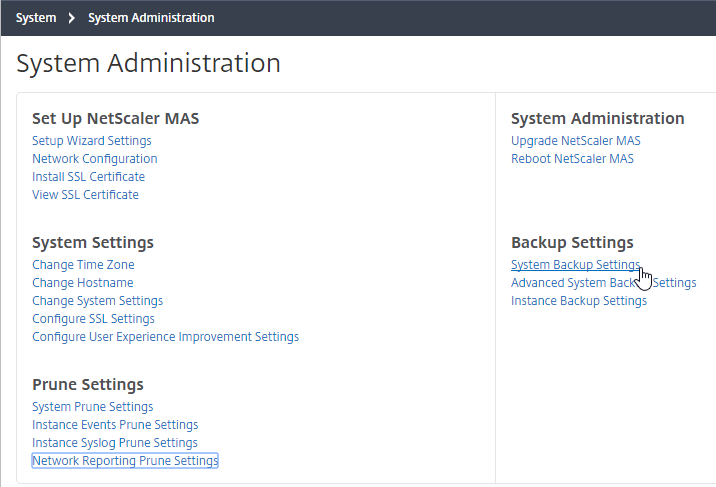
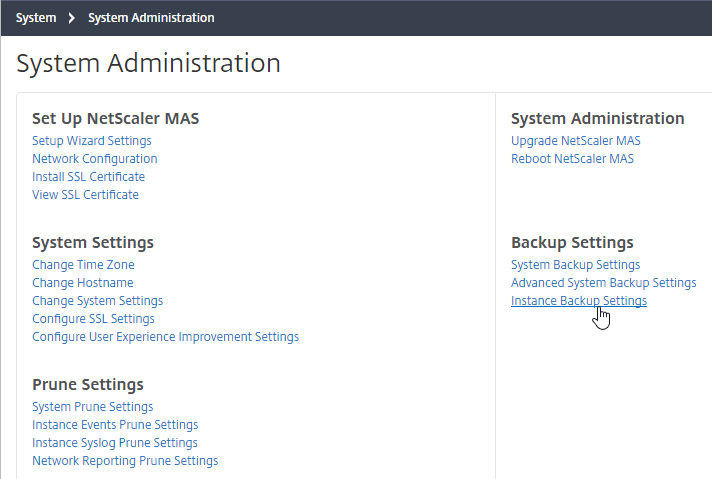
- Instance Backup Settings lets you configure how often the instances are backed up. These can also be transferred to External systems.
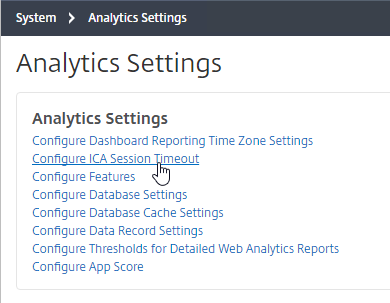
- There are more settings under System > Analytics Settings.
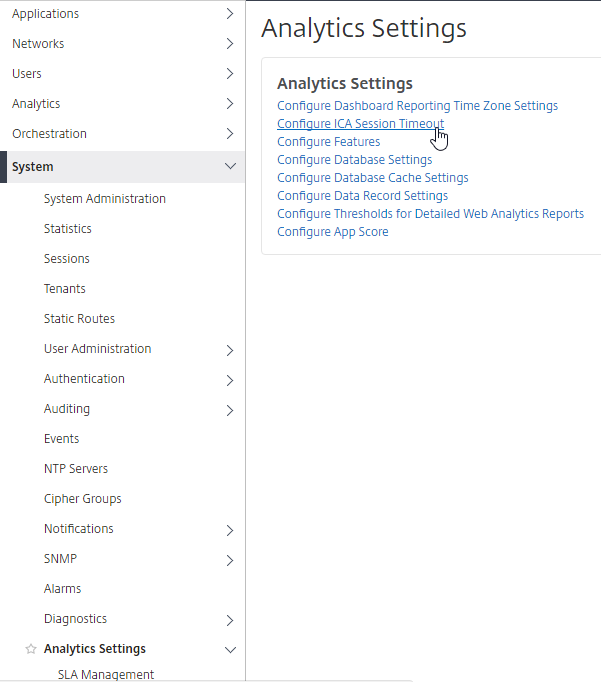
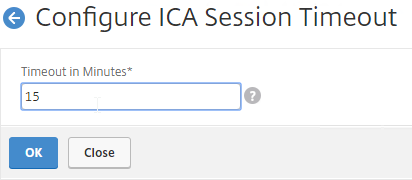
- ICA Session Timeout can be configured by clicking the link. Two minutes of non-existent traffic must occur before the session is considered idle. Then this idle timer starts.
- MAS 12.0 build 56 lets you configure how the App Score (Application Dashboard) is calculated.
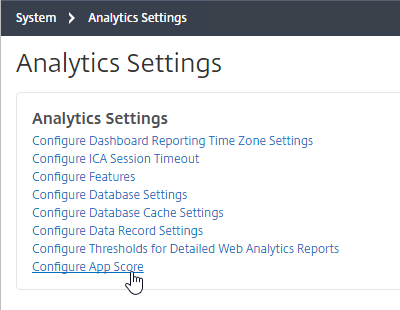

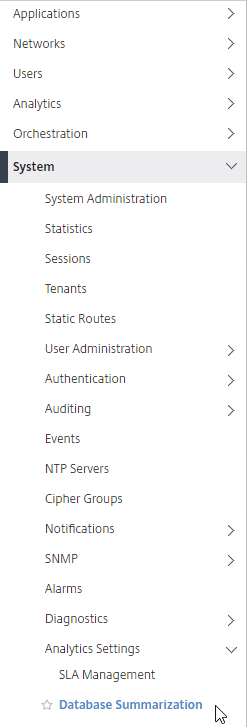
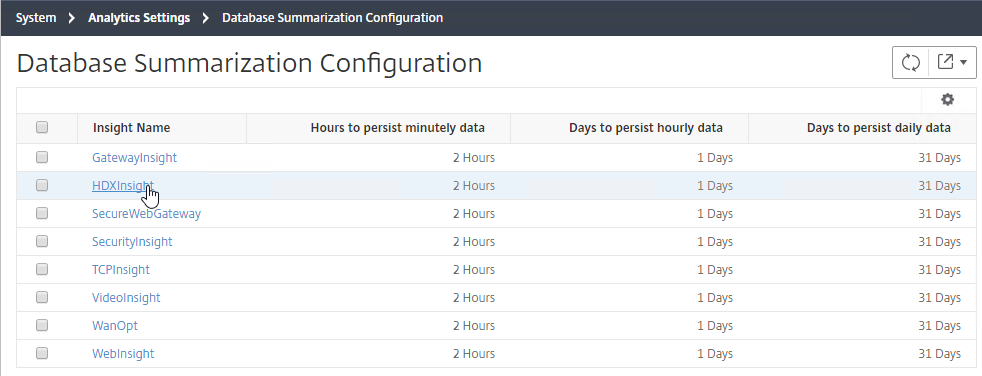
- System > Analytics Settings > Database Summarization lets you configure how long Analytics data is retained. Adjusting these values could dramatically increase disk space consumption. See CTX224238 How Do I Increase Granularity of Data Points Stored on NetScaler MAS Analytics?.
- To see the current database disk usage, go to System > Statistics.
- To see the current database disk usage, go to System > Statistics.
- On the left, click System > NTP Servers.
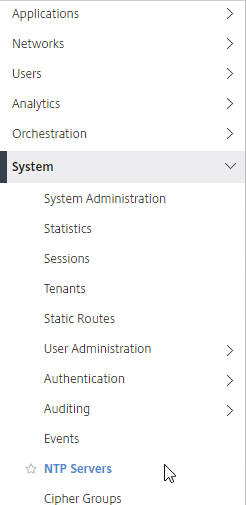
- On the right, click Add.
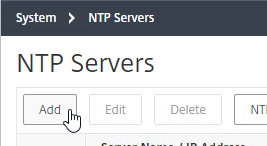
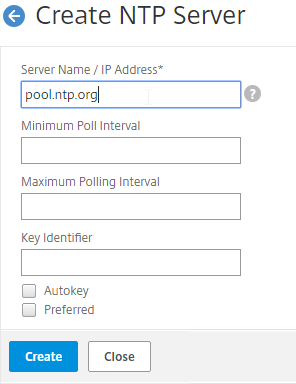
- Enter an NTP server, and click Create.
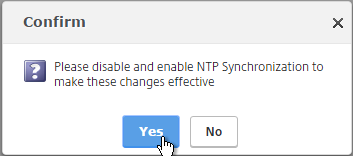
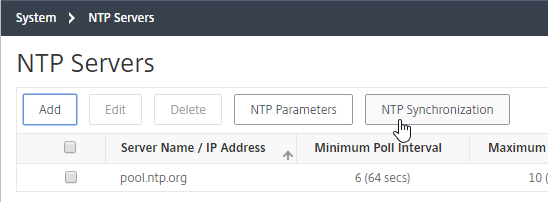
- After adding NTP servers, click the NTP Synchronization button.
- Check the box next to Enable NTP Synchronization, and click OK.
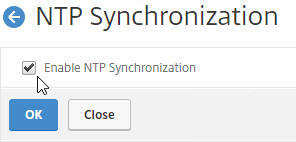
- Click Yes to restart.

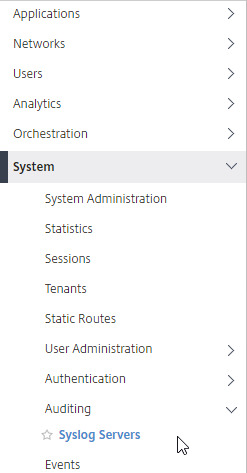
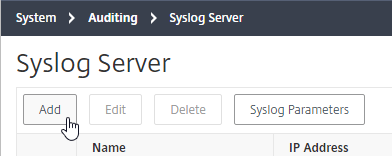
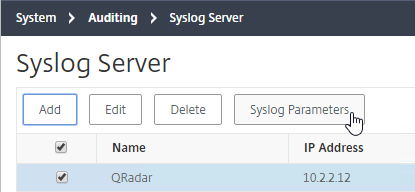
- Go to System > Auditing > Syslog Servers.
- On the right, click Add.
- Enter the syslog server IP address, and select Log Levels. Click Create.
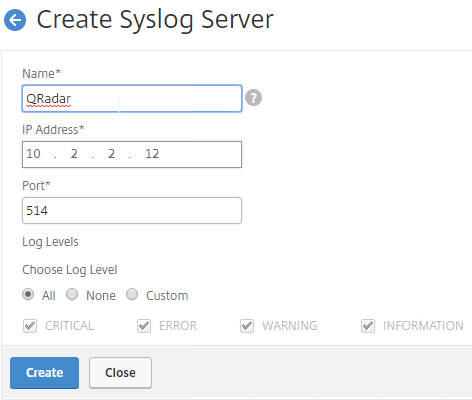
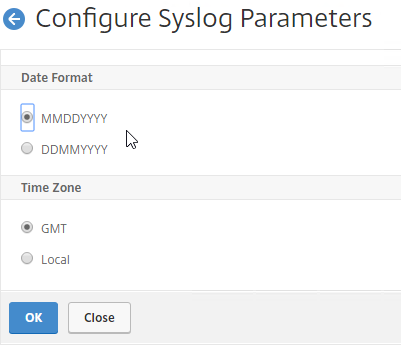
- You can click Syslog Parameters to change the timezone and date format.
System Email Notifications
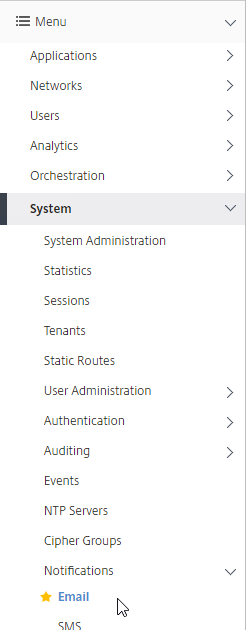
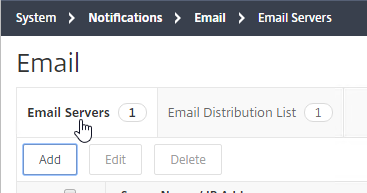
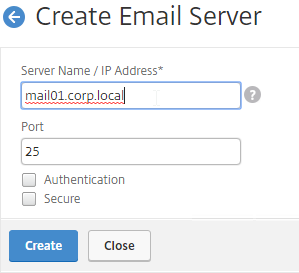
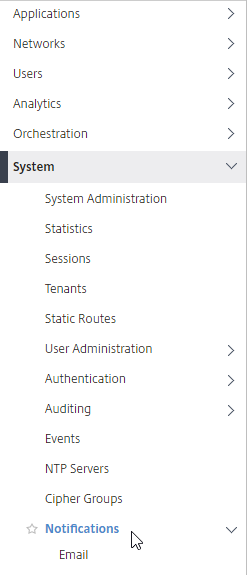
- Go to System > Notifications > Email.
- On the right, on the Email Servers tab, click Add.
- Enter the SMTP server address, and click Create.
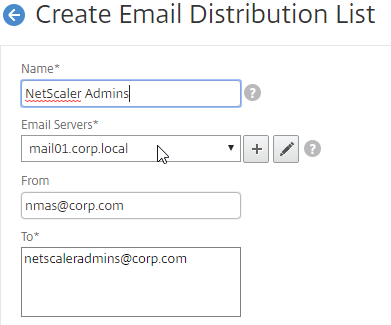
- On the right, switch to the Email Distribution List tab, and click Add.
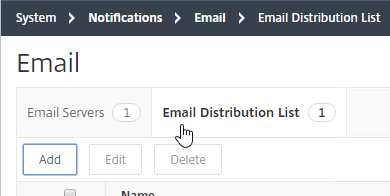
- Enter an address for a destination distribution list, and click Create.
- On the left, click System > Notifications.
- On the right, click Change Notification Settings.
- Move notification categories (e.g. UserLogin) to the right.
- Check the box next to Send Email. Select a notification distribution list. Then click OK.
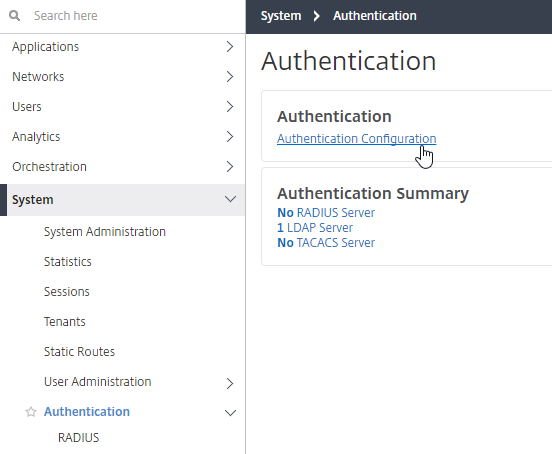
Authentication
- Go to System > Authentication > LDAP.
- On the right, click Add.
- This is configured identically to NetScaler. Enter a Load Balancing VIP for LDAP. Change the Security Type to SSL, and Port to 636. Scroll down.
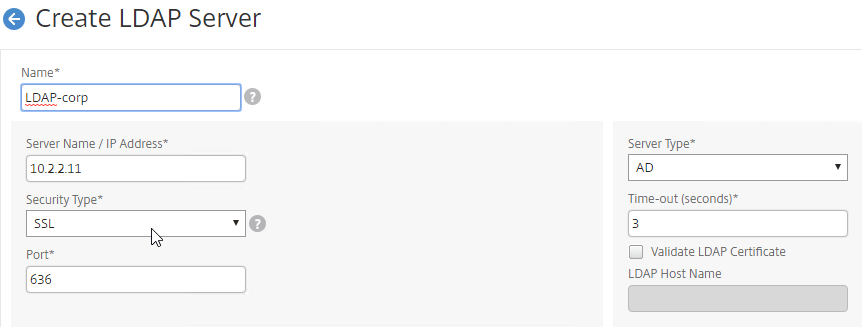
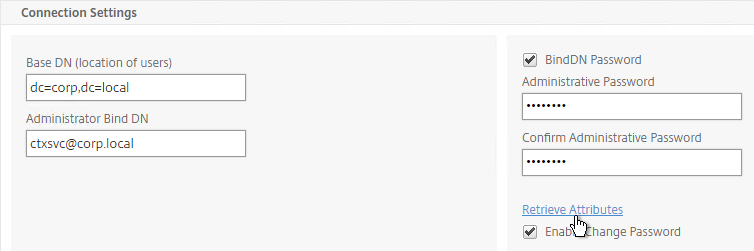
- Enter the Base DN in LDAP format.
- Enter the bind account credentials.
- Check the box for Enable Change Password.
- Click Retrieve Attributes, and scroll down.
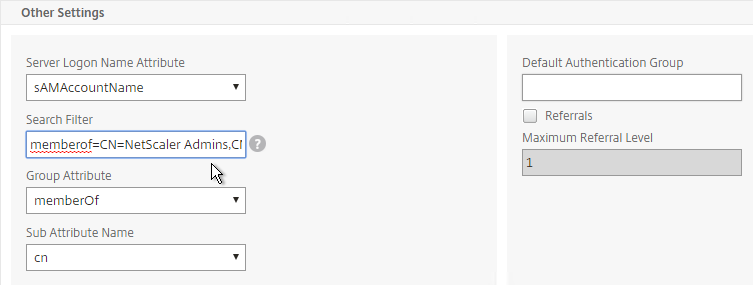
- For Server Logon Attribute, select sAMAccountName.
- For Group Attribute, select memberOf.
- For Sub Attribute Name, select cn.
- To prevent unauthorized users from logging in, configure a Search Filter. Scroll down.
- If desired, configure Nested Group Extraction.
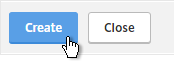
- Click Create.
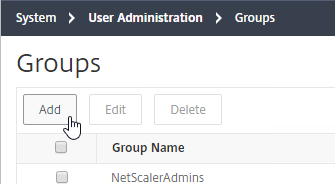
- On the left, go to System > User Administration > Groups.
- On the right, click Add.
- Enter the case sensitive name of your NetScaler Admins AD group.
- Move the admin Permission to the right.
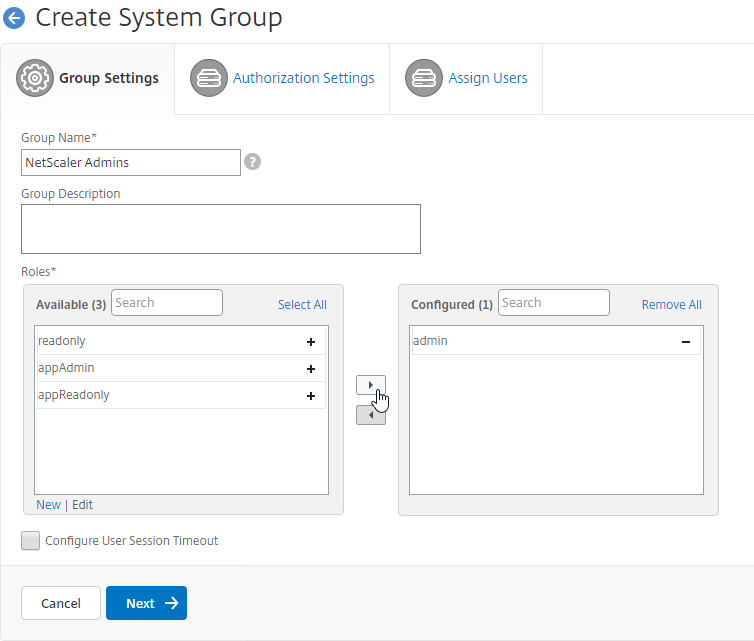
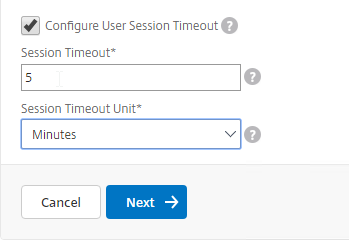
- The Configure User Session Timeout checkbox lets you configure a session timeout.
- Click Next.
- On the Applications and Templates page, click Create Group. If you are delegating limited permissions, you can uncheck these boxes and delegate specific entities.
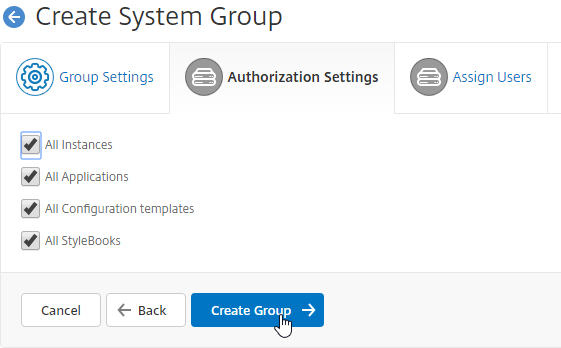
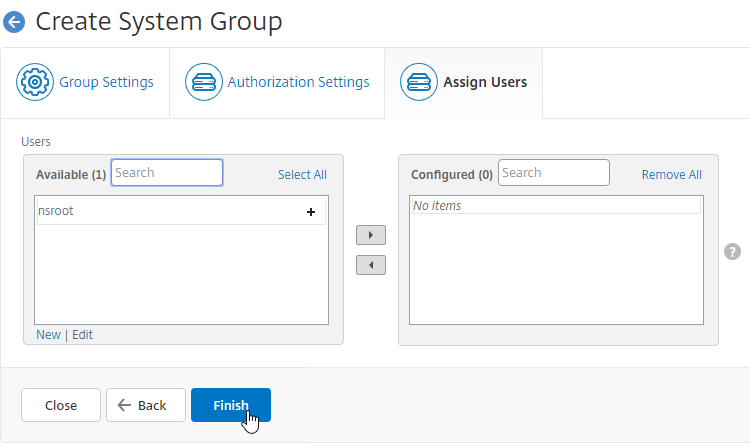
- In the Assign Users page, click Finish. Group membership comes from LDAP, so there’s no need to add local users.
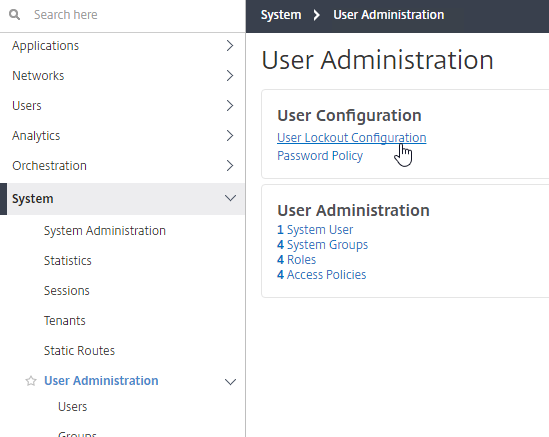
- On the left, go to System > User Administration.
- On the right, click User Lockout Configuration.
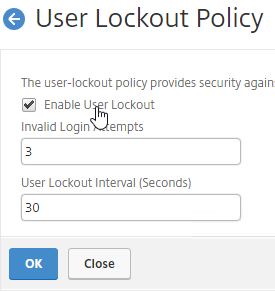
- If desired, check the box next to Enable User Lockout, and configure the maximum logon attempts. Click OK.
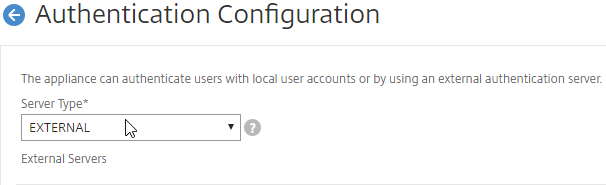
- On the left, go to System > Authentication.
- On the right, click Authentication Configuration.
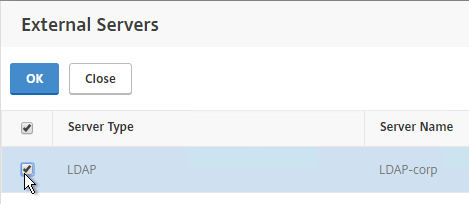
- Change the Server Type to EXTERNAL, and click Insert.
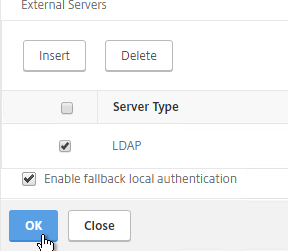
- Select the LDAP server you created, and click OK.
- Make sure Enable fallback local authentication is checked, and click OK.
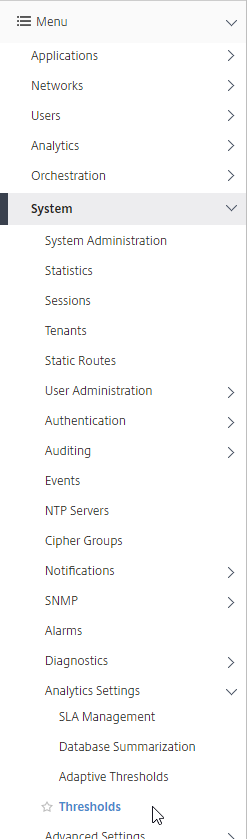
Analytics Thresholds
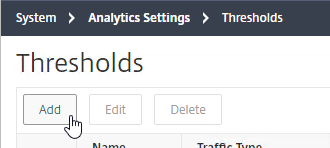
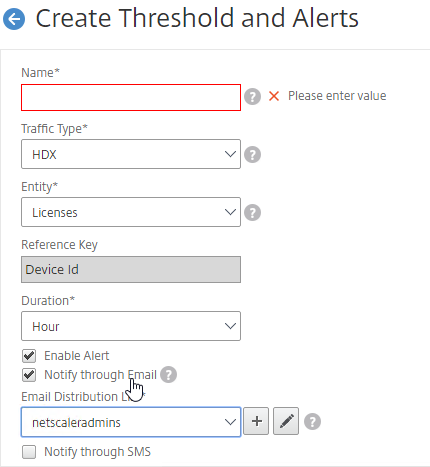
- Go to System > Analytics Settings > Thresholds.
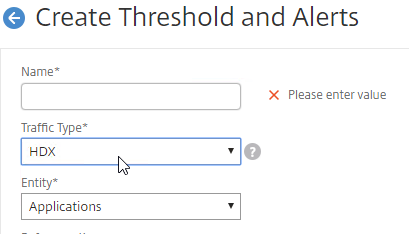
- On the right, click Add.
- Enter a name.
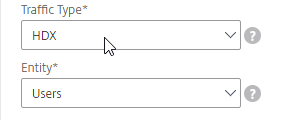
- Use the Traffic Type drop-down to select HDX, Web, or Security.
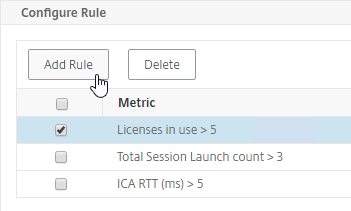
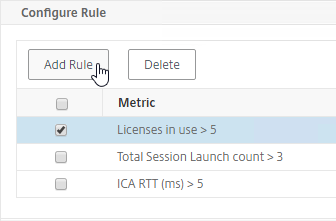
- In MAS 12.0 build 56 and newer, with HDX as the Traffic Type, the Rules section lets you add multiple rules. The other two Traffic Type options only let you specify one rule.
- In MAS 12.0 build 56 and newer, with HDX as the Traffic Type, the Rules section lets you add multiple rules. The other two Traffic Type options only let you specify one rule.
- Use the Entity drop-down to select a category of alerts. What you choose here determines what’s available as Metrics when you click Add Rule. With HDX as the Traffic Type, to add multiple rules for multiple Entity types, simply change the Entity drop-down before adding a new rule.

- Check the box to Enable Alert.
- Check the box to Notify through Email and select an existing Email Distribution List.
- In MAS 12.0 build 56 and newer, if HDX is the Traffic Type, click Add Rule to add a rule.
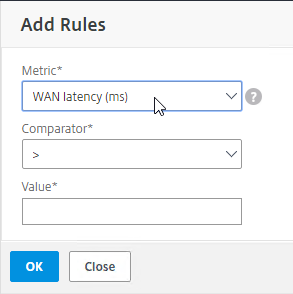
- Select a Metric, and enter threshold values (e.g. WAN Latency > 200 ms). The available metrics are based on the Entity chosen earlier. Click OK when done.
- In MAS 12.0 build 56 and newer, if HDX is the Traffic Type, you can add multiple rules for multiple Entity types.
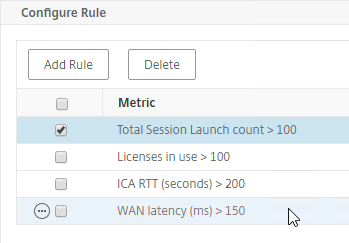
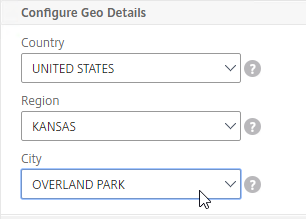
- If the Traffic Type is HDX, and the Entity drop-down is set to Users, on the bottom in the Configure Geo Details section, you can restrict the rule so it only fires for users for a specific geographical location.
- On the bottom of the window, click Create.
Geo Map
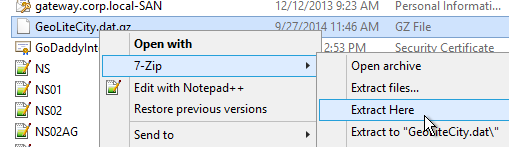
- Download the Maxmind database from http://geolite.maxmind.com/download/geoip/database/GeoLiteCity.dat.gz.
- Extract the .gz file.
- On the left, go to System > Advanced Settings, and click Geo Database Files.
- On the right, click Upload.
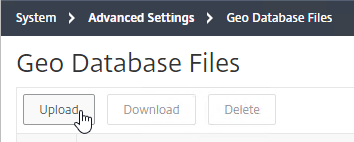
- Browse to the extracted GeoLiteCity.dat file, and click Open.

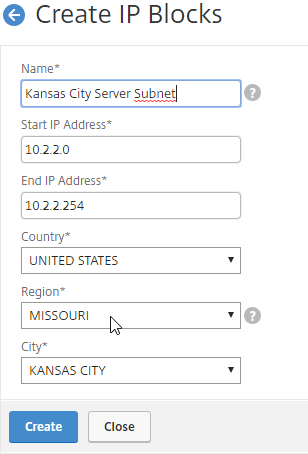
- You can also define Geo locations for internal subnets. Go to Networks > Sites > Private IP Blocks.
- On the right, click Add.
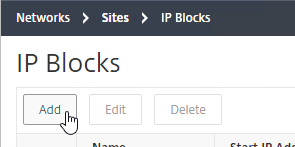
- Enter a name for the subnet.
- Enter the starting and ending IP address.
- Select a Geo Location (Country, Region, City).
- Click Create.
- On the left, go to Networks > Sites.
- On the right, click Add.
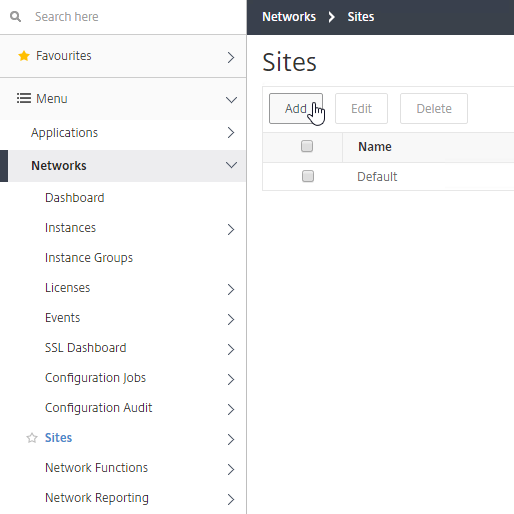
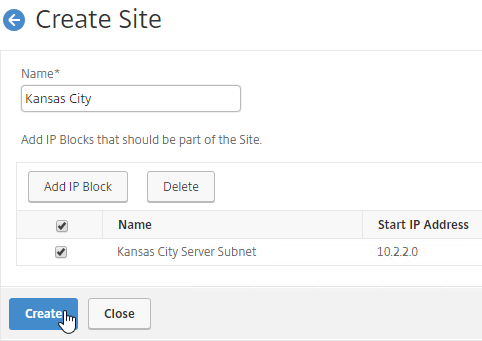
- Give the site a name.
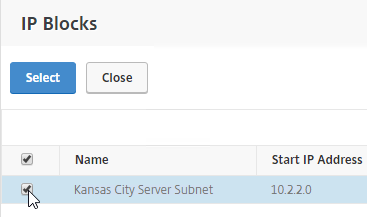
- Click Add IP Block.

- Select one or more IP Blocks, and click Select.
- Click Create.
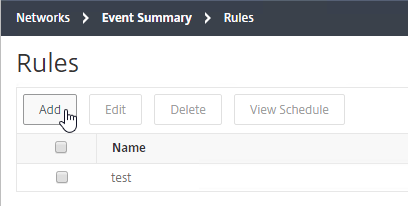
Instance Email Alerts (SNMP Traps)
You can receive email alerts whenever a NetScaler appliance sends a critical SNMP trap.
- On the left, go to Networks > Events > Rules.
- On the right, click Add.
- Give the rule a name.
- Move Severity filters (e.g. Major, Critical) to the right by clicking the plus icon next to each Severity.
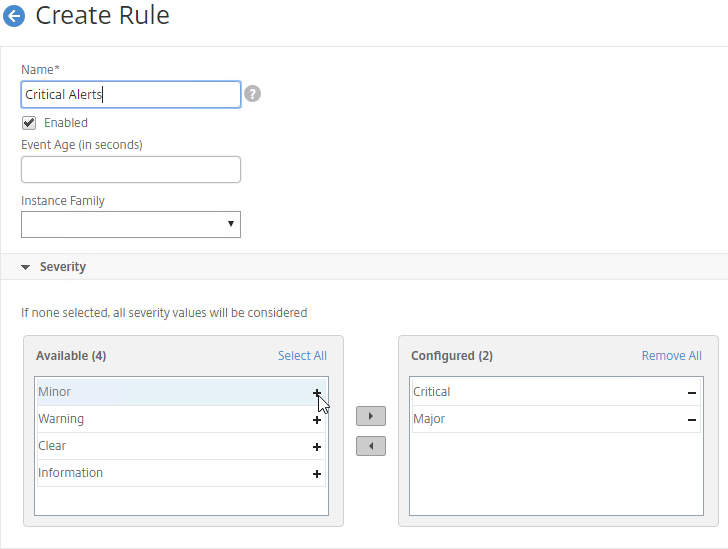
- While scrolling down, you can configure additional alert filters.

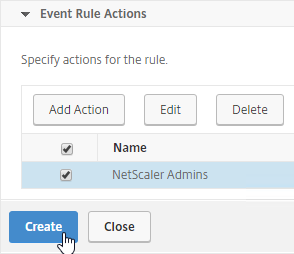
- On the bottom of the page, click Add Action.
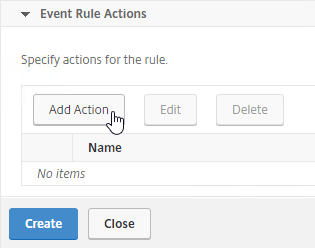
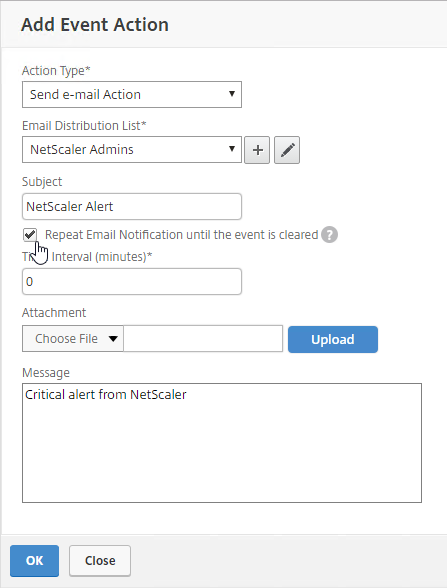
- Select an Action Type (e.g. Send e-mail Action).
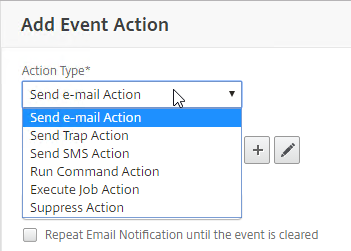
- Select the recipients (or click the plus icon to add recipients).
- Optionally, enter a Subject and/or Message.
- Emails can be repeated by selecting Repeat Email Notification until the event is cleared.
- Click OK.
- Then click Create.
- See the Event Management section at MAS How-to articles at Citrix Docs.
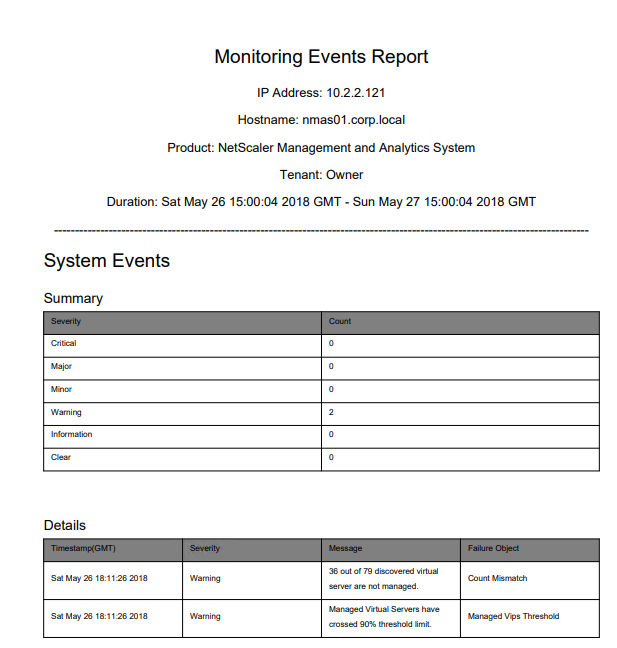
Events Digest 💡
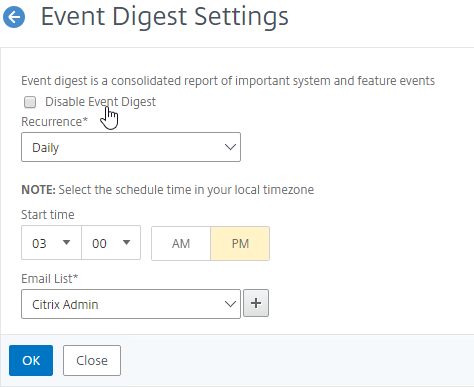
MAS can email you a daily digest (PDF format) of system and instance events
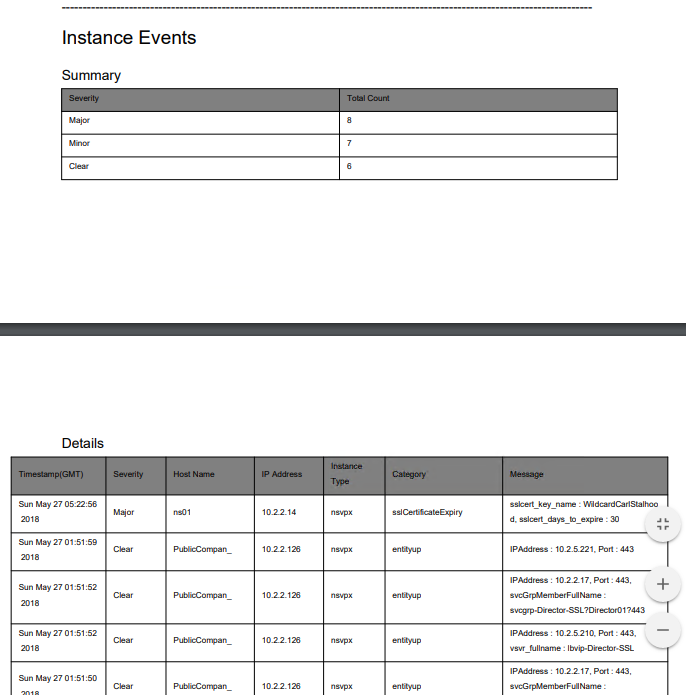
To enable the daily digest:
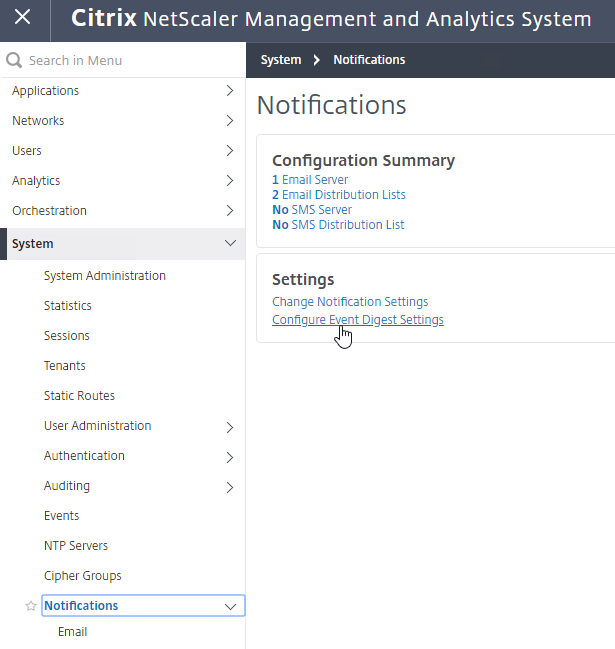
- Go to System > Notifications.
- On the right, click Configure Event Digest Settings.
- Uncheck the box next to Disable Event Digest.
- Configure the other settings as desired, and click OK.
Director Integration
Integrating NetScaler MAS with Director adds Network tabs to Director’s Trends and Machine Details views. Citrix Blog Post Configure Director with Netscaler Management & Analytics System (MAS)
Requirements:
- XenApp/XenDesktop must be licensed for Platinum Edition. This is only required for the Director integration. Without Platinum, you can still access the HDX Insight data by going visiting the NetScaler MAS website.
- Director must be 7.11 or newer for NetScaler MAS support.
- NetScaler MAS must be 11.1 build 49 or newer.
To link Citrix Director with NetScaler MAS:
- On the Director server, run C:\inetpub\wwwroot\Director\tools\DirectorConfig.exe /confignetscaler.
- Enter the NetScaler MAS nsroot credentials.
- If HTTPS Connection (recommended), the NetScaler MAS certificate must be valid and trusted by both the Director Server and the Director user’s browser.
- Enter 1 for NetScaler MAS.
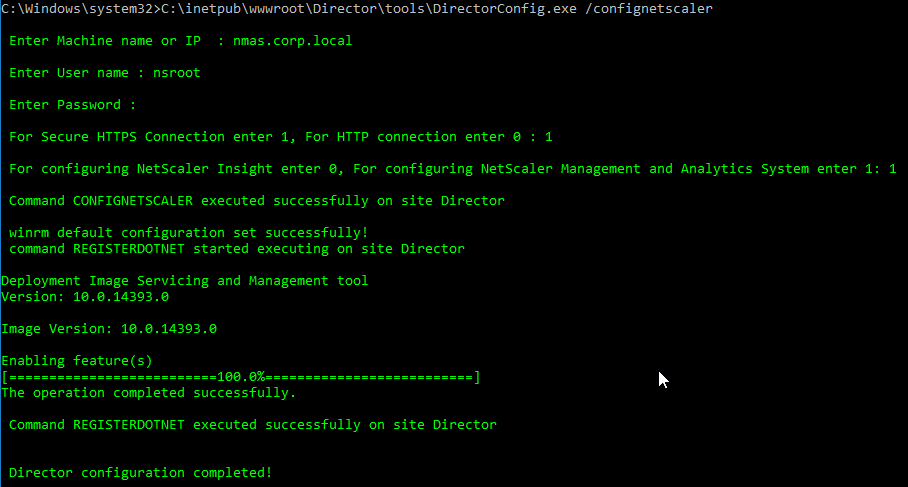
- Do this on both Director servers.
Use NetScaler MAS
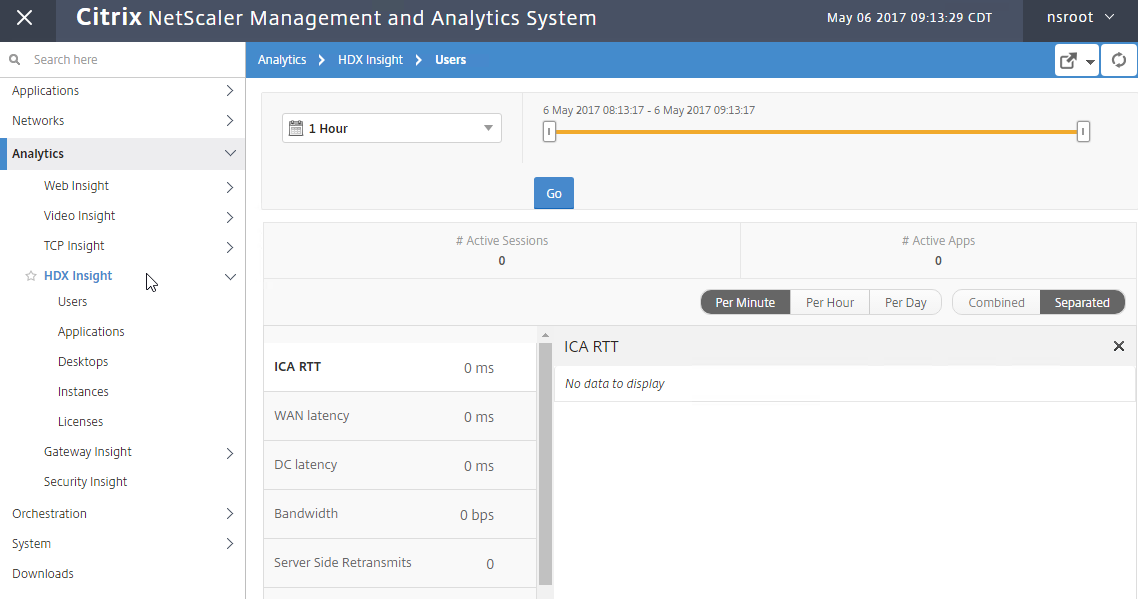
The AppFlow Analysis tools (e.g. HDX Insight) are located under the Analytics node. See Viewing HDX Insight Reports and Metrics at Citrix Docs.
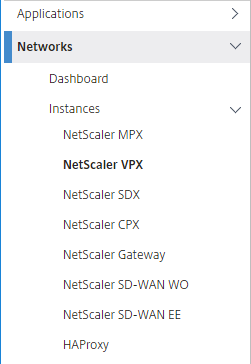
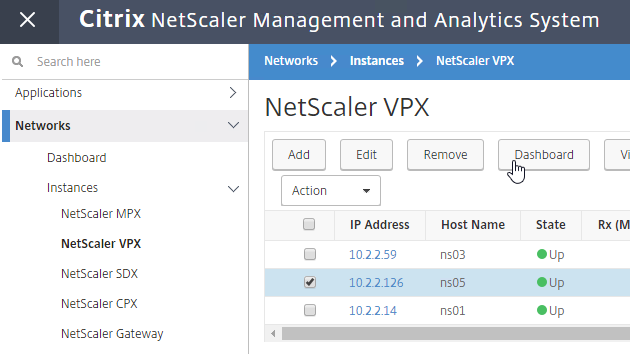
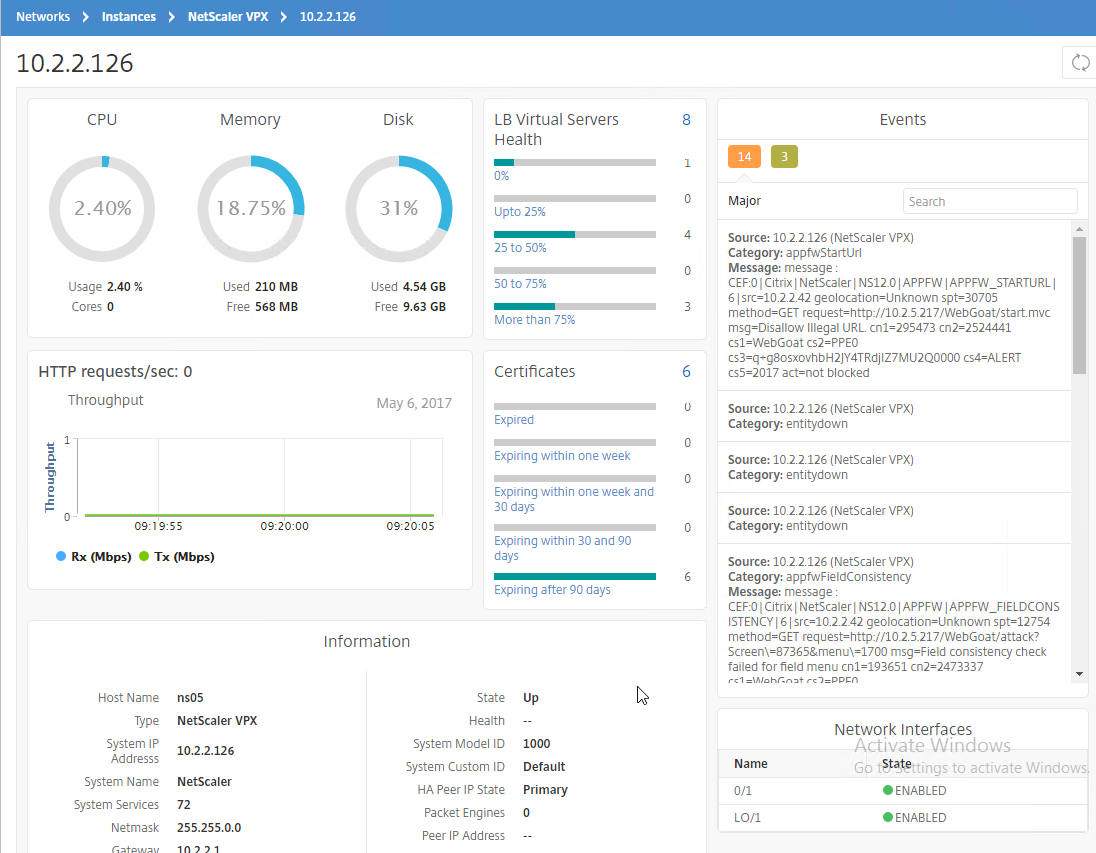
NetScaler MAS also includes all previous Command Center functionality, which you can find on the Networks nodes. For example, at Networks > Instances, select an instance, and view its Dashboard.
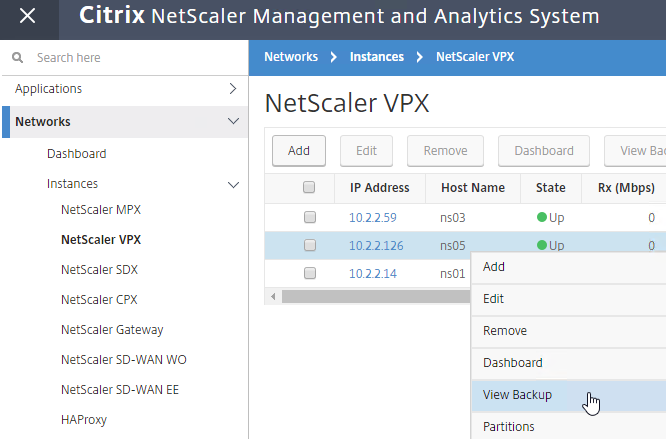
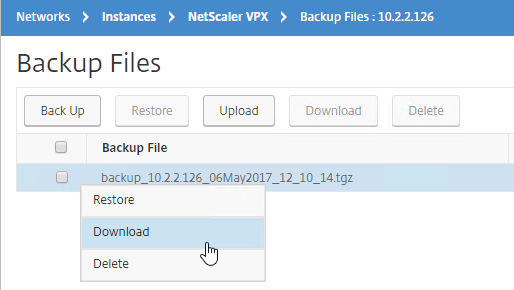
Backups are available by right-clicking an instance, and clicking View Backup.
Networks > Network Reporting > NetScaler let you view Instance performance data.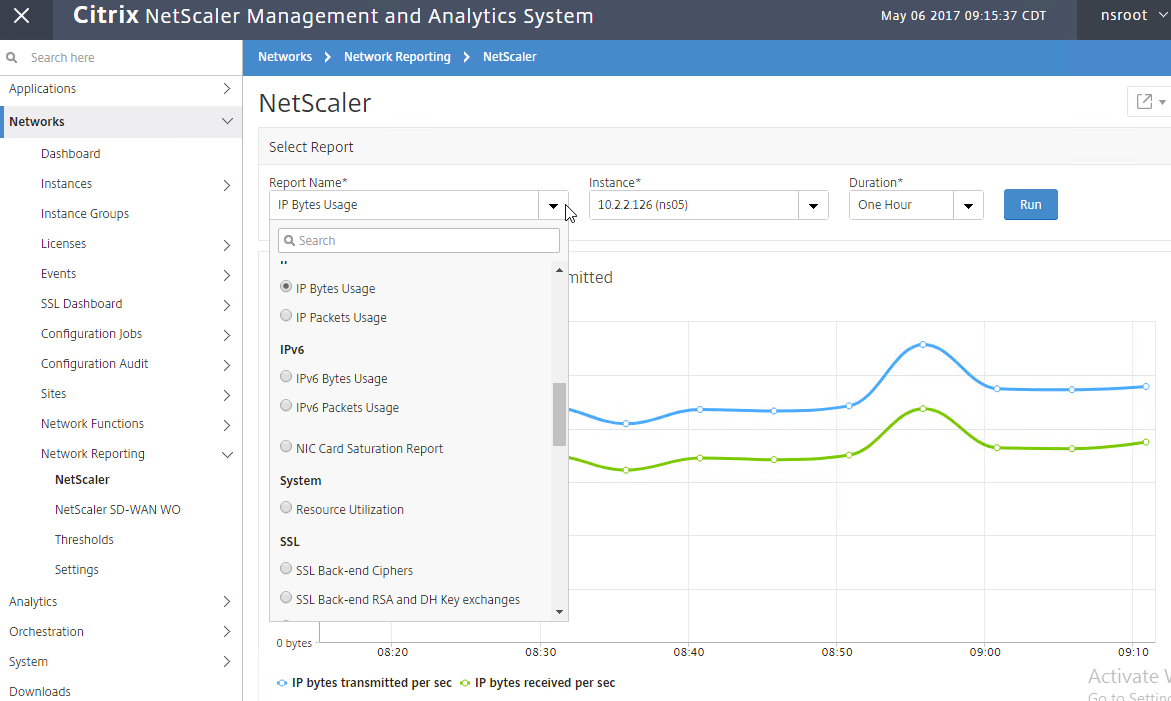
Dave Bretty Automating Your Netscaler 11.1 Vserver Config Using Netscaler Management and Analytics System: use a Configuration Job to deploy StoreFront load balancing configuration to an instance.
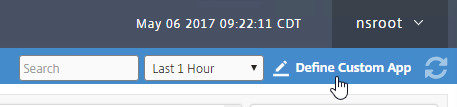
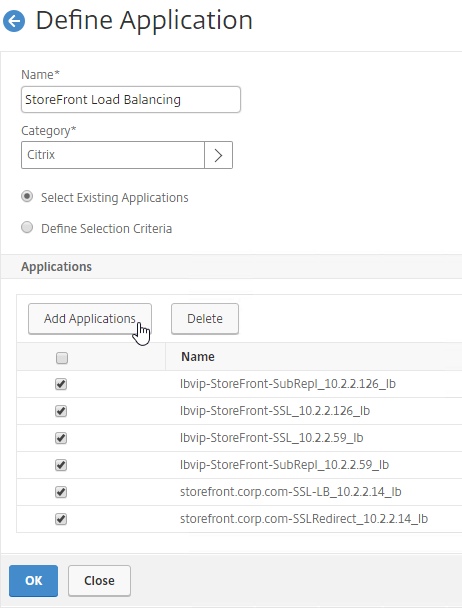
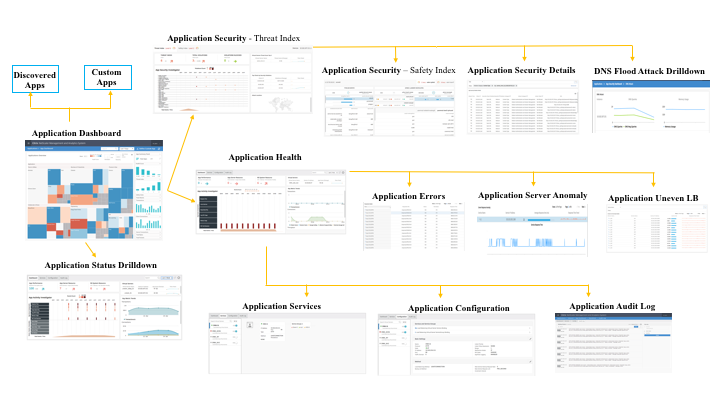
Applications > Dashboard automatically includes all licensed vServers in the Others section. On the top right, click Define Custom App to group vServers together into an application. The grouped vServers are removed from the Others list.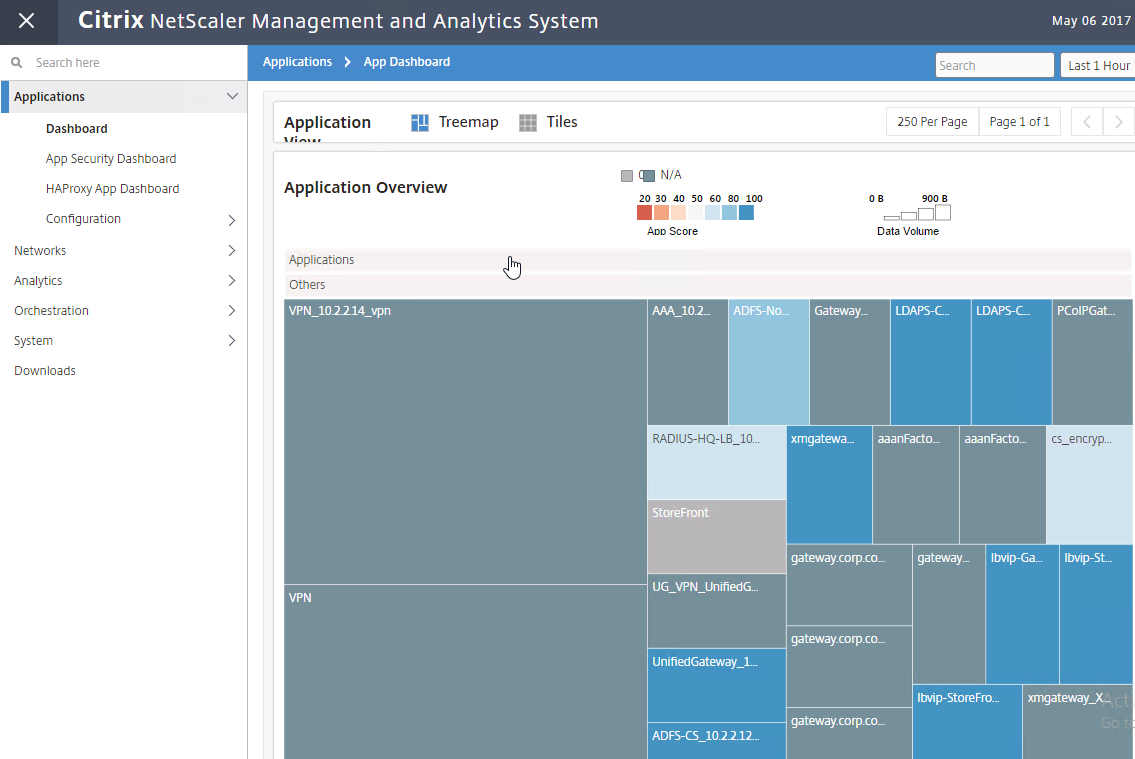
The Applications Node has quite a bit of functionality. See Application Analytics and Management at Citrix Docs for details.
Link:
- NetScaler MAS How-to Articles at Citrix Docs.
HDX Insight
HDX Insight Dashboard displays ICA session details including the following:
- WAN Latency
- DC Latency
- RTT (round trip time)
- Retransmits
- Application Launch Duration
- Client Type/Version
- Bandwidth
- Licenses in use
HDX Insight can also display Geo Maps. Configure NetScaler MAS with Data Center definitions (private IP blocks). More info at Geo Maps for HDX Insight at Citrix Docs.
Citrix CTX215130 HDX Insight Diagnostics and Troubleshooting Guide contains the following contents:
- Introduction
- Prerequisites for Configuring HDX Insight
- Troubleshooting
- Issues Related to ICA parsing
- Error Counter details
- Checklist before Contacting Citrix Technical Support
- Information to collect before Contacting Citrix Technical support
- Known Issues
Gateway Insight
In the Analytics node is Gateway Insight.
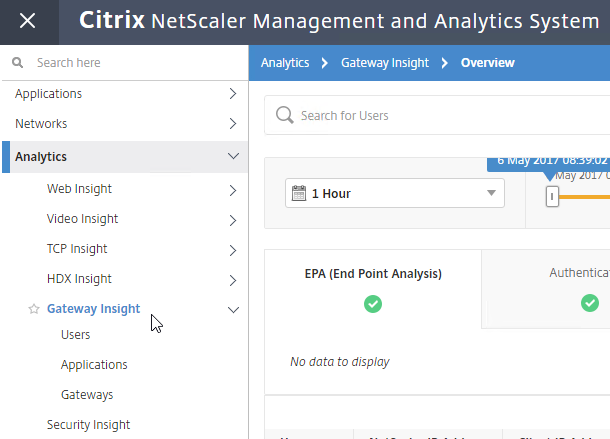
This feature displays the following details:
- Gateway connection failures due to failed EPA scans, failed authentication, failed SSON, or failed application launches.
- Bandwidth and Bytes Consumed for ICA and other applications accessed through Gateway.
- # of users
- Session Modes (clientless, VPN, ICA)
- Client Operating Systems
- Client Browsers
More details at Gateway Insight at Citrix Docs.
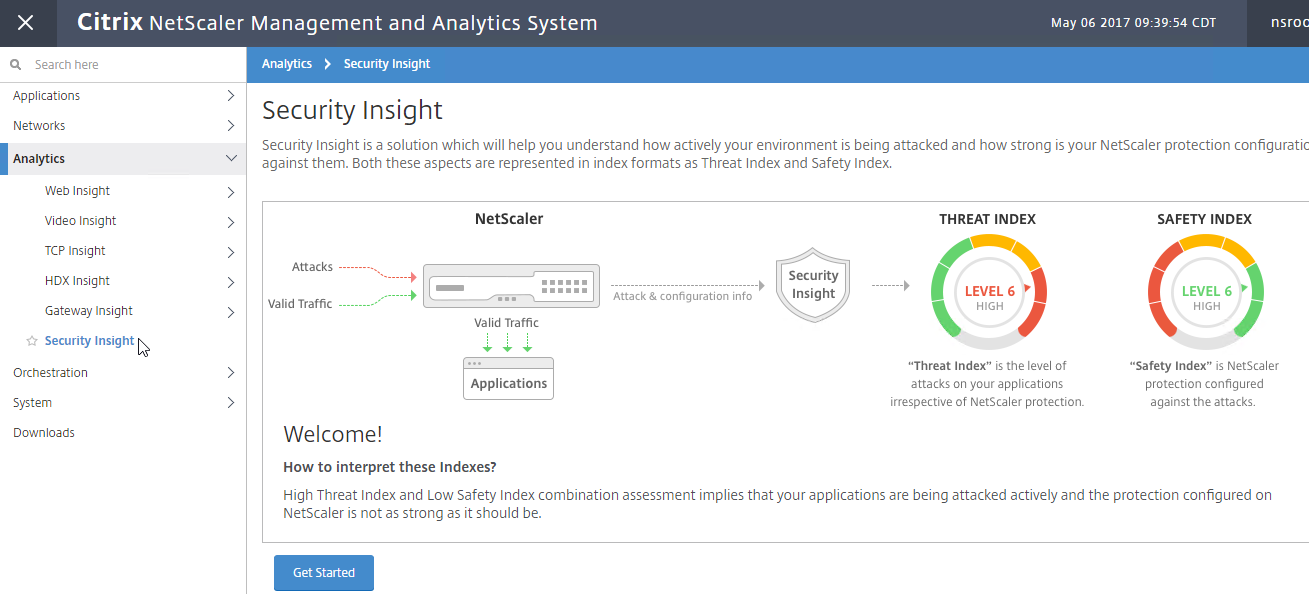
Security Insight
The Security Insight dashboard uses data from Application Firewall to display Threat Index (criticality of attack), Safety Index (how securely NetScaler is configured), and Actionable Information. More info at Security Insight at Citrix Docs.
Troubleshooting
Citrix CTX215130 HDX Insight Diagnostics and Troubleshooting Guide: Syslog messages; Error counters; Troubleshooting checklist, Logs
Citrix CTX224502 NetScaler MAS Troubleshooting Guide
Citrix Blog Post NetScaler Insight Center – Tips, Troubleshooting and Upgrade
See Citrix Docs Troubleshooting Tips. Here are sample issues covered in Citrix Docs:
- Can’t see records on Insight Center dashboard
- ICA RTT metrics are incorrect
- Can’t add NetScaler appliance to inventory
- Geo maps not displaying
Upgrade NetScaler MAS
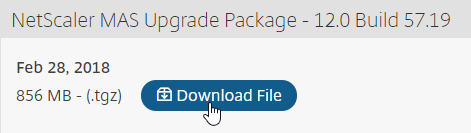
- Download the latest Upgrade Package for NetScaler Management and Analytics System. You want the Upgrade Package, not a MAS image.
- Login to NetScaler MAS.
- Go to System > System Administration.
- On the right, in the right pane, click Upgrade NetScaler MAS.
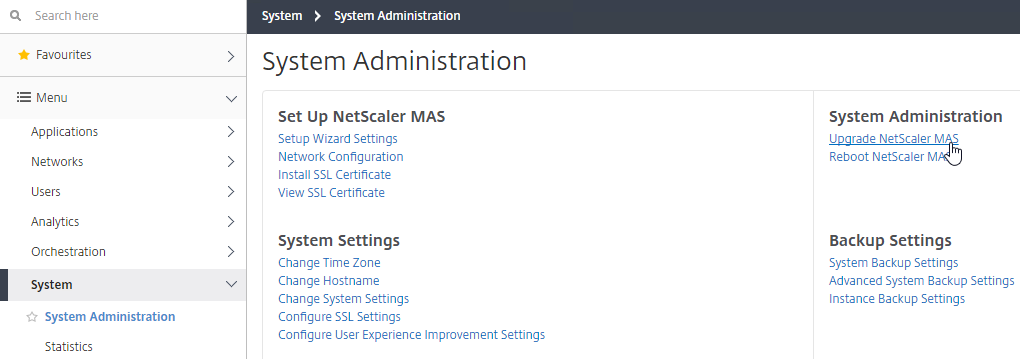
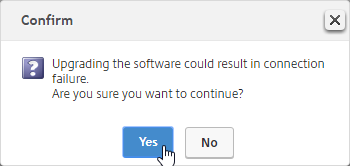
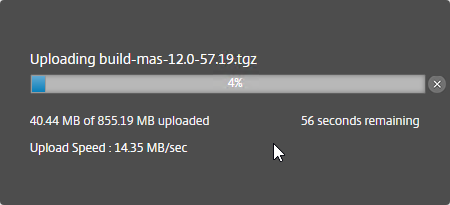
- Browse to the Upgrade Package .tgz file, and click OK.
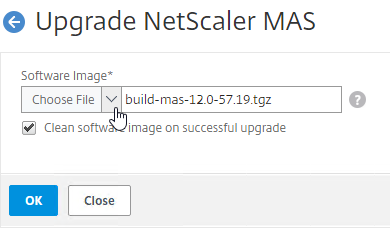
- Click Yes to reboot the appliance.

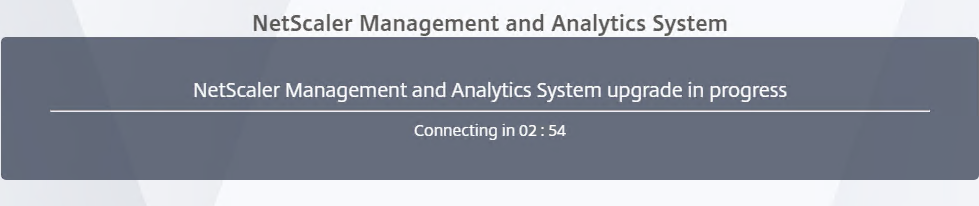
- After it reboots, login. The new firmware version will be displayed by clicking your username in the top right corner.
Hi Carl, Nnormally you change the adaptor to VMXNET3 on VPXs etc, is that not a good idea here as out of the box it’s got an E1000 attached?
I’m not sure if ADM supports VMXNET3.
Hi Carl, do you have any idea how to find the authentication failures via Nitro (api) in Gateway Insight?
Hi, Carl. Is there any potential of resource usage increase on the ADC when imported into the ADM? Or anything of that nature to consider before importing your ADC’s into ADM?
ADC sends traps to ADM. ADM does some periodic polling of the ADCs but that would affect management, not traffic. Management CPU (not packet CPU) increases during scheduled backups.
Hi Carl,
Please let me know if there is a procedure to follow during upgrade of NMAS/CADM in a HA setup
Thanks in advance
Venkatesh K
From Citrix Docs: “Upgrade NetScaler MAS servers in high availability mode by accessing the active node or the load balancing virtual server IP address. Both the servers are automatically upgraded to the latest build once you initiate the upgrade process in either of the servers.” https://docs.citrix.com/en-us/netscaler-mas/12/upgrade.html
12.1 and newer have more components to upgrade, including DR node and Agents.
Hi Carl, first of all thank you for all your usefull posts here.
Im setting up a MAS server, and im receiveng all syslogs messages from our netscalers. But what i want to do is to setup an email notification everytime a users login or logout from our vpn gateway.
134> 11/18/2019:17:00:54 NS 0-PPE-0 : default SSLVPN LOGIN 32417 0 : – Browser_type “Mozilla/5.0 (Windows NT 10.0; Win64; x64) AppleWebKit/537.36 (KHTML, like Gecko) Chrome/78.0.3904.97 Safari/537.36” – SSLVPN_client_type ICA – Group(s) “N/A”
Cannot make my rule working for matching those syslogs messages. Do you know if its possible?
I don’t think ADM has any Syslog notification capability. Other syslog products have email notification capability.
Hi Carl,
I was also looking at Citrix ADM ability of pulling user session from Xendesktop and keeping track of user login audit history from ADM instead of Director. If the audit log is supported it would make sense for me to upgrade my netscaler (ADC) to platinum instead of upgrading Virtual desktop to platinum to get 5 months of user session audit, as with ADC I will get lot of more useful feature in my production environment which I could leverage but as far as virtual desktop is concerned it will suffice to have Ent version based on the volume of VDI usage. I could not get clear answer about audit log feature after speaking with four different support person, they are still testing on lab and my test on lab does not have adequate session to track that either. I would appreciate if your help if you have seen that functionality on appflow tracking, if so I could apply switch my production to eval platinum 30 days trial to test that feature before purchasing license.
Appreciate your help.
ADC Premium Edition enables ADM to keep 30+ days of AppFlow data, which includes some session information. I think pruning is set to 30 days but it should be possible to increase it. I don’t think I’ve tried 5 months.
Hello Carl,
I have installed netscaler MAS to a customer.
Netscaler MAS 12.0.53.6 (Free no license)
Netscaler 11.1.53.11.nc (VPX 200 with platinum license)
I can’t find Analytics –> HDX insight Menu
Why?
I seem to remember there being a bug. Try upgrading MAS.
Thanks for your reply carl,
i solved it doing this.
Permit UDP 4739 between ns and ns mas
and restart of netscaler mas
Regards
Is it possible to scan or add an instance through SNIP? NSIP is on Management VLAN that is not accessible from the subnet where I am planning to put NetScaler MAS appliance.
Add, yes. However, during the first phase of inventory, the system identfies the (active) nodes in the cluster or HA pair and will continue to scan the nodes systems individually using the NSIP. The MAS is intended to do its work out of band, so you will need to place it in a part of your datacenter where you can access the NSIP’s (directly or routed|)
Hi Carl,
I was integrating NAMS with director but had similar issue. Network tab of director shows “No details are available. Network unreachable. Check configuration, authentication, or service availability.”
As mentioned in earlier comments, I tried with entering host name instead of IP address. But that did not work.
SSL trust is good. CA cert is installed on director.
Any inputs on this?
There aren’t any good logs to determine the problem so you’ll have to run CDFControl to see what’s not working.
Verify the following ::
1. Use the ADM FQDN when configuring director script to reference ADM.
2. Replace the ADM TLS cert with a cert trusted by Director Server.
3. Make sure there are no FW blocking https:443 between Director and ADM.
4. try using http only instead https when integrating director and ADM
We have MAS running on a XenServer host. How do I attach an additional disk to NetScaler MAS with XenServer?
I assume you go to the Storage tab on the VM and add another VDI.
I have the additional disk already assigned to the VM. But don’t know if MAS is actually using it
In 12.1, you to run a CLI script to prepare the second disk. In 12.0, it should move automatically. MAS > System > Statistics shows you free disk space.
Found this, https://support.citrix.com/article/CTX222832. So we are probably good. Thanks
Carl, I have MAS virtual appliance running on vSphere. I want to increase its memory, CPUs and disk from default. Can you please guide here?
Thanks
Karan
Hello Carl,
I have tried implementing MAS appliance following your article, but after setting the NW details, I wasn’t prompted to choose the deployment type. Is there any way to trigger the wizard via the CLI?
Login as nsrecover/nsroot.
Then run deployment_type.py. This seems to no longer run automatically.
Thanks for the quick feedback. I’ll try this tomorrow.
Great Posts, I like it very much.
one question: when will people learn, that .local is not a top-level-domein that should be used? it is a reserved word like .dns, .int, etc. (RFC2826, http://tools.ietf.org/html/rfc2826 ), (RFC6303, http://tools.ietf.org/html/rfc6303 ), (RFC4159, http://tools.ietf.org/html/rfc4159 ) you get problems with IPv6.
Are there different steps to enable HDX Insight on a Unified Gateway setup? In this setup, the IP is on a Content Switching vServer. On the Configure Insight screen, when I select VPN in the Application List dropdown, there is no IP to enable AppFlow. There is an IP listed for Content Switching (the one associated with the Unified Gateway); however when I enable AppFlow there is no ICA checkbox to select. Only options are Web Insight, Client Side Measurement, and Security Insight.
For the VPN vServer, does the lack of IP prevent you from enabling HDX Insight AppFlow?
It appears so. In MAS, when I right click the NSIP and choose Enable\Disable Insight, the Application List dropdown for each NetScaler resource (ie. Load Balancing, Content Switching, VPN, or Cache Redirection) only displays applications which have an IP on the NetScaler. In my case, the only application I can enable AppFlow is the one with an assigned IP which is the Content Switching vServer for the Unified Gateway. However, when I edit the AppFlow settings, ICA is not a checkbox to select. I’m running MAS 12.0_57.24
Is a license assigned to the VPN vServer? I just assigned a license, and I’m able to enable AppFlow on the VPN vServer.
That was it, many thanks! I only had the 1 Content Switching server configured in MAS that was consuming 1 of the 30 licenses, but had to turn off ‘Auto-select virtual server’ in the MAS licensing in order to assign a license to the NetScaler Gateway vServer…interesting. Now that just leaves my database syncing question below. 🙂
Side note: Great to meet you in Anaheim this year! #girlattheelevator
In an Active\Passive MAS HA setup, each MAS VM will have it’s own 2nd disk which contains the database, correct? And is it MAS internal software which continually syncs the two databases? Do we have any control over how often or when that syncing occurs?
If I have multiple XenApp sites in a single Director deployment, can I integrate a single MAS deployment with Director for insights on both XenApp sites?
excellent article!
can I use the MAS 12 image to import my netscaler insight center configuration
See https://docs.citrix.com/en-us/netscaler-mas/11-1/migrating-netscaler-insight-center-to-mas.html
Are there any minimum requires for the actual Telemtry box? Can’t find them anywhere!
I suspect there will be more info once the feature finally becomes supported.
Does anyone know how to setup the reporting of event in Local time. The time zone on my nMAS is set to NZ, and the Dashboard Reporting time is set to local. So why am I seeing event time stamped as GMT in the NMAS gui and from Email alerts
I’m having the same issue. Tony, did you get a workaround for this?
@Carl, Any idea?
Kind regards,
Carlos Acosta
No response as yet. I am just using the sent/received dates on emails for now
Have you restarted your unit?
units have had multiple restarts and updates with no change to behavior
hi carl, i trying to instance backup in mas but, not working .. the path is NAS Storage(enable FTP,SFTP)
i check the ID,PW,FTP Port but not working .. how can i do ??
MAS has log files at /var/log/mps. Maybe one of them has the error message?
Are you able to do any file transfer from the MAS CLI shell?
thank you for reply, yes able to transfer in MAS CLI shell.. Download and upload,,created folder can do anything
Apr 12 14:08:28 ns-mgmt-system mas_config: 172.16.0.210 04/12/2018:05:08:28 GMT : DEVICECONFIG CMD_EXECUTED : User nsroot – InstanceIP 192.16.0.52 – InstanceUser – Command “ftp /var/mps/tenants/root/device_backup/192.168.0.210/backup_192.168.0.210_12Apr2018_14_07_02.tgz admin@192.16.0.52:/home//backup_192.168.0.210_12Apr2018_14_07_02.tgz” – Status “Failed” – Message “Backup file upload failed : FTP : ”
i checked var/log ns.log file on this log ..
Hi Carl,
Just wanted to share some exp of the disk size – (the least I can do can do :-))
I have learnt that 120gb default of primary hdd FreeBSD partition cannot be increased.
For example, if you increase the “primary” hdd to any larger size, the primary FreeBSD boot disks still remains at the default 120GB.
Below is the extract of nmas with a 300gb primary hdd, notice the OS still uses 120gb config, (no mention or use of the 300gb thick provisioned hdd):
=============================================
bash-2.05b# df -h
Filesystem Size Used Avail Capacity Mounted on
/dev/md0 542M 483M 47M 91% /
devfs 1.0k 1.0k 0B 100% /dev
procfs 4.0k 4.0k 0B 100% /proc
/dev/da0s1a 1.6G 173M 1.3G 12% /flash
/dev/da0s1e 110G 691M 101G 1% /var
=============================================
So the only way to increase storage is add as an additional 2nd hdd with the larger size (as you mentioned, CTX222832). Best practice is to add 2nd hdd during initial installation.
The primary will be used for bootup/os/firmware etc.
The 2nd hdd will be used for storing logs etc.
Happy Easter 🙂
N
Hi Carl,
re MAS version, you mentioned “the version/build of NetScaler MAS must be the same or newer than the version/build of the NetScaler appliances being monitored”
Now, the question – is it ok to run NMAS ver 12.x with NS instances on ver 11.x?
I have this setup working in this way 🙂
It’s just dawned on me perhaps I should change the setup so that both ends are on ver 11.x.
And when we have a need to move NS to 12.x only then change MAS to 12.x.
Your opinion or exp on this would be most appreciated.
Newbie
I’m currently doing MAS 12 with NetScaler 11.1 appliances. No problem. But one of the builds had a bug that prevented MAS 12.0 from monitoring 11.1.
Thanks Carl for the quick reply!
I forgot to mention that I have had to work through lots of NMAS subsystem errors etc that forced me to upgrade to the next NMAS 12.x release each time. So now wondering if the nmas12.x ns11.x setup has been the root cause 🙁
Any chance you could share the NMAS 12.x?x? that works well with NS 11.x, whenever you finish your testing pls?
Thanks again,
Newbie.
Just today my customer upgraded to 12.0 build 57 and it fixed his HDX Insight from 11.1.
Do you know what build had issues? I can not get my NS to talk to my MAS! I have tried lots of things.
NS = 11.1.52.13
MAS = 12.0.57.19
I believe it was fixed in 11.1 build 56. https://www.citrix.com/downloads/netscaler-adc/firmware/release-111-build-56152.html
11.1 build 52 was pulled from downloads, implying a security issue.
Hello again Carl,
Struggling with this… since upgrading to Ver 12.0-56.20, I am unable to an add ssl cert.
It imports it into the appliance, but does not apply to the gui interface.
I have even done a fresh install – same prob.
Waiting on citrix support to get back to me… their taking ages so wondered if you or anyone else seen this behaviour?
N.
Hello again Carl,
Is there any tool/maintenance schedule on NMAS that allows logs to be groomed or purged so that it does not run out of HDD space due to sheer volume of log collection/data? i.e. clear any logs/data after 1 or 2 months?
Thanks in advance!
N.
What build of MAS?
System > System Administration, on the right pane, there’s a Prune Settings section.
Thanks Carl,
Will take a look at that.
Ver 12.0-56.20.
N.
Hi Carl, how to upgrade the version for MAS telemetry node if it doesn’t have an user interface, thx!
Hi Carl,
Do you have experience with HA features as well?
I’m trying to upgrade the MAS while in HA. It effectively seems to reboot the primary after updating, then (through the loadbalancer) rI get reconnected me to the second node, but it is still on the old build. It does seem to shut me out of the first node all together. No GUI, no SSH, System>Deployment tells me the node is not responding and retrying the update on the second node gives the notice: “Upgrade operation already in progress”
Am I doing something wrong here? Don’t feel particularly like building the entire MAS again…
Thanks Carl,
Have implemented, so far so good… one challenge re Geo Maps.
Have uploaded the GeoLiteCity.dat file, and added IP blocks to map out Data Centers / NS locations, ok.
But now when attempting to see a pictoral representation of all the locations from where users are connecting from (world map showing locations of users).
For example, in NMAS > Analytics > HDX Insight > Users – ICA info such as RTT and usernames etc show correctly, but the World (map) is blank with spinning circle in the middle.
Apparently NMAS needs internet connectivity for the this feature to work, yet I cannot see any reference anywhere for this.
Would appreciate any suggestions?
A
From Citrix Docs: “NetScaler MAS requires an internet connection to display the GeoMaps for a particular geographical location.” https://docs.citrix.com/en-us/netscaler-mas/12/analytics/web-insight.html#par_anchortitle_4244
Thanks Carl!
Anyone able to load balance this? I tried the monitor specified in documentation and it just doesn’t work:
add lb monitor MAS_Monitor TCP-ECV -send “GET /mas_health HTTP/1.1\r\nAccept-Encoding: identity\r\nUser-Agent: NetScaler-Monitor\r\nConnection: close\r\n\r\n\”” -recv “{\”statuscode\”:0, \”is_passive\”:0}” -LRTM DISABLED
Though I do find that if I go to /mas_health, I do see the text specified.
Phil, I’m sure you’ve worked it out by now, but for others, if you don’t do it via command line, you can set it up via GUI, use an http-ecv monitor, send string is “GET /mas_health” and receive string is “{“statuscode”:0, “is_passive”:0}”
Thanks for the reminder Dave. I did just that. Funny though, when I look at the source, I can’t see the difference except that the quote marks provided in Citrix documentation are open/close, rather than straight up/down like my keyboard. Even looks different in Notepad so perhaps a different ASCII code.
The best way to make 100% sure that you have the correct string is actually getting the result from the test in a browser and CP that in the service group monitor.
https://active_mas/mas_health, will return what you need to test on.
In my case, when upgrading to 12.0-57.19, for some reason the monitor started to fail. Updating the monitor test with the above did the trick. (Indeed some ASCII difference of sorts)
Hi Carl,
Once again, thanks for this (and all) awesome writeups!
I have followed the setup to the letter, all ok bar NMAS/Director integration, where I am stuck with the dreaded “Network unreachable. Check configuration, authentication, or service availability” on the Trends tab in Director.
As per your instructions and CTX231463, I have insured Director cert store and browser contains the cert installed on NMAS to no avail 🙁
Having called Citrix support resulted in them spending a long time investigating only to collect logs for analysis.
I would be grateful for any suggestions… thanks in advance.
Newbie.
Are you using the nsroot account?
I wish there was a troubleshooting log for this connection. I wonder if you can do a network trace on the Director server to see the traffic.
Thanks Carl,
Appreciate the reply…
Yep, using the nsroot account, also tried the MAS IP and FQDN when configuring using the Directorconfig.exe command tool (elevated).
Re troubleshoooting log; I can confirm Citrix have collected a wireshark trace and a CDFtrace on the Director.
***NEWS FLASH*** Citrix Support just got back to me, literally:
“……..
Analysis result:
=============================
C:\inetpub\wwwroot\Director\bin\..\DisplayConfig\HdxInsightPlugin\HdxInsightForUDPluginConfig.xml failed with exception could not perform the logon operation and inner exception :
The underlying connection was closed: Could not establish trust relationship for the SSL/TLS secure channel.”,””
Recommendation:
===============
· Reconfigure the Netscaler MAS in the director following the below steps.
C:\inetpub\wwwroot\Director\tools\Directorconfig.exe /unconfignetscaler
· Once the above step is done, follow the below steps on the blog and configure the NSMAS using the Director Config GUI tool
https://www.citrix.com/blogs/2013/08/07/configure-citrix-director-using-director-configuration-gui-tool/
· The tool is located in the below link
https://www.citrix.com/blogs/wp-content/uploads/2013/08/DirectorConfigTool.zip
· Reset the IIS after the change has been made
Note: This should be done on both the Director Servers
………”
***Will post outcome asap.
Regards,
Newbie
# UPDATE #
The above tool has done the trick.
Also worth mentioning – when configuring Director>MAS using the Directorconfig tool – on “Enter Machine name or IP” (for MAS) – only the actual hostname works… i.e.:
MAS hostname (configured without fqdn) – WORKED
MAS IP – DID NOT WORK
MAS FQDN – DID NOT WORK
Regards,
Newbie.
Had the same issue at a customer, tried the tool mentioned above and didn’t make a difference. Had a look at some settings on MAS and disabled session timeout also under SSL settings enabled SSLv3 and TLSv1 ensured the cipher suites group was set to default. Used the FQDN in DirectorConfig tool from CLI version in this case is 7.15 CU2
Hi Carl, just another question. after connecting to the primary instance of the HA pair and configuring instance back-up settings it only takes backups of the primary netscaler. how can i create a scheduled backup of the secondary instance or do i need to do this via Powershell?
Other than the NSIP, what’s different about your secondary?
Another great article , thanks again . We have completed the initial setup with the ovf file everything seems to be working well (we can acces MAS from web and cli) but when we connect to MAS from vsphere console we see errors below are repeating . Anyone seen errors like this before ?
hostname* monit[161] : ‘triton’ process is not running
Hi Ahmet. This is a common error, I’ve seen it on myself. Guess it can be ignored.
Hi Carl, great article again!
i have just installed MAS 12 56.20 but when configured i am missing the HDX insight from the analytics menu. I can see that the applow policies have been configured correctly on the netscaler because I am seeing the policies been hit.
Am I missing something?
When I see that, when I logout and log back in it usually shows up.
indeed, after restarting during my break it shows up and I can see the sessions. Thanks for the quik reply
Change the Group Nesting to a high number like 10.
Hello Carl,
I have a question regarding the number of users using Netscaler gateway to connect to store front.
In the netscaler, Netscaler Gateway > Virtual Servers.. there is current users and total connected users .. what is the difference between them.
And in the MAS the number of Active users represents which number of users in the netscaler (current users or total connected users) ?
Gateway has different counts for AAA (HTTP) vs ICA.
HDX Insight should be showing the number of ICA users.
Hi Carl. Great Post!
Is it possible (or necessary) to change the password of the Telemetry appliance so it doesn’t use the default of freebsd?
I’m having trouble adding an SNMPv3 view to MAS even when using same settings as on a VPX instace.
Subtree [ 1 ] results in [ Please provide proper SNMP view subtree ]
I’ve tried 1, .1, and .1. but none work. Any suggestions would be appreciated.
HI,
I created some rules to receive email if something happens,
But in the email I never see the name of the vServer, I saw the GSLB Entity(vsrvFullName) not even to VIP
Is it possible to have by example if one server in the Load Balancing is down, receive an email saying this Server is down affecting the VIP and the GSLB ?
this is what I receive
entityStatus:, Device_entity_name : gslb_server__NSSVC_SSL_BRIDGE_1, Device_family : ns
Thanks
Instead of giving the real name of the Service Group is giving me that:
Device_entity_name : Device_entity_name : server_serviceGroup_NSSVC_SSL_B,
I should receive example: ADFS-SG to refer to the Service Group
And I did not receive the notification about the server who is affected also.
Thanks
I have had the same problem with NMAS 12 and nested groups.
Set Group Attribute to “memberof” and sub attribute name to “CN” was my solution.
I see in the Analytics – Web Insight – Instances and selecting a instance. You see a chart for operating systems is there a way to expand this and list the client name or IP of each of the OS listed. For example I see Unknown, abd I suspect this is Win10 but is there any way to confirm.
Hi Carl, i was trying to create a Configuration Job with variable (filled with predefined value) and schedule in future time. The configuration is to enable or disable a courtesy page when site is under maintenance. The code is something like that :
———–
bind lb vserver $bindvirtualservername$ -policyName resp_pol_maintenance_page -type REQUEST -priority 100 -gotoPriorityExpression END
savec
———–
unbind lb vserver $bindvirtualservername$ -policyName resp_pol_maintenance_page -type REQUEST
savec
———–
where $bindvirtualservername$ is a variable with predefined value. If i run the job “now” the job get completed , but if i schedule it in future i got an error like this
Invalid name; names must begin with an alphanumeric character or underscore and must contain only alphanumerics, '_', '#', '.', ' ', ':', '@', '=' or '-' [name, $bindvirtualservername$][0;0m
Could you try to reproduce this behavior in your lab to check if i made some mistake?
Thanks
Christian
MAS 12.0 build 53 had a fix for saved jobs with variables. Have you tried that?
Anyone ever tried using users instead of groups for MAS? – Groups work fine but users seem to be unable to successfully login though the external authentication is enabled and successfull.
Hell Carl,
I was curious if NetScaler MAS will give me information about if the Client is having network issues?
I see alot of Data in here, but I assume most ICA connection are between 50-100 Kbps?
I also see the through put on the netscaler showing 1-3 mbps on the dashboard, should that be higher? or is it calculation based on the kpbs per users?
Does MAS help me troubleshooting internal network issues? or jsut more of what is going on in the users ICA/HDX session?
Just stats. It doesn’t tell you why, it just tells you what NetScaler is seeing.
Hello Carl, I’m setting this up to migrate off of Insight Center and Command Center. When I discover my dmz and internal VPXs I’m getting a error during the SNMP trap setup part. It says [Command failed on 10.X.X.X Request to 10.X.X.X failed with error Operation not permitted [Can’t set allPartition flag in Cluster Setup.]]
Any ideas?
Check /var/log/ns.log on the appliances to see what MAS is doing.
On the MAS appliance I get
Jun 22 15:12:59 CitrixMAS mas_config: 10.20.116.250 06/22/2017:15:12:59 GMT : DEVICECONFIG CMD_EXECUTED : User #####- InstanceIP 10.#.#.# – InstanceUser #######- Command “add snmp trap generic 10.20.116.250 -destPort 162 -communityName public” – Status “Failed” – Message “Request to #.#.#.# failed with error Operation not permitted [Can’t set allPartition flag in Cluster Setup.]”
I don’t really see anything on either of the instances it’s trying to configure though.
Sorry, I meant check /var/log/ns.log on the NetScaler appliance, not MAS.
Appears to be a cluster or firmware issue. Open ticket with Citrix but they aren’t sure as of yet. Thanks
Hi Carl, Thanks for info. i am using MAS 12.0. There is no log on the MAS when the devices are failover. Have you encountered such a problem, what do you suggest?
Hi Carl, we have a Netscaler double hop deployment in place. Can you tell me were we have to put the PLatinum License to get full HDX Insight duration. At GW , at ICA Proxy, both?
Hi Carl, when i try and log in with my ad account after following your instructions, i get “User not authorized for any operation” are you able to shed any light?
It the group assigned the admin role? The second page of the add group wizard lets you assign MAS entities.
The MAS group name matches the AD Group name (case sentsitive)?
yes it is, group name is fine, name is “PREFEX_Group Name” maybe the space is an issue?
I also have this problem, but it’s because it appears nested group extraction is failing. Members of nested groups can not login but direct members can. I’m using the same attribute syntax on Netscaler 11.1 and its working fine, but MAS 12 it does not function.