Navigation
This post applies to all Horizon versions 7.0, and newer, including Horizon 2503 (8.15).
- Change Log
- Roaming Profiles Options
- Roaming Profile Shares:
- GPO Templates:
- GPOs:
- Computer Settings:
- General Computer Settings
- Remote Desktop Users Group
- VMware Integrated Printing
- Dynamic Environment Manager (DEM) Policy
- Persona Configuration
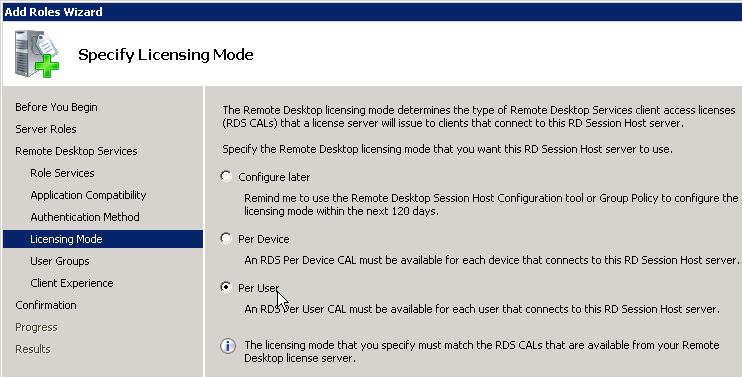
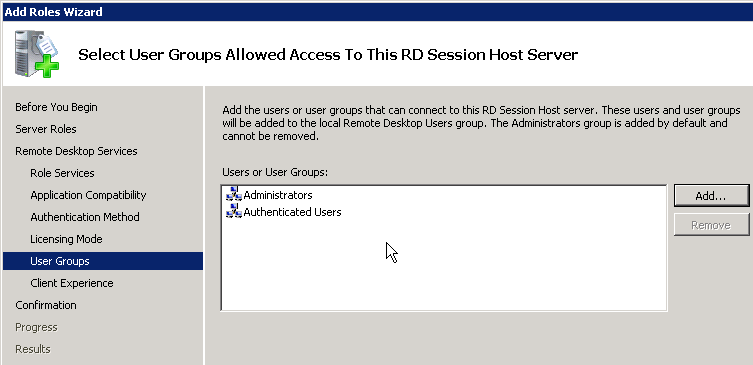
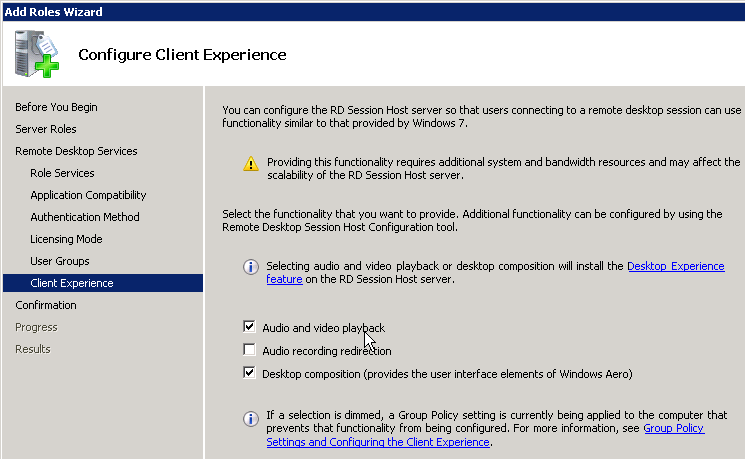
- RDS Roaming Profiles
- Horizon Agent Settings – idle timer, DPI, screen-capture blocking
- PCoIP Configuration
- Real-Time Audio-Video – Microsoft Teams
- USB Redirection Settings
- Blast Settings
- Watermark
- Teams Optimization
- Browser Redirection
- UNC Path Redirection
- URL Content Redirection
- Collaboration Settings
- User Settings:
💡 = Recently Updated
Change Log
- 2025 April 18 – updated Horizon Templates section for Horizon 2503 (8.15).
- 2024 Jul 29 – updated Horizon Templates section for Horizon 2406 (8.13).
- Blast Settings – Build to lossless
- 2023 Apr 1 – Horizon 2303 setting Screen-capture For Media Offloaded Solution
- Horizon 2303 setting Cursor Warping
- Horizon 2303 settingEnable server printer redirection
- Blast Settings – Horizon 2212 adds Blast Optimizer
- 2022 Oct 22 – updated Horizon Templates section for Horizon 2209 (8.7).
- Updated DEM GPO Templates section for DEM 2209 (aka 10.7).
- UNC Path Redirection
- 2022 July 21 – updated Horizon Templates section for Horizon 2206 (8.6).
- Updated DEM GPO Templates section for DEM 2206 (aka 10.6).
- 2022 Apr 6 – updated Horizon Templates section for Horizon 2203 (8.5).
Roaming Profiles Options
There are several options for persisting user profile settings when the user logs off:
- Dynamic Environment Manager (DEM) – DEM is a very configurable product that is generally preferred over Persona and Microsoft Roaming Profiles. It works on both virtual desktops and Remote Desktop Session Hosts.
- In Horizon 2006 (8.0) and newer, DEM Personalization features are available in all editions of Horizon.
- In Horizon 7, only Horizon Enterprise Edition is entitled to Dynamic Environment Manager.
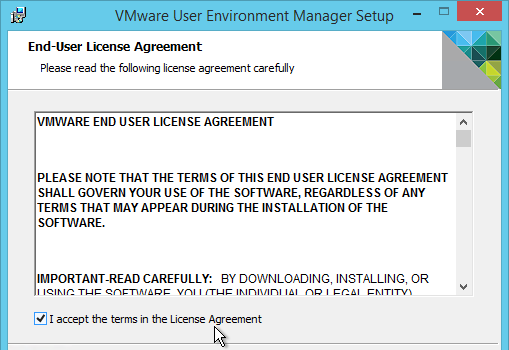
- Dynamic Environment Manager (DEM) is the new name for User Environment Manager (UEM). VMware renamed User Environment Manager 9.9 and newer to DEM to avoid confusion with Workspace ONE Unified Endpoint Management (also UEM), which is actually AirWatch mobility management. User Environment Manager is sometimes called “little UEM”, while AirWatch is sometimes called “big UEM”.
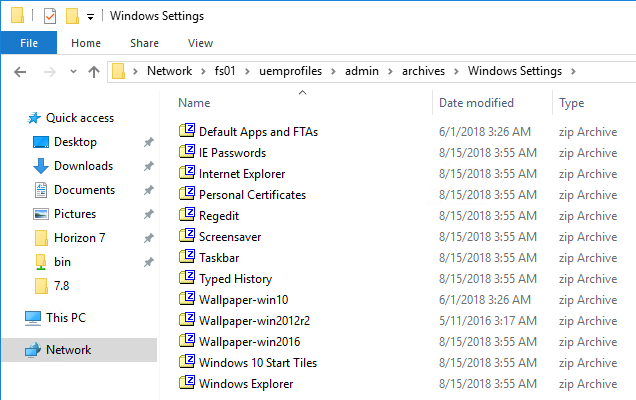
- DEM persists settings for specific applications instead of persisting the entire profile. Saved application settings are stored in separate .zip files (aka profile archives) for each application so you can restore one .zip file without affecting the other .zip files. Many of these DEM profile archive .zip files can be restored to multiple operating system versions, whereas other monolithic profile solutions are tied to a specific operating system version.
- DEM restores profile archives on top of other profile solutions. One option is mandatory profiles so that anything not saved by DEM is discarded on logoff.
- Omnissa KB article 2118056 Migrate Persona Management to Dynamic Environment Manager.
- Persona saves the entire user profile, meaning it is a “set and forget” roaming profile solution that is similar to Microsoft’s native roaming profiles or Citrix Profile Management.
- Persona is not included in Horizon 2006 (8.0) and newer. If you are using Persona in Horizon 7, then before upgrading, see Omnissa Tech Zone Modernizing VDI for a New Horizon to migrate off of Persona.
- Persona is included in all editions of Horizon 7.
- However, Persona doesn’t work on newer versions of Windows 10, Persona doesn’t work on RDSH Horizon Agents, and Persona doesn’t work on Instant Clones.
- In practice, DEM is the only viable profile option from Omnissa, but DEM requires Horizon 7 Enterprise Edition, or upgrade to Horizon 2006 (8.0)
- App Volumes Writable Volumes – App Volumes Writable Volumes can store the user’s profile and roam the writable volume to different Horizon Agent machines.
- App Volumes requires Horizon Enterprise Edition.
- App Volumes is a separate infrastructure (e.g. separate servers, separate agents) that must be built, learned, maintained, and supported.
- Writable Volumes are stored as .vmdk files on vSphere datastores. For backup/restore, you can replicate the .vmdk files to multiple datastores, including multiple data centers.
- When Writable Volumes are combined with DEM, then Outlook search indexes can be stored on the Writable Volumes.
- Writable Volumes can only be mounted on one Horizon Agent machine at a time.
- Persistent Disks – Horizon Composer can generate persistent disks for each dedicated desktop machine. User profile is redirected to the persistent disk so the user profile will be available after the machine is refreshed.
- In Horizon 2006 (8.0) and newer, Composer and Persistent Disks are deprecated. Composer has been removed from Horizon 2012 (8.1) and newer. Before upgrading, see Omnissa Tech Zone Modernizing VDI for a New Horizon to migrate off of Persona.
- Persistent Disk only stores the user’s profile. It does not store user-installed applications. If you need to persist user-installed applications, then implement App Volumes Writable Volumes instead.
- Persistent Disks were brought to Instant Clones in Horizon 2306 (8.10) and newer. See Using Persistent Disks for Dedicated Instant Clones at Omnissa Docs.
- Persistent Disks are only an option for Dedicated Assignment pools, meaning that the Persistent Disks do not float between machines. Administrators can manually detach a Persistent Disk from one machine and attach it to a different machine.
- Persistent Disks are stored as .vmdk files on vSphere datastores. How do you back them up and restore them, especially if they are not currently mounted on a running virtual machine?
- Microsoft FSLogix – FSLogix Profile Containers can store the entire user profile in a .vhdx file that is stored on a file share.
- FSLogix is free for almost all virtual desktop and RDSH customers. If you’re not licensed for DEM, then FSLogix is a viable alternative.
- FSLogix is known for roaming the Outlook Search Index and other special Office 365 files.
- FSLogix Profile Container is very similar to Persistent Disks and Microsoft User Experience Virtualization in that the entire profile is stored in the .vhdx file. Watch out for disk space consumption on the file share. And concurrent access to the .vhdx can be challenging.
- FSLogix Profile Container configuration is “set and forget” since it doesn’t need separate configuration for each application.
- Microsoft Roaming Profiles – a last-case alternative is native Microsoft roaming profiles. However, there are many limitations.
- Microsoft’s Roaming Profiles cause longer login times since the entire profile is downloaded before the user can interact with the desktop or application. This is not a problem in other roaming profile solutions.
- Microsoft’s Roaming Profiles do not merge settings from multiple sessions so if you have users connecting to multiple RDS farms (or multiple desktop pools) then each RDS farm should have separate roaming profile shares.
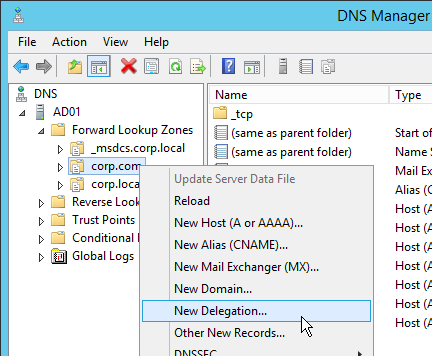
Roaming Profiles File Shares
File Shares Design
This section provides a summary of the required shares. See Create and Share the Folders for Detailed steps for creating the profile shares.
There are typically several types of file share paths:
- Roaming Profiles – stores DEM profile archives, FSLogix .vhdx Profile Containers, etc.
- Roaming profiles (or DEM profile archives) are stored in a separate sub-folder for each user that only the one user has access to.
- FSLogix, Persona and Microsoft Roaming Profiles are monolithic profiles that are tied to a specific operating system version. If you are supporting multiple operating systems, or if users are connecting to multiple, concurrent pools/farms, then create a separate Roaming Profile share path for each operating system version. For example, you might have separate Roaming Profile shares for Windows 10 and Windows Server 2019.
- Theoretically, DEM Personalization Archives can be used across multiple operating system versions.
- Folder Redirection – stores profile folders that you want to persist, but you don’t want to store with the roaming profile. These folders are typically Documents, Downloads, Desktop, and Favorites. Folder Redirection speeds up restoration of roaming profiles. AppData should not be redirected to this file share path.
- Each user has a separate sub-folder that only the one user has access to.
- Folder Redirection can be accessed from multiple operating system versions so there’s no need to create multiple Folder Redirection share paths.
- Home Directories – users store Documents and other personal data in Home Directories.
- Folder Redirection can be stored in Home Directories instead of in a separate Folder Redirection file share path.
- Home Directories might be located on multiple file servers. If these file servers are in branch offices instead of data centers, then Folder Redirection should be stored on file servers in the data center that contains Horizon Agents.
- DEM Configuration Share – Dynamic Environment Manager (DEM) stores its configuration in a file share.
These file shares for a particular user can only be located in one data center. Neither Omnissa nor Microsoft support multi-master replication (aka merge replication) of user profiles, home directories, and folder redirection. If you use DFS Namespaces, then the DFS Namespace path must point to only one target.
- Horizon users should connect to Horizon Agents in the same data center as the file servers that contain the user’s profile, folder redirection, and home directory. If you have active Horizon Agents in multiple data centers, then you can configure Horizon Cloud Pod Home Sites so that specific users connect to specific data centers. If users connect to a Horizon Agent that is not in the same data center as the user’s file servers, then the files are retrieved across the Data Center Interconnect, which might take longer than desired.
- The DEM Configuration Share is primarily read-only so multi-master replication is less of a concern.
Here are NTFS permissions for each of the profile file share types:
DEM Profile Archives share:
- \\server\DEMProfiles
- DEM Admins = Full Control
- DEM Support = Modify
- DEM Users = Read/Execute, Create Folders – this folder only
- Creator Owner = Full Control
Dynamic Environment Manager (DEM) Configuration share:
- \\server\DEMConfig – stores DEM configuration
- DEM Admins = Full Control
- DEM Users = Read
- DEM Support = Read
- Domain Computers = Read – for DEM computer ADMX
Non-DEM Monolithic Roaming Profiles share: (example includes multiple shares for multiple operating systems)
- \\server\Profiles\Win10
- Admins = Full Control
- Support = Modify
- Users = Read/Execute, Create Folders – this folder only
- Creator Owner = Full Control
- \\server\Profiles\Win19
- Admins = Full Control
- Support = Modify
- Users = Read/Execute, Create Folders – this folder only
- Creator Owner = Full Control
Folder Redirection share:
- \\server\Redirect
- Admins = Full Control
- Users = Read/Execute, Create Folders – this folder only
- Creator Owner = Full Control
According to Omnissa 2113665 Imports and exports in Omnissa Dynamic Environment Manager are slow, the two DEM shares should be excluded from antivirus scanning. The article also details some antivirus exclusions for the FlexEngine installed on the Horizon Agent machines.
Create and Share the Folders
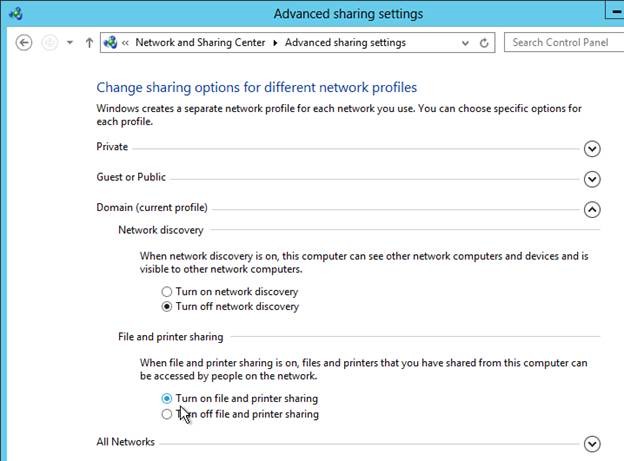
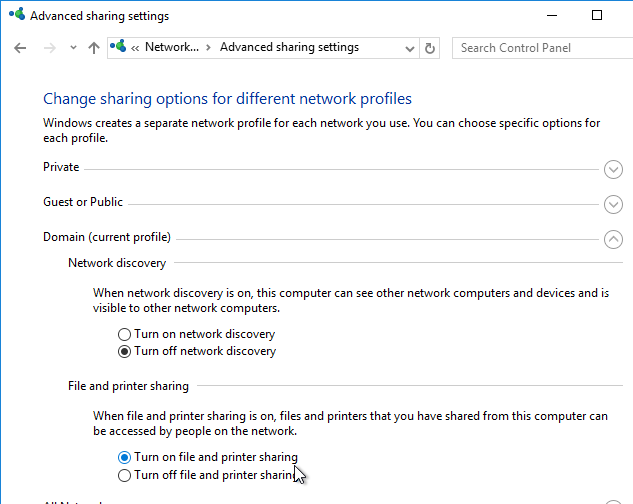
- On your file server, make sure file and printer sharing is enabled.
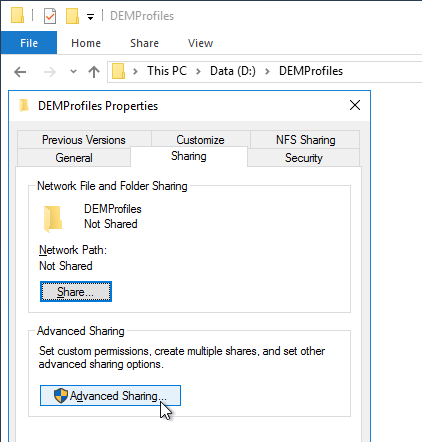
- On the file server that will host the file share, create a new folder and name it DEMConfig, or DEMProfiles or similar. See File Shares Design for design info on the share paths that should be created.
- Open the folder’s Properties.
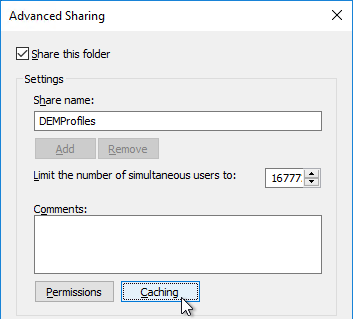
- On the Sharing tab, click Advanced Sharing.
- Check the box to share the folder.
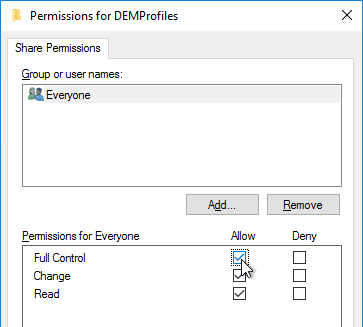
- Click Permissions.
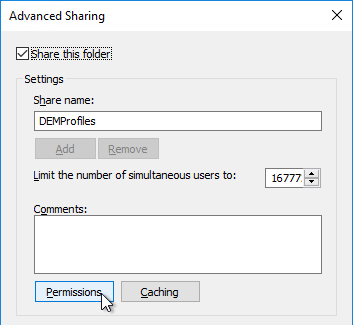
- Give Full Control to Everyone. Click OK.
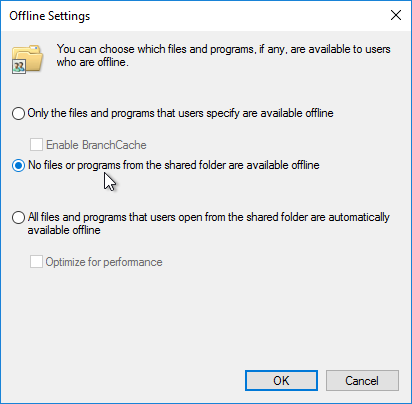
- Click Caching.
- Select No files or programs. Click OK twice, and then click Close.
- According to Omnissa 2113665 Imports and exports in Omnissa Dynamic Environment Manager are slow, the two DEM shares should be excluded from antivirus scanning. The article also details some antivirus exclusions for the FlexEngine installed on the Horizon Agent machines.
Folder Permissions
The following procedure works for any of the profile and redirection folders listed in the file shares design except for the DEMConfig folder.
Lieven D’hoore has VMware Horizon View – Script to create Persona Management Repositories, Shares and Permissions.
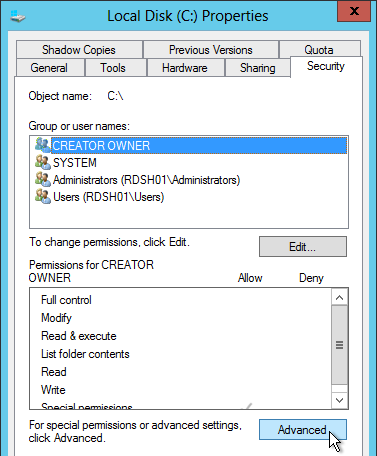
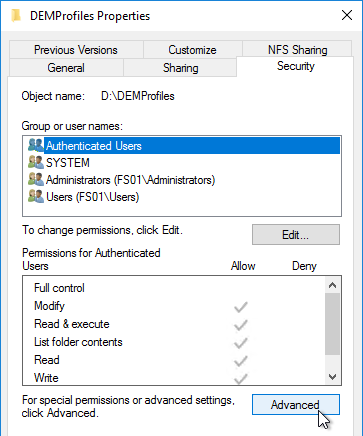
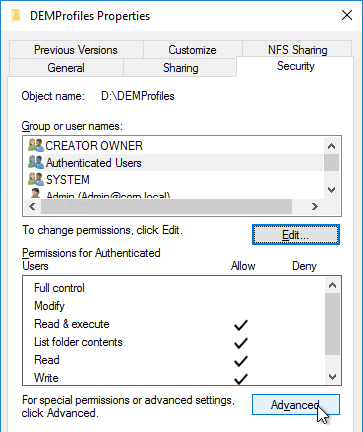
- Open the Properties of the new shared folder.
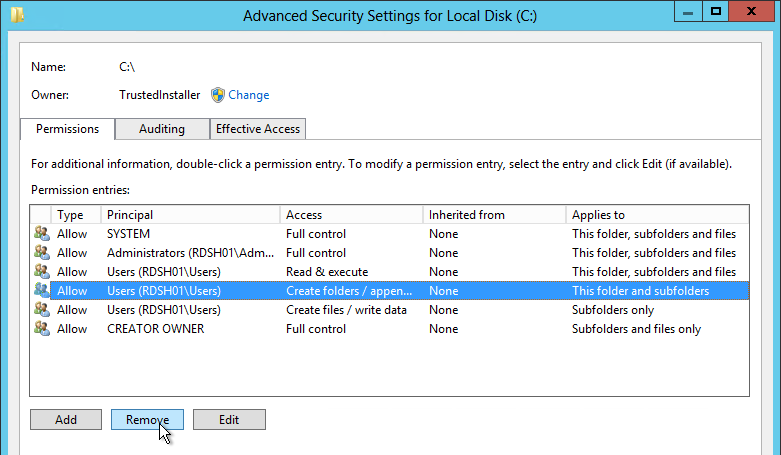
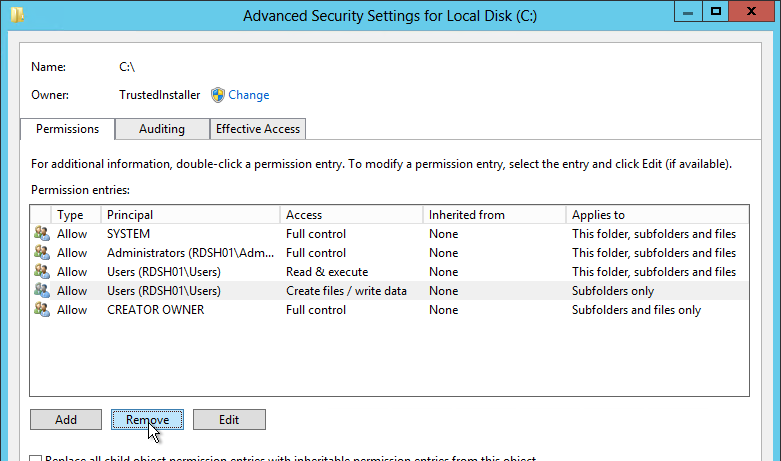
- On the Security tab, click Advanced.
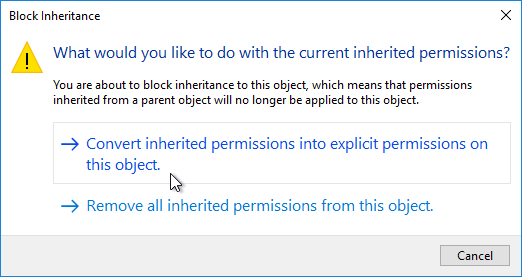
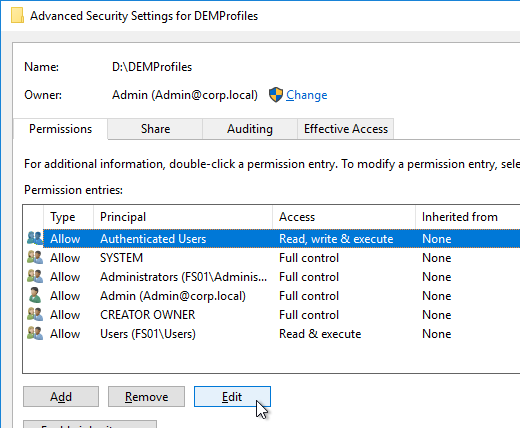
- Click Disable Inheritance.
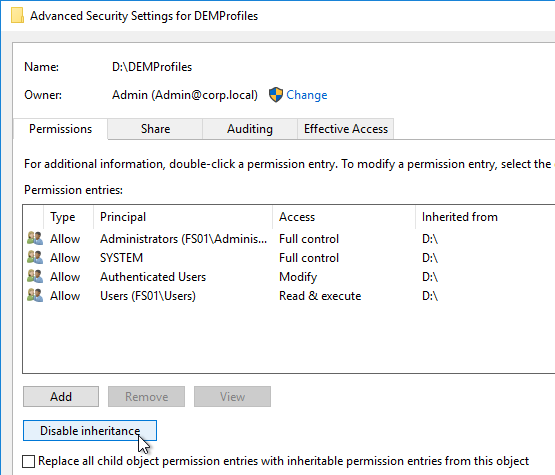
- Click Convert inherited permissions.
- Click OK to close Advanced Security Settings.
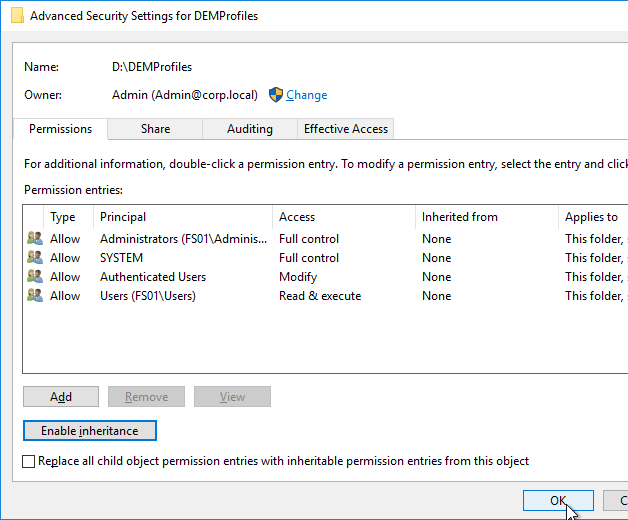
- Click Disable Inheritance.
- On the Security tab, click Edit.
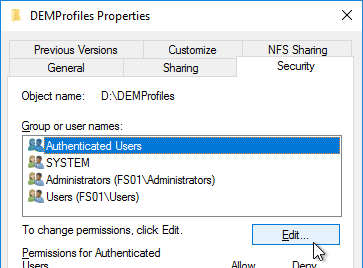
- For the Everyone or the Authenticated Users entry or the Users entry, remove Full Control and Modify. Make sure Write is enabled so users can create new folders.
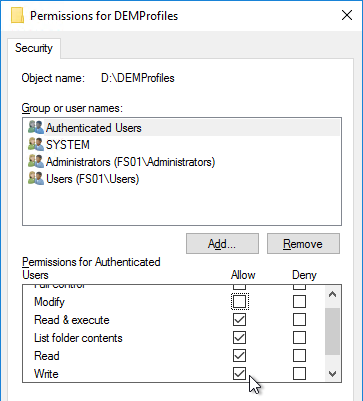
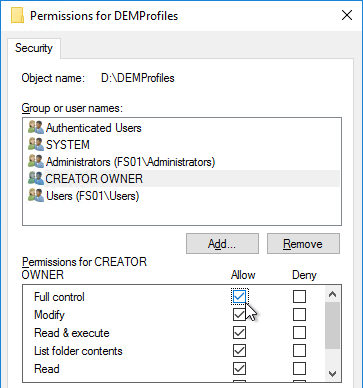
- Add CREATOR OWNER, and give it Full Control. This grants users Full Control of the folders they create.
- Click OK to close the Permissions window.
- For the Everyone or the Authenticated Users entry or the Users entry, remove Full Control and Modify. Make sure Write is enabled so users can create new folders.
- Click Advanced again.
- Highlight the Everyone permission entry or the Authenticated Users permission entry or the Users permission entry and click Edit.
- At the top of the window, change the Applies to selection to This folder only. This prevents the Everyone permission from flowing down to newly created profile folders.
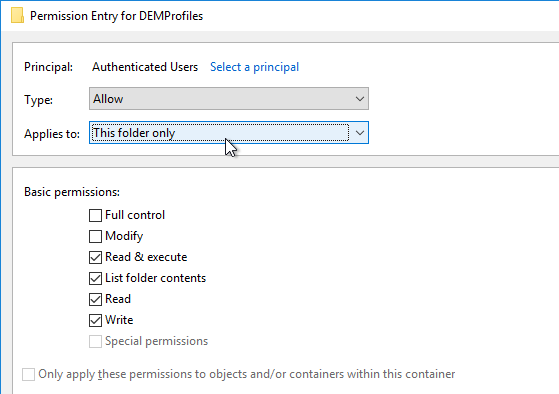
- Remove all other permission entries that grant access to Users, Domain Users, Everyone, or Authenticated Users. There should only be one of these types of permission entries.
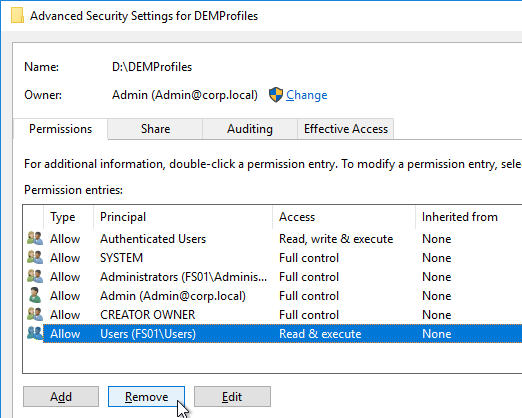
- Click OK twice to close the Security and Properties windows.
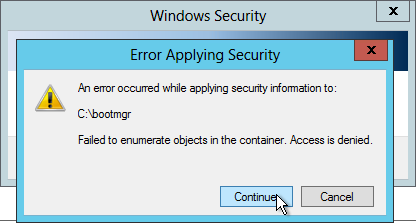
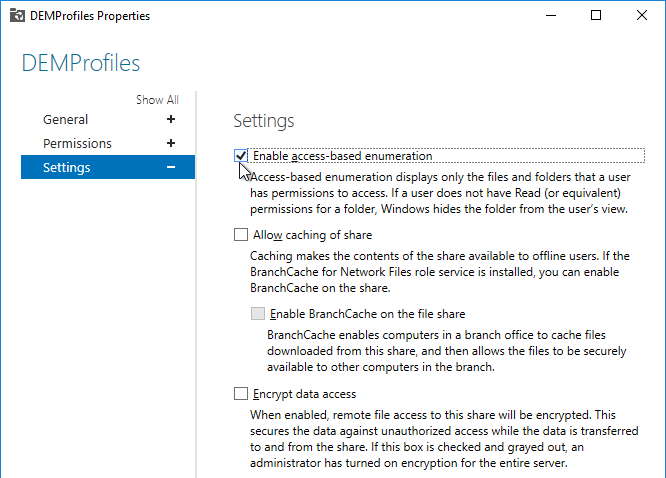
Access Based Enumeration
With access based enumeration enabled, users can only see folders to which they have access.
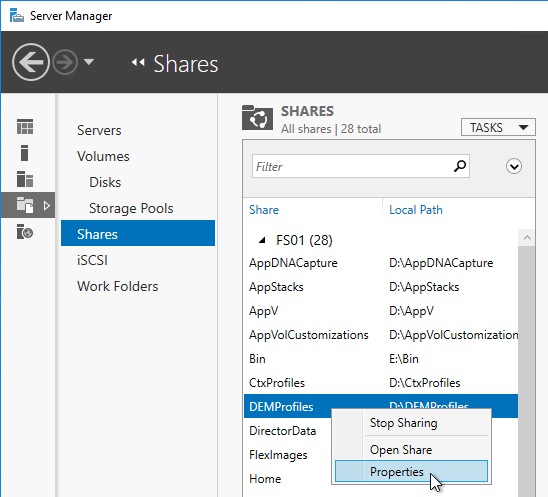
- In Server Manager, on the left, click File and Storage Services.
- If you don’t see Shares then you probably need to close Server Manager and reopen it.
- Right-click the new share, and click Properties.
- On the Settings page, check the box next to Enable access-based enumeration and click OK.
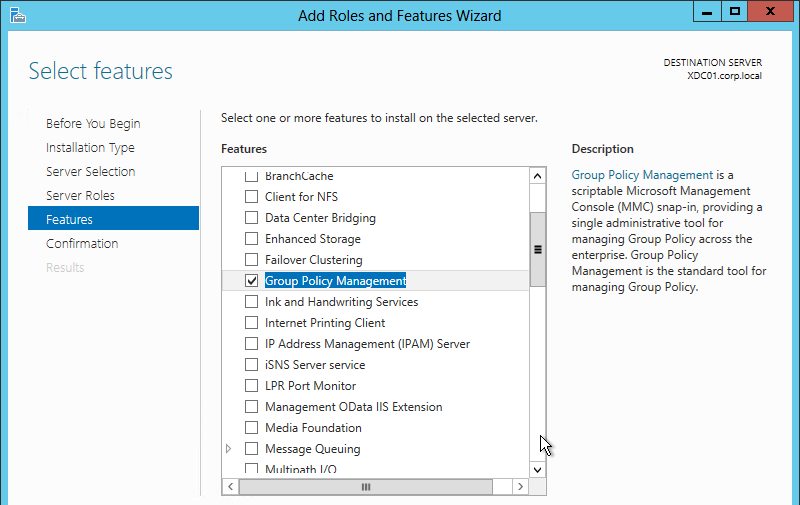
GPO Templates
Windows Group Policy Templates
Unfortunately, there are some differences between the GPO templates for Windows Server, and the GPO templates for Windows 10. You’ll need to download the full set of templates.
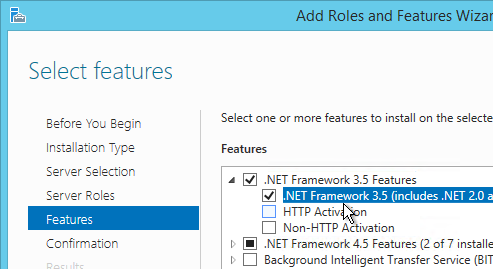
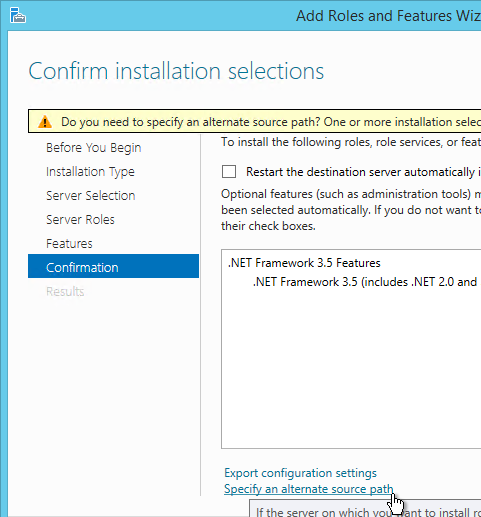
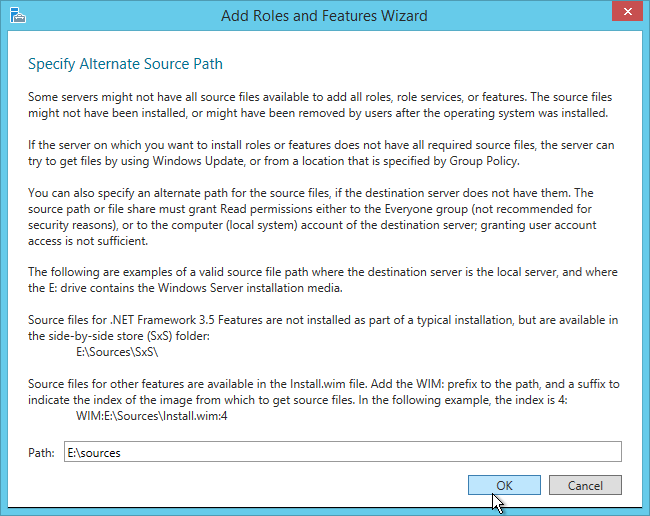
Follow the procedure at https://www.carlstalhood.com/group-policy-objects-vda-computer-settings/#admtemp to download and install the Administrative Templates (.admx) for Windows 10.
Horizon Group Policy Templates
Some of the policy settings in this topic require group policy templates from the Horizon GPO Bundle, which can be downloaded from the Omnissa Horizon Download Page.
For Horizon 2503 (8.15), download Horizon GPO Bundle 8.15 (Omnissa-Horizon-Extras-Bundle-2503-8.15.0)

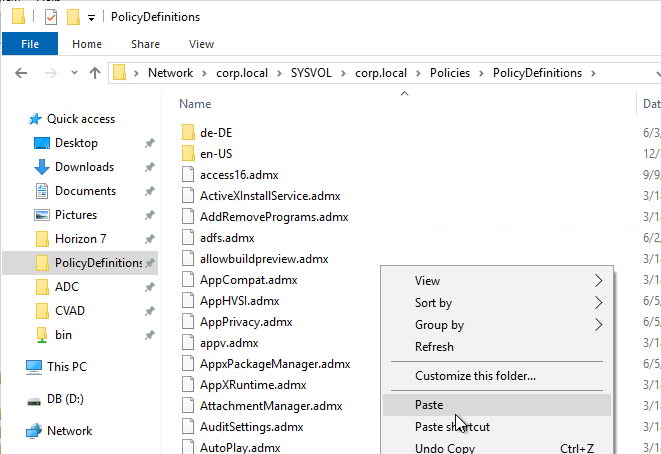
Install the Group Policy files:
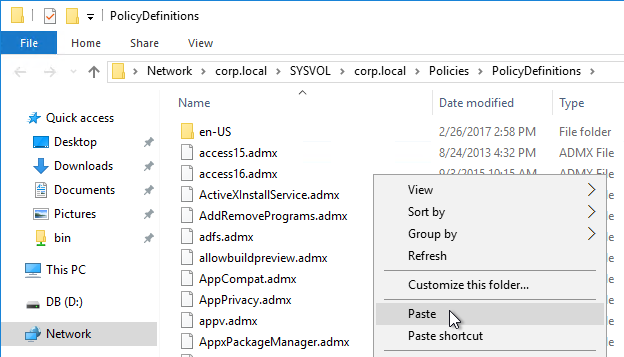
- Go to the downloaded Omnissa-Horizon-View-Extras-Bundle.zip file and extract the files.
- Copy the .admx files and en-US folder to the clipboard.

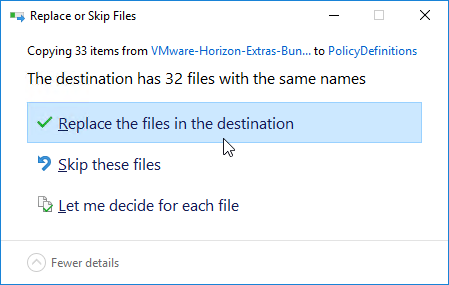
- Go to \\domain.com\sysvol\domain.com\Policies\PolicyDefinitions (if it exists), or C:\Windows\PolicyDefinitions on the group policy editing machines (if PolicyDefinitions doesn’t exist in SYSVOL) and paste the .admx files. Overwrite any older files.
- Horizon 7.13 has an .admx file in the ThinPrint\ADMX folder. Horizon 2006 (8.0) and newer no longer include ThinPrint, so this .admx is not available in Horizon 2006 (8.0) and newer.
- Copy the .admx file, and en-US folder, to the clipboard.
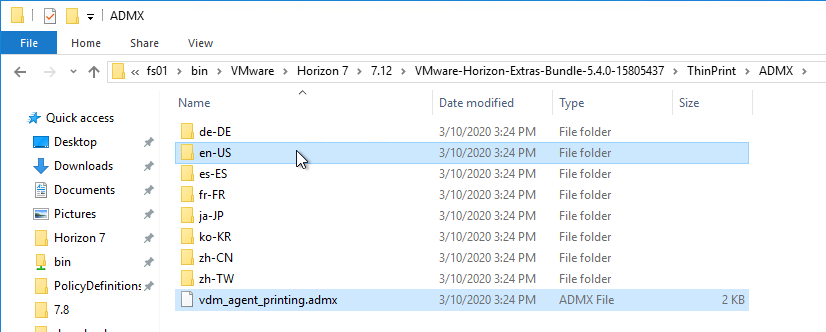
- Go to \\domain.com\sysvol\domain.com\Policies\PolicyDefinitions (if it exists), or C:\Windows\PolicyDefinitions on the group policy editing machines (if PolicyDefinitions doesn’t exist in SYSVOL) and paste the .admx files. Overwrite any older files.
- Copy the .admx file, and en-US folder, to the clipboard.
- When you edit group policy objects, you can now add Horizon settings. Horizon older than 2412 had settings in the VMware nodes. Horizon 2412 and newer have settings in the Omnissa nodes. However, the previously configured VMware settings do not migrate automatically and instead must be reconfigured in the Omnissa nodes. Don’t upgrade your Horizon Agents until you finish reconfiguration of the GPO settings.

- After all Horizon Agents are upgraded to 2412 or newer, you can delete the older vdm .admx template files from PolicyDefinitions.

Dynamic Environment Manager GPO Templates
Download and copy the DEM GPO ADMX templates to PolicyDefinitions. DEM can also work without Active Directory (Group Policy); see Omnissa 2148324 Configuring advanced DEM settings in NoAD mode for details.
In Horizon 2006 (8.0) and newer, DEM is available in all editions of Horizon. There are two editions of DEM, each with different downloads and different ADMX templates.
- Horizon 2006 (or newer) Enterprise Edition is entitled to DEM Enterprise Edition.
- Horizon 2006 (or newer) Standard Edition and Horizon 2006 (or newer) Advanced Edition are entitled to DEM Standard Edition.
In Horizon 7, DEM is only available for Horizon Enterprise Edition customers. Horizon 7 Enterprise Edition customers can download DEM Enterprise Edition.
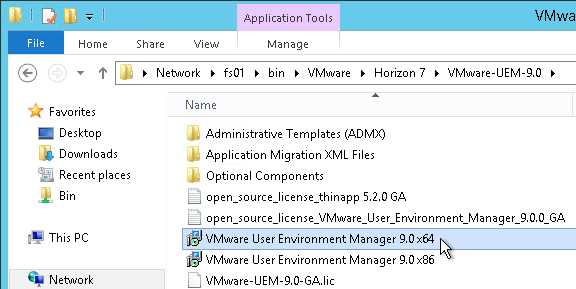
- Download DEM 2503 (10.15) Enterprise Edition.

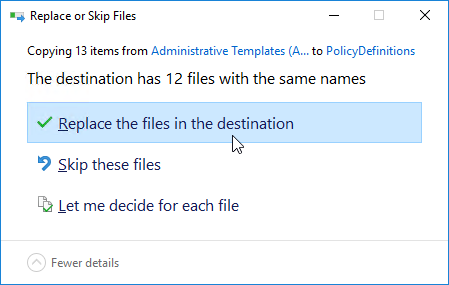
- Go to the extracted Dynamic Environment Manager files, and in the Administrative Templates (ADMX) folder, copy the files and the folder.

- Go to \\domain.com\sysvol\domain.com\Policies\PolicyDefinitions (if it exists), or C:\Windows\PolicyDefinitions on the group policy editing machines (if PolicyDefinitions doesn’t exist in SYSVOL) and paste the files and folder. Overwrite any older files.
- If you are upgrading from DEM 2406 or older to DEM 2412 or newer, then look in PolicyDefinitions for VMware DEM.admx files and delete them.

- You will find Omnissa DEM GPO settings in the User Half of a GPO.

Omnissa DEM FlexEngine Advanced Settings are available in a different GPO template.
- Go to https://kb.omnissa.com/s/article/2145286.
- On the top right, click the link to download the ADMX file.

- Extract the files. Then copy the .admx file.

- Go to your PolicyDefinitions folder and paste the file.
- Go back to the extracted files and then copy the .adml file.

- Go to your PolicyDefinitions folder and paste the file under the en-US folder.

- Look in your PolicyDefinitions for VMware DEM FlexEngine Advanced Settings.admx and delete it.
Microsoft Edge GPO Templates
Horizon Browser Redirection requires installation of an Edge extension. Install the Edge GPO Templates so you can force install the Edge extension.
- Download the Edge ADMX templates from Microsoft Edge for business. Select your version of Edge and then click GET POLICY FILES.

- Extract the .zip file.
- Go to the extracted files. In the \windows\admx folder, copy the msedge*.admx files and the en-US folder.
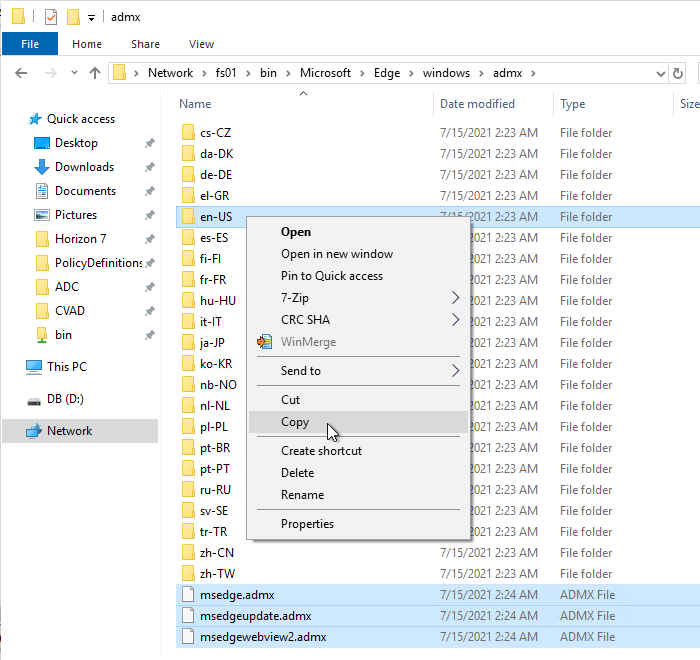
- Go to PolicyDefinitions in your SYSVOL (e.g., \\domain.com\sysvol\domain.com\Policies\PolicyDefinitions) and paste the .admx files and en-US folder.

Google Chrome GPO Templates
Horizon Browser Redirection requires installation of a Chrome extension. Install the Chrome GPO Templates so you can force install the Chrome extension.
- Download the Google Chrome ADMX templates from Set Chrome Browser policies on managed PCs.

- Extract the .zip file.
- Go to the extracted files. In the \policy_templates\windows\admx folder, copy the chrome.admx and google.admx files.

- Go to PolicyDefinitions in your SYSVOL (e.g. \\domain.com\sysvol\domain.com\Policies\PolicyDefinitions) and paste the .admx files.
- Go back to the extracted Google Chrome templates in the \policy_templates\windows\admx folder and copy the en-US folder.

- Go to back to PolicyDefinitions in your SYSVOL and paste the en-US folder. It will add .adml files to the existing en-US folder.

Create Group Policy Objects
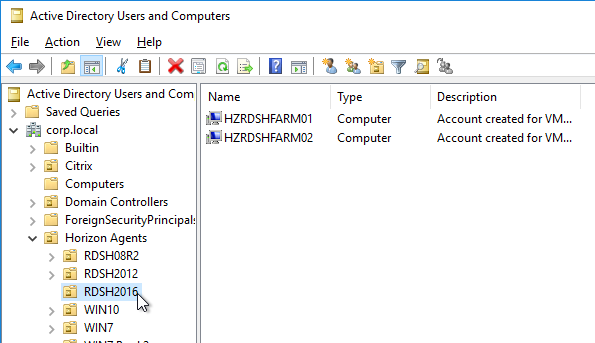
- Within Active Directory Users and Computers, create a parent Organizational Unit (OU) to hold all Horizon Agent computer objects (virtual desktops and Remote Desktop Session Hosts).
- Then create sub-OUs, one for each pool or RDS Farm.
- Move the Horizon Agent machines from the Computers container to one of the OUs created in step 2.
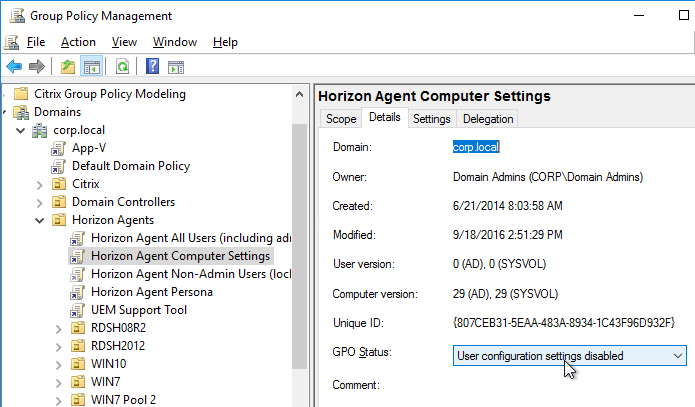
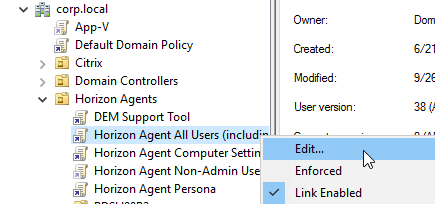
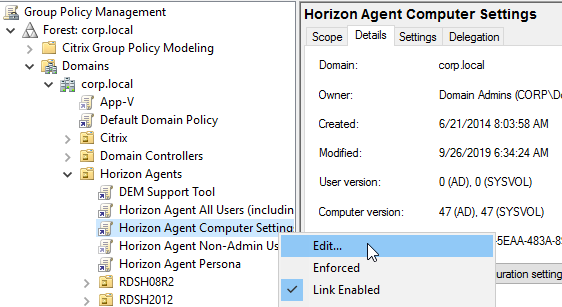
- Within Group Policy Management Console, create a Group Policy Object (GPO) called Horizon Agent Computer Settings and link it to the parent OU created in step 1. If this policy should apply to all pools, then link it to the parent OU. Or you can link it to pool-specific sub-OUs.
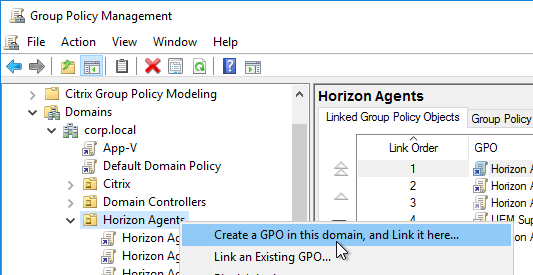
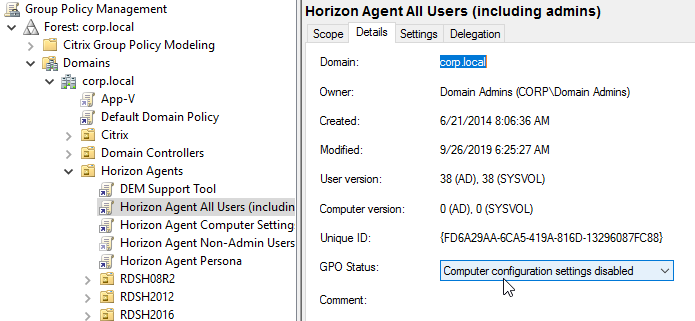
- Modify the properties of the GPO, on the Details tab, so that the User Configuration portion of the GPO is disabled. User settings do not belong in this GPO.
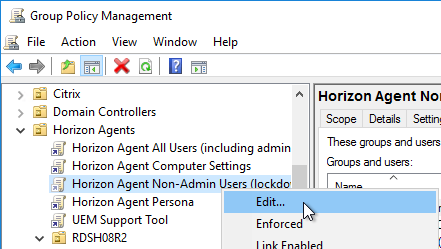
- Create and link two new GPOs to the Session host OU (in addition to the Horizon Agent Computer Settings GPO). One of the GPOs is called Horizon Agent All Users (including admins), and the other is called Horizon Agent Non-Admin Users (lockdown). The Non-Admin Users GPO can either be linked to the parent OU, or to the session host sub-OUs. Locking down sessions is more common for Remote Desktop Session Hosts.
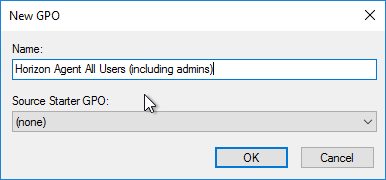
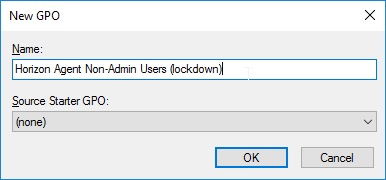
- Modify the properties of both of these GPOs and disable the Computer Configuration portion of the GPO.
- Click the Horizon Agent Non-Admin Users GPO to highlight it.
- On the right, switch to the Delegation tab, and click Add.
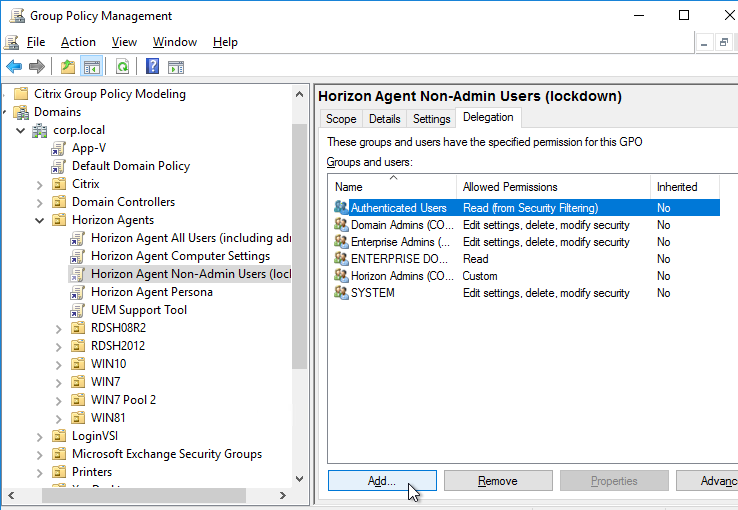
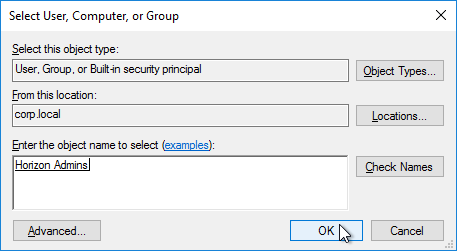
- Find your Horizon Admins group, and click OK.
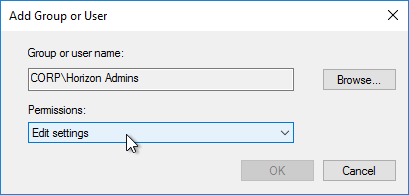
- Change the Permissions to Edit settings, and click OK.
- Then on the Delegation tab, click Advanced.
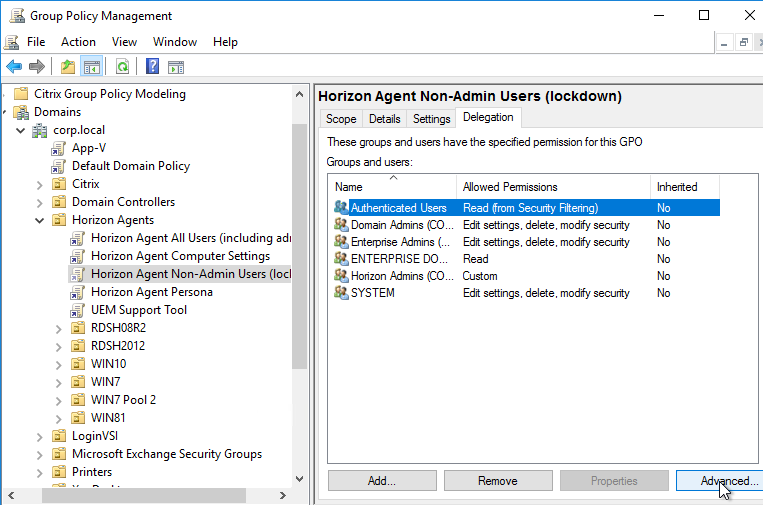
- For Horizon Admins, place a check mark in the Deny column for the Apply Group Policy permission. If desired, you can also deny the GPO to Domain Admins and Enterprise Admins. Click OK.
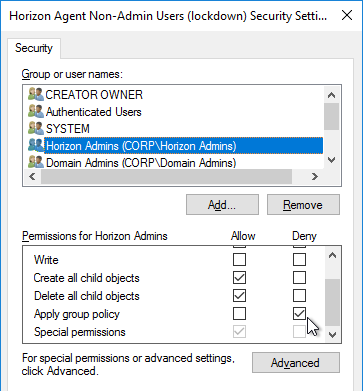
- Click Yes when asked to continue.
- For the other two GPOs, add Horizon Admins with Edit Settings permission. But don’t deny Apply Group Policy. The deny entry is only needed on the Lockdown GPO.
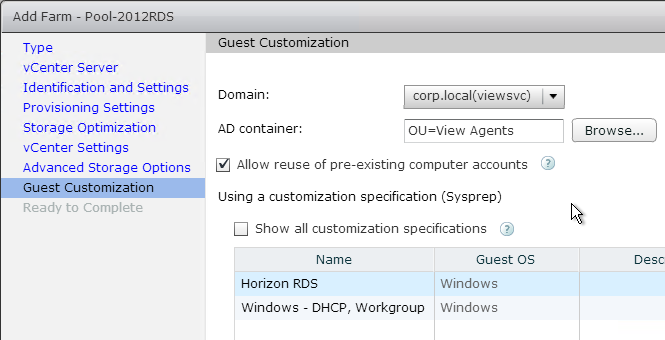
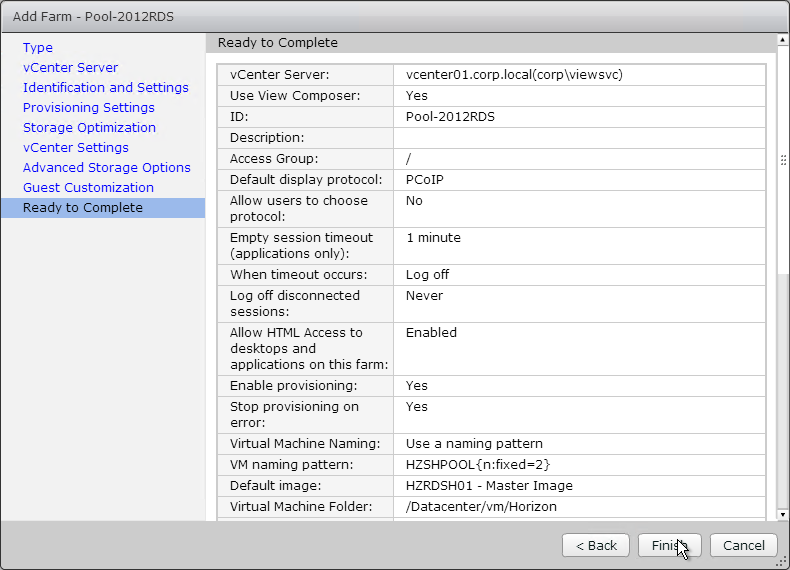
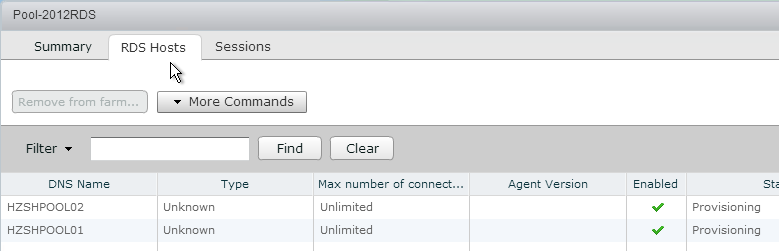
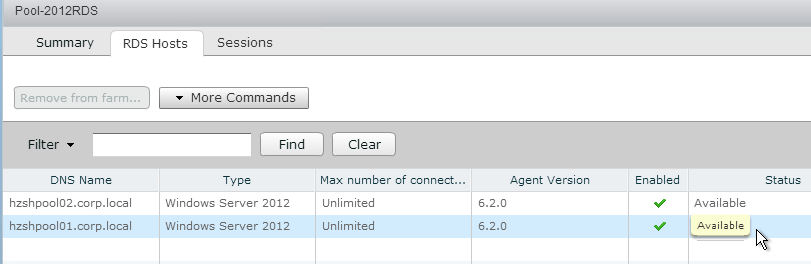
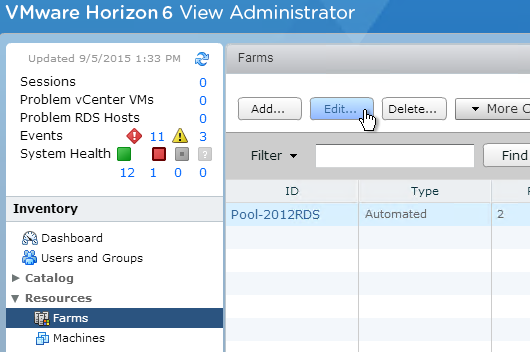
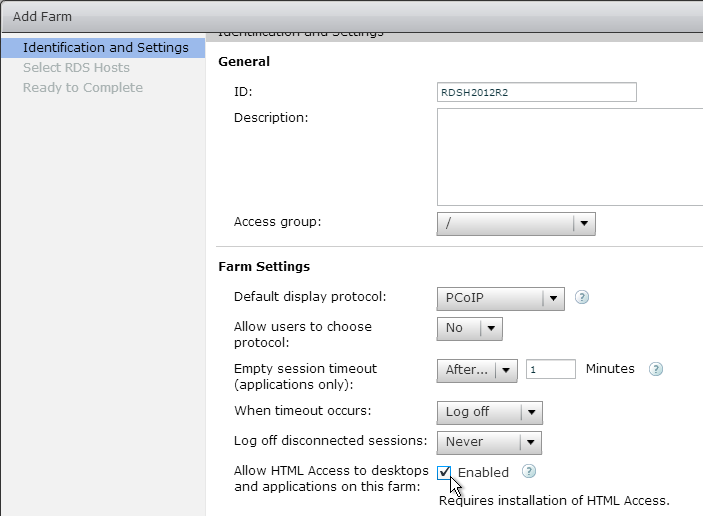
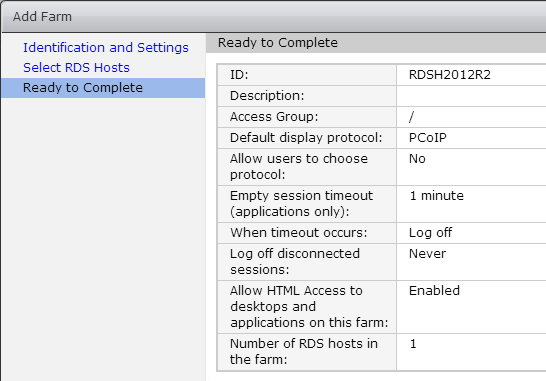
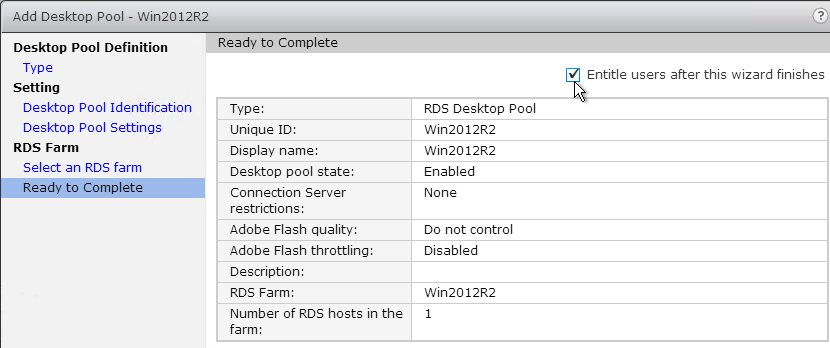
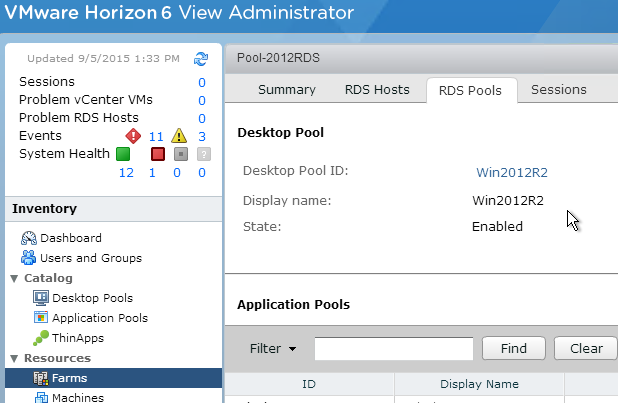
GPOs for Roaming Profiles (Persona and RDS)
You will need separate profile configurations for each Horizon Agent type (virtual desktops, RDS, operating system version, operating system bitness, etc.) Each profile configuration needs a different GPO. Note: if you are licensed for Dynamic Environment Manager, then you can skip this section.
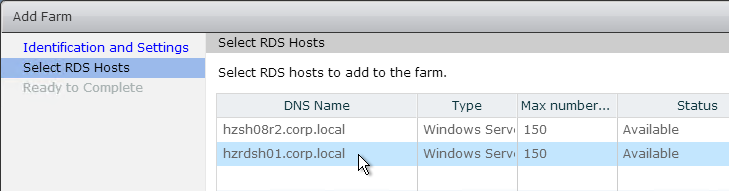
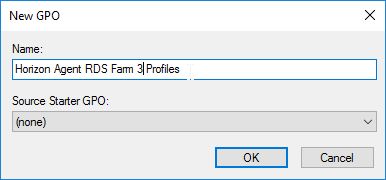
- Right-click one of the Remote Desktop Session Host sub-OUs, and create a new GPO.
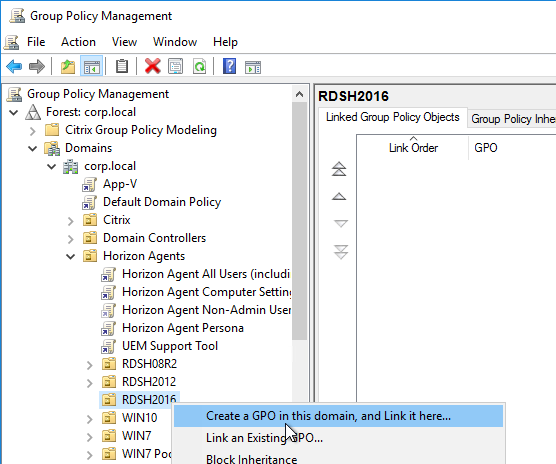
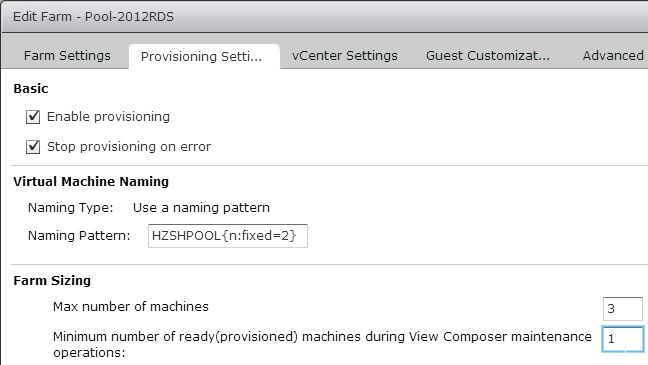
- Name it Horizon Agent RDS Farm 1 Profiles or similar. This policy will use Microsoft’s native roaming profiles instead of Persona. Note: each RDS farm should have a separate roaming profile share.
- Select the new GPO to highlight it. On the right, on the Delegation tab, add the Horizon Admins group, and give it Edit Settings permission.
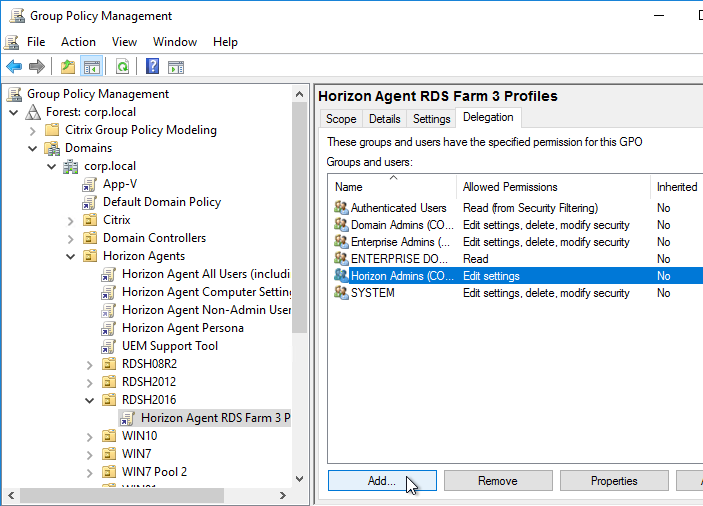
- If you have additional Remote Desktop Session Host sub-OUs (one for each RDS Farm), right-click one of them and create another GPO with a different name. Each RDS Farm needs a different profile path.
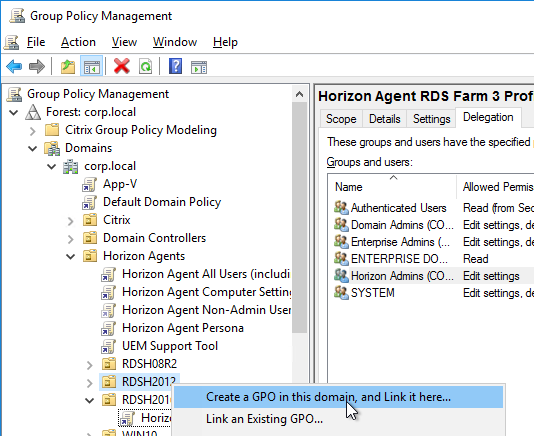

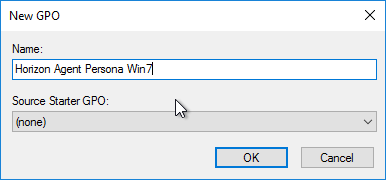
- Right-click a virtual desktop sub-OU, and click Create a GPO in this domain.

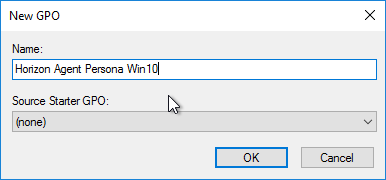
- Name it Horizon Agent Persona Win10 or similar, and click OK. Each operating system version should point to a different file share, so include the operating system version in the GPO name.
- Select the new GPO to highlight it. On the right, on the Delegation tab, add the Horizon Admins group, and give it Edit Settings permission.
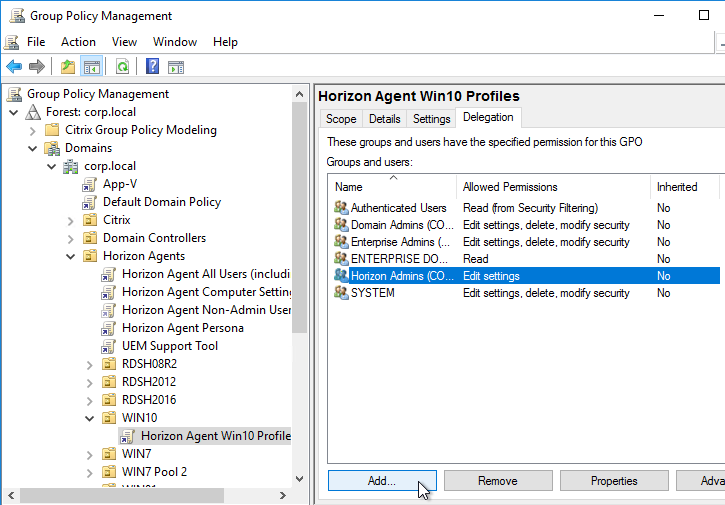
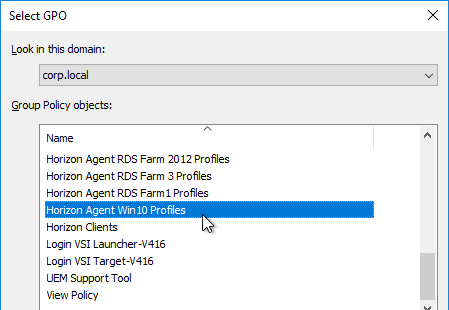
- If you have additional virtual desktop sub-OUs of the same operating system, right-click the OU, and click Link an Existing GPO.
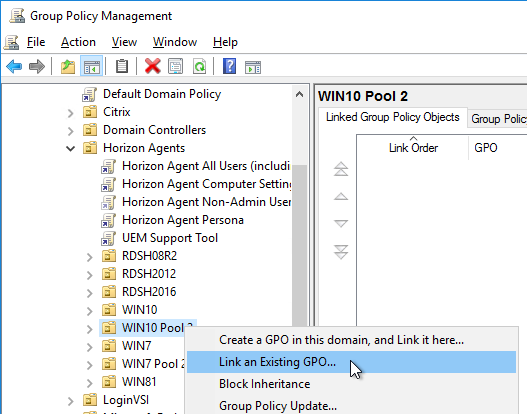
- Select the Horizon Agent Persona Win10 GPO, and click OK.
- For desktop pools running a different operating system, create a new Persona GPO. Each Persona GPO will point to a different share.
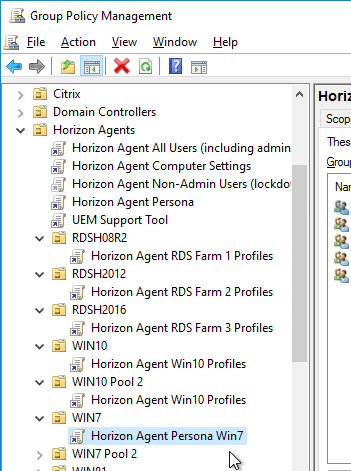
- The final group policy object framework will look like this: some GPOs linked to the parent OU and pool-specific GPOs linked to the sub-OUs. Each sub-OU needs different GPOs for different roaming profile configurations.
Agent Computer Settings
These GPO settings should be applied to the Horizon Agents.
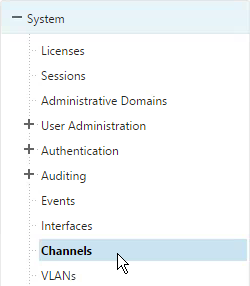
General Computer Settings
- Right-click the Horizon Agent Computer Settings GPO, and click Edit.
- Configure the GPO Computer Settings as detailed at https://www.carlstalhood.com/group-policy-objects-vda-computer-settings/#computer.
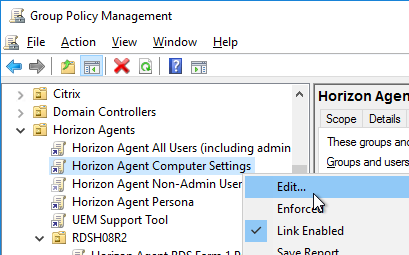
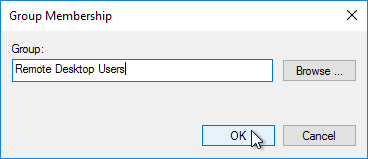
Remote Desktop Users Group
- Right-click the Horizon Agent Computer Settings GPO, and click Edit.
- Under Computer Config > Windows Settings > Security Settings, right-click Restricted Groups, and click Add Group.
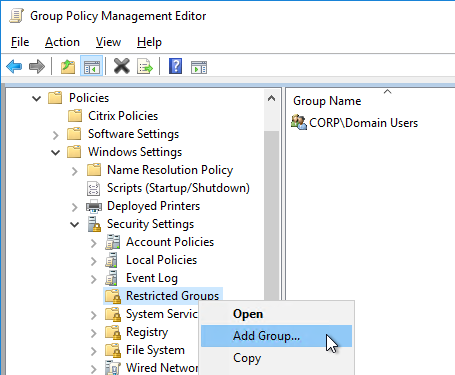
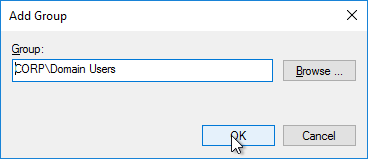
- Browse to the group of users (e.g. Domain Users) that will be added to the Remote Desktop Users group on the virtual desktops. Click OK.
- In the bottom half of the window, click Add to specify that this group is a member of:
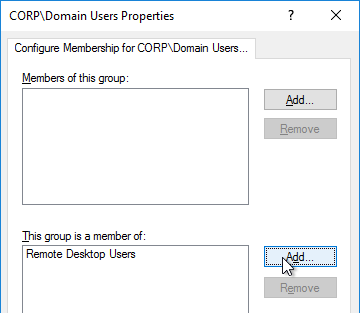
- Enter Remote Desktop Users, and click OK twice.
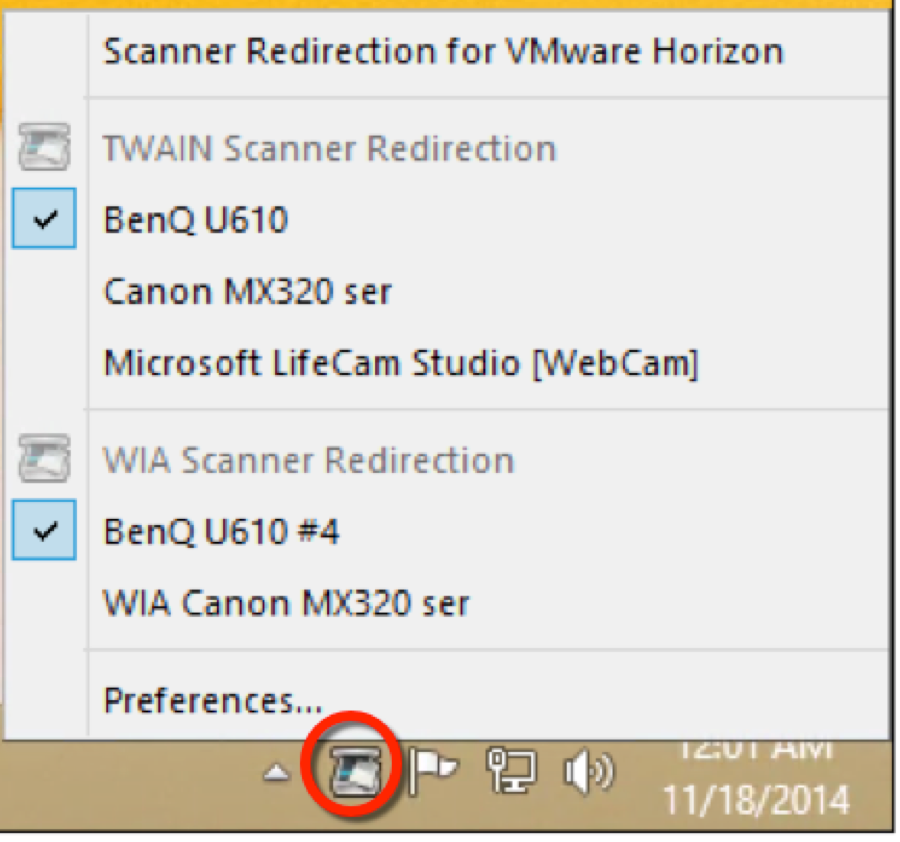
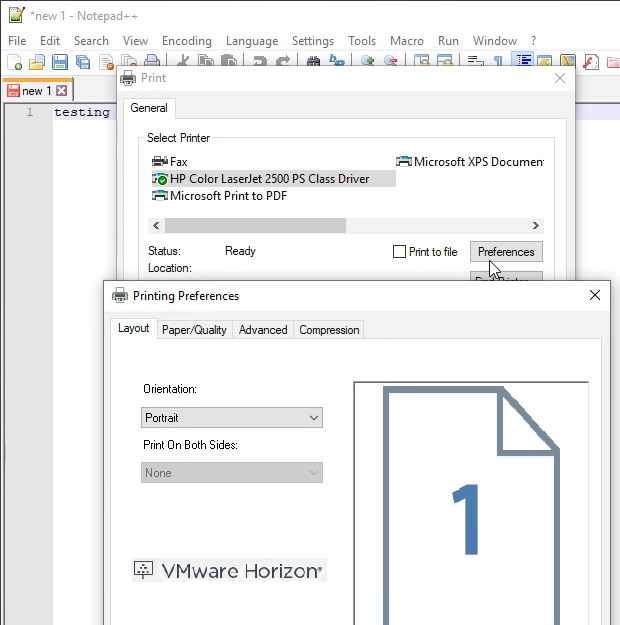
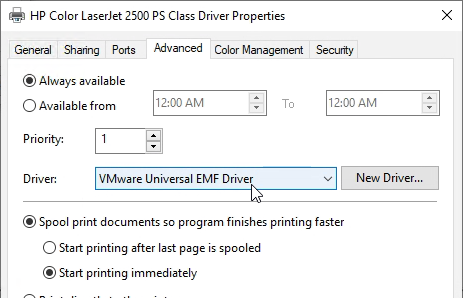
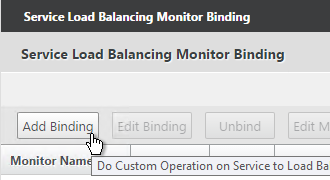
Horizon Integrated Printing
Horizon 7.7 and newer have a new Universal Print Driver named Horizon Integrated Printing.
You can use Group Policy to configure Integrated Printing. (e.g. select whether Native Print Drivers are preferred over the Universal Print Driver). The GPO settings only apply if the Horizon Integrated Printing feature is installed on the Horizon Agent.
- Make sure the Horizon 2012 (8.1) or newer GPO Templates are installed. Some Integrated Printing GPO settings are available in Horizon 7.7 and newer.
- Edit the Horizon Agent Computer Settings GPO.

- Go to Computer Configuration | Policies | Administrative Templates | Omnissa Horizon Agent Configuration | Omnissa Integrated Printing. This node only appears in ADMX templates from Horizon 7.7 and newer.
- The Integrated Printing settings are also available in the user half at User Configuration > Policies > Administrative Templates > Omnissa Horizon Agent Configuration > Omnissa Integrated Printing. User settings override computer settings.
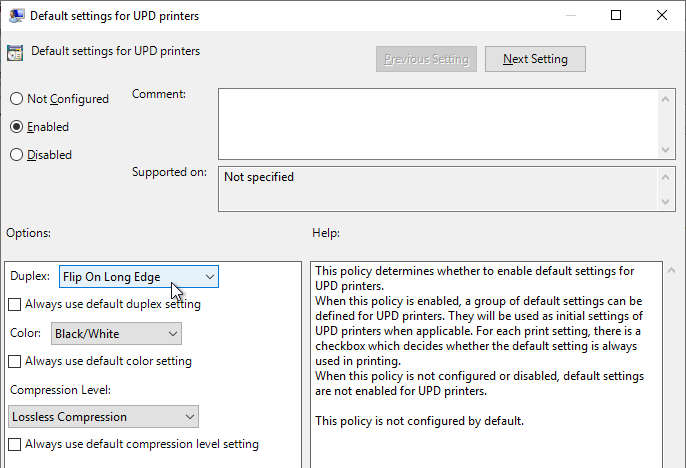
- Horizon 2106 (8.3) and newer have a setting name Default settings for UPD printers that lets you set duplex, color, and compression defaults.

- In Horizon 2012 (8.1) and newer, Do not change default printer prevents the client default printer from overriding the remote default printer.

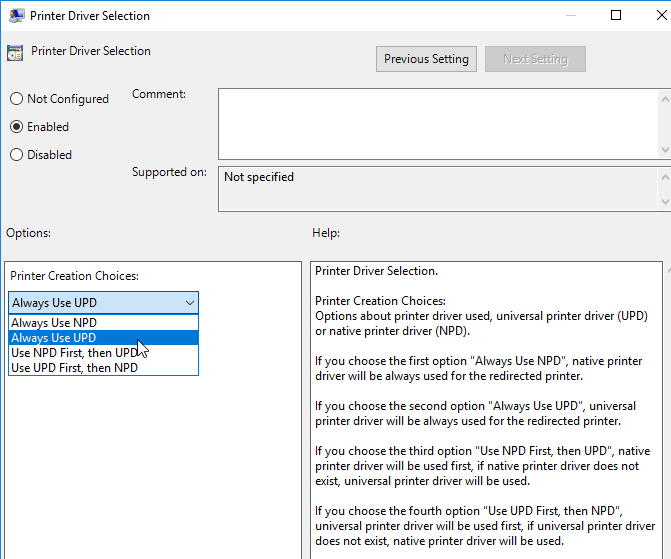
- Edit the setting Printer Driver Selection.

- Enable the setting and then consider setting it to Always use UPD to avoid needing to install any printer drivers on the Horizon Agent machines. This is particularly beneficial for multi-user RDSH machines.
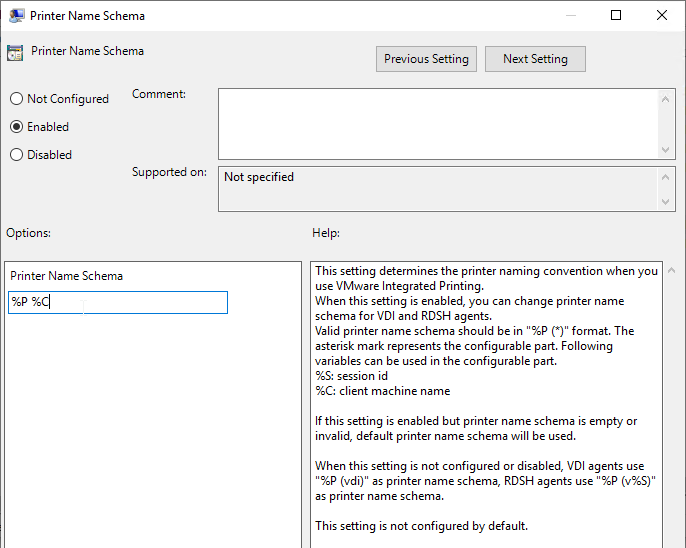
- In Horizon 2012 (8.1) and newer, Printer Name Schema lets you change the names of the redirected printers.

- Horizon 2303 and newer have Enable server printer redirection, which causes the Horizon Agent to connect directly to the print servers instead of routing the print job through the Horizon Client. Print drivers are probably needed on the Agent machine.

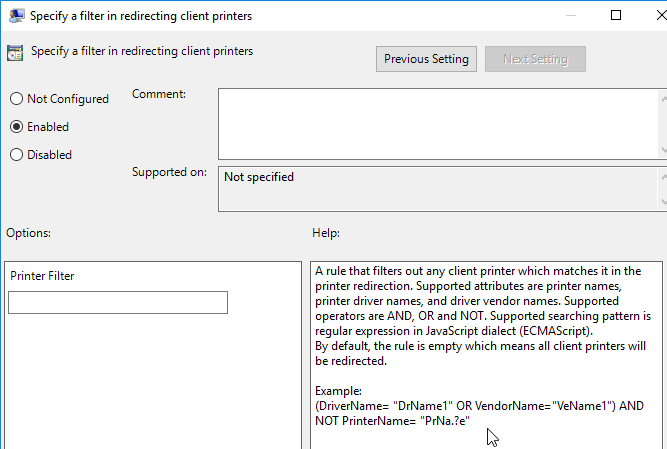
- Horizon 7.8 and newer supports filtering of redirected client printers.

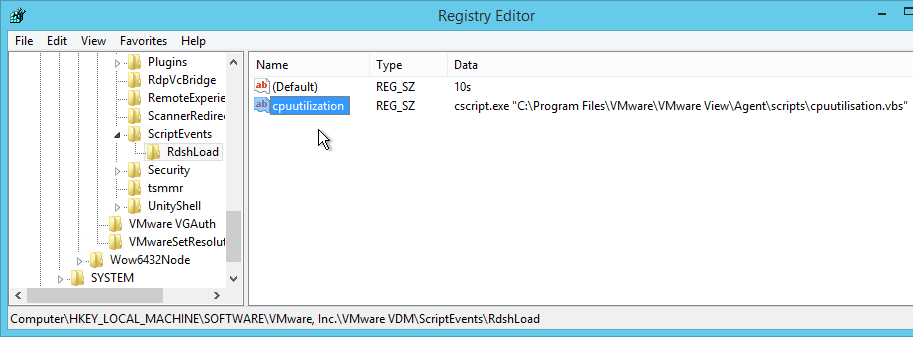
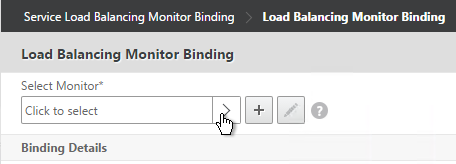
Omnissa Integrated Printing also supports Location Based Printing.
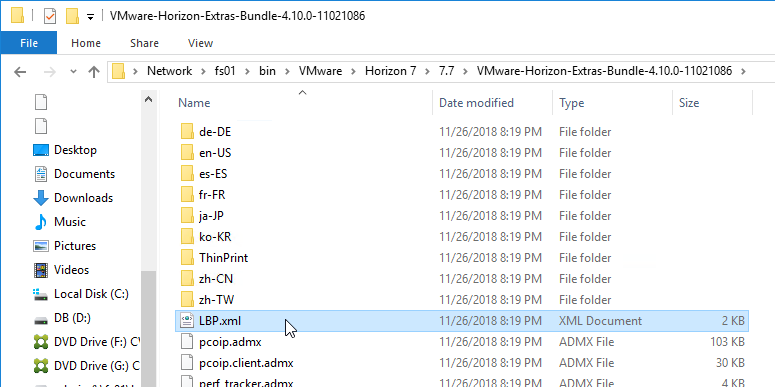
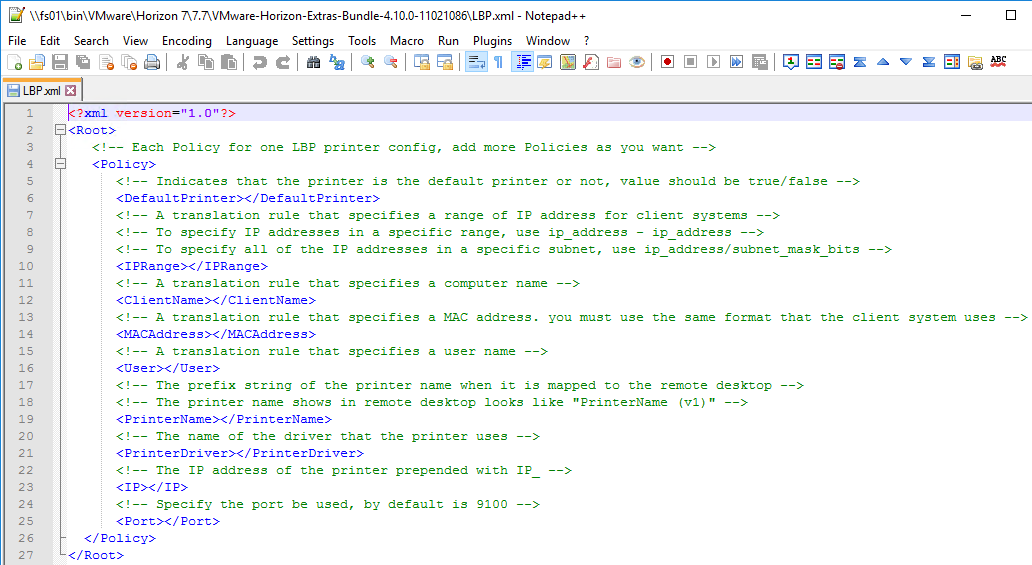
- In the Horizon 7.7 or newer Extras Bundle (GPO templates), find the file named LBP.xml.
- Edit the file. This is an XML document that can contain multiple <Policy> nodes. The file is commented.
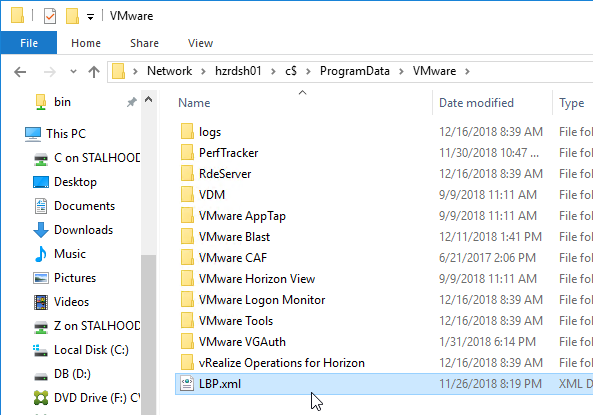
- When done editing the LBP.xml file, copy it to C:\ProgramData\VMware on each Horizon Agent machine. It’s probably easiest to use Group Policy Preferences (or computer startup script) to download this file when the Horizon Agent machines boots.
Dynamic Environment Manager (DEM) Group Policy
Most of the Dynamic Environment Manager GPO settings are user settings, not computer settings. DEM 2006 (aka 10.0) and newer support ADMX files for computers.
Note: UEM 9.1 can also work without Active Directory (Group Policy); see Omnissa 2148324 Configuring advanced UEM settings in NoAD mode for details.
From Omnissa Tech Zone Quick-Start Tutorial for VMware Dynamic Environment Manager and Chris Halstead VMware User Environment Manager (UEM) – Part 1 – Overview / Installation.
- Make sure Prevent access to registry editing tools is not enabled in any GPO. This setting prevents the FlexEngine from operating properly.
- Dynamic Environment Manager requires one computer setting. Edit the Horizon Agent Computer Settings GPO.
- Go to Computer Configuration | Policies | Administrative Templates | System | Logon.
- Double-click Always wait for the network at computer startup and logon.
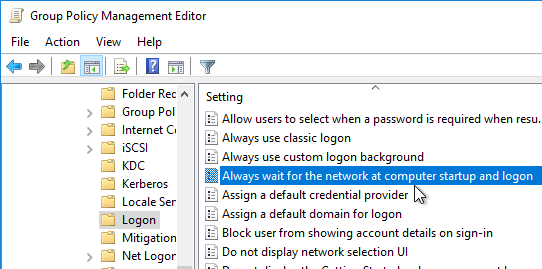
- Enable the setting, and click OK.
- Close the group policy editor.
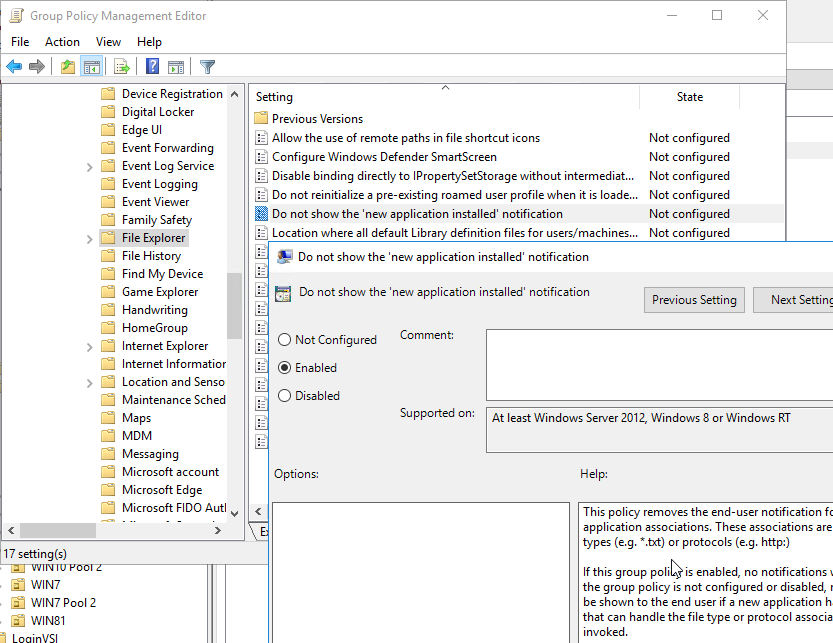
- If you use DEM 9.10 or newer to roam File Type Associations, then enable the GPO setting Do not show the ‘new application installed’ notification at Computer Configuration > Policies > Administrative Templates > Windows Components > File Explorer.
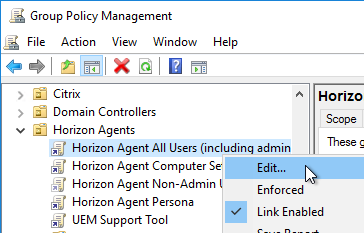
- The remaining settings are user settings. Edit the Horizon Agent All Users GPO. This GPO should apply to the Horizon Agents, and Loopback processing should already be enabled on those machines.
- Go to User Configuration | Policies | Administrative Templates | Omnissa DEM | FlexEngine.
- If you are running Dynamic Environment Manager on top of mandatory profiles, then double-click Certificate support for mandatory profiles.

- Enable the setting and click OK.
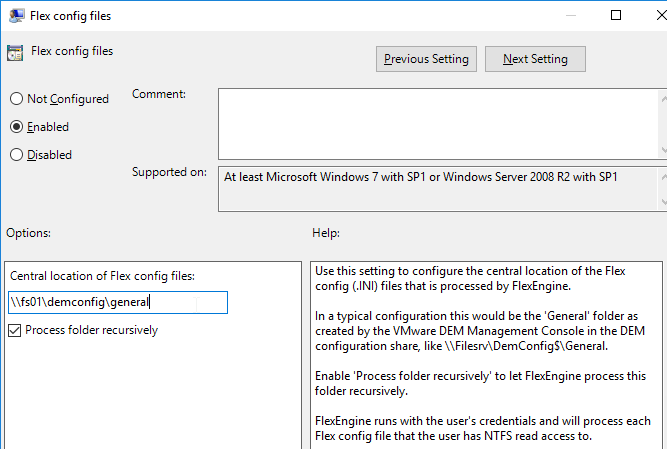
- Double-click Flex config files.

- Enable the setting.
- Enter \\server\demconfig\general. The general folder will be created by the Dynamic Environment Manager management console. Click OK.
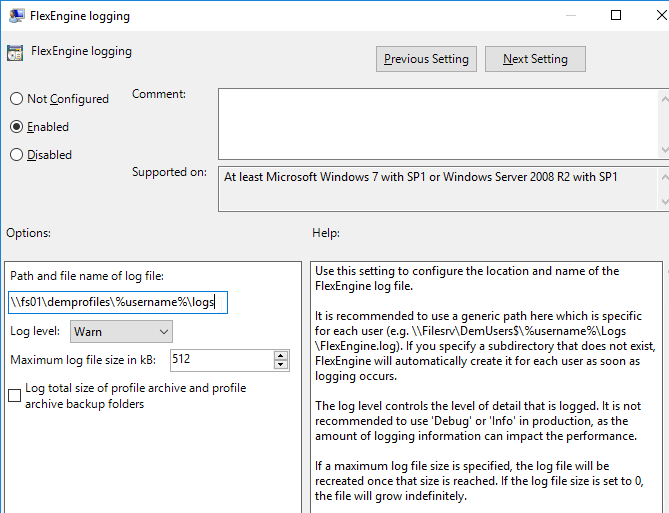
- Double-click FlexEngine Logging.

- Enable the setting.
- Enter \\server\demprofiles\%username%\logs. Dynamic Environment Manager will create these folders. Click OK.
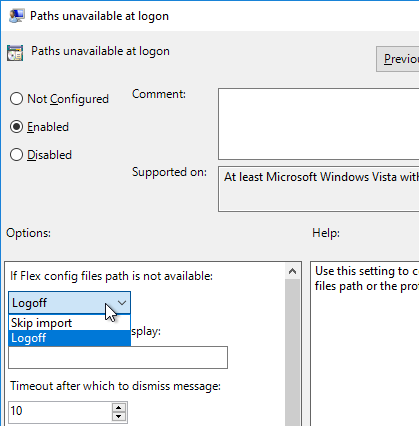
- UEM 9.0 and newer has a setting named Paths unavailable at logon. By default, users are blocked from logging in if the DEM file share is not reachable.

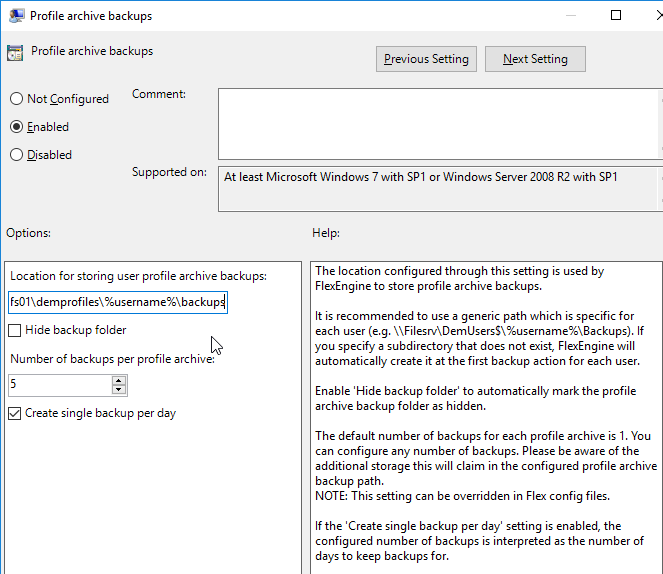
- Double-click the setting Profile archive backups.

- Enable the setting.
- Type in \\server\demprofiles\%username%\backups.
- Enter the number of desired backups, check the box for daily backups, and click OK.
- In DEM 2111 and newer, you can store Profile Archives in OneDrive for Business by configuring the setting OneDrive for Business integration.

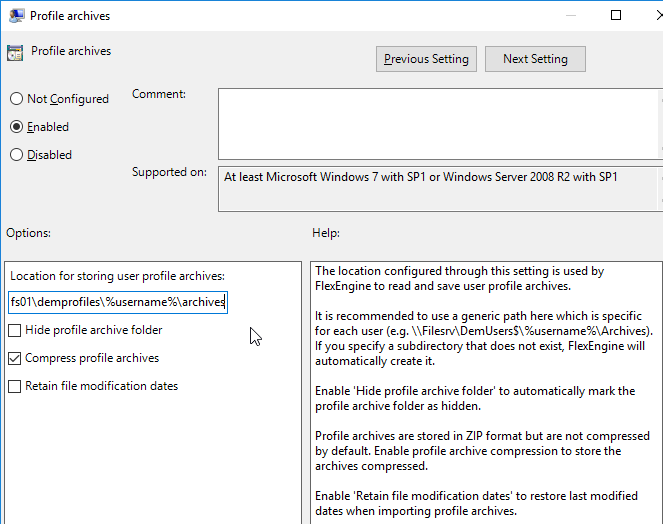
- To store Profile archives in a file share, double-click Profile archives.

- Enable the setting.
- Type in \\server\demprofiles\%username%\archives.
- Check the box next to Retain file modification dates.
- Click OK.
- In DEM 2111 and newer, simply enable the setting Run FlexEngine at logon and logoff.

- For DEM prior to version 2111, configure the group policy extension and logoff script:
- Double-click the setting RunFlexEngine as Group Policy Extension.
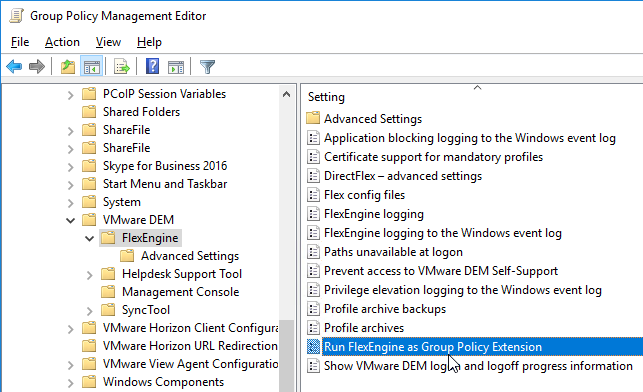
- Enable the setting, and click OK.
- Go to User configuration | Policies | Windows Settings | Scripts (Logon/Logoff).
- Double-click Logoff.

- Click Add.
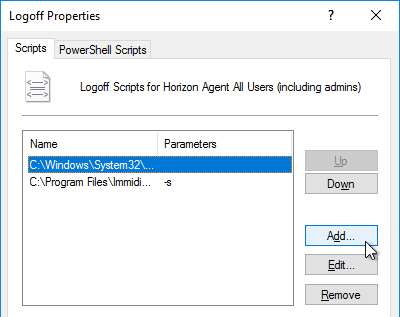
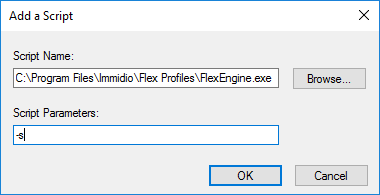
- In the Script Name field, enter C:\Program Files\Immidio\Flex Profiles\FlexEngine.exe.
- In the Script Parameters field, enter -s.
- Click OK.
- Double-click the setting RunFlexEngine as Group Policy Extension.
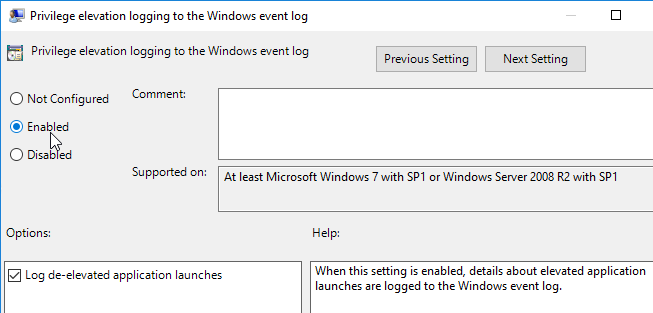
- If you are using the Privilege Elevation feature, consider enabling Privilege elevation logging to the Windows event log.

- Same for Application blocking logging to the Windows event log.

- You can download and install a separate ADMX file containing DEM Advanced Settings.
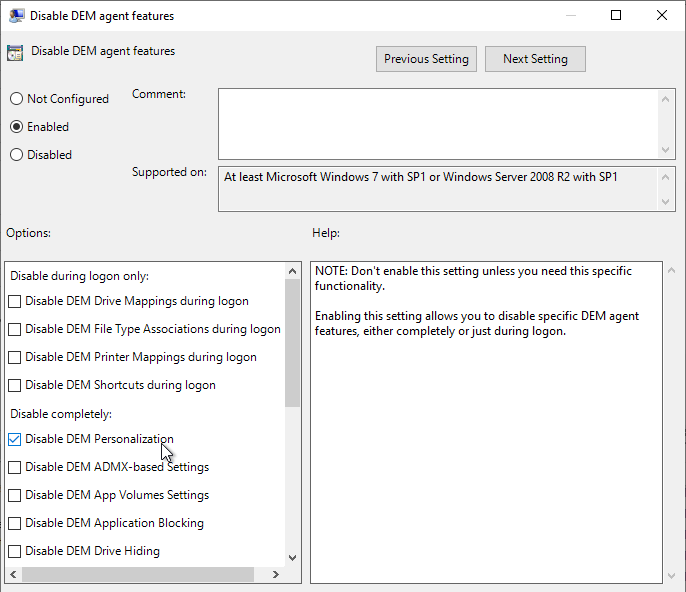
- You can use group policy to Disable DEM agent features on certain OUs. For example, you might not want Personalization on some pools.

- DEM 2111 and newer can enable DEM ADMX Settings to override GPOs by enabling the setting Override existing user policy settings.

- You can use group policy to Disable DEM agent features on certain OUs. For example, you might not want Personalization on some pools.
- If DEM 2006 or newer, you can optionally enable DEM Computer ADMX settings.
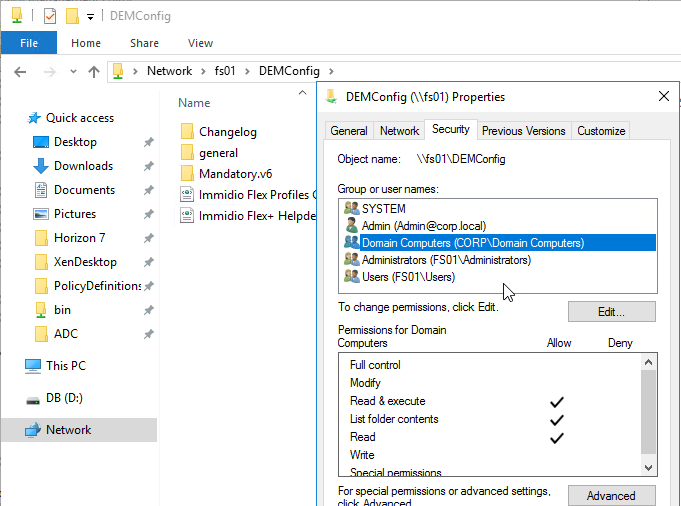
- In the DEM Config share, make sure Domain Computers has Read permission to the folders.
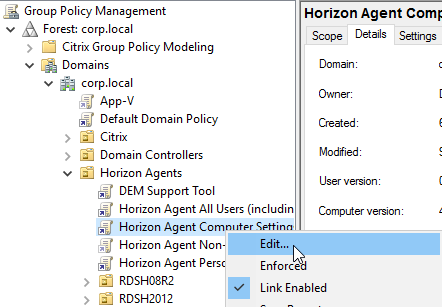
- Edit a GPO that applies computer settings to the Horizon Agent machines (e.g. Horizon Agent Computer Settings).
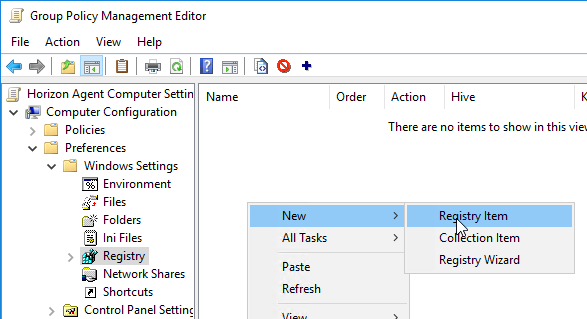
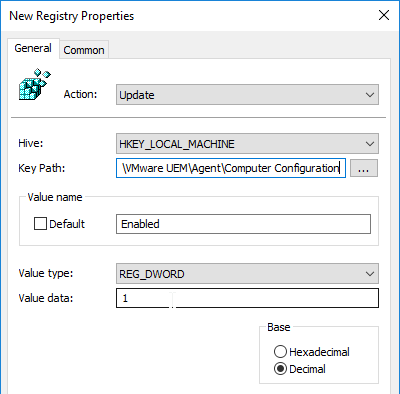
- Go to Computer Configuration | Preferences | Windows Settings | Registry.
- Add a New Registry Item.
- Key Path = SOFTWARE\VMware, Inc.\VMware UEM\Agent\Computer Configuration
- Value name = Enabled
- Value type = REG_DWORD
- Value data = 1. Click OK.
- Create another registry item.
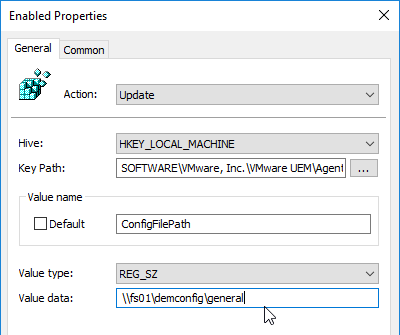
- Key Path = SOFTWARE\VMware, Inc.\VMware UEM\Agent\Computer Configuration
- Value name = ConfigFilePath
- Value type = REG_SZ
- Value data = the path to your DEM Config share, including the general folder. Click OK.
- For more registry values, see Omnissa Docs FlexEngine Configuration for Computer Environment Settings.
- In the DEM Config share, make sure Domain Computers has Read permission to the folders.
Now that DEM is enabled, you can configure Dynamic Environment Manager by using a separate console application. See the instructions at https://www.carlstalhood.com/vmware-user-environment-manager/.
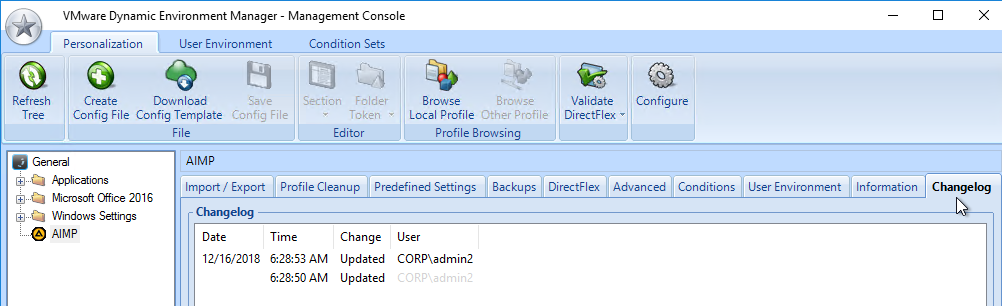
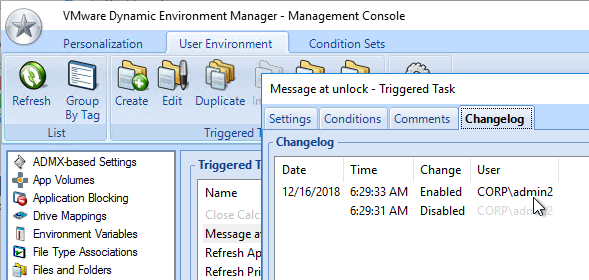
DEM Changelog
- On the left, click the node named Management Console under Omnissa DEM
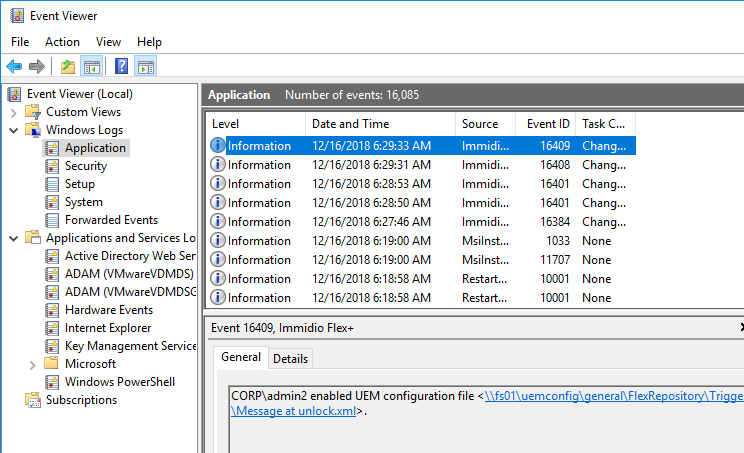
- On the right, UEM 9.6 adds two new settings for Changelog.

- Log changes to disk stores the log in the DEM share at \\server\DEMConfig\Changelog\general. Note that administrators usually have permission to modify this location so they could modify this changelog.
- Log changes to the Windows event log stores the log in the Application Log in Event Viewer of the local console machine and not in any central server.
- You can also enable the Changelog in the DEM Management Console by clicking the ribbon button named Configure.

- Switch to the tab named Version History to enable the two settings.

- Note that Version History overrides Logging to disk.


- Note that Version History overrides Logging to disk.
- Each configuration item in DEM Management Console shows a tab named Changelog after changes are recorded.
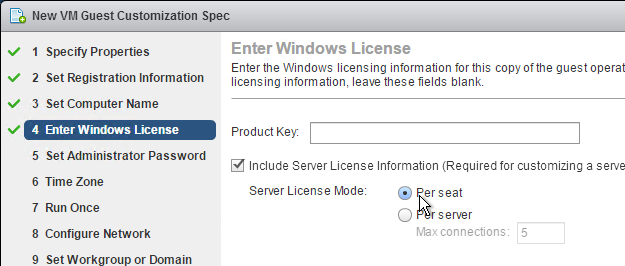
Persona Configuration
This section does not apply to Remote Desktop Session Hosts, Instant Clones, or newer versions of Windows 10. It also does not apply to Horizon 2006 (8.0) and newer.
If you are using Dynamic Environment Manager then skip this section.
- Verify that ICMP is enabled between the Horizon Agent and the domain controller, and as well as the Horizon Agent and the Persona Management Repository.
- Install the Horizon GPO ADMX files if you haven’t already.
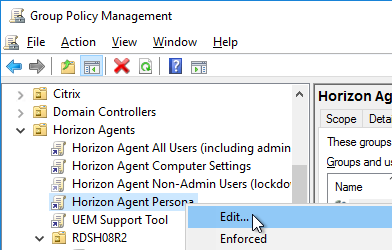
- Edit one of the Horizon Agent Persona GPOs that applies to the virtual desktops (not Remote Desktop Session Hosts).
- Configure the following GPO settings:
- Administrative Templates | System | User Profiles
- Add the Administrators security group to roaming user profiles = enabled
- Do not check for user ownership of Roaming Profile Folders = enabled
- Administrative Templates | System | User Profiles
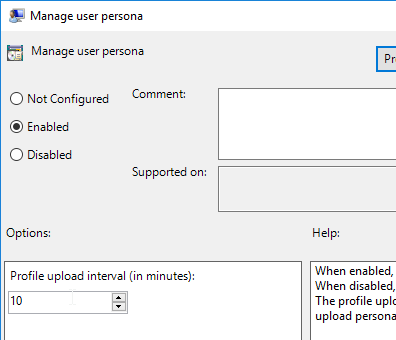
- Go to Computer Configuration | Policies | Administrative Templates | VMware View Agent Configuration | Persona Management | Roaming & Synchronization.
- On the right, double-click Manage user persona.

- Enable the setting. It defaults to 10 minutes. Click OK.
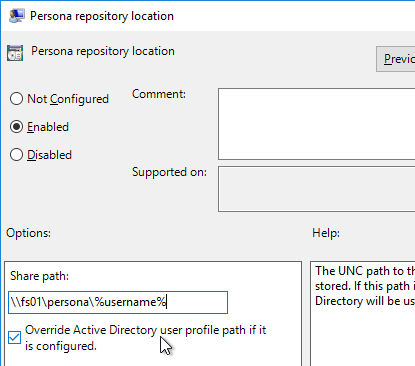
- Double-click Persona repository location, and enable the setting.
- Enter the path to the file share created for Persona. Append %username%.
- Check the box next to Override Active Directory user profile path. Click OK.
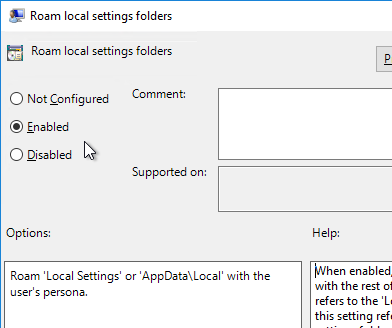
- Double-click Roam local settings folders, and enable it. Click OK.
- Double-click Files and folders excluded from roaming, and enable it. Then click Show.
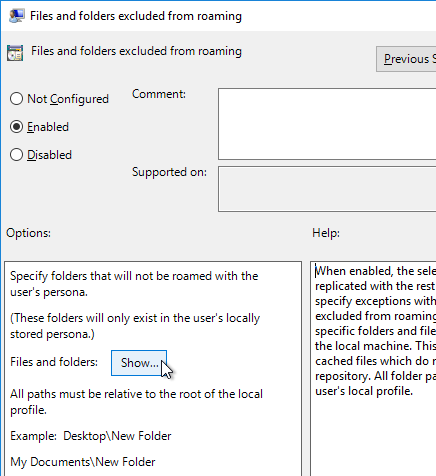
- Enter the values shown below, and then click OK twice.
$Recycle.Bin
Tracing
AppData\LocalLow
AppData\Local\GroupPolicy
AppData\Local\Packages
AppData\Local\Microsoft\Office\15.0\Lync\Tracing
AppData\Local\Microsoft\Windows\Temporary Internet Files
AppData\Local\Microsoft\Windows\Burn
AppData\Local\Microsoft\Windows\CD Burning
AppData\Local\Microsoft\Windows Live
AppData\Local\Microsoft\Windows Live Contacts
AppData\Local\Microsoft\Terminal Server Client
AppData\Local\Microsoft\Messenger
AppData\Local\Microsoft\OneNote
AppData\Local\Microsoft\Outlook
AppData\Local\Windows Live
AppData\Local\Temp
AppData\Local\Sun
AppData\Local\Google\Chrome\User Data\Default\Cache
AppData\Local\Google\Chrome\User Data\Default\Cached Theme Images
AppData\Local\Google\Chrome\User Data\Default\JumpListIcons
AppData\Local\Google\Chrome\User Data\Default\JumpListIconsOld
AppData\Roaming\Sun\Java\Deployment\cache
AppData\Roaming\Sun\Java\Deployment\log
AppData\Roaming\Sun\Java\Deployment\tmp - Double-click Files and folders excluded from roaming (exceptions), and enable it. Then click Show.
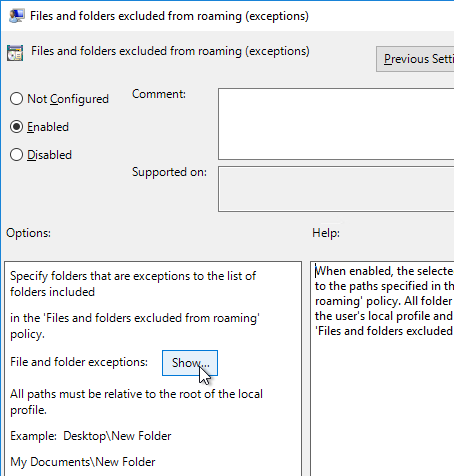
- Enter the exceptions shown below and click OK twice.
AppData\LocalLow\Sun\Java\Deployment\security\exception.sites
AppData\LocalLow\Sun\Java\Deployment\security\trusted.certs
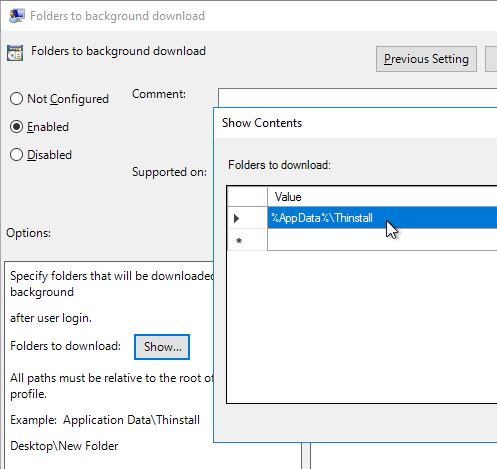
AppData\LocalLow\Sun\Java\Deployment\deployment.properties - Configure %AppData%\Thinstall as a folder to background download. If you are using Thinapps, this will speed up the launch time of Thinapps.
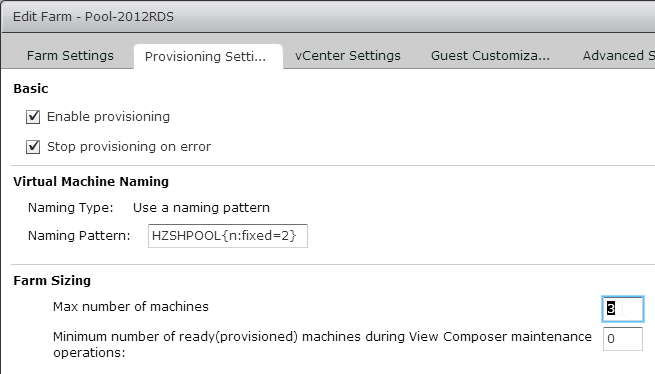
RDS Roaming Profiles
This section applies to Remote Desktop Session Hosts, not virtual desktops.
If you are using Dynamic Environment Manager or FSLogix, then skip this section.
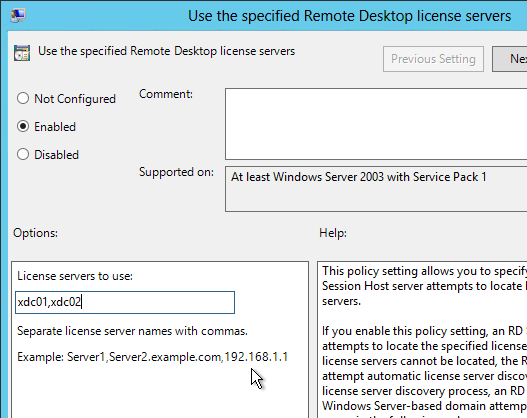
- Edit the Horizon Agent RDS Farm1 Profiles GPO.

- Configure the following GPO settings.
- Administrative Templates | System | User Profiles
- Add the Administrators security group to roaming user profiles = enabled
- Delete cached copies of roaming profiles = enabled
- Do not check for user ownership of Roaming Profile Folders = enabled
- Administrative Templates | System | User Profiles
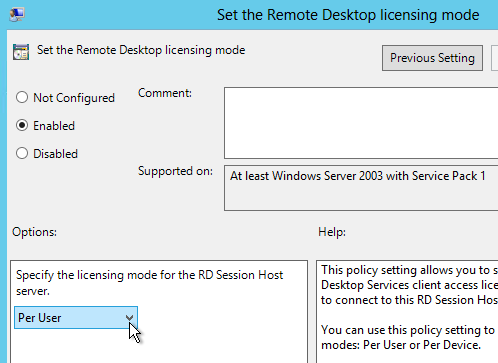
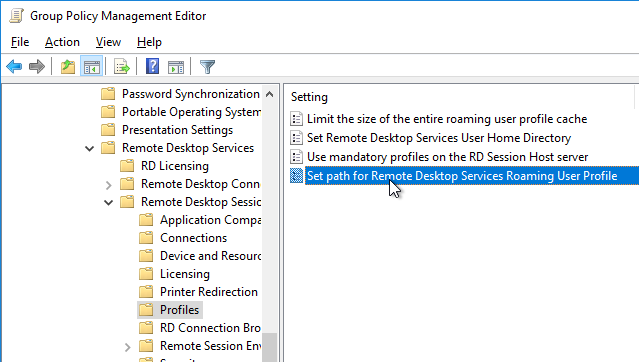
- Go to Computer Configuration | Policies | Administrative Templates | Windows Components | Remote Desktop Services | Remote Desktop Session Host | Profiles.
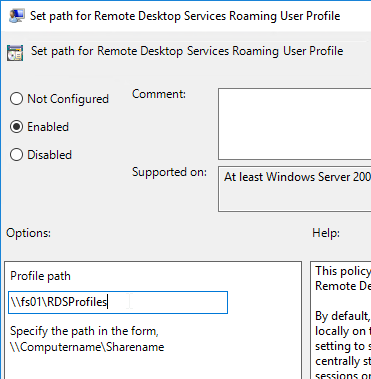
- On the right, open the setting Set path for Remote Desktop Services Roaming User Profile.
- Enable the setting and enter the path to the file share. Do not append %username%.
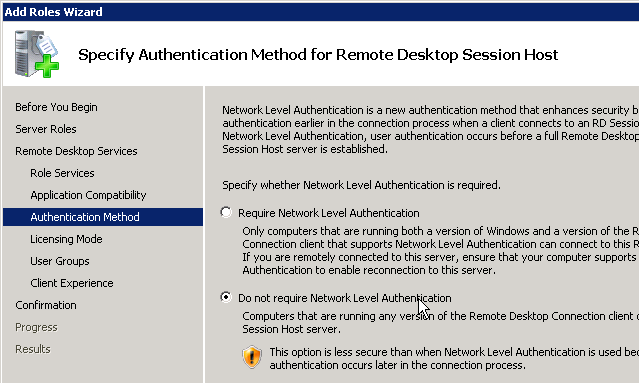
- If you haven’t already done this in a parent OU, also configure the Remote Desktop Services settings as detailed at https://www.carlstalhood.com/group-policy-objects-vda-computer-settings/#computer.
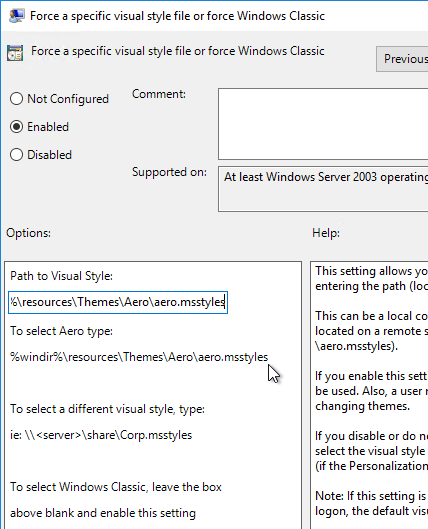
- If you wish to enable the Aero style for Remote Desktop Session Host sessions, go to User Configuration | Policies | Administrative Templates | Control Panel | Personalization.
- Open the setting Force a specific visual style file.
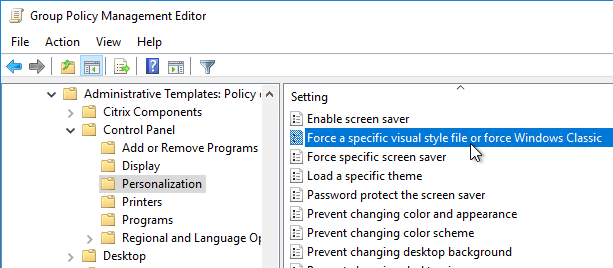
- Enable the setting and enter the following path:
%windir%\resources\Themes\Aero\aero.msstyles
- VMware recommends enabling RunOnce as detailed at https://www.carlstalhood.com/group-policy-objects-vda-user-settings/#runonce.
Horizon Agent Settings
- Install the Horizon GPO ADMX files if you haven’t already.
- Right-click the Horizon Agent Computer Settings GPO, and click Edit.
- On the left, expand Computer Configuration | Policies | Administrative Templates | Omnissa Horizon Agent Configuration. Click Agent Configuration.
- Horizon 2306 and newer have a setting called Allow FIDO2 authenticator access. Combine it with FIDO2 allow list, which defaults to only allowing Chrome, Edge, and Firefox.


- RDSH idle timer is configured using Microsoft RDSH GPO settings and are not Horizon-specific. The Horizon 2106 and newer GPO templates have the RDS timers in the Omnissa Horizon Agent Configuration node or you can configure the RDS timers in the normal Microsoft Remote Desktop Session Host node. Both sets of GPO settings set the same registry values.

- Horizon 7.10 and newer has an Idle Time Until Disconnect (VDI) for virtual desktops. This setting does not apply to RDSH.

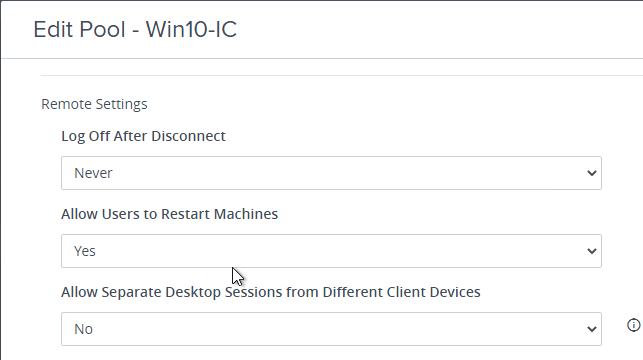
- In Horizon 7.10 or newer, you can use Group Policy to configure a Disconnect Session Time Limit for virtual desktops. This GPO setting overrides the pool setting Logoff after Disconnect.

- Horizon 2106 and newer have a Screen-capture blocking setting. This setting is available in both the computer half and the user half of the GPO. User half overrides computer half.

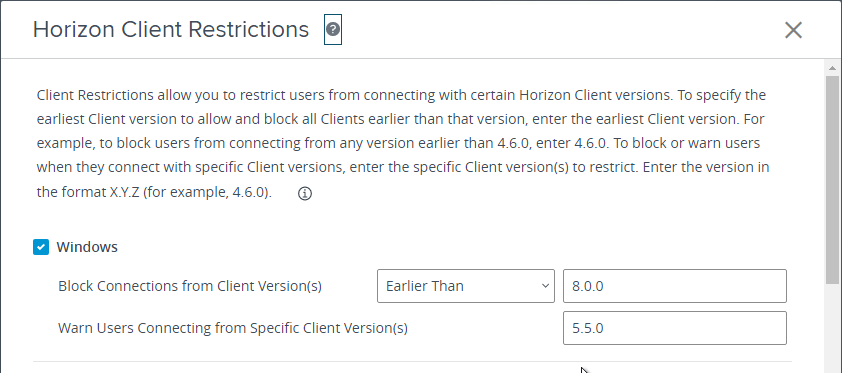
- Screen-capture blocking requires Horizon Agent 2106 and Horizon Client 2106 (8.3). To prevent older Horizon Clients from connecting, in Horizon Console, go to Settings > Global Settings. On the right is a tab named Client Restriction Settings. Click Edit. Check the boxes for the various client operating systems and enter 8.3.0 (2106) as the required minimum version.
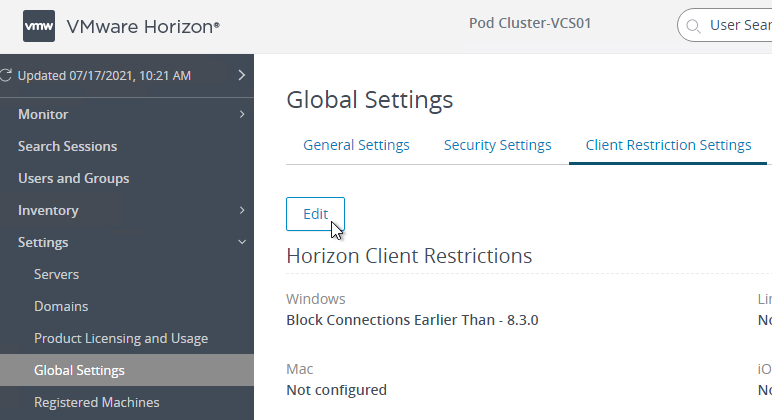
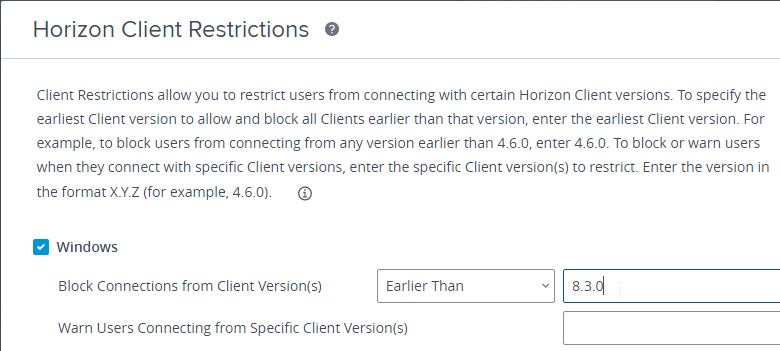
- Screen-capture blocking requires Horizon Agent 2106 and Horizon Client 2106 (8.3). To prevent older Horizon Clients from connecting, in Horizon Console, go to Settings > Global Settings. On the right is a tab named Client Restriction Settings. Click Edit. Check the boxes for the various client operating systems and enter 8.3.0 (2106) as the required minimum version.
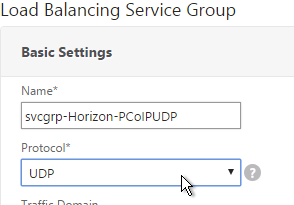
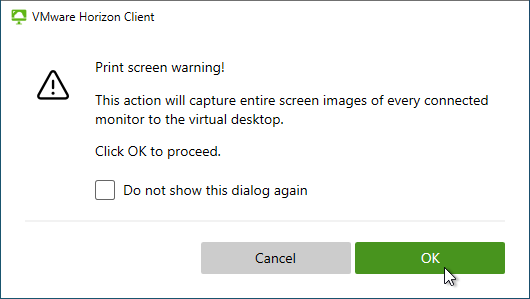
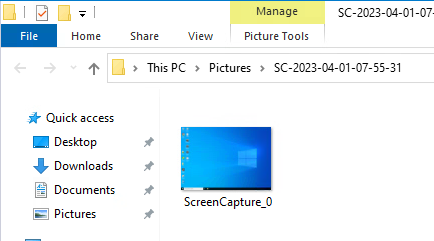
- Horizon 2303 and newer have a setting called Screen-capture For Media Offloaded Solution. This setting adds a Print Screen button to the Horizon Client toolbar. When pressed, the screenshot is saved to the Pictures folder on the remote desktop. The advantage of this feature is that it captures Teams redirection, Multimedia Redirection, multiple monitors, and Watermark.


- Horizon 2111 and newer have a setting for Key Logger Blocking. This setting is available in both the computer half and the user half of the GPO. User half overrides computer half. Use Client Restriction Settings to prevent Horizon Clients older than 2111 from connecting.

PCoIP Configuration
Steve Dunne:
- Horizon View 6 PCoIP – WAN, Limited Bandwidth, Optimise, Tune contains PCoIP optimization settings and their results through a WAN emulator.
- PCoIP Sizing and What’s New from VMworld 2013\2014
Here are some general PCoIP optimization settings:
- Install the Horizon GPO ADMX files if you haven’t already.
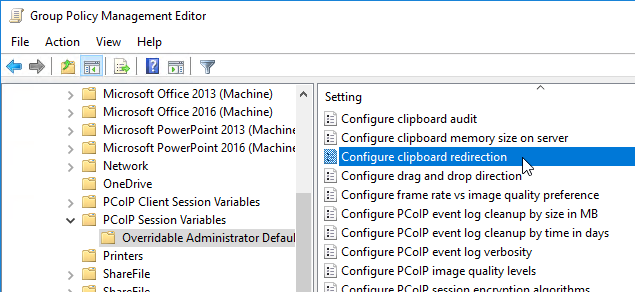
- Right-click the Horizon Agent Computer Settings GPO, and click Edit.
- On the left, expand Computer Configuration | Policies | Administrative Templates | PCoIP Session Variables. Click Overridable Administrator Defaults.
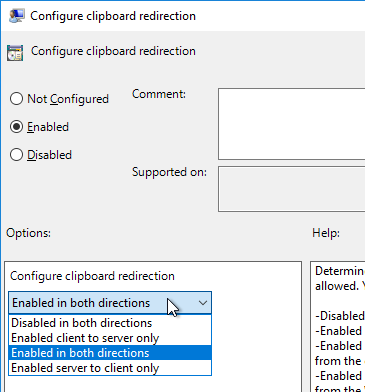
- On the right, double-click Configure clipboard redirection.
- Enable the setting, and select Enabled in both directions. Click OK.
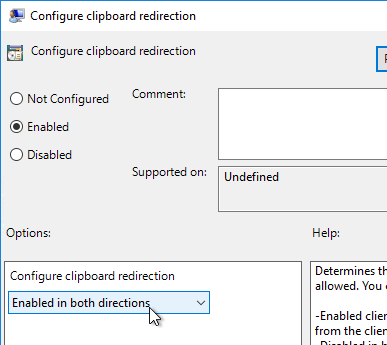
- Enable the setting, and select Enabled in both directions. Click OK.
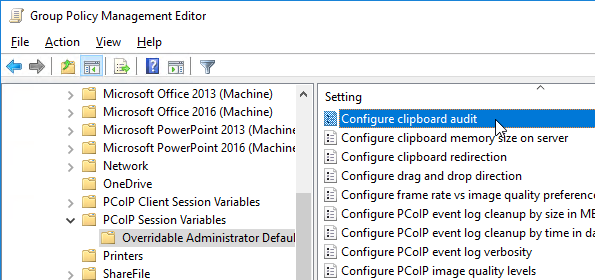
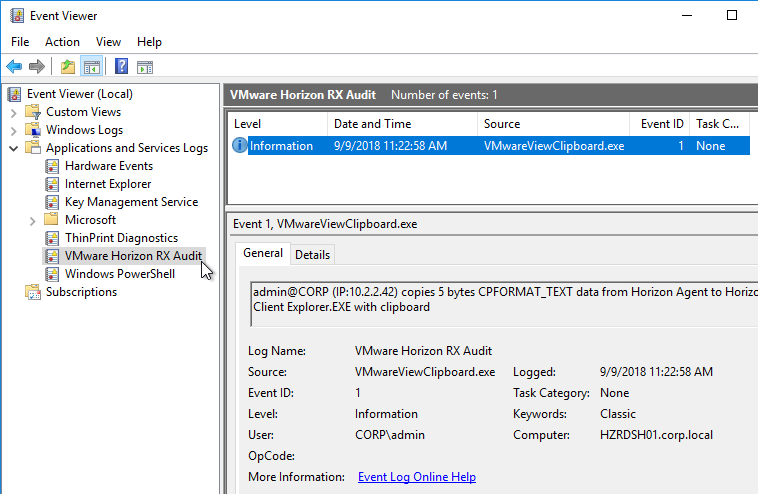
- Horizon 7.6 and newer have a setting for Configure clipboard audit that audits to the Agent’s Event Viewer any clipboard copy/paste from agent to client.

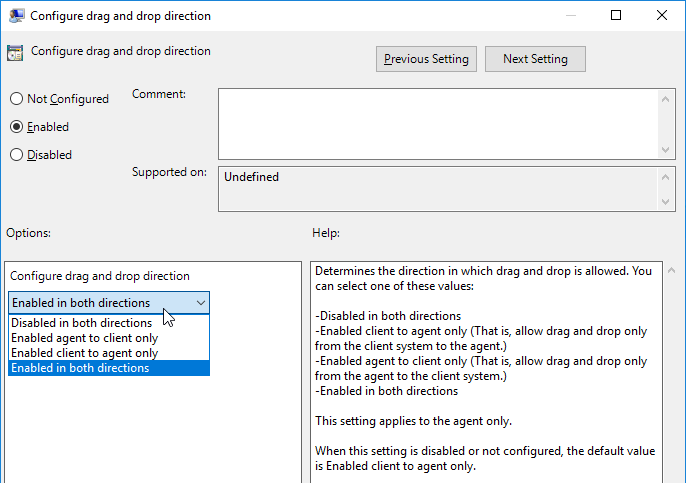
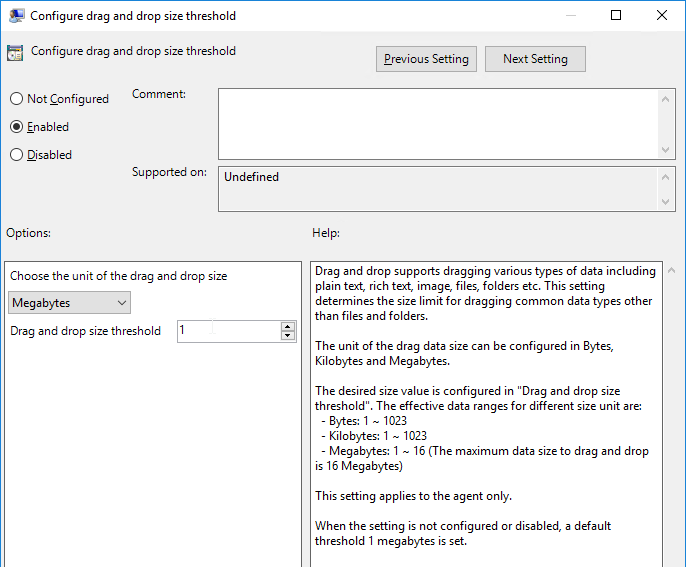
- Horizon 7.7 and newer have a setting named Configure drag and drop direction.
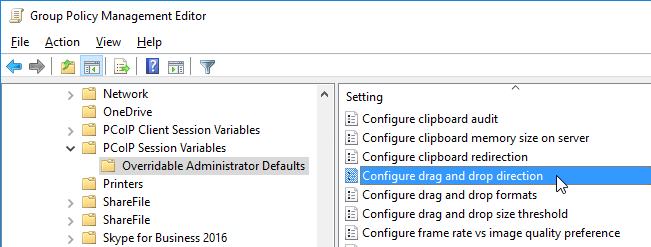
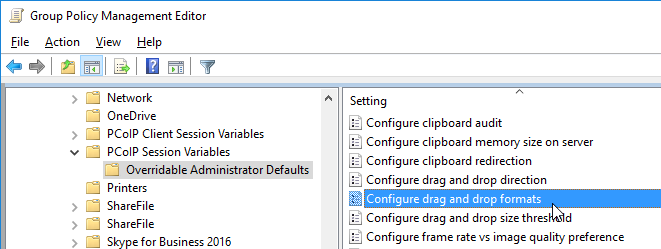
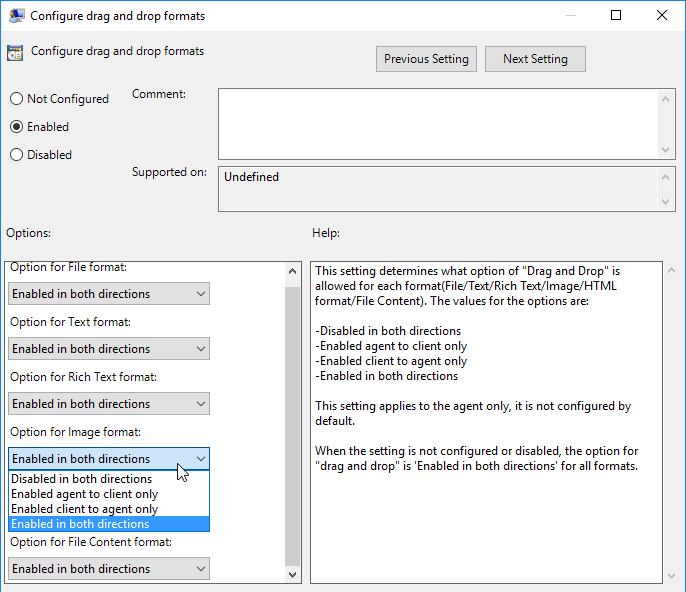
- Horizon 7.9 and newer have settings for Configure drag and drop format (drag and drop direction for each format) and Configure drag and drop size threshold.
- Horizon 7.0.2 and newer have the ability to filter specific clipboard formats.

- Double-click Configure the PCoIP session audio bandwidth limit. For WAN connection users, Omnissa recommends setting this to 100 – 150 Or you can start with 300 Kbps and reduce as needed.

Real-Time Audio-Video
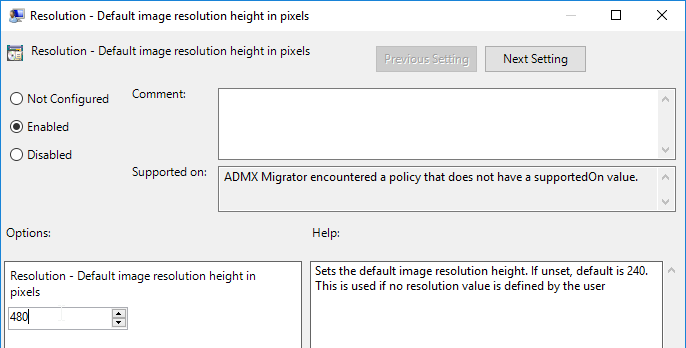
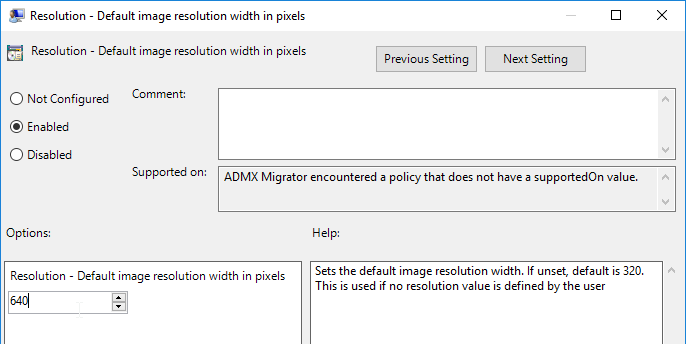
Omnissa validated Horizon 7.9’s Real-Time Audio-Video feature with Microsoft Teams. Here are sizing recommendations:
- Minimum setting of 4vCPU 4GB RAM as a published desktop configuration
- RTAV video resolution configured with 640 x 480p
Real-Time Audio-Video (RTAV) is one of the options that can be selected when installing Horizon Agent. To ensure that Audio is captured by RTAV instead of by USB redirection, exclude audio from USB redirection is described in the next section.
To configure RTAV video resolution, do the following:
- Install the Horizon GPO ADMX files if you haven’t already.
- Right-click the Horizon Agent Computer Settings GPO, and click Edit.
- Expand Computer Configuration | Policies | Administrative Templates | Omnissa Horizon Agent Configuration, expand View RTAV Configuration and click View RTAV Webcam Settings.
- On the right, double-click Resolution – Default image resolution height in pixels

- Enable the setting and set it to 480 pixels. Click OK.
- On the right, double-click Resolution – Default image resolution width in pixels.

- Enable the setting and enter 640. Click OK.
- There are two more GPO settings for Max height and width. If these are not configured then there is no maximum.
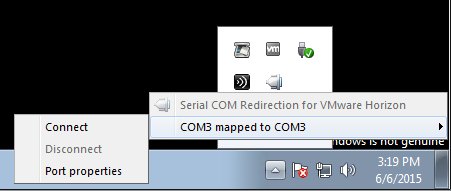
USB Redirection Settings
VMware TechPaper USB Device Redirection, Configuration, and Usage in View Virtual Desktops details the following:
- PCoIP zero clients use a PCoIP virtual channel for USB. No extra network ports needed.
- All other PCoIP clients, including Windows, Mac, etc., use TCP 32111 between the Horizon Client and the Horizon Agent.
- If Secure Tunnel is enabled, the USB traffic is sent to the Horizon Security Server on TCP 443. It is then forwarded to the Horizon Agent on 32111.
- USB performance across the WAN can be slow.
- Webcams are only supported using RTAV (Real-Time Audio-Video).
- USB3 uses too much bandwidth for most WANs. USB3 is supported in Horizon Agent 6.0.1 and Horizon Client 3.1.
- Linux clients do not let you choose USB devices. Instead, all USB devices are redirected.
- USB device redirection can be filtered. Multi-interface USB devices can be split. See the TechPaper for details.
- In Horizon 6.1 and Horizon Client 3.3, USB storage devices can be redirected to Remote Desktop Session Host.
- Client Downloadable only GPO settings are downloaded to the Horizon Client when the Horizon Client first connects to the Horizon Agent.
- USB GPO Settings on the Horizon Agent can either override or merge the Horizon Client USB GPO settings. Merge means that if Horizon Client settings exist then the Horizon Agent settings are ignored.
- The Exclude All Devices setting is overridden by other Include
- USB Redirection logs are located at %PROGRAMDATA%\VMware\VDM\logs\debug-*.txt. Look for <vmware-view-usbd>
- How to configure USB Redirection rules on Windows, Mac, and Linux.
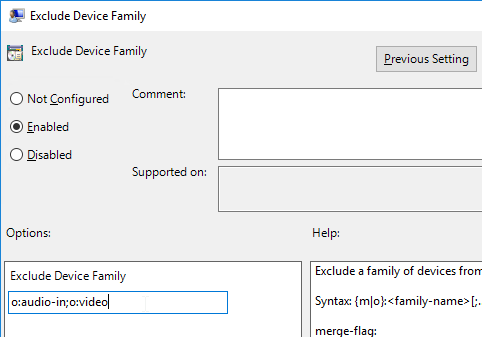
If you intend to use the Real-Time Audio-Video feature, then disable USB redirection of audio and video so it is instead accessed through the optimized virtual channel. RTAV and USB Redirection do not apply to Remote Desktop Session Host.
You can also use this procedure to block USB storage devices from being mapped.
- Install the Horizon GPO ADMX files if you haven’t already.
- Right-click the Horizon Agent Computer Settings GPO, and click Edit.
- Expand Policies | Administrative Templates | Omnissa Horizon Agent Configuration and click Horizon USB Configuration.
- On the right, double-click Exclude Device Family.

- Change the selection to Enabled.
- Enter o:audio-in;o:video.
- If you want to block USB storage devices, add o:storage to the list. Click OK.
Blast Settings
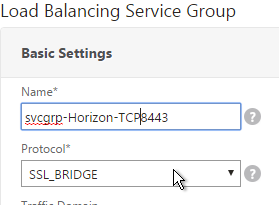
The full Horizon Client 4.0 and newer can use UDP when connecting to Horizon 7 Agents using Blast.
- Omnissa Tech Zone VMware Blast Extreme Optimization Guide
- VMware Blog Post Deep Dive into VMware Horizon Blast Extreme Adaptive Transport – Blast Extreme Adaptive Transport is enabled by default in VMware Horizon View 7.1 and Horizon Client 4.4. If the clients are connecting from outside the demilitarized zone (DMZ), you would also need to have VMware Unified Access Gateway (not Security Server) to take full advantage of the new transport. The adaptive transport will automatically sense the network for UDP availability and will fallback to legacy Blast TCP if UDP is not available.
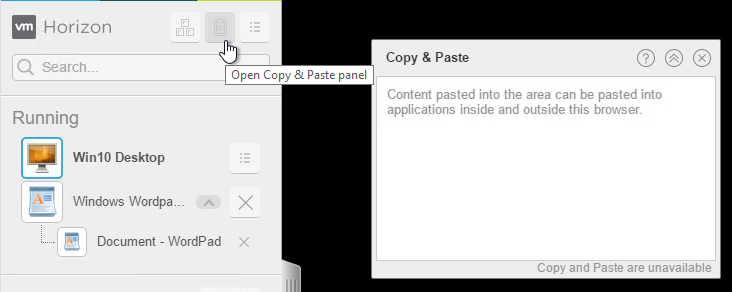
Blast by default only allows clipboard redirection from client-to-server. This can be changed in group policy.
If you want file transfer in HTML5 Blast, then you must configure clipboard from server-to-client (or both directions).
- Install the Horizon GPO ADMX files if you haven’t already.
- Right-click the Horizon Agent Computer Settings GPO and click Edit.
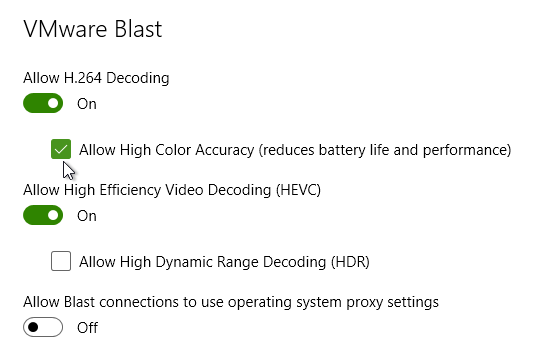
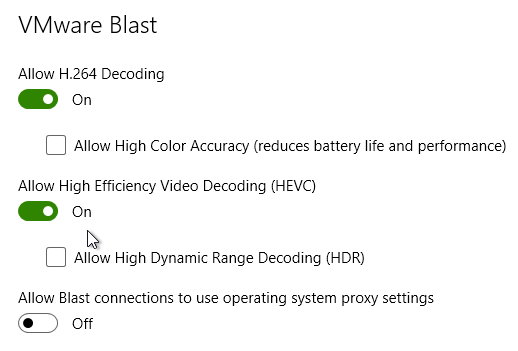
- In Horizon 2012 (8.1) and newer, expand Computer Configuration | Policies | Administrative Templates | Omnissa Horizon Agent Configuration and click Clipboard Redirection.
- In versions earlier than Horizon 2012 (8.1), expand Policies | Administrative Templates, and click VMware Blast.
- On the right, double-click Configure clipboard redirection.

- Enable the setting and then make your choice. Click OK.
- Enable the setting and then make your choice. Click OK.
- Horizon 7.6 and newer have a setting for Configure clipboard audit that audits to the Agent’s Event Viewer any clipboard copy/paste from agent to client.

- Horizon 7.7 and newer have a setting to Configure drag and drop direction. In Horizon 2012 (8.1) and newer it’s under the separate Omnissa Horizon Agent Configuration | Drag and Drop node instead of VMware Blast.

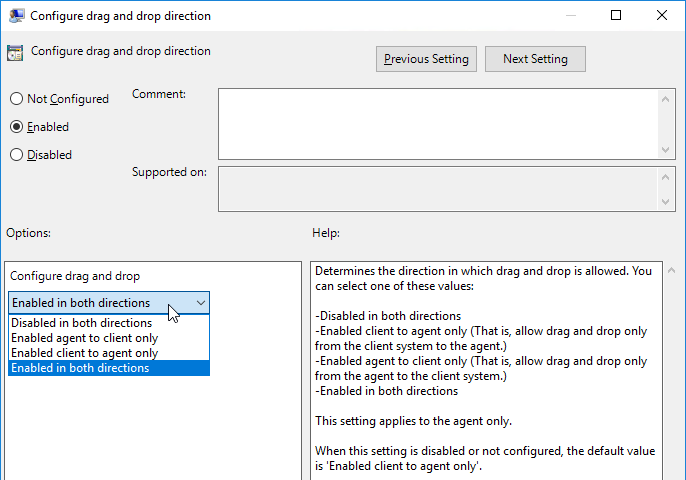
- Horizon 7.9 and newer have settings for Configure drag and drop format (drag and drop direction for each format) and Configure drag and drop size threshold. In Horizon 2012 (8.1) and newer it’s under the separate Omnissa Horizon Agent Configuration | Drag and Drop node instead of VMware Blast.

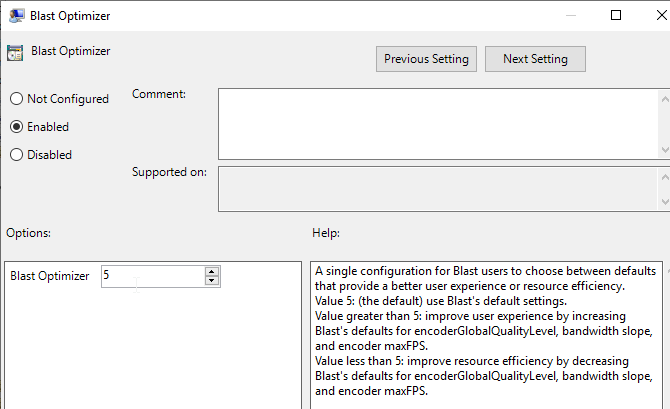
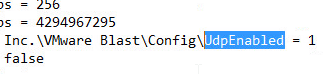
- In the Horizon Blast node, Horizon 2212 and newer have a setting called Blast Optimizer that adjusts multiple settings for better user experience or better performance.

- Horizon 2312 and newer support Build to Lossless.

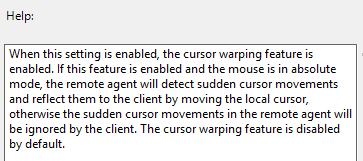
- Horizon 2303 and newer have a setting called Cursor Warping that moves the client mouse when sudden cursor movements are detected in the remote Agent.

- Horizon 7.6 and newer have settings to add DSCP markings to the Blast protocol. See VMware Blast Policy Settings at Omnissa Docs.

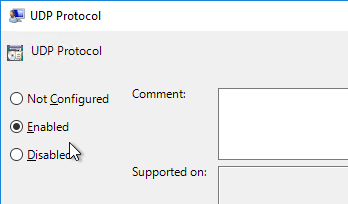
- On the right, double-click UDP Protocol.

- You can optionally enable UDP protocol. Click OK.
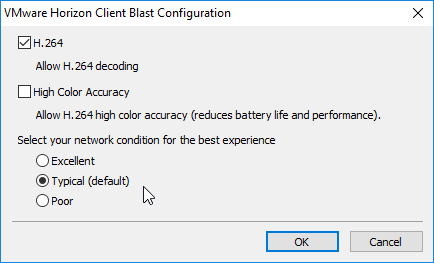
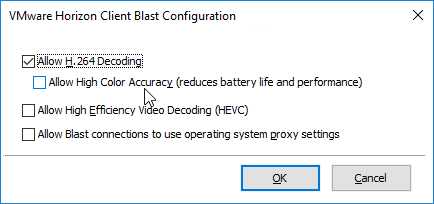
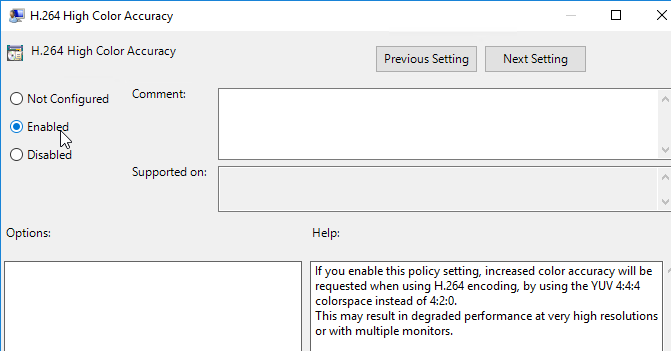
- Horizon 7.4 introduced the H.264 High Color Accuracy setting.

- Horizon 7.0.2 and newer have a setting for H.264 Quality Levels.


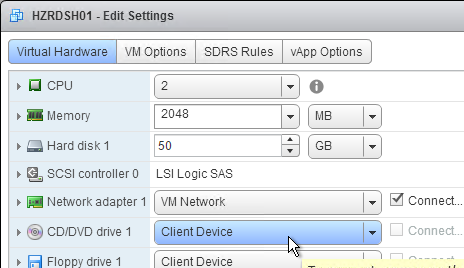
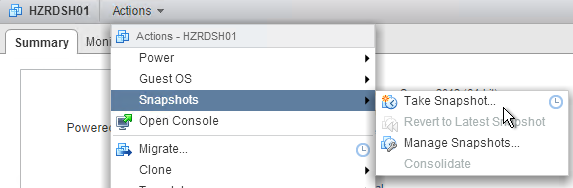
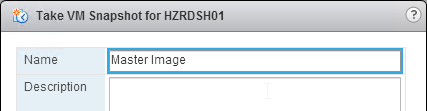
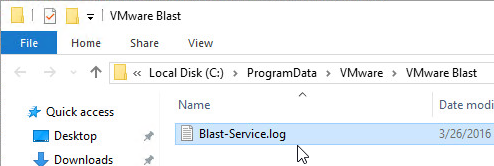
- If you enabled UDP protocol, then on your master image, reboot the machine so it reads the GPO settings. Look in the file C:\ProgramData\Omnissa\Horizon Blast\Blast-Service.log to make sure UDP is enabled. If not, reboot the machine again. After it’s enabled, snapshot the master machine and push it to your Pools.
Watermark
Horizon 2006 (8.0) and newer has a Watermark feature. It works for both apps and desktops.
For limitations of this feature, see Configuring a Digital Watermark at Omnissa Docs.
- Make sure the Horizon 2006 or newer GPO Templates are installed.
- Edit the Horizon Agent All Users Settings GPO. This is a User GPO setting so make sure GPO Loopback Processing is enabled in the Computer Settings GPO.
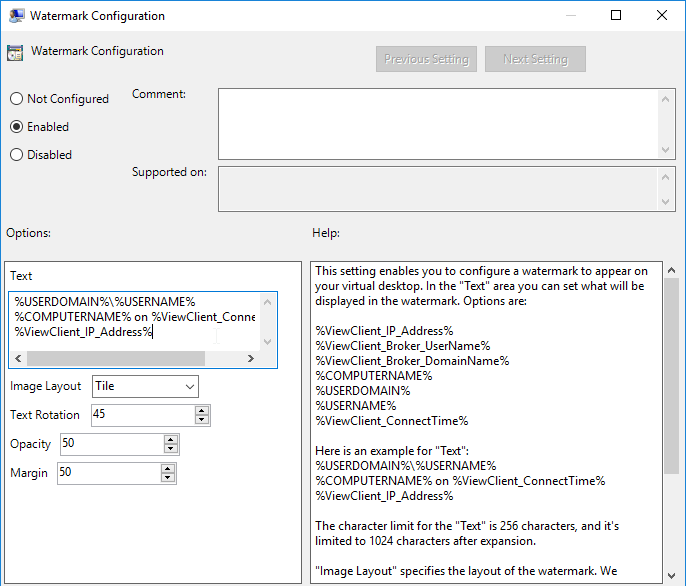
- Go to User Configuration | Policies | Administrative Templates | Omnissa Horizon Agent Configuration | Watermark.
- Edit the setting Watermark Configuration.

- See the Help text for explanation of the setting.
Teams Optimization
Horizon Agent 2006 (or newer) and Horizon Client 2006 (or newer) can offload Microsoft Teams media (audio/video) to the client device. Horizon 7.13 with Horizon Client 5.5 can offload Microsoft Teams media (audio/video) to the client device.
Newer versions of Horizon support more Teams features:
- Horizon 2312 (8.12) and newer support blur backgrounds, select effects, or select an available background image.
- Horizon 2306 (8.10) and newer support simulcast, which allows multiple streams at multiple resolutions.
- Horizon 2303 (8.9) and newer support individual application sharing in VDI and RDSH desktop sessions.
- Horizon 2203 (8.5) and newer support Give and take control of screen sharing.
- Horizon 2106 (8.3) and newer can offload to Linux and Mac clients in addition to Windows clients.
- E911 and Location-Based Routing require Mac client (2111 and later) and Windows client (5.5.4 and later; 2111 and later) only. Not supported for Linux client.
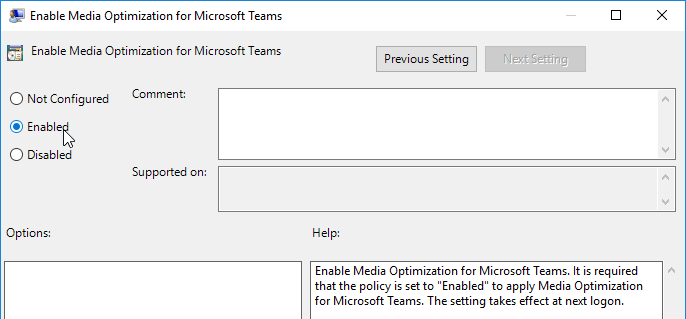
In Horizon 2212 and newer, Teams Optimization is enabled by default. In older Horizon, it is disabled by default. For requirements and limitations, see Configuring Media Optimization for Microsoft Teams at Omnissa Docs.
- Make sure the Horizon 7.13 or Horizon 2006 or newer GPO Templates are installed.
- Edit the Horizon Agent Computer Settings GPO.
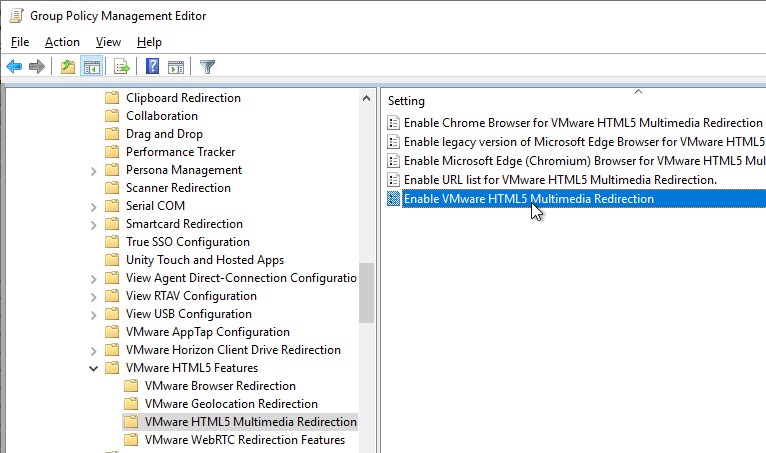
- Go to Computer Configuration | Policies | Administrative Templates | Omnissa Horizon Agent Configuration | VMware HTML5 Features | Horizon WebRTC Redirection Features.
- Edit the setting Enable Media Optimization for Microsoft Teams.

- Set it to Enabled.
Browser Content Redirection
Browser Content Redirection redirects the contents of the browser to be rendered by the client machine instead of the Horizon Agent machine. Browser Content Redirection in Horizon 2106 and newer supports both Chrome and Edge. HTML5 Multimedia Redirection is the older feature. See Omnissa Docs.
- Edit a GPO that applies to the Horizon Agents.
- Expand Computer Configuration, expand Administrative Templates, expand Omnissa Horizon Agent Configuration, and click Horizon HTML5 Features.
- On the right, enable the setting Enable Horizon HTML5 Features. This setting is only available in Horizon 7.10 and newer.

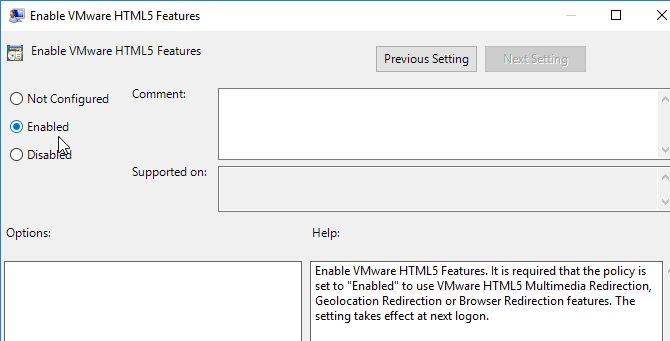
- In Horizon 7.10 and newer:
- On the left, under Horizon HTML5 Features, click Horizon Browser Redirection.
- On the right, enable the setting Enable Horizon Browser Redirection.

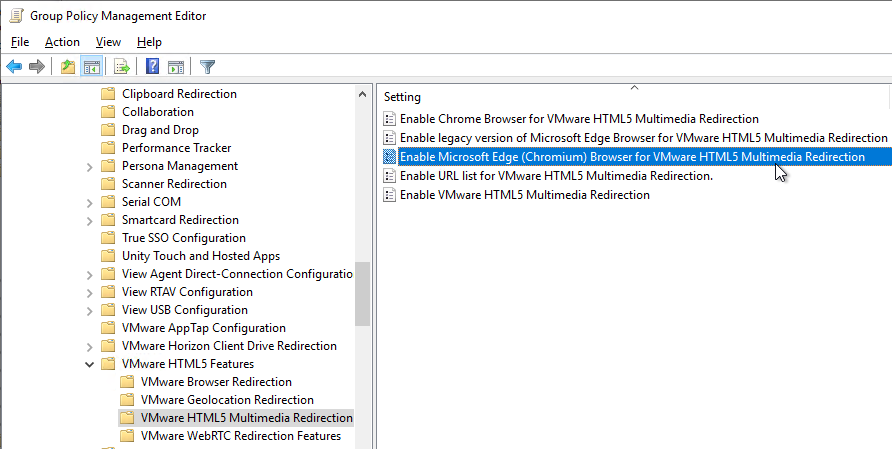
- Also enable the setting Enable Browser Redirection feature for Microsoft Edge (Chromium) Browser. This setting requires Horizon 2106 (8.3) or newer.

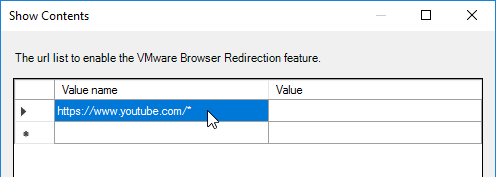
- On the right, configure the setting Enable URL list for VMware Browser Redirection.

- Enable the setting and click Show.
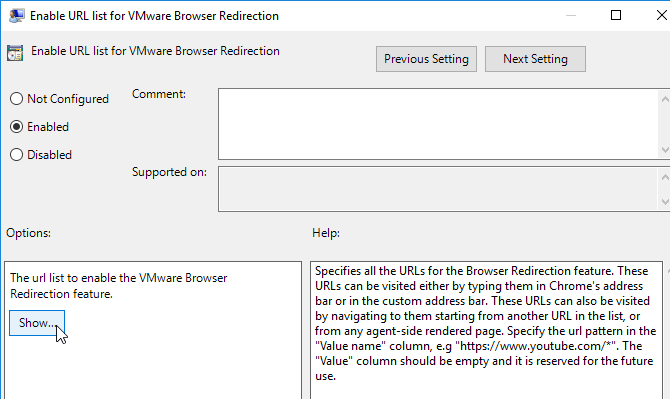
- Add a list of URLs that you want the client to render. Use wildcards in the path.
- The older feature is HTML5 Multimedia Redirection, which you can optionally enable. See Configuring HTML5 Multimedia Redirection at Omnissa Docs.
- Install the Edge GPO Templates if you haven’t already.
- In either the computer half or user half of a group policy, expand Policies, expand Administrative Templates, expand Microsoft Edge, and click Extensions.
- On the right, double-click the setting Control which extensions are installed silently.
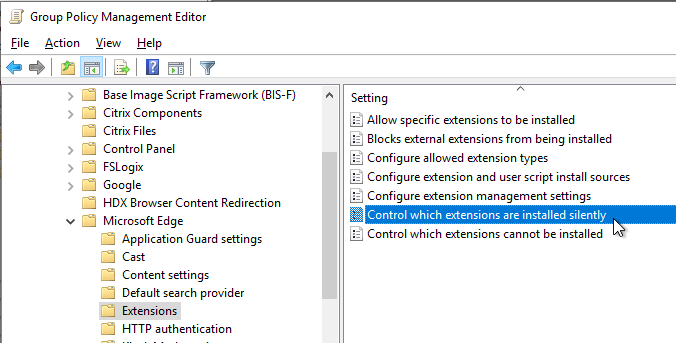
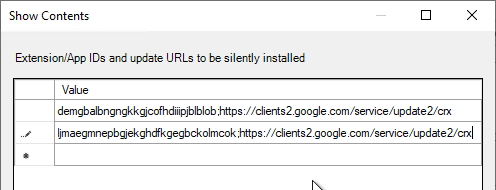
- Enable the setting and click Show.
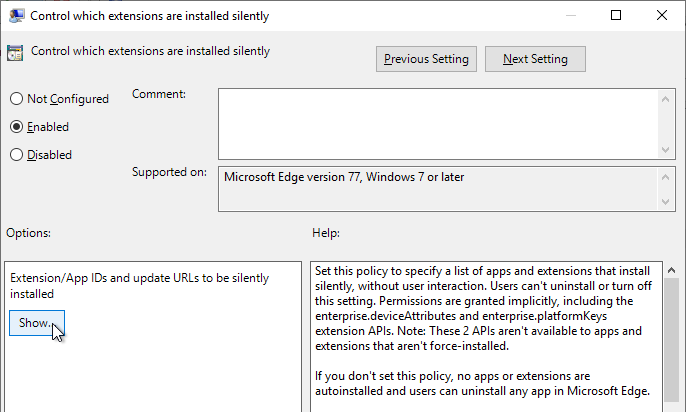
- For Horizon Browser Redirection in Horizon 7.10 and newer, enter the following:
demgbalbngngkkgjcofhdiiipjblblob;https://clients2.google.com/service/update2/crx
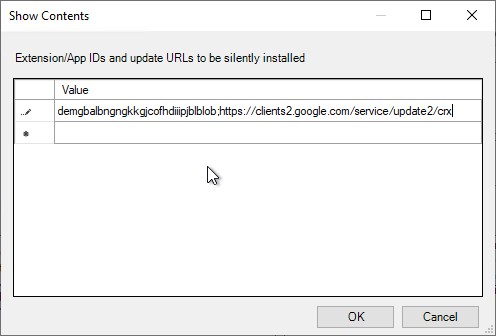
- For the older HTML5 Multimedia Redirection in Horizon 7.3 and newer, enter the following. You can do either extension, but not both. If you enable both extensions, then they will conflict with each other.
ljmaegmnepbgjekghdfkgegbckolmcok;https://clients2.google.com/service/update2/crx
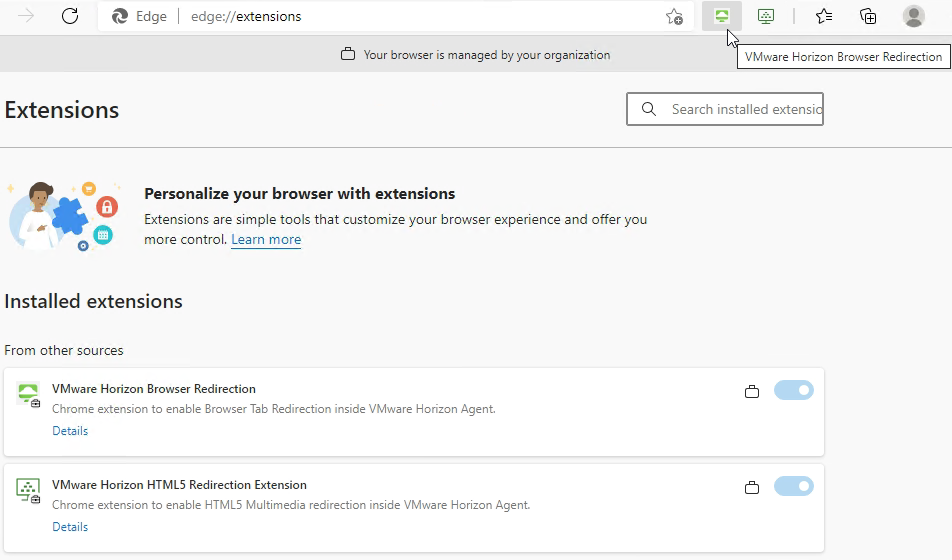
- When you log into a Horizon Agent session, the extension should automatically be added to Edge.
- Enable the setting and click Show.
- Install the Chrome GPO Templates if you haven’t already.
- In either the computer half or user half of a group policy, expand Policies, expand Administrative Templates, expand Google, expand Google Chrome, and click Extensions.
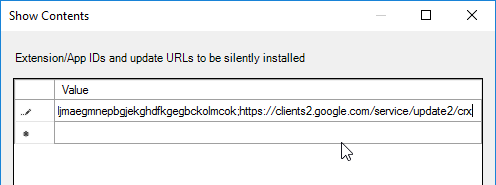
- On the right, double-click the setting Configure the list of force-installed apps and extensions.
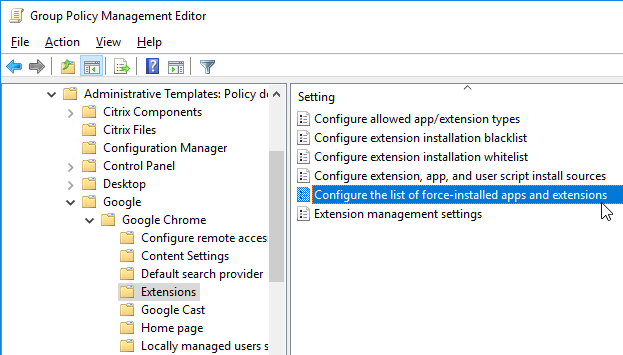
- Enable the setting and click Show.

- For Horizon Browser Redirection in Horizon 7.10 and newer, enter the following:
demgbalbngngkkgjcofhdiiipjblblob;https://clients2.google.com/service/update2/crx

- For the older HTML5 Multimedia Redirection in Horizon 7.3 and newer, enter the following. You can do either extension, but not both. If you enable both extensions, then they will conflict with each other.
ljmaegmnepbgjekghdfkgegbckolmcok;https://clients2.google.com/service/update2/crx
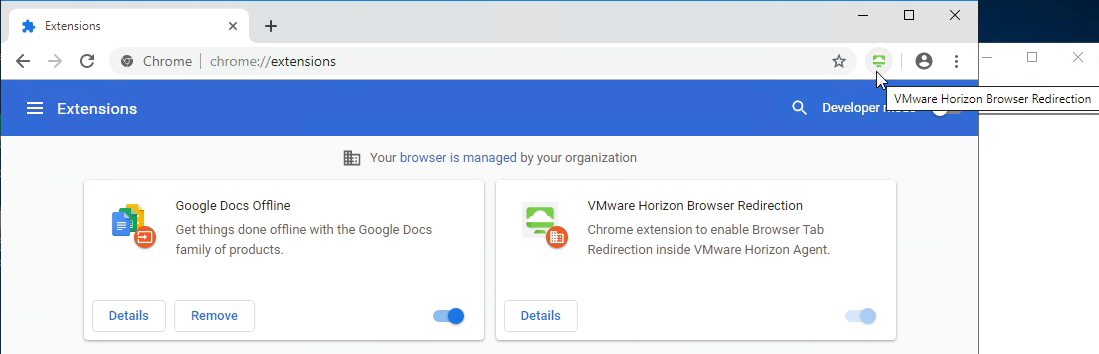
- When you log into a Horizon Agent session, the extension should automatically be added to Chrome.
- Enable the setting and click Show.
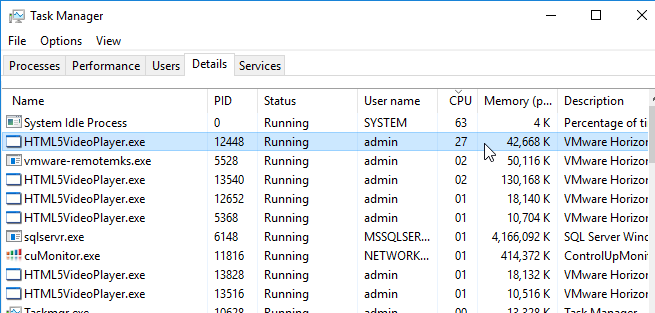
- When you navigate to a URL on the configured URL List, if the redirection feature is working, then the Chrome extension will show REDR.
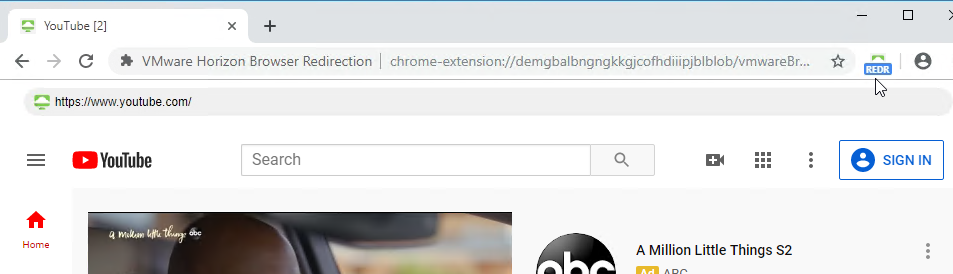

- And you’ll see HTML5VideoPlayer.exe on the client side.
UNC Path Redirection
Horizon 2209 and newer can redirect network links inside Outlook from agent-to-client or from client-to-agent.
- Install the Horizon 2209 or newer GPO ADMX files if you haven’t already.
- In the computer half of a GPO, find the settings under Computer Configuration | Policies | Administrative Templates and click Horizon UNC Path Redirection.

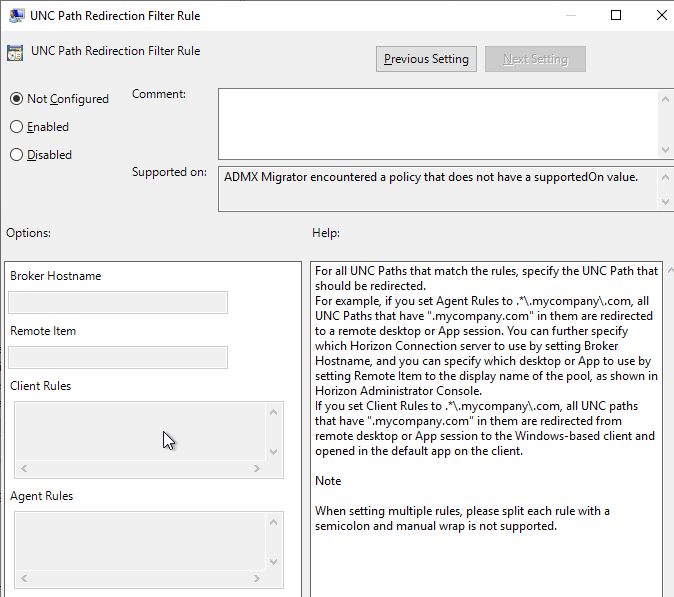
- First enable the feature by setting Enable UNC Path Redirection.
- Then configure UNC Path Redirection Filter Rule. For agent-to-client, add paths in the Client Rules box. The other boxes are for client-to-agent. Regular Expressions are supported as detailed at Omnissa Docs.
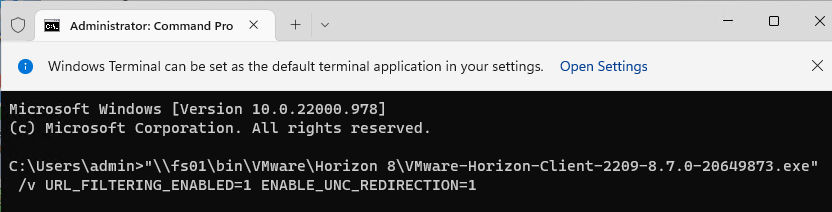
- When installing Horizon Agent 2209 or higher, add
/v ENABLE_UNC_REDIRECTION=1to the command line.

- When installing Horizon Client 2209 or higher, add
/v ENABLE_UNC_REDIRECTION=1to the command line.
URL Content Redirection
URL Content Redirection allows web browser URLs to be redirected from Agent-to-Client or from Client-to-Agent. This feature requires:
- URL Redirection component installed from command line on Horizon Agent.
- URL Redirection component installed from command line on Horizon Client.
- If Horizon Client is installed on a Horizon Agent machine, you can install URL Redirection for one or the other, but not both.
- Internet Explorer 9 or later only
- GPO Settings
URL Redirection GPO settings apply to both Horizon Agents and Horizon Clients depending on the source of the redirection. For Agent-to-Client redirection, edit a GPO that applies to the Horizon Agents. For Client-to-Agent redirection, edit a GPO that applies to the Horizon Clients.
- Install the Horizon GPO ADMX files if you haven’t already.
- Expand Computer Configuration | Policies | Administrative Templates and click Horizon URL Redirection.
- On the right, double-click IE policy: Automatically enable URL Redirection plugin, and enable it. If you don’t configure this, then users are required to activate the IE add-on manually.

- On the right, double-click Url Redirection Enabled and enable the setting. The setting description says it’s enabled by default, but actually it’s not.

- On the right, double-click Url Redirection Protocol ‘http’.

- For Agent-to-Client, configure clientRules and agentRules. clientRules are redirected from Agent-to-Client. However, agentRules override clientRules. This lets you redirect every URL to client but keep some URLs on the agent. Separate multiple rules with a semicolon.
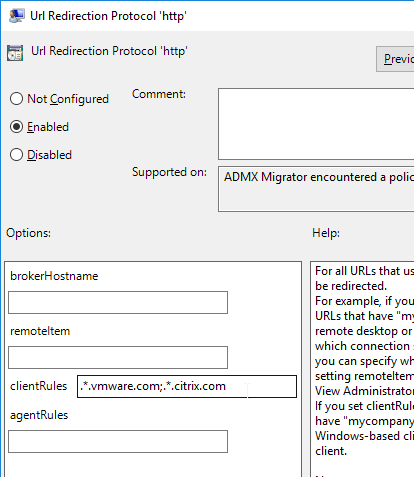
- For Client-to-Agent, configure agentRules. Anything that matches will be redirected to the remoteItem (name of published icon) accessible through brokerHostname.
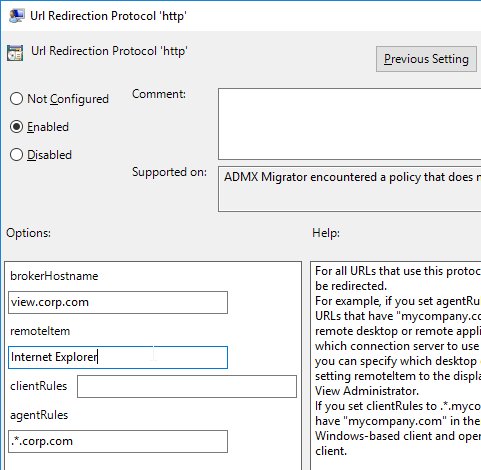
- In the User half of a GPO that applies to Horizon Agents with Loopback Processing enabled, Horizon 7.4 added a new policy setting to automatically install the URL Content Redirection extension in Chrome. This setting should be applied to both the Horizon Agents, and the Horizon Clients.

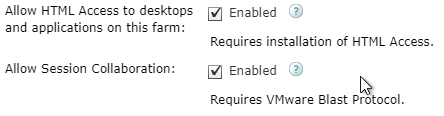
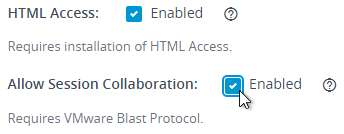
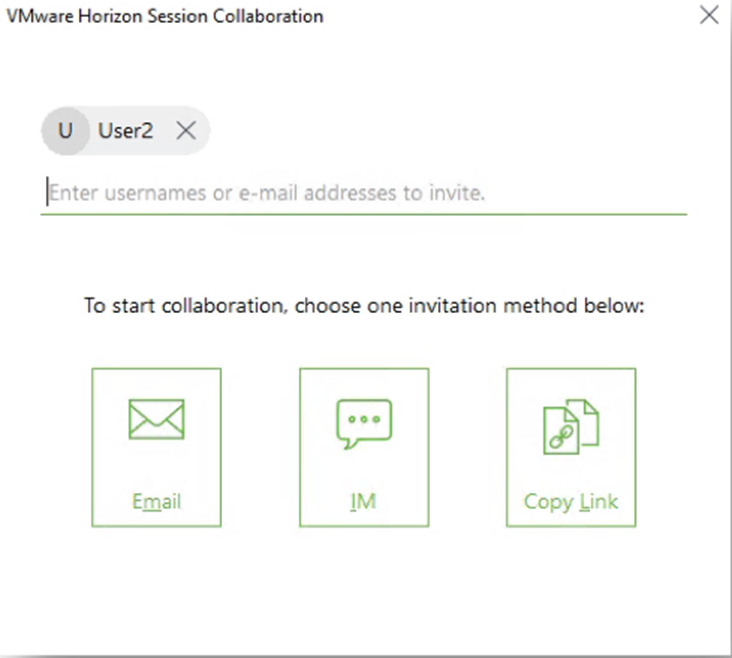
Collaboration Settings
Horizon 7.4 and newer have a Collaboration feature, which has some group policy settings.
- Install the Horizon GPO ADMX files if you haven’t already.
- Right-click the Horizon Agent Computer Settings GPO and click Edit.
- Expand Computer Configuration | Policies | Administrative Templates, expand Omnissa Horizon Agent Configuration, and click Collaboration.

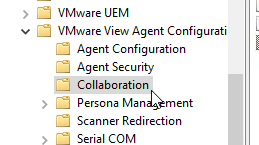
- On the right, you can configure settings like the Maximum number of invited collaborators. The limit is 10.

User Lockdown Settings
Edit the Horizon Agent Non-Admin Users GPO, and configure the settings detailed at https://www.carlstalhood.com/group-policy-objects-vda-user-settings/#lockdown.
User Application Settings
Edit the Horizon All Users GPO and configure settings for applications (Internet Explorer, Office, etc.) as detailed at https://www.carlstalhood.com/group-policy-objects-vda-user-settings/#ie and https://www.carlstalhood.com/group-policy-objects-vda-user-settings/#office2013.
Redirected Profile Folders
In addition to roaming profiles, configure Redirected Profile Folders as detailed at https://www.carlstalhood.com/citrix-profile-management/#redirected. Anything redirected will not be copied locally by Persona, RDS profiles, or DEM.
Related Pages
- Back to Omnissa Horizon 8