Navigation
Changelog
- 2024 May 22 – added link to NetScaler Docs Migrate the configuration of a NetScaler instance across SDX appliances
- 2022 Sep 11 – added a note about question marks ( ? ) in the config
- 2022 Sep 9 – added /var/download
- 2022 Sep 1 – added /var/netscaler/locdb
- 2022 Aug 10 – check management services to make sure TLS12 is not disabled.
- 2021 Sept 8 – added KEK key files
Overview
This article details one method of migrating a Citrix NetScaler ADC configuration from an old appliance pair to a new appliance pair while preserving the IP addresses. It requires a brief outage to move the IP addresses from the old pair to the new pair. Keeping the existing IP addresses avoids needing to make any changes to DNS, NAT, firewall, and routing.
- NetScaler Docs Migrate the configuration of a NetScaler instance across SDX appliances details using HA sync to migrate a NetScaler instance.
- Another method is to migrate one VIP at a time. However, you won’t be able to move the SNIP, so you might need new firewall rules for the new appliance pair.
Notes:
- The new appliances must be connected to the same networks as the old appliances. If not, then the IP addresses need to change.
- If you migrate the entire configuration at once, then the SNIPs can also be migrated.
- The new appliances won’t have a SNIP until cutover time, so DNS will not work on the new appliances until cutover.
- It’s much easier and quicker if you don’t migrate the NSIPs, so the new appliances will need new NSIPs.
- You can use temporary SNIPs to validate connectivity on the new appliances.
- Firmware versions can usually be different on the new appliances as compared to the old appliances.
- If the old appliances are 10.5 or older, and if you have NetScaler Gateway with a customized logon page, then you’ll have to redo the customization as a Portal Theme on the new appliances.
- GSLB Sites (MEP) can usually have different firmware versions.
Here’s a summary of the migration process. See the rest of this article for details.
- Prepare new appliances by connecting them to the network and pairing them together.
- Export files (e.g., SSL certificates) from old appliances and import to new appliances.
- Export configuration from old appliance and modify the configuration for later import to the new appliances.
- During a brief outage window, disable the old appliances (power off or disconnect), then run the config on the new appliances.
- Test the new appliances. If a problem is discovered, then you can roll back by disabling the new appliances and re-enable the old appliances.
Prepare New appliances
If VPX (not on SDX):
- Import new VPX appliances into your hypervisor.
- If vSphere, change NIC to VMXNET3.
- Configure anti-affinity for VPX appliances in the same hypervisor cluster.
- Configure new management IP Addresses in the virtual machine console.
- Default gateway should be on the NSIP subnet. The default gateway will be changed to a data VLAN during the cutover.
- In the Welcome Wizard, don’t configure any SNIPs. And DNS won’t work without SNIP.
- Install licenses on the new VPX appliances.
- If pooled licensing, enter ADM IP address instead of DNS name to avoid needing DNS/SNIP configuration.
- Optional: configure VPX CPU Yield.
If VPX on SDX:
- Configure switch ports for LACP port channel and VLAN trunking.
- Connect the physical SDX hardware to port channels or individual interfaces.
- In SDX SVMs, create Channels and confirm that the channels are distributing.
- In SDX SVMs, upload desired VPX XVA firmware virtual appliance.
- In SDX SVMs, create new instance and connect the instance to channels.
- New management IP address for each instance.
- Default gateway should be on the NSIP subnet. The default gateway will be changed to a data VLAN during the cutover.
- Enable NSVLAN if the VLAN trunk doesn’t have a native untagged VLAN.
- For HA pair, create each instance on separate SDX appliances.
If MPX:
- Configure switch ports for LACP port channel and VLAN trunking.
- Connect the physical MPX hardware to port channels or individual interfaces.
- Use LCD, LOM, serial cable, or 0/1 Ethernet crossover to configure new NSIP for each MPX appliance.
- Default gateway should be on the NSIP subnet. The default gateway will be changed to a data VLAN during the cutover.
- Enable NSVLAN if the VLAN trunk doesn’t have a native untagged VLAN.
- In the Welcome Wizard, don’t configure any SNIPs. And DNS won’t work without SNIP.
- Upgrade firmware to desired version.
- At System > Network > Interfaces, configure LACP and confirm that the channels are distributing.
- At System > Network > Interfaces, disable all interfaces that are not plugged in.
- At System > Network > Channels, enable tagall and other channel configs to match the old appliances. Repeat these interface/channel configurations on the secondary node.
- Install licenses on the new MPX appliances.
- If pooled licensing, enter ADM (or ADM Agent) IP address instead of DNS name to avoid needing DNS/SNIP configuration.
For all ADC models:
- Create new DNS names for the new NSIP IP Addresses.
- Ensure you can SSH (e.g., Putty) and SCP (e.g., WinSCP) to the new NSIPs and old NSIPs.
- In the Welcome Wizard, don’t configure any SNIPs. And DNS won’t work without SNIP.
- Configure NTP and Time Zone on each node before you pair them together.
- Enter NTP IP address instead of DNS name to avoid needing DNS/SNIP configuration.
- From CLI, run shell, then run ntpdate command with NTP Server IP address to sync the local time with NTP server. NTP Sync needs to be disabled before you can run this command.
- Pair the two new appliances together.
- Configure a new password on the RPC Nodes at System > Network > RPC. Do it on both nodes.
- Set NSIP to Secure Access Only at System > Network > IPs, edit NSIP, checkbox at bottom of page. Do it on both nodes.
- Configure VLANs without SNIPs.
- For dedicated management subnet, configure PBRs.
- If you have channels that are not configured with a native, untagged VLAN, then configure tagged High Availability Heartbeats for non-NSIP interfaces by marking one VLAN as untagged and enabling the tagall option on the channel.
- From CLI, run show ha node to confirm that there are no interfaces on which heartbeats are not seen.
- Use new temporary SNIP addresses to test VLAN connectivity
- Bind the temporary SNIP to VLAN and channel and try to ping it.
- Remove temporary SNIP when done testing.
- Install custom Management certificates that match new NSIP DNS names.
- If Default SSL Profile is enabled on old appliance, then enable it on new appliance pair.
- Add new pair to Citrix ADM.
- Add new pair to SNMP Manager.
- Add new pair to ControlUp Monitoring or any other Citrix NetScaler ADC monitoring tool.
- If any RADIUS authentication, and if RADIUS is not load balanced, then add the new NSIPs as RADIUS Client IP Addresses on the RADIUS servers.
- If RADIUS is load balanced, then SNIP is the RADIUS Client IP, and the SNIP will be moved over during cutover.
Export/Import Files
Enact a change freeze to prevent any changes to the old appliances so that the files and Running Configuration don’t have to be downloaded again.
A full backup of the ADC will contain every file you need to upload to the new appliances.
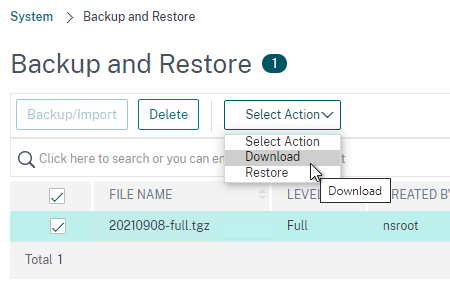
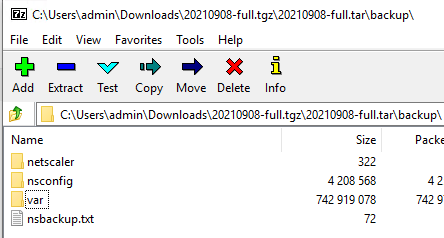
- On Windows, you’ll need a tool like 7-zip to extract the .tgz file.
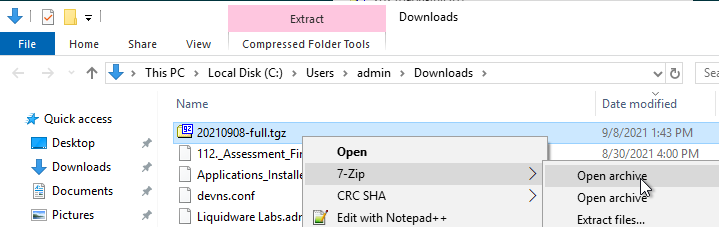
- Inside the backup folder are the files that you’ll need to upload to the new appliances.
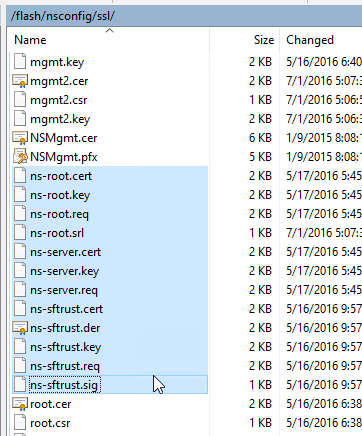
Use WinSCP to transfer the following files from the old appliances to the same place on the new appliances.
- Certificate files and DH files from /nsconfig/ssl
- UNIX is case sensitive but Windows is not. While downloading, if you see a message about overwriting files, that’s probably because you have two files with the same name but different cases.
- Don’t upload the files that start with ns- (e.g. ns-server.cert) since those are management certificate files.
- LDAP certificate verification files from /nsconfig/truststore, if exists.
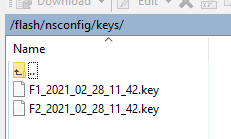
- KEK files from /flash/nsconfig/keys. This is more likely to be needed when moving a 13.0 and newer configuration.
- Custom monitors (e.g. nsldaps.pl) from /nsconfig/monitors, if exists. Grant execute permission to the uploaded .pl files.
- Login Schemas from /nsconfig/loginschema.
- /var/download has Bot signatures, WAF signatures, and Responder HTML Page imports. Signatures have their own method of export/import. Import these objects manually using the ADC GUI.

- Location database from /var/netscaler/locdb.
- Custom Portal Themes from /var/netscaler/logon/themes, if exists.
- There’s no need to download the built-in themes. Only download the non-built-in themes.
- On the new appliances, create Portal Themes with the same names and same template as the old appliances.
- Then upload the Portal Theme files to the new appliances and overwrite the default files.
- VPN bookmarks from /var/vpn/bookmark, if exists.
- Gateway logon page customizations from /var/vpn/vpn, if any.
- Try to redo these customizations as Portal Themes instead of uploading to the new appliances. The .js files in NetScaler 11.0 and newer are quite different from NetScaler 10.5 and older.
- /nsconfig/ntp.conf for NTP server configuration.
- /nsconfig/rc.netscaler if it contains anything other than ntpd.
- If this file contains customizations for the Gateway logon page, then try to redo them as a Portal Theme.
- After uploading this file to the new appliances, reboot the new appliances so the commands are executed. Or you can manually run rc.netscaler after you chmod +x to the file.
- /nsconfig/nsafter.sh if it exists.
- If this file contains customizations for the Gateway logon page, then try to redo them as a Portal Theme.
- After uploading this file to the new appliances, reboot the new appliances so the commands are executed. Or you can manually run nsafter.sh after you chmod +x to the file.
- SSH Banners, like /nsconfig/issue.net, /nsconfig/issue, and /nsconfig/motd.
To test the Portal Themes, you can create a temporary Gateway Virtual Server with a temporary VIP. Remove the temporary configuration when done testing.
Export Configuration
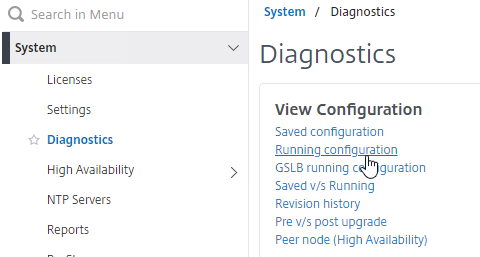
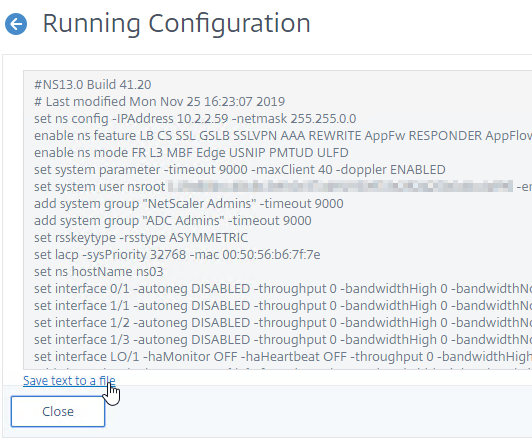
Export running configuration from the old appliances by going to System > Diagnostics > Running Configuration and then click the link to Save text to a File.
Edit the downloaded nsrunning.conf file to prepare it to be executed on the new appliances:
- Remove all NSIP and hostname lines, including IPv6 and MAC addresses. These lines start with the following:
set ns config -IPAddressset lacp -sysPriority 32768 -macset ns hostNameadd ns ip -type NSIP– leave the other “add ns ip” commands, especially the SNIP (-novserver) commandsadd ns ip6 -type NSIP
- Remove the nsroot line that starts with:
set system user nsroot
- Remove all interface commands that start with:
set interface
- Adjust all channel commands that start with the below. Remove the lamac parameter. Change the LA number to match the new hardware.
add channelset channel
- Fix VLAN binding commands for new channels/interfaces.
- Edit set snmp mib command, if it exists.
set snmp mib
- Remove PBR commands for NSIP that start with. Or you can adjust the commands for the new NSIPs.
add ns pbr NSIP
- Remove High Availability / Cluster commands that start with:
add HA node 1
- Remove RPC Node commands that start with:
set ns rpcNode
- Review the add route commands to make sure they are correct for the new appliances.
- Search for set ssl service and look for the ones that start with ns (e.g., nshttps-127.0.0.1-443). If any of them have the parameter -tls12 DISABLED, then remove that parameter.
- Search the entire config file for question marks ( ? ). Question marks do not import correctly from the CLI so you’ll have to fix them in the GUI after the import is complete.
Make sure the name of the modified configuration file is all lower case and doesn’t have any spaces. The batch command doesn’t work if there are upper case letters or spaces.
Upload the modified config file to /tmp on the new primary appliance.
Optional: review the SSL commands and look for any bindings of custom ciphers to SSL vServers. After the cutover, the new appliances will have your custom ciphers but unfortunately will also have the DEFAULT ciphers. To speed up the post-cutover process, you can pre-create the CLI commands that unbind the DEFAULT cipher groups. Here’s an example command:
unbind ssl vserver MySSLvServer -cipherName DEFAULT
Cutover
Decide how you will disable the old appliances. Here are some options:
- Shutdown MPX Ethernet interfaces on network switch – if rollback, it’s easy to unshut the interfaces
- Power off old VPX appliances, including on SDX – if rollback, it’s easy to power them on again
- If old appliances have dedicated management network (no SNIP on management network), then you can go to System > Network > Interfaces and disable them – if rollback, easy to re-enable
- Power off old MPX appliances – if rollback, is somebody available in the data center to power them on again?
Before outage – Before the outage window, do the following on the old appliances:
- Backup the old appliances and download the backup files.
- Review the old appliances and record what’s up or down – After cutover, you’ll confirm up/down is the same on the new appliances.
- Look in Traffic Management > Load Balancing > Virtual Servers for up/down status, including the number of UP services.
- Go to Authentication > Dashboard to see which authentication servers are reachable
Outage – During outage window, do the following:
- Disable the old appliances.
- SSH to the new primary appliance and run the batch command to run the commands in your modified configuration file. For example:
batch -fileName /tmp/nsrunningmodified.conf -outfile /tmp/outfile.txt
- Review the outfile for errors. Some warnings can be ignored. You can use WinSCP to access the out file. Or cat it.
After running the batch command, do the following to fix the imported configuration.
- Default Route – Remove extra Default Route, if any.
- System > Network > Routes. If there are two 0.0.0.0 routes, then remove the one for the NSIP subnet. Check it on both nodes.
- Question Marks – for any line that had a question mark ( ? ), fix the config in the GUI. The question marks are probably missing if you did copy/paste into an SSH session instead of running the batch command.
- VIPs are UP? – Ensure VIPs (Load Balancing, Content Switching, Gateway) are up or down as noted on the old appliance.
- Traffic Management > Load Balancing > Virtual Servers.
- Go to Authentication > Dashboard and ensure the status matches the old appliance.
- If needed, fix LDAP Password in load balancing monitor and in LDAP Policies/Servers.
- If needed, fix RADIUS Secret in load balancing monitor and in RADIUS Policies/Servers.
- Portal Themes – Point your browser to the Citrix Gateway logon pages and verify Portal Themes customizations are correct.
- GSLB MEP – Set GSLB RPC nodes with Secure checked.
- System > Network > RPCs. Check the Secure box. Change RPC password.
- DEFAULT ciphers – If Default SSL Profile is enabled, then remove DEFAULT cipher group from SSL Profiles that have custom Ciphers.
- System > Profiles > SSL tab. Edit each profile. In SSL Ciphers section, remove DEFAULT if it’s not the only cipher.
- If Default SSL Profile is not enabled, then remove DEFAULT cipher group from all SSL Virtual Servers that have custom ciphers.
- E.g. Traffic Management > Load Balancing > Virtual Servers. Edit an SSL Virtual Server. Scroll down to the SSL Ciphers section. If you see both DEFAULT and something else, then remove DEFAULT.
- SSL Labs – Use SSL Labs to test externally reachable VIPs.
- HA failover – Do a High Availability failover and verify that the same VIPs and authentication servers are UP on new primary appliance.
Hi Carl
Just a comment on something that left me floundering for a little while…
I had an issue with the nsrunning.conf file not running properly. After a bit of digging i realised that I had to replace all instances of " with ”
A stuopid little thing but had me head scatching for a while so thought i would share 🙂
Could you do a post for upgrading a VPX from 13.0 to 14.1?
Just a note; I am working on migration from MPX to VPX and saw an issue with trying to configure by using batch file for nsrunning.conf on the new devices. every command errors. same command entered manually to CLI works fine.
What I have found (and apologies if this is mentioned before – i checked and couldnt see it) is that I had to add a blank space to the end of every command line in the nsrunning.conf file…… batch process now works correctly….
NS v13.1.Build 55.34.nc on both old and new NS.
Make sure the file is saved using UNIX line endings instead of Windows.
Ahh – thanks – just worked how to achive that with Notepad ++ 🙂
Carl, can you please add this to your procedure? This one just bit us. The outfile.txt showed an error for the last word of every config line.
Hi Carl,
Thanks for your information, I wonder if to convert Citrix ADC to Fortiadc, what do I need to pay attention to this conversion?
Use my config extractor script to extract configs one VIP at a time. Then translate them to your desired platform. https://github.com/cstalhood/Get-ADCVServerConfig
Hi,
we are trying to-do a fresh install of Citrix AD 14.1 on Hyper-v 2022, we can configure an IP (pingable) but we can’t connect to the WEB GUI? Any idea?
Thanks,
P.
Hi Carl,
I need to consolidate VIPs from 3x VPXs to one VPX. Majority have Certificate files (SSL) and we do not know the password to import. We are running 13.0.92.21 code and it uses the KEK security method for password decryption.
Can I copy the *any-kek-file”.key to the SSL/keys directory? Is it limited to only 2x files?
thank you
Carmelo
Should the certbundle/trusted_root_certs.pem folder/file from /nsconfig/ssl also be transferred to the new devices? Overwriting the existing one?
If they are identical then it doesn’t matter. If you modified that file on the old appliance, then yes.
Hello Carl,
How should we proceed to migrate the RPC node configuration when we have some GSLB sites? Can we keep the configuration in the batch file (removing only the configuration from the old MPX nodes)? We are migrating from MPX to VPX.
Yes. The RPC passwords might not be decryptable unless you are also migrating the encryption keys.
Thank you Carl.
I have another issue regarding the heartbeats. The new VPX appliances is being configured to use 2 interfaces: management and data (trunk with 5+ vlans). I am seeing heartbeat only on 0/1 and not on the data interface 1/1.
The native VLAN for the switch which the VMware servers are connected is not the default 1. For the MPX that will be replaced, the trunk port is set with a dedicated native vlan for the Netscalers, so we have no problem with the heartbeats.
How should we proceed to fix the heartbeat on our VPX data interface? Adding the dedicated VLAN without being tagged binded to the data interface would do? Is there another way to solve it?
Rafael,
I have the same. log a support case to citrix. They have given me the run around blaming all sorts of things its not. There is more to this than it seems.
ie not only cant you enable it but you cant disable it.
its potentially a vmware driver issue
VMware port groups usually don’t require tagging unless you set the VMware port group VLAN to 4095. VMware port groups are usually for single VLANs. Just connect both VPXs to the same VMware port group. Don’t configure any VLAN tagging.
the vlan port groups work well with multiple tagged vlans terminating them on the VPX, the issues isn’t there the network ‘works’ flawlessly the NIC doesn’t allow heartbeats to be ‘touched’ at all by cmdline or gui.
This is the same on any number of NIC’s you may need to add to the one appliance only the management heartbeats work.
this did work on v11-12 firmware on vmware just 13.x doesn’t for me but now the traffic isn’t even sent over non management nics. I’ve traced it to be sure you just cant set/unset the heartbeat so it sends nothing.
KEK key files are not synced in a HA pair (13.0). You may need to copy them to both members and not just the primary
Thanks Carl,
We are currently running 13.1 on an HA pair of VPX appliances. Is the following sequence feasible to get them upgraded to 14.1:
1 – Stay primary on primary 13.1 node
2 – Disable HA and remove secondary 13.1 node
3 – Stand-up new 14.1 appliance and join to HA with 13.1 primary
4 – Stay primary on new 14.1 node
5 – Disable HA and remove 13.1 node
6 – Stand-up new 14.1 appliance and join to HA with 14.1 primary
To upgrade a NetScaler version, do an in-place upgrade on the Secondary, failover, and then do the primary. No need to build new appliances.
HA nodes won’t sync if they’re not the same version.
If you split an HA pair without clearing the config then you will experience IP conflicts as both try to take over.
Thank you very much!
“HA nodes won’t sync if they’re not the same version”
Sadly you can thank me for that working properly. As they used to only stop the config sync but not the file sync during this process, until it broke a customer appfw by pushing back schema ‘updates’.
a non-issue for most but the way the appfw config had been changed to fix the horrible sql injection rules used by default meant our ‘fix’ broke as this enabled items that had been deleted when the schema updated. So we did what anyone would, and we failed back and had the new schema still. Oops, that should never have been allowed to happen, but Citrix didn’t see why they would need to stop the file sync, until then. SIGH
Hi Carl,
we are currently planning a migration to a new ADC box. We are on version 13.0 and want to go 13.1. Issue is we have both advanced and classic expressions. IS there a way to share with us the safest/ cleanest way to do that conversion?
Thank you
Most classic configs still work on 13.1 (and 14.1). There are some exceptions, like “pattern” in Rewrite policies.
check_invalid_config shows you which commands won’t work in 13.1. https://github.com/netscaler/ADC-scripts/blob/master/nspepi/check_invalid_config
I normally write scripts to unbind old objects, remove the old commands, create using new commands, and then bind the new objects.
Thank you so much Carl!!
“HA nodes won’t sync if they’re not the same version.”
yea they fixed the file sync still occurring during firmware upgrades a few years ago now (2016 off memory). So be warned if you use really old firmware (11.1 or earlier) this may still be happening. Yes I’ve seen people still using 9.x so this is a real issue for some.
We plan to migrate 4 VPX instances (Int/Ext on HA) from 2 SDX 11520 (EOL) to 2 new SDX 9100. The new SDX comes with the pool licenses and ADM is required. Does the ADM needs to be implemented, up and running before the rest of VPX migration?
Thanks,
ADM is required as the license server for pooled licenses for your SDX. You can add your instances to ADM instance management later.
depending on how you licensed the 11520’s you need to pay attention to the migration as if you end up unlicensed and reboot after a save you can lose some of your config. this can typically be restored fairly easily by comparing saved vs running.
ie we migrated from the same hardware using perpetual licenses. it will lose the license on migration.
If ADM is up and running it should be possible to change the licensing on the vpx prior to migration to avoid this, so yes, I would recommend having ADM up first. It doesn’t take much effort to spin one up, even temporarily as you have a grace period of 30 days I think if ADM goes down to be rebuilt and migrate to your ‘proper’ one
Hello Carl,
thank you for the informations.
I have a question on a similar topic.
It is possible to export the ADC VM an import on other esxi host?
Same network, vlan, …
I Try it but i get a white page on the https://portal.. page.
Network an VLAN is the same only new vm ware host.
I can login to managemant IP it work fine only the user portal page ist white without any content.
Thanks.
Are the vSphere Port Groups setup identically on both hosts?
Other group name and vSwitch and ony one vmnic (only one anstead two)
OLD esxi host:
vSwitch1
Name:VLAN1000_Netscaler
Physikal Adapter: failover mode
vmnic1
and
vmnic3
VLAN ID: 1000
NEW esxi (vsphere):
vSwitch2
Name: VL1000_DMZ_NETSCALER
VLAN ID: 1000
Physical Adapter:
vmnic3
so long as the port groups have identical behavior on both vmware sides and you are not going backwards in vmware versioning I honestly think it *should* work (SRVIO could be an issue if not on both sides and used as that’s a 10/1 ->1/1 interface situation or visa versa)
i.e. dropping back to an old vmware 6.7 with a 13.1 firmware could be problematic, or if you’re lucky it will just ‘work’.
do however remember if your MAC is different its relicense time unless you use a license server like ADM
Check the network device settings on the second nic , ands if it is present inside the VM itself with the same name as the original, esp if the vlan is terminated on the VPX
we have had issues where vmware sees the nic but BSD doesn’t. If another nic is then added it appears to BSD… simply then delete the ‘dud’ one
If it doesn’t work just spin up a blank and copy the config over as above its not much more work
Hi, I followed the tip and downloaded and installed a new VPX. Then import a full backup. Unfortunately, the portal page is still displayed blank and white page 🙁
Does it matter that the vSwitch, the name , the vmnic adapter are the same? Then I could do everything exactly the same on the old esxi.
Another idea would be to unmount the network and migrate without adapter settings.
honestly it doesn’t matter as that’s all inside VMware and invisible to the VM ie you can arbitrarily change to another port group, rename thr group etc and the VM will keep working so long as the settings are ‘right’
when it comes to vnic adapter the only difference will be if its SR-IOV to be a 10Gb interface not a 1Gb. that’s a case where you [may] have to do something to make this work.
hangon… you list vmnic1&3 on one and just vmnic3 on the other are we going from two interfaces to one?
that would need a config change for sure.
Confusing…. so a question here. Why don’t we simply use the Backup utility ? I mean, backup the entire config and then use Import on the new appliance. Won’t the import migrate everything to the new ADC ?
again i know this import option is when you want to keep the same ADC hostname/IPs and VIP plus certs etc. Correct ?
I think restore requires the same firmware version and same hardware model. Restores include the NSIP. The only way to test the new NetScaler prior to restore is if you configure a temporary NSIP then then replace the NSIP when you do the restore. For VPX on SDX, you shouldn’t let the restore change the NSIP, so you’d have to take an outage to shut down the old NetScaler, create the VPX on SDX with the previous NSIP, and then perform the restore. The restore includes networking configuration so you’d probably have to fix the channels, VLANs, etc. after you restore to different hardware. And licensing if you’re not doing VPX on SDX.
yes, if we are migrating from, lets say VPX to VPX (same firmware etc) AND we want to have same Hostname, IPs(Including SNIP and SubnetIPs), certs then the backup import wizard should be enough. This will as you said incur an outage.
We are planning to go this route, as our VPX ADC running on Vmware went caput and the new ADC have to have the same config.
I think your article is for a scenario where someone is migrating from SDX to vpx or vice versa and this should be noted at the beginning of the article.
Other than that great stuff Carl!.
no firmware and hardware don’t have to match. you may have additional work if hardware doesn’t match, same on firmware as some defaults have changed. but if you are aware of these it’s a non-issue you can ‘fix’ this
another note on a backup is it copies the license with it and if you restore to an invalid license, you may simply loose config as unlicensed features are disabled and config deleted. sure, I can re copy the config over etc. and fix. but we want a least effort fix really, so in this case backup&restore can be your enemy unless you can keep your hostid (MAC) or use ADM to license.
unless you have an appfw enabled typically just the nsconfig folder will see you good. when we migrated an appfw enabled vpx(as citrix support was useless) we did a restore. fixed the licenses and then imported the backed-up ns.conf over the top and rebooted to fix 1200 lost config lines. We originally tried reimporting what was missing, but it was way too much to manage and the timeline on how long that would take was horrendous.
@Agu Balu
no this works SDX->vmware, vmware->vmware, vmware->sdx, sdx->sdx
the concept is the same. but as i mentioned above (and below a few times) if your hardware changes you do have to update the config. find anything that refers to an interface ie 10/1 and replace with 1/1 and anything referring to that too.
ie Iredddddddddddddddddddddddddddddddddddddd restore from a 10/1 based system to a 1/1 based system when it boots we are missing everything for that interface and have to add the config back. this may simply just be vlan information and nothing more. search your config. If oyu have a half decent understanding of netscalers it’s not hard to work out what needs touching
On a similar question, if we are planning on replacing a pair of SDX 8005 units (active / standby) with new 5905 units, are the configurations compatible enough to take the old 8005 standby node out and add one of the new 5905 units in, restore the backed up configuration (editing any interfaces which may have changed with the new model), make the new node the primary and the repeate to replace the other old node? or are they different enough, where a different plan is required? I’d start with getting both on the same latest 13.0.x firmware but wanted to know your opinion on how to proceed.
Thank you.
I’ve gone from SDX->VMware that way, and have near zero downtime approach but yea it should work basically as stated.
but at start of change make sure you tell the VPX’s to stop syncing, otherwise you lose the hardware changes on the secondary if you need to make any.
Citrix say HA doesn’t work with mismatched hardware this is only kind of true, you can’t set it up, and the config sync will stop you from having dissimilar hardware by overwriting the config as it syncs, and there is no automatic failover. hence the stop the config sync comment.
so stop the sync, update config, save, then do a forced failover. If you do this right all the NIC settings will be pushed to the ex-primary after its rebuild too
and do pay attention to licensing as it can get ‘lost’ during this process depending on how it was applied prior to migration.
Hi Carl,
Thanks for explaining the steps of Config migration.
I have same scenario to migrate configurations of VPX Netscaler to another netscaler, but facing issue to restore the configuration on target side.
how so, can you elaborate please?
for instance, depending on when you apply the license to the copied box you could lose config for unlicensed features.
ie bgp is a good example with health state injection and either config in the netscaler or virtual router going the way of the dodo on a save. Easy fix normally by reapplying the missing config (diagnostic running vs previous saved for instance)
we can’t make recommendations unless you give us a tad more detail.
ie is hardware like for like? firmware not too different ie 13.1.x to 13.1.x+y or is it 11.1.x to 13.1.x
Hi Carl,
Thank you for such a detailed explanation. I am planning to replace SDX8920/11515 model with new 15000Z model. We have multiple VPX instances built over SDX. Will SDX full config backup restore each piece of configuration on new hardware(SSL cert, vpx’s config) or is there any additional step i need to be aware of apart of changing the interface namings in ns.conf file before restoring?
I don’t recall if it backs up the configs inside the VPXs. But it does back up the configs needed to recreate the VPXs.
If you have ADM, then you should have backups for each instance.
lets have a quick look….
so that backup includes (for vpx’s)
– images (/backup/ns_images) – ie firmwares
– backups (/backup/ns/) – this includes /var and /nsconfig
so that will be the config to rebuild the vpx but not a built vpx. and yes thats ssl etc… note that does seem to include WAF backup info which is good if you use one.
how well this restores to a new device I cant confirm as we are moving away from SDX’s
Hi Carl,
Thank you for the articles shared. Our objective is to mirror all configuration on the existing Netscaler MPX 8000 to ADC MPX 8900. The interfaces, hostname, NSIP, VLAN, routes, VIP, SNIP are all going to be the same. Basically just swapping the devices. In this case, should we still remove these lines when uploading the configuration to the new Netscaler unit
set ns config -IPAddress
set lacp -sysPriority 32768 -mac
set ns hostName
add ns ip -type NSIP
set interface
add channel
set channel
Routing
VLAN
We planned to set it up in isolated network environment same as the production network before cut over to the production network
If you want NSIP to be the same, then you have to shut down the old appliance before you can start configuring the new one. Or configure it in an isolated environment to avoid IP conflicts.
You could do a backup and restore but the interfaces might be different between the two models. Or just modify the ns.conf with new interface configs and leave the rest.
the interface change is fairly simple to deal with, its almost the same as your normal ‘migration’ change you just have to rebind vlan/ips etc anywhere where its lets say a 10/1 on a SDX running the VPX is replaced by a 1/1 on say a vmware VPX
For minimal downtime just do this on the secondary and failover once you have it all in place.
we migrated from SDX->vmware with minimal interruptions (ie the customer didn’t notice at all)
Me I build two blanks (temp IP’s), license them off ADM, upload the old config to them. shutdown old secondary, reboot new secondary (it wont have any of the config load that can’t work on it)… update config as needed, save, reboot, verify, failover, then do same with old primary.
Stopping replication between the nodes is essential while the configs are different. Upgrading the firmware here on the new nodes first helps break replication, incase you forget…. and its a good time to do it if you’ve not done recently as there is no extra outage windows needed etc.
and yes that’s worked from 11.x to 13.1 if you are worried about going from real old firmware to new.
In addition to this, if you wish to replicate Web App Firewall policies to a new ADC appliance, see article https://docs.citrix.com/en-us/citrix-adc/current-release/application-firewall/profiles/import-export-profiles.html
The biggest thing to consider with the WAF is it uses two parts. The normal netscaler config and the signature objects (so is replicated between two nodes via the ‘config’ and ‘file’ replication(for the signatures). Sadly my experience shows well over half of Citrix first line support don’t know this, and a number of second line too
I’ve not attempted migrating a WAF system yet, but if you do it one node at a time, the replication of configs and files will fill in any missing gaps so you wont have to risk messing around with anything. Provided of course that’s a viable method for you,
Given how buggy it is I groan every time its mentioned. I’m personally responsible for a number of its fixes over the last few years due to discovering dozens of bugs that had not been noticed at all by anyone else. ie file replication used to continued when firmware versions mismatched, but config replication didn’t – doesn’t sound bad until it updates the schema on your signature objects and the non updated node doesn’t support that schema and you have to fail back as the new node isn’t working right…l and now the WAF is broken on the old node.
Don’t get me wrong its much better than some other load balancers WAF’s but is way too simplistic in a number of checks.
(ie look at SQL injection its a joke as to how simplistic it is) and you can spend a lot of time correcting this.. and still be working on bugs with Citrix 5+ years later. it took them over 8 months to find one we reported, but hey their lab sees non production traffic, and it needed multiple developers looking at the code base to find the issue in the end as they were never able to replicate
Hi Carl,
i have an issue whith configuration import
All passwords cannot be decreupted
The error message is “ERROR: Internal error [Error while decrypting the argument]”
Do you have an idea ?
Hi! Did you solved? I’ve got the same issue. Thank you
what are you migrating to and from? do any of the ns logs show any additional details?
I’ve had zero issues migrating so far, that were not self inflicted by my own stupidity or exhaustion.
Hi Dwayne!
I solved copying the key (inside nsconfig) folder to the new MPX pair.
Thank you
I’m getting this error when copying/pasting the config from one VPX to another. The cert files were manually copied beforehand. It seems like it only happens to any “add ssl certKey…” line that has certificate/key/password. I’m able to manually (via GUI) re-install all the certs, but it is a PAIN to do it that way.
Any ideas?
I would like to migrate MPX to newer VPX. can i sync the configuration with HA to reduce any risk? Thanks
the instructions as they stand are basically copy config&files of one old node to the new. Yes you could simply configure a new node, remove replication (cant have 3 in a HA setup) then setup replication between old an new nodes.
It will copy the missing config and files (the 2 separate parts of replication), OR as I did only shutdown the secondary node not both (one planned failover only so trivial outage)
risk wise… well we never stopped both nodes at the same time just the secondary, a new secondary was built (with its own unique IP, then config copied while original is down, and a reboot to load it) the biggest obvious risk is if you need to failover during that process and both ways have that risk. if the new secondary is broken, well you still have original that you can get back in a few minutes. and HA file replication would need to complete prior to a successful HA failover. we got it down to sub 14 minutes of implementation time per node, most of that is of course the shutdown old/reboot new so not a huge risk if the devices are stable
The other, more major and less obvious risk would be the VPX isnt built the same way as the mpx (vlan trunking, interface names etc) and that needs a little love no matter which way you do it. Possibly disabling HA copies and updating the secondary to the new required virtual hardware then forcing a failover.
ie we migrated some VPX’s from an old SDX to vmware, and the interfaces were different, capacity wasn’t an issue and messing with vmware wasn’t needed or desired, it was less risk to simply update the config.
A quick export of the config, a script to update all interface references and we had a good config to import, provided HA replication didn’t overwrite it. (yes we disabled replication while we updated the secondary)
We did something similar when we migrated DC’s as some of the vlan ID’s changed (ie queried ADM for all instances, pulled relevant config lines, updated them (including removing the original as there is a vlan limit we hit on one HA pair)
Sorry waffled a bit there, main point is you just have to look at what needs to change, that’s your biggest risk. having both nodes down and planned outage makes it easier to safely apply and test any config changes needed, and people expect an outage then that may never occur bit its good if they expect it and it does occur. Enough pre planning and that kind of outage can be avoided. The first one I did the ‘change’ it worked perfectly,took less than 30min and only resulted in few milliseconds of downtime. However the planning, investigating what needed to change etc took longer. This article was not here to help me at the time either, nor the responses from others in the citrix community
Of course identical hardware (virtual or physical) and your right simply creating a blank vpx and changing HA replication will work an absolute treat (ie would be the same as if you had a MPX pair where one has its disk fail, but as is often the case when migrating its not that simple as things change and that’s where the real problems and risk exist….
Regards
Dwayne
Hi Carl,
Your articles are great as usual!
I am currently migrating from an old MPX to new VPX HA pair and wonder what needs to be changed on StoreFront side.
We choose to use new SNIPs so we have the new VPX in parallel with the old MPX, and I want to test the new access gateway before performing an external DNS change to finalize the migration.
I would expect that the new VPX needs to be added to StoreFront as an additional Netscaler, but it would have identical configuration as the existing Netscaler.. All I can think of is to make use of the Subnet IP address setting which is optional to make the distinction?
Or the Callback URL but that would require an internal DNS change as well (and/or other certificate as I can’t use the same certificate as used on the old MPX – the old environment has to remain operational and we want to use external DNS change as the final step to activate everything)
Callback is a pain with multiple appliances. If you don’t use SmartAccess and if you don’t use SAML, then you usually don’t need Callback. Then both Gateways can have the same FQDN (use HOSTS file on client to test the new one).
Hi Carl,
Great stuff. One question, We have 11500 SDX’s EOL and would want to migrate the VPX instances to existing 1400 series SDX. Since the EOL VPX’s are in HA, can I build a new VPX instance on 1400 SDX then introduce this 3rd instance in the cluster. Sync the configuration and remove the existing EOL VPX.
Is clustering possible with different SDX Hardware models ?
Thanks
Abhijith.
HA is two nodes max. It’s not supported to mix different hardware models in the same HA pair. Your 14000 might have different interfaces than your 11500, which causes issues when syncing the config. However, some customers have had success doing this.
Cluster and HA are vastly different (apples to tractors type different), original comments indicate HA not cluster. as Carl has stated be careful that any new instance on the 1400 has the same kind of interfaces presented, although there are ways around this, a HA pair on the same site typically wont be configured in a way that can support this without downtime to reconfigure it from a more traditional build to one that can. This can also be a big issue migrating hypervisors. For a migration breaking replication, updating the passive and doing a forced fail over works, but you don’t want to miss anything when doing it, and it should not be a long term strategy for managing fail overs between dissimilar nodes.
There is hardware limitation on clustering on MPX’s but VPX wise they must be the same type of virtual (ie only vmware, only SDX,etc). All nodes must have same licences, which you’d need to check the SDX’s to confirm, unless you are not using the SDX licences, and a cluster licence.This also means if one day you decide to leave the 1400’s and abandon SDX’s all together and go to another hypervisor (vmware/KVM/etc) you can’t just migrate a node at a time, like you can with HA.
Personally I would not bother with clustering except maybe under certain situations ie a single netscaler can’t handle the load, clustering has its own limitations and caveats. Outside of doing any qualification exam that needs it most people will likely never use it, for good reasons. I know one of our clients didn’t like the idea of active-passive and thought clustering would address that, but after some detailed discussions on how clustering works, and work required to migrate, they decided to stay HA instead.
You could remove one device from HA and simply replicate to the new one, if that’s what you mean instead, but that’s what these steps are all about anyway.
Good Afternoon Sir, I am trying to migrate from an ADC to a VPX. What would be the best way to get this done. I have setup the VPX with a NISP, Management IP, Hostname and License. I have also setup the Network Adapters for all of my interfaces that are setup on the ADC. I have made a copy of the ns.conf and have it pulled up in in notepad, just not sure what to change. Once I get this one done, which is my Secondary I will setup the Primary. Any info you can give would be greatly appreciated. Thanks,
hi, i have a problems with the XML files in “var/vpn/bookmark/”, this are not associate with the LDAP user id.
I can see all files in this format, “bm_prefix_a2d1YWphcjE=.xml”, and cannot be copy and backup.
can you help me please? My ADC is NS12.1 55.18.nc and my others vm_ADC are not have the same problems. this other machine did have
NS12.1 54.13.nc
regards, from Chile
Guilliano Palavecino Rojas
technical support
Was your NetScaler compromised by the recent vulnerabilities? Try the IOC scanner https://github.com/citrix/ioc-scanner-CVE-2019-19781/
thank for you reply. My team of the cibersecurity has review this case and this vulnerability.
regards.
before this article was posted we did something similar in a POC on a HA pair of vpx’s (on SDX) to vpx’s on vmware migration, the only thing to remember there is the management vlan might not be on the vpx on the sdx and will need to be added when migrated to vmware, depending on how the sdx/vmware networking is configured. (ie what is and isn’t trunked)
NOTE: you might want to check if anyone did something ‘funky’ at the shell level that isn’t matched by a nsconfig item (or in the exported nsconfig folder), as these can be ‘missed’ in the migration process, depending on where the change is made.
@mark hodges
as per Carl’s comments, and automating this isn’t too hard depending on how far you want to take it.
script config extraction (ssh/scp/nitro), add/replace items based on some lookup.
nitro will let you focus on only the items you want to extract, so once you know those it can be a doddle to extract and rewrite a config, same in powershell (or favorite scripting language) via ssh (and probably easier for most)
OR via ADM, backup nightly, extract from backup – replace/remove key lines, and you can have a DR config ready for applying.
if you look a the whole config, rather than the load balancing you can replace the known items for your current DR site, and with a few variable changes switch the DR config to a new site as needed. (interface,snip,vlan etc changes). it really is worth it if there is a good chance your DR site will change over time, script it well and you can do a dozen or more pairs with the one script if you’re supporting a decent number of these and have to do so.
Hi, Carl
do you know if this process works with an azure ADC ?
I have to migrate from an on-premise ADC to an azure ADC
There shouldn’t be much difference.
Great stuff Carl,
Quick question..Want to replace exising 11500 to 15000z.. want to do it in one shot.. would it make sense to take the standby adc out.. add the new 15000z sync the configs than fail it over?
Citrix doesn’t support different hardware types in an HA pair. But I’ve seen reports of successfully doing this. If the interfaces are different, then this won’t work without downtime after failover.
What if its 11500 SDX… to a new 15100 SDX..
Moving VPX from 11500 to 15100 VPX… can I sync .. VPX in 11500 to VPX in 15100
Was your question ever answered?
https://docs.netscaler.com/en-us/netscaler-hardware-platforms/sdx/migrating-configuration-of-netscaler-instance-across-sdx-appliance.html suggests that you can.
“Citrix doesn’t support different hardware types in an HA pair. ”
I’ve mentioned elsewhere (here even). they don’t support adding a node that doesn’t match but once its added it doesn’t care, to a degree…..
basically so long as the interfaces (as in names ie 10/1 etc) and vlan termination (on or off vpx) match between them you should be able to. the citrix layer on top of BSD doesn’t care about the exact model of NICs. The config syc does have issues if one box is 10/1 and one its 1/1 but not if both are 10/1.
Simply put Hardware type is much broader than people think. 1 cpu = 1cpu regardless of clock speed. 1 nic =1 nic if same throughput, etc.
I’ve mentioned in other comments how you can deal with migrating between dissimilar hardware with no downtime, but that involves not keeping them in that state as you cant sync while you are in that situation
Hi Carl, I sincerely appreciate your response. I have checked via CLI and its showing down, I have logged a case with Citrix however for security reason I can neither shadow the sessions nor share the log so I am not hoping to get much from them. I have ruled out its STA server issue as if I use earlier Citrix ADC with same IP address as the problematic one STA is working fine on earlier ADC. So it look like there is a issue with ADC which is not able to communicate to STA server. I have tried telnet to STA on port 80 and it was successful however I assume it must be using NSIP as source rather than using SNIP.
As I could not figure out why STA is down I am setting up two VPC ADC in HA and restoring the config and I am hoping it will work. However I am bit concerned if on two ADC STA is down then how do I troubleshoot further.
I have tried re configuring the STA on virtual server using below article and its still showing down
https://docs.citrix.com/en-us/citrix-gateway/12-1/integrate-web-interface-apps/ng-wi-comm-wrapper-con/ng-wi-comm-sta-config-tsk.html
Any help or suggestion will be highly appreciated
Hi Carl,
First of all thanks a lot for sharing this article, using this I have restored the setting from 11.1 to 13.0 ADC and its restored all the settings and its worked fine.Yesterday there was issue reported and both (primary and secondary) appliance is factory restored.
I have deleted all the configs and paired them in HA and tried restoring the earlier config. Everything is working fine except the STA on virtual Gateway is down. I can ping both sta ip address from ADC CLI and telent to port 80 however its still showing down. There are many articles talks about adding STA server in virtual gateway which seems to be easy one. Because its down for me I have unbinded and bind again however still its showing down.
Can you please recommend some solution.
ADC version is 13.0, STA in virtual gateway I am using IP address which is same as storefront. Storefront and Delivery controller on same server. XML default port is 80
There might be a GUI issue in ADC 13. In CLI, if you run “show vpn vserver myGateway”, does it show the STAs as up?
Hi Carl
Am planning to migrate our VPX version 12 from VMware to Hyper-V in HA and am not sure if the steps mentioned above will work. I am thinking of migrating the secondary node first from VMware to Hyper-V and reusing the existing license, and copy the config including SSL. Am trying to avoid downtime and am not sure if this approach will work .
Cheers
Jesse
Some people have tried that approach even though it’s probably not supported since the two nodes could be considered different hardware.
Thanks Carl. Since it’s a virtual appliance and the licenses are mapped to Mac addresses, am thinking of changing the MAC address of the new VMs in Hyper-V to be same as current appliances on VMware. Make secondary appliance STAY SECONDARY. Shut it down and apply the license to the new appliance in Hyper-V. Keeping my fingers crossed. Any suggestions on this?
I finally migrated Citrix ADC 12 from VMware to Hyper-V without downtime. Most important thing was to reuse the static MAC addresses on VMware appliance in Hyper-V, reason being the license is associated to the MAC
-i copied the configuration, certificates and license files to appliance in Hyper V
-shutdown secondary appliance in VMware
-Changed the NSIP and Mac address on the secondary appliance in Hyper V to match secondary appliance in VMware.
-Failed over traffic to new appliance in Hyper V.
– Repeated same steps on Primary appliance
Was very smooth without any downtime
is there a way to export/import the Dashboard that are created when going through the wizard for “XenApp and XenDesktop” under “Integrate with CitrixProducts” in Netscaler?
i have tried to do export from such setup and imported to new netscaler and it is working as the old one but the Dashboard is missing for the Gateway.
BR
Ingvar
Hi Carl, do you think this method will works also on AWS instances?
I have to migrate a single instance to an HA one (both on AWS), and it looks not so easy to do as it would be on an on prem ones.
The geneal idea is to create a new cluster by the AWS store and then migrate the single instance configuration.
Another option is to use my Configuration Extractor script to extract a full Virtual Server configuration, change its IP, and then run the same commands on the AWS appliance. https://github.com/cstalhood/Get-ADCVServerConfig
I will give a look.
The real challeng is related to the number of vips and policies configured on that particolar instance: we are talking about 50 vservers and with a very complex AAA configurator.
My original idea was to add a second VPX instance and configure HA with the old one, but the existing VPX is a flat one (2 nic, but on the same network) and all the documentation related to AWS HA talks about 3 nic with logic separation of FE/BE/MGMT: I strongly suspect that networking does not work as flat as on prem installations.
This is handy, but what would be really nice is a way to easily create a DR configuration from an existing environment, especially when it comes to the VIP’s..being able to quickly take an existing Config, ignore all the SNIP settings (since those would be pre-set) and just find and replace the VIP ip’s with new ones and import would be nice…
You can search for “add lb vserver”, “add cs vserver”, “add vpn vserver” and change their IP addresses.
Then remove any lines that reference the SNIP.
Hi Mark, I actually found this article really useful for configuring my DR environment. I’d also suggest repeating the process monthly or quarterly (depending on the frequency of your Production changes) or alternatively, replicating any Production changes to DR at the same time. I have taken some additional steps in the process.
Removal of the following config file entries:
set lacp – syspriority
set iptunnelparam -mac
add vlan
bind vlan
add snmp trap
add appflow collector
add audit syslogaction
add audit syslogpolicy
add appflow action
add appflow policy
Migration of Web App Firewall profiles as per the following article: https://docs.citrix.com/en-us/citrix-adc/current-release/application-firewall/profiles/import-export-profiles.html
sure that will migrate policies but not signature files. so unless you want to export and import a pile of stuff that’s painful.
the non signature, non learned data are in the ns.conf file so the migration steps above will cover that but unless the files are present first that’s an issue.
NOTE don’t waste your time logging a job to citrix to ask what files the appfw uses as they can’t/won’t tell you
you can however use the backup/restore in the vpx to get these files. however restoring will apply the original licensing that may not work on the new device, which will see the feature and config vanish.
BUT.. the files will be there…. so re license, reboot, copy the config prior to migrating on the device as per Carl’s comments and reboot….
boom migrated. hey sure if you dont have many sigs/profiles/polices this is more work but if you have prod/test on the one device it saves lots of time and effort.
Oh and only do this step on the first node migrated, as the HA sync on a HA pair will do the other node.