Navigation
- Change Log
- Upgrade to 7.15.9000 LTSR
- New Install Preparation
- Delivery Controller 7.15.9000 LTSR New Install
- SSL for Delivery Controller
- Studio – Slow Launch
- Concurrent Logon Hard Limit
- Local Host Cache
- Database Maintenance – Change Database connection strings, read-committed snapshot, Director grooming, Logging Database operations, etc.
- Export/Import Configuration
- Studio Administrators
- Customer Experience Improvement Program (CEIP)
- vCenter Connection – vCenter certificate, Hosting Resources
- Citrix Licensing Server
- Remote Desktop Licensing Server
- Smart Check
- Health Check
💡 = Recently Updated
Change Log
- 2022 July 9 – updated article for 7.15.8000 (Cumulative Update 9)
- 2021 Aug 11 – updated article for 7.15.8000 (Cumulative Update 8)
- 2021 Feb 24 – 7.15 CU7 and newer support vSphere 7.0 Update 1 (source = CTX131239 Supported Hypervisors for Virtual Desktops (XenDesktop) and Provisioning (Provisioning Services))
- 2021 Feb 9 – updated article for 7.15.7000 (Cumulative Update 7)
- 2020 Jun 30 – updated article for 7.15.6000 (Cumulative Update 6)
- 2020 Mar 14 – added Citrix Studio 7.15.5000 Hotfix 1
- 2019 Oct 22 – Updated Install and Upgrade sections for version 7.15.5000 (Cumulative Update 5).
- 2019 Jul 7 – Upgrade – added link to Utilizing Local Host Cache for Nondisruptive Database Upgrades at Citrix Docs.
- 2019 Apr 23 – Updated Install and Upgrade sections for version 7.15.4000 (Cumulative Update 4).
- 2019 Jan 18 – New Delivery Controller – for LHC, configure four cores per socket
- 2018 Dec 28 – SSL for Delivery Controller – added info from Michael Shuster at HowTo: Enable SSL on Citrix Delivery Controllers – Easy Method
- 2018 Nov 7 – New Install – added link to Citrix Tech Zone Endpoint Security and Antivirus Best Practices
- 2018 Oct 29 – Updated Install and Upgrade sections for version 7.15.3000 (Cumulative Update 3).
- 2018 Oct 29 – Health Check – Pavan900 posted a PowerShell-based Health Check script at Citrix Studi – Colors for Maintenance Mode at Citrix Discussions
- 2018 Oct 16 – Change SQL connection strings – added content from CTX140319
- 2018 Oct 16 – SSL for Delivery Controller – new section to install certificate on Delivery Controller
- 2018 Sep 28 – Broker Service 7.15.2000 Hotfix 1 download was pulled so I removed it from this procedure
- 2018 Sep 3 – added Broker Service 7.15.2000 Hotfix 1 from CTX237283 – LHC fix
- 2018 June 3 – added Studio 7.15.2000 Hotfix 1 from CTX235169
- 2018 Apr 17 – Updated Install and Upgrade sections for version 7.15.2000 (Cumulative Update 2).
- 2018 Mar 8 – in New Install Preparation section, added link to Patrick van den Born How to: Configure Citrix XenApp/XenDesktop to use Microsoft SQL multi-subnet (Basic) Availability Groups
- 2018 Jan 4 – in Local Host Cache section, added note about PowerShell Execution Policy.
- 2017 Dec 4:
- Updated Install and Upgrade sections for version 7.15.1000 (Cumulative Update 1).
- Added vCenter Root CA Certificate section as alternative to importing actual vCenter certificate.
- In LHC section, added link to Trentent Tye Citrix XenDesktop/XenApp 7.15 – The local host cache in action.
Upgrade
If you are performing a new install of XenApp/XenDesktop Controller, then skip to the next section.
You can upgrade directly from any Delivery Controller version 5.6 or newer.
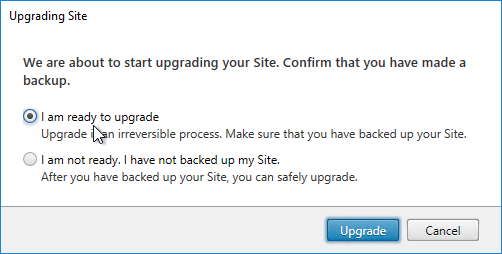
During the upgrade of Delivery Controller, be aware that a database upgrade is required. Either get a DBA to grant you temporary sysadmin permission, or use Citrix Studio to generate SQL scripts that a DBA must then run in SQL Studio.
- Consider Utilizing Local Host Cache for Nondisruptive Database Upgrades at Citrix Docs.
- Cumulative Updates – 7.15 is a Long Term Service Release (LTSR). Citrix periodically releases Cumulative Updates for LTSR versions.
- Cumulative Updates include bug fixes only. Cumulative Updates do not include any new features. If you want new features, then you’ll have to upgrade to a Current Release (e.g. 7.16), which has a much shorter support lifecycle. See Lifecycle Milestones for Citrix Virtual Apps & Citrix Virtual Apps and Desktops.
- LTSR compliance – To remain compliant with LTSR (5 years of support), you must install the exact versions detailed at XenApp and XenDesktop 7.15 LTSR baseline components at Citrix Docs. If you upgrade a single component beyond LTSR, then you should upgrade all components to the latest release.
- See Citrix CTX205549 XenApp, XenDesktop, and XenServer Servicing Options (LTSR) FAQ.
- Citrix LTSR Assistant can determine your LTSR compliance.
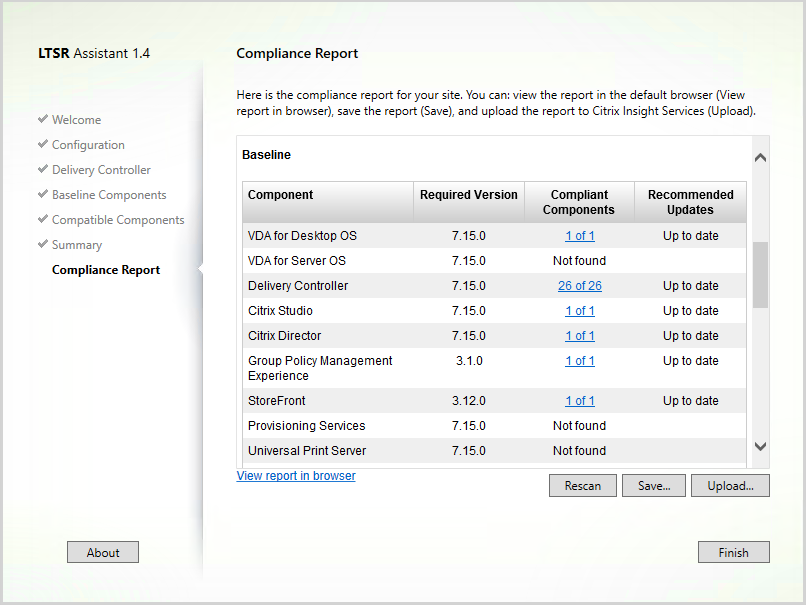
- Citrix Smart Check can verify some of the LTSR components.
- OS Upgrade – If you are currently have 7.6 LTSR Controllers on Windows Server 2012 R2 and want to migrate to Windows Server 2016 Controllers, then do the following:
- In-place upgrade your Windows Server 2012 R2 Controllers to 7.15.9000 LTSR.
- Build a couple new Windows Server 2016 VMs with 7.15.9000 LTSR Controller and join them to the existing site/farm.
- Edit the ListOfDDCs registry key on each VDA to point to the new Win16 Controllers.
- Edit StoreFront Console > MyStore > Manage Delivery Controllers, and point to the new Win16 Controllers.
- Reconfigure Director server > IIS > Application Settings > Director path > Service.AutoDiscoveryAddresses to point to the new Win16 Delivery Controllers.
- Adjust monitoring tools to point to the new Win16 Controllers. For example, if using Citrix SCOM, deploy the Citrix SCOM Agents to the new Controllers, and remove from the old Controllers.
- If other components are installed on the old Controllers, move those components to the new Win16 Controllers.
- Remove the Windows Server 2012 R2 Controllers from Citrix Studio (Configuration > Controllers > Remove Controller), which removes them from the database.
- Decommission the Windows Server 2012 R2 Controllers.
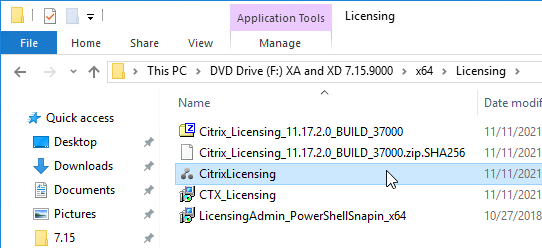
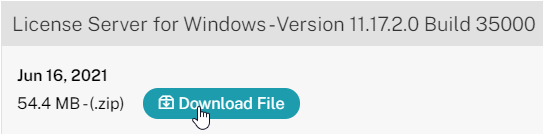
- License Server – Before upgrading to 7.15.9000, upgrade your Citrix Licensing Server to 11.17.2.0 Build 37000 or newer. It’s on the XenApp and XenDesktop ISO under \x64\Licensing.
- Sysadmin permissions – The person upgrading Delivery Controller needs temporary SQL sysadmin permission so the databases can be automatically upgraded. Or Citrix Studio can generate SQL scripts that a DBA must then run in SQL Studio.
- SCOM Agent – If StoreFront is installed on the Controller, and if the Citrix SCOM Agent for StoreFront is installed, stop the Citrix MPSF Agent service. See CTX220935 Cannot Perform a StoreFront Upgrade if Citrix SCOM Management Pack Agent Service is Running.

- Close PowerShell and Consoles. Make sure all Citrix Consoles and PowerShell consoles are closed. StoreFront won’t upgrade if any are running. If StoreFront fails, then the StoreFront configuration is wiped out.
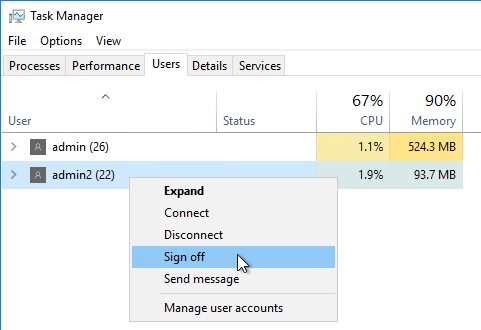
- Other Users – Use Task Manager > Users tab to logoff any other user currently logged into the machine.
- Snapshot. If StoreFront is installed on the Controller, take a snapshot before attempting the upgrade.
- Another option is to export the StoreFront configuration so you can restore it later if something goes wrong.
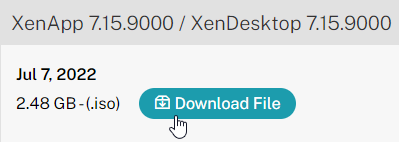
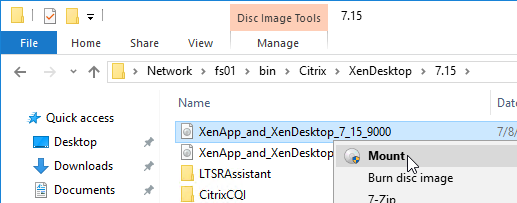
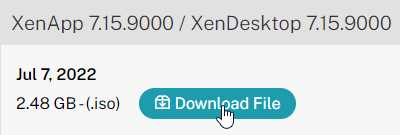
- Download the XenApp/XenDesktop 7.15.9000 LTSR ISO.
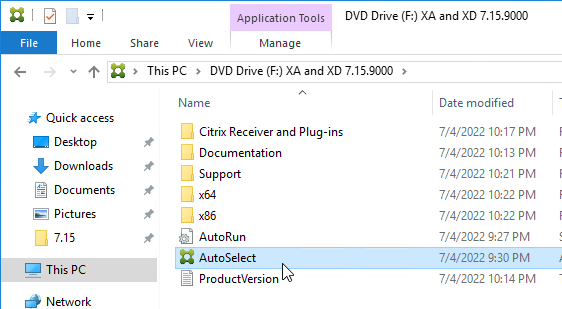
- Run AutoSelect.exe from the 7.15.9000 LTSR ISO.

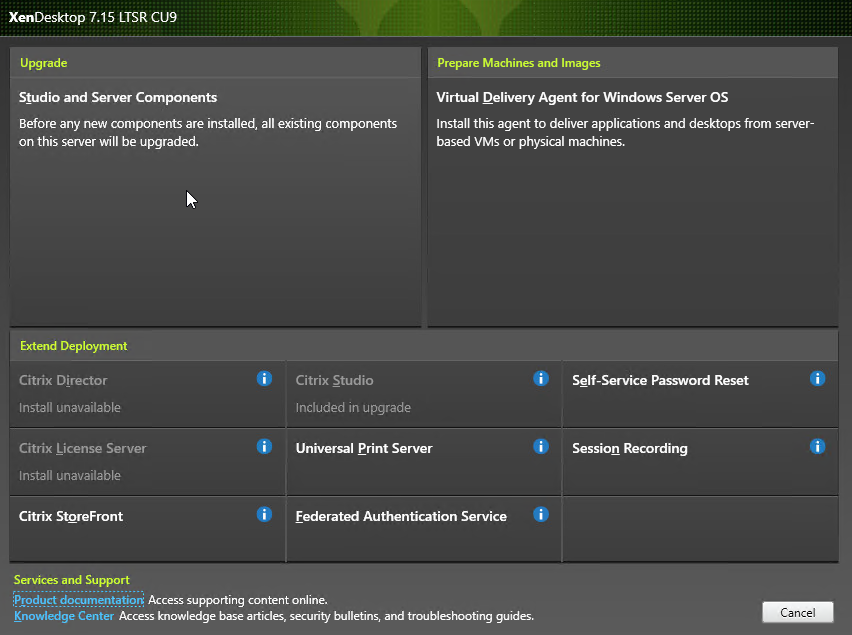
- On the top left, under Upgrade, click Studio and Server Components.
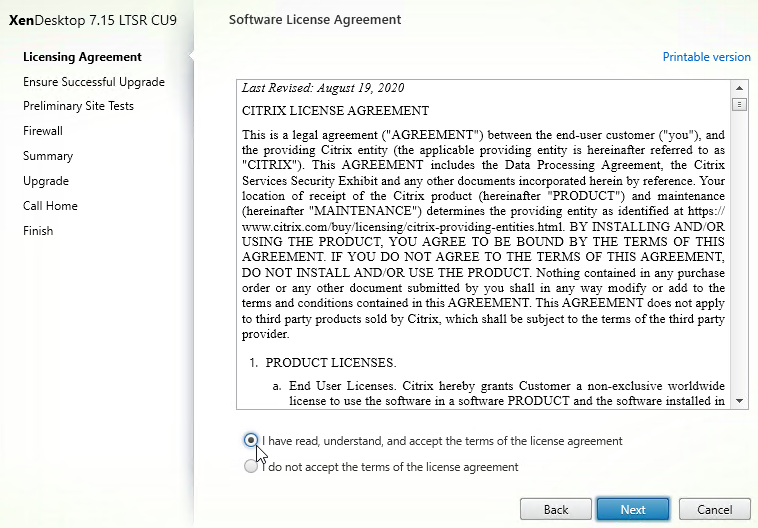
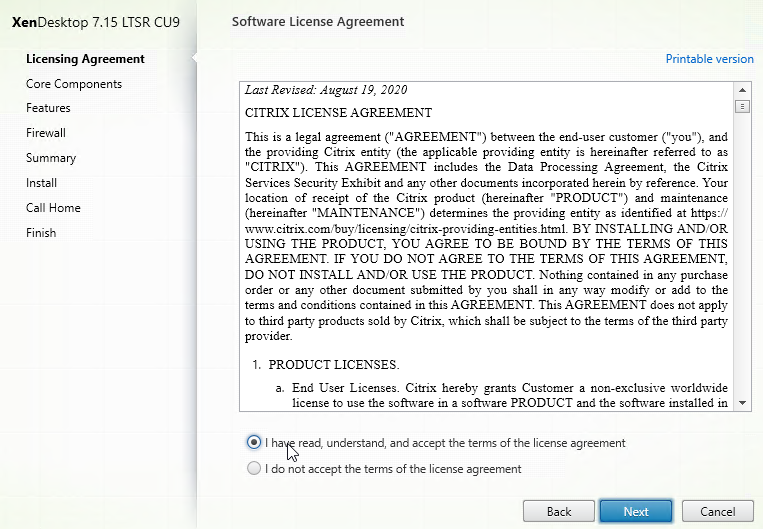
- In the Licensing Agreement page, select I have read, understand, and accept the terms, and click Next.
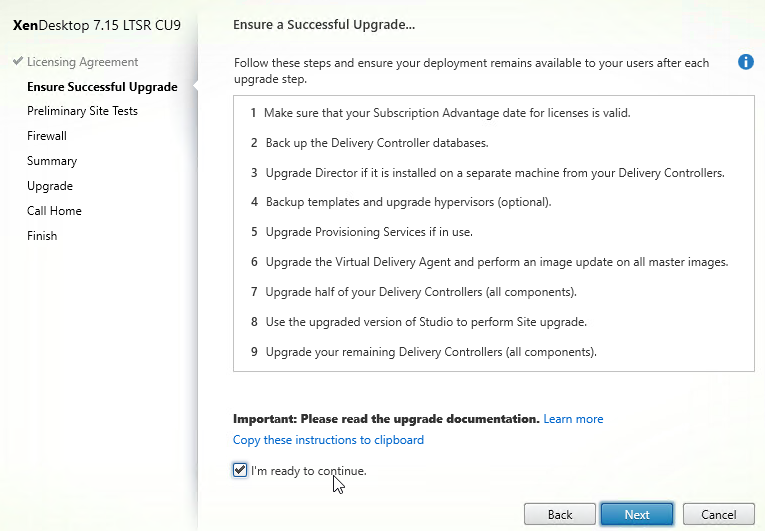
- In the Ensure Successful Upgrade page, read the steps, check the box next to I’m ready to continue, and click Next.
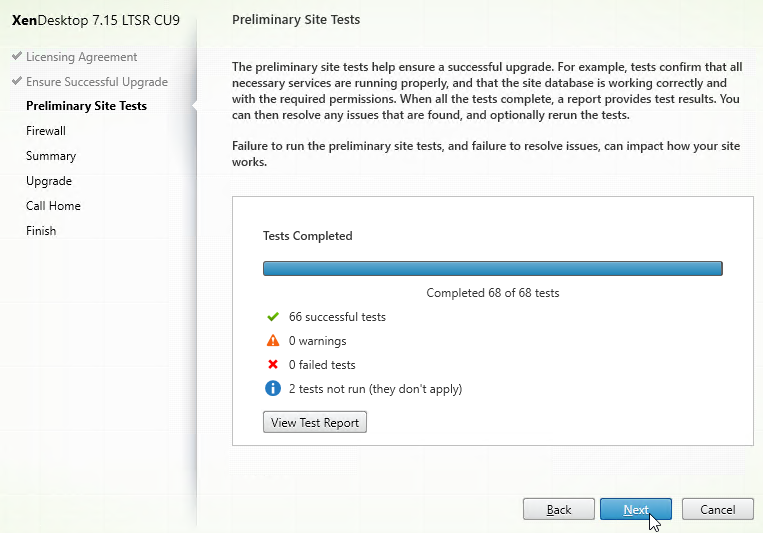
- In the Preliminary Site Tests page, click the blue button labelled Start Preliminary Tests.
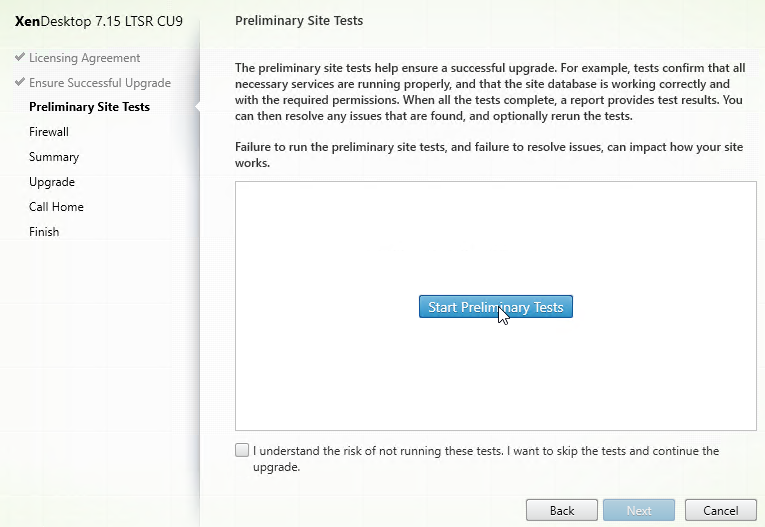
- If any tests fail, then click View Test Report.
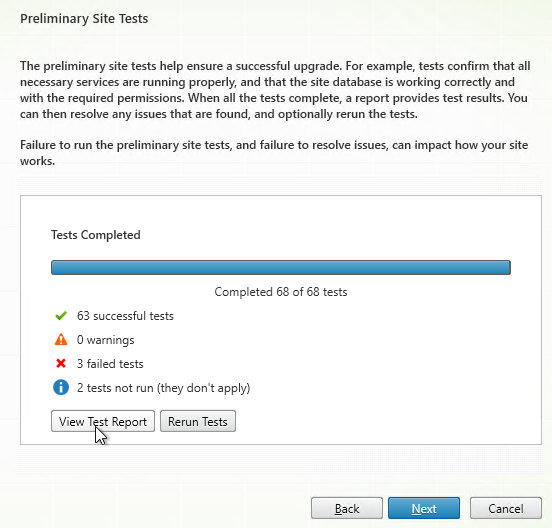
- If any tests fail, then click View Test Report.
- Click Next.
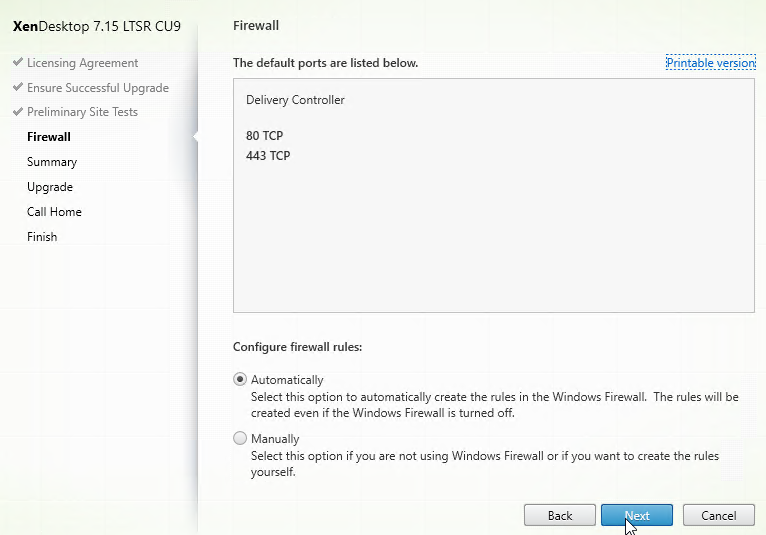
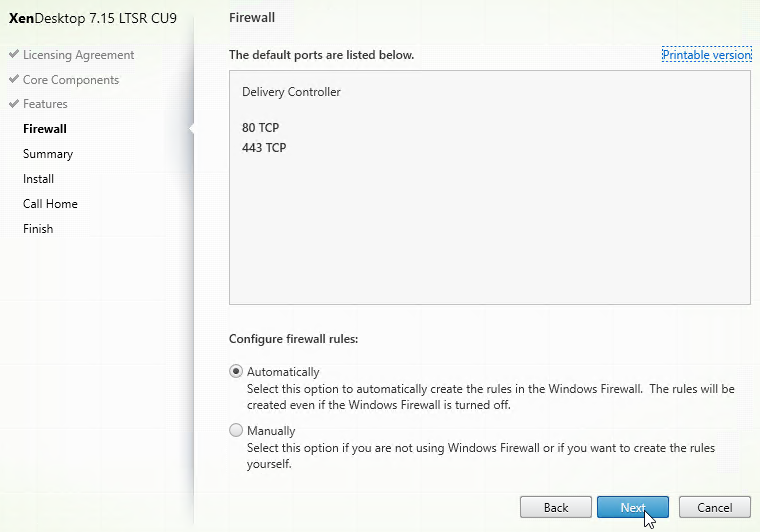
- In the Firewall page, click Next.
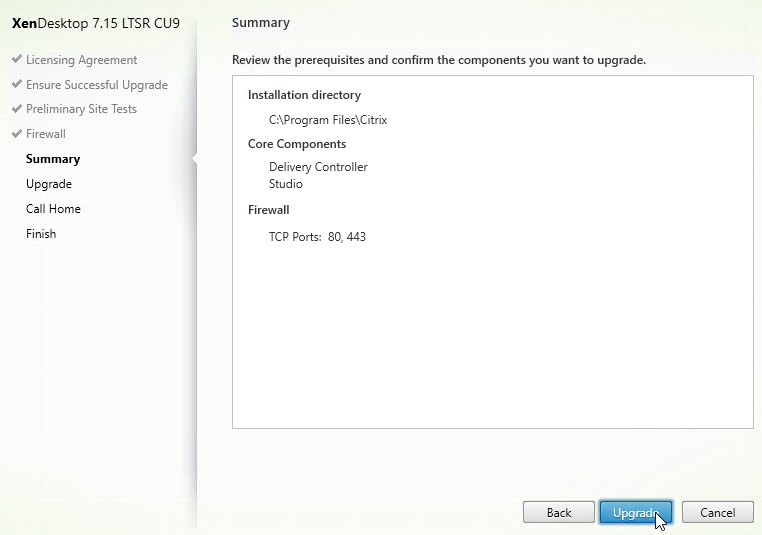
- In the Summary page, click Upgrade.
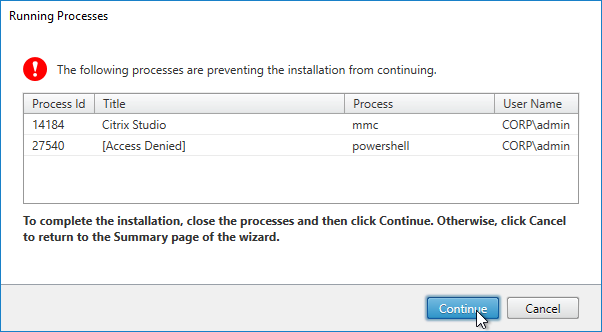
- If you see a Running Processes window, close the listed programs, and click Continue.
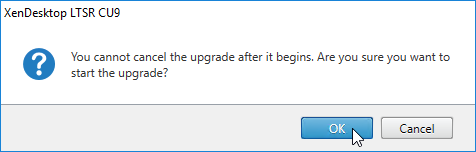
- Click OK when asked to start the upgrade.
- Click Close if you are prompted to restart.
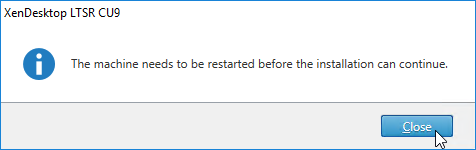
- After the reboot, login.
- If you see a Locate ‘XenDesktop LTSR CU9’ installation media window:
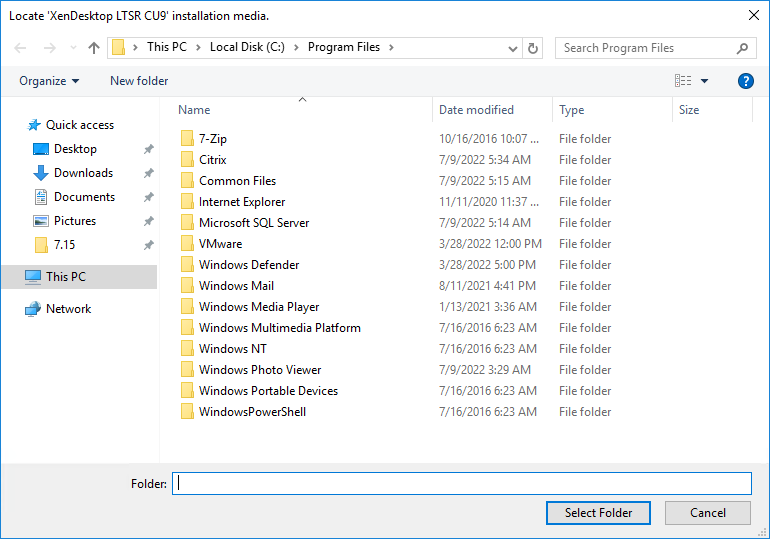
- Don’t close the Locate window.
- Mount the XenApp_and_XenDesktop_7.15.9000.iso.
- Go back to the Locate window.
- On the bottom left, under This PC, click the mounted drive. Then click the Select Folder button.
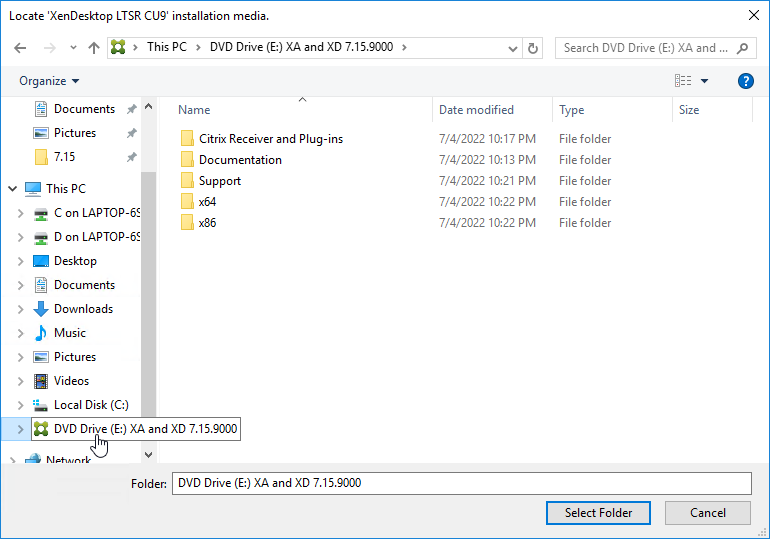
- Installation will resume.
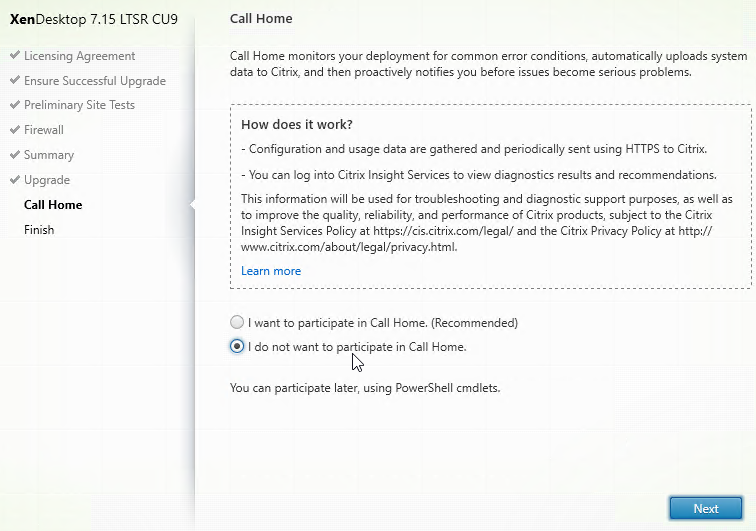
- In the Call Home page, make a selection. If participating, click Connect, login with mycitrix.com credentials, and then click Next. See Citrix Insight Services at Citrix Docs for more information on these options.
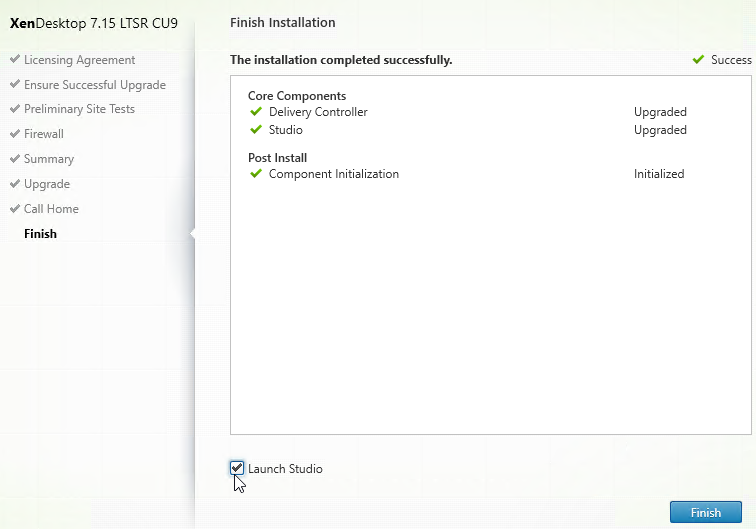
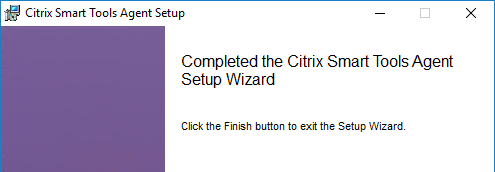
- In the Finish page, check the box next to Launch Studio and click Finish.
Studio – Upgrade Database, Catalogs, and Delivery Groups
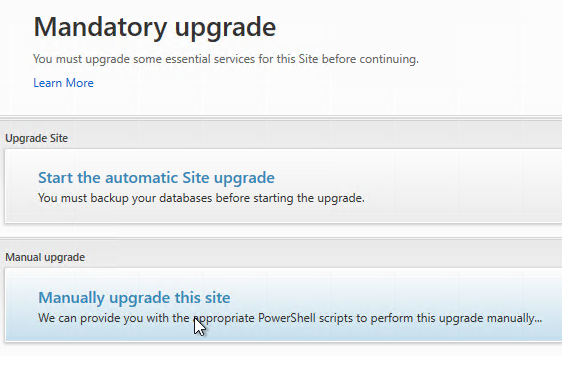
- After Citrix Studio launches, if you have sysadmin permissions on SQL, then click Start the automatic Site upgrade. If you don’t have full permission, then get a DBA to help you, click Manually upgrade this site, and follow the instructions.
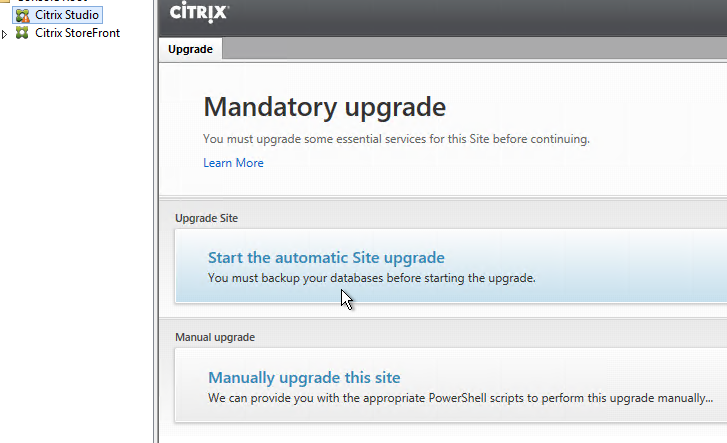
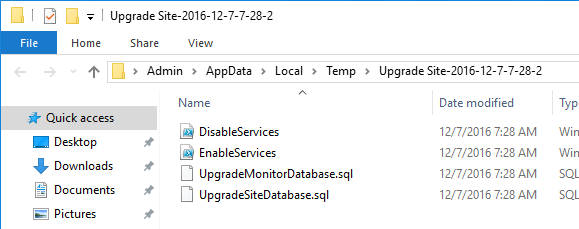
- If you choose to Manually upgrade this site, then note that there might not be an upgrade for the Logging Database schema, depending on what version you are upgrading from.
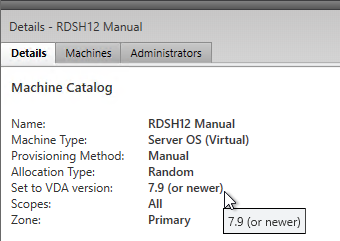
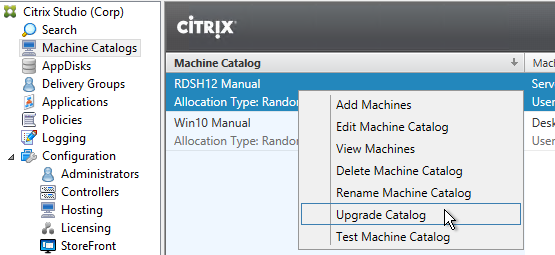
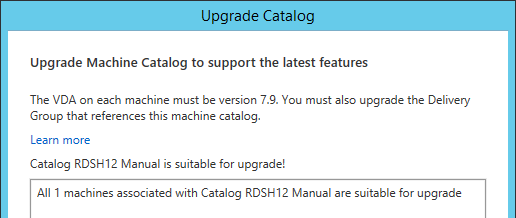
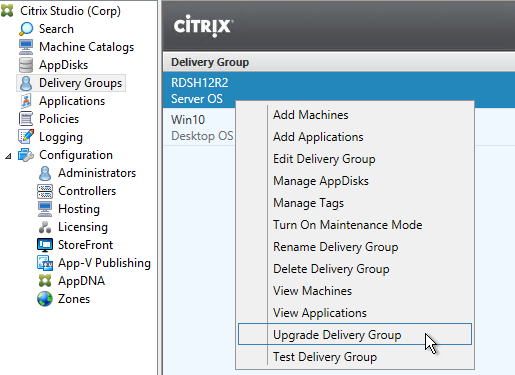
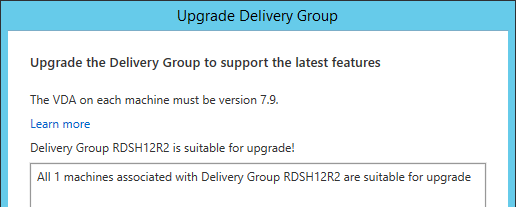
- After all Controllers and VDAs are upgraded, right-click the Catalogs, and click Upgrade Catalog. Note: 7.9 is the newest minimum functional level. You won’t see an option for 7.15.9000. If your Catalogs are already set to VDA version 7.9, then there’s no need to upgrade the Catalogs or Delivery Groups.
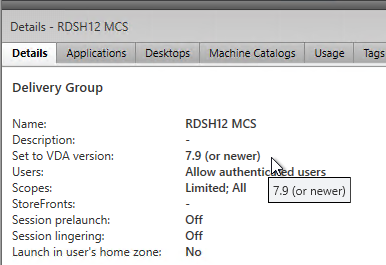
- Then do the same for the Delivery Groups. Note: 7.9 is the newest minimum functional level. You won’t see an option for 7.15.9000. If your Delivery Groups are already set to VDA version 7.9, then no upgrade is needed.
Other XenApp/XenDesktop components can also be in-place upgraded:
- StoreFront 3.12.9000
- Director 7.15.9000
- Upgrading Director overrides modifications to LogOn.aspx (e.g., default domain name), so you’ll have to reapply them.
- VDAs 7.15.9000
- Citrix Policy Management Plug-in
- Profile Management 7.15.9000 Group Policy Templates
- Citrix Workspace app Group Policy Templates
- Workspace Environment Management 2206 – there is no LTSR version of WEM
- Provisioning Services 7.15.45
- Session Recording 7.15.9000
- Federated Authentication Service 7.15.9000
New Install Preparation
Cumulative Updates – 7.15 is a Long Term Service Release (LTSR). Citrix periodically releases Cumulative Updates for LTSR versions.
- Cumulative Updates include bug fixes only. Cumulative Updates do not include any new features. If you want new features, then you’ll have to upgrade to a Current Release (e.g. 7.16), which has a much shorter support lifecycle. See Lifecycle Milestones for Citrix Virtual Apps & Citrix Virtual Apps and Desktops.
LTSR compliance – To remain compliant with LTSR (5 years of support), you must install the exact versions detailed at XenApp and XenDesktop 7.15 LTSR baseline components at Citrix Docs. If you upgrade a single component beyond LTSR, then you should upgrade all components to the latest release.
- See Citrix CTX205549 XenApp, XenDesktop, and XenServer Servicing Options (LTSR) FAQ.
- Citrix LTSR Assistant can determine your LTSR compliance. Note: LTSR Assistant downloads its configuration from ctxsym.citrix.com, so you don’t have to update LTSR Assistant after installing a new Cumulative Update.

- Citrix Smart Check can verify some of the LTSR components.
Installation Automation – If you want to automate the install of Delivery Controllers, see Dennis Span Citrix Delivery Controller unattended installation with PowerShell and SCCM.
Citrix Licensing – If you are going to use an existing Citrix Licensing Server, upgrade it to 11.17.2.0 Build 35000.
Note: multiple license types (but not multiple editions) are supported in a single farm. See CTX223926 How to Configure Multiple License Types within a Single XenApp and XenDesktop Site.
SQL Databases
- Citrix CTX209080 Database Sizing Tool for XenDesktop 7
- Citrix article CTX114501 – Supported Databases for XenApp and XenDesktop Components
- Three databases – There are typically three databases: one for the Site (aka farm), one for Logging (audit log) and one for Monitoring (Director).
- The name of the monitoring database must not have any spaces in it. See CTX200325 Database Naming Limitation when Citrix Director Accesses Monitoring Data Using OData APIs
- If you want Citrix Studio to create the SQL databases automatically, then the person running Studio must be a sysadmin on the SQL instances. No lesser SQL role will work. sysadmin permissions can be granted temporarily and revoked after installation.
- As an alternative, you can use Citrix Studio to create SQL scripts, and then run those scripts on the SQL server. In that case, the person running the scripts only needs the dbcreator and securityadmin roles.
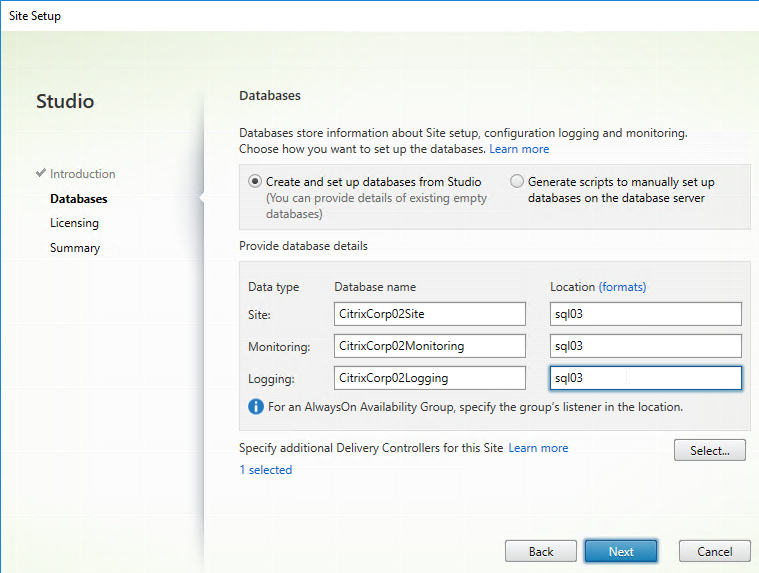
- It is possible to create the three databases in advance. However, you must use the non-default Latin1_General_100_CI_AS_KS collation.
- SQL High Availability Options:
- Basic Availability Groups – Build two SQL 2016 (or newer) Standard Edition servers and create three Basic Availability Groups, one for each database. Each Basic Availability Group has its own Listener.
- SQL Standard Edition is much cheaper than SQL Enterprise Edition.
- See Patrick van den Born How to: Configure Citrix XenApp/XenDesktop to use Microsoft SQL multi-subnet (Basic) Availability Groups. 💡
- Database Mirroring – Build two SQL 2014 or older Standard Edition servers and configure Database Mirroring.
- AlwaysOn Availability Group – Build two SQL Enterprise Edition servers and create one AlwaysOn Availability Group with one Listener.
- Failover Clustering – Build two SQL Enterprise Edition servers and configure SQL Database Failover Clustering.
- Basic Availability Groups – Build two SQL 2016 (or newer) Standard Edition servers and create three Basic Availability Groups, one for each database. Each Basic Availability Group has its own Listener.
- Cloud – Azure SQL and AWS RDS are not supported. You’ll need to build your own SQL Servers on IaaS VMs.
Windows Feature
Installing Group Policy Management on the Delivery Controllers lets you edit Citrix-targeted Group Policy Objects (GPOs) directly from the Controllers. Controllers already have Studio and Citrix Group Policy Management installed, so if GPMC runs from a Controller, then the GPO Editor will automatically have access to the Citrix Policies node. Or you can install Citrix Group Policy Management Plug-in on a different machine that has GPMC installed.


vSphere
- Create a role in vSphere Client. Assign a service account to the role at the Datacenter or higher level.
Delivery Controller New Install
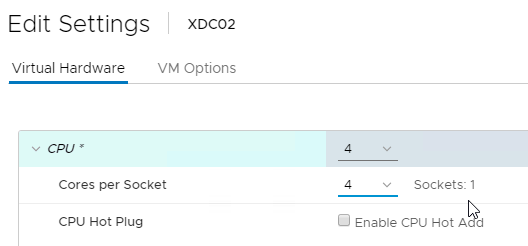
- A typical size for the Controller VMs is 2-4 vCPU and 8+ GB of RAM. If all components (Delivery Controller, StoreFront, Licensing, Director, SQL Express) are installed on one server, then you might want to bump up memory to 10 GB or 12 GB.
- From Local Host Cache sizing and scaling at Citrix Docs:
- For LHC LocalDB, assign the Controller VMs a single socket with multiple cores.
- Add two cores for LHC.
- Add at least three more Gigs of RAM and watch the memory consumption.
- Since there’s no control over LHC election, ensure all Controllers have the same specs.
- SQL LocalDB uses max four cores on one socket. Configure the Delivery Controller VM with four cores per socket.
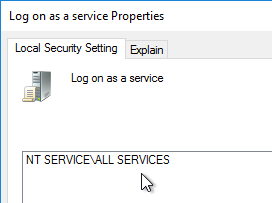
- Make sure the User Right Log on as a service includes NT SERVICE\ALL SERVICES or add NT SERVICE\CitrixTelemetryService to the User Right.
- Download the XenApp/XenDesktop 7.15.9000 ISO.
- On two Delivery Controllers, to install the Delivery Controller software, run AutoSelect.exe from the 7.15.9000 ISO.
- Click Start next to either XenApp or XenDesktop. The only difference is the product name displayed in the installation wizard.
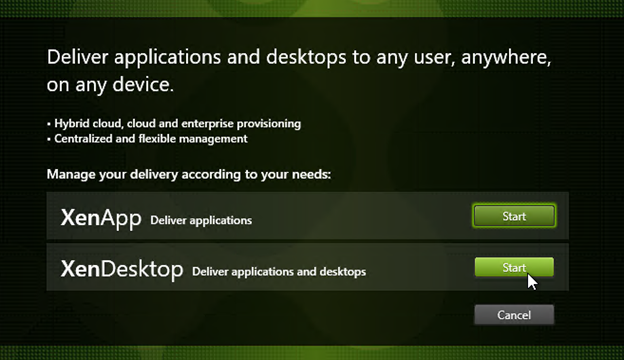
- On the top left, click Delivery Controller.
- In the Licensing Agreement page, select I have read, understand, and accept the terms, and click Next.
- In the Core Components page, you can install all components on one server, or on separate servers. Splitting them out is usually recommended for the following reasons: large environments; or if you have multiple farms, and want to share the Licensing, and Director components across those farms. In CU6 and later, StoreFront is no longer an option in this metainstaller, but it can be installed separately. Click Next.

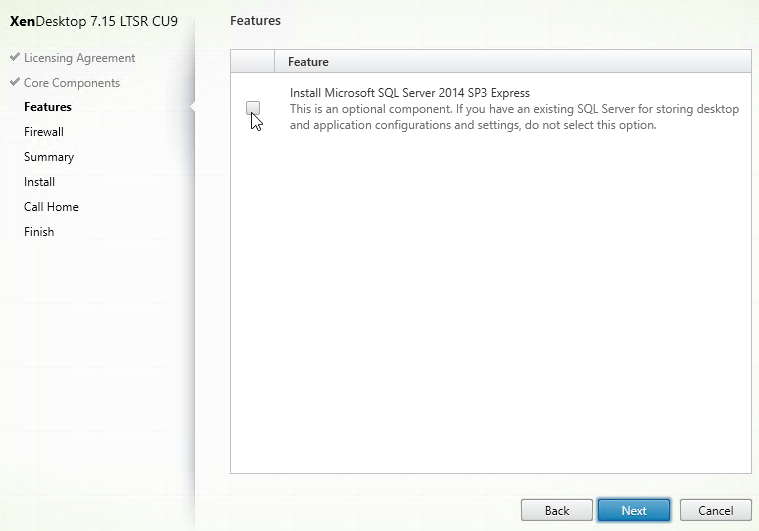
- In the Features page, uncheck the box next to Install Microsoft SQL Server 2014 SP3 Express, and click Next.
- In the Firewall page, click Next.
- In the Summary page, click Install. This will take several minutes.
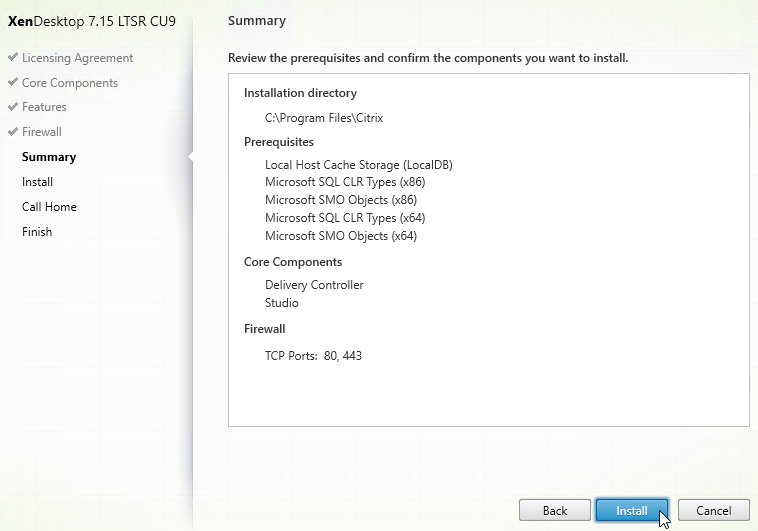
- In the Call Home page, make a selection, click Connect, enter your MyCitrix.com credentials, and then click Next.

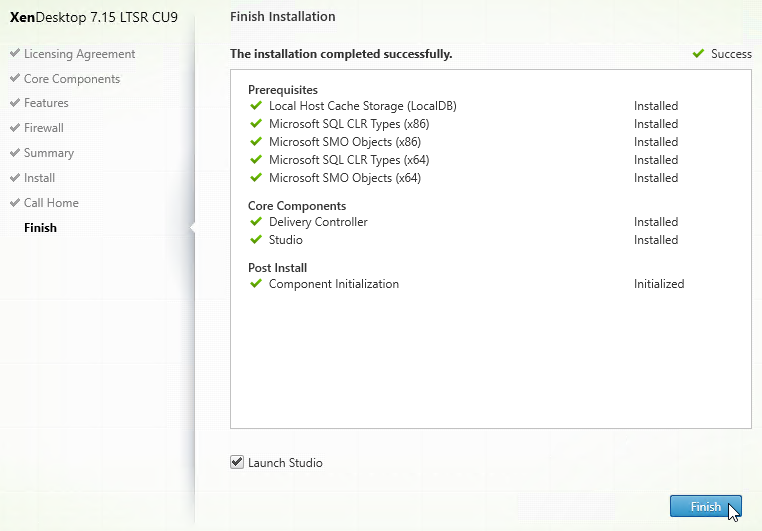
- In the Finish page, click Finish. Studio will automatically launch.
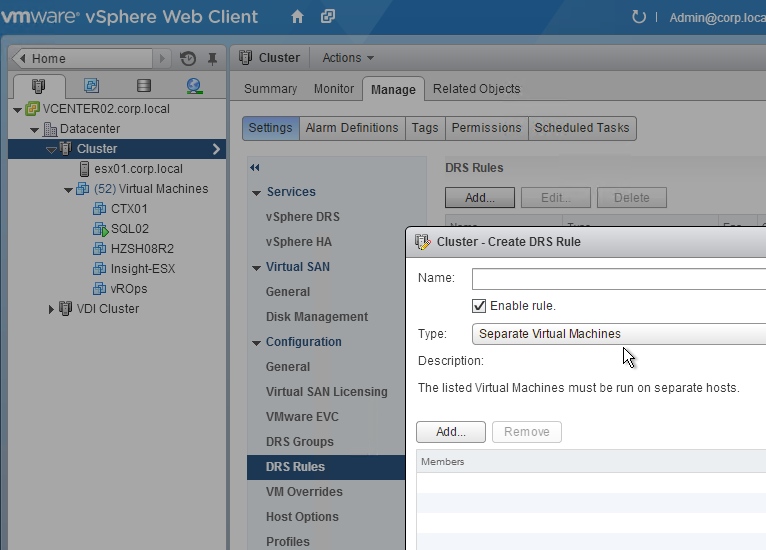
- Ensure the two Controller VMs do not run on the same hypervisor host. Create an anti-affinity rule.
- Citrix Tech Zone Endpoint Security and Antivirus Best Practices: provides guidelines for configuring antivirus software in Citrix Virtual Apps and Desktops environments
Create Site – Create Database
There are several methods of creating the databases for XenApp/XenDesktop:
- If you have sysadmin permissions to SQL, let Citrix Studio create the databases automatically.
- If you don’t have sysadmin permissions to SQL, then use Citrix Studio to generate SQL scripts, and send them to a DBA.
Use Citrix Studio to Create Database Automatically
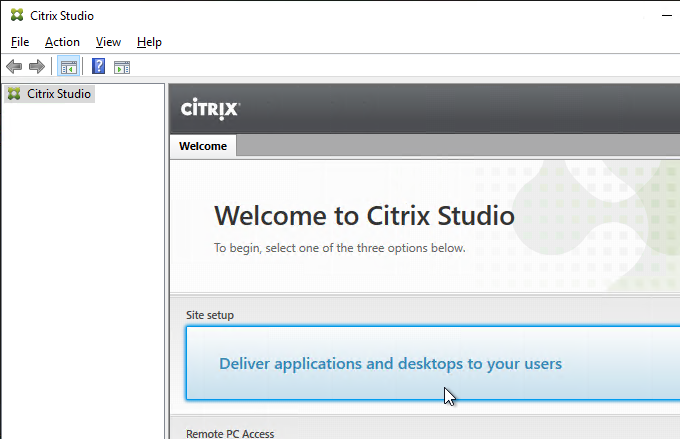
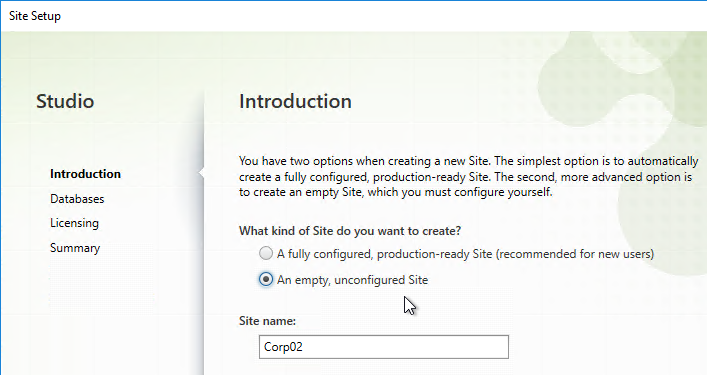
- Launch Citrix Studio. After it loads, click Deliver applications and desktops to your users.
- In the Introduction page, select An empty, unconfigured site. This reduces the number of pages in this Setup wizard. The other pages will be configured later.
- Enter a Site Name (aka farm name), and click Next. Only administrators see the farm name.
- In the Databases page, if you are building two Controllers, click Select near the bottom of the same page.
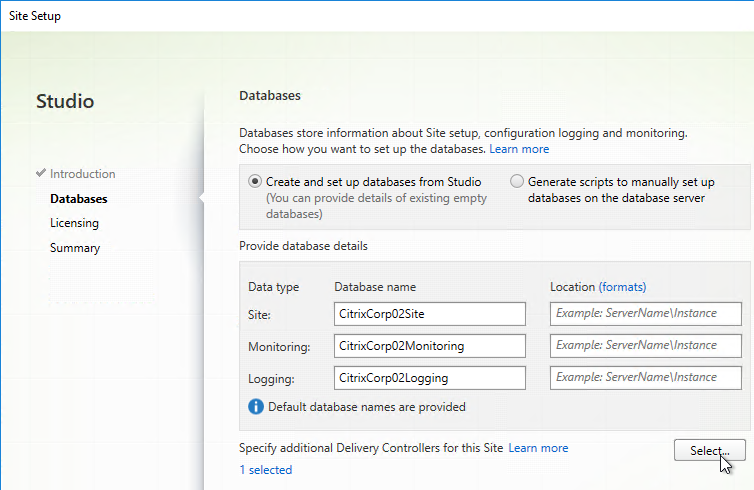
- Click Add.
- Enter the FQDN of the second Controller, and click OK. Note: the Delivery Controller software must already be installed on that second machine.
- Then click Save.

- If the person running Citrix Studio has sysadmin permissions to the SQL Server, then enter the SQL server name/instance in the three Location fields, and click Next.
- If you don’t have sysadmin permission, the jump to the SQL Scripts section below.
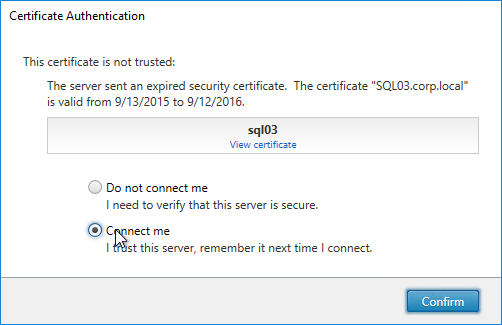
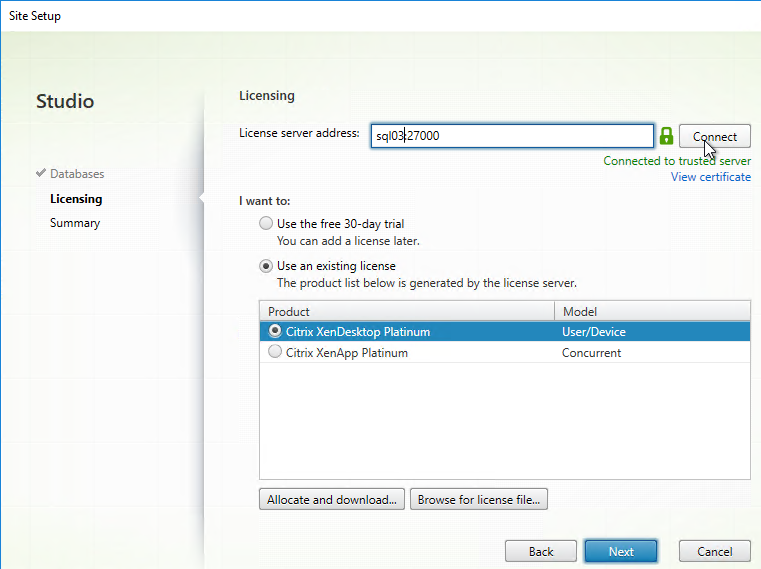
- On the Licensing page, enter the name of the Citrix License Server, and click Connect. If you installed Licensing with your Delivery Controller, then simply enter localhost.
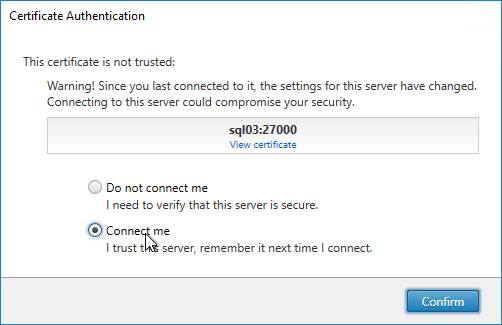
- If the Certificate Authentication appears, select Connect me, and click Confirm.
- Then select your license, and click Next. See CTX223926 How to Configure Multiple License Types within a Single XenApp and XenDesktop Site.
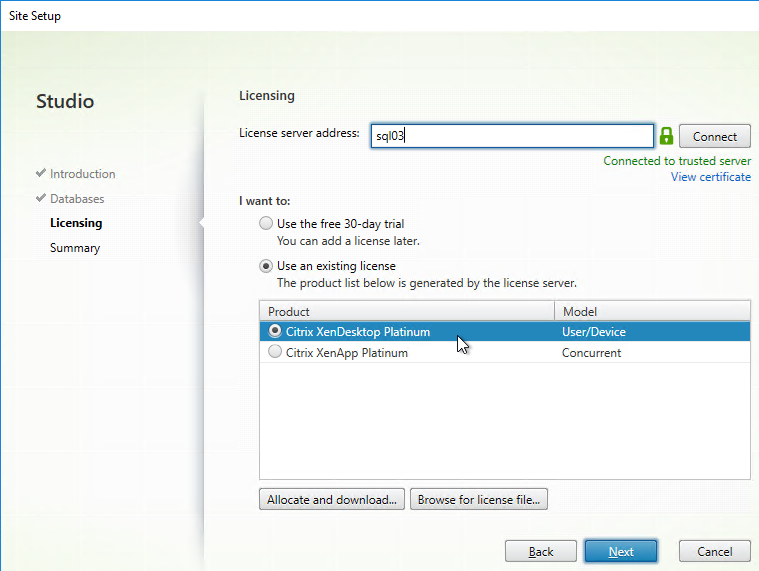
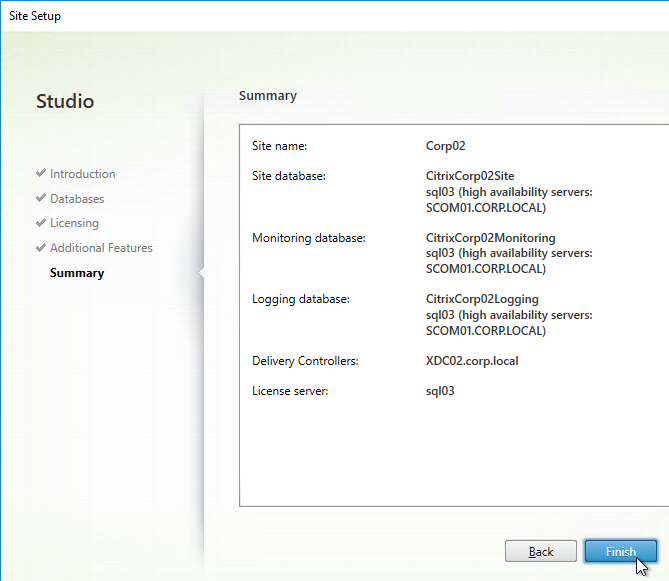
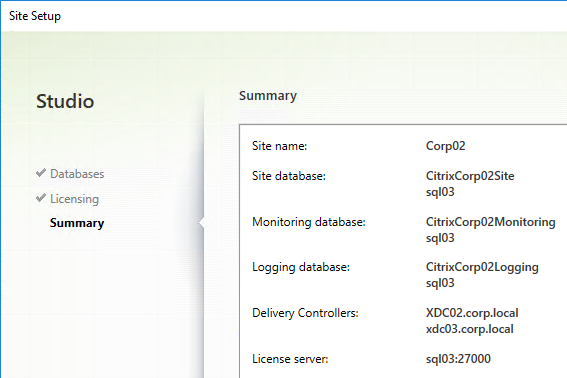
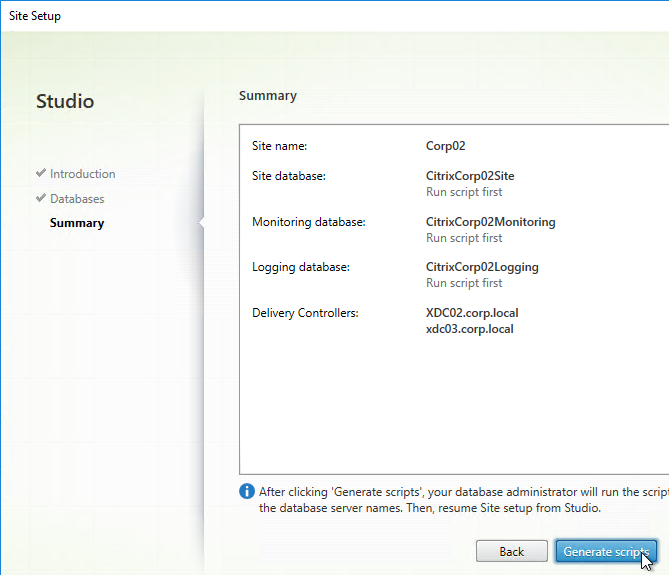
- In the Summary page, if your databases are mirrored or in an Availability Group, each database will show high availability servers, and the name of the Mirror server. Click Finish.
- It will take some time for the site to be created.
Use Studio to create SQL scripts
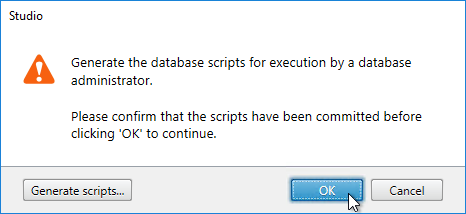
- If you don’t have sysadmin permissions, change the selection to Generate scripts to manually set up databases on the database server. Change the database names if desired, and click Next.
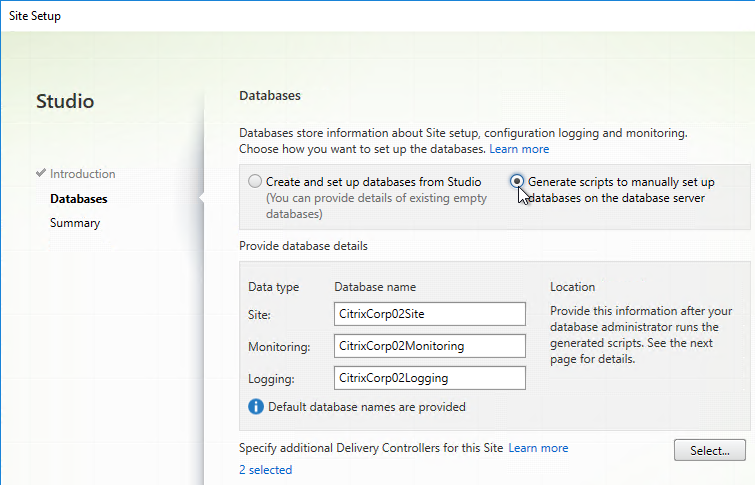
- In the Summary page, click Generate scripts.
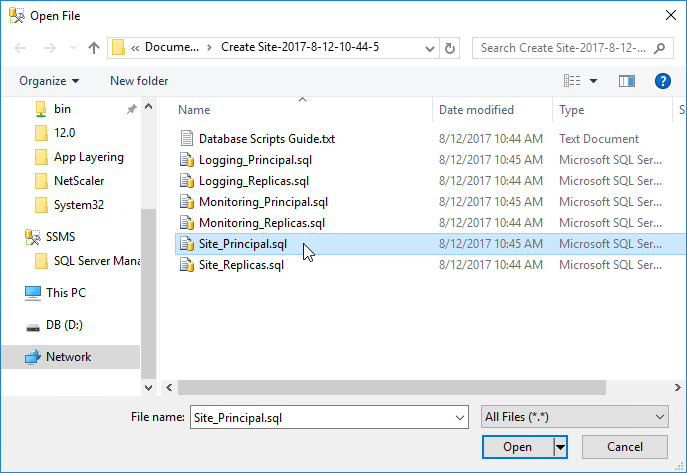
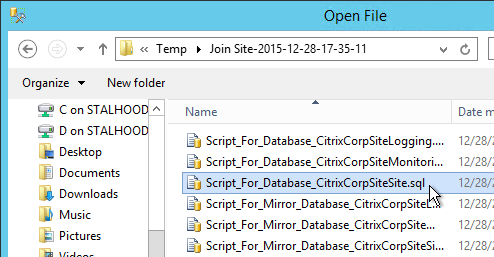
- A folder will open with six scripts. Edit each of the scripts.
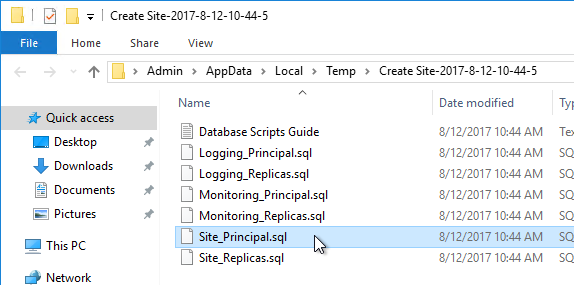
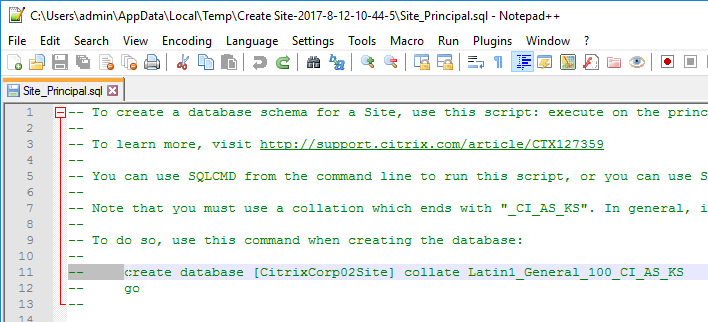
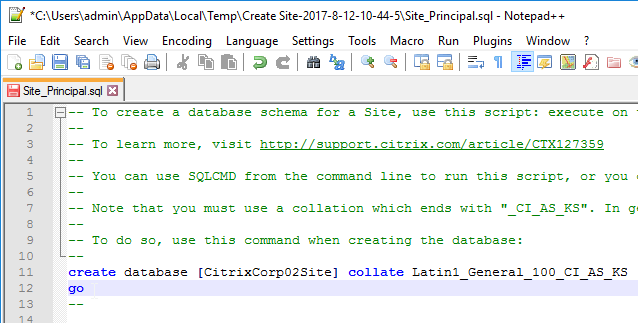
- Near the top of each script are two lines to create the database. Uncomment both lines (including the go line). Then save and close the file.
- Once all of the scripts are edited, you can send them to your DBA.
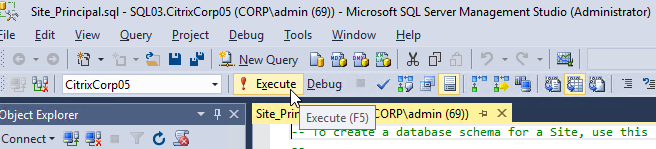
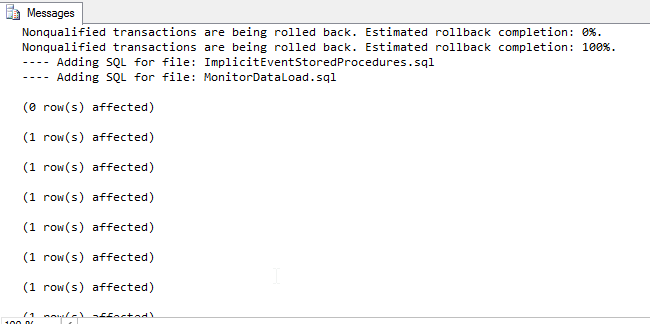
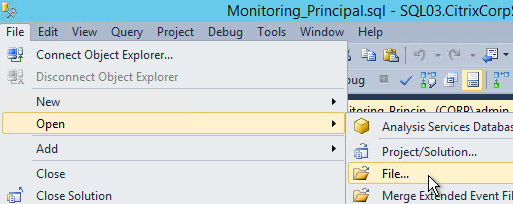
- On the Principal SQL Server, open the file Site_Principal.sql.
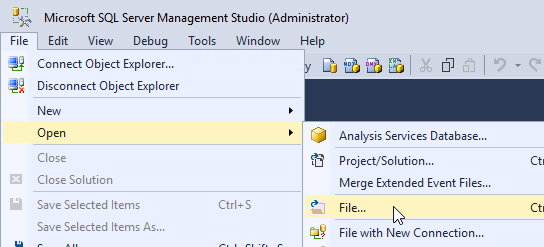
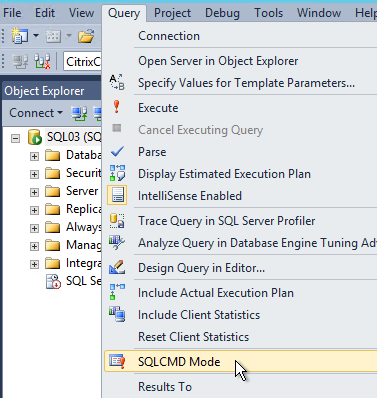
- Open the Query menu, and click SQLCMD Mode to enable it.
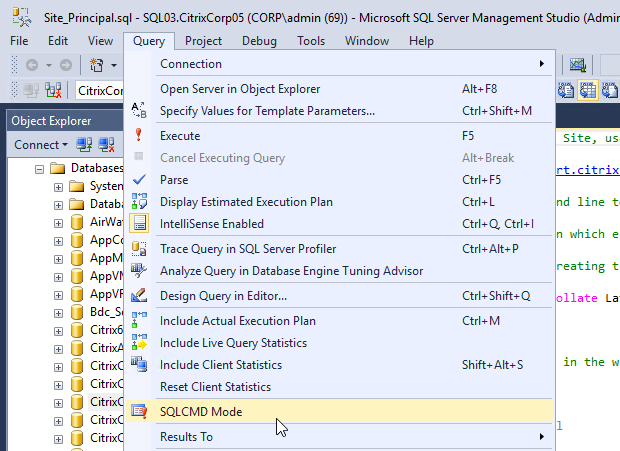
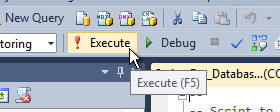
- Then execute the script.
- If SQLCMD mode was enabled properly, then the output should look something like this:
- If you have a mirrored database, run the second script on the mirror SQL instance. Make sure SQLCMD mode is enabled.
- Repeat for the Logging_Principal.sql script.

- You’ll have to enable SQLCMD Mode for each script you open.

- Repeat for the Monitoring_Principal.sql script.

- Once again enable SQLCMD Mode.
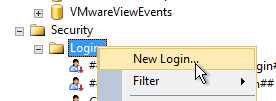
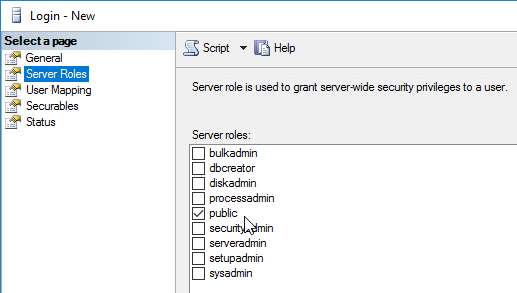
- The person running Citrix Studio must be added to the SQL Server as a SQL Login, and granted the public server role, so that account can enumerate the databases.
- On the Principal SQL Server, open the file Site_Principal.sql.
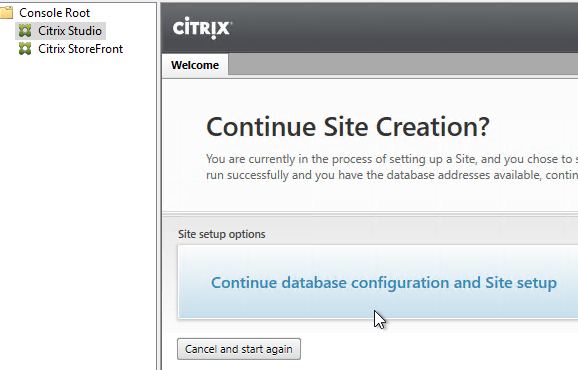
- Back in Citrix Studio, click the Continue database configuration and Site setup button.
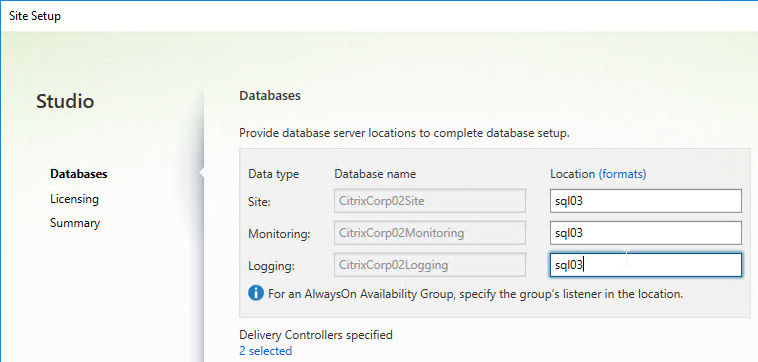
- In the Databases page, enter the SQL server name, and instance name, and click Next.

- On the Licensing page, enter the name of the Citrix License Server, and click Connect. If you installed Licensing with your Delivery Controller, then simply enter localhost.
- If the Certificate Authentication appears, select Connect me, and click Confirm.
- Then select your license, and click Next. See CTX223926 How to Configure Multiple License Types within a Single XenApp and XenDesktop Site.
- In the Summary page, if your databases are mirrored, each database will show high availability servers, and the name of the Mirror server. Click Finish.
- It will take some time for the site to be created.
Verify Database Mirroring
If your database is mirrored, when you run asnp citrix.* and then run get-brokerdbconnection, you’ll see the Failover Partner in the database connection string.

Second Controller
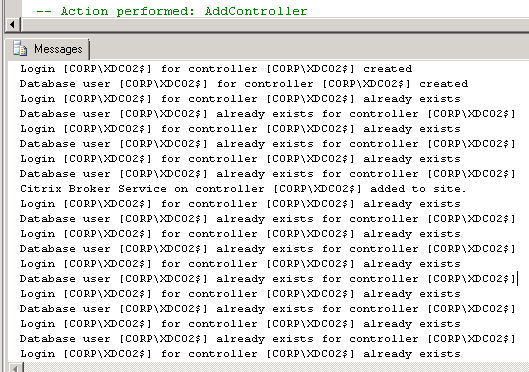
When building the first Delivery Controller, the scripts might have already included the second Delivery Controller. Thus no special SQL permissions are needed. If the second Delivery Controller has not already been added to the SQL databases, then there are several methods of adding a second Controller to the databases for XenApp/XenDesktop:
- If you have sysadmin permissions to SQL, let Citrix Studio modify the databases automatically.
- If you don’t have sysadmin permissions to SQL then use Citrix Studio to generate SQL scripts and send them to a DBA.
To use Citrix Studio to create the SQL Scripts:
- On the first Delivery Controller, if StoreFront is installed on the Controller, then delete the default StoreFront store (/Citrix/Store), and recreate it with your desired Store name (e.g. /Citrix/CompanyStore).
- On the second Delivery Controller, install XenDesktop as detailed earlier.
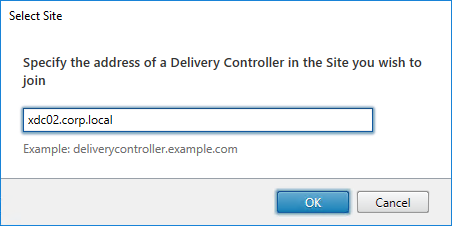
- After running Studio, click Connect this Delivery Controller to an existing Site.
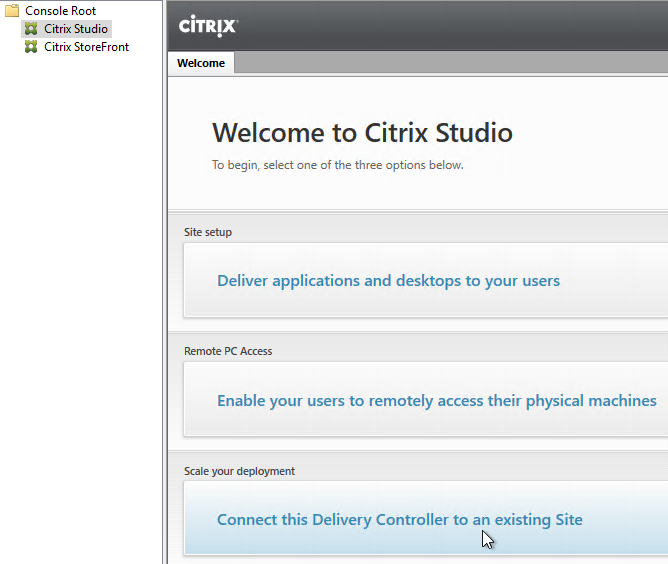
- Enter the name of the first Delivery Controller, and click OK.
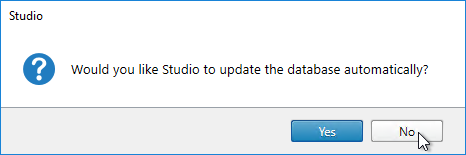
- If you don’t have full SQL permissions (sysadmin), click No when asked if you want to update the database automatically.
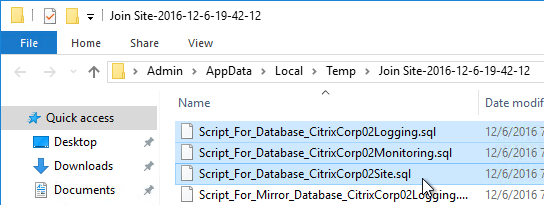
- Click Generate scripts.
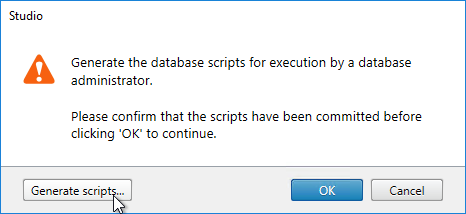
- A folder will open with six scripts. If not mirroring, then the top three scripts need to be sent to a DBA. If mirroring, send all six.
- On the SQL Server, open one of the .sql files.
- Open the Query menu, and click SQLCMD Mode.
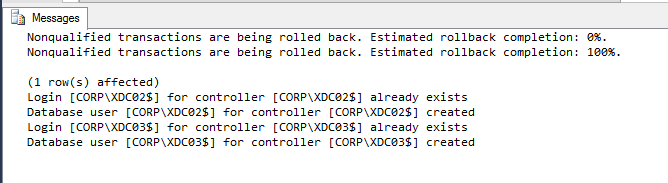
- Then execute the XenDesktop script.
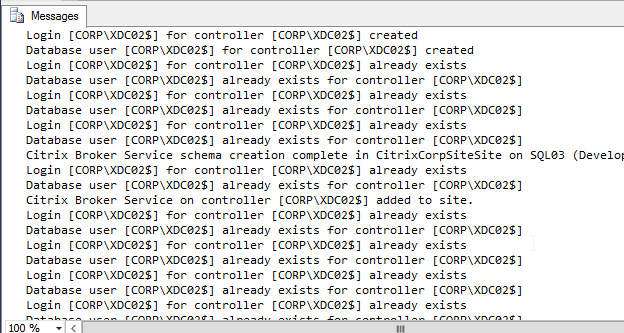
- If SQLCMD mode was enabled properly, then the output should look something like this:
- Repeat for the remaining script files.
- Back in Citrix Studio, click OK.
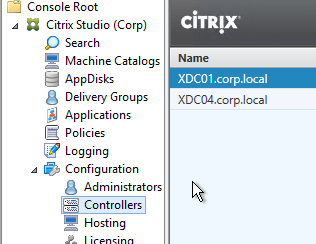
- In Citrix Studio, under Configuration > Controllers, you should see both controllers.
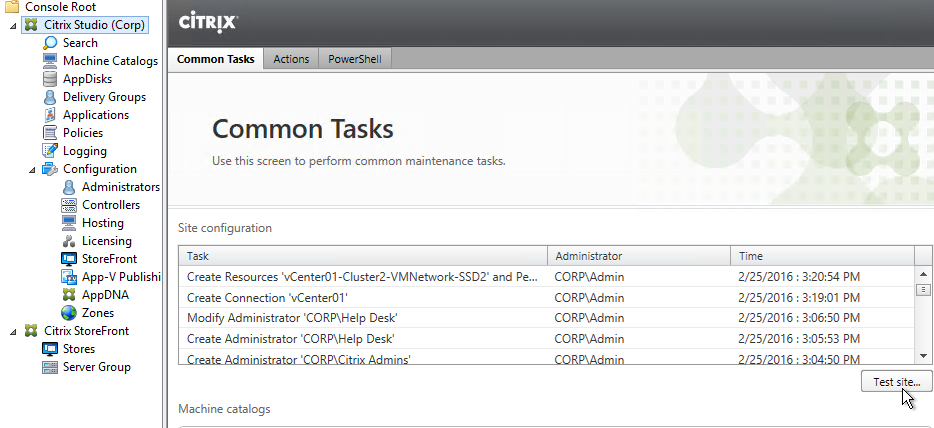
- You can also test the site again if desired.
SSL for Delivery Controller
SSL certificates should be installed on each Delivery Controller to encrypt the traffic between StoreFront and Delivery Controller. This traffic contains user credentials. The SSL certificate on each Delivery Controller needs to match the FQDN of the Delivery Controller.
- If StoreFront is installed on the Delivery Controller, then make sure the certificate matches the Delivery Controller FQDN, and not necessarily the StoreFront FQDN. The actual StoreFront certificate is hosted on NetScaler Load Balancing Virtual Server, and not usually on the StoreFront server.
To enable SSL for a Delivery Controller:
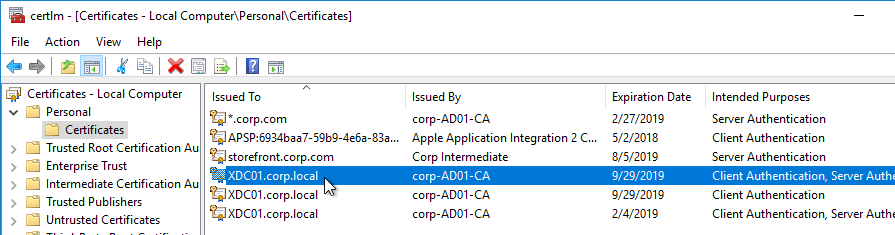
- Run certlm.msc, go to Personal > Certificates, and create or install a server certificate that matches the Delivery Controller’s FQDN. This can be an internally-signed certificate if the StoreFront server trusts internally-signed certificates.
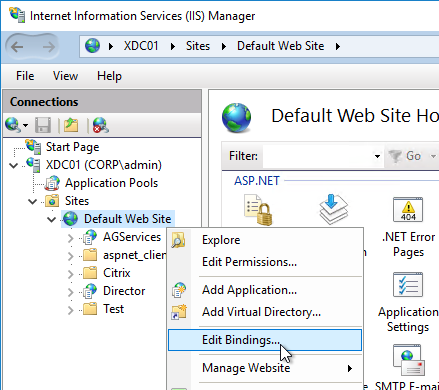
- If IIS is installed on the Delivery Controller, then simply run IIS Manager, go to Default Web Site, click Edit Bindings, and add an https binding using the chosen certificate.

If IIS is not installed on the Delivery Controller, then we need to build a command line to bind the certificate to Citrix Broker Service.
- Open a command prompt as administrator.
- Enter the following text but don’t press Enter yet.
netsh http add sslcert ipport=0.0.0.0:443 certhash=
- Right after certhash= paste the certificate thumbprint using the following procedure:
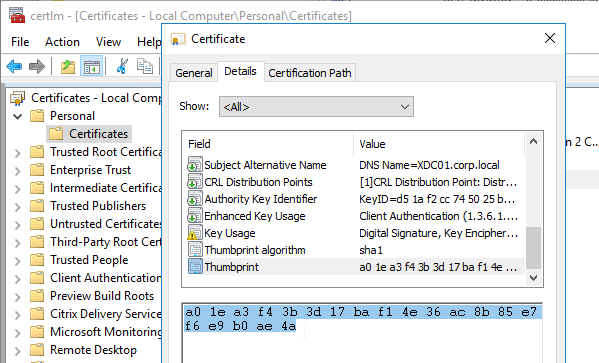
- Go to certlm.msc > Personal > Certificates.
- Double-click the certificate you want to bind.
- On the Details tab, scroll down to Thumbprint and copy the thumbprint.
- Paste the thumbprint into the command line we’re building.
- Remove the special character at the beginning of the thumbprint.
- Remove the spaces.

- Add the following to the command line:
appid=
- Michael Shuster at HowTo: Enable SSL on Citrix Delivery Controllers – Easy Method says you can run the following PowerShell to get the Broker Service GUID.
Get-WmiObject -Class Win32_Product | Select-String -Pattern "broker service"
- Paste the GUID for Citrix Broker Service that you got from the Get-WmiObject. Make sure the GUID has curly braces on both sides with no space between appid and the left curly brace.

- Press <Enter> to run the command.
- If you entered everything correctly, then it should say SSL Certificate successfully added.

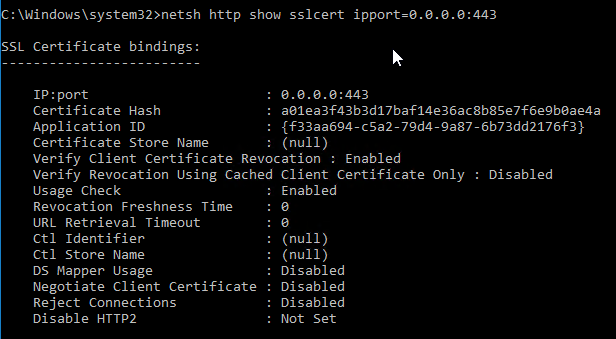
- To confirm the certificate binding, run the following:
netsh http show sslcert ipport=0.0.0.0:443
Studio – Slow Launch
From B.J.M. Groenhout at Citrix Discussions: The following adjustments can be made if Desktop Studio (and other Citrix management Consoles) will start slowly:
- Within Internet Explorer, go to Tools – Internet Options – Tab Advanced – Section Security, and uncheck the option Check for publisher’s certificate revocation
After adjustment Desktop Studio (MMC) will be started immediately. Without adjustment it may take some time before Desktop Studio (MMC) is started.
Registry setting (can be deployed using Group Policy Preferences):
- HKEY_CURRENT_USER\Software\Microsoft\Windows\CurrentVersion\WinTrust\Trust Providers\Software Publishing
- “State“=dword:00023e00
Concurrent Logon Hard Limit
From Samuel Legrand XenApp 7.14 – (Really) Manage a DR! – Citrix Policies has a setting called Concurrent Logon Tolerance. However, it is not a hard limit, meaning once the limits are reached, it continues to let users connect. You can configure the Controllers to make it a hard limit by setting the following registry value:
- HKLM\Software\Policies\Citrix\DesktopServer
- LogonToleranceIsHardLimit (DWORD) = 1
Local Host Cache
If you have 10,000 or fewer VDAs per zone (up to 40,000 VDAs per multi-zone site/farm), you can enable Local Host Cache (LHC) instead of Connection Leasing. LHC allows new sessions to be started even if SQL database is unavailable. VDA limits for LHC are higher in 7.15 than previous versions of XenApp/XenDesktop.
From Local Host Cache sizing and scaling at Citrix Docs:
- For LHC LocalDB, assign the Controller VMs a single socket with multiple cores.
- Add two cores for LHC.
- Add at least three more Gigs of RAM and watch the memory consumption.
- Since there’s no control over LHC election, ensure all Controllers have the same specs.
- The Docs article has scripts for monitoring LHC performance.
From XenApp 7.12, LHC and a reboot at Citrix Discussions:
- If the rebooted DDC is the elected one, a different DDC will take over (causing registration storm) and when the DDC gets back, it will take over brokering causing second registration storm. Site will sort itself out and all will work.
- If the rebooted DDC is not the elected one, it will not impact any functionality.
- If you turn the DDC down when site is working, and start it during outage, LHC will not trigger on that machine. This DDC will not impact the LHC unless it would become the elected one. In that scenario it will take control, however not start LHC and resources would not be available.
Trentent Tye at Citrix XenDesktop/XenApp 7.15 – The local host cache in action has a video showing LHC in action. 💡

For Windows Server 2008 R2 Controllers, PowerShell 3, or newer, is required. See LHC XD 7.12 and W2K8SR2 SP1 at Citrix Discussions.
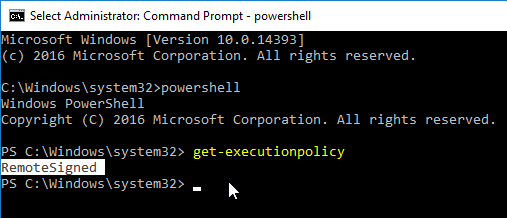
As mentioned by Citrix Docs, make sure PowerShell Execution Policy is set to RemoteSigned, Unrestricted, or Bypass.
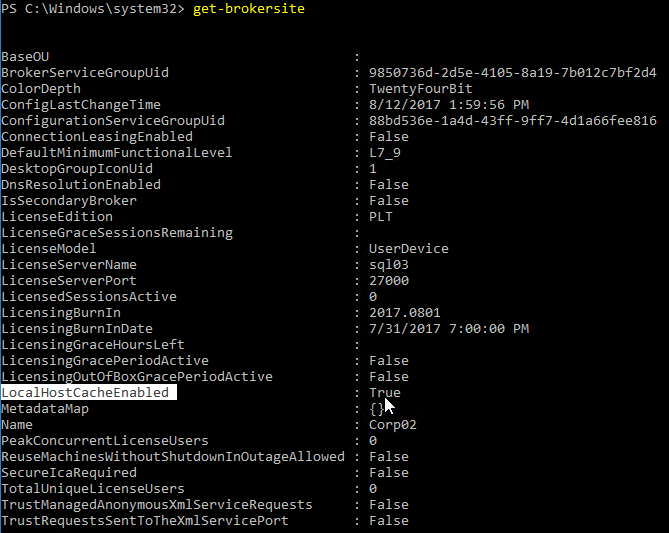
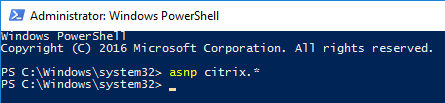
If you did a fresh install of 7.15, then Local Host Cache should be enabled by default. You can run Get-BrokerSite to confirm. (run asnp citrix.* first).
If not enabled, you can run some PowerShell commands to enable Local Host Cache:
asnp citrix.*
Set-BrokerSite -ConnectionLeasingEnabled $false
Set-BrokerSite -LocalHostCacheEnabled $true

George Spiers Local Host Cache XenApp & XenDesktop 7.12 shows the Event Log entries when LHC is enabled.
Database Maintenance
Enable Read-Committed Snapshot
The XenDesktop Database can become heavily utilized under load in a large environment. Therefore Citrix recommends enabling the Read_Committed_Snapshot option on the XenDesktop databases to remove contention on the database from read queries. This can improve the interactivity of Studio and Director. It should be noted that this option may increase the load on the tempdb files. See Citrix article CTX137161 How to Enable Read-Committed Snapshot in XenDesktop for configuration instructions.
Change Database Connection Strings
Sometimes the database connection strings need to be modified:
- When moving the SQL databases to a different SQL server
- For AlwaysOn Availability Groups, to add MultiSubnetFailover to the SQL connection strings
- For SQL mirroring, to add Failover Partner to the SQL connection strings
Here are general instructions for moving the database and assigning the correct permissions:
- Backup the three Citrix databases on the original SQL server, and restore them on the new SQL server. See Microsoft’s documentation for details.
- In SQL Management Studio > Security > Logins, add the Delivery Controller computer accounts (e.g. CORP\DDC01$)
- When adding the SQL Login, on the User Mapping page, select the three Citrix databases (Site database, Monitoring database, and Logging database)
- For each of the three Citrix databases, add the Delivery Controller computer account to the various database roles as listed below. The Site database has many more roles than the Logging and Monitoring databases.
- Site database – ADIdentitySchema_ROLE
- Site database – Analytics_ROLE (7.8 and newer)
- Site database – AppLibrarySchema_ROLE (7.8 and newer)
- Site database – chr_Broker
- Site database – chr_Controller
- Site database – ConfigLoggingSchema_ROLE
- Site database – ConfigLoggingSiteSchema_ROLE
- Site database – ConfigurationSchema_ROLE
- Site database – DAS_ROLE
- Site database – DesktopUpdateManagerSchema_ROLE
- Site database – EnvTestServiceSchema_ROLE
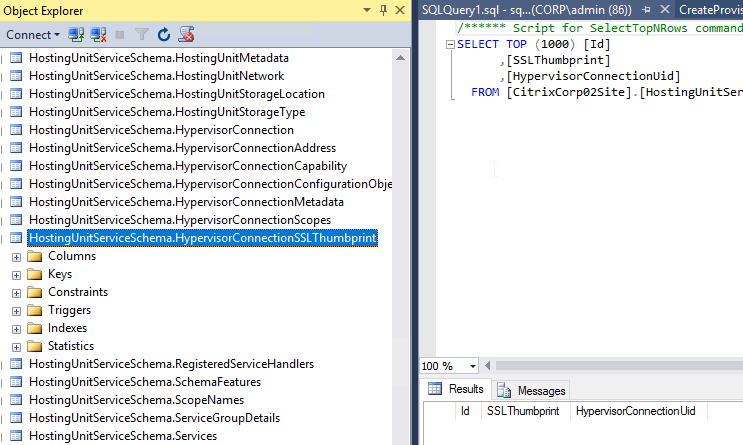
- Site database – HostingUnitServiceSchema_ROLE
- Site database – Monitor_ROLE
- Site database – MonitorData_ROLE
- Site database – OrchestrationSchema_ROLE (7.11 and newer)
- Site database – public
- Site database – StorefrontSchema_ROLE (7.8 and newer)
- Site database – TrustSchema_ROLE (7.11 and newer)
- Monitoring database – Monitor_ROLE
- Monitoring database – public
- Logging database – ConfigLoggingSchema_ROLE
- Logging database – public
From Citrix Docs Update database connection strings when using SQL Server high availability solutions: Citrix offers several PowerShell scripts that update Delivery Controller database connection strings when you are using SQL Server high availability database solutions such as AlwaysOn and mirroring. The scripts, which use the Citrix Virtual Apps and Desktops PowerShell API, are:
- DBConnectionStringFuncs.ps1: The core script that does the actual work. This script contains common functions that the other scripts use.
- Change_XD_Failover_Partner_v1.ps1: Updates (adds, changes, or removes) the failover partner. This script prompts for the failover partner location (FQDN) for each database. (Providing a blank failover partner removes the failover partner. You can also use the ClearPartner option to remove a partner.) Do not set the failover partner to the same location as the principal database server.
- Change_XD_To_ConnectionString.ps1: Uses the provided connection strings to update the connection strings to the databases. This script ensures that certain Citrix services are up and running, and then updates those services in the correct order on all Controllers in the site. Enclose connection string information for each database in quotes.
- Change_XD_To_MultiSubnetFailover.ps1: Toggles the addition and removal of MultiSubnetFailover=true. If you use AlwaysOn Availability Groups, Microsoft recommends that the connection string include MultiSubnetFailover=true. This option speeds up recovery when a high availability event occurs, and is recommended for both single and multi-subnet environments. Run this script once to add the option. Run the script again to remove it.
- Change_XD_To_Null.ps1: Resets all the connection strings on the localhost because something has gone wrong. By resetting the connection strings to null, this script places the Controller into an “initial” state. If you run Studio after running this script, you’ll be asked if you want to create a site or join an existing site. This is useful if something has gone wrong and a reset is needed. After the reset, you can try again to set the connection strings.
Here are the DB Connections that must be changed. Make sure you include all of the DB Connections shown below. You can get the full list of database commands by running Get-Command Set-*DBConnection. When changing the DB connections, AdminDBConnection must be the last to be set to NULL, and the first to be configured with the new connection string. Repeat these instructions on all Delivery Controllers in the farm.
Remove the existing Database connections
At the Delivery Controller, open PowerShell as Administrator and run the following commands to clear the existing database connections.
## Load the Citrix snap-ins
asnp Citrix.*

## Disable configuration logging for the XD site:
Set-LogSite -State Disabled

## ## Clear the current Delivery Controller database connections
## Note: AdminDBConnection must be the last command
Set-ConfigDBConnection -DBConnection $null
Set-AppLibDBConnection –DBConnection $null    #7.8 and newer
Set-OrchDBConnection –DBConnection $null      #7.11 and newer
Set-TrustDBConnection –DBConnection $null     #7.11 and newer
Set-AcctDBConnection -DBConnection $null
Set-AnalyticsDBConnection -DBConnection $null # 7.6 and newer
Set-HypDBConnection -DBConnection $null
Set-ProvDBConnection -DBConnection $null
Set-BrokerDBConnection -DBConnection $null
Set-EnvTestDBConnection -DBConnection $null
Set-SfDBConnection -DBConnection $null
Set-MonitorDBConnection -DataStore Monitor -DBConnection $null   #Monitoring Database
Set-MonitorDBConnection -DBConnection $null                      #Site Database
Set-LogDBConnection -DataStore Logging -DBConnection $null       #Logging Database
Set-LogDBConnection -DBConnection $null                          #Site Database
Set-AdminDBConnection -DBConnection $null -force
Specify the new Database connection strings
Run the following commands to set the new connection strings. Adjust the variables to match your desired connection string. For example, if you wish to add “;MultiSubnetFailover=True” to the connection strings, then set the $csSite variable to "Server=$ServerName;Initial Catalog=$SiteDBName;Integrated Security=True;MultiSubnetFailover=True". Repeat this for the $csLogging and $csMonitoring variables.
## Replace <dbserver> with the SQL server name, and instance if present, e.g "ServerName\SQLInstanceName". If no SQL Instance name is mentioned, this commandlet will try to connect to the default SQL instance.
## Replace <dbname> with the name of your restored Database
## Note: AdminDBConnection should be first

$ServerName = "<dbserver>"
$SiteDBName = "<SiteDbName>"
$LogDBName = "<LoggingDbName>"
$MonitorDBName = "<MonitorDbName>"
$csSite = "Server=$ServerName;Initial Catalog=$SiteDBName;Integrated Security=True;MultiSubnetFailover=True"
$csLogging = "Server=$ServerName;Initial Catalog=$LogDBName;Integrated Security=True;MultiSubnetFailover=True"
$csMonitoring = "Server=$ServerName;Initial Catalog=$MonitorDBName;Integrated Security=True;MultiSubnetFailover=True"

Set-AdminDBConnection -DBConnection $csSite
Set-ConfigDBConnection -DBConnection $csSite
Set-AcctDBConnection -DBConnection $csSite
Set-AnalyticsDBConnection -DBConnection $csSite # 7.6 and newer
Set-HypDBConnection -DBConnection $csSite
Set-ProvDBConnection -DBConnection $csSite
Set-AppLibDBConnection –DBConnection $csSite # 7.8 and newer
Set-OrchDBConnection –DBConnection $csSite # 7.11 and newer
Set-TrustDBConnection –DBConnection $csSite # 7.11 and newer
Set-BrokerDBConnection -DBConnection $csSite
Set-EnvTestDBConnection -DBConnection $csSite
Set-SfDBConnection -DBConnection $csSite
Set-LogDBConnection -DBConnection $csSite
Set-LogDBConnection -DataStore Logging -DBConnection $null
Set-LogDBConnection -DBConnection $null
Set-LogDBConnection -DBConnection $csSite
Set-LogDBConnection -DataStore Logging -DBConnection $csLogging
Set-MonitorDBConnection -DBConnection $csSite
Set-MonitorDBConnection -DataStore Monitor -DBConnection $null
Set-MonitorDBConnection -DBConnection $null
Set-MonitorDBConnection -DBConnection $csSite
Set-MonitorDBConnection -DataStore Monitor -DBConnection $csMonitoring
Set-LogSite -State Enabled
Test the new Database connection strings
Run the following commands to verify connectivity to the database:
asnp citrix.*

## Copy these variables from the previous step
## If you haven’t closed your PowerShell window, then the variables might still be defined. In that case, just run the Test commands
$ServerName = "<dbserver>"
$SiteDBName = "<SiteDbName>"
$LogDBName = "<LoggingDbName>"
$MonitorDBName = "<MonitorDbName>"
$csSite = "Server=$ServerName;Initial Catalog=$SiteDBName;Integrated Security=True"
$csLogging = "Server=$ServerName;Initial Catalog=$LogDBName;Integrated Security=True"
$csMonitoring = "Server=$ServerName;Initial Catalog=$MonitorDBName;Integrated Security=True"

Test-AcctDBConnection -DBConnection $csSite
Test-AdminDBConnection -DBConnection $csSite
Test-AnalyticsDBConnection -DBConnection $csSite # 7.6 and newer
Test-AppLibDBConnection -DBConnection $csSite # 7.8 and newer
Test-BrokerDBConnection -DBConnection $csSite
Test-ConfigDBConnection -DBConnection $csSite
Test-EnvTestDBConnection -DBConnection $csSite
Test-HypDBConnection -DBConnection $csSite
Test-LogDBConnection -DBConnection $csSite
Test-LogDBConnection -DataStore Logging -DBConnection $csLogging
Test-MonitorDBConnection -DBConnection $csSite
Test-MonitorDBConnection -Datastore Monitor -DBConnection $csMonitoring
Test-OrchDBConnection -DBConnection $csSite # 7.11 and newer
Test-ProvDBConnection -DBConnection $csSite
Test-SfDBConnection -DBConnection $csSite
Test-TrustDBConnection -DBConnection $csSite # 7.11 and newer
Director Grooming
If XenDesktop is not Platinum Edition, then all historical Director data is groomed at 30 days.
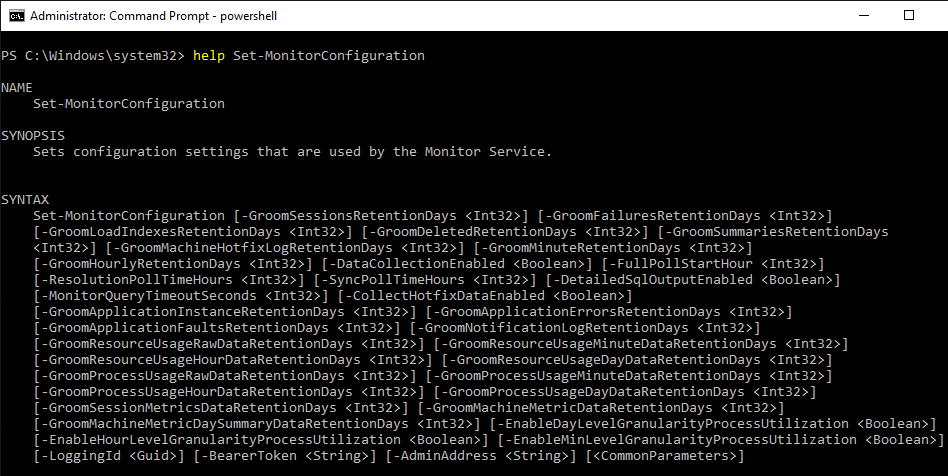
For XenDesktop/XenApp Platinum Edition, by default, most of the historical Director data is groomed at 90 days. This can be adjusted up to 367 days by running a PowerShell cmdlet.
- On a Delivery Controller, run PowerShell elevated (as administrator), and run asnp Citrix.*
- Run Get-MonitorConfiguration to see the current grooming settings.
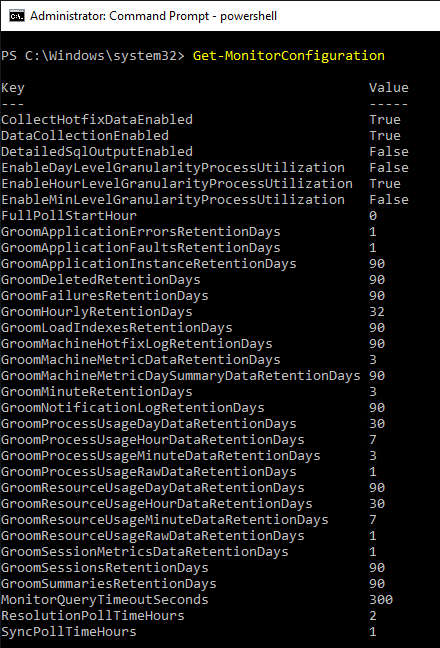
- Run Set-MonitorConfiguration to change the grooming settings.
View Logging Database
To view the contents of the Logging Database, in Studio, click the Logging node. On the right is Create Custom Report. See Citrix article CTX138132 Viewing Configuration Logging Data Not Shown for more info.
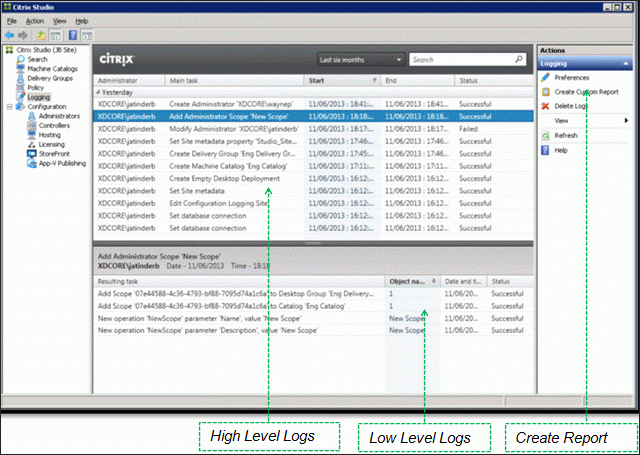
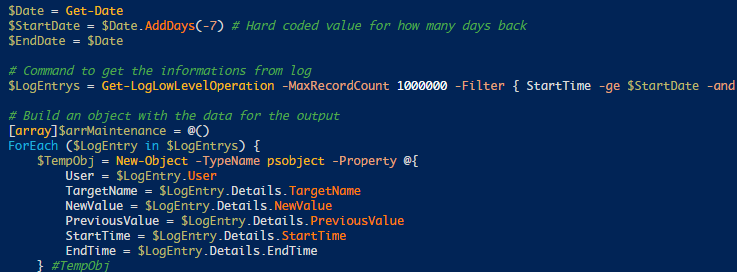
The Logging Database can be queried using Get-LogLowLevelOperation. See Stefan Beckmann Get user who set maintenance mode for a server or client for an example script that uses this PowerShell cmdlet.
Maintain Logging Database
Citrix CTX215069 Troubleshooting and managing Oversized Configuration Logging database: The article’s queries can be used to determine the number of configuration operation types performed by XenDesktop Administrator, and to analyze the content of the Configuration Logging database when it is considered oversized. A grooming query is also provided to delete data older than a specified date.
Export/Import Configuration
Ryan Butler has a PowerShell script that can export configuration from one XenDesktop farm and import it to another.
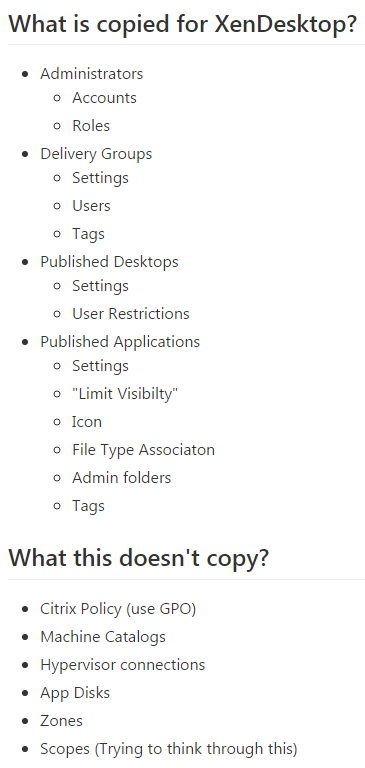
Studio Administrators
Full Administrators
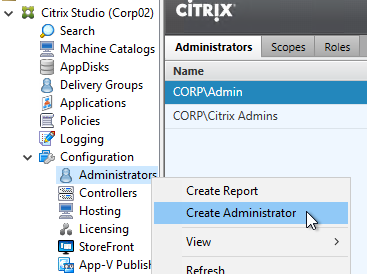
- In the Studio, under Configuration, click the Administrators node. The first time you access the node you’ll see a Welcome page. Feel free to check the box to Don’t show this again, and then click Close.
- On the Administrators tab, right-click, and click Create Administrator.
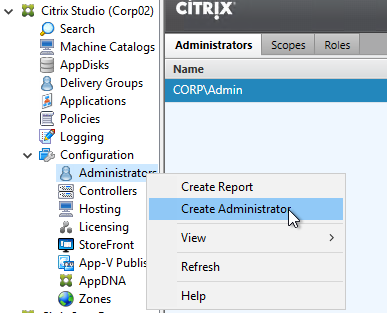
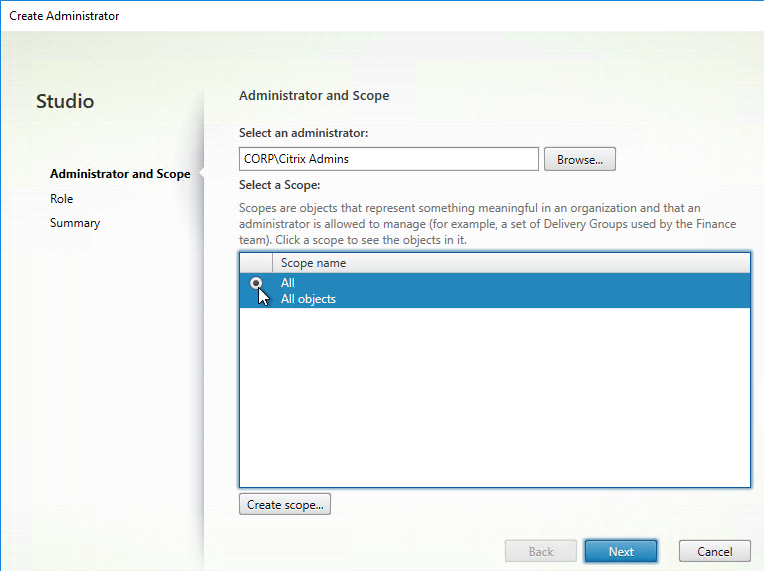
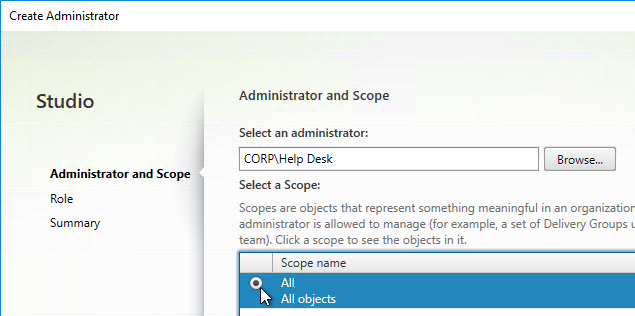
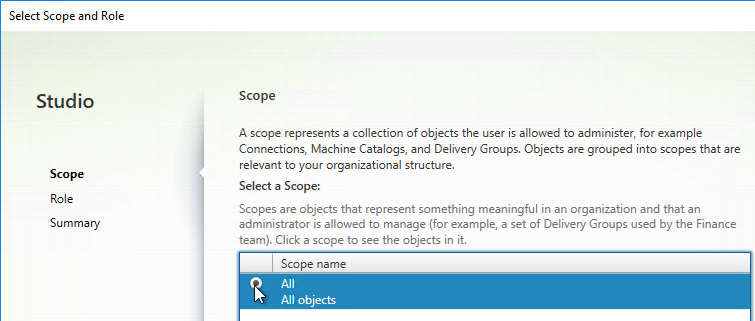
- In the Administrator and Scope page, Browse to a group (e.g. Citrix Admins) that will have permissions to Studio and Director. These groups typically have access to all objects, so select the All scope. Alternatively, you can create a Scope to limit the objects. Click Next.
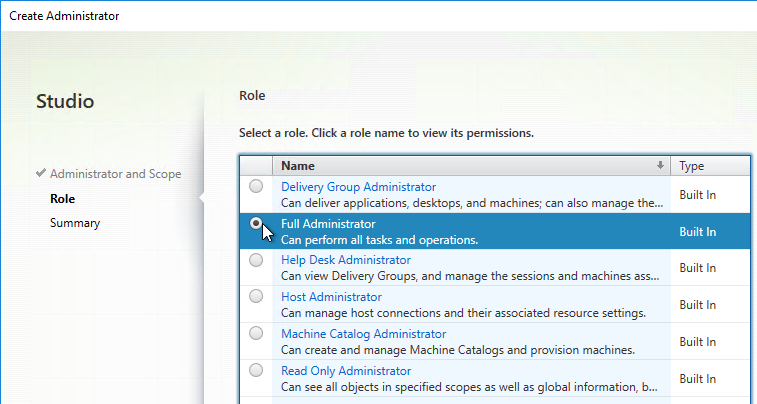
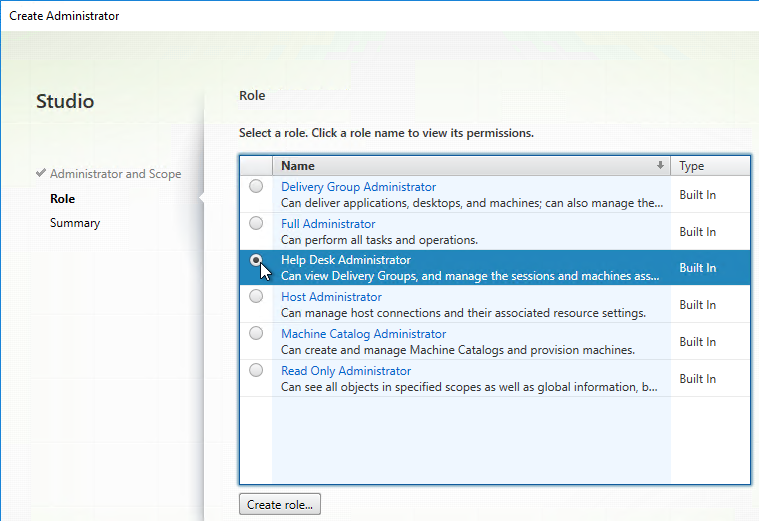
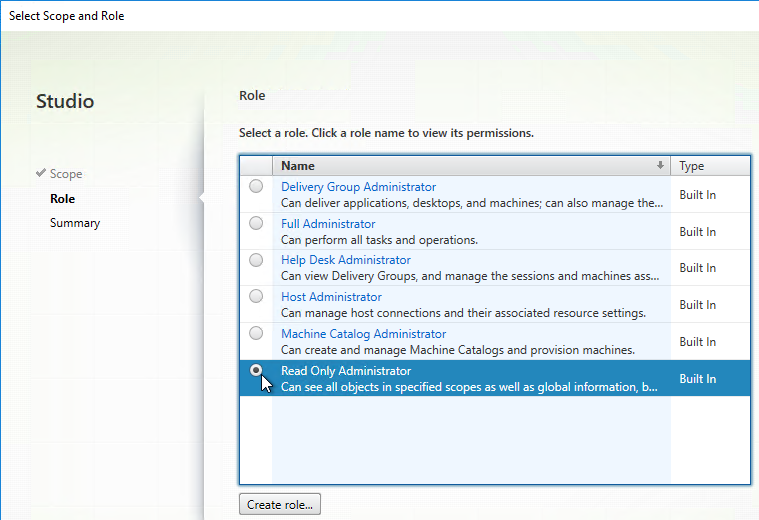
- On the Role page, select a role, and then click Next. For example:
- Full Administrator for the Citrix Admins group
- Help Desk Administrator for the Help Desk group
- Machine Catalog Administrator for the desktop team
- In the Summary page, click Finish.
Help Desk
- In the Studio, under Configuration, click the Administrators node. On the Administrators tab, right-click, and click Create Administrator.
- In the Administrator and Scope page, Browse to a Help Desk group that will have permissions to Studio and Director. Select the All scope. And click Next.
- On the Role page, select the Help Desk Administrator role, and then click Next.
- In the Summary page, click Finish.
- When administrators in the Help Desk role log into Director, all they see is this.

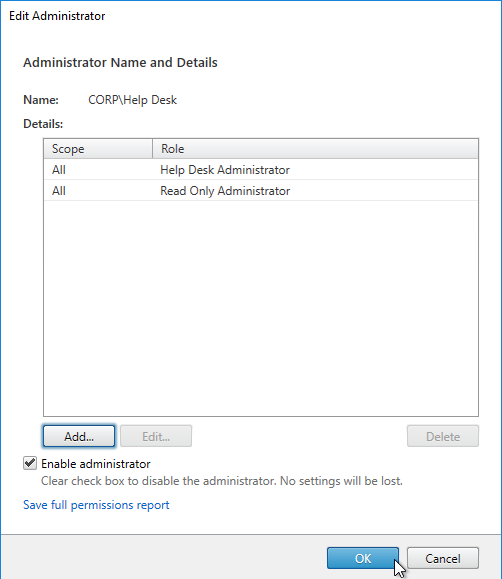
To jazz it up a little, add the Help Desk group to the read-only role. - Right-click the Help Desk Administrator, and click Edit Administrator.

- Click Add.
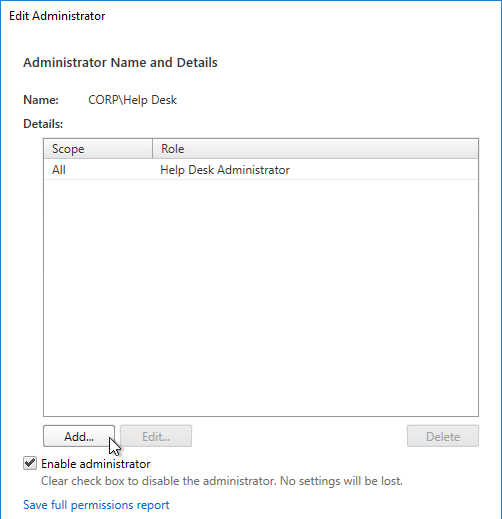
- In the Scope page, select a scope, and click Next.
- In the Role page, select Read Only Administrator, and click Next.
- In the Summary page, click Finish.
- Then click OK. Now Director will display the dashboard.
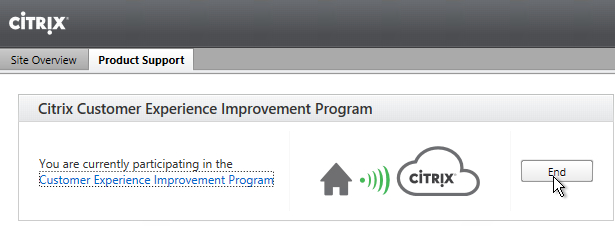
Customer Experience Improvement Program
XenApp/XenDesktop 7.15 enables CEIP by default. If desired, you can disable it in Citrix Studio:
- On the left, go to the Configuration node.
- On the right, switch to the Product Support tab.
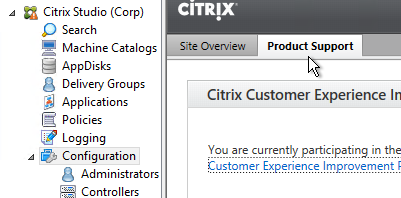
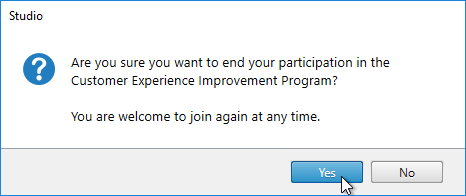
- Click End.
- Click Yes.
Each XenApp/XenDesktop component has a separate configuration for disabling Customer Experience Improvement Program:
- License Server CEIP
- Virtual Delivery Agent CEIP
- Profile Management CEIP
- StoreFront CEIP
- Provisioning Services CEIP
- Receiver CEIP
- Receiver for HTML5 CEIP
- Session Recording CEIP
- AppDNA CEIP
- NetScaler CEIP
vCenter Connection
XenDesktop uses an Active Directory service account to log into vCenter. This account needs specific permissions in vCenter. To facilitate assigning these permissions, create a new vCenter role and assign it to the XenDesktop service account. The permissions should be applied at the datacenter or higher level.
7.15 CU7 and newer support vSphere 7.0 Update 2 (source = CTX131239 Supported Hypervisors for Virtual Desktops (XenDesktop) and Provisioning (Provisioning Services))
Import vCenter Root Certificate
If the vCenter certificate is valid and trusted, then you can skip to the Hosting Resource section.
For newer versions of vCenter, you can import the root certificate that signed the vCenter Server/Appliance certificate.
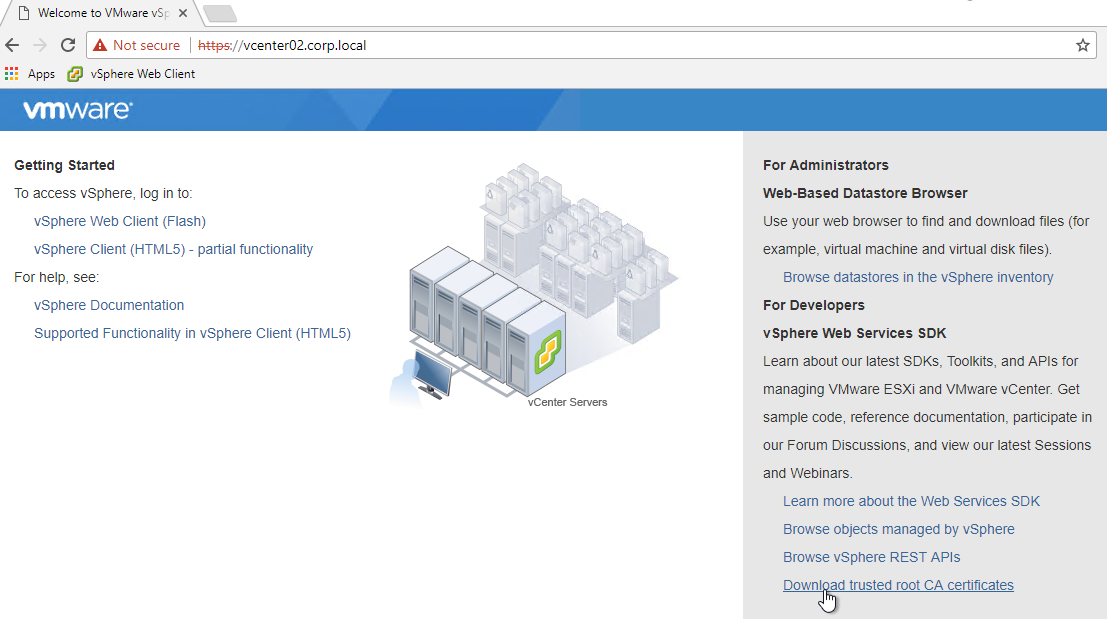
- Point your browser to the root path of the vCenter Server URL.
- On the bottom right, click Download trusted root CA certificates.
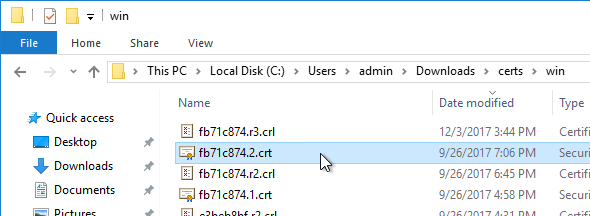
- Extract the downloaded files.
- Go to \certs\win.
- Sort the files by date, and double-click the newest .crt file.
- On the General tab, click Install Certificate.

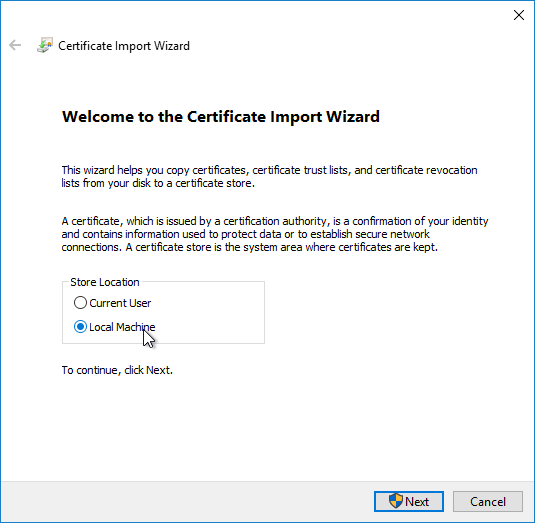
- In the Welcome to the Certificate Import Wizard page, change the Store Location selection to Local Machine, and click Next.
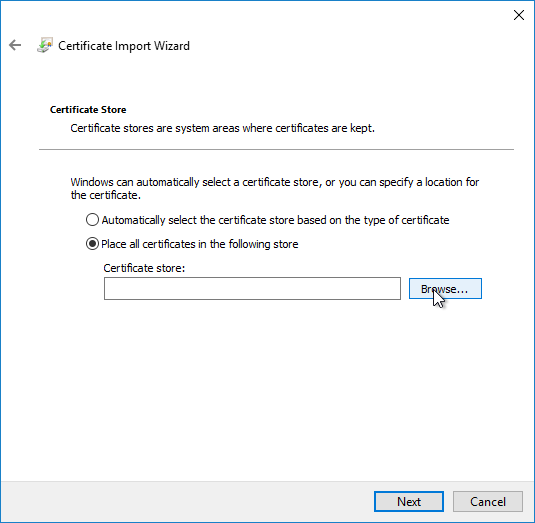
- In the Certificate Store page, click Browse.
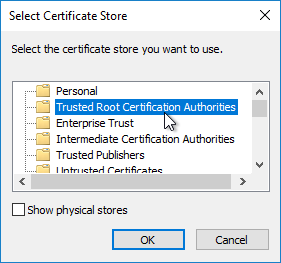
- Select Trust Root Certification Authorities, and click OK.
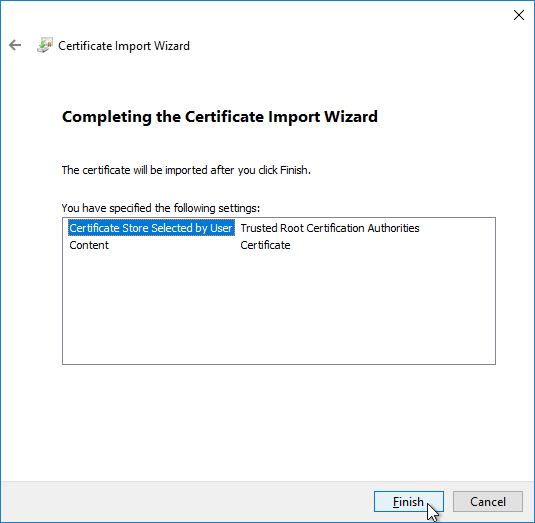
- In the Completing the Certificate Import Wizard page, click Finish.
- If you close your browser and reopen it, and then go to the vCenter URL, there should no longer be any certificate errors.
- Skip to the Hosting Resource section.
Import vCenter Certificate
If the vCenter certificate is valid and trusted, then you can skip to the Hosting Resource section.
Alternatively, you can import the actual vCenter Server certificate (instead of the root). This is the only option for older self-signed vCenter certificates.
Newer versions of XenDesktop have the ability to import the vCenter certificate thumbprint into the database so every Controller trusts it. However, it is difficult to update the thumbprint whenever the vCenter certificate changes. It might instead be more reliable to use the older method of configuring the Trusted People store on the Delivery Controllers. Whenever the vCenter certificate is changed, you’ll need to repeat these steps.
- Get the vCenter certificate.
- Open a browser and point it to the vCenter URL. Note: this procedure to get the certificate won’t work in Internet Explorer.

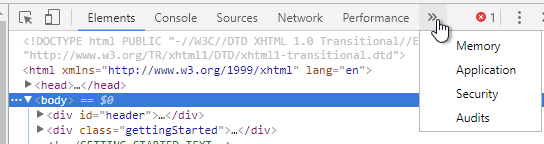
- If Google Chrome, press <F12> to open the Developer Tools.
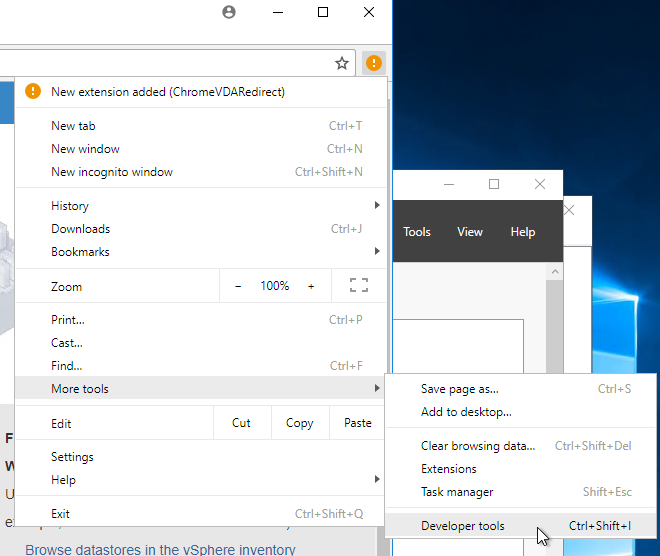
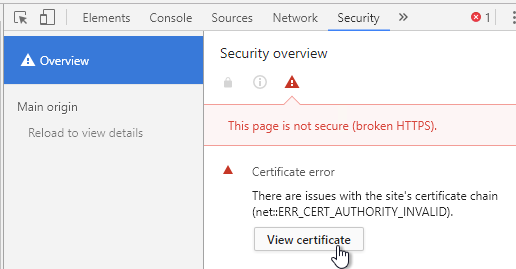
- On the top right, click the two right arrows to show more tabs, and click Security.
- On the Security tab, click View certificate.
- On the Details tab, click Copy to File.
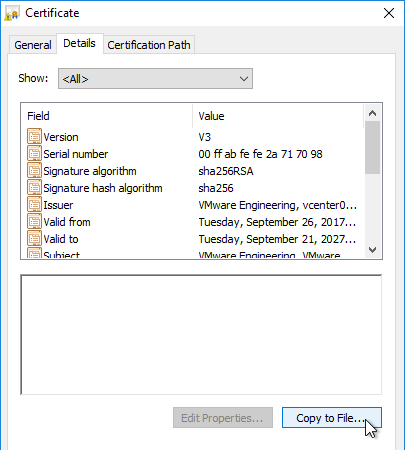
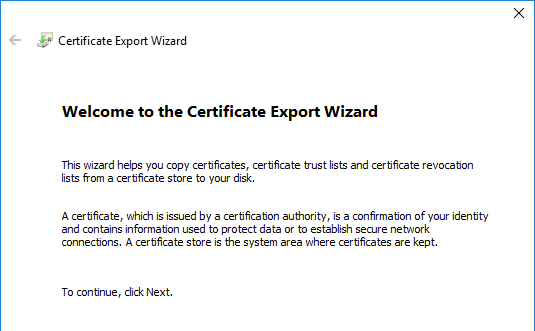
- In the Welcome to the Certificate Export Wizard page, click Next.
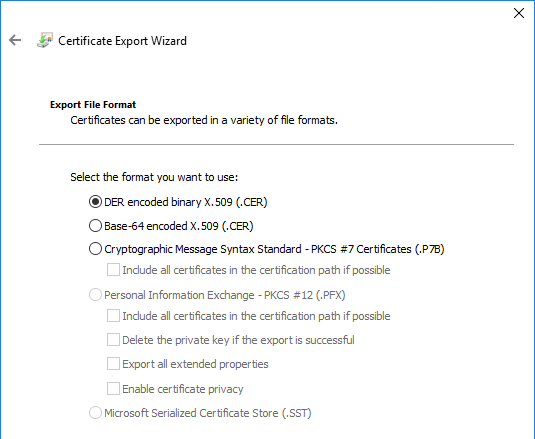
- In the Export File Format page, either format will work. Click Next.
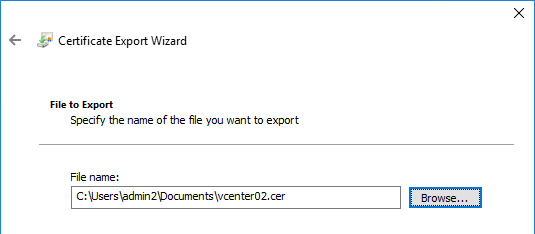
- In the File to Export page, browse to a new file, and click Next.
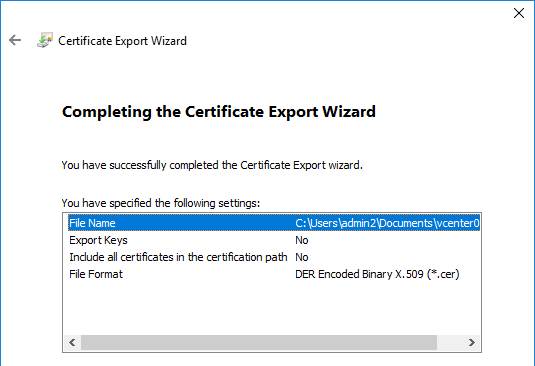
- In the Completing the Certificate Export Wizard page, click Finish.
- Open a browser and point it to the vCenter URL. Note: this procedure to get the certificate won’t work in Internet Explorer.
- If your Delivery Controller is Windows 2012 R2 or newer, then simply run certlm.msc. This opens the MMC console with Certificates snap-in already added and pointing to Local computer.
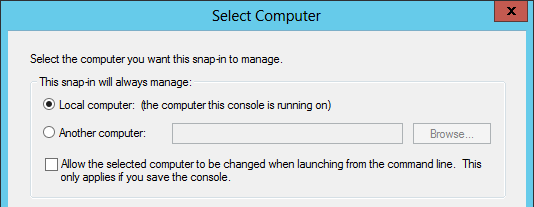
- For Windows 2008 R2, run mmc.exe, open the File menu, and click Add/Remove Snap-in.
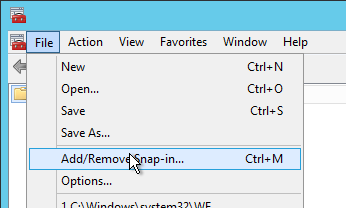
- Move the Certificates snap-in to the right by highlighting it, and clicking Add.

- Select Computer account, and click Next.
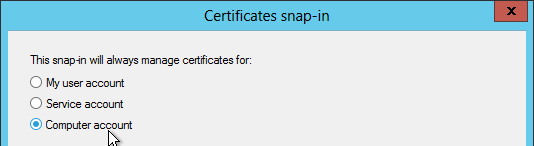
- Select Local computer, and click Finish.
- Click OK.
- For Windows 2008 R2, run mmc.exe, open the File menu, and click Add/Remove Snap-in.
- On the left, right-click the Trusted People node, expand All Tasks, and click Import.
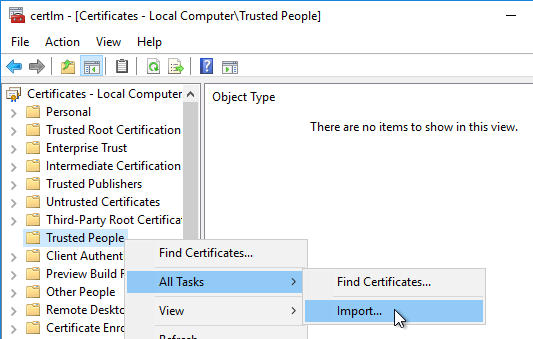
- In the Welcome to the Certificate Import Wizard page, click Next.
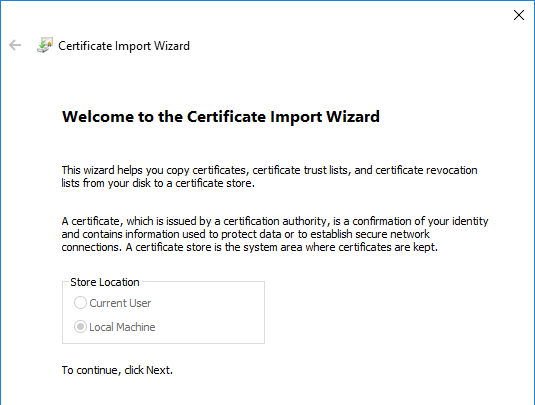
- In the File to Import page, browse to the certificate you saved earlier, and click Next.
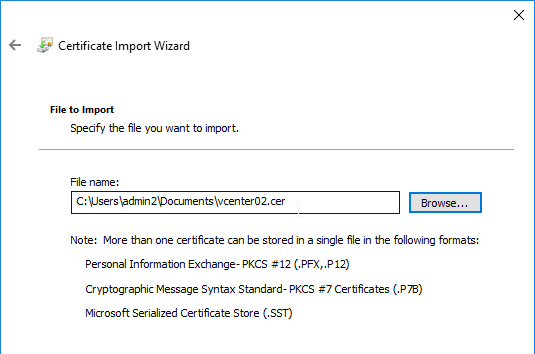
- In the Certificate Store page, click Next.
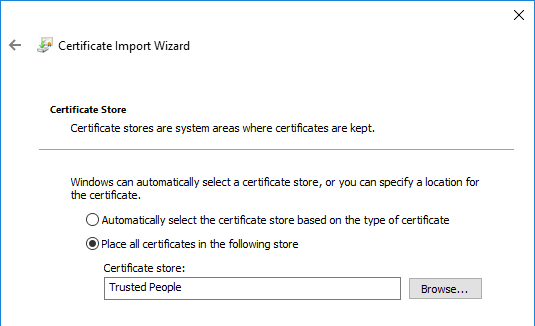
- In the Completing the Certificate Import Wizard page, click Finish.
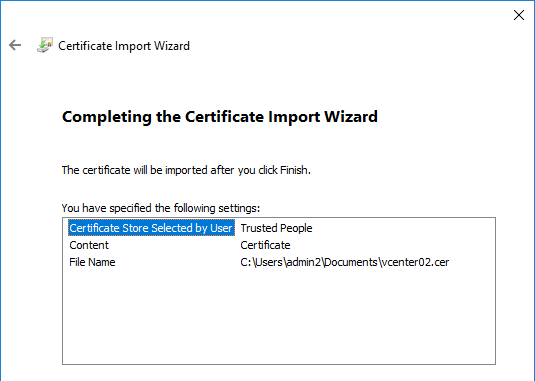
- Click OK to acknowledge that the import was successful.
- Repeat these steps on the second Controller. It is important that you import the certificate on both Controllers before adding the Hosting Resource.
- If you open Internet Explorer and browse to the vCenter Server, there should be no certificate errors.
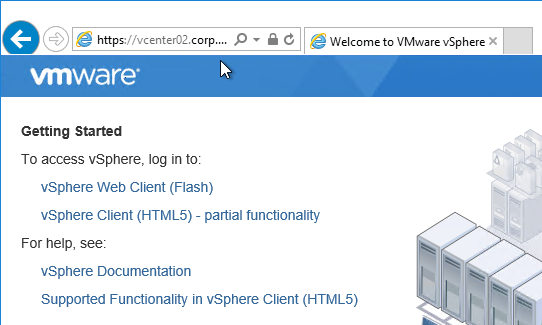
Hosting Resources
7.15 CU7 and newer support vSphere 7.0 Update 2 (source = CTX131239 Supported Hypervisors for Virtual Desktops (XenDesktop) and Provisioning (Provisioning Services))
A Hosting Resource = vCenter + Cluster (Resource Pool) + Storage + Network. When you create a machine catalog, you select a previously defined Hosting Resource, and the Cluster, Storage, and Network defined in the Hosting Resource object are automatically selected. If you need some desktops on a different Cluster+Storage+Network then you’ll need to define more Hosting Resources in Studio.
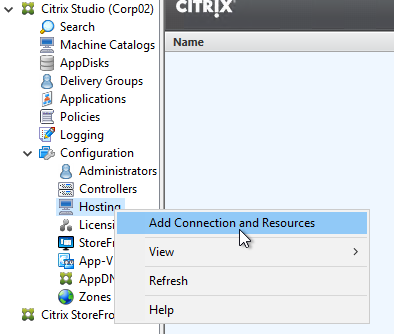
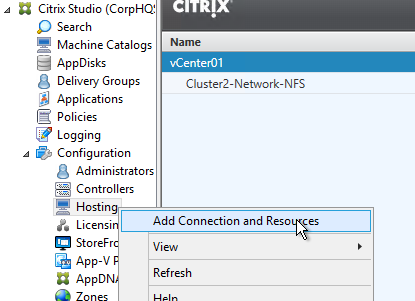
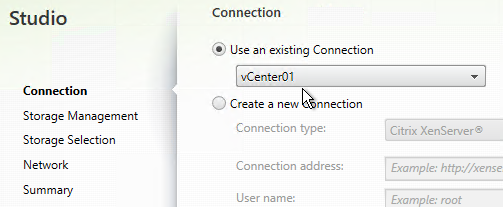
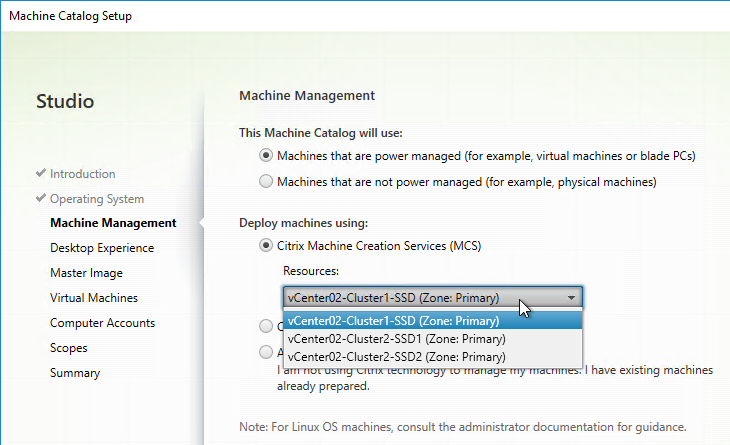
- In Studio, expand Configuration and click Hosting. Right-click it, and click Add Connection and Resources.
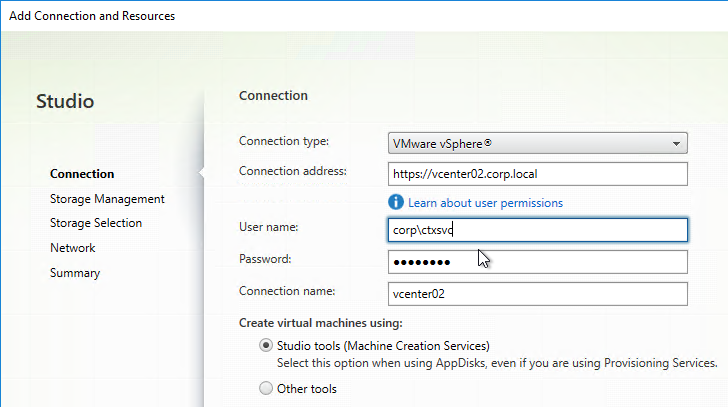
- In the Connection page, for Connection type, select VMware vSphere.
- Notice there’s a Learn about user permissions blue link to an article that describes the necessary permissions.
- Enter https://vcenter01.corp.local/sdk as the vCenter URL. The URL must contain the FQDN of the vCenter server.
- Enter credentials of a service account that can log into vCenter.
- In the Connection name field, give the connection a name. Typically, this matches the name of the vCenter server.
- If you are not using Machine Creation Services, and instead only need the vCenter connection for machine power management, change the Create virtual machines using selection to Other Tools. If you intend to use MCS, leave it set to Studio Tools.
- Click Next.
- If you see a message about the vCenter certificate, check the box next to Trust certificate, and click OK.
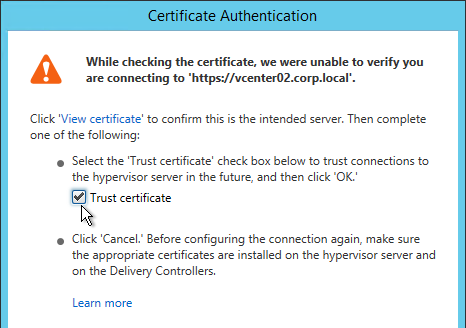
- Note: this vCenter certificate thumbprint is stored in the XenDesktop database, and is not updated when the vCenter certificate changes. See CTX217415 Cannot connect to the VCenter server due to a certificate error for instructions on manually updating the database with the new certificate thumbprint.
- Also see CTX224551 Xendesktop 7.x – Steps to perform after certificate change on vCenter.
- Alternatively, you can import the vCenter certificate to Trusted People on every Controller.
- If you see a message about the vCenter certificate, check the box next to Trust certificate, and click OK.
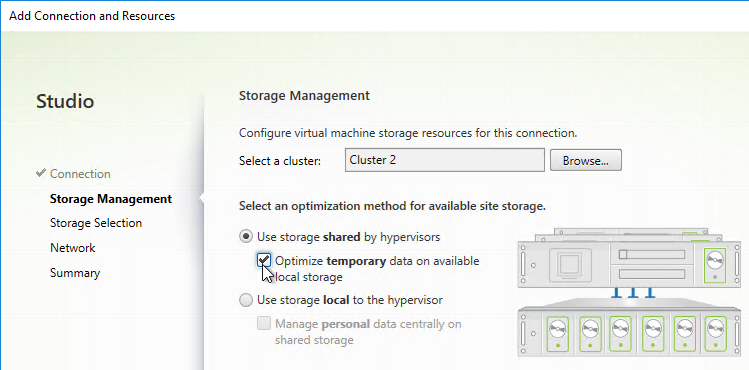
- In the Storage Management page, click Browse, and select a vSphere cluster.
- Note: as detailed at CTX223662, make sure there’s no comma in the datacenter name.
- Select Use storage shared by hypervisors.
- If you have sufficient disk space on each ESXi host, also select Optimize temporary data on available local storage. From Mark Syms at XA 7.9 MCS with RAM Caching at Citrix Discussions: “If you use just MCS caching to local storage then the VM is not agile at all and cannot be moved even when powered off as it has a virtual disk permanently associated with a single host.”
- From Martin Rowan at XA 7.9 MCS with RAM Caching at Citrix Discussions: for the temporary cache disk, “Don’t format it, the raw disk is what MCS caching uses.”
- Click Next.
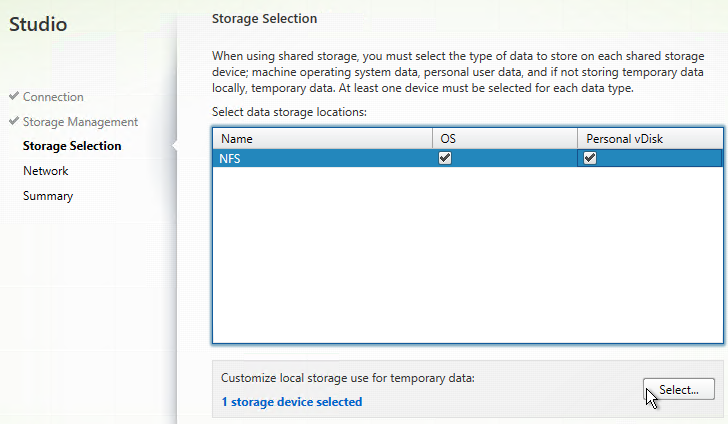
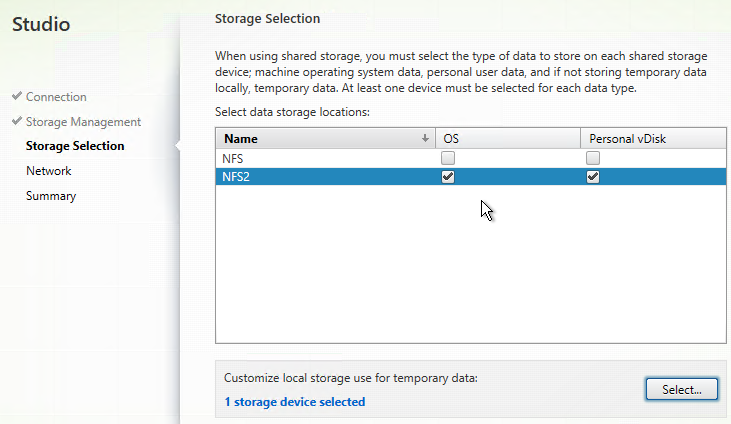
- In the Storage Selection page, OS and Personal vDisk must be selected on at least one datastore. For maximum flexibility, only select one datastore. To select additional datastores, run this wizard again to create a separate Hosting Resource.
- If you selected the temporary data on local storage option, on the bottom, click Select, and choose the datastores you want to use for disk caching. By default, all local datastores are selected. Click Next when done.
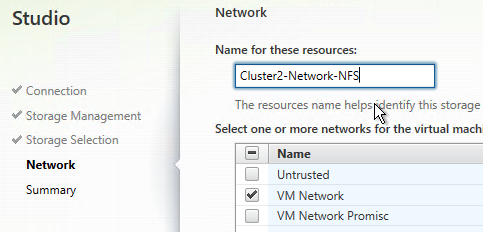
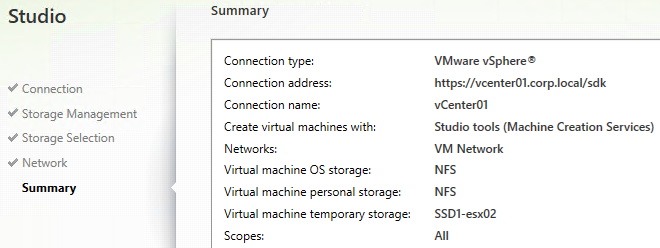
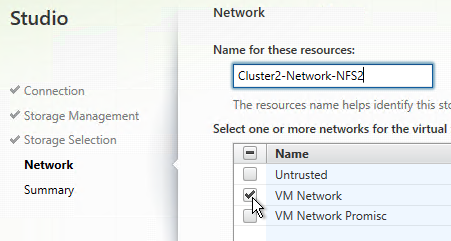
- In the Network page, enter a name for the hosting resource. Since each hosting resource is a combination of vCenter, Cluster, Network, and Datastores, include those names in this field (e.g. vCenter01-Cluster01-Network01-Datastore01).
- Select a network and click Next.
- In the Summary page, click Finish.
- If you have multiple datastores for your VDAs, run the wizard again.
- You can use the existing vCenter connection.
- This time, select a different datastore.
- Give it a name that indicates the chosen datastore.
- When you create a Catalog, select the Hosting Resource for the datastore where you want the VDAs to be placed. Create additional Catalogs for each datastore. You can then combine the Catalogs into a single Delivery Group.
- Later in the Catalog wizard, you’re given an option to enable caching and select a cache size. This is similar to Provisioning Services option “Cache in RAM with overflow to disk”.

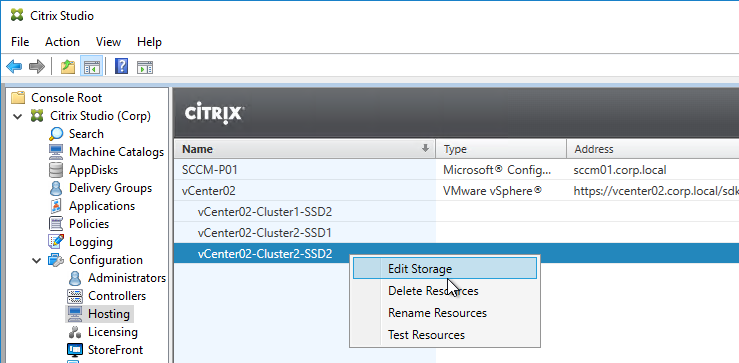
- If you rename Storage, Network, or Datacenters, see Citrix CTX225019 XA/XD 7.13: Renaming Storage, Network or Datacenters When Used With MCS or PVS. Either run
Update-HypHypervisorConnection -LiteralPath "XDHyp:\Connections\MyConnection", or right-click the Hosting Resource and click Edit Storage. You can cancel the wizard.
Citrix Licensing Server
Upgrade
XenApp/XenDesktop 7.15.9000 comes with 11.17.2.0 Build 37000.
If you have a standalone Licensing Server, upgrade it to Citrix Licensing 11.17.2.0 build 37000, if it isn’t already.
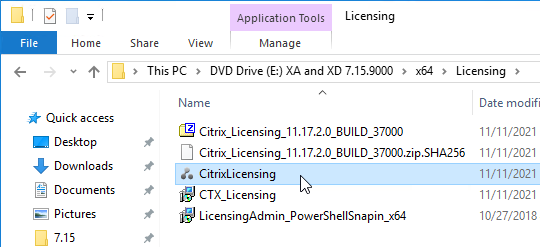
- On the XenApp and XenDesktop ISO, go \x64\Licensing and run CitrixLicensing.exe.


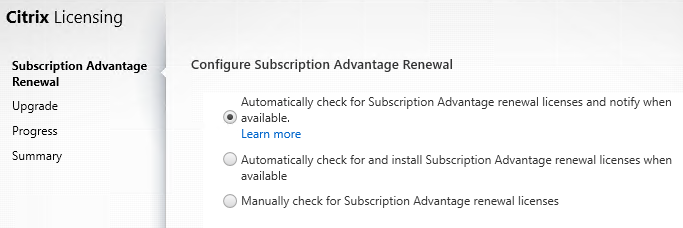
- If you see the Subscription Advantage Renewal page, make a selection, and click Next.
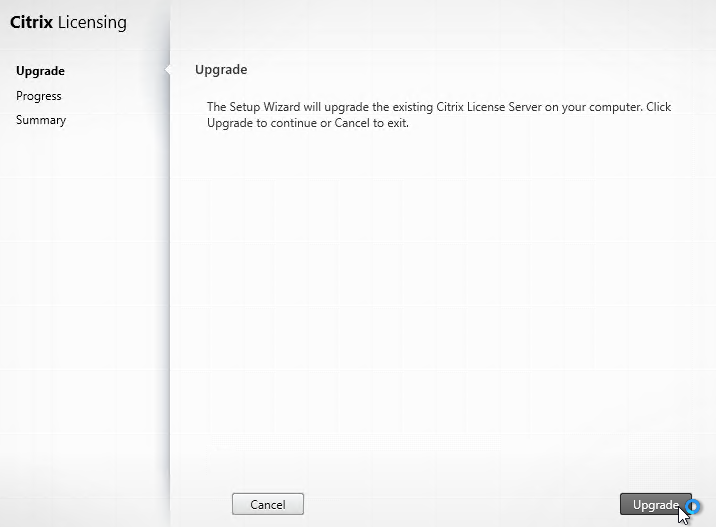
- In the Upgrade page, click Upgrade.
- Click Finish.
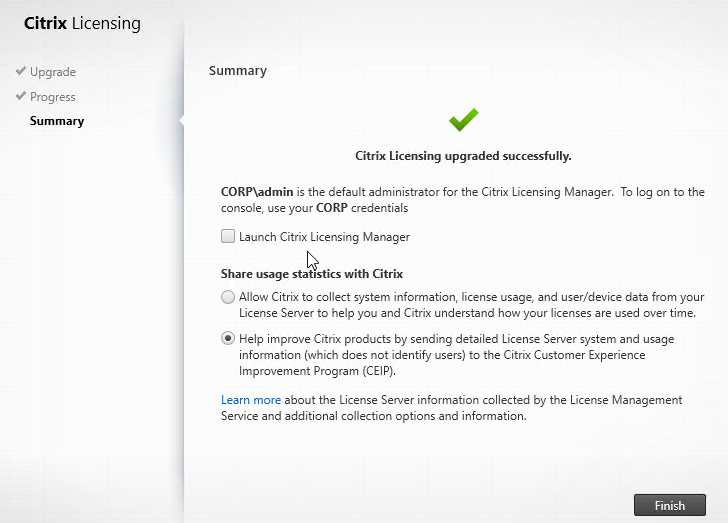
- Citrix Licensing 11.6.6.0 build 31000 and newer no longer include the License Administration Console (:8082).
- After upgrading Citrix Licensing Server, in Citrix Studio, go to Configuration > Licensing.
- On the right, click Authenticate Certificate.
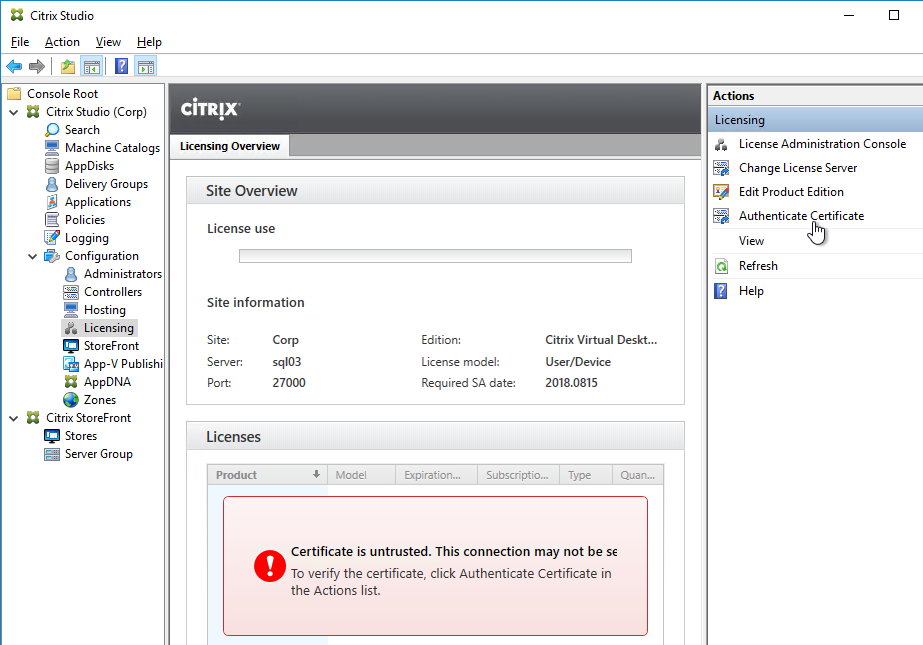
- Change the selection to Connect me, and click Confirm.
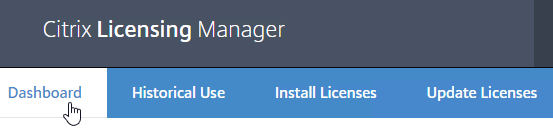
Citrix Licensing Manager
Newer versions of License Server come with a new management web site. License Server 11.16.6 and newer no longer include the License Administration Console (:8082).
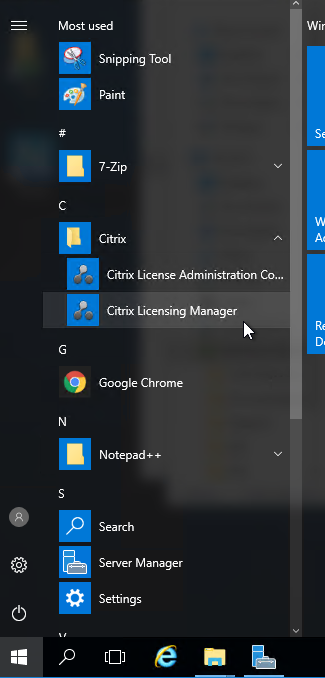
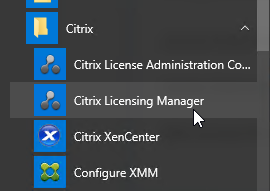
- From the Start Menu, run Citrix Licensing Manager. Or go to https://<My_Licensing_Server>:8083
- You might be prompted to login.
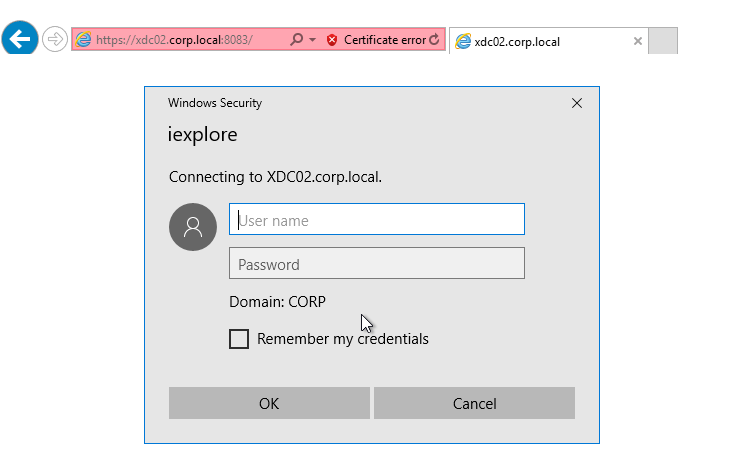
- To eliminate this login, add the License Server URL to the Local Intranet zone.
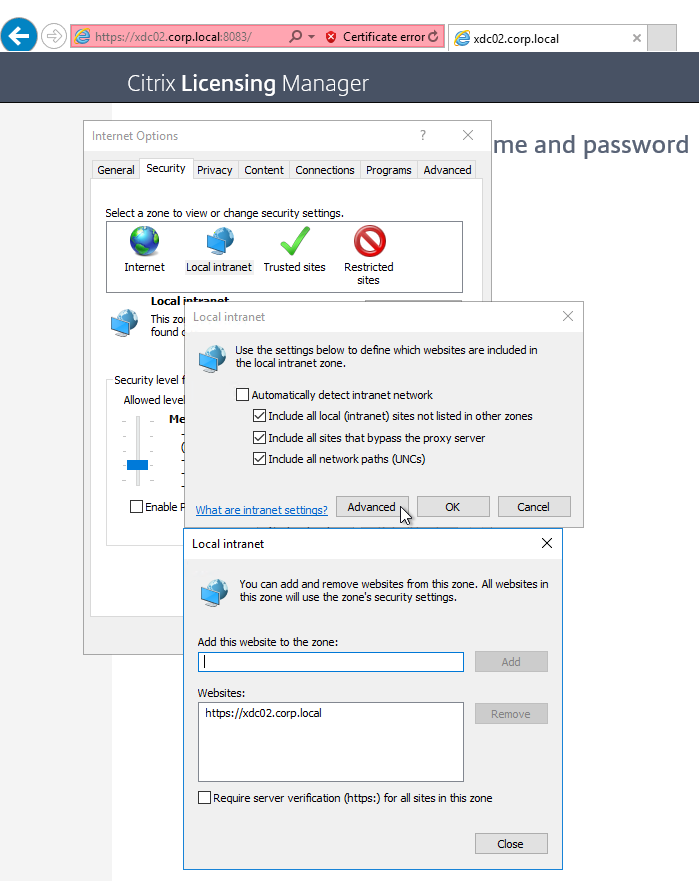
- To eliminate this login, add the License Server URL to the Local Intranet zone.
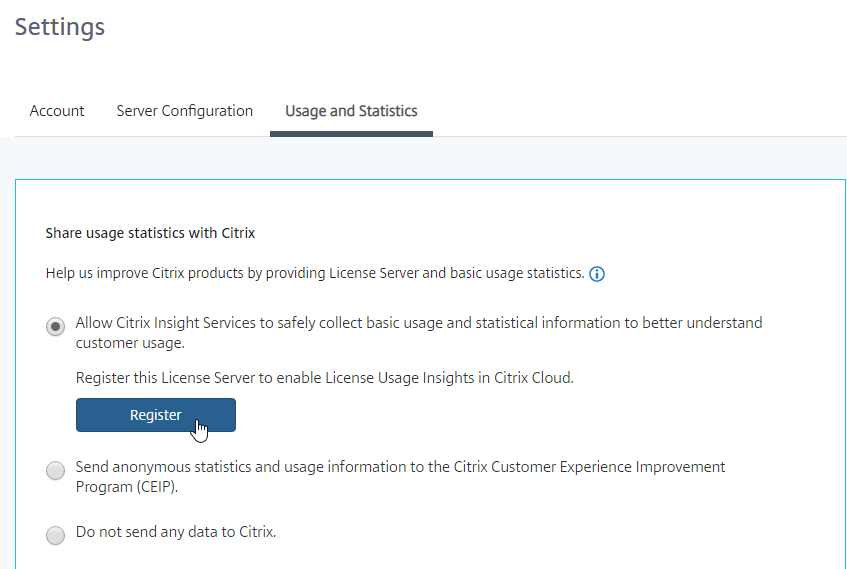
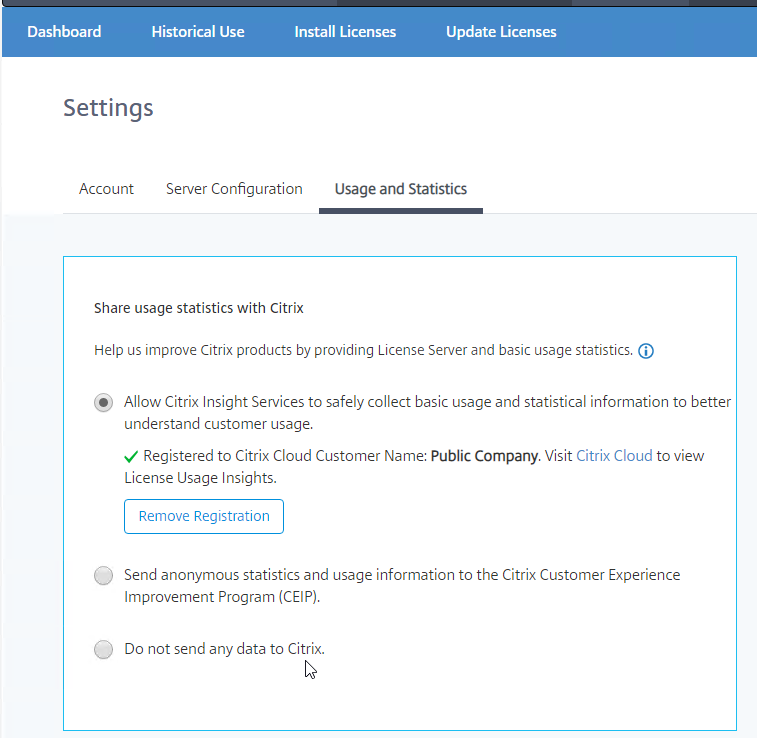
- Licensing Manager might prompt you to register with Citrix Cloud.
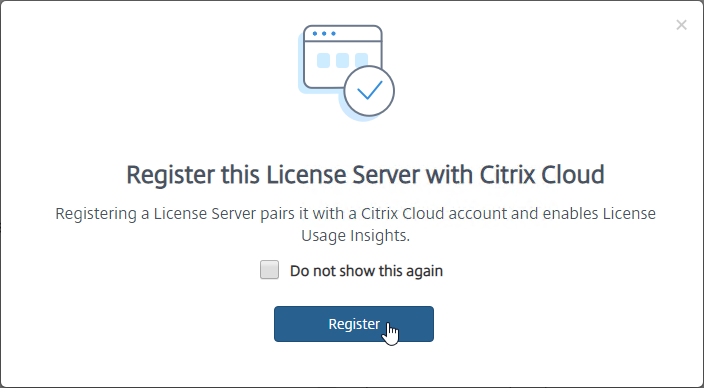
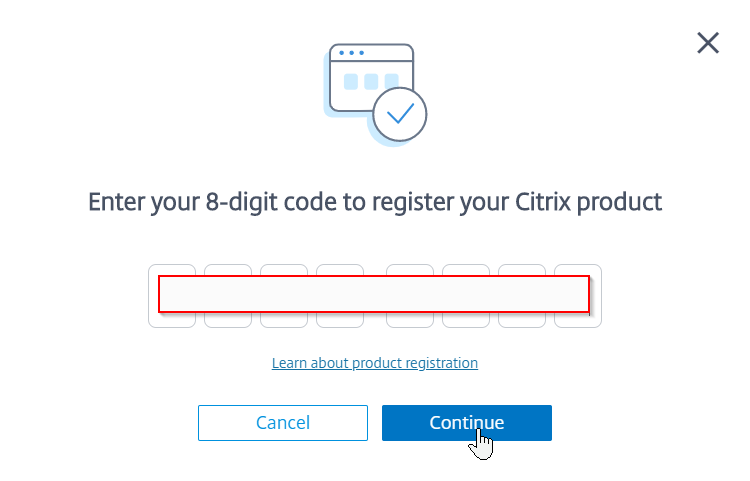
- On the Settings > Usage and Statistics page, in the Share usage statistics with Citrix section, click Register.
- You’ll see a screen with a registration code. Click the Copy button and then click Register to be take to Citrix Cloud.
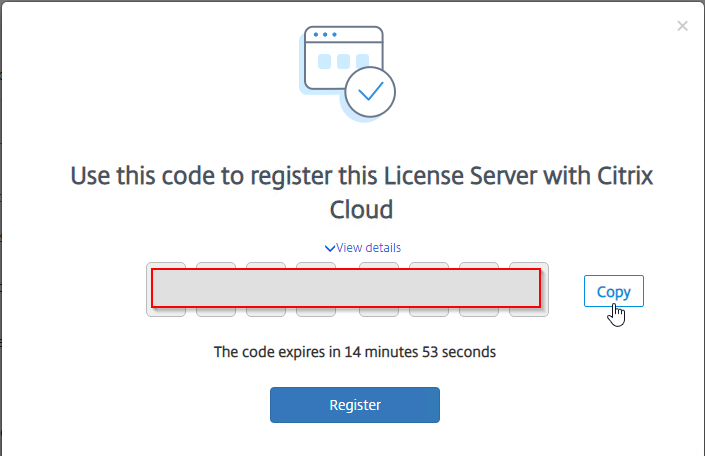
- After logging in to Citrix Cloud, on the top left, click the menu (hamburger) icon and then click License & Usage. If you don’t see this link, you might have to logout and log back in.
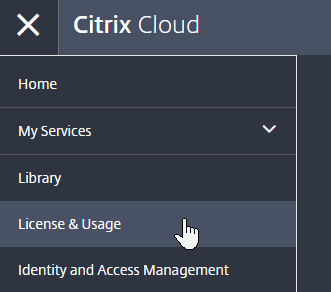
- In the License & Usage service, switch to the Registrations tab.

- Click the blue Register button in the middle of the page.
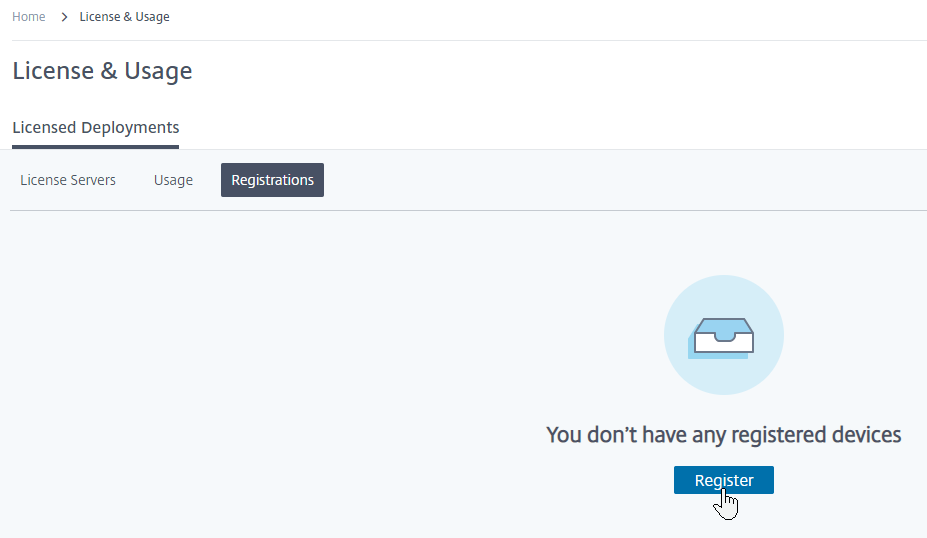
- Paste in the copied code and then click Continue.
- Click Register.

- Back in the on-premises Licensing Manager, it will eventually show as Registered.
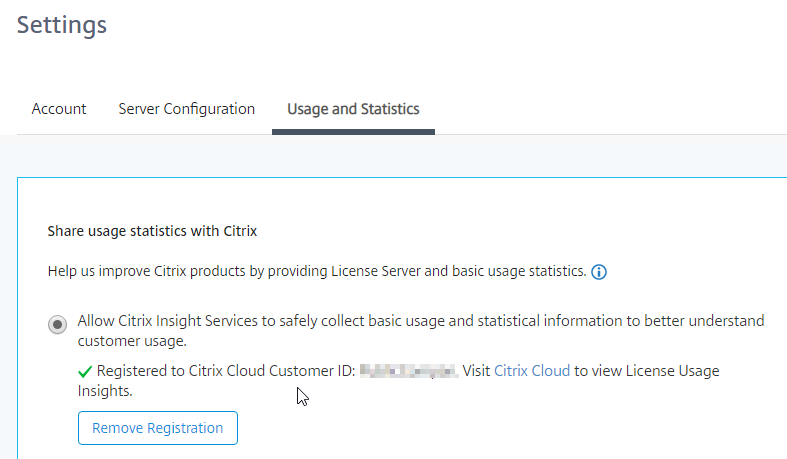
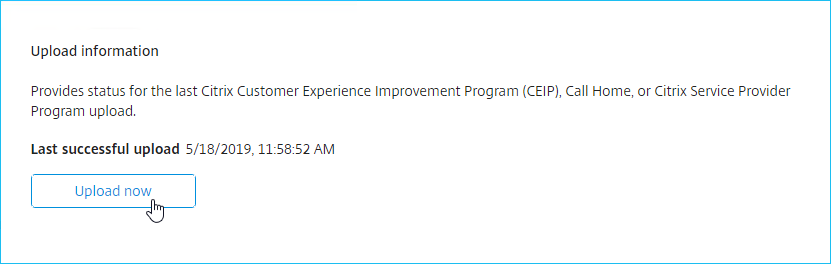
- On the same Usage & Statistics page, scroll down, and then click Upload now. This should cause data to upload to Citrix Cloud and show up in Citrix Cloud License & Usage.
- On the Settings > Usage and Statistics page, in the Share usage statistics with Citrix section, click Register.
- Licensing Manager has a new Dashboard page to replace the one in the License Administration Console.
- Click the arrow next to a license to see when it expires and the number of licenses in use.
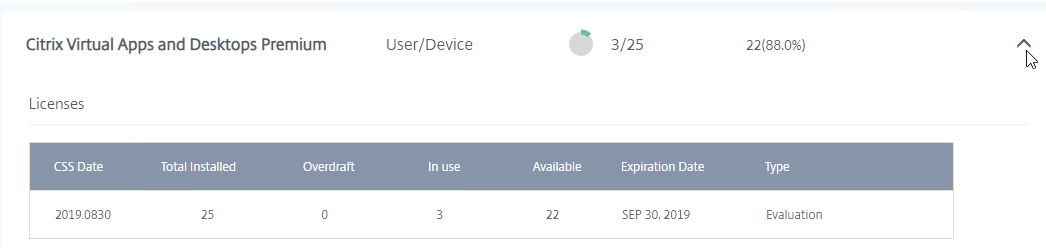
- Click the arrow next to a license to see when it expires and the number of licenses in use.
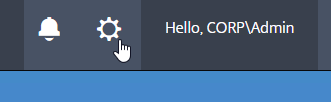
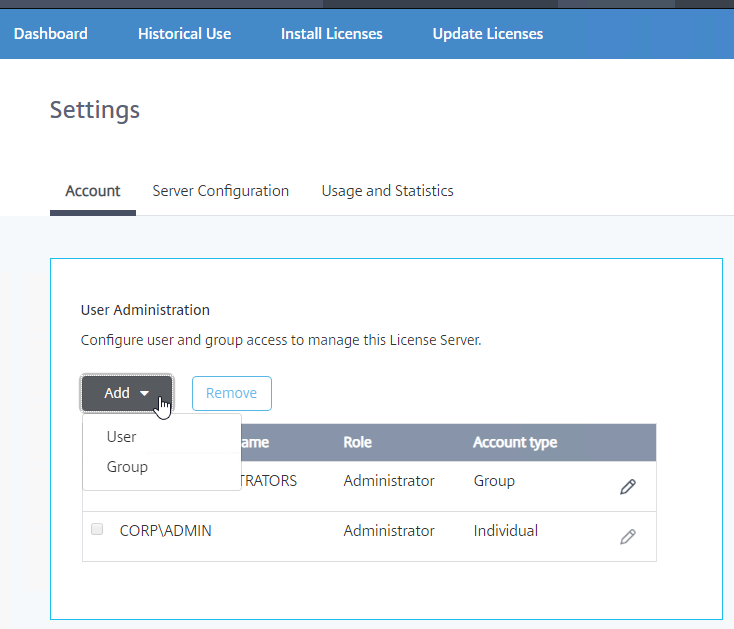
- If you click the gear icon on the top right…
- On the Account tab, you can add License Server Administrators.
- The Update Licenses tab lets you check for license renewals and download them.
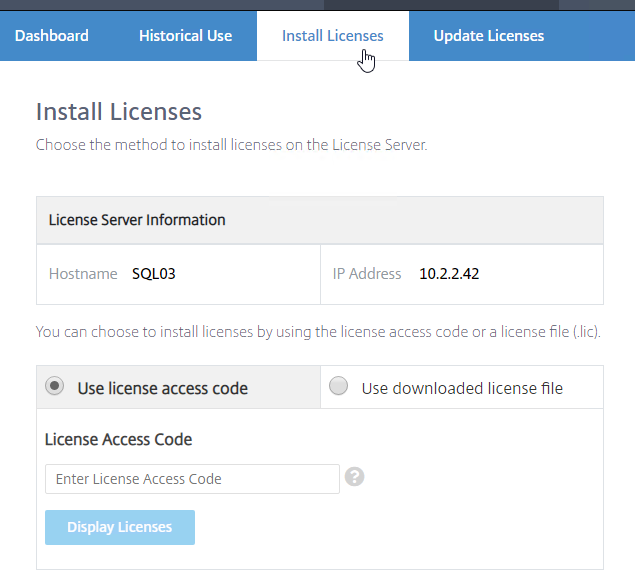
Activate Citrix License
The easy way to install and activate a Citrix license is through Citrix Studio:
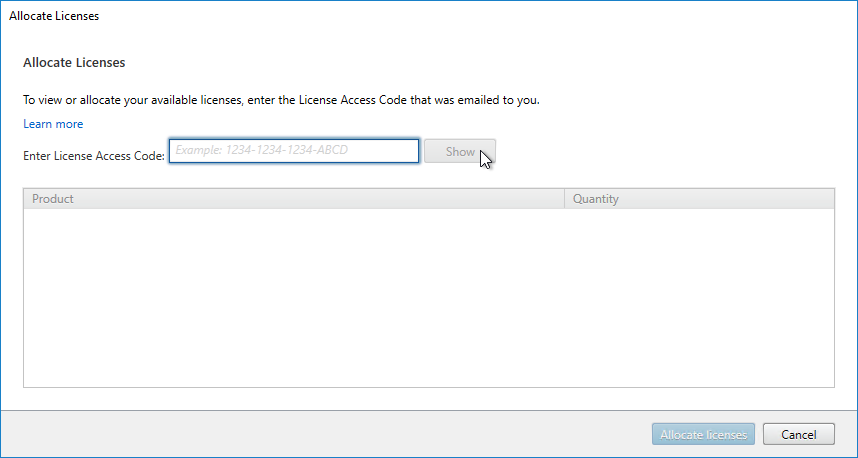
- In Citrix Studio, expand Configuration, right-click Licensing, and click Allocate Licenses.
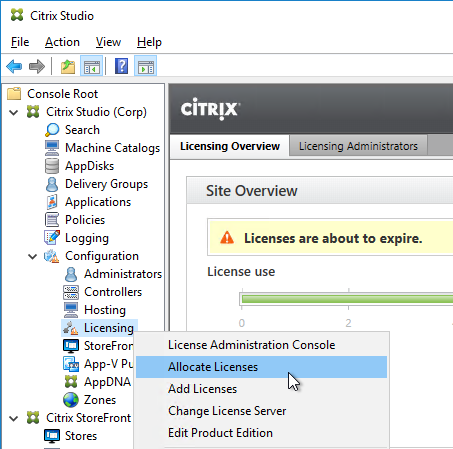
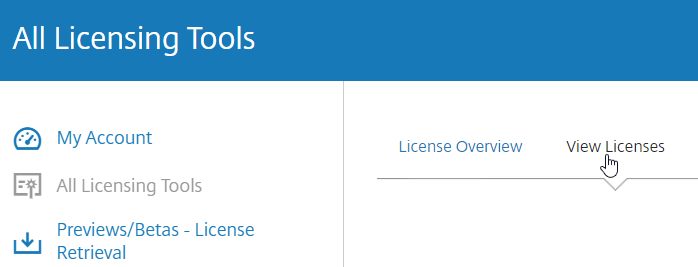
- Enter the LA- license code, and click Show. You can find your code at http://mycitrix.com, click All Licensing Tools, and click View Licenses.
- Then click Allocate licenses.
- Another method of allocating licenses is in the Citrix Licensing Manager at https://MyLicenseServer:8083 > Install Licenses tab.
- Another method of allocating licenses is in the Citrix Licensing Manager at https://MyLicenseServer:8083 > Install Licenses tab.
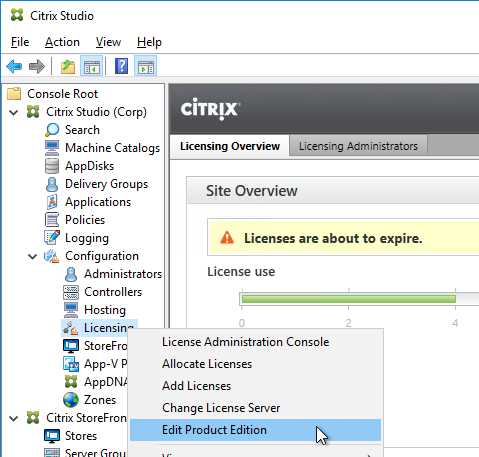
- After licenses are installed, right-click the Licensing node, and click Edit Product Edition
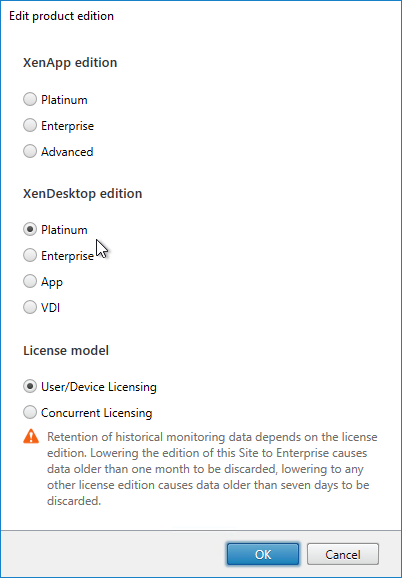
- Change the edition to match your licenses. If you see both XenDesktop and XenApp licenses, you must select XenDesktop. If you see both Concurrent and User/Device, then you must select User/Device. Click OK when done.
- XenDesktop 7.14 and newer support mixed licensing in a single site/farm. See the following:
- Citrix Blog Post Introducing Multi-Type Licensing in XenApp & XenDesktop 7.14.
- Multi-type licensing at Citrix Docs.
License Server CEIP
Citrix Licensing Server enables CEIP by default. This can be disabled:
- In the Citrix Licensing Manager (https://MyLicenseServer:8083) by clicking the gear icon.
- Switch to the Usage and Statistics tab and make a selection in the Share usage statistics with Citrix section.
Citrix License Management Service
Version 11.14.0.1 and newer include the Citrix License Management Service. This service helps you avoid prohibited practices:
- Duplication of licenses outside a Disaster Recovery (DR) environment
- Use of legacy licenses for new product versions
- Use of rescinded licenses
Citrix License Server Monitoring
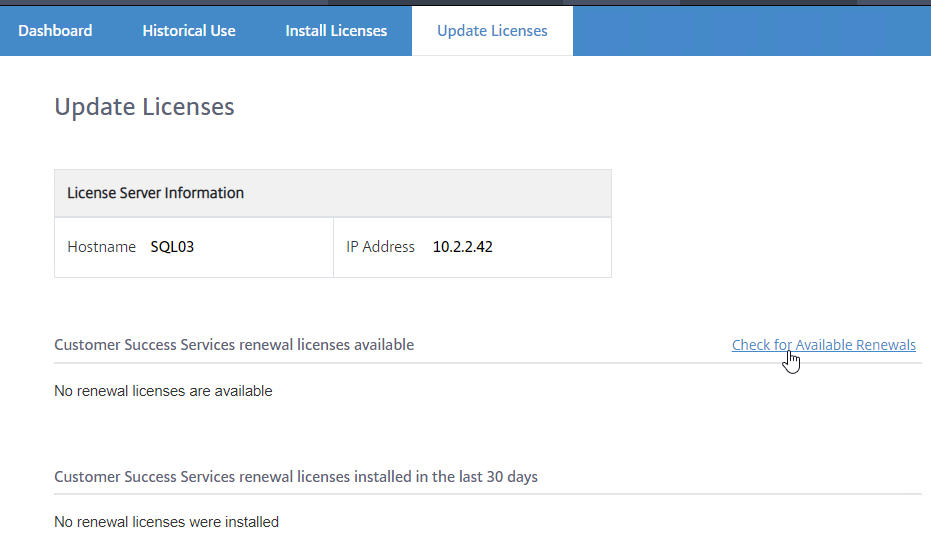
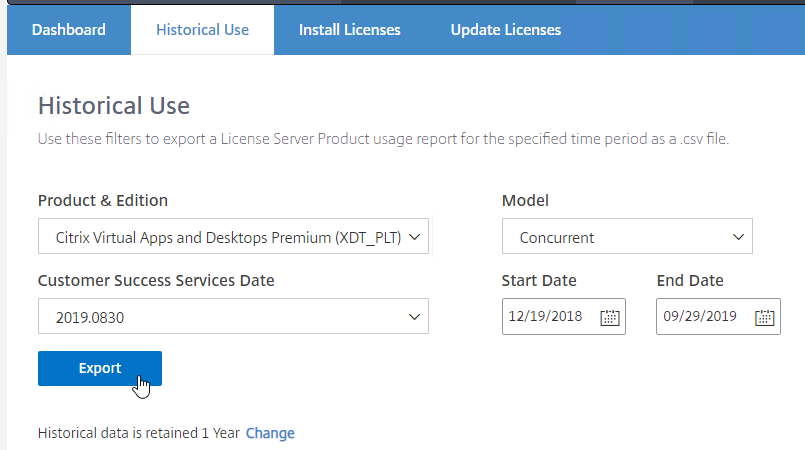
Citrix Licensing Manager has historical usage reporting:
- Run Citrix Licensing Manager from the Start Menu. Or use a browser to connect to https://MyLicenseServer:8083
- On the Historical Use tab, use the drop-down menus to select a license type, select dates, and export to a .csv file.
- At the bottom of this page is a link to change the retention period.
Jonathan Medd Monitor Citrix License Usage With PowerShell.
Lal Mohan – Citrix License Usage Monitoring Using Powershell
Jaroslaw Sobel – Monitoring Citrix Licenses usage – Graphs using WMI, Powershell and RRDtool. This script generates a graph similar to the following:

Remote Desktop Licensing Server
Install Remote Desktop Licensing Server
Do the following on your XenDesktop Controllers:
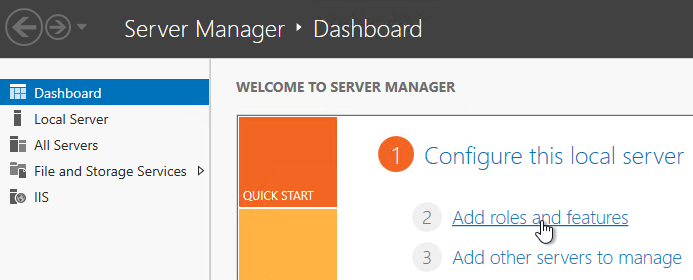
- In Server Manager, open the Manage menu, and click Add Roles and Features.
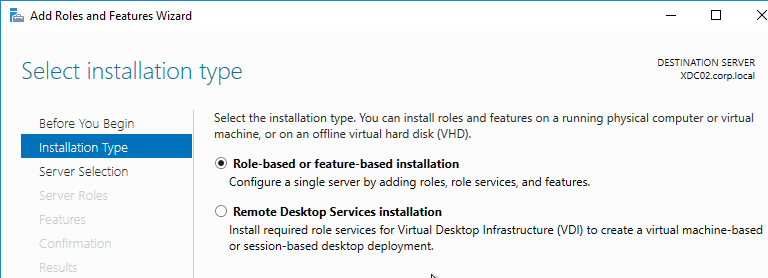
- In the Installation Type page, select Role-based or feature-based installation.
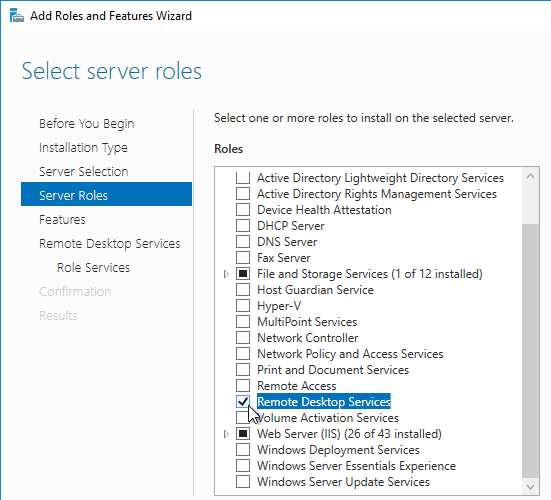
- Click Next until you get to the Server Roles page. Check the box next to Remote Desktop Services, and click Next.
- Click Next until you get to the Role Services page. Check the box next to Remote Desktop Licensing, and click Next.

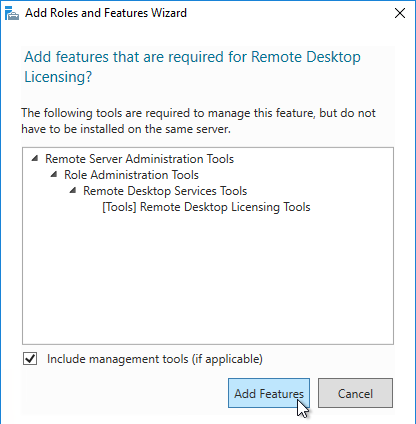
- Click Add Features if prompted.
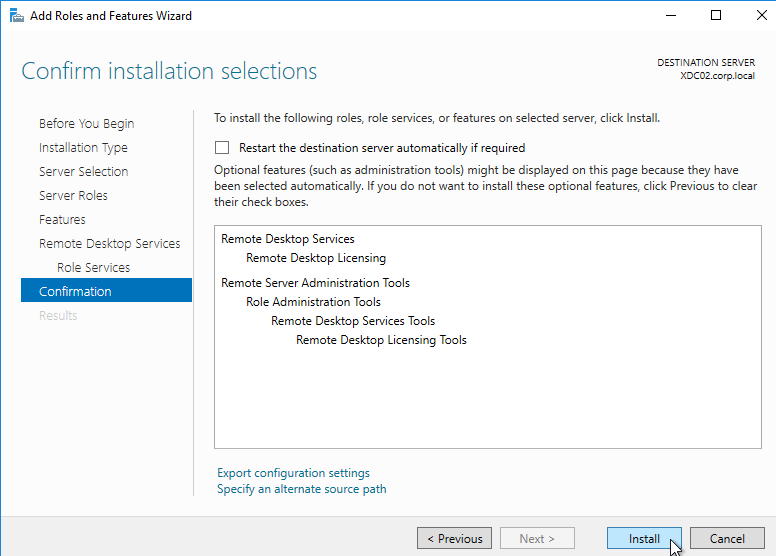
- Then finish the wizard to install the role service.
Activate Remote Desktop Licensing
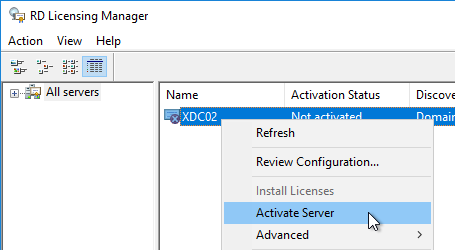
- After RD Licensing is installed, in Server Manager, open the Tool menu, expand Terminal Services (or Remote Desktop Services), and click Remote Desktop Licensing Manager.
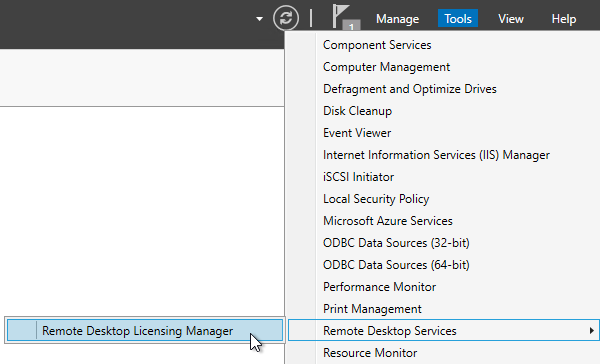
- The tool should find the local server. If it does not, right-click All servers, click Connect, and type in the name of the local server.
- Once the local server can be seen in the list, right-click the server and click Activate Server.
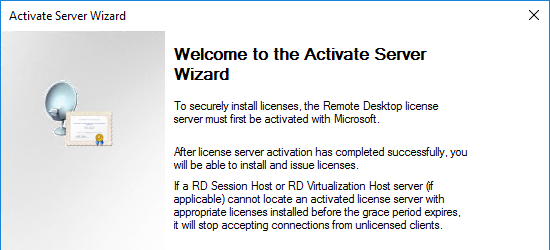
- In the Welcome to the Activate Server Wizard page, click Next.
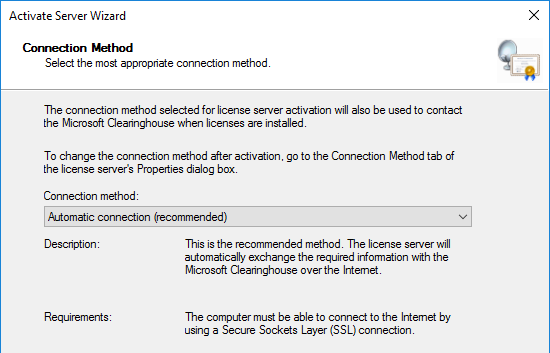
- In the Connection Method page, click Next.
- In the Company Information page, enter the required information, and click Next.
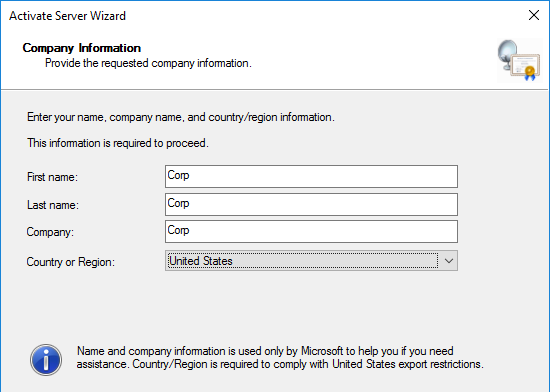
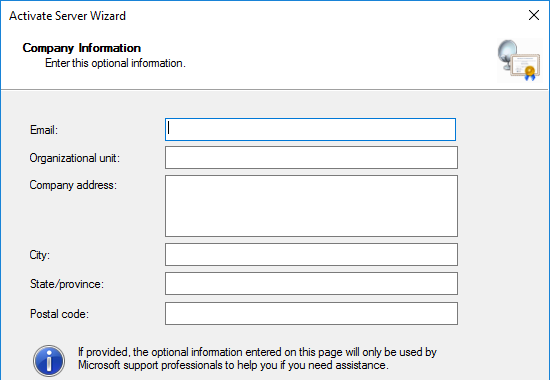
- All of the fields on the Company Information page are optional, so you do not have to enter anything. Click Next.
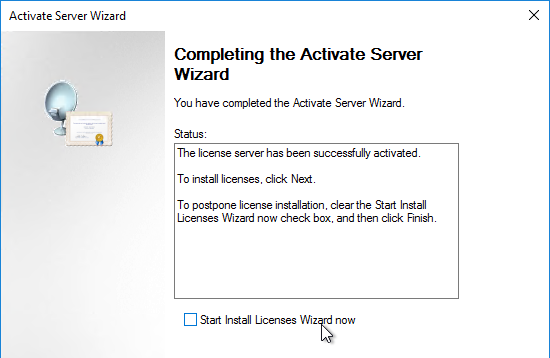
- In the Completing the Activate Server Wizard page, uncheck the box next to Start Install Licenses Wizard now, and click Finish. Since the session hosts will be configured to pull Per User licenses, there is no need to install licenses on the RD Licensing Server.
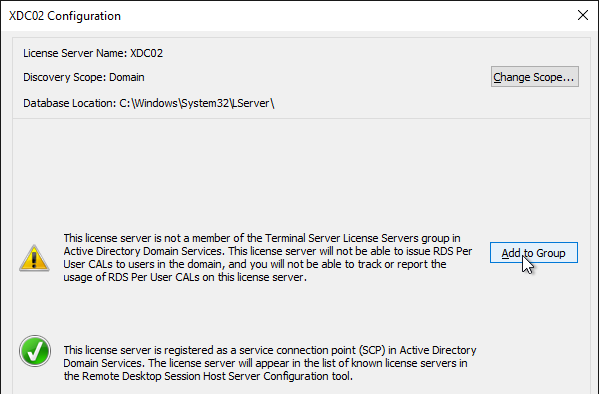
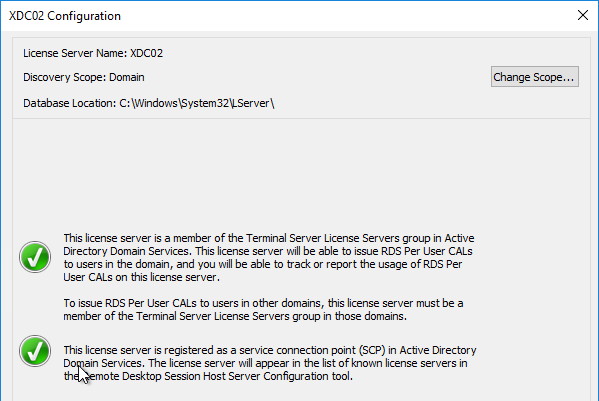
- In RD Licensing Manager, right-click the server, and click Review Configuration.
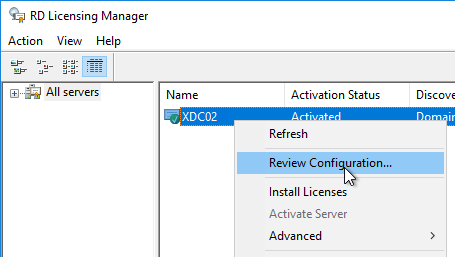
- Ensure you have green check marks. If the person installing Remote Desktop Licensing does not have permissions to add the server to the Terminal Server License Servers group in Active Directory, ask a domain admin to do it manually. If you have the proper permissions, click Add to Group.
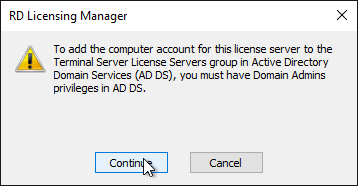
- Click Continue when prompted that you must have Domain Admins privileges.
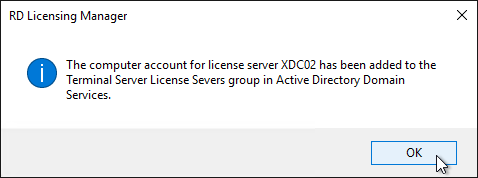
- Click OK when prompted that the computer account has been added.
- Click OK to close the window.
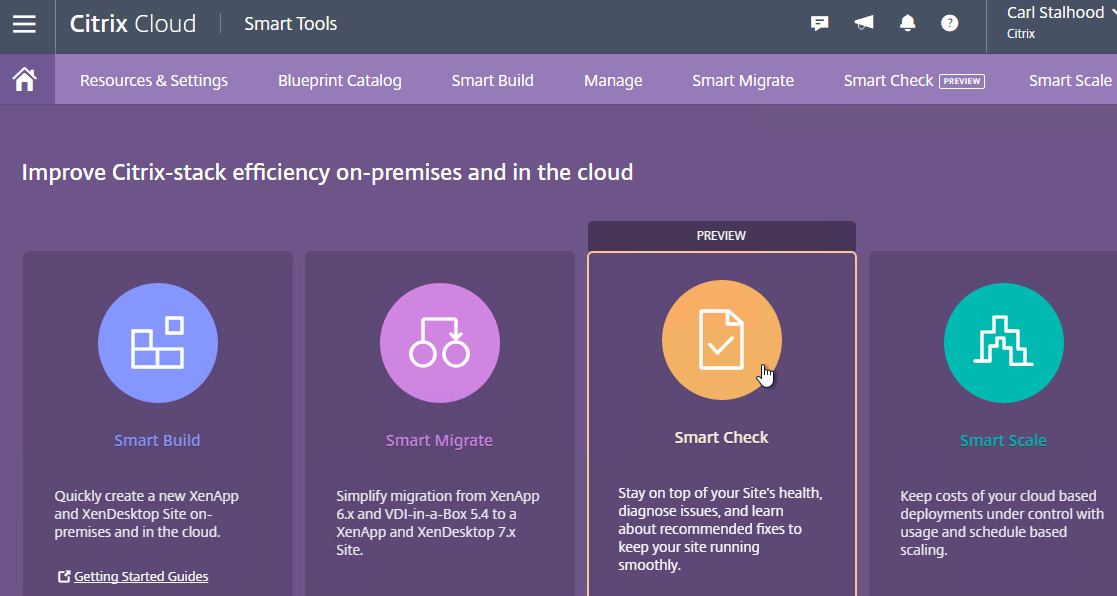
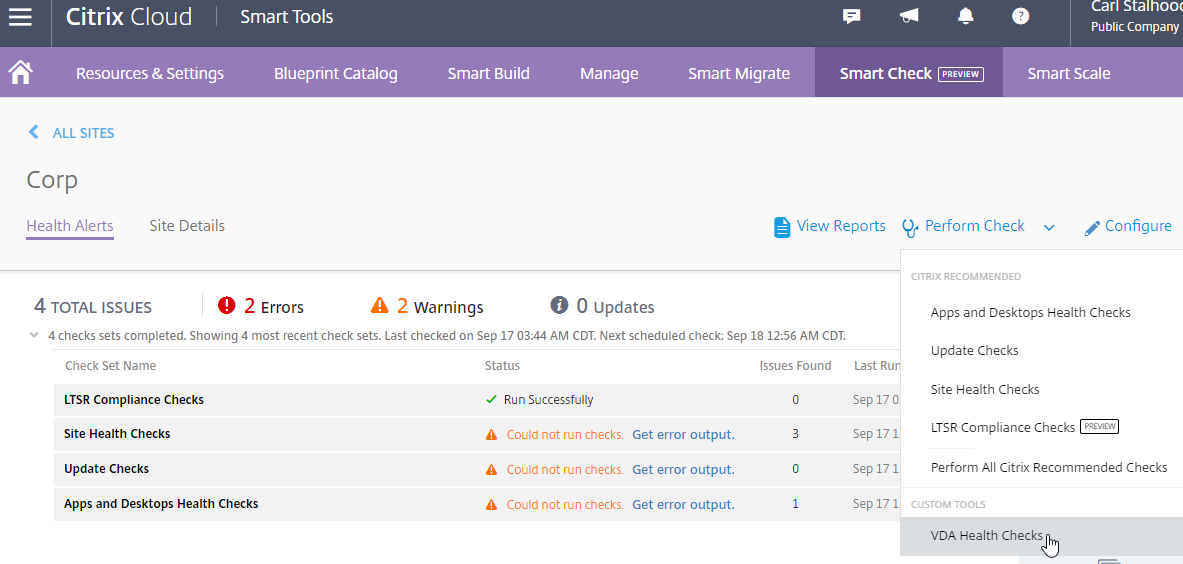
Smart Check
Citrix Cloud offers a Smart Check service that can scan your XenApp/XenDesktop infrastructure for known issues.
- For a list of checks, see About health checks at Citrix Docs.
- See What’s new for Citrix Smart Tools at Citrix Docs
- For a comparison of Smart Check and Citrix Insight Services, see Citrix Blog Post What Data is Smart Check Collecting?
To run Smart Check:
- Go to https://citrix.cloud.com, and login.
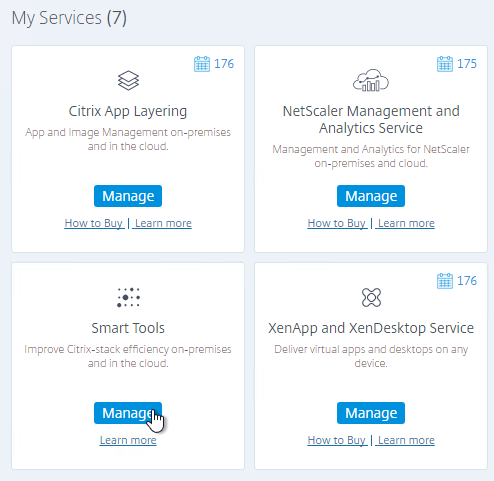
- After logging in, under My Services, find Smart Tools, and click Manage.
- Click Smart Check.
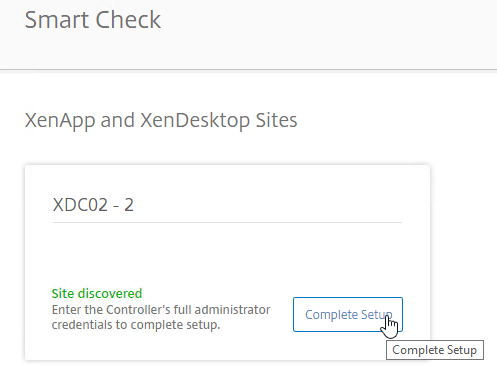
- If you enabled Smart Tools during the installation of XenDesktop 7.15, then the site should already be there. Click Complete Setup.
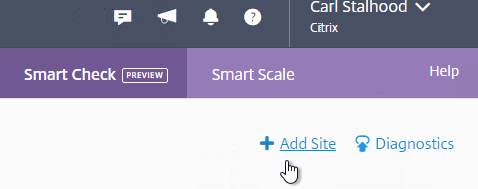
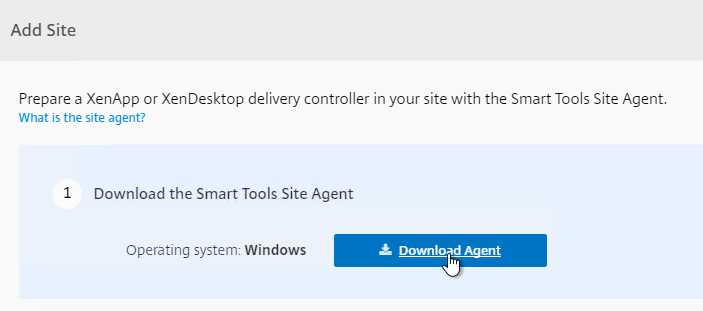
- If you didn’t enable Smart Check during XenDesktop installation, then on the top right, click Add Site.
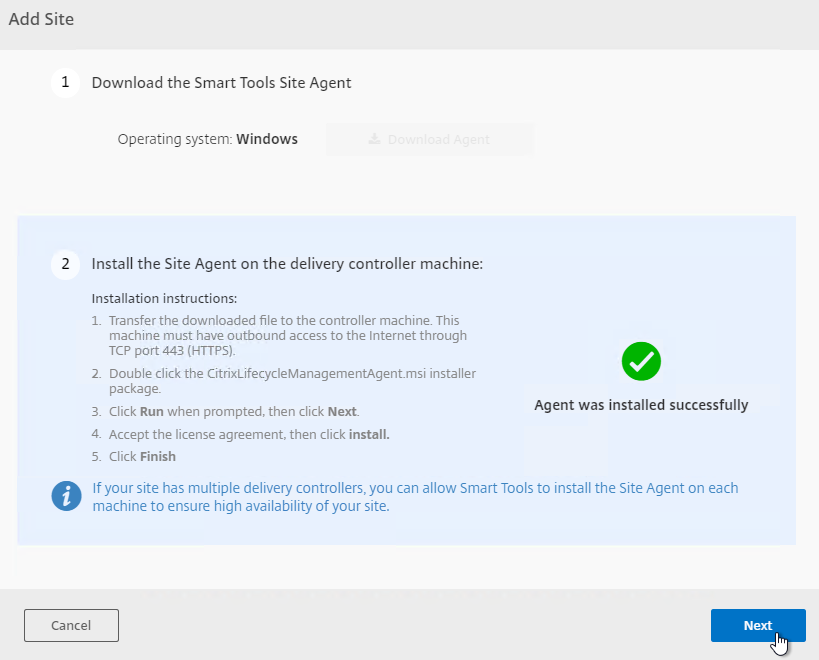
- In step 1, click Download Agent.
- Step 2 indicates it is waiting for you to install the Agent.
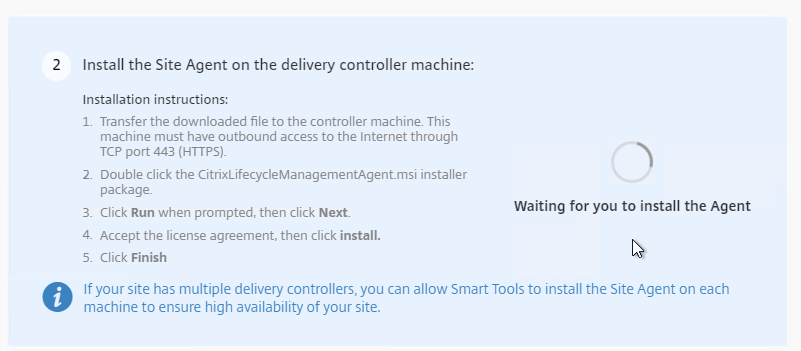
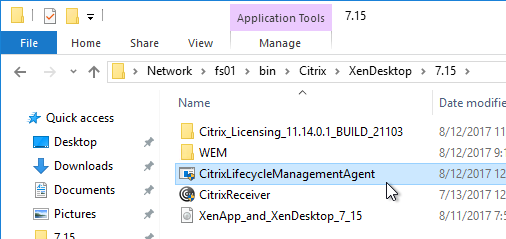
- On a Delivery Controller, run the downloaded CitrixLifecycleManagementAgent.exe.
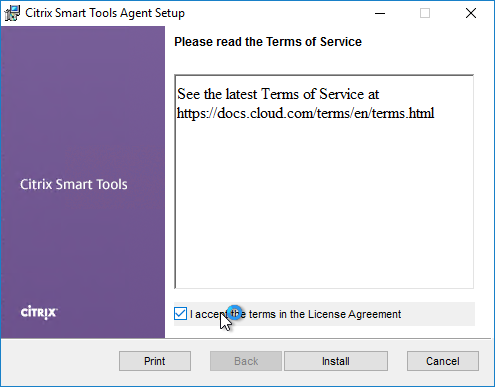
- Check the box next to I accept the terms in the License Agreement, and click Install.
- In the Completed the Citrix Smart Tools Agent Setup Wizard page, click Finish.
- Step 2 now shows that the Agent was installed successfully. Click Next.
- In step 1, click Download Agent.
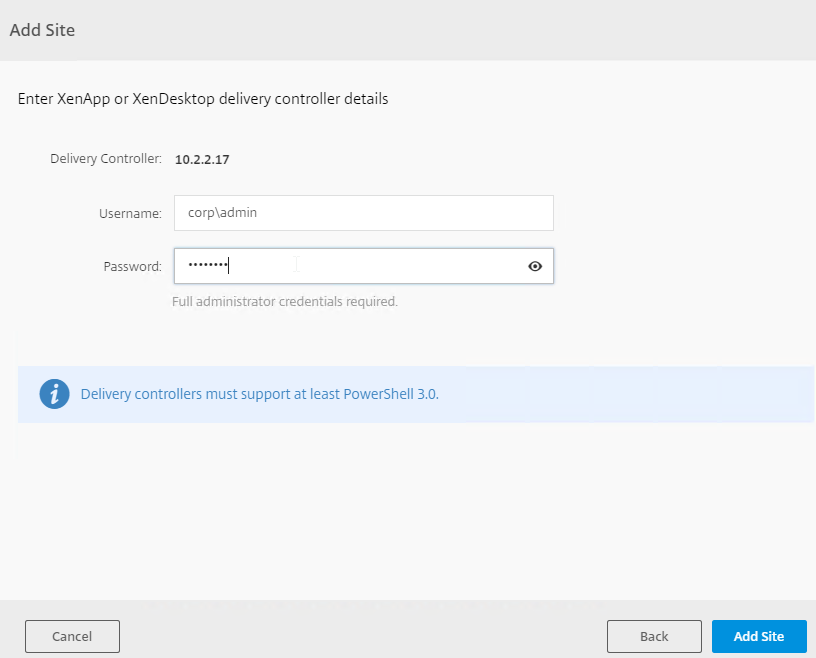
- Enter credentials for your XenDesktop farm, and click Add Site, or click Done.
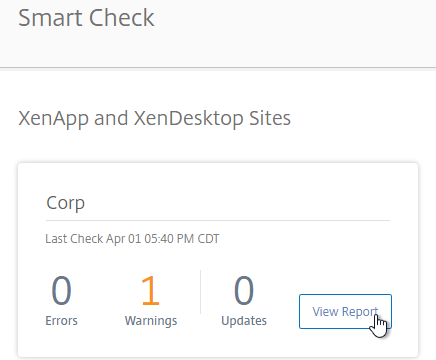
- Eventually you’ll see a Get Started link.

- Or, if the site is already added to your list of sites, click View Report next to the site.
- StoreFront, Provisioning Services, and Licensing Server cannot be automatically detected. You can add a Custom Check that targets those machines. See Perform health checks on Storefront, Licensing, and Provisioning Servers at Citrix Docs.
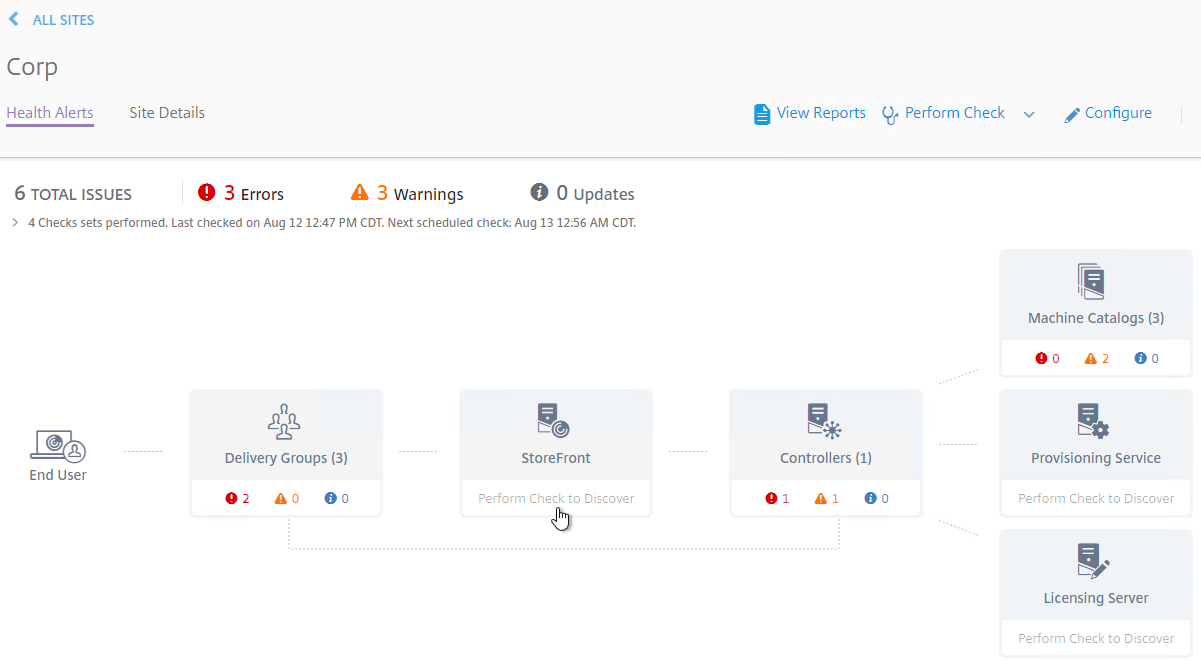
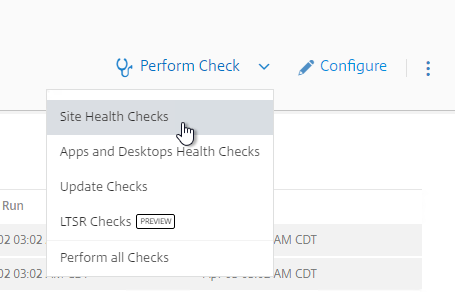
- At the top right, if you click Perform Check, you can run one of the checks.
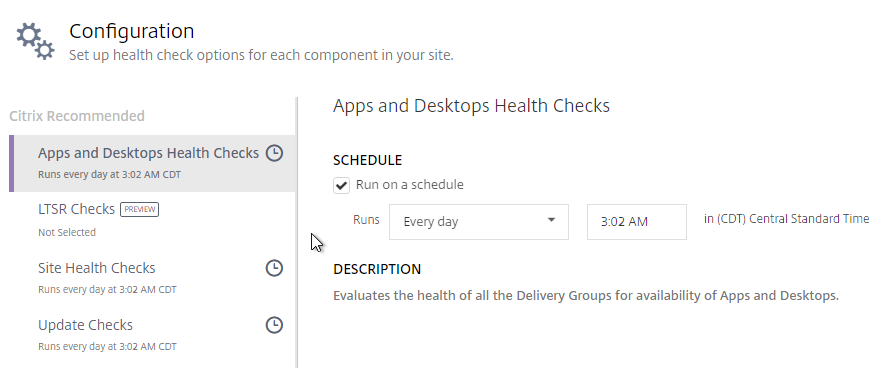
- If you click Configure.

- You can schedule the checks to automatically run periodically.
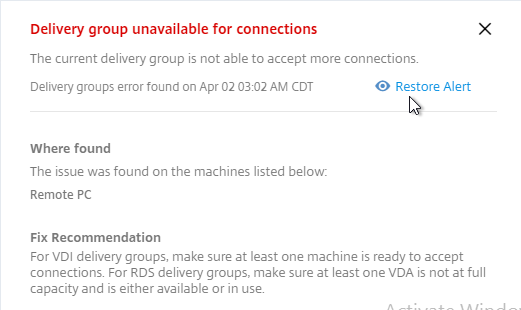
- To view the alerts, click one of the alert badges in the component category. Also see Smart Check alerts reference at Citrix Docs.

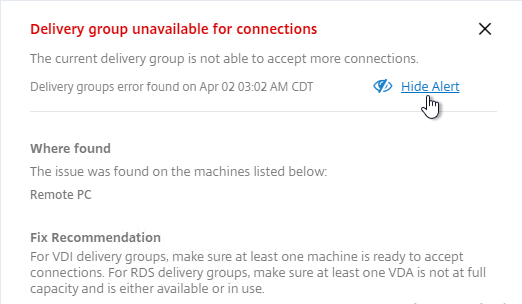
- Expand a component, and click an alert.

- On the right, there’s an option to Hide Alert.
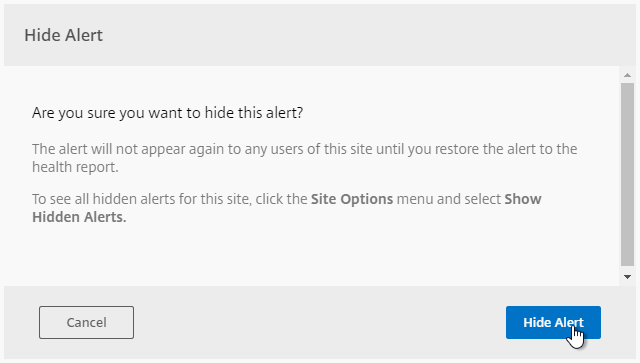
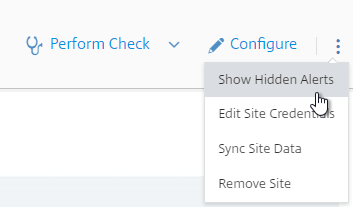
- To view the hidden alerts, at the top right, click the menu icon, and click Show Hidden Alerts.
- The hidden alert is grayed out. If you click the alert, you can restore it.

Additional Smart Checks
The Blueprint Catalog has additional checks that you can add to Smart Check. Click Blueprint Catalog in the menu bar. Scroll down to the Citrix Checks section, and click the plus icon next to one of them.
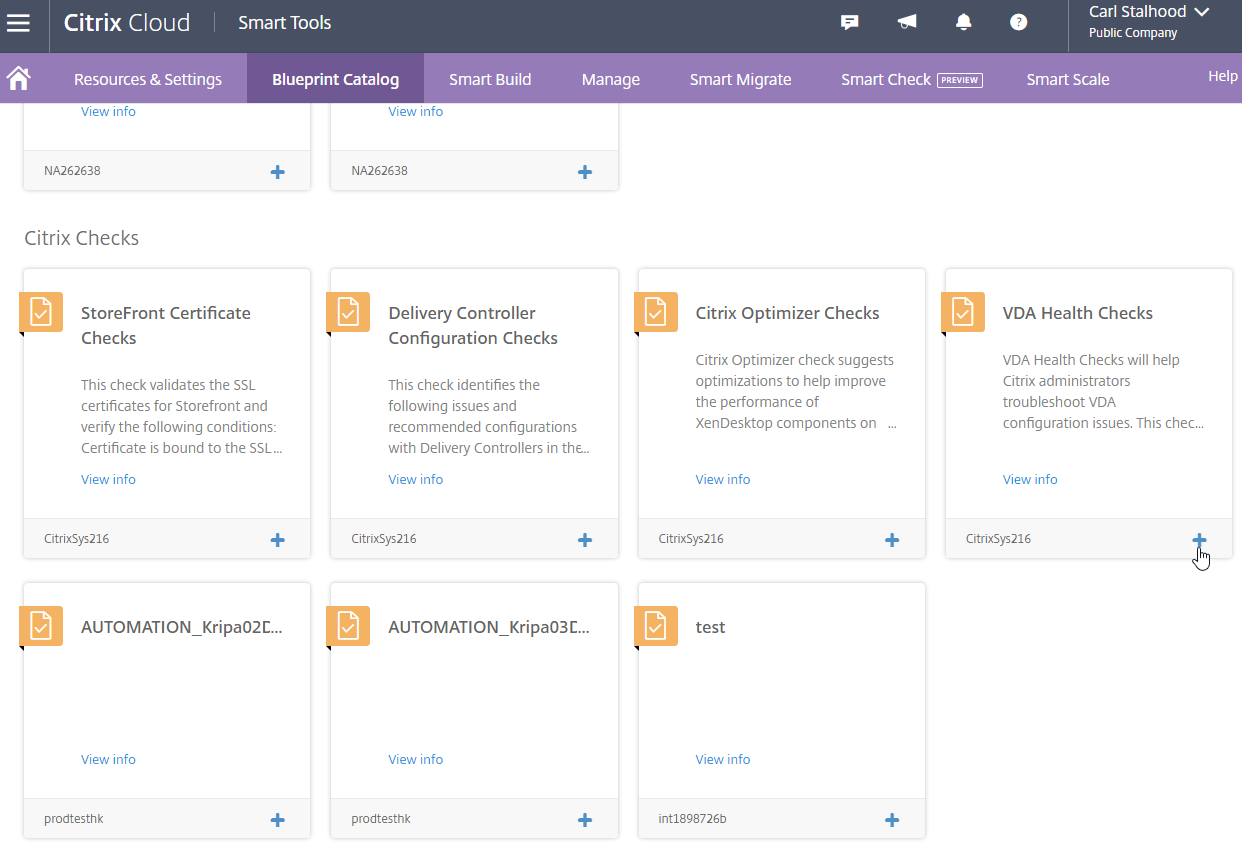
When you go back to Smart Check, open a site (View Report), and click Perform Check, you’ll see the Custom Check that you added from the Blueprint Catalog.
See Citrix Blog Post VDA Health Check Now Available on Smart Check.
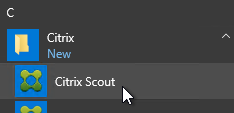
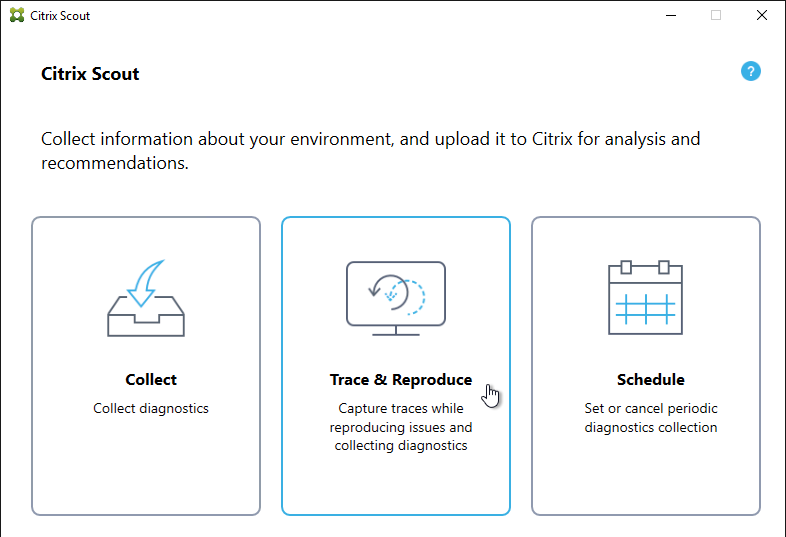
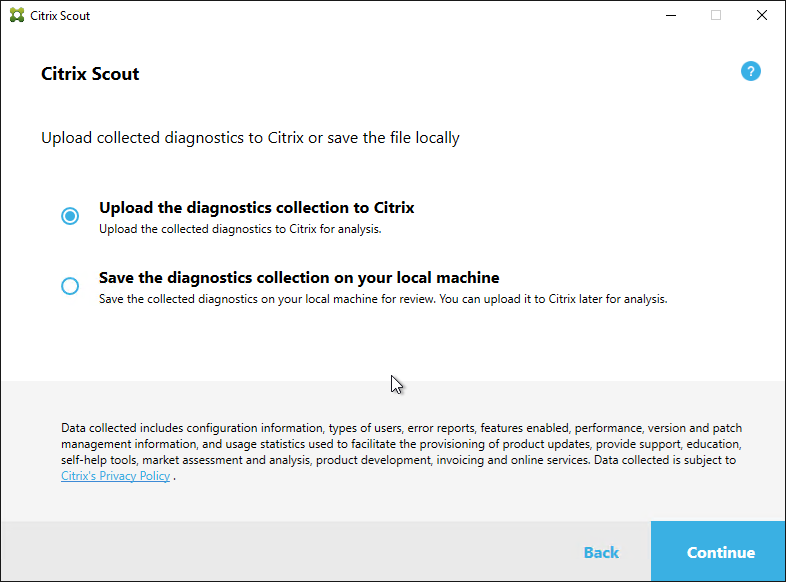
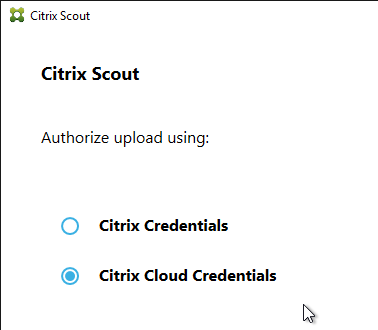
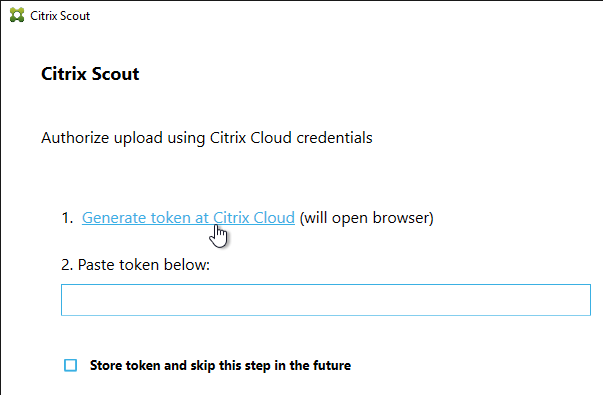
Citrix Scout
XenDesktop 7.15 includes a new Citrix Scout that can be launched from the Start Menu.
The tool can run a manual collection, run a trace, or schedule periodic collection. The results are uploaded to Citrix Smart Tools.
Links with more information:
- Bas van Kaam With XenDesktop & XenApp 7.14 comes Scout 3.0 – some big changes, read what’s new – compares old Scout with new Scout
- Citrix Docs Citrix Scout
XenApp/XenDesktop Health Check
Sacha Tomet Finally 1.0 – but never finalized!: XenApp & XenDesktop 7.x Health Check script has now Version 1.0.

Pavan900 posted a PowerShell-based Health Check script at Citrix Studi – Colors for Maintenance Mode at Citrix Discussions.
Andrew Morgan – New Free Tool: Citrix Director Notification Service: The Citrix Director Notification service sits on an edge server as a service (or local to the delivery controller) and periodically checks the health of:
- Citrix Licensing.
- Database Connections.
- Broker Service.
- Core Services.
- Hypervisor Connections.
And if any of these items fall out of bounds, an SMTP alert is sent to the mailbox of your choice for action. The tool will also send “All Clear” emails when these items are resolved, ensuring you are aware when the service has resumed a healthy state.
Matt Bodholdt XenDesktop 7.x Controller Service Status Script at CUGC – PowerShell script that checks the following:
- Lists Controllers with boot time
- Licensing status
- Service status on each Controller
- DB Connections
- Controller Available Memory
- Hypervisor Connections Status
Hi Carl,
Request you to suggest best way to migrate from XenApp 7.15/XenDesktop7.15 LTSR, to Desktops 7 2203 LTSR
Note: Not an in-place upgrade base Server Windows OS will also be changed(new machine)
Appreciate the input.
Upgrading the OS doesn’t prevent you from doing in-place upgrade.
1. In-place upgrade to 1912.
2. Replace the Delivery Controllers with 2019 servers.
3. In-place upgrade to 2203
4. Replace the Delivery Controllers with 2022 servers.
See https://www.carlstalhood.com/cvad-upgrades/#deliverycontrollers
Hi Carl,
Thank you for your quick response.
I want to firstly correct my mistake, the(current) version is 7.15 LTSR CU1.
And secondly we want to actually build new VM’s(License, Storefront, Delivery controller with Windows 2019/2022 ) and migrate it on them.
Appreciate all the help.
Citrix does not provide any tools to migrate config from one on-prem farm (database) to another on-prem farm. You can use PowerShell commands to export from one and import to the other. You can find some migration scripts on the Internet.
A simple question that no one seems to answer, so I am hoping this will be quick. Installing CU9 on XenApp/Xendesktop 7.15 with CU5 already installed. Does CU9 do any sort of database upgrade to the SQL Citrix farm databases, or not? I think not, but no one ever seems to answer this question directly. We have already upgraded most of the required components already. All that is left is Studio, the delivery controllers, and Citrix Commands. Appreciate any feedback.
Yes, every CU upgrades the database.
Thanks Carl! I appreciate knowing that for planning purposes.
Have you come across an issue where the Config Sync service simply will not initiate an import of the LHC files? I updated our controllers to 7.15 CU9 yesterday, and it stopped working. Services are all up and running without any other issues that I can see.
Hi Carl – I want to move Citrix Databases to new SQL Server. Is there a procedure that describes this process?
For the Citrix part, see https://www.carlstalhood.com/delivery-controller-2203-ltsr-and-licensing/#changedbstrings
I have what I think is a simple and straightforward question about upgrading our 7.15 LSTR base level site to CU7. In the article you linked about using local host cache for nondisruptive database upgrades, Citrix wrote the following:
“The following procedure demonstrates how LHC can be used to perform a nondisruptive upgrade of the Site when there are no secondary zones. Check back for future updates as Citrix is looking to expand this guide to include a procedure for environments with multiple zones.”
It seems to me this procedure can easily be used on sites with multiple zones. In our case, we have two zones each containing two delivery controllers.
So, it seems to me that I could just:
Force the outage on all four delivery controllers
Run the 7.15 LTSR CU7 product installer on the non-elected broker in the primary zone and then, from upgraded studio on that controller, perform the site database upgrade
Run the installer on the non-elected broker in the secondary zone
Exit the forced outage and ensure all VDAs register with the upgraded delivery controller in their respective zones
Run the installer on the remaining controller in each zone
Does this sound right to you?
I thought about this some more. My StoreFront servers load balance across all 4 delivery controllers–2 in each zone. During the forced outage, only the elected broker in each zone would accept requests from StoreFront. Additionally, during the outage, it is my understanding that users will only be able to launch applications from VDAs registered in the zone that the broker they happen to hit belongs to. So, I am thinking the key would be that I have VDAs for all critical applications residing in both zones, which is largely true in our case. I have opened a case with Citrix support to seek confirmation on how to do perform a nondisruptive upgrade in my specific situation with multiple zones. I’ll see what they say.
Hi Carl,
We are setting new environment 7.15 LTSR CU1 with all azure hosted environment (OS 2019) and SQL 2019
We are seeing issue where when we setup Azure Hosting Connection, only 1 delivery controller can be active and connected. When we logged into other DDC, we are getting prompt to re-enter our Azure Subscription Secret ID again.
We havent get far to create Machine Catalog due to this issue. Have anyone or Carl seen this issue? We have open case with Citrix and it’s on escalation engineer.
It’s very odd that they have not seen their customer with this setup before.
Are you able to upgrade your Delivery Controllers to version 1912, which it the last version to support Azure?
The License Server version 11.16.6.0 Build 31000 support concurrent licensing when using XenApp 6.5 or earlier?
I think I saw some reports in Citrix Discussions of it not working with 6.5. 6.5 isn’t supported any more so I don’t think Citrix tests it.
Hi Carl, Good Day.. We have already configured Secure XML communication in our environment. Now, certificate is going expire soon. So we need to install new certificate on DDC. What are steps we need to follow and what precaution we need to take so that it should not impact current production environment.
Install the new cert in certlm.msc.
Run
netsh http delete sslcert ipport=0.0.0.0:443to unbind the existing cert.Then run “netsh http add sslcert” with the additional parameters for thumbprint (new certificate) etc. Just like you did it initially.
I would probably prepare these commands in advance and run them at the same time to minimize the downtime. If StoreFront can’t connect while you’re doing this, then StoreFront should fail over to a different Controller.
Found out our XML certs expired several years ago. Any reason this hasn’t broken anything? Seems like something should have been affected. The certs still exist in certlm.msc but only show up as archived.
Is StoreFront using https to talk to the Delivery Controllers?
Hi Carl,
our VDAs went to unregistered state after migrating Database to another server. we need to restart VDA destop service to make registered again. this is right scenario or any other option to ignore VDA to unregistered state.
Hi Carl,
Our Vmware team changed network name. And now, our MCS Catalog (7.15CU4) cannot add machines because it´s referenced to the old network path.
What impact\behavior to run Update-HypHypervisorConnection -LiteralPath on our Production Enviroment? there´s no information about the results or what happens under the hood.
thanks!
I think it only affects newly created machines.
Hi Carl,
I have a query since you are clearing my doubts recently, im reaching you.
We have a existing farm with a domain e.g abc.com.
now we are planing for citrix hybrid, controllers in the on-premise and VDA servers in azure cloud.
Here the problem is client wants confirmation that , they are going to create new domain e.g.abz.com in the azure cloud will VDA server communicate with the existing site and authentication will happen without issue.
Please guide me with this scenerio to proceed further . Awaiting your reply
Thanks,
Azifkhan.N
Are the domains in the same forest? Or are they separate forests (external trust)? Here’s an article – https://support.citrix.com/article/CTX134971
Hi Carl, Thank You very much for your blog posts it has great information about the Citrix products.
I have a small scanner to publish an RDP application. what is the best way to publish an RDP application using citrix DDC.
we have 7.15 LTSR version and no RDSH server.
do we need to have dedicated RDSH and publish app from this server?
or rdsh role can be installed and configured on ddc server then publish from local server?
In single-server environment, you can install VDA on the Delivery Controller and publish an app in Citrix Studio. Otherwise, you should build separate RDSH machines with Citrix VDA, add them to a Catalog, add them to a Delivery Group, and then publish the application in Citrix Studio.
Hi Carl ,
For the certificate import in powershell I had to put the { } between ‘ to make it work Exemple — appid='{EEFA927F-A148-46C2-9640-4A8F7D1D2FDD}’
If you have problem to import I found a nice post about it from user mohghaderi here: https://stackoverflow.com/questions/779228/the-parameter-is-incorrect-error-using-netsh-http-add-sslcert
/quote
Here are some causes:
1- Copy and pasting certificate thumbprint from windows dialog adds a hidden character to your hash. It is not visible in text editors but you need to remove the character to make it work.
2- SSL thumbprint should be available in Personal -> Certificates to work with localhost.
3-It should be ‘ipport=’ not ‘ipport:’
4- SSL certificate should have a private key. If you are using certificate management console, make sure that it has a little key icon on the certificate view.
5- GUID should be defined in full format: {a10b0420-a21f-45de-a1f8-818b5001145a}, and it should have one quote in powershell: ‘{a10b0420-a21f-45de-a1f8-818b5001145a}’ Thus, PowerShell format is different from command line.
6- SSL Cert should have complete characters with all padding ‘0’s and without any space. You may copy thumbprint (be careful to remove special hidden character) and remove spaces, or use ‘netsh http show sslcert’ to get the value if the certificate is already registered for another address.
Hi Carl,
We have a need to determine who hasn’t logged into a particular 7.15 XenApp published desktop in a certain amount of time (or ever) for licensing purposes. I’ve combed over the PoSh SDK and searched online but can’t find anything. Director will show “User never attempted to connect to this machine.” or “User is currently not connected.” with a “Last connection attempt” entry if I find an applicable user. Can you point me in the direction of how to gather this info for all users who have the ability to log into this desktop?
Thanks!
Hi Carl, can one change port 80 Communication between Controllers to be different? Port 80 is not liked by security. I am trying to add a 2nd delivery controller and when I communicate with the main one it says “there was an error communicating with the delivery controller”
Maybe this? https://support.citrix.com/article/CTX232520
That looks promising but what about if I follow your ssl on delivery controllers instructions, would the controllers communicate with each other via port 443? And I can add the 2nd controller?
SSL for Delivery Controllers… I just observed that the appid changes between CU3 and CU4. If I have a cert installed with CU3 and upgrade to CU4 will I have to rebind the cert with the netsh command?
I just tried an upgrade and it works without any changes. I don’t think the appid actually does anything. I tried with some fake appids and it still worked. Google says the appid can be anything.
Hi carl ,
thanks for the great Blog
I am installing a Xendesktop 7.15 LTSR plateform (the plateform exists in DOMAIN A) . I want to use an existing SQL cluster to host my 3 databases (SQL cluster exists in DOMAIN B)
trust relationship is from Domain B —> Domain A
I will manual script for the creation (will send them to our DBA)
do you know if that could be possible or not?
thanks in advance
You might have to test it but it looks like it might work. The Controller’s Computer account logs into SQL.
thanks , will try that
Hello Carl,
i have installed xendesktop 7.15 delivery controller on 2 server.
the db for the 1st controller are created with script and work like a charm.
I run the script for the second 2nd controller and give it to the dba. the dba run it correctly, but when i try to add the second delivery controller it return with the error
Error Id: XDDS:E3C75A28
Exception:
Citrix.Console.Models.Exceptions.PermissionDeniedException You do not have the necessary permissions on the remote site to perform this join operation.
I add the service user as local admin in director and add the same user as db owner on relative db.
What i miss?
Does your account have full admin permissions inside of Studio on the first Controller?
Yes it was added as local Admin on servers
And Full Admin on Citrix Studio
Now i found that, after running the sript for the second controller.
I receive Cannot comunicate with the database even in first Delivery Controller.
Before running 2nd script all worked perfectly.
Was the 2nd script run using SQLCMD mode?
If this is a new deployment, it might be easier to start over. You can do that by setting your Citrix service connection strings to $null.
Ok, I reinstalled the delivery controller and generate a script for the 2 Delivery Controller at the same time and all works.
Thanks
Hello Carl,
I have a question regarding the issue Allessandro mentioned.
I have installed a second delivery controller just like Alessandro dit and game across the same issues.
The account i used for installing Citrix is a local admin on the server, full admin inside the studio on the first delivery controller, the scripts are run in SQLCMD mode and the account is sysadmin on the DB server. On the first delivery controller i’m also unable to manage the delivery controllers in the studio.
Unfortunatly this is not a fresh install but a production environment and therefor i can not start over again. Is there an easy way, other then performing a restore of the database, to remove the second controller of the database or to succesfully add the second to the site.
Kind regards,
Menno Bakker
See https://support.citrix.com/article/CTX139505
The database is running on a SQL HA allways on cluster. I think that the problems are relates to that setup.
Can you confirm that?
Carl,
Firstly, Thanks for all your Citrix work, been a lifesaver a couple of times for me! Secondly regarding CU4 I just finished updating our infrastructure from 7.15.2000 to 7.15.4000 last weekend. Externally everything is fine but internally it fails with Event ID 29: An SSL hostname was required but none was found. We dont use SSL on the delivery controller it is set to HTTP and the citrix article linked to it didn’t yield any answers.
Hi Carl, I need to know if i can add Workspace Environment Management licence for citrix cloud at standalone ?
I have access to Gateway, Virtual Apps and Desktops, Endpoint Management, Smart Tools and Content Collaboration for 25 users.
Thanks Carl
Are you asking if you can use the WEM Service in Citrix Cloud? I think it’s included with any Cloud Virtual Apps & Desktops subscription. Or are you asking if you can use on-prem WEM servers with Citrix Cloud Virtual Apps & Desktops instead of the WEM Servers in Citrix Cloud?
Is get-trustdbconnection a cmdlet only available after you upgrade a DDC to 7.15? Upgrade Step 11 says to run it before upgrading but my DDC doesn’t recognize that cmdlet…
I think it came with 7.8 and newer.
Hi Carl,
I have an Administrators jumpbox with Studio and Provisioning console installed to allow remote management of my Farm. All the consoles work as expected excluding Studios Search for VDAs in a delviery group.
The Jumpbox is in the same domain as most of the VDAs (one delivery group and four VDA of that group are in another domain). All the server are on 7.15.3000.
The error is, regardless of which delviery group I search, “The specidied domain does not exist or cannot be contacted”
This works fine on the Delivery Controllers themselves its just the jump box that has this error.
Full Error details:
__________
Error Id: XDDS:BA1624F2
Exception:
Citrix.Console.Models.Exceptions.ScriptException The specified domain does not exist or cannot be contacted.
at Citrix.Console.PowerShellSdk.DesktopService.Scripts.GetMachinesBaseScript`1.WaitForScopableObjectLoad()
at Citrix.Console.PowerShellSdk.DesktopService.Scripts.GetMachinesBaseScript`1.RunScript()
at Citrix.Console.PowerShellInteraction.PowerShellScript`1.Run()
at Citrix.Console.Desktops.UI.Mmc.Tabs.RdsMachineTabViewModel.PerformSearch(SearchRequestModel searchRequestModel)
at Citrix.Console.CommonControls.Mmc.SearchNodeTabViewModel`1.c__DisplayClass54_0.b__0()
at Citrix.Console.CommonControls.ViewModelBase.c__DisplayClass90_0.b__0(Object s, DoWorkEventArgs e)
DesktopStudio_ErrorId : UnknownError
ErrorCategory : NotSpecified
DesktopStudio_PowerShellHistory : Get Machines
31/01/2019 09:03:38
Get-BrokerMachine -AdminAddress “cdcv02.Domain.local:80” -Filter “(((DesktopGroupName -eq `”Dynamic Desktop`”)) -and (SessionSupport -eq `”MultiSession`”))” -MaxRecordCount 500 -Property @(“DNSName”,”CatalogName”,”DesktopGroupName”,”InMaintenanceMode”,”PersistUserChanges”,”PowerState”,”RegistrationState”,”SessionCount”,”MachineName”,”Uid”,”DesktopUid”,”DesktopKind”,”HypervisorConnectionUid”,”HypHypervisorConnectionUid”,”ProvisioningType”,”PvdStage”,”LastDeregistrationReason”,”FaultState”,”Tags”,”CatalogUid”,”DesktopGroupUid”,”Capabilities”,”SupportedPowerActions”) -ReturnTotalRecordCount -Skip 0 -SortBy “+DNSName”
Get-BrokerMachine : Returned 64 of 64 items
+ CategoryInfo : OperationStopped: (:) [Get-BrokerMachine], PartialDataException
+ FullyQualifiedErrorId : Citrix.XDPowerShell.Broker.PartialData,Citrix.Broker.Admin.SDK.GetBrokerMachineCommand
Inner Exception:
System.DirectoryServices.ActiveDirectory.ActiveDirectoryObjectNotFoundException The specified domain does not exist or cannot be contacted.
at System.DirectoryServices.ActiveDirectory.Domain.GetDomain(DirectoryContext context)
at Citrix.Console.ActiveDirectoryInteraction.ActiveDirectoryService.LookupDomain(String domainName)
at Citrix.Console.PowerShellSdk.ModelConverters.SdkCatalogModelConverter.ToModelObject(SdkCatalog input, IUnityContainer container)
at Citrix.Console.PowerShellSdk.DesktopService.Scripts.GetAllCatalogsWithScopesScript.b__1_0(SdkCatalog x)
at System.Linq.Enumerable.WhereSelectListIterator`2.MoveNext()
at System.Collections.Generic.List`1..ctor(IEnumerable`1 collection)
at System.Linq.Enumerable.ToList[TSource](IEnumerable`1 source)
at Citrix.Console.PowerShellSdk.DesktopService.Scripts.GetAllCatalogsWithScopesScript.RunScript()
at Citrix.Console.PowerShellInteraction.PowerShellScript`1.Run()
at Citrix.Console.PowerShellSdk.DesktopService.Scripts.GetMachinesBaseScript`1.b__15_2()
DesktopStudio_PowerShellHistory : GetAllCatalogsWithScopesScript
31/01/2019 09:03:08
Get-BrokerCatalog -AdminAddress “cdcv02.Domain.local:80” -MaxRecordCount 2147483647
__________
Any advise?
Kind regards
JC
I’ve installed a second jumpbox with the same error. I can’t seartch any machine or sessions on the jumpboxes. If anyone has any advice I’m all ears.
Hi Carl,
We currently have delivery controllers and storefront on the same server. Is it best practice to separate them and if so why?
Kind regards
I usually separate them in larger environments. Sometimes you want to upgrade the components separately.
Thanks Carl, is there any security benefits as well? isolating the STA from the storefront servers
STA runs on the Delivery Controller, not StoreFront. It’s just a small .dll that creates tickets in memory.
Hi Carl, in a AlwaysOn deployment, when does LHC take affect when there is a DB outage? For e.g if SQL goes down then it would automatically failover to secondary node in (DR), when does LHC take affect, if both SQL servers are down?
Local Host Cache engages when the site database is inaccessible for 90 seconds. https://docs.citrix.com/en-us/xenapp-and-xendesktop/7-15-ltsr/manage-deployment/local-host-cache.html
Thanks, but what would trigger first the Automatic failover or LCH.
@Carl, when you write : “Studio 7.15.2000 does not localize Citrix Policies”. Some Citrix policies don’t apply correctly and we have to install this patch?
Or upgrade to CU3.
I’d like but my client doesn’t want another migration. I’ll push the patch and the citrix policies will be functional. Thx for the tips.
Hello Carl,
Please note that I have configured Always on Availability group in SQL and at the time site creation(DDC) given Lister location. However in Summary page. I am getting message “no High Availability” ( I have sysadmin access on SQL)
Any suggestion??
Regards,
Dip B
I am looking to add a 7.18 DDC into my 7.15 LTSR farm as part of a process to have the DDC, Storefront, Licensing etc on the latest version but run a mixed, 7.15 LTSR and 7.18 VDA’s. When I try to add the 7.18 DDC to the farm it prompts for a database upgrade. I assume there are no issues of this to the functionality of the 7.15 components in the farm?
From Citrix Docs: “Within each Site, Citrix recommends upgrading all components. Although you can use earlier versions of some components, all the features in the latest version might not be available. For example, although you can use current VDAs in deployments containing earlier Controller versions, new features in the current release may not be available. VDA registration issues can also occur when using non-current versions.” I always upgrade all Controllers at the same time. If you need different versions, then you can create separate farms.
I am looking for solution to optimize HDX bandwidth over the MPLS link. We have 256 kpbs MPLS link in which currently 3 users are using outlook application and they are facing application hanging issue while accessing. So hereby i want to know which device I can be use to optimize the HDX bandwidth connections and apart from that what configuration do I have to do at DDC level in case of HDX optimization..
Hi Carl
This patch appears to be no longer available or supported by Citrix.
Citrix Broker Service 7.15.2000 Hotfix 1 – https://support.citrix.com/article/CTX237283
Hello Carl,
I currently have a 7.12 production platform (License, 2 Controllers, 2 SF, 2 Director) , and building a 7.12 UAT Platform in order to validate a 7.15 upgrade.
Currently, the 2 platform get licenses from the same Licenses server (7.12).
Is it possible to upgrate thise licenses server to 7.15, and get UAT platform (7.15) and production platform (7.12) running correctly? this mixed scenario should be running for 3 weeks.
Thank you for your help
Regards
Pierre
HI Carl
Do we have any tool for power management for xenapp 7.18 similar to citrix smart scale.
i have my ddc and vdi in azure and want to use feature similar to smart scale
From what i have heard you need citrix cloud subscription to use smart scale and is not free.
Regards
Citrix Xenapp 7.15 LTSR CU2 upgrade Installation suite doesnt show the core Components Page, i wonder why.
I’m forced to upgrade all the components at one go.
I have Storefront/DDC/License Server components installed on the Same server and want to upgrade DDC component before the storefront. i have already upgraded the License server.
any inputs why i’m not displayed the Core Components page where i can selectively upgrade only few components in my infra?
If you run xendesktopserversetup.exe from the ISO, does it only upgrade controller?
Hi Carl,
I am planning for secure xml communication
Currently its configured as below:
1. DDCs are LB via VIP
2.VIP in turn points to DDC on Prt 80
3.Monitor used is XD DDC one
4. for the LB VIP,there is no DNS entry
5. VIP IP has been added as manage del controller on SF console Transport type HTTP with port 80
6. No IIS installed on DDC.
Can you please suggest how i can achieve this
Due to Kerberos and WCF, Load Balancing will not work for VDA registration to Controllers.
Due to STA tickets, load balancing will not work for NetScaler Gateway to Controllers.
You might be able to put a cert on the load balancer and configure StoreFront to point to the load balanced FQDN using https. But that’s all you can do with load balancing.
What is the reasoning for installing the Remote Desktop Licensing Server on the Controllers and not the Citrix License Server? And if this must be the case, should the RDLS be on every Controller? Thanks.
For redundancy. Two minimum.
Carl,
I am having issues with a couple of my DDC’s. When I look in Studio it shows on 1 DDC under controllers. The other two are not there. Here’s where it gets weird. If I logon to either of the other two server (the ones not showing in Studio) and launch Studio, it launches and presents the Same info as the third DDC. I would expect to get the “Join an existing site, create a new site, etc” screen.
I am in the process of upgrading to 7.15LTSR, and prior to the upgrade, I removed both DC A and B from the site as we have not upgraded the VDAs yet and did not want to cause issues. Any thought on this?
I have run the evict scripts in the past for dead DDC’s but even thought server A and B do not show up anywhere in the database, or when running broker commands, they still connect to the DB. Please help, I am not in a position to rebuild the site, as this is a live production environment.
VDAs can be a different version than the Controllers so I’m not sure I understand why you removed Controllers.
Did you use Studio to remove the Controllers? After doing that, on the removed Controllers, did you set the database connection strings to null? https://support.citrix.com/article/CTX140319
I was not able to remove the other two DCs through studio, as they did not show up in the list of controllers. I set DB connections to null and ran evict scripts to try to get them out entirely but when i launch studio from either DC1 or DC 2 it still opens like they are functional. I guess my roundabout question is why does studio open on DC 1 and 2 if they do not show up in the list of controllers? I have had several sites where this has happened, and Citrix support can’t seem to give me a reason. Hoping you can shed some light on that.
Hi Carl,
i have a global farm with 2 DDC in USA and 2 in Israel under same DB, when i open the studio it is take long time to launch it, i already did unchecked the option Check for publisher’s certificate revocation on all DDC servers.
any ideal what can be the reason?
Hi Carl,
In the “Activating Remote Desktop Licensing” section you state the following:
“In the Completing the Activate Server Wizard page, uncheck the box next to Start Install Licenses Wizard now, and click Finish. Since the session hosts will be configured to pull Per User licenses, there is no need to install licenses on the RD Licensing Server.”
If we have a XenApp 7.15 environment only using Server OS to deliver published desktops, don’t we need to purchase Windows Remote Desktop User CALS for connecting to the session host servers? I’m confused that you’re saying there is no need to install licenses.
Yes, RDSH machines require each named user to have an RDS License.
However, what I’m saying is that Per User RDS Licensing is not technically enforced like Per Device licenses are enforced. But you must still be compliant with licensing requirements.
Studio – Slow Launch
– Despite this registry key being changed per the solution, it still takes 30-45 minutes to launch any Citrix MMC application (Storefront, Studio, etc.) any thoughts on what else could be interfering with the launch? Using 7.15 LTSR
Thanks!
Are you blocking Internet access from the Studio machine? If you run Studio on a machine that has Internet access, is it faster?
Hey Carl, I recently upgraded from 7.15 to CU1. The LTSR Assistant is complaining about the Citrix StoreFront Privilege Service on my storefront servers. When I look at the details of the Citrix.Storefront.PrivilegedService.exe file it does in fact show version 7.6.3000.1. I have a call logged with support, but wanted to know if you or anyone else has seen this before? Appwiz.cpl on both my storefront servers show this: storefront= 3.12.1000.1, XenApp= 7.15.1000.150, so I am confused that this one component did not upgrade.
I don’t see that file on my StoreFront 3.13. Maybe it’s no longer needed?
Do you think they deprecated the service? The service is still actively running on both my storefront servers.
Never mind. I was looking in the wrong place. My version of the file is 7.16.0.15.
Have you tried uninstalling StoreFront and reinstalling? If you have a Server Group, you should be able to then replicate the config from the other node.
I think I will wait for support before I take that on. Everything, to my knowledge, is currently working so I am a little gun shy with making too many changes without support on the call. Thanks.
HI Carl i want to upgrade from 7.6 sp3 to 7.15 ltsr, storefront 3.01 to storefront 3.12( if is needed ), and profilemanagement 5.2 admx to 5.8 or whichever is on 7.15, my question is , if i do the inplace automatic upgrade will all those components work with my 2015 netscaler 11.0 instalation and the setttngs from there which i took from youre website or i need to reconfigure the netscaler?
No NetScaler changes needed, unless you want to use the new UDP-based EDT protocol, or if you’re using AppFlow reporting.
Is there a bug with 7.15 published applications? I published a simple notepad and calc and screen is black. A published desktop is working as expected. The published apps are running on a windows 2012 R2 server
I have many 7.15 deployments with no issues with published applications. I’m guessing something environmental. Have you tried a clean 2012 build with just VDA and put it in an OU with no group policies?
Hi Carl,
thanks for the great tutorial. We are on XenDesktop 7.6 LTSR CU4 at the moment and plan to upgrade to 7.15 LTSR (license server already updated). We use two delivery controllers, the first one contains also the license server.
Do you see any problems when I upgrade the first delivery controller, database, delivery groups etce during working hours? Are there logins still possible on the secont delivery controller?
best regards,
In theory, it should continue to allow logins during the upgrade process. Once the database is upgraded, the upgraded Controller will handle logons.
Hi Carl
We’re presently running 7.13 and waiting for 7.16 to upgrade. But as I just discovered that support for older OS like “Windows 7” would be depreciated in 7.16 and we still have some such, thought 7.15 LTSR would be an alternative.
However I’m wondering if inplace upgrade from “LTSR” to “Current Release” is supported, when we would no longer required older OS.
Trying to put all facts together before jumping into “LTSR”.
Thanks
Yes, you can in-place from any older 7.x version to any newer version.
VDA 7.15 will work with Controller 7.16.
Hi Carl,
Did you expect a force schedule restart of all delivery groups after upgrading database in studio ?
Was the database offline during a scheduled restart of RDSH? If so, once the database is back online, it might kick off the scheduled restart.
Not during a normal schedule restart and my database wasn’t offline at this time…
I expect this force restart directly after the database upgrade.
I can see some event like “the citrix broker service has begun the processing reboot cycle…” but it’s not the right time for schedule reboot.
I guess it’s directly linked to database upgrade and schedule restart…
Citrix is testing in a lab right now.
Hi Carl: Thanks, as usual, for the very helpful documentation here on your Site. One question: I have looked everywhere for “yes” or “no” to this: Does the Delivery Controller, or any VDA that will host Apps or Desktops, need some of the “old” preparation steps that 6.5 used to require? Remember how we had to add the Roles of “Application Server” and “COM+” and “Remote Desktop Session Host” prior to installing XenApp on a Server? Along those same lines, do Apps get installed on a XenApp VDA (or any other) using something like that old “Install using Remote Desktop Services mode” or something similar? Thanks very much!
The XenDesktop/XenApp installer automatically installs whatever it needs.
If you’re installing MSI, or setup.exe, or install.exe, then no need to “change user /install”, since it happens automatically. Other installers might need it. I usually don’t do it, and fix HKCU manually, instead of relying on “install mode”.
Hi Carl,
In Studio, Configuration, Licensing when you Change Licensing Server on the Certificate Authentication screen, it always shows “This certificate is not trusted” and the expired license server certificate. Is this just getting the initial cert from when it first connected to the license server, nad not the current SSL cert? Is there a way to get it to fetch the current one? Or is it indeed getting the current one and I need to do something on the Licensing server, renew a cert or…? Thanks!
There are two certs on License Server – one for LS, one for WebServices. I’m guessing you need to change the WebServices cert (C:\Program Files (x86)\Citrix\Licensing\WebServicesForLicensing\Apache\conf). Uninstall/reinstall should generate new self-signed cert.
Is this anything to worry about, or update on a regular basis, anytime the cert shows as expired? Or ignore?
I’m not aware of any issue if it expires or untrusted.
Hi Carl,
I am going to implement 1000 Citrix XenApp users session and want to know how much bandwidth would be required at datacenter for the same.