Navigation
- Change Log
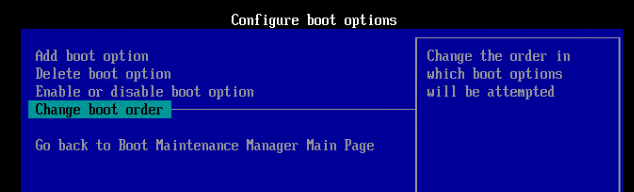
- Health Check Overview
- StoreFront Load Balancing
- Delivery Controllers
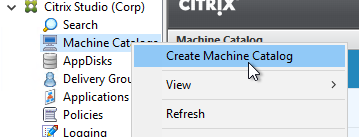
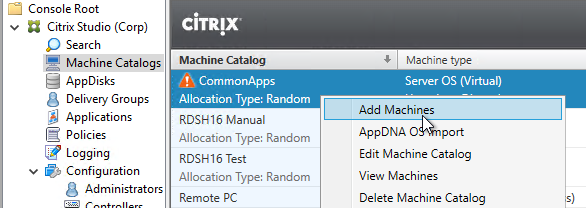
- Citrix Studio
- Citrix License Server
- Remote Desktop Services (RDS) Licensing
- Citrix Director
- VDAs
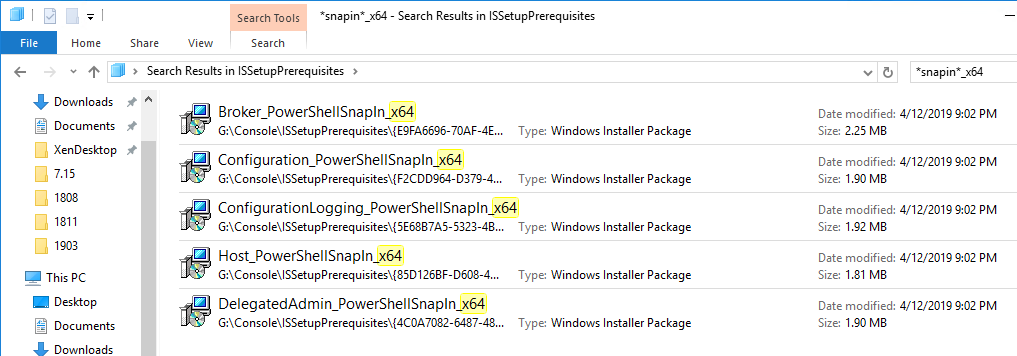
- Citrix App Layering
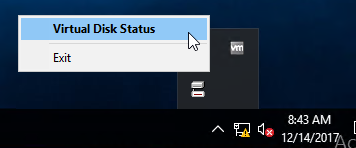
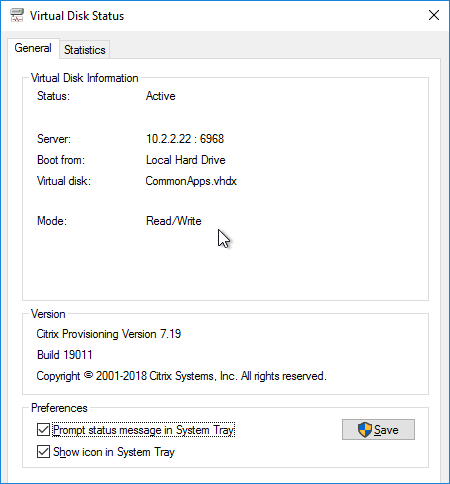
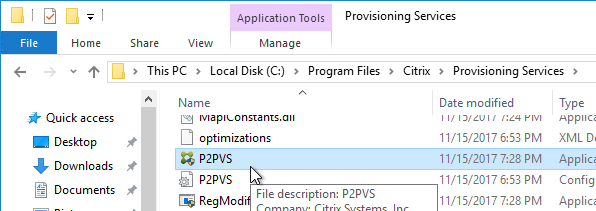
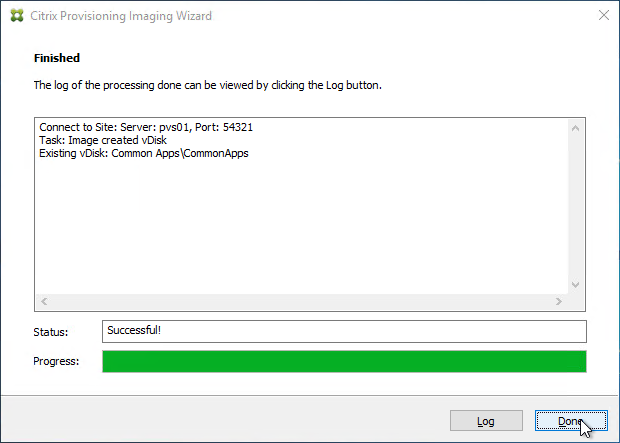
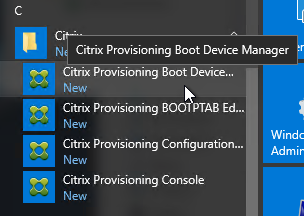
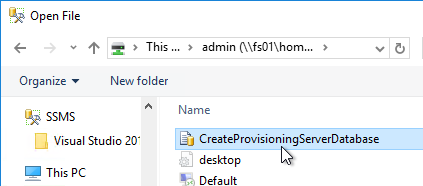
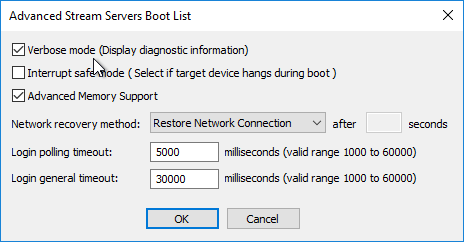
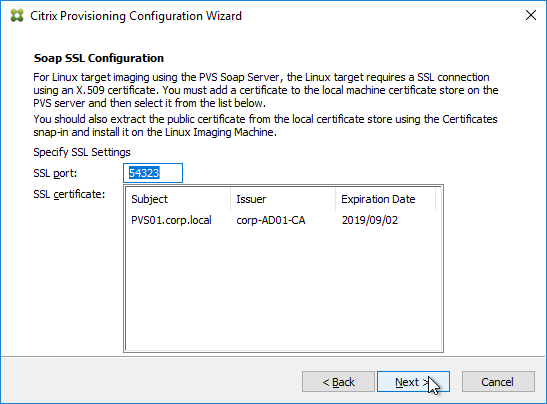
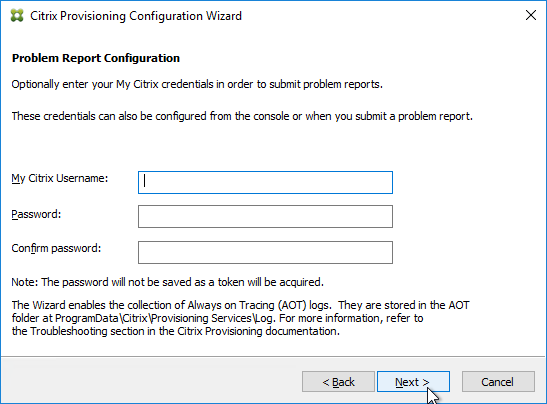
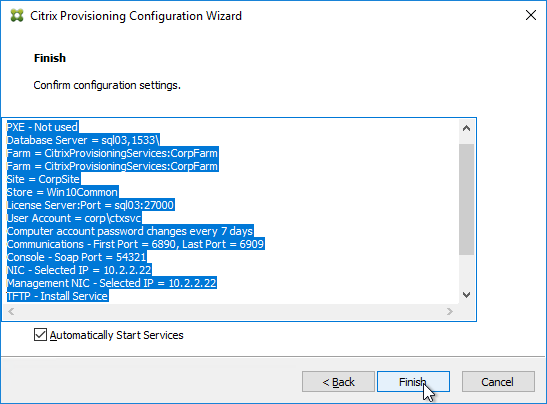
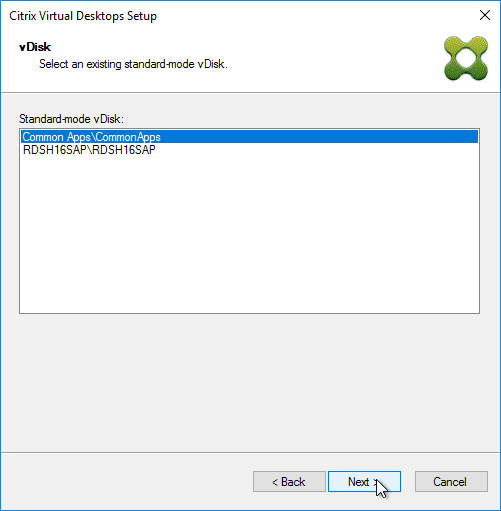
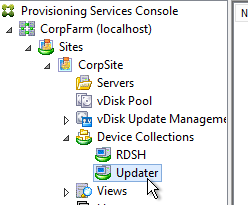
- Citrix Provisioning
- Group Policies and Active Directory
- Citrix Policies
- Citrix Workspace Environment Management (WEM)
- Citrix Profile Management and Folder Redirection
- Endpoint Devices
- NetScaler Citrix ADC
- NetScaler Citrix Gateway ICA Proxy
- NetScaler Citrix ADC GSLB
Change Log
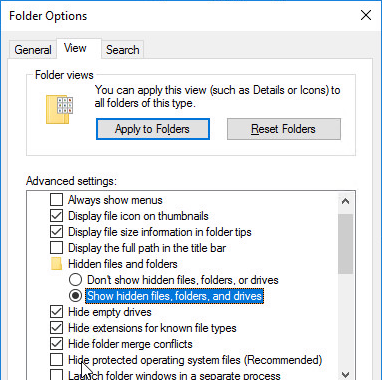
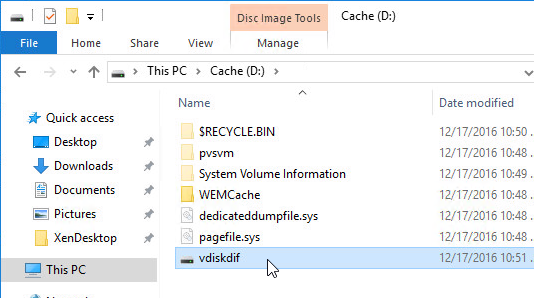
- 2024 Feb 28 – NVIDIA vulnerability
- 2024 Jan 24 – NetScaler vulnerability
- 2024 Jan 24 – StoreFront vulnerability
- 2023 Oct 26 – VDA Master Image – VMware Tools 12.3.5 to fix vulnerability
- 2023 Oct 25 – vCenter vulnerability
- 2023 Oct 10 – NetScaler vulnerability
- 2023 June 13 – Citrix vulnerability
- 2023 Mar 10 – nFactor login fields are encrypted.
- 2023 Feb 5 – License Server telemetry requirement
- 2023 Feb 4 – Workspace app vulnerabilities fixed in versions 2212, 2203 CU2, and 1912 CU7
- 2023 Feb 4 – VDA Master Image – VDA privilege elevation vulnerability
- 2022 Nov 17 – Citrix NetScaler 12.1 with SAML – security vulnerability
Health Check Overview
Health Checks review an environment for configurations that might cause future problems, not necessarily existing problems. Health Checks tend to focus on non-functional qualities like the following:
- Availability
- Security
- Manageability
- User Experience
- Performance
- Reliability
The rest of this article is an incomplete list of health check assertions for Citrix environments.
StoreFront Load Balancing
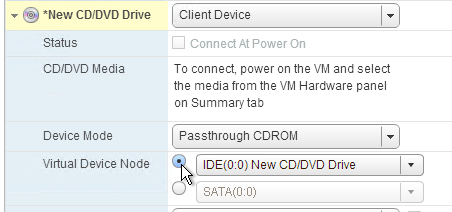
- Citrix connectivity infrastructure design is documented: StoreFront, Gateways, ADCs, multiple datacenters, Delivery Controllers, SQL, etc.
- Separate test Citrix environment has identical architecture as production: multiple data centers, high availability for all components, etc. – enables testing changes, including HA/DR changes, before performing those changes in production. Some upgrades are performed differently for HA/DR than for single components.
- The FQDN that users use to access Citrix (e.g. https://citrix.company.com) resolves to a Load Balancing VIP, not a single server.
- The FQDN automatically fails over (e.g. GSLB) to a VIP in a different data center if the primary data center is down.
- The certificate for the SSL Load Balancing VIP is valid: trusted, not expired, matches FQDN, no errors in Chrome, etc.
- Someone is responsible for ensuring the certificate is not expired and receives pending certificate expiration notifications.
- The Load Balancing VIP sends SSL traffic to two or more StoreFront servers in the local data center – for redundancy.
- The ADC-to-StoreFront server communication is SSL/TLS encrypted, not HTTP – this traffic contains user credentials.
- The ADC monitor for the StoreFront servers is type STOREFRONT, or does a GET request to /Citrix/Store/discovery – other monitors might not detect stopped services.
- X-Forwarded-For is configured in the Load Balancing Services (or Service Group) for Client IP header insertion.
- Load balancing persistence is SOURCEIP with a timeout that is as long as the Receiver for Web timeout – COOKIEINSERT doesn’t work on all client devices.
StoreFront Servers
- If the StoreFront servers are on the same hypervisor cluster, then anti-affinity is configured to keep them on separate hypervisor hosts.
- StoreFront server VMs do no have any old snapshots – slows down performance, and consumes disk space.
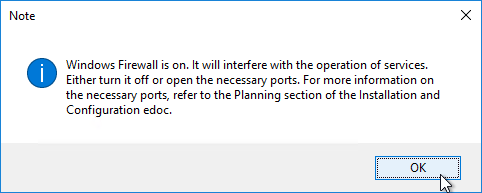
- StoreFront version is updated to resolve Security vulnerability as of Jan 16, 2024.
- Upgrades are performed in a separate test environment that has identical architecture as production before the updates are performed in production.
- StoreFront server group have latency of less than 40 ms (with subscriptions disabled) or less than 3 ms (with subscriptions enabled) between each member.
- StoreFront configuration is propagated to other servers in the StoreFront Server Group.
- OS, Patch level and VM Configuration of all StoreFront Server Group members are identical.
- No recent unknown errors in Event Viewer at Applications and Services -> Citrix Delivery Services.
- StoreFront Base URL is an https URL, not http. The FQDN resolves to the Load Balancing VIP, not a single server.
- SSL certificates are installed on each StoreFront server and bound to IIS Default Web site. The SSL certificates are not expired.
- C:\Users does not contain a bunch of user profiles. Delprof2.exe should be scheduled to delete these profiles – caused by users changing expired passwords.
- If HTML5 Workspace app is enabled, then HTML5 Receiver is up to date – New versions are released at least monthly.
- If Workspace app is stored on StoreFront servers, then the local Workspace apps in C:\Program Files\Citrix\Receiver StoreFront\Receiver Clients is current.
- If Favorites are enabled, then Favorites (aka Subscriptions) are replicated to a StoreFront Server Group in a different data center.
- If Federated Authentication Service (FAS), then multiple FAS servers configured through Group Policy.
- FAS Servers are the same version as StoreFront.
- If the FAS servers are on the same hypervisor cluster, then anti-affinity is configured to keep them on separate hypervisor hosts.
- FAS Get-FasAuthorizationCertificate shows registration certificate is OK and not MaintenanceDue.
- FAS group policy .admx template is up to date in SYSVOL.
- FAS User Rules restricts usage to just some StoreFront servers, some VDAs, and some users – not all
- Auto-enrollment is not enabled on the FAS certificate templates..
- The Certificate Authority database is not excessively large.
- For CA that is dedicated to only FAS, only Citrix templates. Other templates (e.g. Domain Controller) removed.
- Task Manager shows sufficient CPU and Memory for each StoreFront server.
- There’s sufficient free disk space – check C:\inetpub\logs
- A monitoring tool alerts administrators of any StoreFront performance metric issue, availability issue (e.g. service stopped), and Event Log errors.
- Logon Simulator runs periodically to verify that StoreFront is functional.
- StoreFront Disaster Recovery procedure is documented and tested.
StoreFront Configuration
- Only one store. Or every store but one is hidden – if multiple stores are advertised, then Workspace app will prompt the user to select a store.
- Each Delivery Controller farm is configured with two or more Delivery Controllers – for redundancy.
- Or Delivery Controller XML can be load balanced. If load balanced, then ADC monitor is of type CITRIX-XD-DDC – so ADC can detect Local Host Cache outages.
- Prefer separate farms per data center instead of stretched single farms (with zones) across multiple data centers.
- Transport Type for Delivery Controllers is https, not http – this traffic includes user credentials.
- Receiver for Web Session Timeout is not too short for user experience or too long for security.
- Citrix Gateway configuration in StoreFront console:
- The STAs in StoreFront match the STAs configured on the Citrix Gateway Virtual Server on the ADC appliances.
- Session Reliability is enabled.
- Callback URL is only needed for SmartAccess and Citrix FAS – Callback URL should be removed if it’s not needed.
- Internal Beacon is only reachable internally.
- External Beacon does not include citrix.com – ping.citrix.com is OK
- HDX Optimal Routing can send ICA traffic through the Citrix Gateway that is closest to the VDA (i.e. farm).
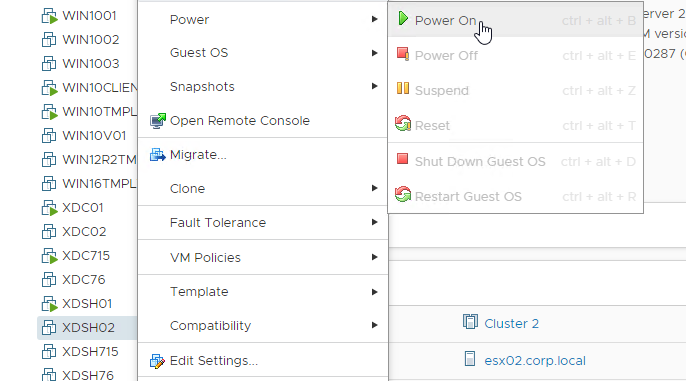
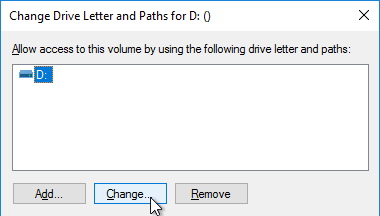
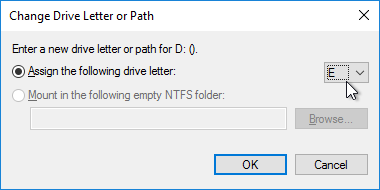
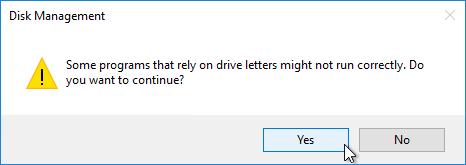
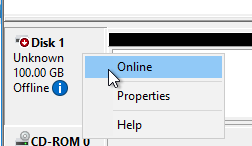
Delivery Controllers
- In CVAD 1906+, Citrix Scout Health Check does not show any errors or warnings.
- If the Delivery Controller servers are on the same hypervisor cluster, then ensure anti-affinity is configured to keep them on separate hypervisor hosts.
- Delivery Controller VMs do not have any old snapshots.
- Delivery Controller version is an LTSR Cumulative Update version (e.g., 1912 CU7), or the two latest Current Release versions (e.g., 2305). No other versions are supported – Citrix Product Matrix shows support dates.
- Delivery Controller Upgrades are performed in a separate test environment before performed in production.
- Citrix upgrades or updates are performed around twice per year.
- Run Get-BrokerDBConnection to see the SQL connection string. No SQL Express. For AlwaysOn Availability Group (AAG):
- SQL String points to AAG Listener, not single node.
- All AAG SQL nodes in one data center. For multiple data centers, prefer separate farms in each data center with local SQL.
- SQL String contains MultiSubnetFailover.
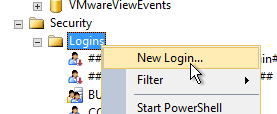
- Each SQL server has SQL Logins for all Delivery Controllers – SQL Logins usually don’t replicate between SQL nodes.
- Prefer Synchronous Commit with Automatic Failover over Asynchronous replication.
- AAG Dashboard in SQL Studio does not show any issues.
- SQL databases for Site, Monitoring, and Log are separate, not combined.
- SQL databases for Citrix are not excessively large. Database Backup tool is truncating the database logs.
- SQL Servers have sufficient CPU/Memory to handle the Citrix SQL traffic. Monitoring tool alerts SQL DBAs of any performance or availability issues.
- SQL Server version is supported by Citrix. https://support.citrix.com/article/CTX114501
- Local Host Cache is enabled on the Delivery Controllers. Run Get-BrokerSite to confirm.
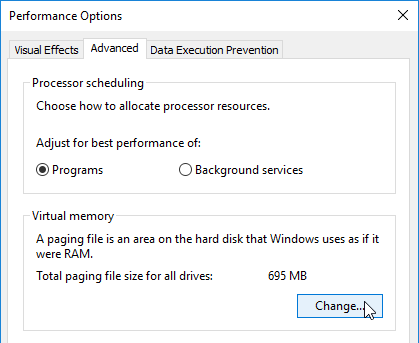
- Delivery Controller virtual CPU allocation is 1 CPU socket with multiple cores – SQL Express LocalDB for Local Host Cache only runs on a single socket (up to four cores).
- How are non-persistent virtual desktops handled during SQL outage?
- In CVAD 1912 and newer, LocalDB is upgraded to SQL Server Express LocalDB 2017
- SQL Disaster Recovery plan is documented and tested.
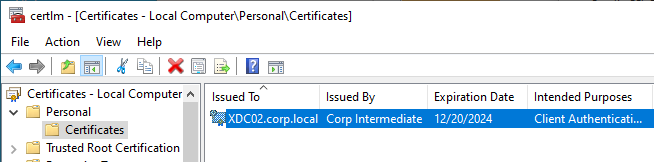
- SSL Certificates are installed on Delivery Controllers to encrypt XML traffic from StoreFront.
- SSL certificates are bound to IIS Default Web Site, or netsh http sslcert to perform binding. IIS Binding does not include hostname.
- SSL certificate not expired.
- Trust XML Requests is enabled for pass-through authentication, SmartAccess, FAS, etc. Run Get-BrokerSite to confirm.
- Task Manager shows sufficient CPU and Memory for each Delivery Controller server.
- A monitoring tool alerts administrators of any Delivery Controller performance metric issue, availability issue (e.g. service stopped), and Event Log errors.
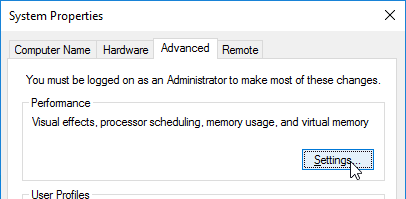
Citrix Studio
- Citrix Studio consoles installed on administrator machines are the same version as the Delivery Controllers.
- Customer Experience Improvement Program is disabled in Citrix Studio > Configuration node > Product Support tab.
- Licensing Model/Edition matches what you actually own.
- Citrix Studio Administrators are periodically audited to ensure only authorized users are granted Studio access.
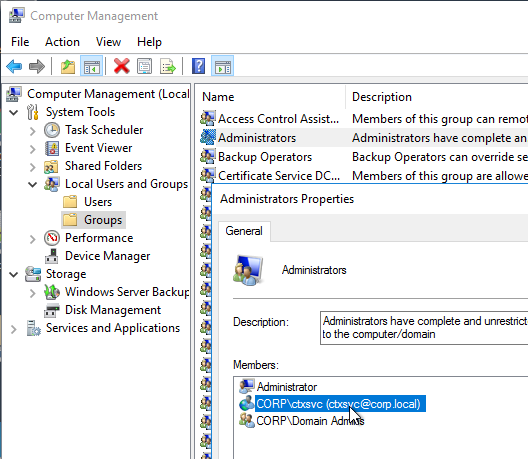
- Administrators are added as Active Directory Groups, not individual users.
- Applications are published to Active Directory Groups, not individual users.
- If App Groups, applications are published to only App Groups. Applications are not published to both App Groups and Delivery Groups.
- Hypervisor connection uses a service account, not an admin account.
- Hypervisor permissions for the service account are the minimum permissions required (custom role), not full hypervisor administrator.
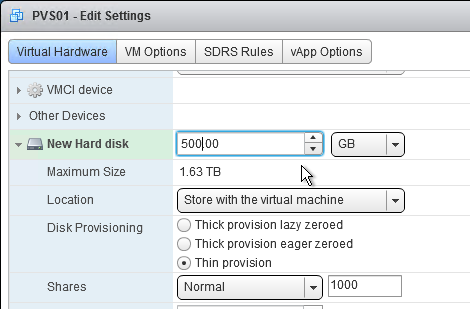
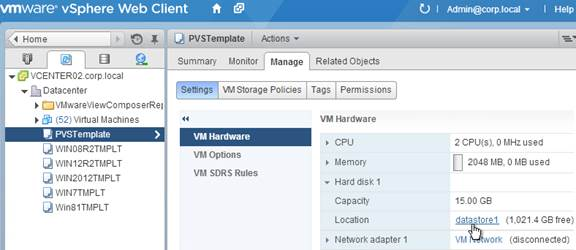
- Each Hosting Resource only has one datastore selected, not multiple datastores – Citrix MCS does not have a datastore “Rebalance” option. More datastores means more copies of master image snapshots, which means longer time to push out an updated Master image.
- MCS Memory Caching Option is not enabled unless VDA 1903 or newer – older VDA, including 7.15 VDA, has poor performing MCSIO driver.
- If MCS, VDA restarts are not performed in hypervisor since hypervisor does not cause MCS reset like Studio restart does.
- StoreFront URLs are not assigned to Delivery Groups using Studio – instead use Workspace app group policy to assign StoreFront URL.
Citrix License Server
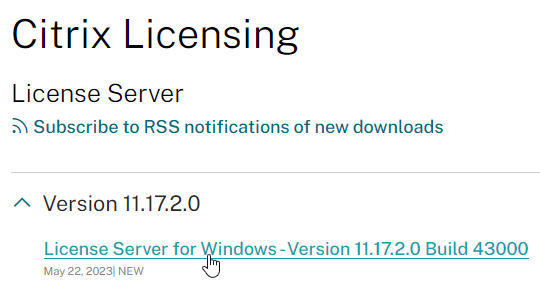
- Citrix License Server is version 11.17.2.0 build 40000 or newer to resolve Apache vulnerabilities.
- Citrix License Server is uploading telemetry every 90 days as required by Citrix. Check c:\Program Files (x86)\Citrix\Licensing\LS\resource\usage\last_compliance_upload
- The licenses installed on Citrix License Server match the purchased licenses at https://citrix.com/account – some Citrix License Servers have too many licenses installed.
- If multiple Citrix License Servers, installed license count across all License Servers does not exceed the purchased licenses shown at https://citrix.com/account
- Administrators are not frequently clearing named user license assignments to simulate concurrent licensing – license assignments should only be cleared when the user permanently no longer uses Citrix.
- Subscription Advantage dates are not expired – if expired, download new license files and install them.
- Usage and Statistics tab is configured as intended in the Citrix Licensing Manager gear icon.
- Citrix License Server Disaster Recovery procedure is documented and tested.
Remote Desktop Services (RDS) Licensing
- If RDSH VDAs, two or more activated RDS Licensing servers.
- RDS Licensing Server operating system version matches (or newer) the RDSH VDA operating system version – e.g. Windows 2019 RDS Licensing for Windows 2019 RDSH servers. Windows 2019 RDS Licensing also works with Windows 2016 RDSH servers.
- In RD Licensing Manager, right-click server -> Review Configuration shows green checkmarks.
- The combined licenses installed on all RDS license servers do not exceed the purchased licenses.
- On RDSH VDAs, HKEY_LOCAL_MACHINE\SOFTWARE\Policies\Microsoft\Windows NT\Terminal Services\LicenseServers shows two servers.
- LicensingMode = 4, which is Per User mode, which is not enforced.
Citrix Director
- Director version matches the Delivery Controller version.
- If multiple Director servers:
- Hypervisor Anti-affinity is configured.
- Director Saved Filters are relocated to a UNC path instead of local C: drive.
- Director server VMs do not have old snapshots – slows down servers, and increases disk space.
- SSL certificate is installed on Director servers.
- Admins and Support teams always use https to access Director. IIS or load balancer redirects from http to https.
- Director website is SSL load balanced.
- SSL protocol, not http, between load balancer and Director servers – this traffic contains user credentials.
- Director logon page auto-populates the domain name – for user convenience. Might have to reconfigure the domain name after every Director upgrade.
- Citrix Policy Settings for Director:
- Enable Process monitoring is enabled.
- Enable monitoring of application failures is enabled.
- If Citrix Virtual Apps and Desktops (CVAD) is Premium Edition:
- Director Alerts are configured to email CVAD administrators.
- Citrix ADM HDX Insight is integrated with Director. HTTPS protocol, not HTTP.
- Probes are configured – Probe Agent version matches the Director version.
- Help Desk knows how to use Citrix Director to support users.
- Average logon durations are not excessive.
- Repetitive issues (e.g. profile resets) are analyzed for root cause analysis and future prevention.
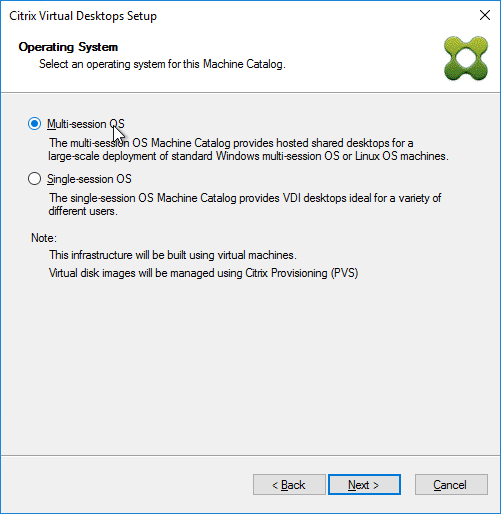
VDAs
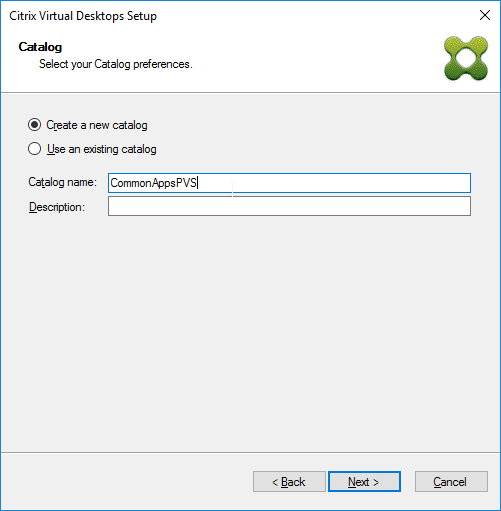
- Catalog design is documented – storage design, network design, multiple datacenters design, recovery design, etc.
- VDA version matches the Delivery Controller version.
- CVAD Current Release is 2009 or newer (2103) for Security Updates.
- CVAD 1912 is CU2 or newer (CU3), which has Security Updates.
- XA/XD 7.15 is CU6 with Security Updates, or newer (CU7).
- VDA Subnets are added to Active Directory Sites & Services.
- Check LOGONSERVER variable after logon to confirm correct Domain Controller.
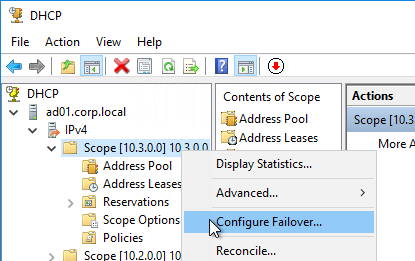
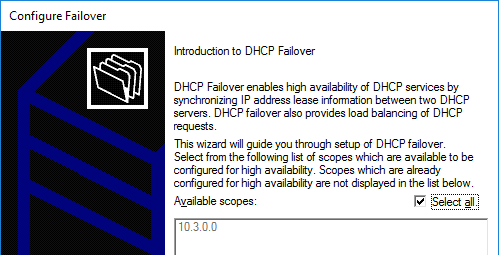
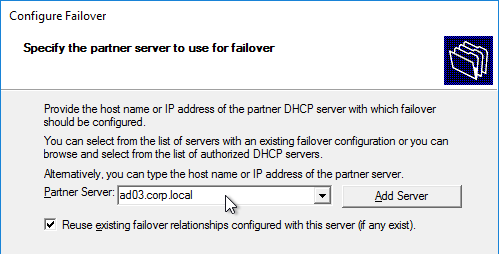
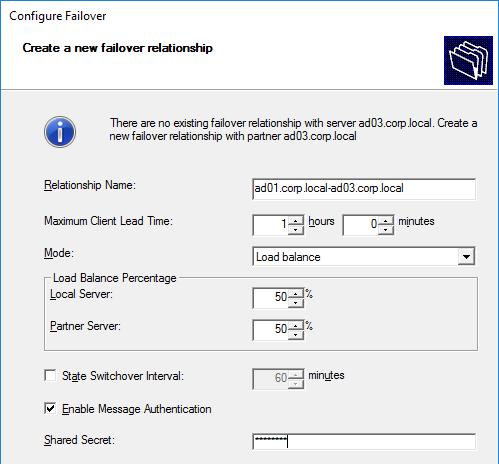
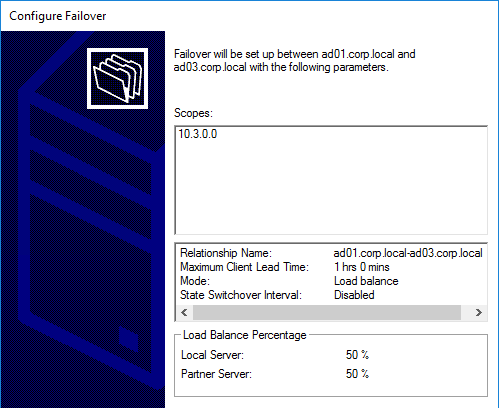
- DHCP is highly available. VDA IP Subnet router forwards DHCP requests to more than one DHCP server. DHCP scope is replicated to more than one DHCP server.
- DHCP Scope has sufficient address availability for VDAs.
- DNS Reverse Lookup Zone with PTR records for the Virtual Apps and Desktops machines.
- If KMS, slmgr.vbs /dlv shows a unique KMS CMID for each VDA machine – another option is Active Directory-based activation.
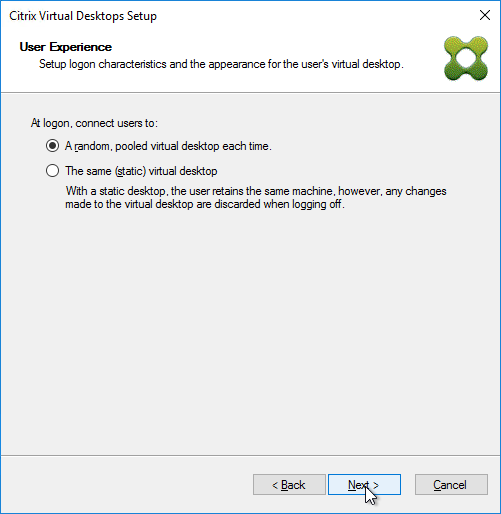
- If persistent (dedicated) Catalogs:
- The VDA version matches the Delivery Controller version – VDA updates should be automated (e.g. SCCM).
- Dedicated Catalogs are created as Full Clones – Fast Clones cannot be moved to different storage or different hypervisor cluster.
- Persistent desktops are backed up, replicated, etc. Recovery process is documented and tested.
- Persistent desktop provisioning process is automated, preferably from a self-service portal.
- No Personal vDisk – User Layers instead
- No User Layers – slows down logons, and not all apps work – prefer Persistent Desktops instead.
- User Layers are backed up, and restore process is documented and tested.
- User Layers are stored on a clustered file server that can handle failover of always-open VHD files (e.g. Windows File Share with Continuous Availability) – Replication won’t help with file server outage and already open User Layers
- Multiple department-specific master images instead of a single monolithic image – during user logon, monolithic images need to be dynamically customized for user requirements, which slows down logons.
- No double-hop – slows down logons and increases complexity since double hop requires Workspace app and icon management on the first-hop VDA machine – prefer master images with every application installed locally instead of double-hop to published applications.
- No Shortcut visibility management – slows down logons
- No Elastic Layering – slows down logons
- No App-V – slows down logons, and slows down machine performance
- Master Image update process is automated – e.g. SCCM can push updates to master images
- Catalogs are upgraded to latest Catalog version available.
- VDA registrations are somewhat evenly distributed across the Delivery Controllers.
- ListOfDDCs registry value on VDAs has two or more Delivery Controllers.
- Daily Health Check report shows registration status and maintenance mode status of every VDA machine.
- RDSH Load Index Policy has not been modified from the default. CPU Metric is too volatile, and can cause a Denial of Service and uneven distribution of sessions. Current Load Index values should be almost the same on every RDSH VDA and not be anywhere near 10000.
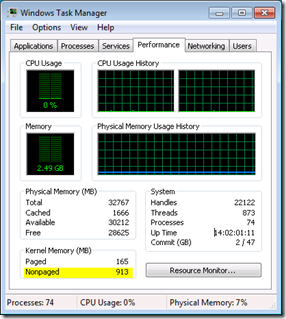
- In-guest monitoring agent shows VDA memory usage. Allocated VM Memory matches or exceeds memory Committed Bytes – Hypervisor monitoring can’t show actual VM memory usage.
- RDSH VDAs are periodically restarted – net statistics workstation or net server statistics shows uptime.
- In CVAD 1909+, MaxDelayMins is configured in Get-BrokerRebootScheduleV2.
- For EDT protocol, MtuDiscovery is enabled on the VDAs. MtuDiscovery requires VDAs version 1912 and newer.
- If Cloud-hosting of VDAs, PowerScale controls VDA power management.
VDAs – Hypervisor Hardware Clusters
- Desktop VDAs are in their own hypervisor cluster that does not contain any Server virtual machines – avoids Windows Server licensing.
- Hypervisor clusters with Windows Servers have proper Windows Server licensing.
- Hypervisor admins don’t perform any hypervisor updates without first reviewing Citrix’s Supported Hypervisors article.
- Hypervisor software is recently patched, especially to resolve security vulnerabilities (e.g., VMware Security Advisories).
- vCenter is updated to resolve critical vulnerability as of October 2023.
- VDA vCenter is separate from non-VDA vCenter – allows non-VDA vCenter to be upgraded without affecting Citrix.
- Hypervisor performance is monitored and alerted: CPU contention (aka CPU Ready Percentage), disk latency, CPU Usage, etc.
- Capacity planning tool warns admins when more hypervisor hardware is needed.
- vSphere clusters have N+1 or N+2 extra capacity for redundancy.
- HA and DRS are enabled on vSphere cluster according to design – not all designs use these features
- CPU and Memory consumption are evenly distributed across the hypervisor cluster
- If VMFS6 datastores, vSphere 6.7 Update 3 is installed – see release notes
- NTP is configured and running on hypervisor hosts.
- Hypervisor hosts have High performance BIOS settings.
- In larger environments, dedicated VLAN(s) for VDAs – not shared with non-Citrix workloads
- MCS and PVS require DHCP
- Network Uplinks are redundant and have sufficient capacity
- ESXi Management/Vmotion/Storage traffic are separate VLANs from the VDA VLANs
- Storage multipathing is functioning
- NVIDIA vGPU software is current on hypervisor host and virtual machines. – vGPU Manager 11.0+ supports guest driver version one major version back (e.g., 10.0) – February 2024 security update
- The newest hypervisors can vMotion GPU-configured virtual machines – vgpu.hotmigrate configured in vCenter Advanced Settings. DRS set to Manual or Partially Automated.
- NVIDIA in-guest vGPU Driver is installed before the VDA is installed – otherwise HDX 3D Pro will not work.
- ESXi Host Graphics Settings set to Shared Direct and spread across GPUs – Host GPUs set to Shared Direct.
- NVIDIA license servers are redundant (failover support), or in the cloud.
VDAs – Virtual Machine Hardware (vSphere)
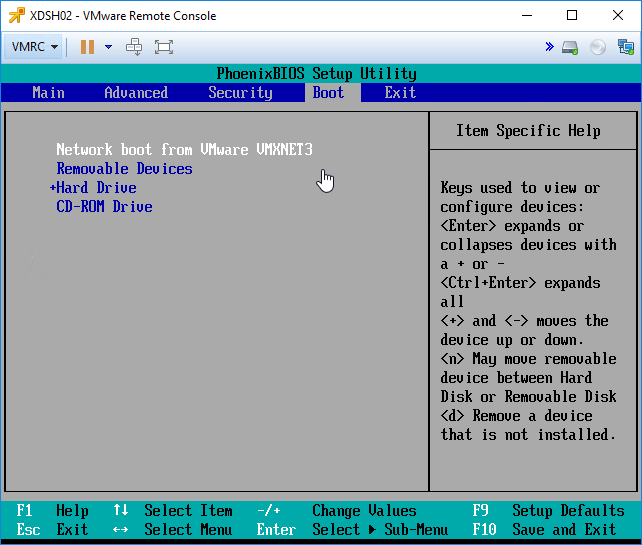
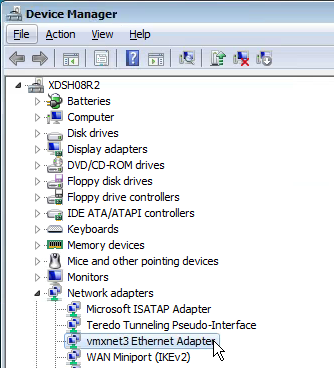
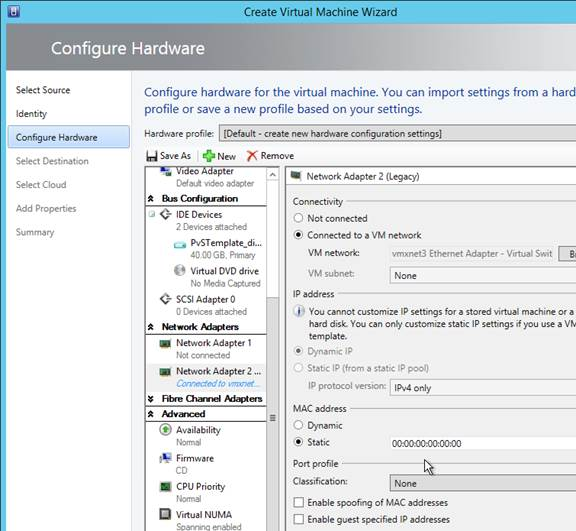
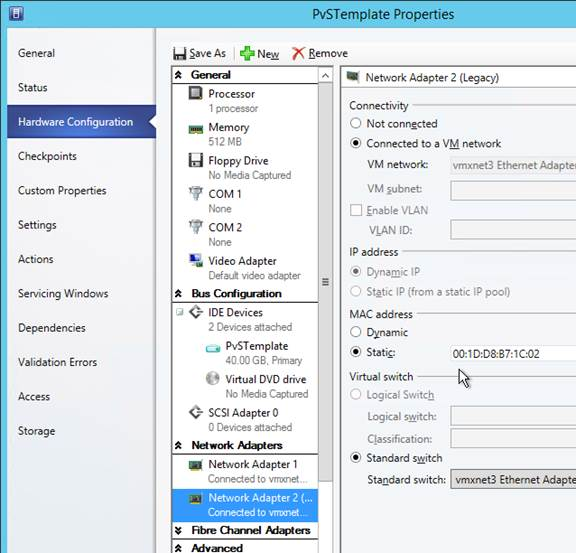
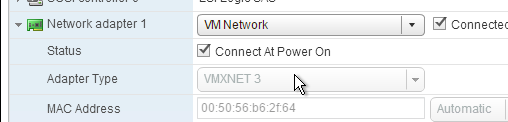
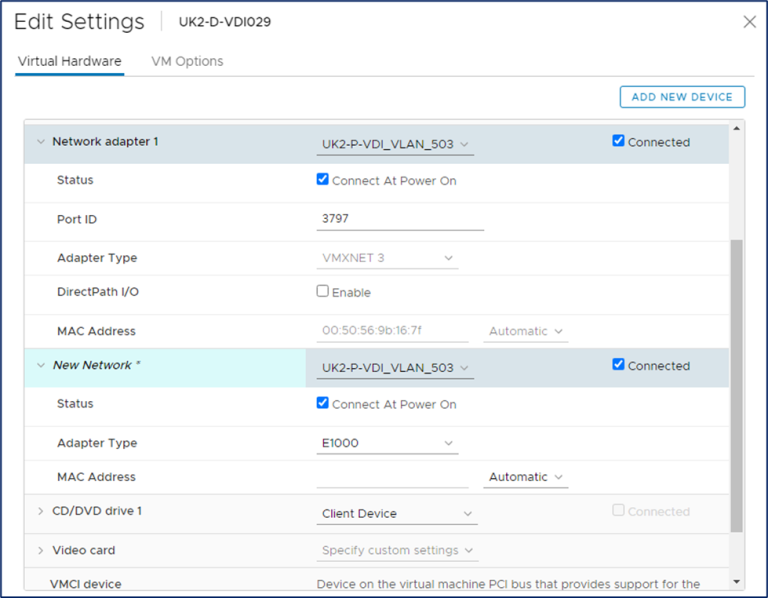
- Network Interface type is VMXNET3, not E1000.
- devices.hotplug=false is configured in Virtual Machine Configuration Settings.
- If disk space is a concern, virtual machine memory is reserved to reduce .vswp file size.
- If Citrix App Layering:
- Paravirtual controller is not added.
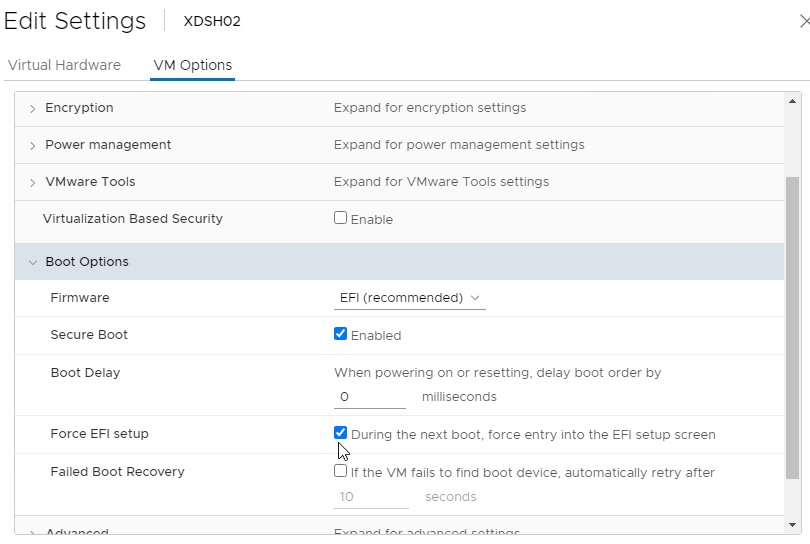
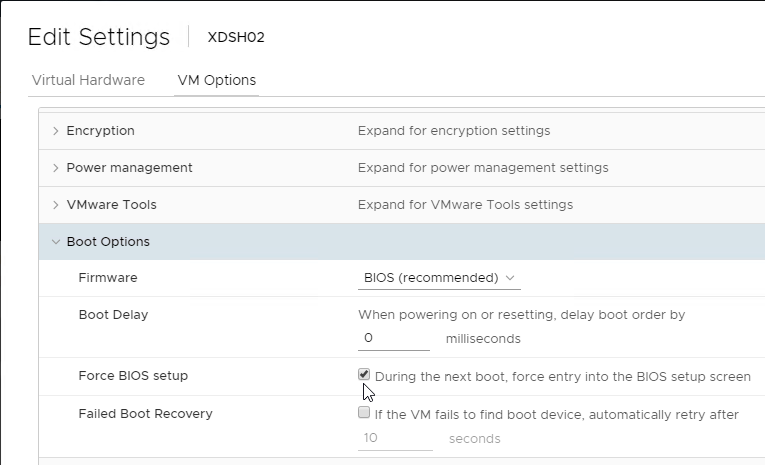
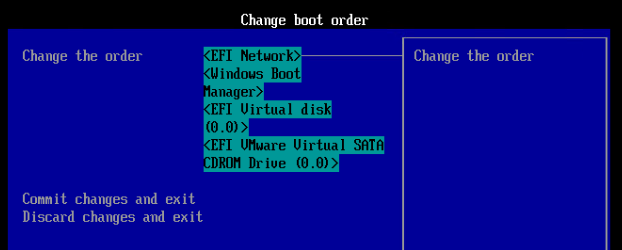
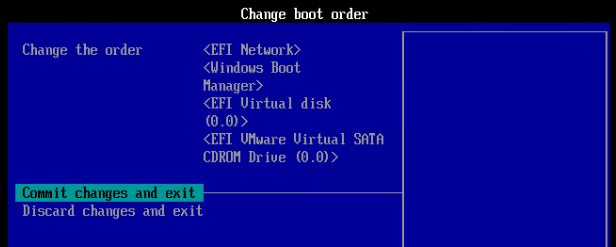
- Boot firmware is BIOS, not EFI.
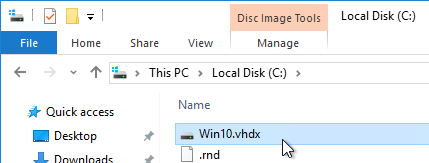
- Windows 10 version is supported by Citrix VDA version, and supported by App Layering version.
- Windows 11 is supported with VDA 2109 and newer. It is not supported by VDA 1912.
- VMware Tools version is current.
- VMware Tools 12.3.5 or newer to fix a vulnerability. See VMware Security Advisory
VDAs – Master Image Build
- Master Image build process is documented.
- Master Image virtual machine was built from scratch – not converted from a physical machine.
- Security scan of the VDA Master Images shows compliance with enterprise security requirements.
- VDA version resolves vulnerability – 2305, 2203 CU3, or 1912 CU7
- Master Image updates:
- Master Image maintenance is automated – e.g., SCCM can push updates to Master Images. A script can push Master Images to Catalogs.
- Software Deployment team notifies the Master Image maintainers when applications or Windows require an update.
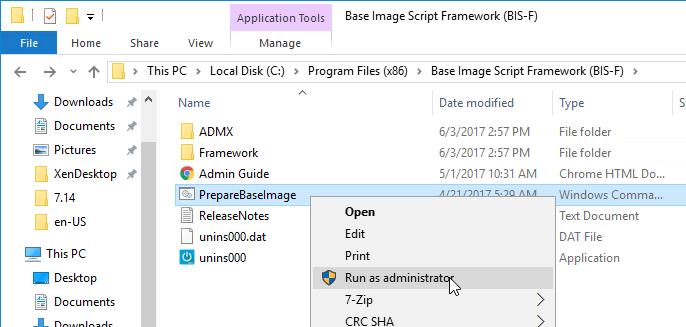
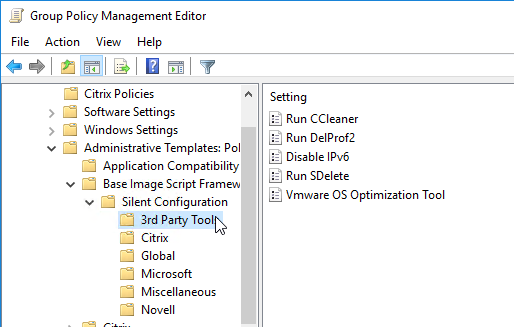
- Master Image is sealed before shutdown – e.g., antivirus is generalized, SCCM Client is generalized – sealing should be scripted – Base Image Script Framework (BIS-F) can automate this
- Master Image updates are tested before deployed to production. QA testing. Canary testing.
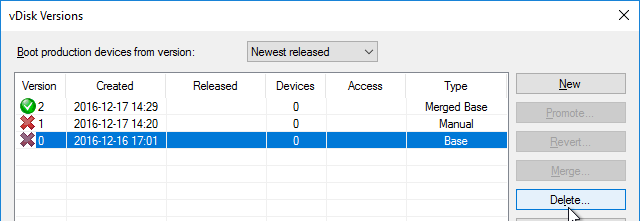
- Master Image snapshots are deleted after a period of time.
- Profile Management is patched to resolve Local privilege escalation vulnerability – 2106 Hotfix 1, 1912 CU3 Hotfix 1, or 7.15 CU7 Hotfix 1. 1912 CU4 includes the fix.
- Antivirus is installed. Antivirus is optimized for non-persistent machines (aka VDI).
- Other IT agents (e.g., software auditing, SCCM Agent) are optimized for non-persistent machines.
- Local Groups:
- Administrators group does not contain any non-administrators.
- Direct Access Users group only contains authorized RDP users.
- Citrix Optimizer or similar has removed Windows 10 Store Apps.
- Windows Default profile was not modified – instead use group policy to control Windows appearance.
- Windows Updates are current (i.e., last install date is within the last 60 days).
- C: drive permissions are changed so Users can’t create folders on root of C: drive.
- Power management is set to High Performance with no sleep timers.
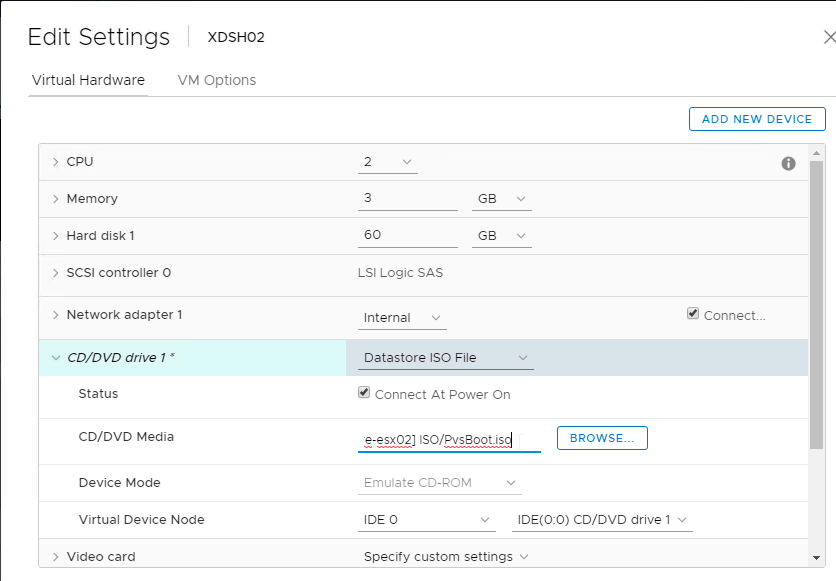
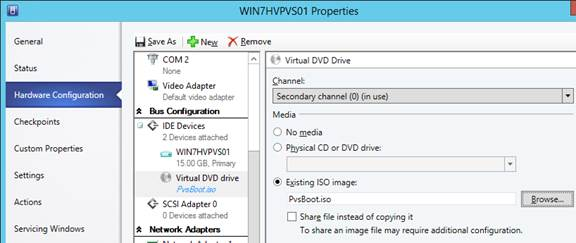
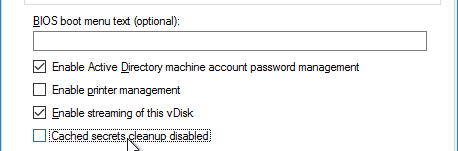
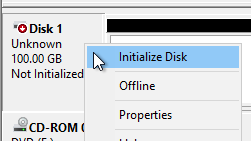
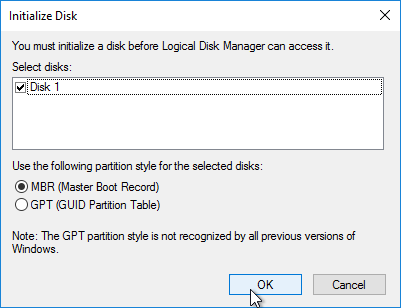
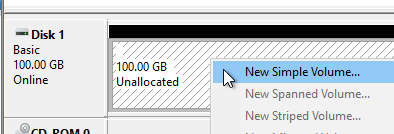
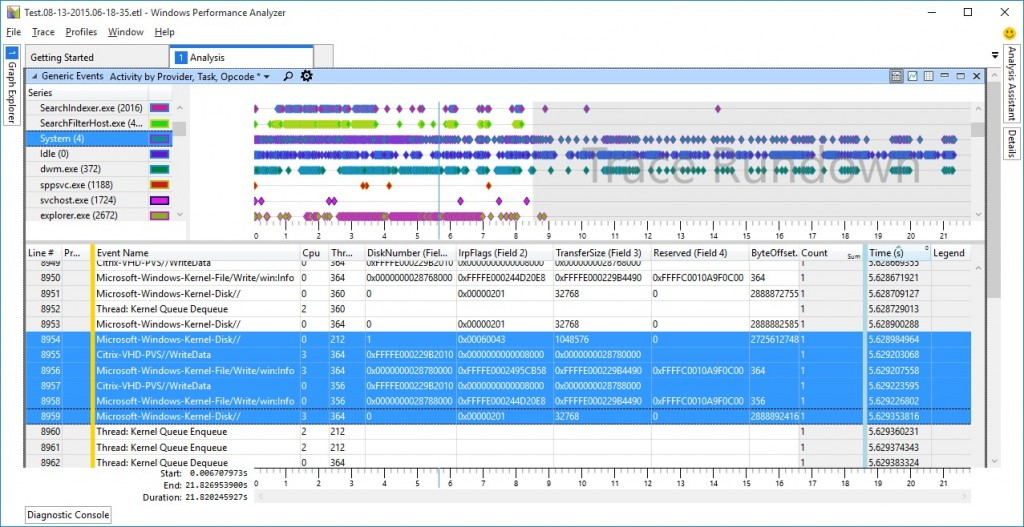
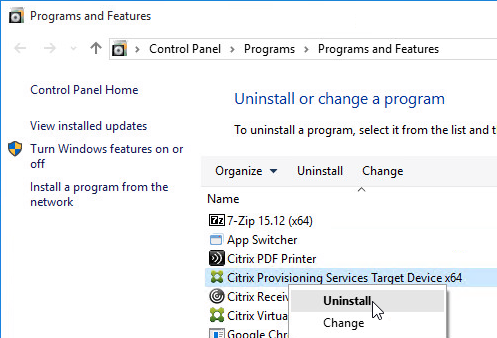
- If Citrix Provisioning:
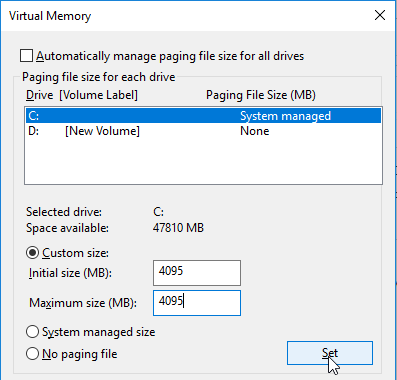
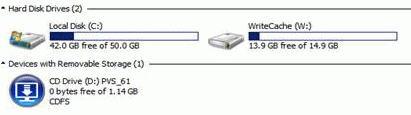
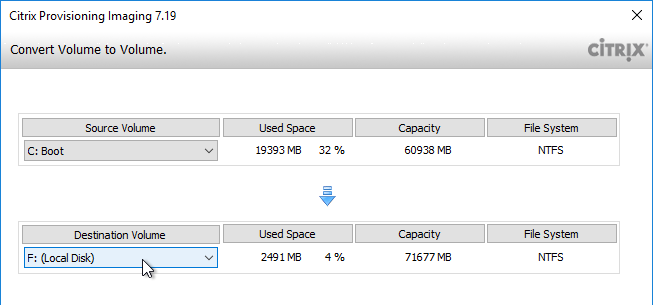
- Pagefile is shrunk so it fits on PVS cache disk – there’s no need to move the pagefile since PVS will move it for you. Just make sure it’s small.
- Event Logs are moved to PVS cache disk.
- Customer Experience Improvement Program is disabled in VDA registry.
- FSLogix is a recent version – FSLogix version 2.9.7979.62170 resolves a security vulnerability in Cloud Cache.
- Office 365 Shared Computer Activation is enabled.
- FSLogix is implemented for Outlook search roaming.
- Microsoft Teams is installed using machine-wide installer.
- Microsoft Teams machine-wide installation is periodically manually updated – there’s no auto-update.
- Teams cache folders excluded from roaming profiles.
- For OneDrive Files On-demand, is only installed on Windows Server 2019 and newer, or Windows 10 1709 and newer
- OneDrive is installed using machine-wide installer – check C:\Program Files (x86)\OneDrive
- FSLogix saves OneDrive cache.
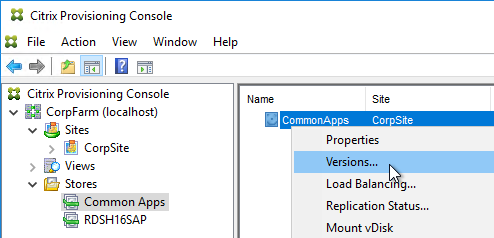
Citrix App Layering
- Prefer automated (e.g. SCCM) Master Image updates over manual App Layering layer updates – if SCCM is mature, then there’s no need for App Layering.
- Prefer SCCM-managed dedicated desktops over User Layers – SCCM is a known technology. User Layers are proprietary to Citrix and might not support every application.
- Enterprise Layer Manager (ELM) version is current – ELM updates are required to support newer Citrix Virtual Apps and Desktops (CVAD) and newer Windows 10. There’s no LTSR version of ELM.
- Citrix Provisioning Agent version matches the ELM version.
- Directory Junction Bind account is a service account, not a regular user whose password expires.
- LDAP is Secure (Use SSL).
- Administrator role membership is periodically audited to ensure only authorized users are granted access.
- ELM is backed up. Or layers are periodically exported from ELM.
- Group Policy controls membership of local groups in VDA machines – e.g. add Domain Admins to local Administrators group.
- Antivirus is configured properly for Layering.
- Hypervisor Connector uses a service account with limited permissions.
- Connector cache is enabled to speed up layering operations.
- Offload Compositing is enabled in the Connectors.
- File servers hosting Elastic Layers and User Layers are monitored for performance issues and capacity planning.
- User Layers are backed up, replicated, etc.
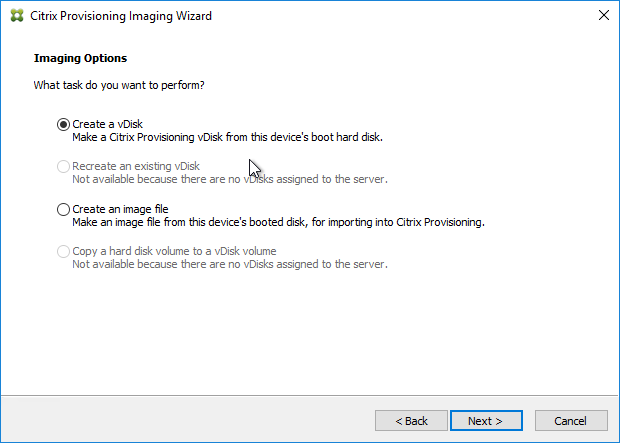
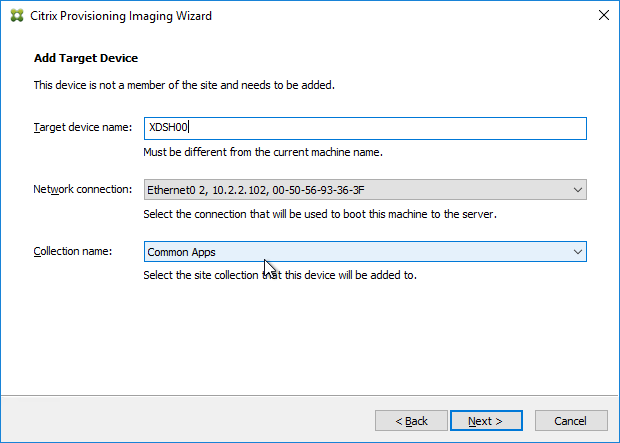
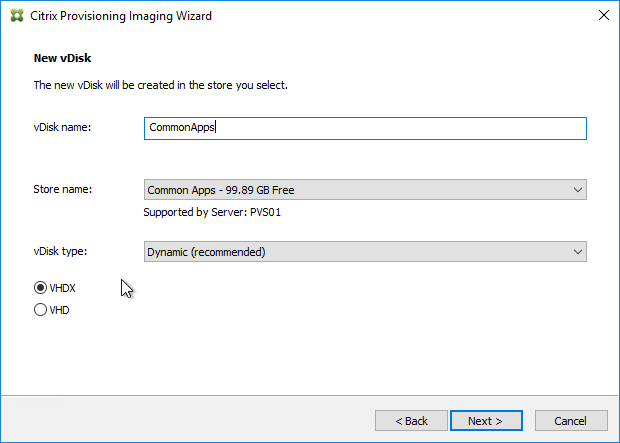
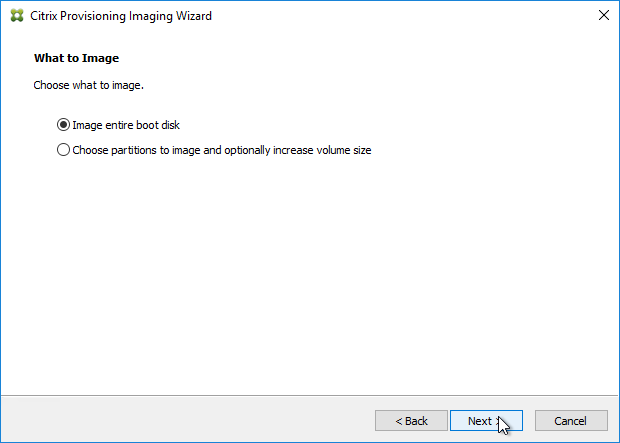
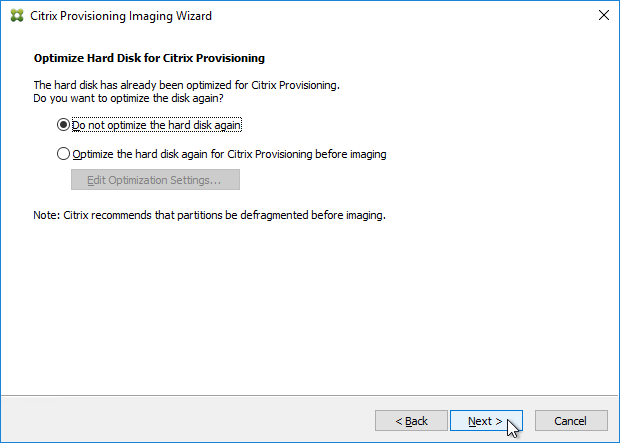
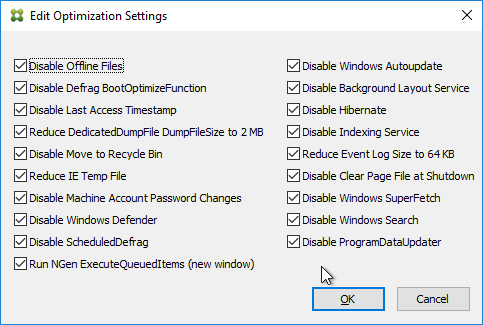
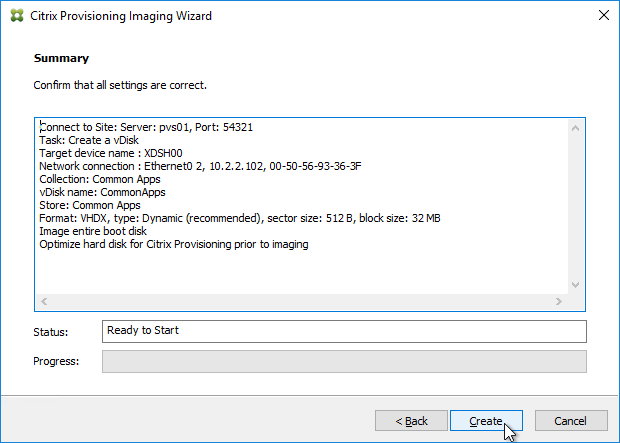
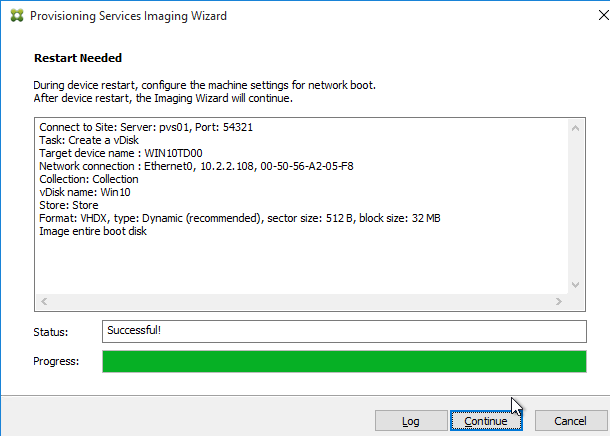
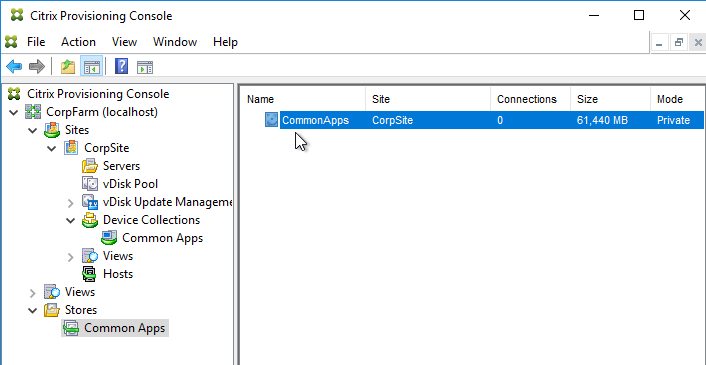
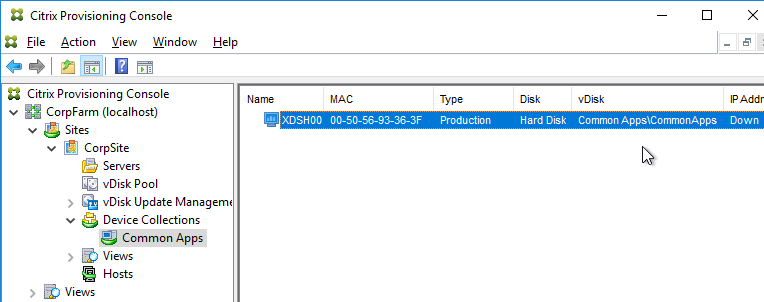
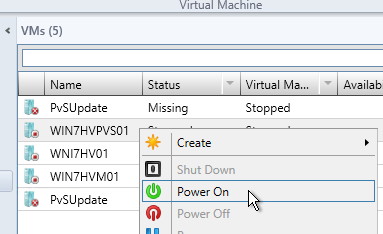
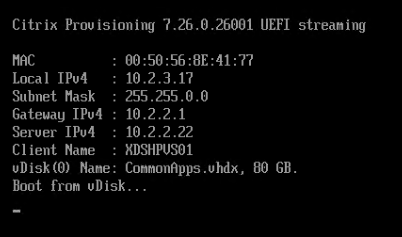
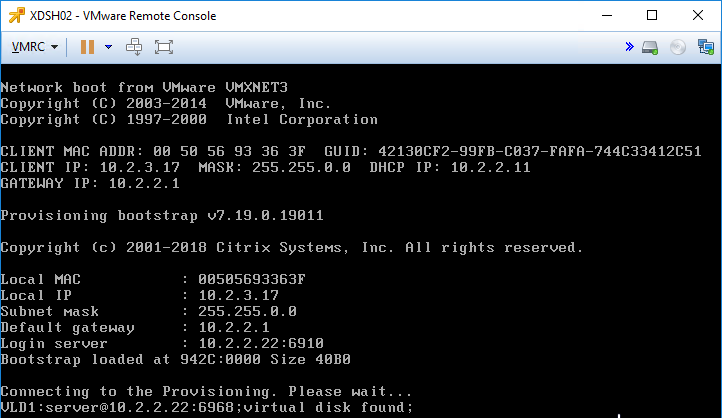
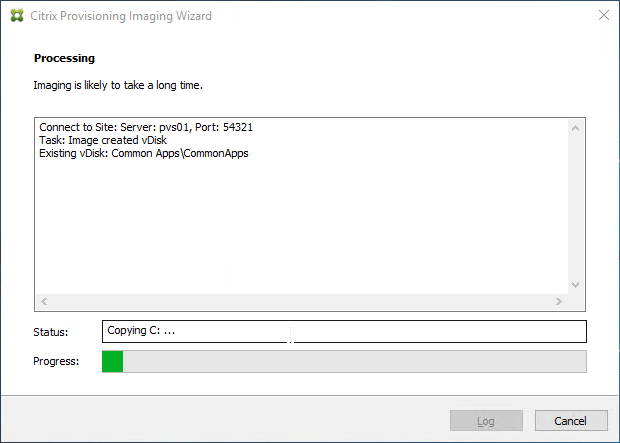
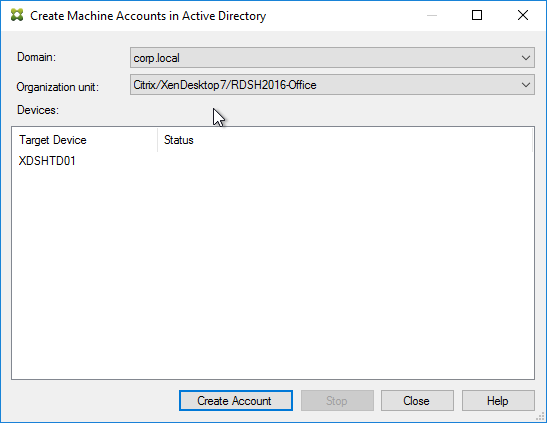
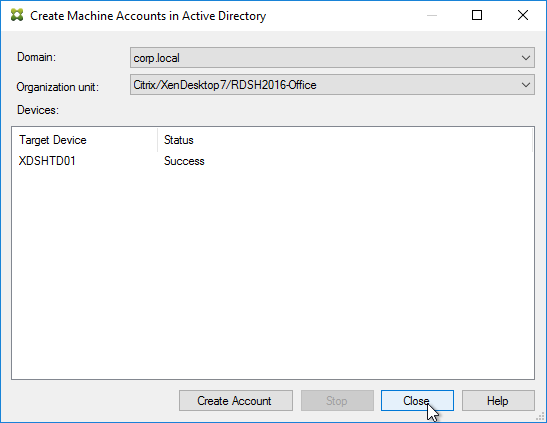
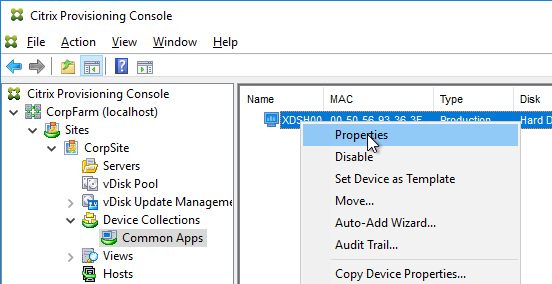
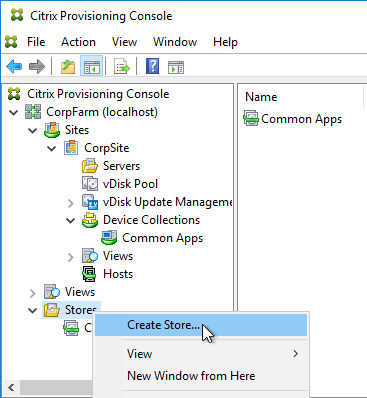
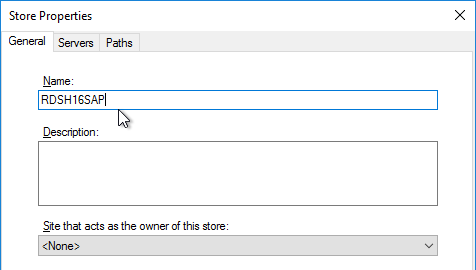
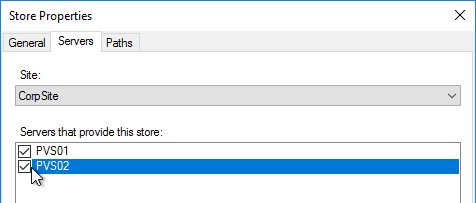
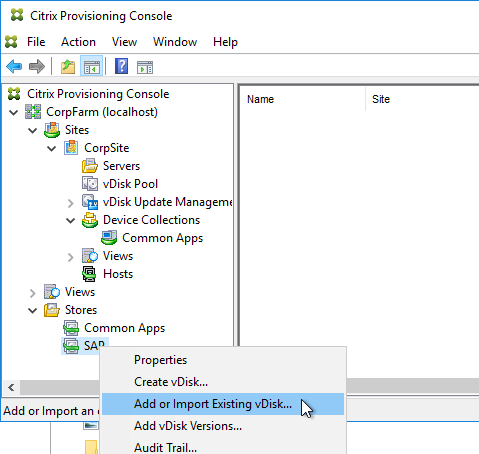
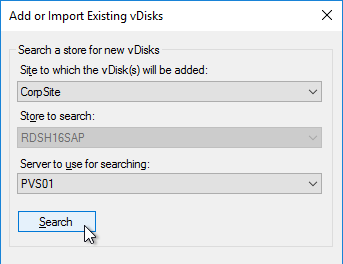
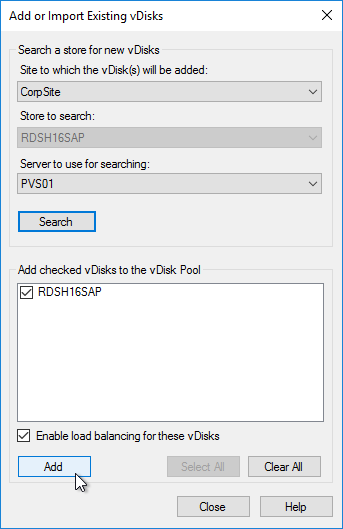
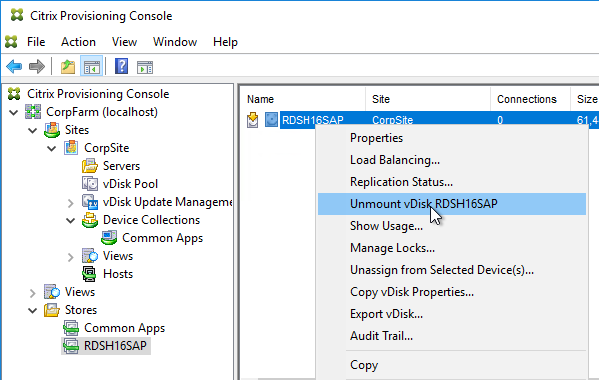
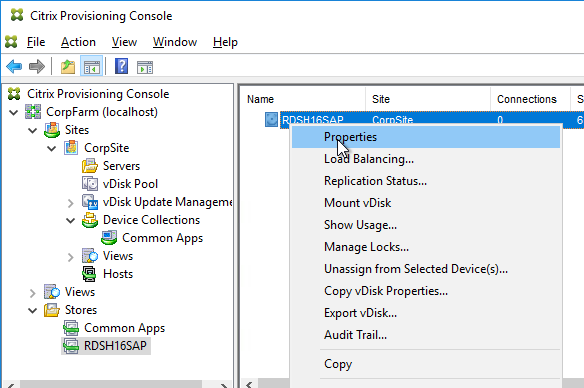
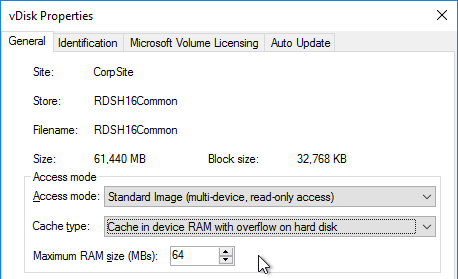
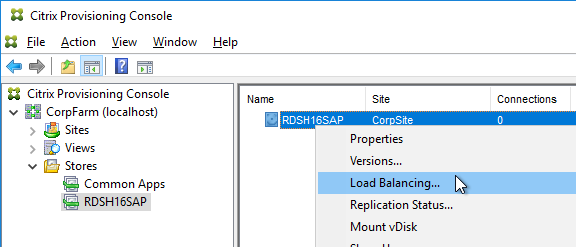
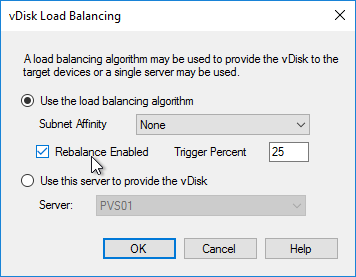
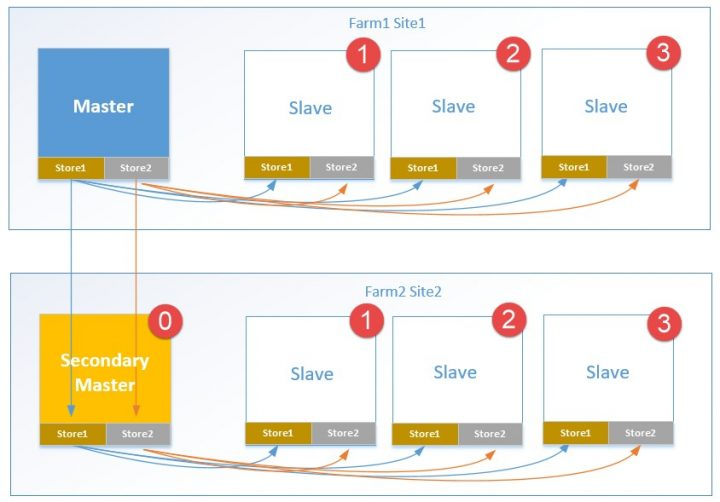
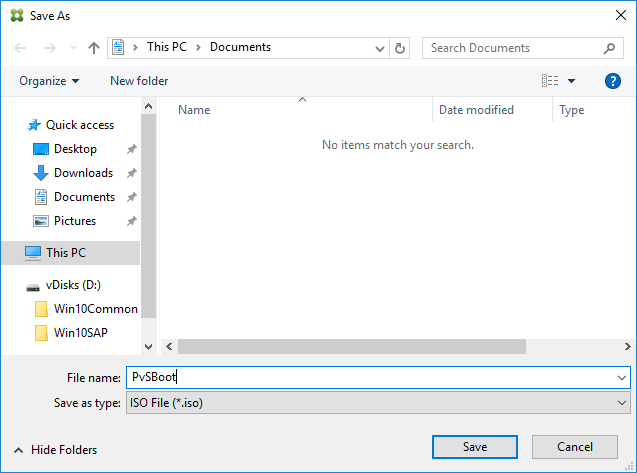
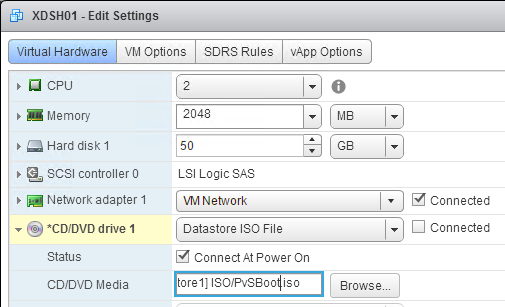
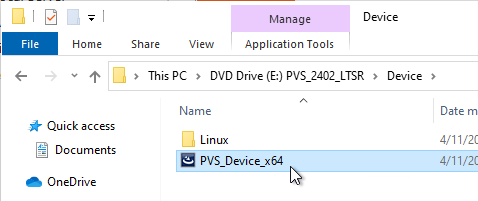
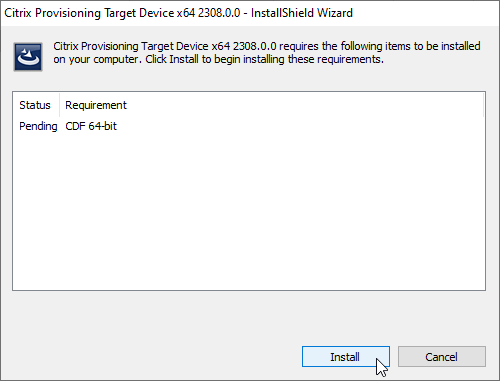
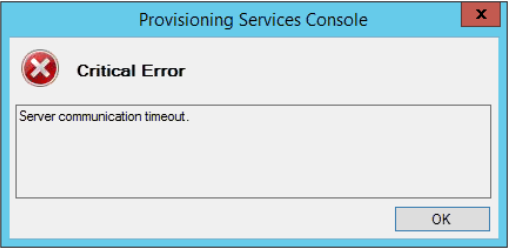
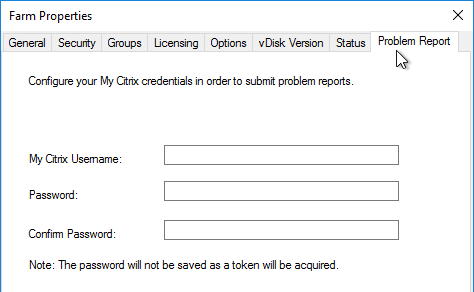
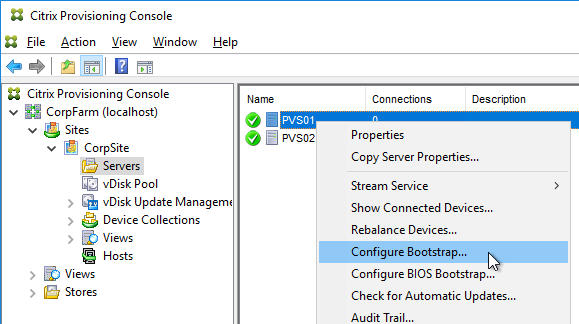
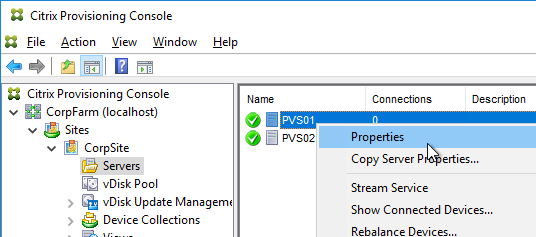
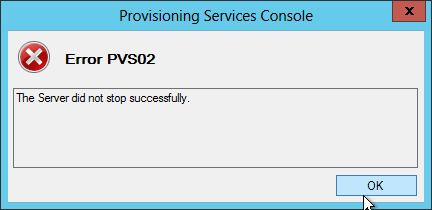
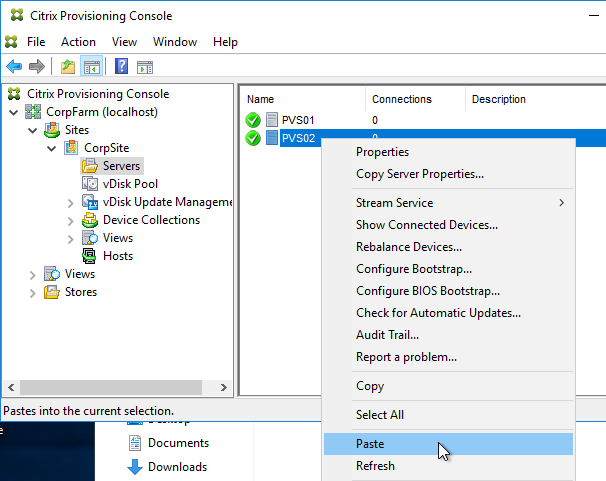
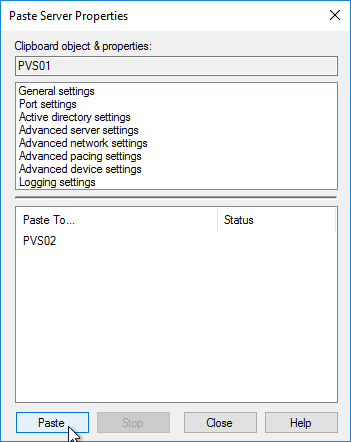
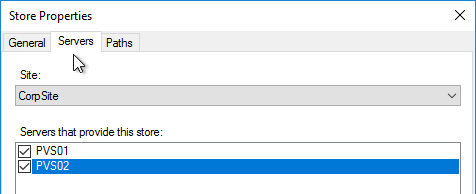
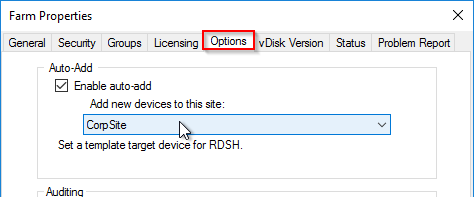
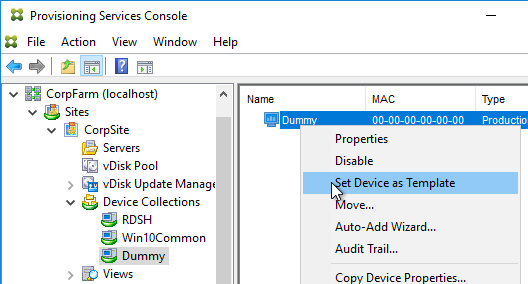
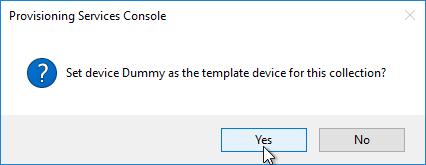
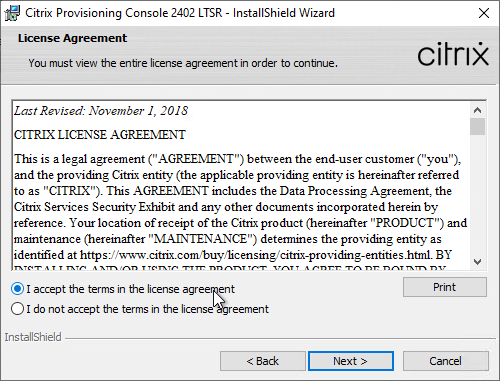
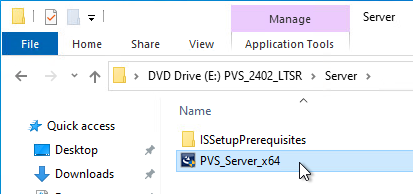
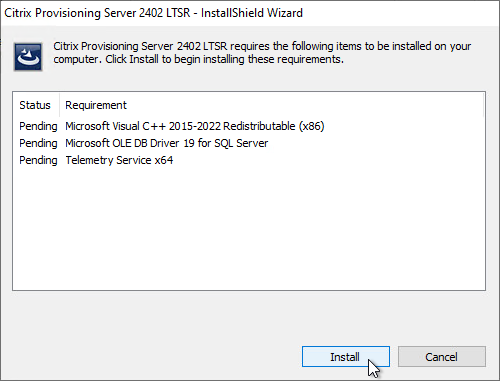
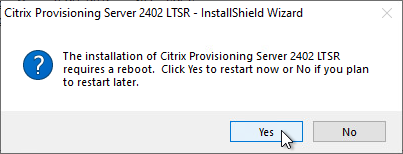
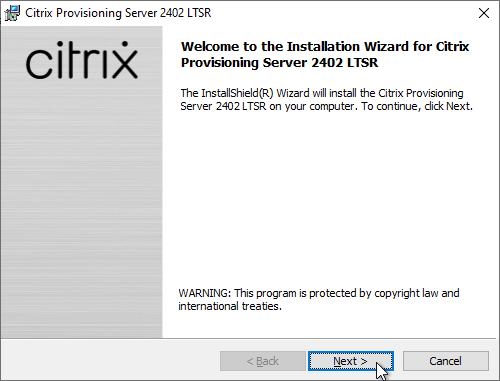
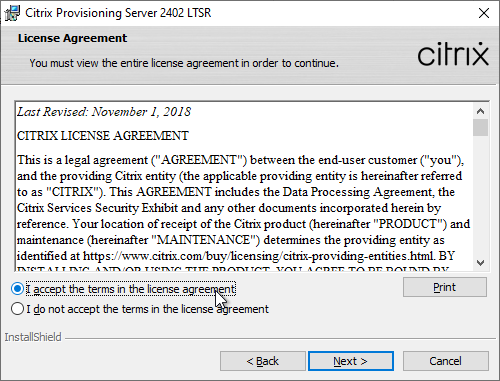
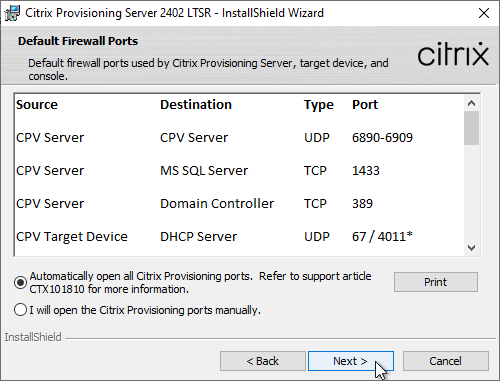
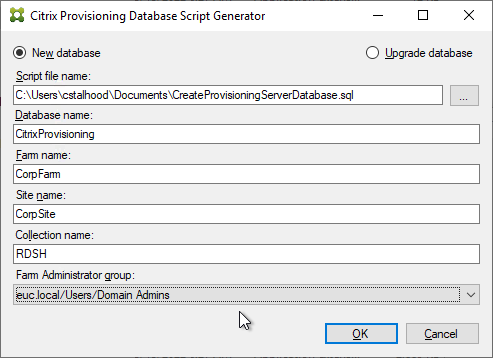
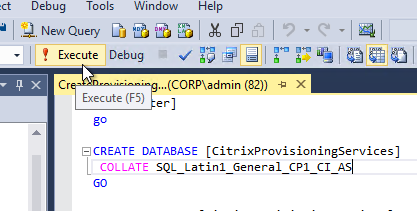
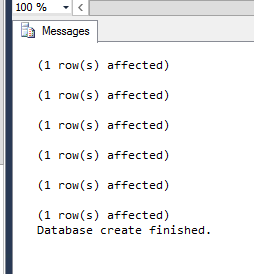
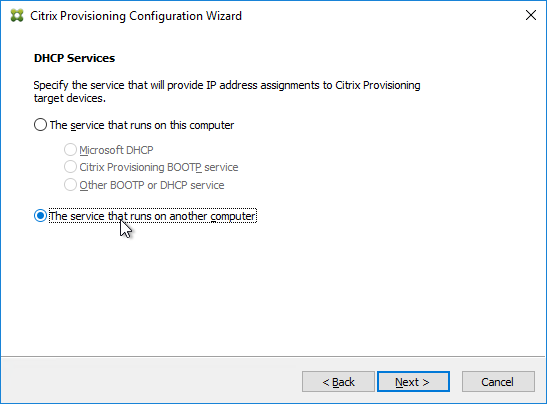
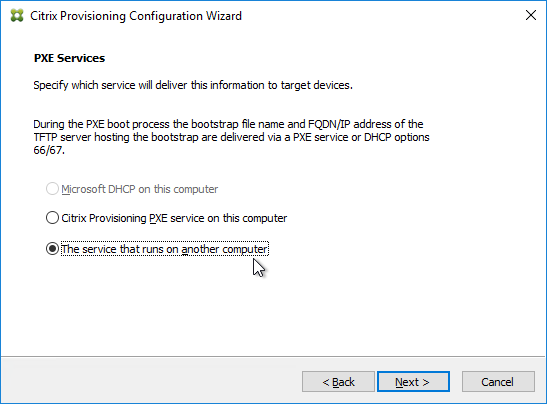
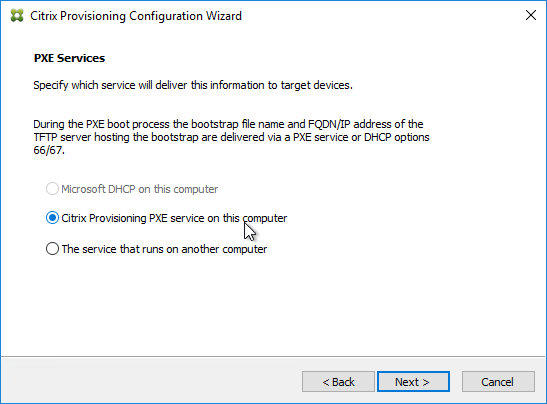
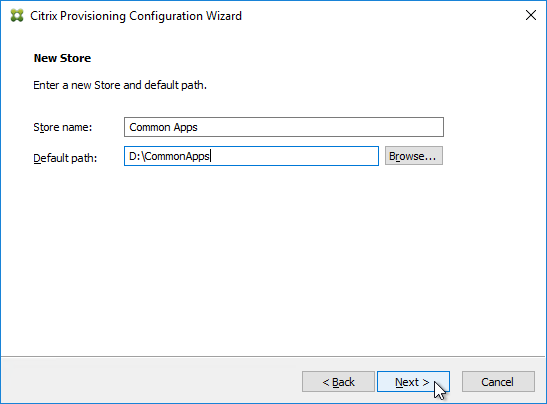
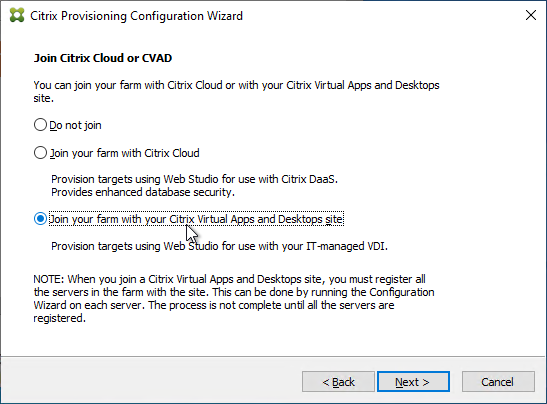
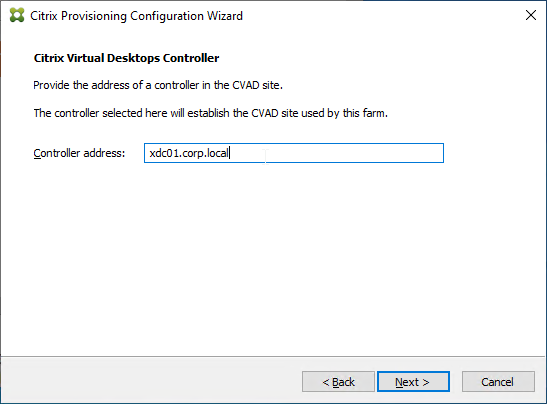
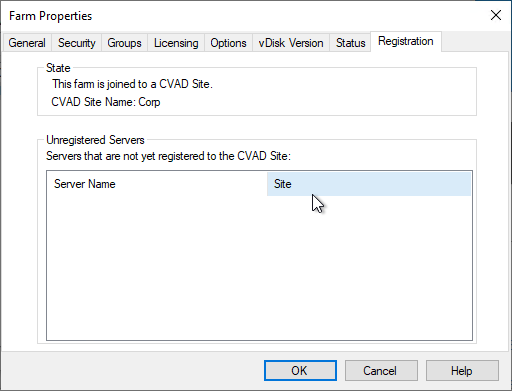
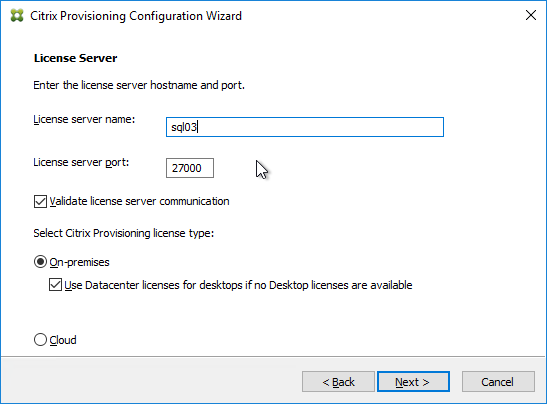
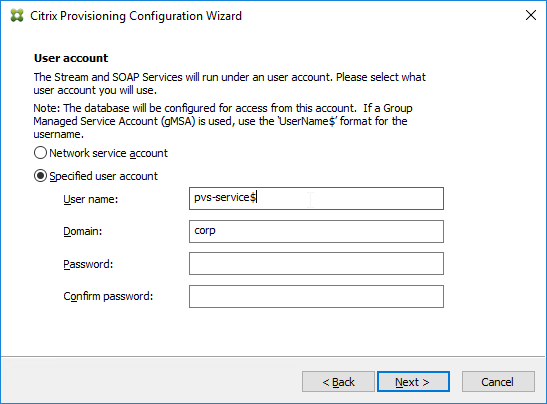
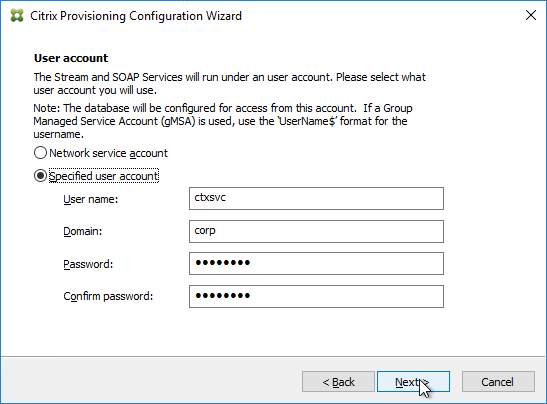
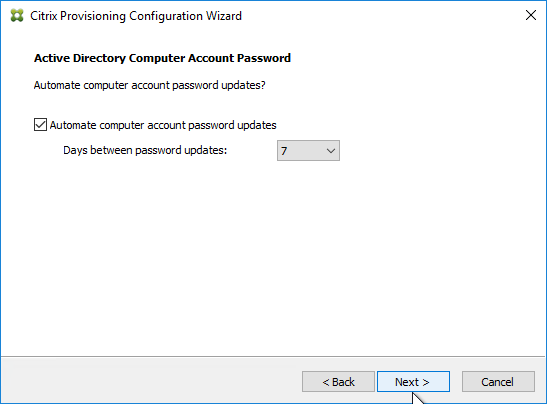
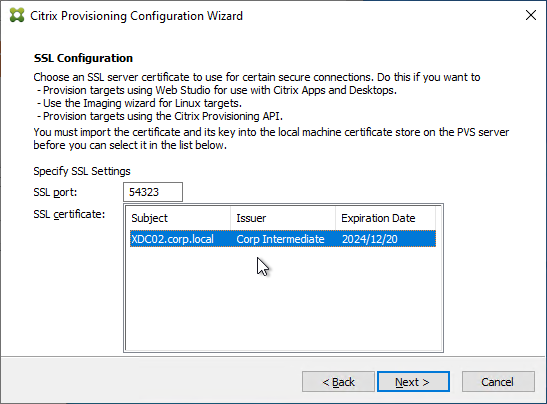
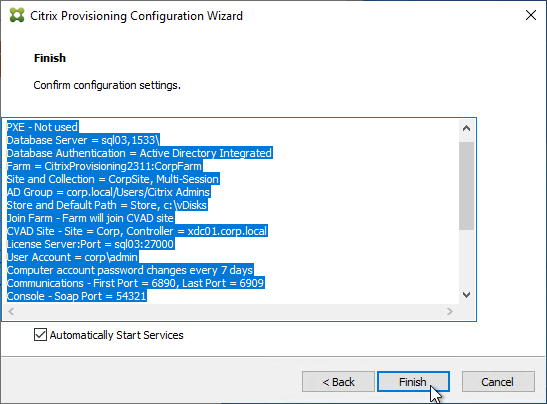
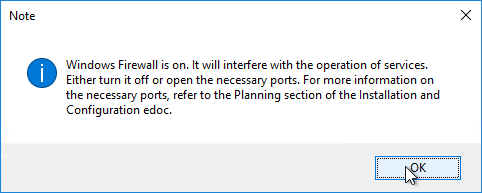
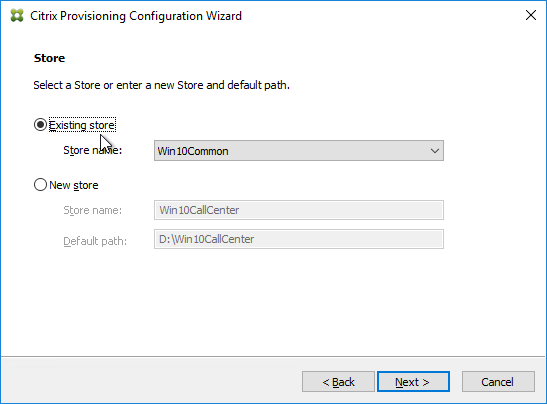
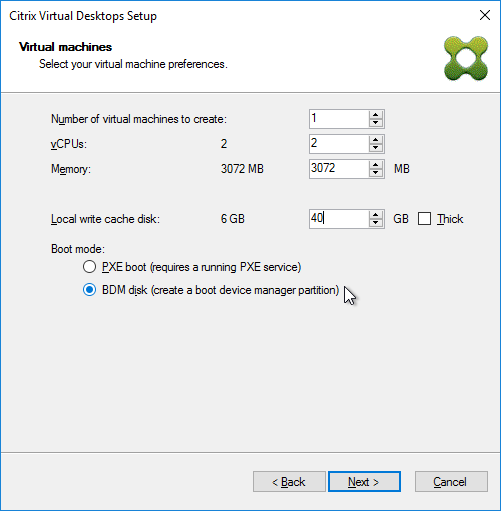
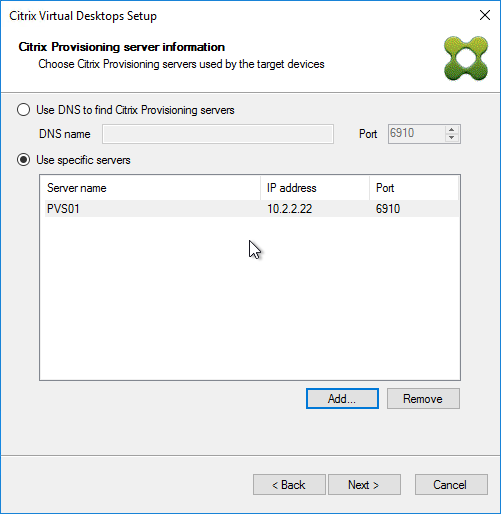
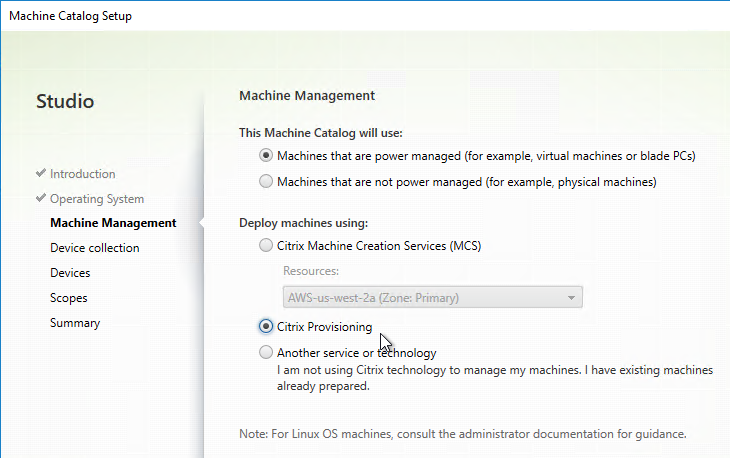
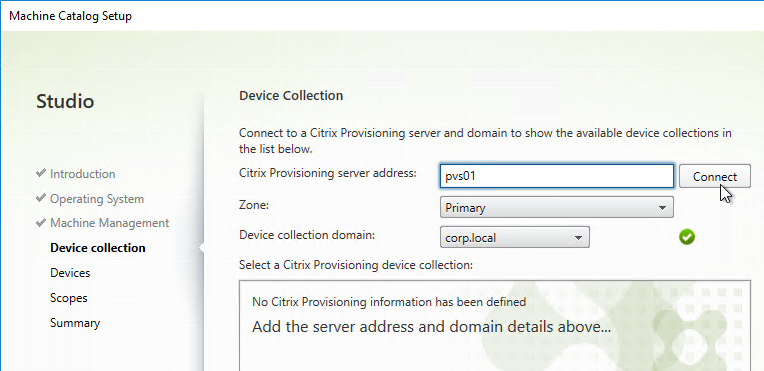
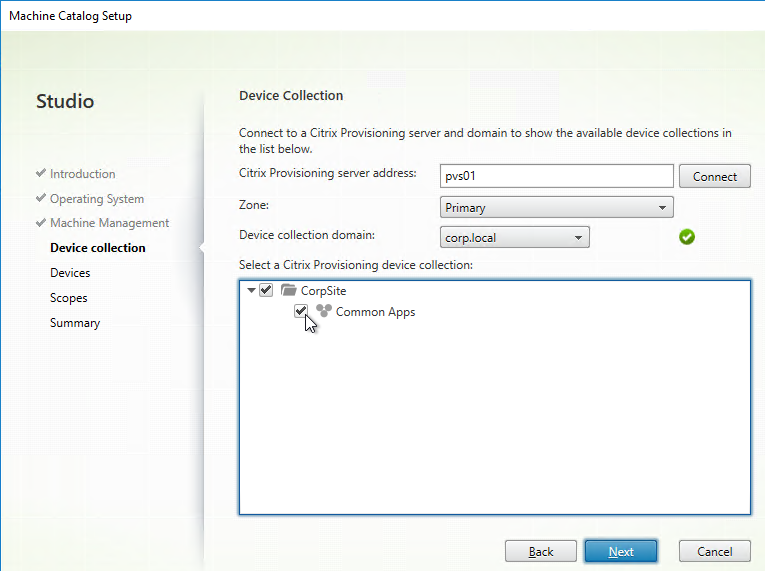
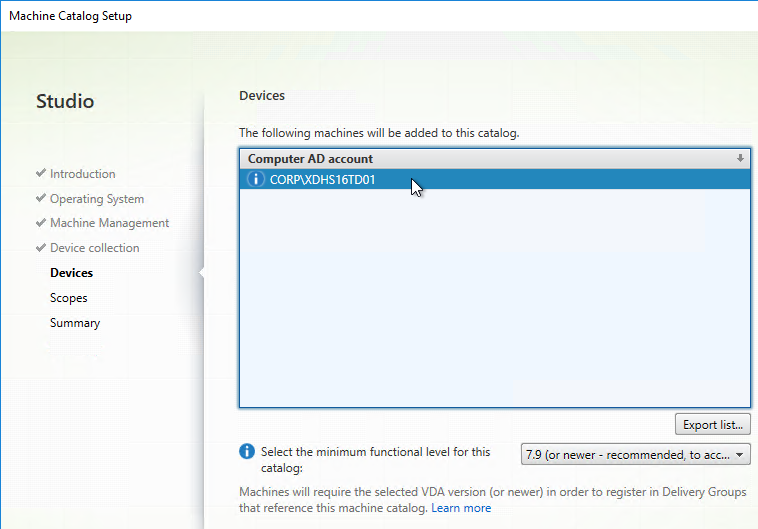
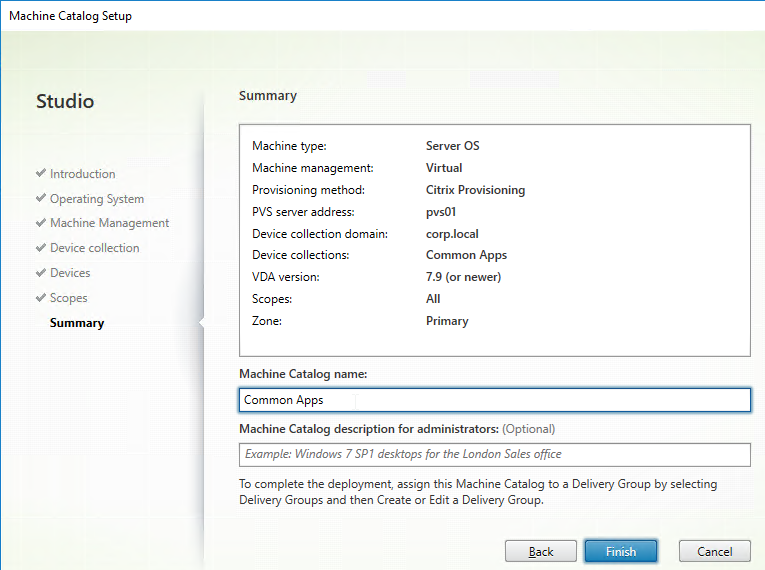
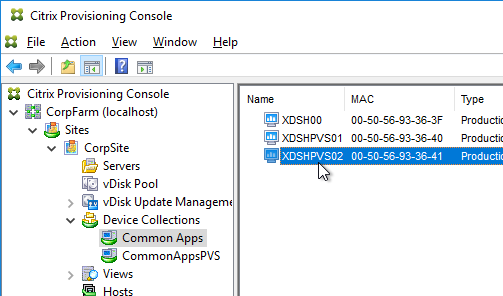
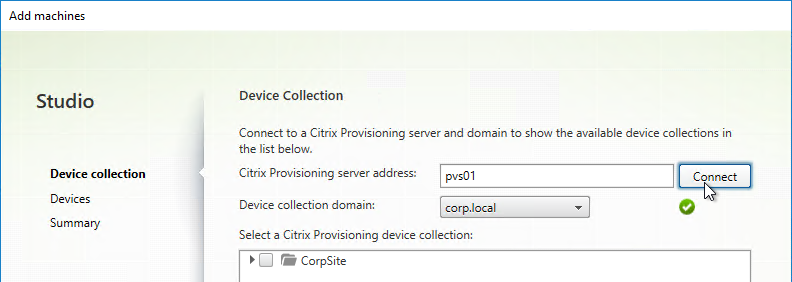
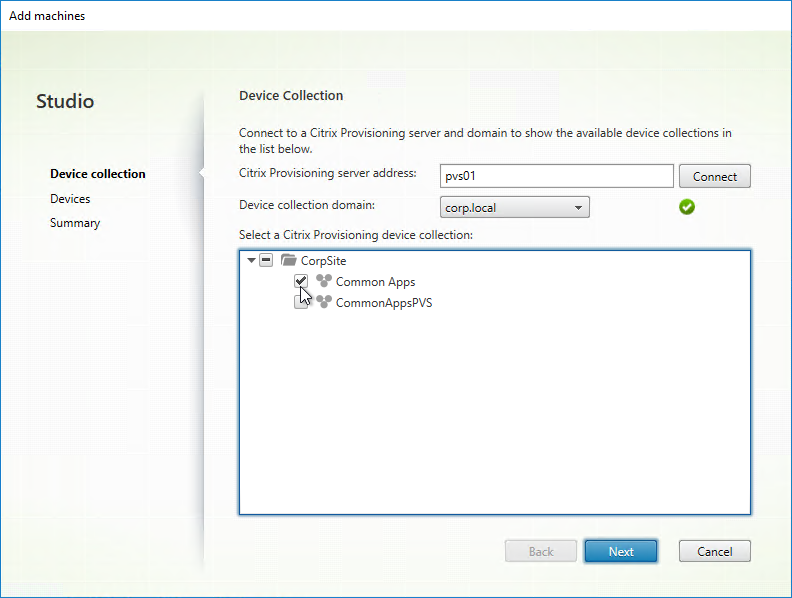
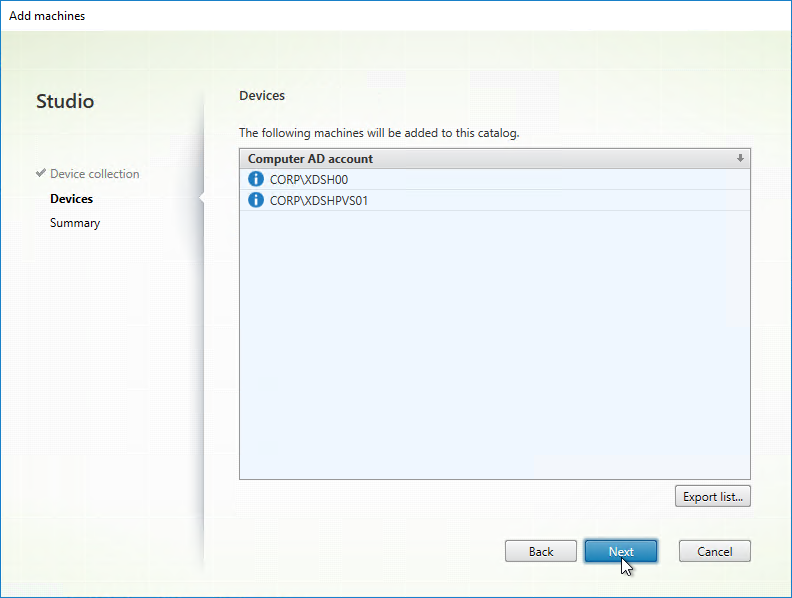
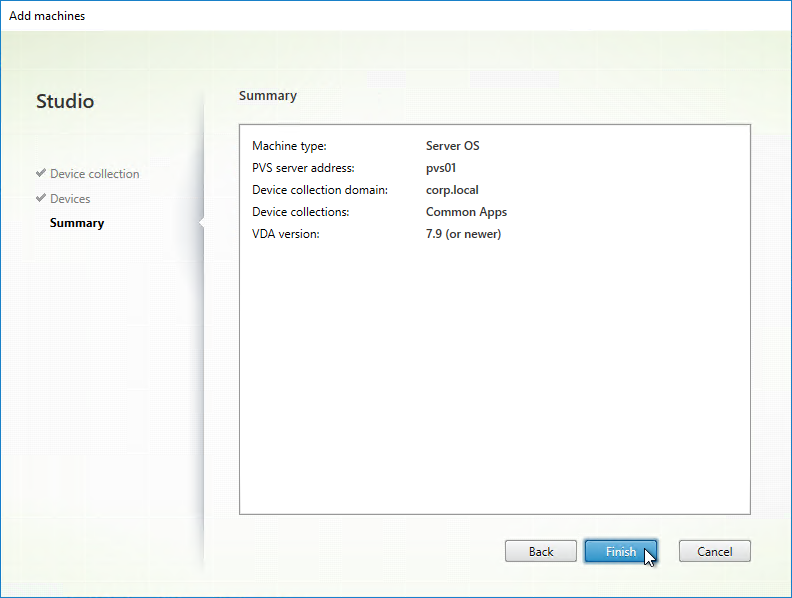
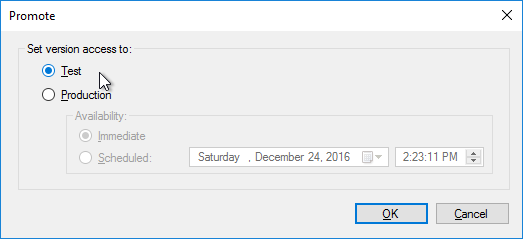
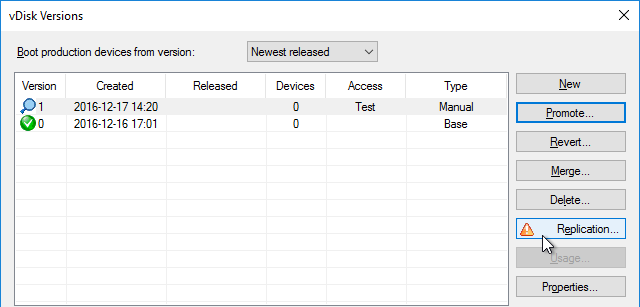
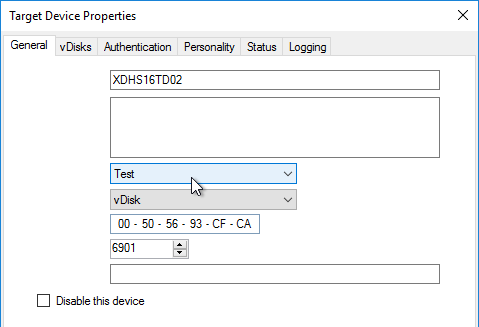
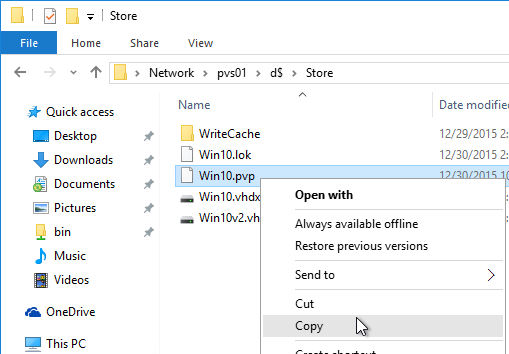
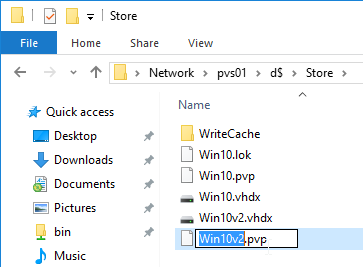
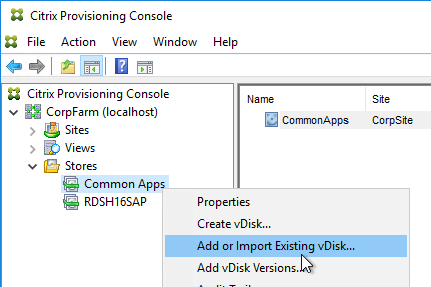
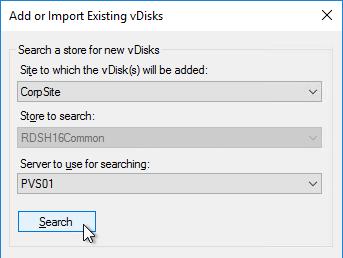
Citrix Provisioning
Provisioning Servers:
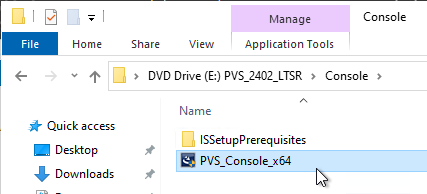
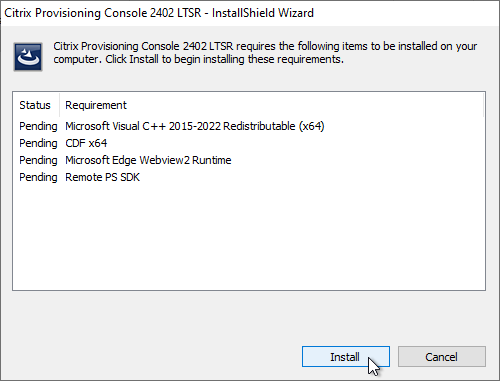
- Provisioning Servers version matches the Delivery Controller version.
- Multiple Provisioning Servers for High Availability.
- Hypervisor Anti-affinity is configured.
- Sufficient RAM for vDisk caching in memory – around 2-3 GB of memory per active vDisk.
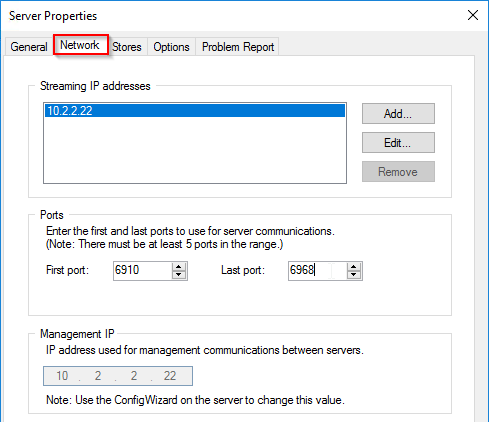
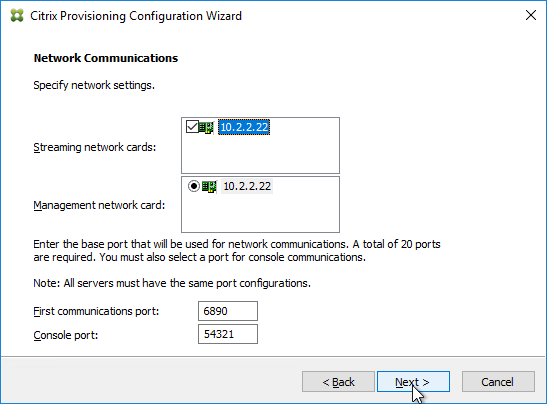
- Only one NIC per Provisioning Server – simplifies the configuration.
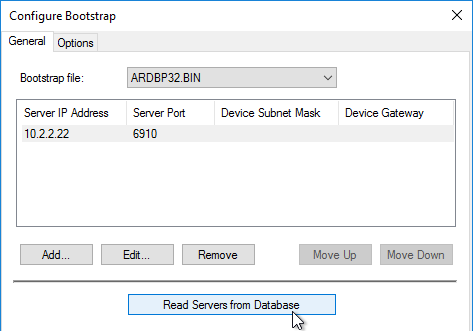
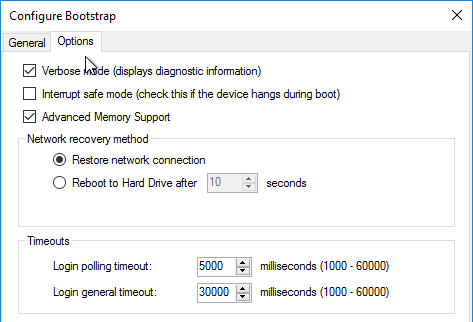
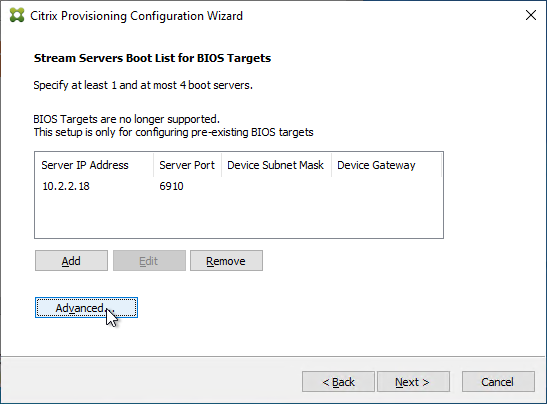
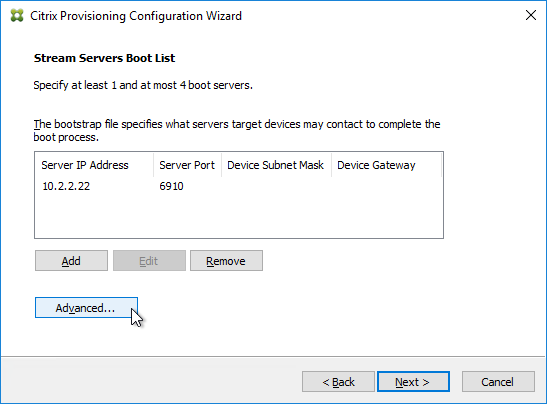
- Server Bootstrap has multiple Provisioning Servers listed.
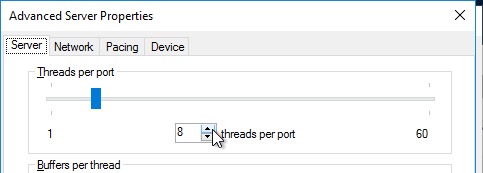
- Threads times Ports are sufficient for the number of target devices.
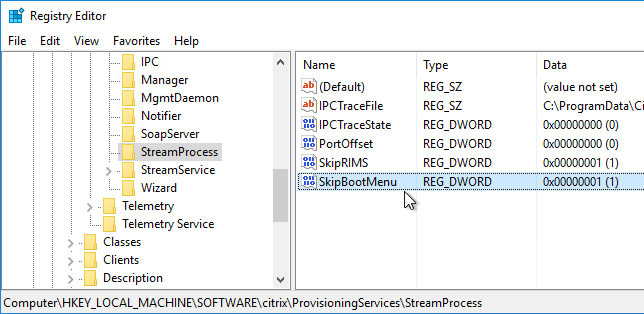
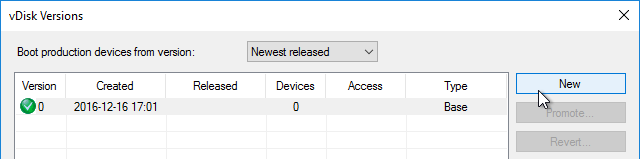
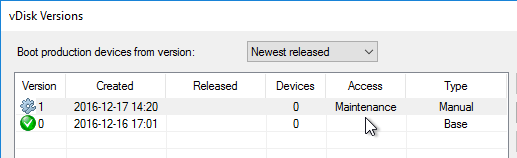
- vDisk Boot Menu is disabled in the registry – enables maintenance mode Target Devices to automatically boot from maintenance mode vDisks.
- Antivirus has exclusions for Citrix Provisioning.
- Provisioning Server performance metrics are monitored and alerted.
- NIC throughput is not saturated.
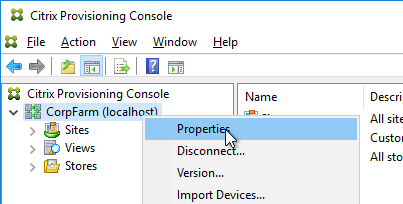
Provisioning Farm Properties:
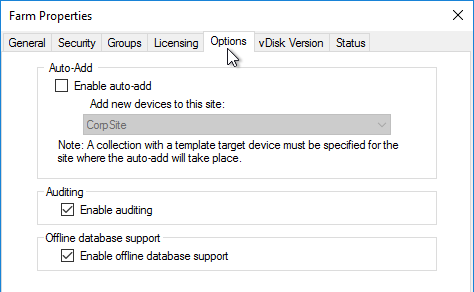
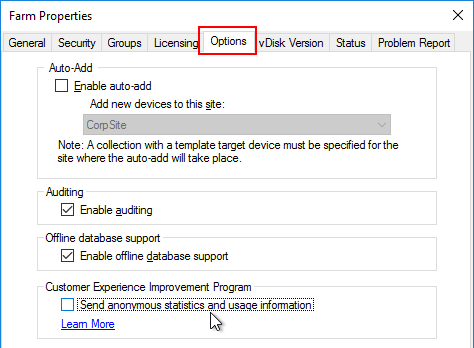
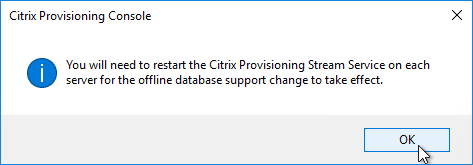
- Offline database is enabled.
- Auditing is enabled.
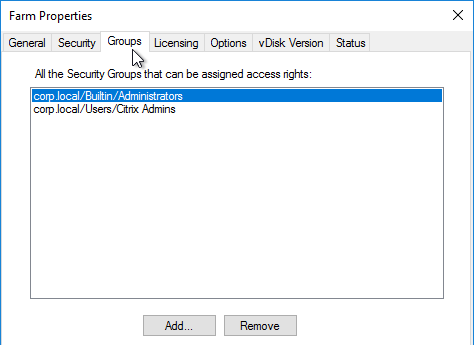
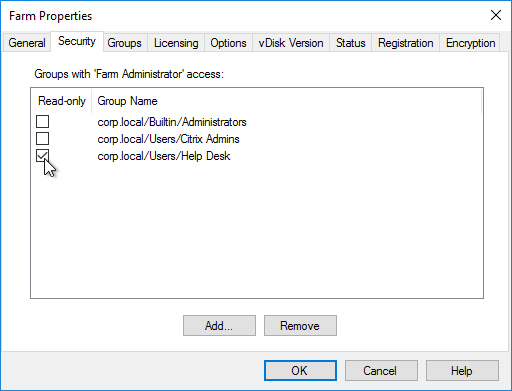
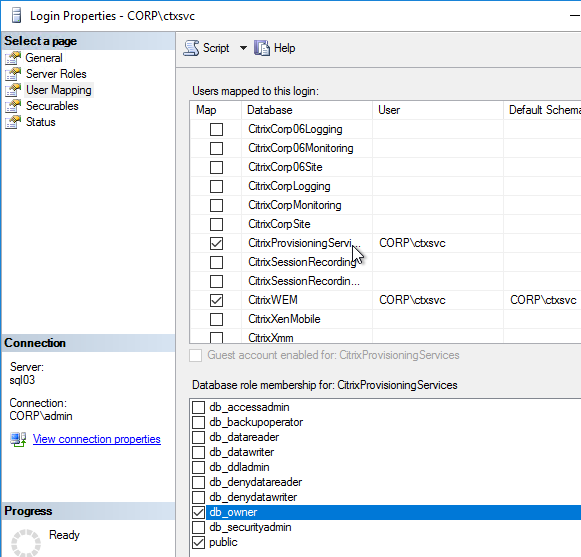
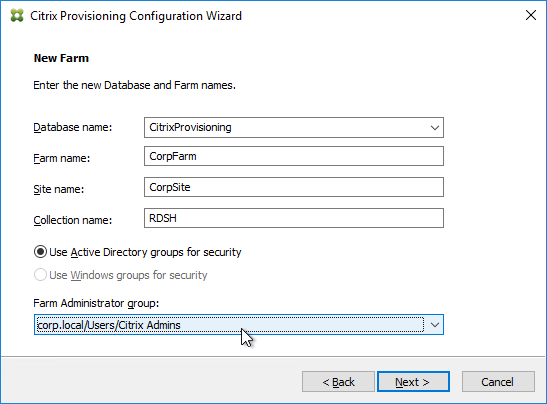
- Administrators list only contains authorized administrators, preferably from an Active Directory Group.
- Customer Experience Improvement Program is disabled.
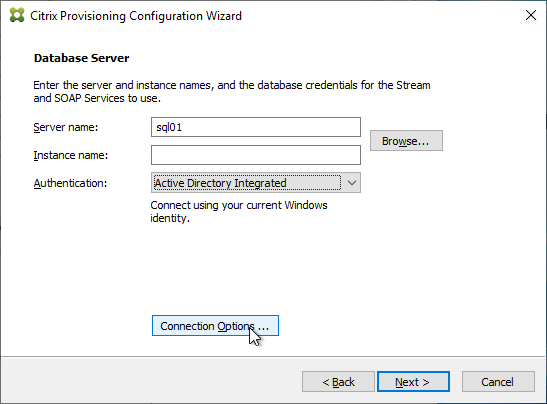
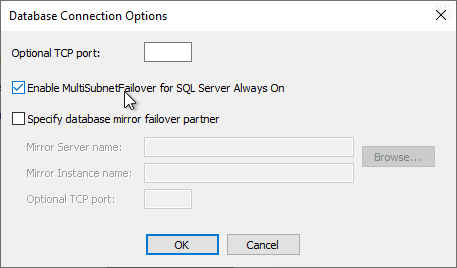
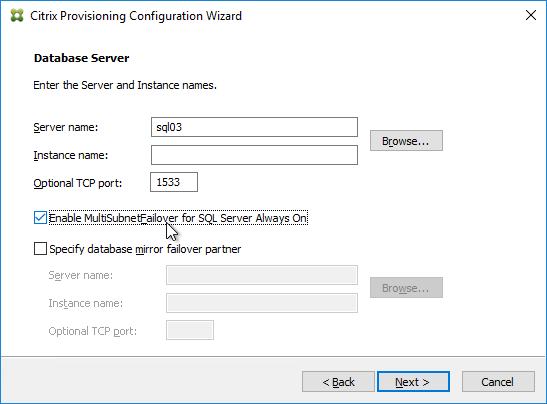
- For AlwaysOn Availability Group, MultiSubnetFailover is configured in the database connection string.
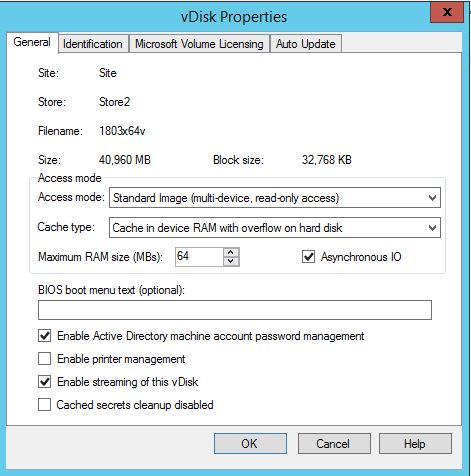
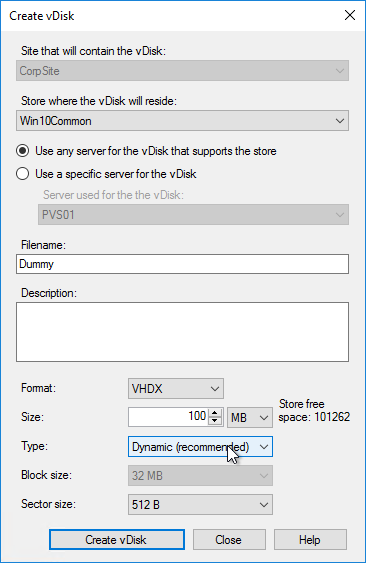
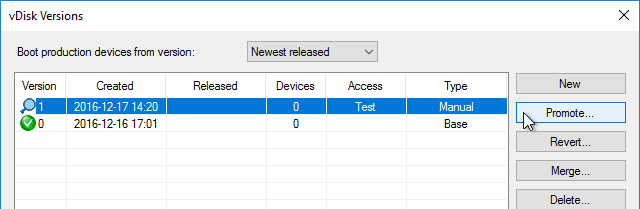
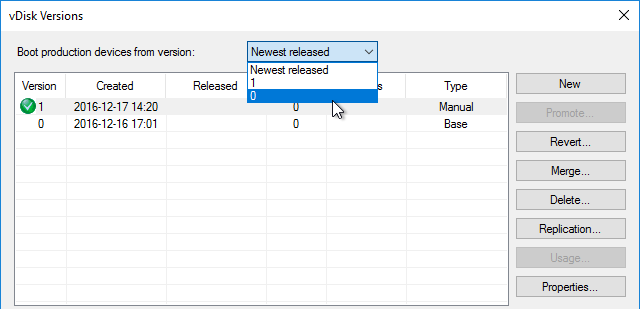
vDisks:
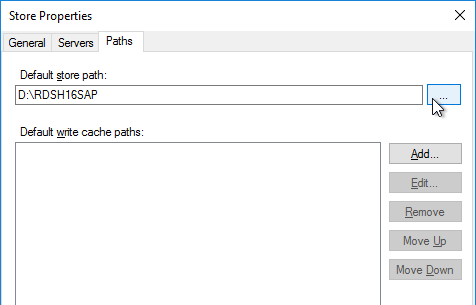
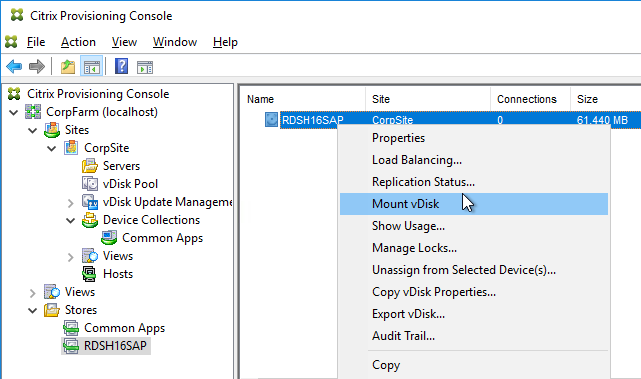
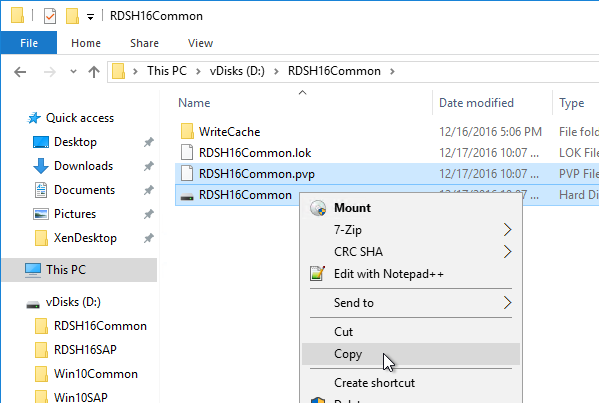
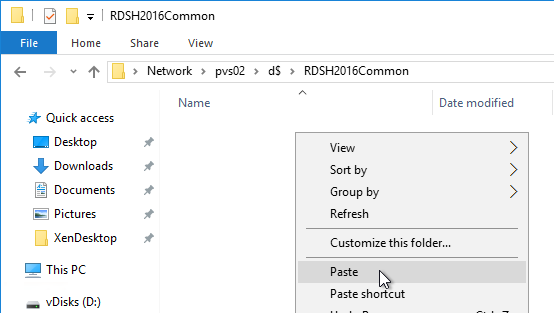
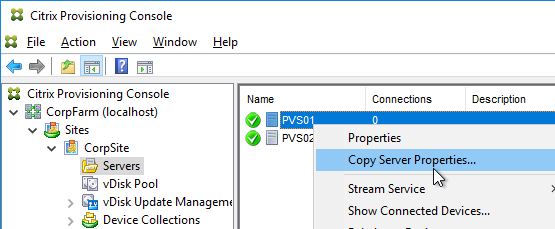
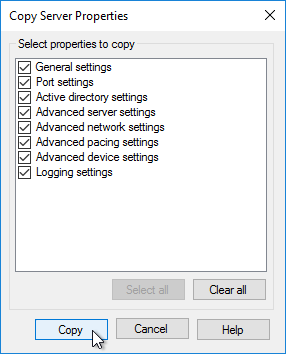
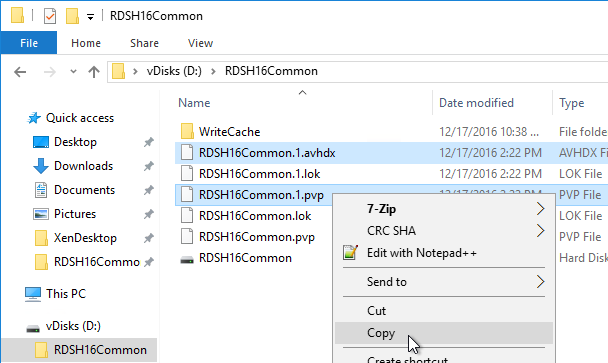
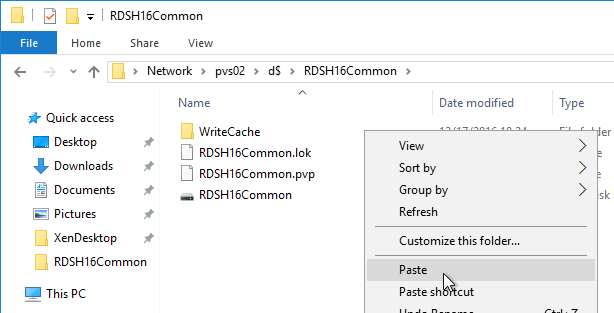
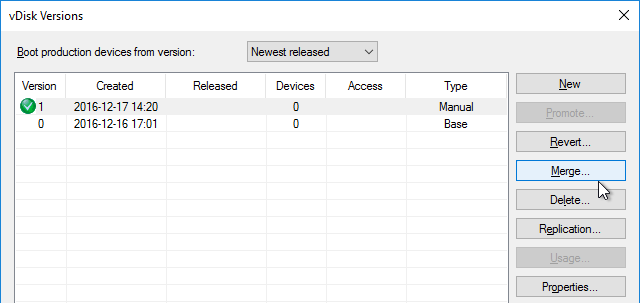
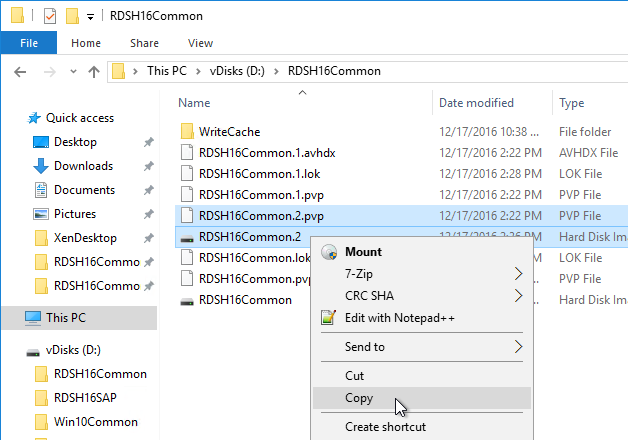
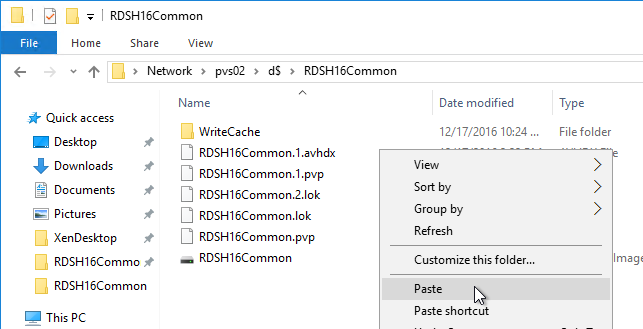
- If local storage, vDisk files are identical on all Provisioning Servers.
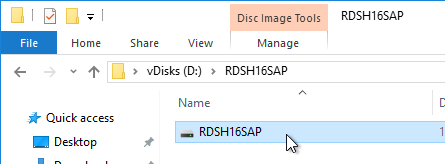
- vDisk files are VHDX, not VHD – faster version merging.
- vDisks are sized dynamic, not fixed – Saves disk space. Standard Mode vDisks don’t grow so no performance impact.
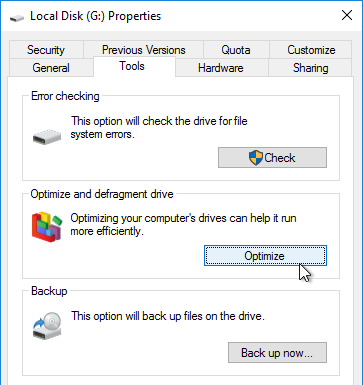
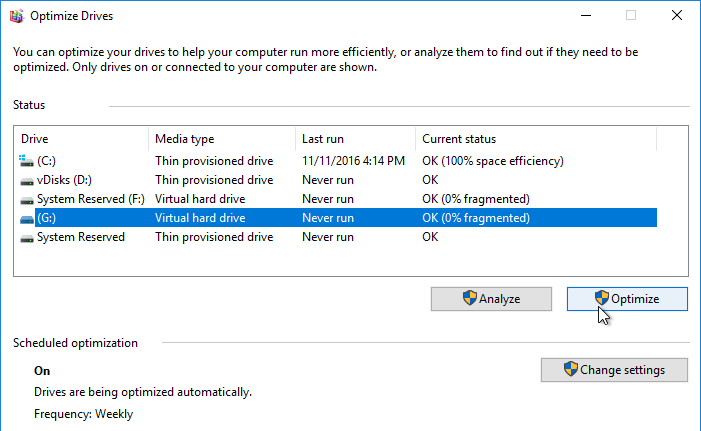
- vDisk files are defragmented.
- vDisk files are backed up.
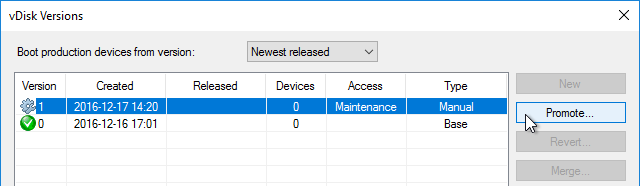
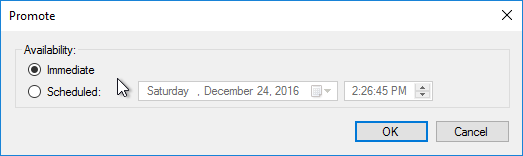
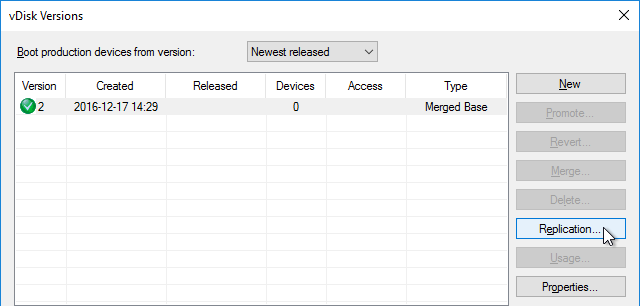
- vDisk updates are automated.
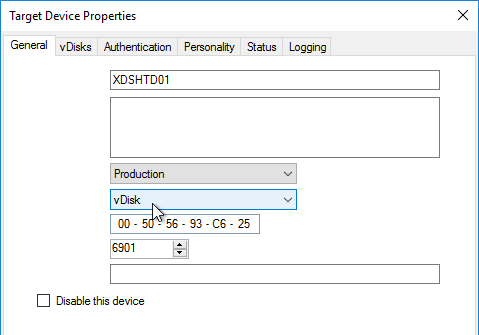
Target Devices:
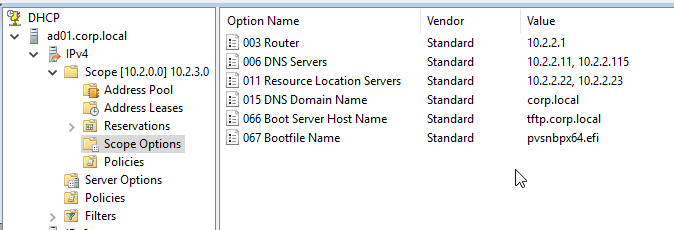
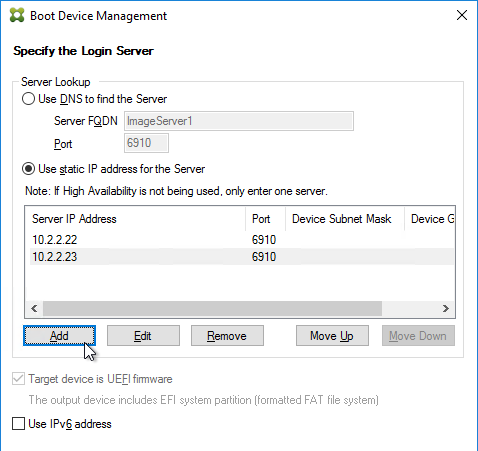
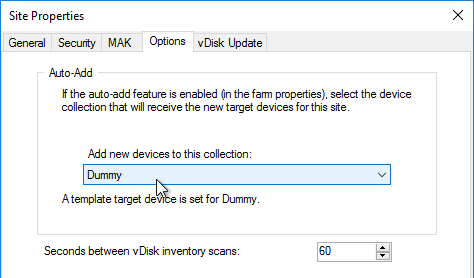
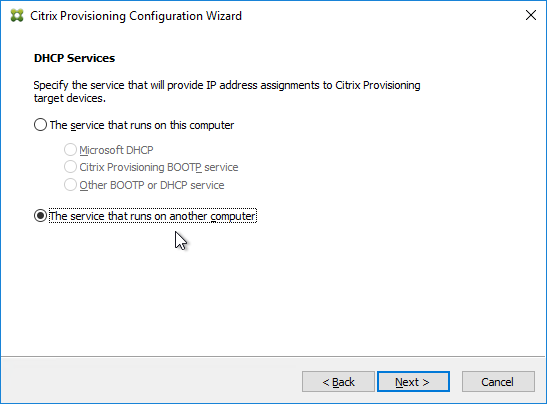
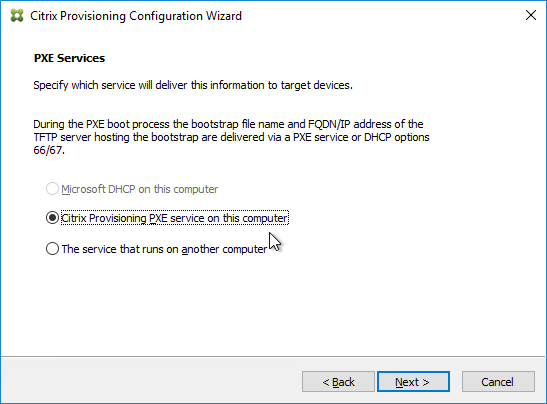
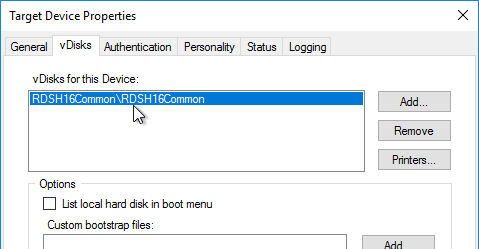
- Target Device Boot Method is highly available – Target Devices on same subnet Provisioning Servers. Or DHCP Option 66 with TFTP Load Balancing. Or Boot ISO/Boot Partition has multiple Provisioning Server addresses.
- DHCP is highly available. Subnet’s router forwards DHCP requests to multiple DHCP servers. Replicated DHCP scope.
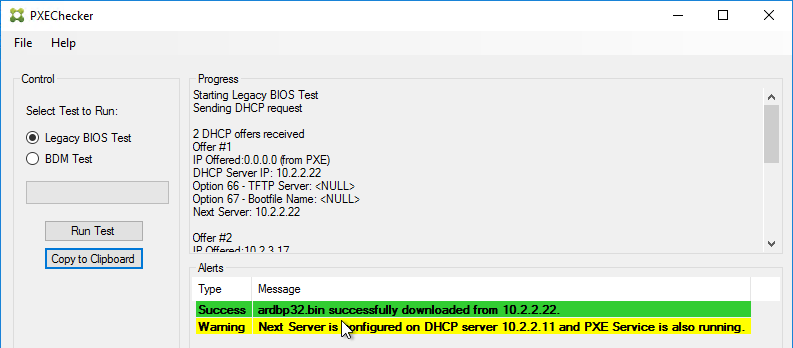
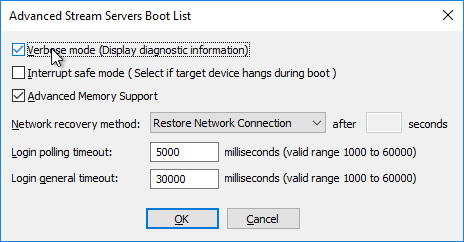
- Use PXEChecker to verify multiple TFTP responses.
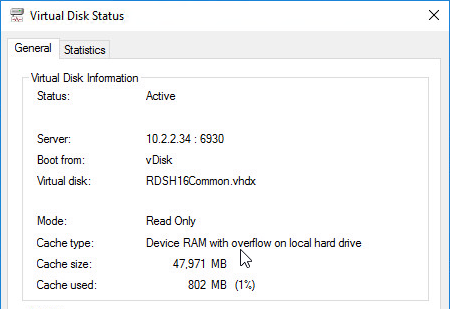
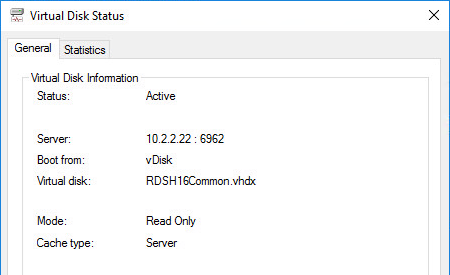
- vDisk Write cache is configured for Target Device RAM with overflow to disk – health check script should periodically verify this.
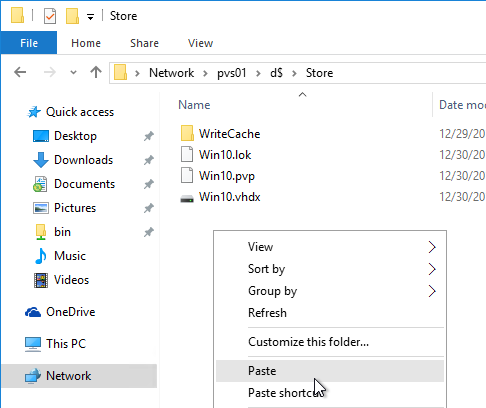
- WriteCache folders on Provisioning Servers are empty – no server-side caching.
- If KMS, slmgr.vbs /dlv shows a unique KMS CMID for each Target Device machine – another option is Active Directory-based activation.
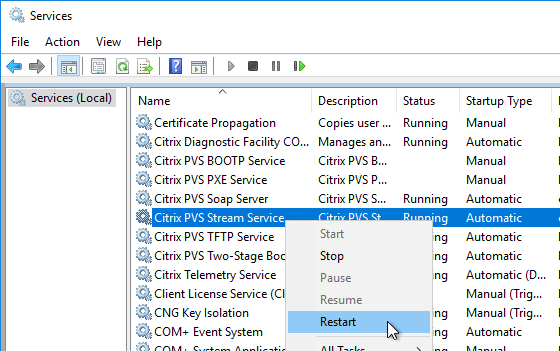
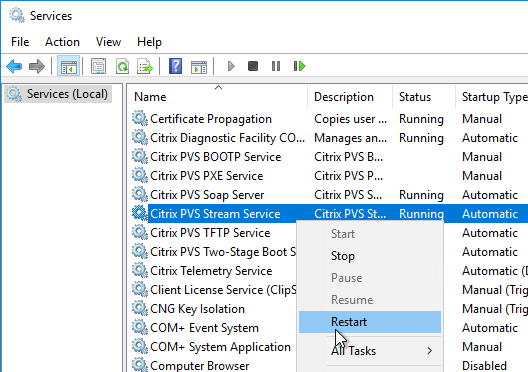
- Target Devices are evenly distributed across multiple Provisioning servers – ensures that High Availability is working correctly – stop Stream Service to confirm HA
- System Reserved Partition is removed from inside vDisk.
- VMware Tools in Target Devices (vDisks) is up to date.
- Target Device Software version matches the Citrix Provisioning version.
- Target Device status shows low number of retries.
Group Policies and Active Directory
- VDAs are placed in VDA-only OUs, no users – group policies apply to VDAs without affecting physical endpoints.
- Separate OUs per Delivery Group – different group policies apply to different Delivery Groups.
- Master Images are located in VDA OUs – computer-level GPO settings apply to the Master Images to avoid GPO timing issues on linked clones.
- Block Inheritance OUs and Enforced GPOs are minimized.
- .admx templates in SYSVOL > PolicyDefinitions are current – Windows 10 templates, Office templates, Citrix templates, etc.
- Group Policy Loopback Processing Mode is enabled.
- Duplicate, conflicting GPO settings are minimized – e.g. Group Policy Loopback Processing Mode is sometimes enabled in several GPOs.
- Run Group Policy Results to show the actual GPO settings that applied to a specific session – compare with design
- Lockdown GPO applies to non-administrators that log into VDA machines. Lockdown GPO doesn’t apply to administrators.
- Remote Desktop Session Host (RDSH) session timeouts (idle, disconnect) are configured in a Microsoft GPO.
- AppLocker or similar prevents users from running unauthorized executables (e.g. ransomware).
- Initial application configuration is automated using group policy – e.g. auto configure application database connections, remove first time usage prompts.
- Group Policy changes are tested in separate Test GPOs and separate Test VDAs before applying to production.
- Monitoring tool shows group policy processing duration during logon.
Citrix Policies
- Citrix Policies are configured in a Group Policy Object, not in Citrix Studio – a GPO can apply to multiple Citrix Virtual Apps and Desktops (CVAD) farms in multiple datacenters. Citrix Studio is single farm only.
- Citrix Policies are not configured in both Citrix Studio and Group Policy – avoids confusion over which setting wins
- If configured in Citrix Studio, and if multiple farms/sites, then Citrix Policy settings are identical in all farms/sites.
- Citrix Group Policy Management plug-in on GPMC machines is same version included with CVAD ISO.
- Unfiltered policy is on the bottom of the list (lowest priority) – most specific filters on top, least specific filters on bottom.
- Client drive mapping, client clipboard, client printing, drag and drop, and client USB are disabled when connecting from external (e.g. SmartAccess) – only enabled by exception.
- If client clipboard is enabled, then file copy/paste is disabled. (CTX_File clipboard format)
- Client printing is set to Use Universal Print Driver only – avoids installing print drivers on VDA machines.
- Audio is set to Medium quality – High Quality uses more bandwidth than Medium Quality.
- Time zone redirection is configured in both Citrix Policy and RDSH Microsoft Group Policy.
- For HDX Insight, ICA Round-Trip Time policy is enabled.
- Visual quality and video codec settings are not modified from the defaults.
- Legacy Graphics Mode is disabled.
- Adaptive Transport (EDT) is enabled – it’s default disabled in 7.15. MTU might need to be decreased.
- MtuDiscovery is enabled on the VDAs. MtuDiscovery requires VDAs version 1912 and newer.
- Session Reliability is not disabled.
- RDSH Session Timers are configured in Microsoft GPO, not Citrix Policy – Citrix Policy setting description shows if setting applies to Server OS or not.
Citrix Workspace Environment Management (WEM)
- Prefer Group Policies over WEM – WEM requires extra infrastructure, extra learning, extra administration, and extra support. Some WEM user settings are per-machine (per configuration set) only. WEM can’t replace group policies since there’s currently no .admx support.
- Citrix Profile Management and Microsoft Folder Redirection are configured using Microsoft Group Policy, not WEM – Group Policies are well known. WEM is proprietary to Citrix and requires WEM skills to troubleshoot.
- WEM is within two versions of the latest – there’s no LTSR version of WEM.
- WEM Consoles and WEM Agents match WEM Server version.
- Multiple load balanced WEM Servers for High Availability.
- If multiple WEM servers are on the same hypervisor cluster, then Hypervisor anti-affinity is configured for the multiple WEM servers.
- WEM Agents point to WEM Server load balanced FQDN, not individual server.
- WEM Console points to single WEM Server, not load balanced FQDN.
- WEM Brokers are close the VDAs – WEM configuration can be exported/imported into WEM implementations in multiple data centers.
- WEM Database is hosted on an AlwaysOn Availability Group or other Highly Available SQL solution.
- SQL database is backed up. SQL database recovery is documented and tested.
- In WEM 1909+, Infrastructure Service Enable performance tuning for Windows Communication Framework is enabled and set to the number of concurrent WEM Agents that will be connected to this one WEM server. Maximum value is 3000.
- Antivirus exclusions are configured for Citrix WEM.
- WEM .admx group policy template in SYSVOL > PolicyDefinitions is updated whenever WEM Servers are updated.
- Settings are in WEM, or Group Policy, but not both – helps troubleshooting. Reduces confusion.
- Bypass ie4uinit Check is enabled (Advanced Settings > Service Options) – for faster logons.
- Drive mappings and printer mappings are moved to WEM and processed asynchronously (Advanced Settings > Agent Options).
- Check Application Existence is enabled (Advanced Settings > Agent Options) – doesn’t create shortcut unless application exists
- CPU Optimization is enabled – Memory management trades memory for disk; which is cheaper? Process exclusions might be needed.
- In WEM 1909 and newer, CPU Spike Protection = Auto instead of Customize.
- Fast logoff is enabled.
- Unused action types are disabled from processing (Advanced Settings > Main Configuration) – speeds up logons.
- Run Once enabled for Actions and scenarios that support it – speeds up logons.
- WEM Agent Offline mode is enabled.
- Computer startup script refreshes WEM Agent cache on each VDA reboot.
- Script has correct Agent installation path and correct service name since they changed in 1909 and newer.
- WEM Logs are reviewed for problems – enable debug logging. Look for Active Directory timeouts.
- WEM Server performance is monitored for metric thresholds and future capacity issues.
- WEM Server recovery is documented and tested.
Citrix Profile Management and Folder Redirection
- No mandatory profiles on Windows 10 – benchmarks show slower performance.
- Profile Management is configured in Group Policy, not Citrix Policy or Citrix WEM – Group Policy is the most reliable and most well-known option.
- Profile file share:
- File server is close to the VDAs – users log into VDAs that are closest to the file server (aka home site).
- File share is highly available.
- Caching is disabled on the file share.
- No DFS multi-master replication. Single target only – neither Citrix nor Microsoft support merge replication.
- Profiles are backed up and/or replicated. Recovery process is documented and tested.
- Different profile folders for different operating system versions and/or different Delivery Groups.
- NTFS permissions of individual user folders in the file share only grant access to the one user – no Users, no Domain Users, and no Authenticated Users.
- Use TreeSize or similar to see profile size – adjust profile exclusions if too big.
- Antivirus is not slowing down profile file transfer performance – time how long it takes to copy a profile folder to the local machine.
- File servers are monitored for performance issues, including disk latency and free disk space.
- Profile Management .admx file in SYSVOL > PolicyDefinitions matches the VDA version (or date).
- Profile Management logs are stored on UNC share instead of local C: drive, especially if the VDAs are non-persistent.
- Only Domain Computers have Modify permission to the Logs share – Users don’t need any permission.
- Profile Management logs contain at least a few days of logons – if only a few minutes, then too much information is being logged and Log Settings GPO setting should be modified.
- Profile streaming is enabled – speeds up logons.
- Active Write Back is disabled – places extra load on file servers for not much benefit.
- Customer Experience Improvement Program is disabled.
- Locally cached profiles are deleted at logoff from RDSH machines that don’t reboot often.
- No Start Menu roaming issues – might need ResetCache registry value.
- Microsoft FSLogix is implemented for Outlook Search roaming – better than UPM’s Outlook search roaming.
Folder Redirection:
- Folder Redirection is configured in Microsoft GPO settings, not in Citrix Profile Management settings – Microsoft GPO configuration is most reliable, most known, and can migrate existing files.
- No AppData redirection – slows down applications.
- “Grant the user exclusive rights” option is unchecked – allows administrators to access redirected profile folders.
- Folder Redirection file share:
- File share is highly available.
- No DFS multi-master replication. Single target only – neither Citrix nor Microsoft support merge replication.
- Redirected Folders are backed up and/or replicated. Recovery process is documented and tested.
- NTFS permissions of individual user folders in the file share only grant access to the one user – no Users, no Domain Users, and no Authenticated Users.
- Antivirus is not slowing down folder redirection performance.
- File servers are monitored for performance issues, including disk latency and free disk space.
Home Directories:
- File server is close to the VDAs – users log into VDAs that are closest to the file server (aka home site).
- File share is highly available.
- No DFS multi-master replication. Single target only – neither Citrix nor Microsoft support merge replication.
- Home Directories are backed up and/or replicated. Recovery process is documented and tested.
- NTFS permissions of individual user folders in the file share only grant access to the one user – no Users, no Domain Users, and no Authenticated Users.
- Antivirus is not slowing down file transfer performance – time how long it takes to copy a Home Directory folder to the local machine.
- File servers are monitored for performance issues, including disk latency and free disk space.
Endpoint Devices
- Prefer Windows 10 endpoints over thin clients – thin clients don’t support all Citrix functionality (e.g. local printing, browser content redirection). ThinKiosk can lock down Windows 10 endpoints.
- Newest VDAs and newest Workspace apps have better WAN performance than LTSR 7.15.
- Browser Content Redirection offloads video (e.g. YouTube) from VDAs to endpoint – reduces CPU consumption in the data center.
- Workspace app is periodically (e.g., twice per year) updated by endpoint management team.
- Workspace app vulnerabilities fixed in versions 2212, 2203 CU2, and 1912 CU7
- Workspace app 2210.5, 2203 CU2, and 1912 CU7 and newer improve SSON password protection.
- Newer versions of Windows 10/11 require newer versions of Workspace app.
- LTSR Receiver 4.9 is End-of-life as of 31-Dec-20. All clients should be Citrix Workspace app.
- If LTSR Receiver 4.9, then version is 4.9.9002 or newer to resolve security vulnerabilities.
- Workspace app (aka Receiver) ADMX templates in SYSVOL > PolicyDefinitions are current.
- Group Policy adds StoreFront URL to Local Intranet zone.
- Group Policy pushes StoreFront URL to Workspace app – so users don’t have to enter the URL.
- Pass-through authentication is enabled for internal PCs – SSON Configuration Checker can verify proper configuration.
- HKCU\Software\Citrix\Dazzle\Sites\store\type shows DS, not PNA – store added as Delivery Services (StoreFront), not PNAgent (legacy).
- Internal Beacon at HKEY_CURRENT_USER\SOFTWARE\Citrix\Receiver\SR\Store\#\Beacons\Internal\Addr0 is internally reachable only – not reachable externally.
- External Beacon at HKEY_CURRENT_USER\SOFTWARE\Citrix\Receiver\SR\Store\#\Beacons\External does not include citrix.com or ping.citrix.com.
- EDT protocol (aka Adaptive Transport) is enabled. Director shows HDX protocol as UDP – Remote Display Analyzer can analyze problems with the graphics/codec.
- HDX Insight: Newest VDAs and newest Workspace app have less AppFlow CPU impact on ADC than LTSR 7.15 VDAs.
- Google Chrome detects Workspace app properly, especially through Gateway – requires Gateway ADC to able to resolve StoreFront Base URL to StoreFront IP
- Chrome 77+ has receiver://* added to URL whitelist so the user isn’t prompted to open Workspace app
Citrix NetScaler ADC
- NetScaler ADC Admins have subscribed to Citrix Security Bulletins at https://support.citrix.com/user/alerts
- NetScaler ADC firmware build is patched for vulnerabilities as of Jan 16, 2024.
- If SAML, Relay State Rule is configured
- /nsconfig/rc.netscaler contains remediation
- Indicator of Compromise Scanner for CVE-2019-19781 does not show any compromise.
- ADC > Dashboard page does not show excessive outbound bandwidth. If so, then it might be DTLS Amplification Distributed Denial of Service Attack.
- NetScaler ADC firmware updates are tested on separate test ADC appliances before performed in production. Test ADC appliances have test VIPs – application owners can test their VIPs on test ADC before firmware is upgraded in production.
- NetScaler ADC VPX on vSphere:
- NetScaler VPX NICs are VMXNET3, not E1000.
- NetScaler is version that supports vSphere version.
- DRS Cluster Anti-affinity is configured for the VPX appliances in the same HA pair.
- CPU/Memory are reserved at hypervisor. If not reserved at hypervisor, then Yield CPU is not enabled so that VPX can reserve CPU itself.
- NetScaler ADC license does not expire any time soon – check date inside license files at /nsconfig/license
- ADM Pooled Licensing has license alerts enabled for email notifications.
- Physical NetScaler ADC:
- LOM port is connected and configured.
- LOM nsroot password is changed from the default.
- No VLAN is connected to multiple active interfaces unless those interfaces are in a port channel.
- ADC nsroot password is not nsroot. nsroot password is managed by Privileged Identity Management tool. Admins don’t use nsroot to login.
- Policies are Advanced Expressions instead of Classic Expressions. (source = CTX296948)
- Management authentication is configured for external authentication server, typically LDAP.
- LDAP is load balanced instead of multiple LDAP Policies to individual LDAP servers – avoids premature account lockout.
- LDAP is encrypted: LDAPS on port 636.
- LDAP Bind account is a service account – not a regular user whose password expires.
- LDAP Search Filter only allows ADC Admins Active Directory Group to authenticate.
- If TACACS, firmware is 12.0 build 57 or newer to prevent TACACS Accounting from blocking AAA.
- nsroot account has external authentication disabled.
- No local NetScaler ADC accounts except nsroot.
- NTP and Time Zone are configured.
- Syslog is configured to send logs to external SIEM, especially if ADC is performing authentication.
- SNMP Traps are sent to Citrix ADM appliance.
- Thresholds are configured for CPU and Memory alarms.
- Customer Experience Improvement Program (CUXIP) is disabled.
- Recommended TCP Profile Settings are configured.
- Drop Invalid HTTP requests is enabled in HTTP global settings.
- Secure Access Only is enabled on all NSIPs and all management-enabled SNIPs – check both nodes of High Availability pair.
- Management certificate has no certificate errors.
- Networking:
- NetScaler ADC VLANs only have one interface (or one channel) – Best Practices at Citrix Docs.
- If Dedicated Management Network, Policy Based Routes (PBR) are configured for NSIP reply traffic and NSIP-initiated traffic.
- Unused network interfaces are disabled.
- ADC instance is connected to only one security zone – if connected to multiple security zones, then a firewall is bypassed.
- Default route should be Internet facing, or a data VLAN – not NSIP VLAN.
- Only one default route – extra default routes can come from HA pairing or hardware migration.
- Root DNS server address “h.root-servers.net” is set to 198.97.190.53 – might be old address due to older firmware
- Unused NetScaler ADC configurations are removed – unused server objects, unused policies, etc.
- Citrix ADM monitors and backs up the ADC appliances.
- ADC Dashboard shows that CPU, Memory, and Throughput have not exceeded appliance capacity or appliance licensing.
- /var/core and /var/crash do not have recent crash dumps.
NetScaler ADC High Availability Pair
- Firmware build is identical on both nodes.
- Installed Licenses are identical on both nodes.
- NTP and time zones are configured on both appliances – Configuration node shows System Time.
- Unused interfaces are disabled.
- HA is synchronizing without error.
- Both HA nodes are set to ENABLED – not STAYPRIMARY and/or STAYSECONDARY.
- Fail-safe mode is enabled.
- “show ha node” shows heartbeats across all interfaces – no “interfaces on which heartbeats are not seen”.
- High Availability failover has been tested, including RADIUS authentication, which might come from a different source IP.
- Sync VLAN configured to enable ISSU on ADC 13.0+
NetScaler ADC SDX
- LOM port is connected and configured.
- LOM nsroot password is not nsroot.
- No hardware problems shown on SDX SVM dashboard page.
- SDX firmware is current – should be same or newer than the VPX firmware.
- SDX SVM nsroot password is not nsroot. nsroot password is complex. Admins don’t use nsroot to login.
- Management authentication is configured for external authentication server, typically LDAP.
- LDAP is load balanced instead of multiple LDAP Policies to individual LDAP servers – avoids premature account lockout.
- LDAP is encrypted: LDAPS on port 636.
- LDAP Bind account is a service account – not a regular user whose password expires
- LDAP Bind account should be a regular domain account, not a Domain Admin.
- LDAP Bind account should be dedicated to LDAP Bind and not used for anything else.
- LDAP Search Filter only allows ADC SDX Admins Active Directory Group to authenticate.
- No local accounts except nsroot.
- No certificate errors when accessing SVM management using htttps.
- HTTPS is forced in System Settings – HTTP is not allowed.
- Multiple DNS servers are configured in Networking Configuration – initial setup only asks for one DNS server.
- Channels are created at SDX SVM instead of inside VPX instances.
- NTP is configured and enabled.
- Syslog is configured.
- SNMP traps are sent to Citrix ADM.
- The number of SDX instance licenses installed matches what’s owned at https://citrix.com/account
- SDX SVM Backups are configured with External Transfer – or download periodically – or ADM.
- VPX Instances:
- Platinum Edition license is assigned to instances.
- SSL Chips are assigned to VPX instances.
- All SDX hardware is allocated to VPX instances – If not, why not?
- Production instances typically have Dedicated CPU cores. Test/Dev instances typically have Shared CPU.
- VLANs are specified inside VPX instances instead of at instance properties on SDX Management Service – avoids reboot if you need to change the VLAN configuration.
- No VMACs in instance interface settings.
NetScaler ADC Load Balancing and SSL
- Load Balancing configurations are documented.
- Monitors do more than just telnet – e.g. LDAP monitor performs LDAP query.
- LDAP monitor bind account uses service account, not domain admin.
- LDAP monitor is filtered to cn=builtin – to reduce result size.
- RADIUS monitor looks for response code 2 or 3.
- If multiple Virtual Servers for multiple ports on the same VIP, configure Persistency Group – e.g. Horizon Load Balancing.
- Rewrite policies remove web server header information (Server, X-Powered-By, etc.)
- SSL Labs SSL Server Test shows A or A+ grade for all Internet-facing SSL vServers.
- Redirect Virtual Servers are UP (Responder method) instead of DOWN (Backup URL method).
- Custom (non-default) ciphers are bound to every SSL Virtual Server – see Citrix Networking SSL / TLS Best Practices.
- SSL v3 and TLS v1.0 are disabled on every SSL Virtual Server.
- SSL Renegotiation is set to NONSECURE: configured globally, or in SSL Profiles (including default profile).
- Root certificate is not linked to intermediate certificate.
- Certificates are not expired.
- SSL Services do not have “-TLS11 disabled” or “-TLS12 disabled” – might be disabled from older firmware.
- ADM alerts ADC administrators when certificates are soon to expire.
- ADM Analytics is enabled for the HTTP Virtual Servers.
- ADM Web Insight is viewed.
- Bot Management (13.0 build 41+) and/or Web App Firewall are configured if ADC Premium Edition.
- ADM Security Insight is enabled and viewed.
Citrix NetScaler ADM
- NetScaler ADM exists and manages all ADC appliances.
- Prompt credentials for instance login is enabled in ADM System Settings – if ADM does Single Sign-on to instances, then all instance changes are logged as nsroot instead of ADM user.
- NetScaler ADM firmware version is current.
- ADM Agents and DR nodes have same firmware version as ADM – check /var/mps/log/install_state
- Two DNS servers are configured in ADM Network Configuration – initial setup only asks for one DNS server.
- Two NetScaler ADM appliances in High Availability mode with Floating IP – provides redundancy.
- Every High Availability node and DR node has same disk size.
- NetScaler ADM nsroot password is not nsroot. nsroot password is complex. Admins don’t use nsroot to login.
- NetScaler ADM Agent nsrecover password has been changed from the default.
- Management authentication is configured for external authentication server, typically LDAP.
- LDAP is load balanced instead of multiple LDAP Policies to individual LDAP servers – avoids premature account lockout.
- LDAP is encrypted: LDAPS on port 636.
- LDAP Bind account is a service account – not a regular user whose password expires.
- LDAP Search Filter only allows ADM Admins Active Directory Group to authenticate.
- No local accounts except nsroot.
- No certificate errors when accessing ADM management using htttps.
- HTTPS is forced in System Settings – HTTP is not allowed
- Time zone is configured.
- NTP is configured and enabled.
- NetScaler ADM Database is not full. Sufficient disk space.
- Sufficient ADM CPU/Memory – verify at System > Statistics or System > Deployment.
- All features enabled – verify at System > Administration > Disable or enable features
- SSL Dashboard alert notifications are enabled to warn of upcoming certificate expiration.
- Tasks page notifications are enabled
- Event Rules are configured to email ADC administrators of Critical or Major ADC alarms.
- NetScaler ADC Instance Backup settings on NetScaler ADM:
- Number of NetScaler ADC instance backups retained is sufficient for restoring from history.
- NetScaler ADC Backups are transferred to external SFTP, SCP, or FTP server.
- NetScaler ADC Restore process is documented and tested.
- VIP Licensing:
- Installed license count on NetScaler ADM matches the licenses owned at https://citrix.com/account.
- Licenses are assigned to Virtual Servers that need Analytics (e.g. HDX Insight) or Applications tab.
- AppFlow/Insight is enabled on NetScaler Citrix Gateway and HTTP Virtual Servers.
- TCP 5563 opened from SNIP to ADM for Metrics Collector.
- License expiration notifications are enabled.
- Private IP Blocks are configured for geo mapping of ADC instances and Analytics sessions.
- Analytics Thresholds are configured – e.g., ICA Latency threshold.
- Session Reliability on HA Failover is enabled on ADC instances in ICA Parameters – if not enabled, then sessions drop on failover.
- ADM HDX Insight is linked to Director Premium Edition using https protocol, not http protocol.
NetScaler Citrix Gateway ICA Proxy
NetScaler Citrix Gateway Virtual Server:
- SSL Labs SSL Server Test shows A or A+ when it scans the Gateway external FQDN.
- If ICA Only is unchecked on the Gateway Virtual Server, then System > Licenses shows sufficient Maximum Citrix Gateway Users Allowed.
- NetScaler Citrix Gateway Virtual Server Maximum Users is 0, which means unlimited.
- TCP Profile is configured with Recommended TCP Profile Settings.
- DTLS is enabled on the Virtual Server for EDT protocol.
- UDP ports are open on firewall from Internet and to VDAs.
- Director Session Details shows HDX protocol as UDP.
- ICA Connections shows port 2598 (Session Reliability enabled), not 1494.
- NetScaler Citrix Gateway communication to StoreFront is https protocol, not http.
- NetScaler Citrix Gateway communication to StoreFront is load balanced to multiple StoreFront servers – not a single StoreFront server.
- STAs on NetScaler Citrix Gateway matches StoreFront configuration.
- Policies are Advanced Expressions instead of Classic Expressions. (source = CTX296948)
- If EPA is used for SmartAccess, then Endpoint Analysis Libraries are updated.
NetScaler Citrix Gateway Authentication:
- Encrypted LDAP:
- LDAP is load balanced instead of multiple LDAP Policies to individual LDAP servers – avoids premature account lockout.
- LDAP is encrypted: LDAPS on port 636.
- LDAP Bind account is a service account – not a regular user whose password expires.
- LDAP Search Filter only allows authorized remote users in an Active Directory group to authenticate.
- Two-factor authentication – RADIUS:
- For Workspace app, password fields are swapped.
- Both factors are required to login. Can’t bypass second factor.
- RADIUS tested from both High Availability nodes (perform failover).
- SAML Authentication:
- Prefer RADIUS over SAML so that ADC will have access to the user’s password to facilitate Single Sign-on to the VDA machines.
- If SAML response does not provide user’s password, then Federated Authentication Service (FAS) is deployed .
- For Workspace app support of SAML, SAML is configured in nFactor (AAA), not Gateway – requires ADC 12.1 and newest Workspace app.
- SAML iDP Signing certificate is not expired. ADC administrators know how to update the Signing certificate.
- relaystateRule configured in SAML Action to prevent session hijack – see https://support.citrix.com/article/CTX316577
- Native OTP:
- OTP Active Directory attribute is encrypted.
- nFactor login fields are encrypted.
NetScaler ADC GSLB
- If a DNS name resolves to multiple IP addresses, then the DNS name should be GSLB-enabled for automatic failover.
- DNS Records are delegated to two or more ADC ADNS services, usually in separate data centers.
- NS records and SOA records are added to ADC for delegated domain names and/or delegated sub zones.
- All NetScaler ADC nodes that have ADNS listeners for the same DNS name have identical GSLB configuration.
- Public GSLB Services have monitors that verify remote Internet connectivity – don’t give out IP if users can’t reach it.
- Separate NetScaler ADC appliances for public DNS and internal DNS – If both are on one appliance, then how are the DNS configurations separated?
- RPC nodes for Metric Exchange Protocol (MEP) should have Secure enabled.
- Firewall should only allow the MEP endpoints to communicate over 3009 – don’t open to whole Internet.
- If Static Proximity:
- Static Proximity database is current.
- GSLB Services show correct geo location.
- Custom Entries are added for internal subnets.
- If DNS Views, DNS Views are configured on all GSLB Services – if GSLB Service doesn’t have a DNS View, then that GSLB Service might not function correctly.
- If Active/Active GSLB load balancing, then site persistence is functioning correctly.
- DNS security options are configured to prevent ADNS Denial of Service.